Django Testing

Django is a highly regarded open-source framework for Python, renowned for its versatility, scalability, and security. Major organizations such as Mozilla, Pinterest, Instagram, Disqus, and National Geographic leverage Django to power their applications, attesting to its robustness and capability to handle complex requirements.
-
ScalableIts 'shared nothing' architecture allows you to add hardware resources such as database servers, caching servers, or web/application servers at any stage without constraints. This flexible structure facilitates efficient scalability, accommodating growth, and changing needs. Django also boasts its own built-in caching framework, enhancing its handling of performance optimization tasks.
-
VersatileIt's not bound to a specific type of application; whether you want to create Content Management Systems (CMS), social networking sites, or delve into the realm of scientific computing platforms, Django provides a solid foundation. Its adaptable and feature-rich nature allows developers to create a wide variety of applications with relative ease.
-
SecureDjango steps ahead of the curve by integrating numerous built-in provisions to fortify your application. It's equipped to prevent common security issues such as cross-site scripting (XSS), SQL injection attacks, cross-site request forgery (CSRF), and clickjacking.
A Django project primarily comprises three major components: models, views, and templates. Models define the structure of your data, views dictate what data is displayed to the user, and templates determine how this data is rendered. Upon receiving a request, Django maps the URL to the corresponding view, thus effectively directing the request through the application.
Unit Testing
The base tier of the testing pyramid is unit testing, which forms an important part of the testing process. It involves testing individual components of the application in isolation. As your application grows, you'll need lightweight testing strategies in place to ensure that each component works as expected. Unit tests are meant to be lightweight since they do not require the entire system to be booted for test execution.
Django offers many powerful tools, extending from Python libraries, which can assist you in writing test cases with ease. Let's explore these.
The test client is a Python class that enables you to test and interact with your Django-powered application's views by providing a dummy web browser. However, note that this is not intended to replace other in-browser frameworks.
import unittest
from django.test import Client

class SimpleTest(unittest.TestCase):
  def setUp(self):
    # Every test needs a client.
    self.client = Client()

  def test_details(self):
    # Issue a GET request.
    response = self.client.get('/customer/details/')

    # Check that the response is 200 OK.
    self.assertEqual(response.status_code, 200)

    # Check that the rendered context contains 5 customers.
    self.assertEqual(len(response.context['customers']), 5)
Building on the unittest library, Django provides additional extensions. The unittest.TestCase is extended to derive SimpleTestCase, TransactionTestCase, TestCase, and LiveServerTestCase. Each of these classes possesses additional features that are useful when you need to write different types of tests, such as matching two URLs, testing two XML or JSON fragments for equality, and using database fixtures
TestCase is the most common class used for writing tests in Django.
from django.core import mail
from django.test import TestCase


class ContactTests(TestCase):
  def test_post(self):
    with self.captureOnCommitCallbacks(execute=True) as callbacks:
      response = self.client.post(
        '/contact/',
        {'message': 'I like your site'},
      )

    self.assertEqual(response.status_code, 200)
    self.assertEqual(len(callbacks), 1)
    self.assertEqual(len(mail.outbox), 1)
    self.assertEqual(mail.outbox[0].subject, 'Contact Form')
    self.assertEqual(mail.outbox[0].body, 'I like your site')
from django.test import TestCase

class MyTests(TestCase):
  @classmethod
  def setUpTestData(cls):
    # Set up data for the whole TestCase
    cls.foo = Foo.objects.create(bar="Test")
    ...

  def test1(self):
    # Some test using self.foo
    ...

  def test2(self):
    # Some other test using self.foo
    ...
Django supports Tox, a tool for running automated tests in different virtual environments, and django-docker-box, which allows you to run tests across supported databases and Python versions. You can learn more about them in the provided resources.
Integration Testing
Although unit tests help monitor the health of individual methods, there is a need for tests that examine whether these methods and services can collaboratively produce the desired results. This is where integration testing comes into play. Typically, these test cases target scenarios that involve integrations with databases, file systems, network infrastructure, or other third-party applications. Since integration tests are intended to be lighter weight compared to end-to-end tests, it is crucial to strategically mock data.
For instance, imagine a scenario where it's essential to ensure that the service does not fetch critical data when the API response is erroneous. In this situation, you can mock the API response to always yield a failure, enabling your test case to proceed.
from django.urls import reverse

class VendorTesting(TestCase):
  def test_getAddedVender(self):
    payload = {“name”: “Adam”, “contact”: “+45678932”,
              “businessType”:”groceries”,
              “email”:”[email protected]”}

    Header = {'HTTP_AUTHORIZATION': 'auth_token'}

    response = Client().post(reverse('VendorAPI'),
              data = json.dumps(payload)),
              content_type = 'application/json',
              **header)

    getVendor = vendor.objects.filter(name=”Adam”)
    self.assertNotNone(getVendor)
Using factory methods to mock data is a good idea when writing integration tests. You can read more about the various methods to handle such requirements here.
End-to-End Testing
- Selenium-based tools with LiveServerTestCase
- testRigor
Using LiveServerTestCase to run Selenium testing
LiveServerTestCase offers a critical functionality - it enables you to launch a live Django server, which is beneficial when you want to run functional tests. Selenium is supported in this context, and you can write test cases by installing the Selenium package into your project.
from django.contrib.staticfiles.testing import StaticLiveServerTestCase
from selenium.webdriver.common.by import By
from selenium.webdriver.firefox.webdriver import WebDriver

class MySeleniumTests(StaticLiveServerTestCase):
  fixtures = ['user-data.json']

  @classmethod
  def setUpClass(cls):
    super().setUpClass()
    cls.selenium = WebDriver()
    cls.selenium.implicitly_wait(10)

  @classmethod
  def tearDownClass(cls):
    cls.selenium.quit()
    super().tearDownClass()

  def test_login(self):
    self.selenium.get('%s%s' % (self.live_server_url, '/login/'))
    username_input = self.selenium.find_element(By.NAME, "username")
    username_input.send_keys('myuser')
    password_input = self.selenium.find_element(By.NAME, "password")
    password_input.send_keys('secret')
    self.selenium.find_element(By.XPATH, '//input[@value="Log in"]').click()
testRigor for end-to-end testing
You can use testRigor, which addresses key challenges faced by Selenium users. testRigor is specifically designed for end-to-end testing, and is known for the ease of no-code test creation and minimal test maintenance.
You can conduct cross-platform and cross-browser testing without major configuration steps. Tests are on the UI level and do not include implementation details, meaning they aren't going to break as long as the UI stays the same.
get item "item-name" from session storage and save it as "varName"
call api post "http://dummy.restapiexample.com/api/v1/create" with headers "Content-Type:application/json" and "Accept:application/json" and body "{\"name\":\"James\",\"salary\":\"123\",\"age\":\"32\"}" and get "$.data.name" and save it as "createdName"
check that stored value "createdName" itself contains "James"
How to do End-to-end Testing with testRigor
Let us take the example of an e-commerce website that sells plants and other gardening needs. We will create end-to-end test cases in testRigor using plain English test steps.
Step 1: Log in to your testRigor app with your credentials.
Step 2: Set up the test suite for the website testing by providing the information below:
- Test Suite Name: Provide a relevant and self-explanatory name.
- Type of testing: Select from the following options: Desktop Web Testing, Mobile Web Testing, Native and Hybrid Mobile, based on your test requirements.
- URL to run test on: Provide the application URL that you want to test.
- Testing credentials for your web/mobile app to test functionality which requires user to login: You can provide the app’s user login credentials here and need not write them separately in the test steps then. The login functionality will be taken care of automatically using the keyword
login. - OS and Browser: Choose the OS Browser combination on which you want to run the test cases.
- Number of test cases to generate using AI: If you wish, you can choose to generate test cases based on the App Description text, which works on generative AI.
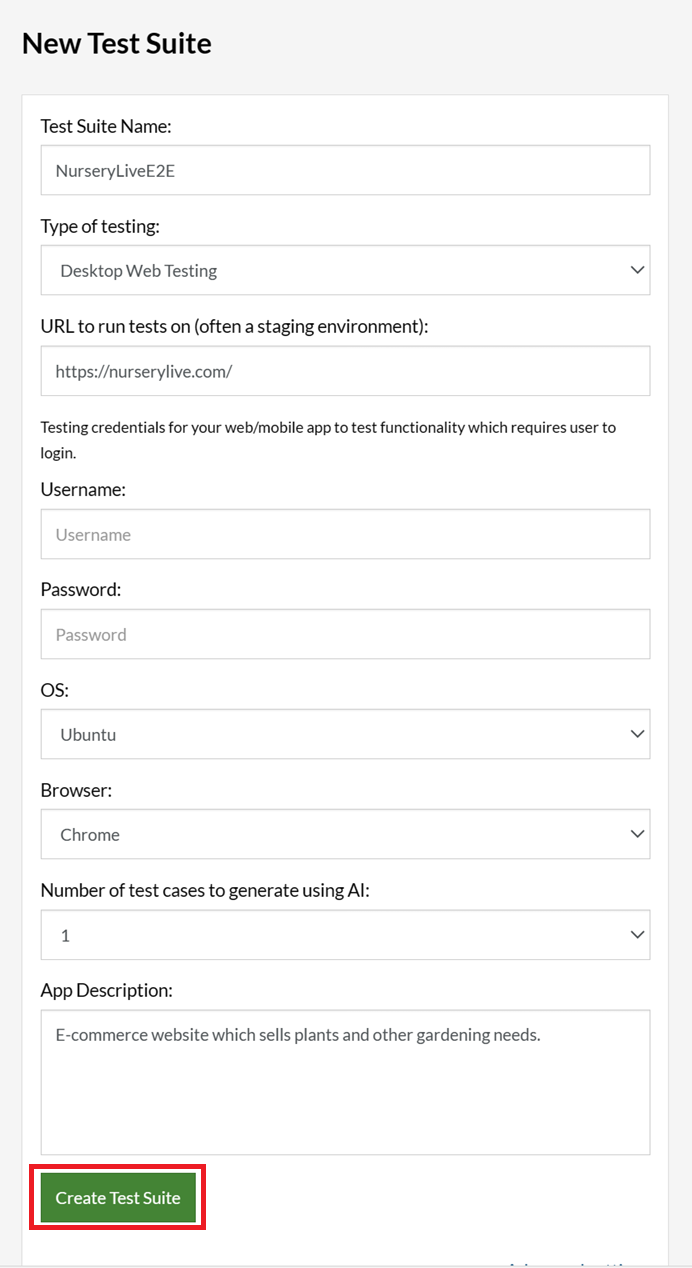
Step 3: Click Create Test Suite.
On the next screen, you can let AI generate the test case based on the App Description you provided during the Test Suite creation. However, for now, select do not generate any test, since we will write the test steps ourselves.
Step 4: To create a new custom test case yourself, click Add Custom Test Case.

Step 5: Provide the test case Description and start adding the test steps.
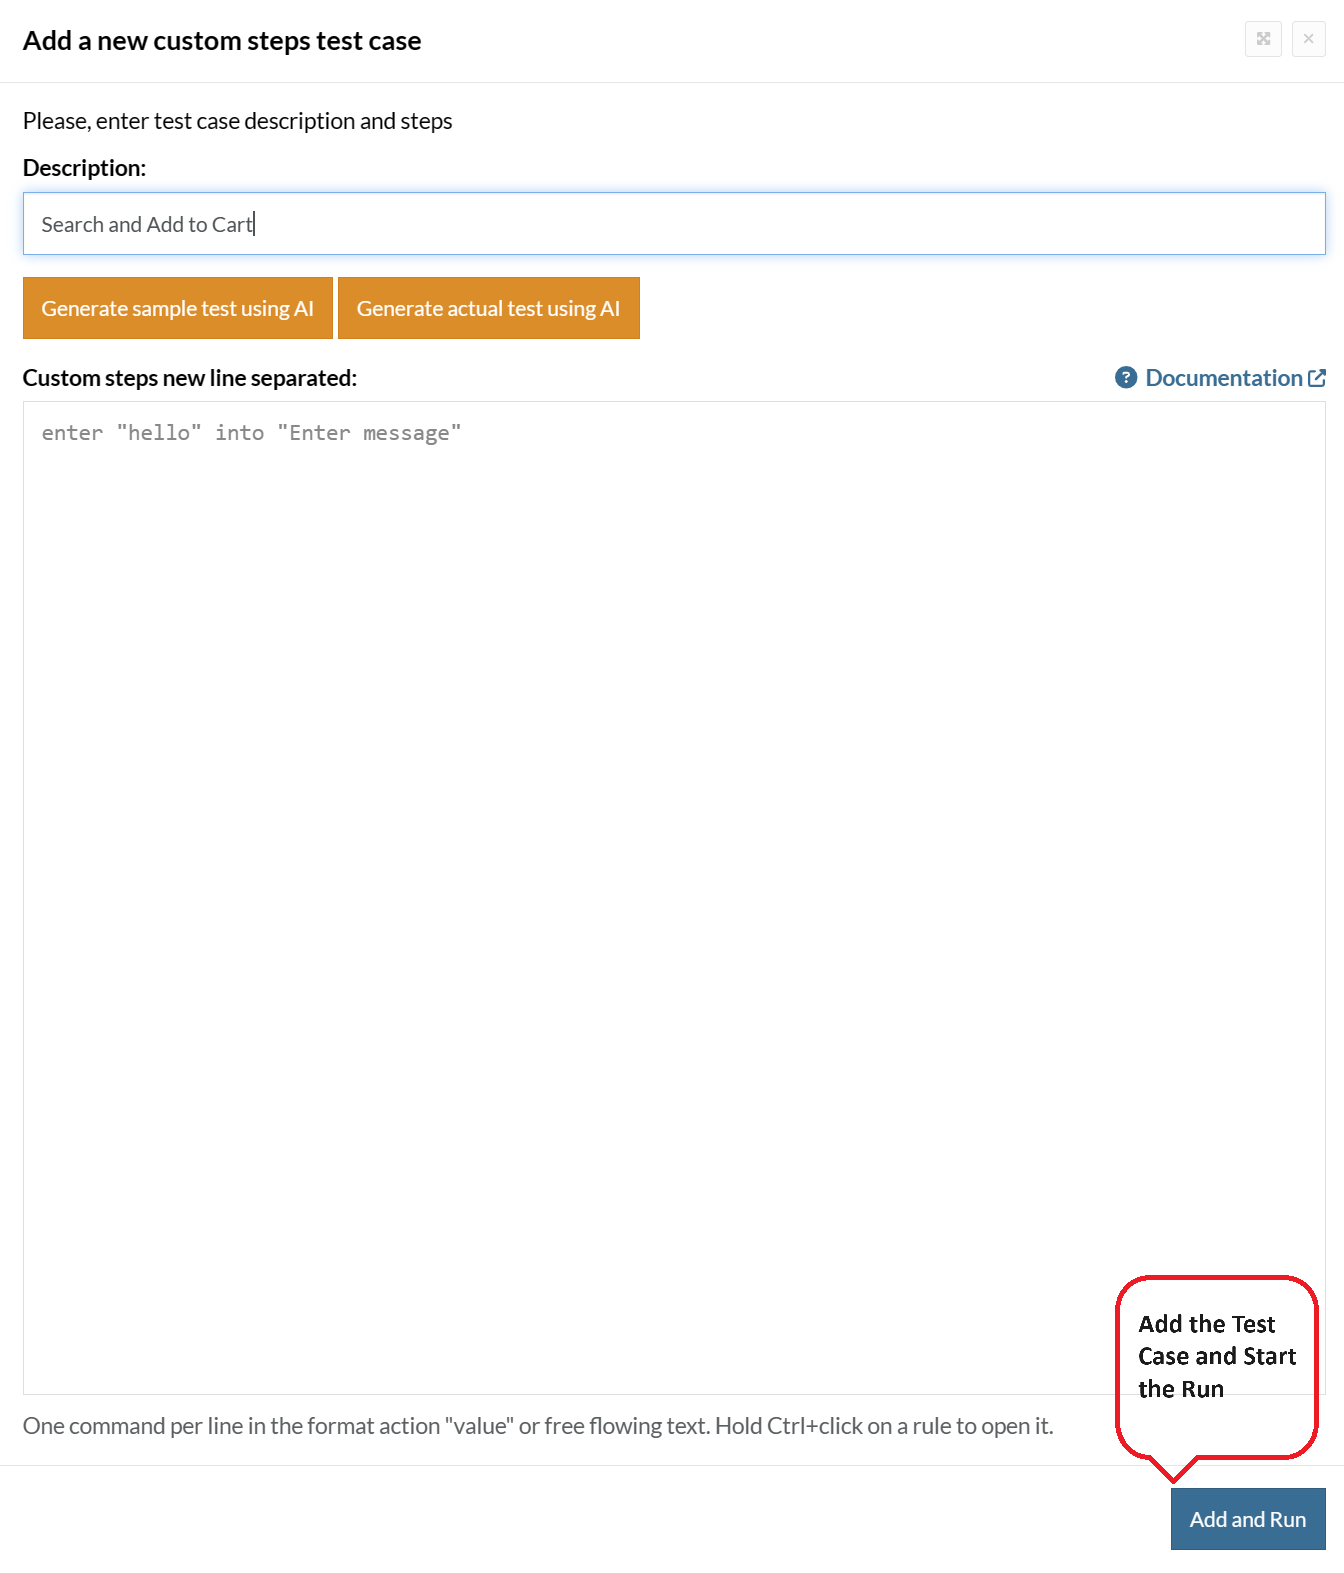
For the application under test, i.e., e-commerce website, we will perform below test steps:
- Search for a product
- Add it to the cart
- Verify that the product is present in the cart
Test Case: Search and Add to Cart
Step 1: We will add test steps on the test case editor screen one by one.
testRigor automatically navigates to the website URL you provided during the Test Suite creation. There is no need to use any separate function for it. Here is the website homepage, which we intend to test.

First, we want to search for a product in the search box. Unlike traditional testing tools, you can identify the UI element using the text you see on the screen. You need not use any CSS/XPath identifiers.
click "What are you looking for?"
Step 2: Once the cursor is in the search box, we will type the product name (lily), and press enter to start the search.
type "lily"
enter enter
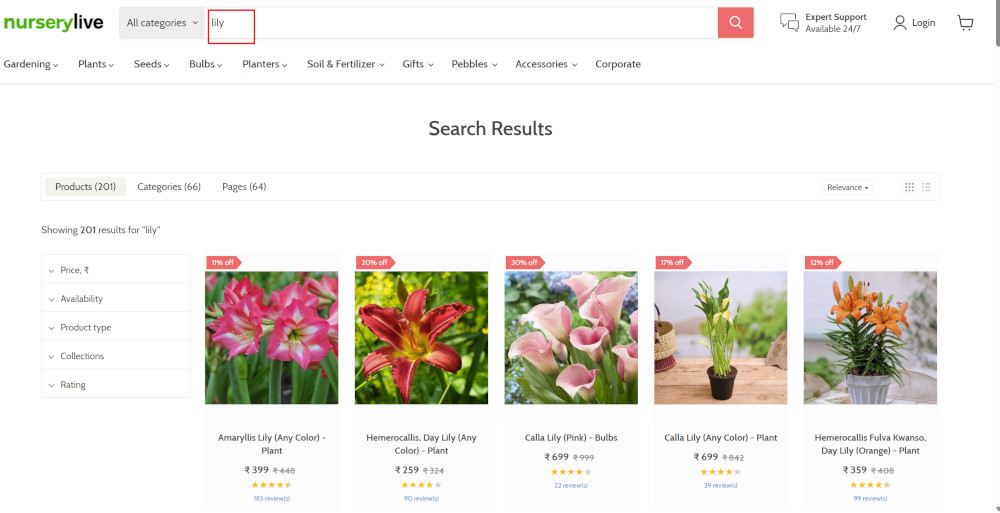
Search lists all products with the “lily” keyword on the webpage.
Step 3: The lily plant we are searching for needs the screen to be scrolled; for that testRigor provides a command. Scroll down until the product is present on the screen:
scroll down until page contains "Zephyranthes Lily, Rain Lily (Red)"
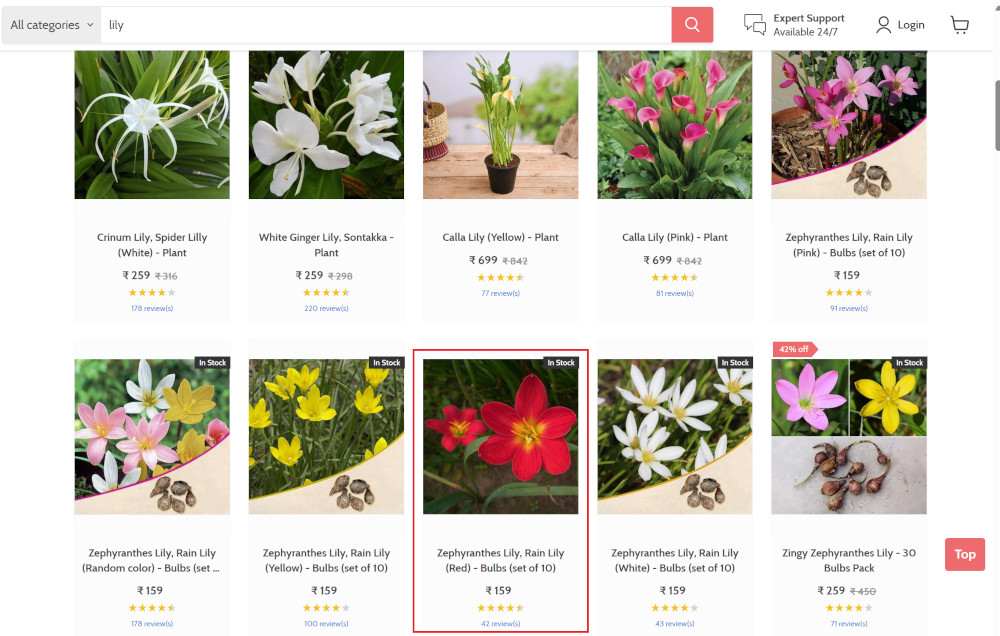
When the product is found on the screen, testRigor stops scrolling.
Step 4: Click on the product name to view the details:
click "Zephyranthes Lily, Rain Lily (Red)"
After the click, the product details are displayed on the screen as below, with the default Quantity as 1.
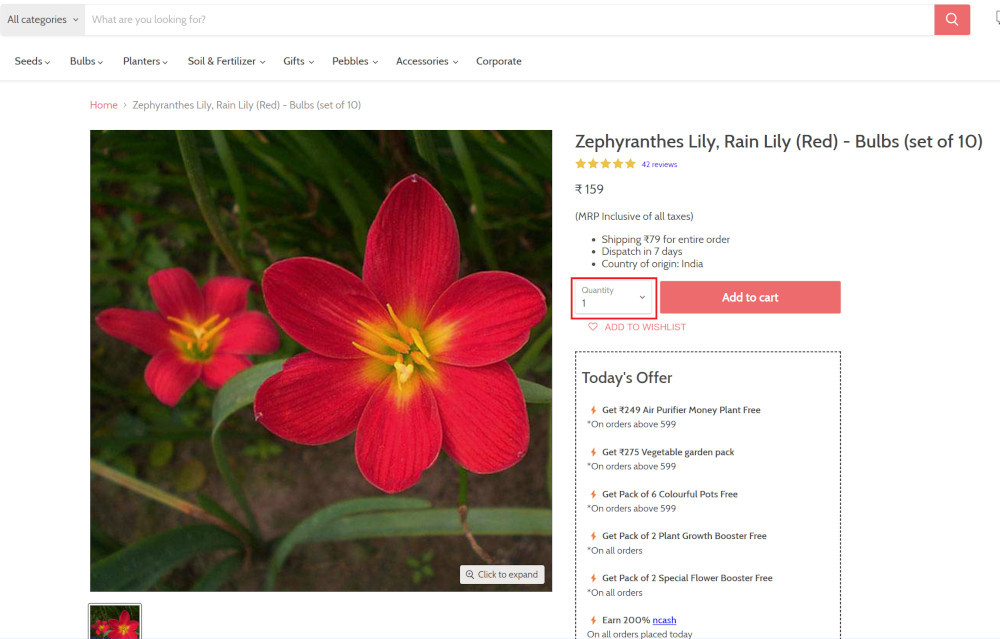
Step 5: Lets say, we want to change the Quantity to 3, so here we use the testRigor command to select from a list.
select "3" from "Quantity"
click "Add to cart"
The product is successfully added to the cart, and the “Added to your cart:” message is displayed on webpage.
Step 6: To assert that the message is successfully displayed, use a simple assertion command as below:
check that page contains "Added to your cart:"
Step 7: After this check, we will view the contents of the cart by clicking View cart as below:
click "View cart"

Step 8: Now we will again check that the product is present in the cart, under heading “Your cart” using the below assertion. With testRigor, it is really easy to specify the location of an element on the screen.
check that page contains "Zephyranthes Lily, Rain Lily (Red)" under "Your cart"

Complete Test Case
Here is how the complete test case will look in the testRigor app. The test steps are simple in plain English, enabling everyone in your team to write and execute them.
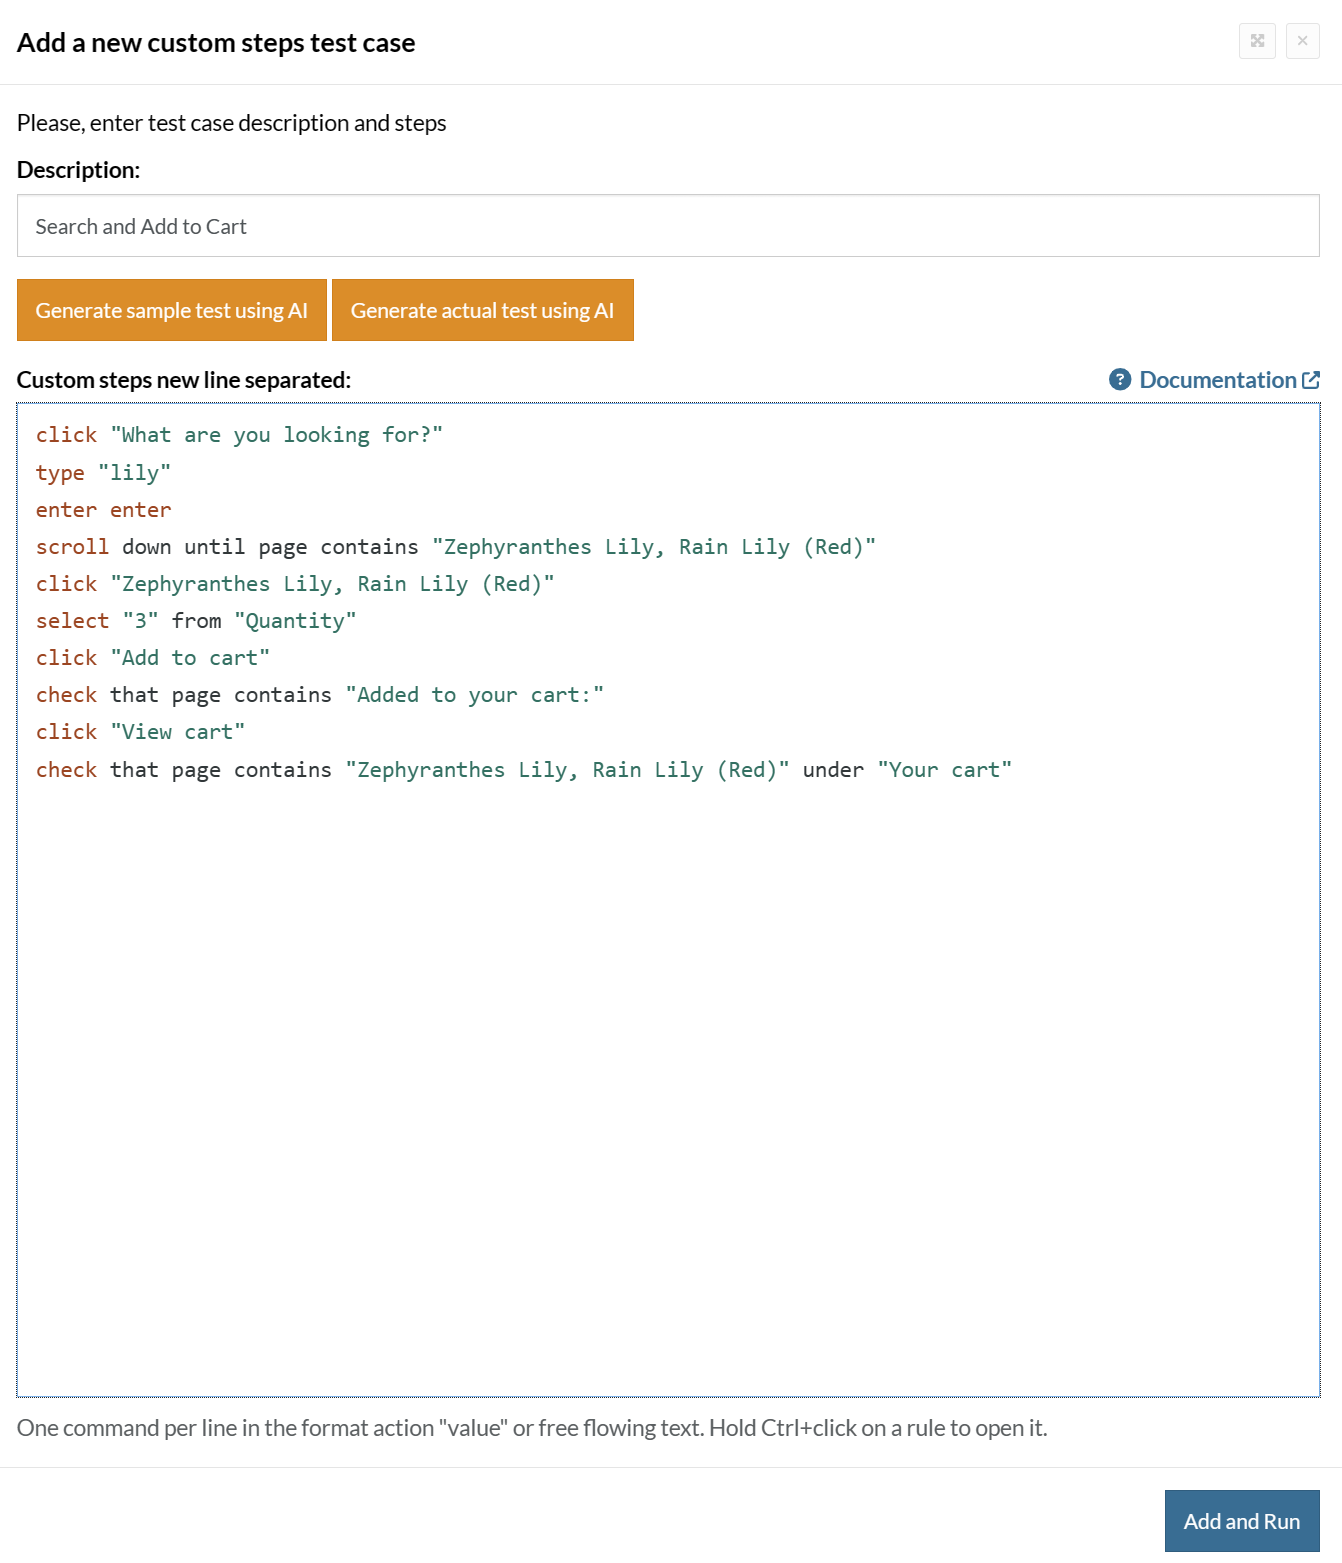
Click Add and Run.
Execution Results
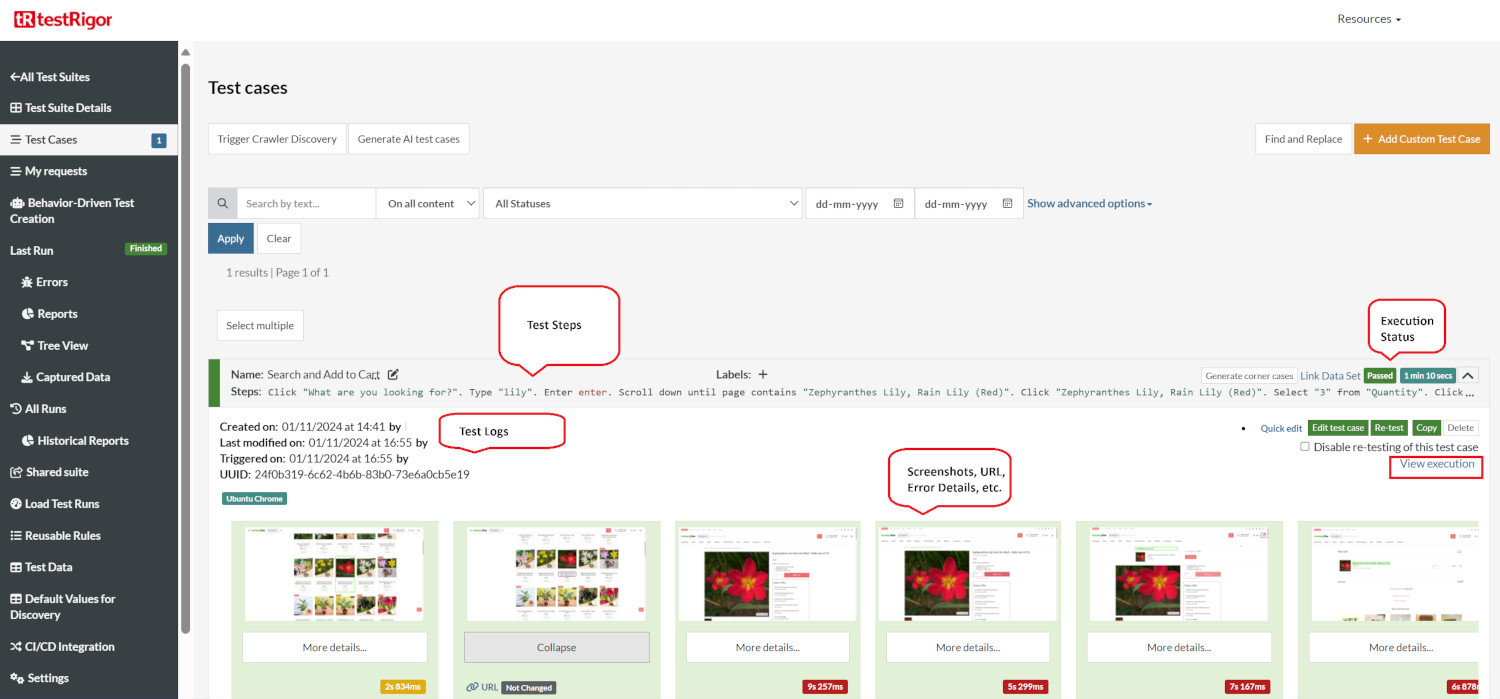
Once the test is executed, you can view the execution details, such as execution status, time spent in execution, screenshots, error messages, logs, video recordings of the test execution, etc. In case of any failure, there are logs and error text that are available easily in a few clicks.
You can also download the complete execution with steps and screenshots in PDF or Word format through the View Execution option.
testRigor’s Capabilities
Apart from the simplistic test case design and execution, there are some advanced features that help you test your application using simple English commands.
- Reusable Rules (Subroutines): You can easily create functions for the test steps that you use repeatedly. You can use the Reusable Rules to create such functions and call them in test cases by simply writing their names. See the example of Reusable Rules.
- Global Variables and Data Sets: You can import data from external files or create your own global variables and data sets in testRigor to use them in data-driven testing.
- 2FA, QR Code, and Captcha Resolution: testRigor easily manages the 2FA, QR Code, and Captcha resolution through its simple English commands.
- Email, Phone Call, and SMS Testing: Use simple English commands to test the email, phone calls, and SMS. These commands are useful for validating 2FA scenarios, with OTPs and authentication codes being sent to email, phone calls, or via phone text.
- File Upload/ Download Testing: Execute the test steps involving file download or file upload without the requirement of any third-party software. You can also validate the contents of the files using testRigor’s simple English commands.
- Database Testing: Execute database queries and validate the results fetched.
testRigor enables you to test web, mobile (hybrid, native), API, and desktop apps with minimum effort and maintenance.
Additional Resources
- Access testRigor documentation to know about more useful capabilities
- Top testRigor’s features
- How to perform end-to-end testing
Conclusion
Recognizing the importance of having testing strategies in place for your application is crucial for developing high-quality products. With Django, you can develop robust code and test cases. The framework offers many key features that simplify the process of writing and maintaining test cases.
| Achieve More Than 90% Test Automation | |
| Step by Step Walkthroughs and Help | |
| 14 Day Free Trial, Cancel Anytime |


