Swift Testing

Swift is a high-level general-purpose, multi-paradigm, compiled programming language developed by Apple Inc. It prioritizes safety, performance, and modern software design patterns for iOS, macOS, watchOS, and tvOS applications. Swift was created to replace Objective-C, Apple’s earlier programming language, which lacked modern features and remained unchanged since the 1980s. Swift is designed to work seamlessly with Apple’s frameworks, such as Cocoa and Cocoa Touch, and can also interoperate with existing Objective-C code. It was built using the LLVM(low-level virtual machine) compiler framework and has been integrated into Xcode since version 6.
Swift was first introduced at Apple's Worldwide Developers Conference (WWDC) in 2014 and has undergone several upgrades, including becoming open-source with the release of version 2.2 in 2015. Over time, the Swift syntax has evolved, focusing on maintaining source stability in later versions. In 2018, Swift surpassed Objective-C in popularity, highlighting its growing adoption among developers. One of the significant aspects of making Swift open-source is to port across different operating systems. Currently, Swift provides platform support to all Apple platforms, Linux OS and Windows OS.
The Swift project aims to create a language that excels in various use cases, including systems programming, mobile and desktop app development, and scaling up to cloud services. Its primary focus is making it easier for developers to write and maintain correct programs. Swift also features inbuilt robust error handling, Advanced control flow with do, guard, defer, and repeat keywords, Concise and fast iteration over a range or collection, Functional programming patterns, e.g., map and filter, Type Inference, and type annotation, Tuples and multiple return values.
Now let's discuss how testing is performed in Swift applications. We will discuss the three primary types of testing:
Unit Testing
Unit testing focuses on verifying the correctness and functionality of individual units or components of a software system. It involves isolating specific sections of code, known as units, and testing them in isolation to ensure they perform as expected. The main goal is to catch and fix issues in small, independent code units, such as functions or methods, early in the development process. For unit testing Swift code, we use the inbuilt XCTest framework. Let's see how we can perform unit testing using XCTest.
XCTest Framework
XCTest is a unit testing framework provided by Apple that is built into Xcode. XCTest allows developers to create test cases and assertions to verify the behavior and correctness of individual code units. The XCTest framework offers two key classes that are instrumental in creating and executing tests:
- XCTest: This class is the foundation for creating, managing, and executing tests. It provides functionalities for setting up and tearing down test environments and managing test execution and reporting. XCTest acts as the base class that other test-related classes build upon.
- XCTestCase: XCTestCase is a subclass of XCTest and serves as the primary class for defining test cases, test methods, and performance tests. Developers use XCTestCase to create individual test cases, grouping related tests. XCTestCase provides various assertion APIs for validating expected outcomes and checking conditions. Additionally, it supports the creation of performance tests to evaluate the performance of specific code segments.
Like many other unit test frameworks, XCTest also has a test cycle, where the initial setup needs to be done before running the unit test, and once completed, it needs to be cleaned. So for that, mainly two methods are used - setUp() and tearDown(). setUp() method starts the initial state before the tests run, like starting a temporary database or API server. tearDown() method is used to clean up after the tests run, like deleting the temporary database.
import XCTest
class LoginFunctionTests: XCTestCase {
  var loginManager: LoginManager!
  override func setUp() {
    super.setUp()
    // Create an instance of the LoginManager or set up any necessary resources
    loginManager = LoginManager()
  }
  override func tearDown() {
    super.tearDown()
    // Clean up any resources or reset state
    loginManager = nil
  }
  func testLoginWithValidCredentials() {
    // Set up any necessary preconditions
    // Call the login function with valid credentials
    let result = loginManager.login(username: "validUsername", password: "validPassword")
    // Assert the expected result
    XCTAssertTrue(result, "Login should succeed with valid credentials")
  }
  func testLoginWithInvalidCredentials() {
    // Set up any necessary preconditions
    // Call the login function with invalid credentials
    let result = loginManager.login(username: "", password: "")
    // Assert the expected result
    XCTAssertFalse(result, "Login should fail with invalid credentials")
  }
}
In this example, a unit test class called LoginFunctionTests subclasses XCTestCase. Inside the test class, we override the setUp method to create an instance of LoginManager or set up any necessary resources before each test case. The tearDown method is overridden to clean up any resources or reset the state after each test case.
The testLoginWithValidCredentials and testLoginWithInvalidCredentials methods are test cases for the login function. Then, the login function is called on the loginManager instance and stores the result. Finally, the expected results are evaluated using assertions like XCTAssertTrue and XCTAssertFalse.
Best Practices in XCTest Framework
While naming any functions, it's always better to prefix with the word “test” , so it will be easy to identify testable functions.
The method name can be long enough so that if any failure happens, it can be easy to understand why the test failed; for the above example, if testLoginWithInvalidCredentials() fails, it's easy to understand because the test was with invalid credentials.
Integration Testing
Integration and unit tests share similarities in using the same APIs and following the Arrange-Act-Assert pattern. However, the key distinction lies in the scale of what they cover. While unit tests focus on small portions of app logic, integration tests analyze the behavior of more extensive subsystems or combinations of classes and functions. In the Arrange step of an integration test, the scope of real project code under test is expanded, with fewer stub objects being used.
Unlike unit tests that aim to cover various conditions and boundary cases, integration tests prioritize asserting that components effectively collaborate to achieve app objectives in critical scenarios. Rather than striving for exhaustive coverage, integration tests focus on important situations where the interaction between components is crucial.
We can perform integration testing for the Swift application using tools such as:
- XCTest
- KIF
- Appium
Let's go through each one!
XCTest
XCTest can also be used for performing integration tests. Integration tests using XCTest involve the same process while doing Unit testing. Maybe we can break down the integration process into steps like - identifying the components to test together, setting up dependencies and test data, writing integration test cases, using XCTest assertions to validate behavior, executing tests with XCTest's runner, analyzing results for issues, and use XCTest's failure messages and debugging information for problem resolution. XCTest enables seamless integration, delivering reliable software outcomes.
KIF
KIF, meaning “Keep It Functional”, is an iOS integration test framework. KIF helps to easily automate iOS apps by leveraging the accessibility attributes the OS provides. KIF uses standard XCTest testing targets for buildings and executing tests. The testing process occurs synchronously on the main thread, utilizing the run loop to simulate the passage of time. This synchronous approach enables the implementation of more complex logic and test composition. KIF integrates with Xcode Test Navigator, command line build tools, and Bot test reports and provides easy configuration, wide OS, and XCode coverage.
import XCTest
import KIF

class LoginTests: KIFTestCase {

  func testLoginSuccess() {
    // Arrange: Set up any necessary preconditions
    // Act: Simulate user interactions
    tester().clearText(fromAndThenEnterText: "testuser",
        intoViewWithAccessibilityLabel: "UsernameTextField")

    tester().clearText(fromAndThenEnterText: "password",
        intoViewWithAccessibilityLabel: "PasswordTextField")

    tester().tapView(withAccessibilityLabel: "LoginButton")

    // Assert: Verify the expected outcome
    tester().waitForView(withAccessibilityLabel: "WelcomeLabel")
  }

  func testLoginFailure() {
    // Arrange: Set up any necessary preconditions
    // Act: Simulate user interactions
    tester().clearText(fromAndThenEnterText: "testuser",
        intoViewWithAccessibilityLabel: "UsernameTextField")

    tester().clearText(fromAndThenEnterText:"wrongpassword",
        intoViewWithAccessibilityLabel: "PasswordTextField")

    tester().tapView(withAccessibilityLabel: "LoginButton")

    // Assert: Verify the expected outcome
    tester().waitForView(withAccessibilityLabel: "InvalidCredentialsAlert")
  }

}
In this example, a test class LoginTests subclasses KIFTestCase from KIF. The test methods testLoginSuccess and testLoginFailure simulate user interactions for successful and failed login attempts, respectively. Inside each test method, KIF's testing APIs are used to interact with the user interface elements. Afterward, we use KIF's waitForView method to wait for the expected outcome, such as a welcome label for successful login or an alert for a failed login.
Appium
Appium can also be used for end-to-end testing. We will discuss it in detail in the next section.
End-to-end Testing
End-to-end testing aims to validate the entire flow of an application, from start to finish, by simulating real-world user scenarios. It involves testing the application's functionality, interactions, and integrations across multiple components, subsystems, or modules that comprise the entire system.
There are many tools for performing E2E testing for Swift applications, out of which the following are most commonly used:
- Appium
- XCUITest framework
- testRigor
Appium
Appium is an open-source automation testing framework supporting mobile app and browser testing. Appium supports hybrid, native and web apps for both iOS and Android devices. Appium uses the WebDriver protocol to interact with the application under test, allowing it to perform actions like tapping buttons, entering text, swiping, and validating UI elements. Appium supports testing frameworks like XCTest for iOS and Espresso for Android. Appium uses the underlying Selenium WebDriver libraries to communicate with mobile devices or emulators.
import io.appium.java_client.MobileElement;
import io.appium.java_client.android.AndroidDriver;
import io.appium.java_client.android.AndroidElement;
import io.appium.java_client.remote.MobileCapabilityType;
import org.openqa.selenium.remote.DesiredCapabilities;
import java.net.MalformedURLException;
import java.net.URL;

public class AmazonLoginTest {
  public static void main(String[] args) throws MalformedURLException,    InterruptedException {
    DesiredCapabilities capabilities = new DesiredCapabilities();
    capabilities.setCapability(MobileCapabilityType.DEVICE_NAME, "YOUR_DEVICE_NAME");
    capabilities.setCapability(MobileCapabilityType.PLATFORM_NAME, "Android");
    capabilities.setCapability(MobileCapabilityType.APP, "PATH_TO_YOUR_AMAZON_APP_APK");

    AndroidDriver<AndroidElement> driver = new AndroidDriver<>(new URL("http://127.0.0.1:4723/wd/hub"),
    capabilities);

    // Perform login
    MobileElement signInBtn = driver.findElementByXPath("//android.widget.Button[@text='Sign-In']");
    signInBtn.click();
    MobileElement emailField = driver.findElementByXPath
        ("//android.widget.EditText[@resource-id='ap_email_login']");

    emailField.sendKeys("YOUR_EMAIL");
    MobileElement continueBtn = driver.findElementByXPath
        ("//android.widget.Button[@text='Continue']");

      continueBtn.click();
    MobileElement passwordField = driver.findElementByXPath
        ("//android.widget.EditText[@resource-id='ap_password']");

    passwordField.sendKeys("YOUR_PASSWORD");
    MobileElement loginBtn = driver.findElementByXPath
        ("//android.widget.Button[@resource-id='signInSubmit']");

    loginBtn.click();
    // Add item to cart
    MobileElement searchField = driver.findElementByXPath
        ("//android.widget.EditText[@resource-id='twotabsearchtextbox']");

    searchField.sendKeys("Men's Printed Shirt");
    MobileElement searchBtn = driver.findElementByXPath
        ("//android.widget.Button[@text='Go']");

    searchBtn.click();
    MobileElement item = driver.findElementByXPath
        ("(//android.view.View[contains(@text,'Men')])[1]");

    item.click();

    MobileElement addToCartBtn = driver.findElementByXPath
        ("//android.widget.Button[@text='Add to Cart']");

    addToCartBtn.click();

    // Proceed to checkout
    MobileElement cartBtn = driver.findElementByXPath("//android.widget.Button[@text='Cart']");

    cartBtn.click();

    MobileElement proceedToCheckoutBtn = driver.findElementByXPath
        ("//android.widget.Button[@text='Proceed to checkout']");

    proceedToCheckoutBtn.click();

    // Perform further checkout steps as needed
    // Quit the driver
    driver.quit();
  }
}
Though Appium is one of the commonly used tools, there are a few major drawbacks of using it, such as:
- Appium doesn't provide any device cloud repo. For test execution, we may need to buy licenses for other device cloud providers.
- As the number of automated test cases increases in Appium, the complexity of the code also grows. This complexity results in more time and effort for debugging and maintaining the code. Consequently, the QA team may have limited time available for creating new test cases while needing to allocate more time towards code maintenance.
- Appium doesn't provide any inbuilt integrations to reports, test management tools, or Continuous Integration tools.
XCUITest Framework
XCUITest is an automated user interface (UI) testing framework Apple provides for iOS and macOS applications. It is specifically designed for testing the user interface of native iOS and macOS apps. XCUITest is built on top of XCTest. XCUITest allows developers and QA teams to write UI tests using Swift. With XCUITest, Users interact with UI elements, simulate user actions, and perform assertions to validate your app's behavior, interactions, and visual elements of your app. It provides synchronization mechanisms, accessibility support, and seamless integration with Xcode, making writing, running, and analyzing UI tests within the Xcode IDE easier.
Setting up and executing test cases with XCUITest is easier and faster compared to Appium. However, when testing on real devices, XCUITest might produce more flaky tests and has limitations when it comes to running tests in parallel.
testRigor
When examining the requirements organizations have for modern test automation tools, it becomes evident that testRigor perfectly meets these criteria. As a leading AI-integrated codeless automation tool, testRigor effectively addresses contemporary test automation challenges. It enables the entire team to craft and execute E2E test cases both swiftly (pun intended!) and efficiently.
Let's highlight some of testRigor's advantages over other E2E tools, starting with its initial setup:
- Cloud-Based: testRigor is a cloud-hosted tool, which translates to significant savings in time, effort, and cost by negating the need to establish an infrastructure for the framework and device cloud.
- Generative AI: With its innovative generative AI, testRigor can automatically generate test cases based on provided test case descriptions alone.
- Plain English Scripting: One of testRigor's standout features is its ability to create test scripts in plain English. This eradicates the need for proficiency in programming languages, empowering the manual QA team, management, business analysts, and stakeholders to easily contribute to automated scripts. With testRigor, the automation process becomes more inclusive, accommodating a diverse group of team members.
- Stable Locators: testRigor offers a respite from the common issues with Xpath. Instead of relying on the often unstable XPath methods, testRigor uses its locator methods, enhancing test case stability. Users can reference the element name or its position, such as "click 'cart'" or "double click on the 3rd 'hello.'”
- 2FA Testing Support: testRigor has built-in capabilities for 2FA testing, supporting Gmail, text messages, and Google Authenticator.
- Integrated Tools: testRigor seamlessly integrates with a vast array of CI/CD tools, test management tools, infrastructure providers, and communication platforms like Slack and Microsoft Teams.
This overview only scratches the surface of what testRigor offers. You can refer to the provided resource for a more detailed look at the main features.
open url "https://www.amazon.com"
click "Sign In"
enter stored value "email" into "email"
click "Continue"
enter stored value "password" into "password"
click "Login"
enter "Men's Printed Shirt" roughly to the left of  "search"
click "Search"
click on image from stored value "Men's Printed Shirt" with less than "10" % discrepancy
click "Add to Cart"
click "Cart"
click "Checkout"
The script shared here is the same as the one used in the Appium example. Using testRigor, we can observe a significant reduction in the required code. This highlights the crucial role played by testRigor in simplifying script maintenance and reducing complexity. Moreover, testRigor supports cross-platform and cross-browser testing.
How to do End-to-end Testing with testRigor
Let us take the example of an e-commerce website that sells plants and other gardening needs. We will create end-to-end test cases in testRigor using plain English test steps.
Step 1: Log in to your testRigor app with your credentials.
Step 2: Set up the test suite for the website testing by providing the information below:
- Test Suite Name: Provide a relevant and self-explanatory name.
- Type of testing: Select from the following options: Desktop Web Testing, Mobile Web Testing, Native and Hybrid Mobile, based on your test requirements.
- URL to run test on: Provide the application URL that you want to test.
- Testing credentials for your web/mobile app to test functionality which requires user to login: You can provide the app’s user login credentials here and need not write them separately in the test steps then. The login functionality will be taken care of automatically using the keyword
login. - OS and Browser: Choose the OS Browser combination on which you want to run the test cases.
- Number of test cases to generate using AI: If you wish, you can choose to generate test cases based on the App Description text, which works on generative AI.
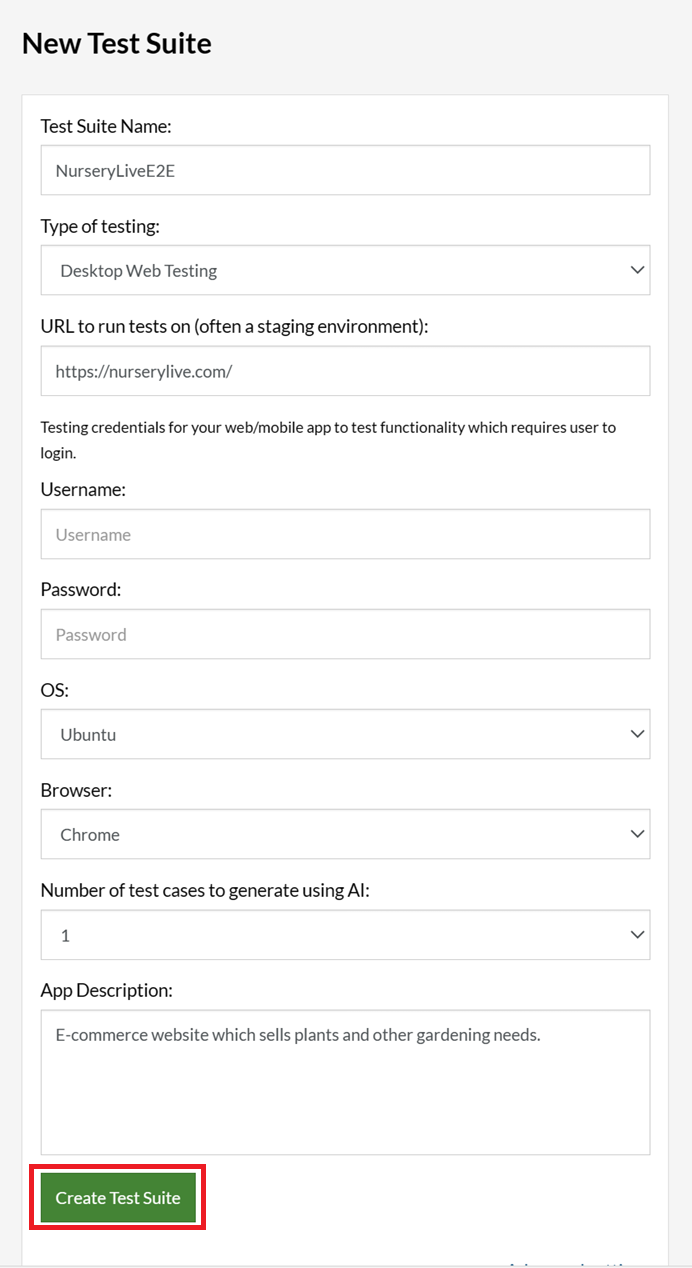
Step 3: Click Create Test Suite.
On the next screen, you can let AI generate the test case based on the App Description you provided during the Test Suite creation. However, for now, select do not generate any test, since we will write the test steps ourselves.
Step 4: To create a new custom test case yourself, click Add Custom Test Case.

Step 5: Provide the test case Description and start adding the test steps.
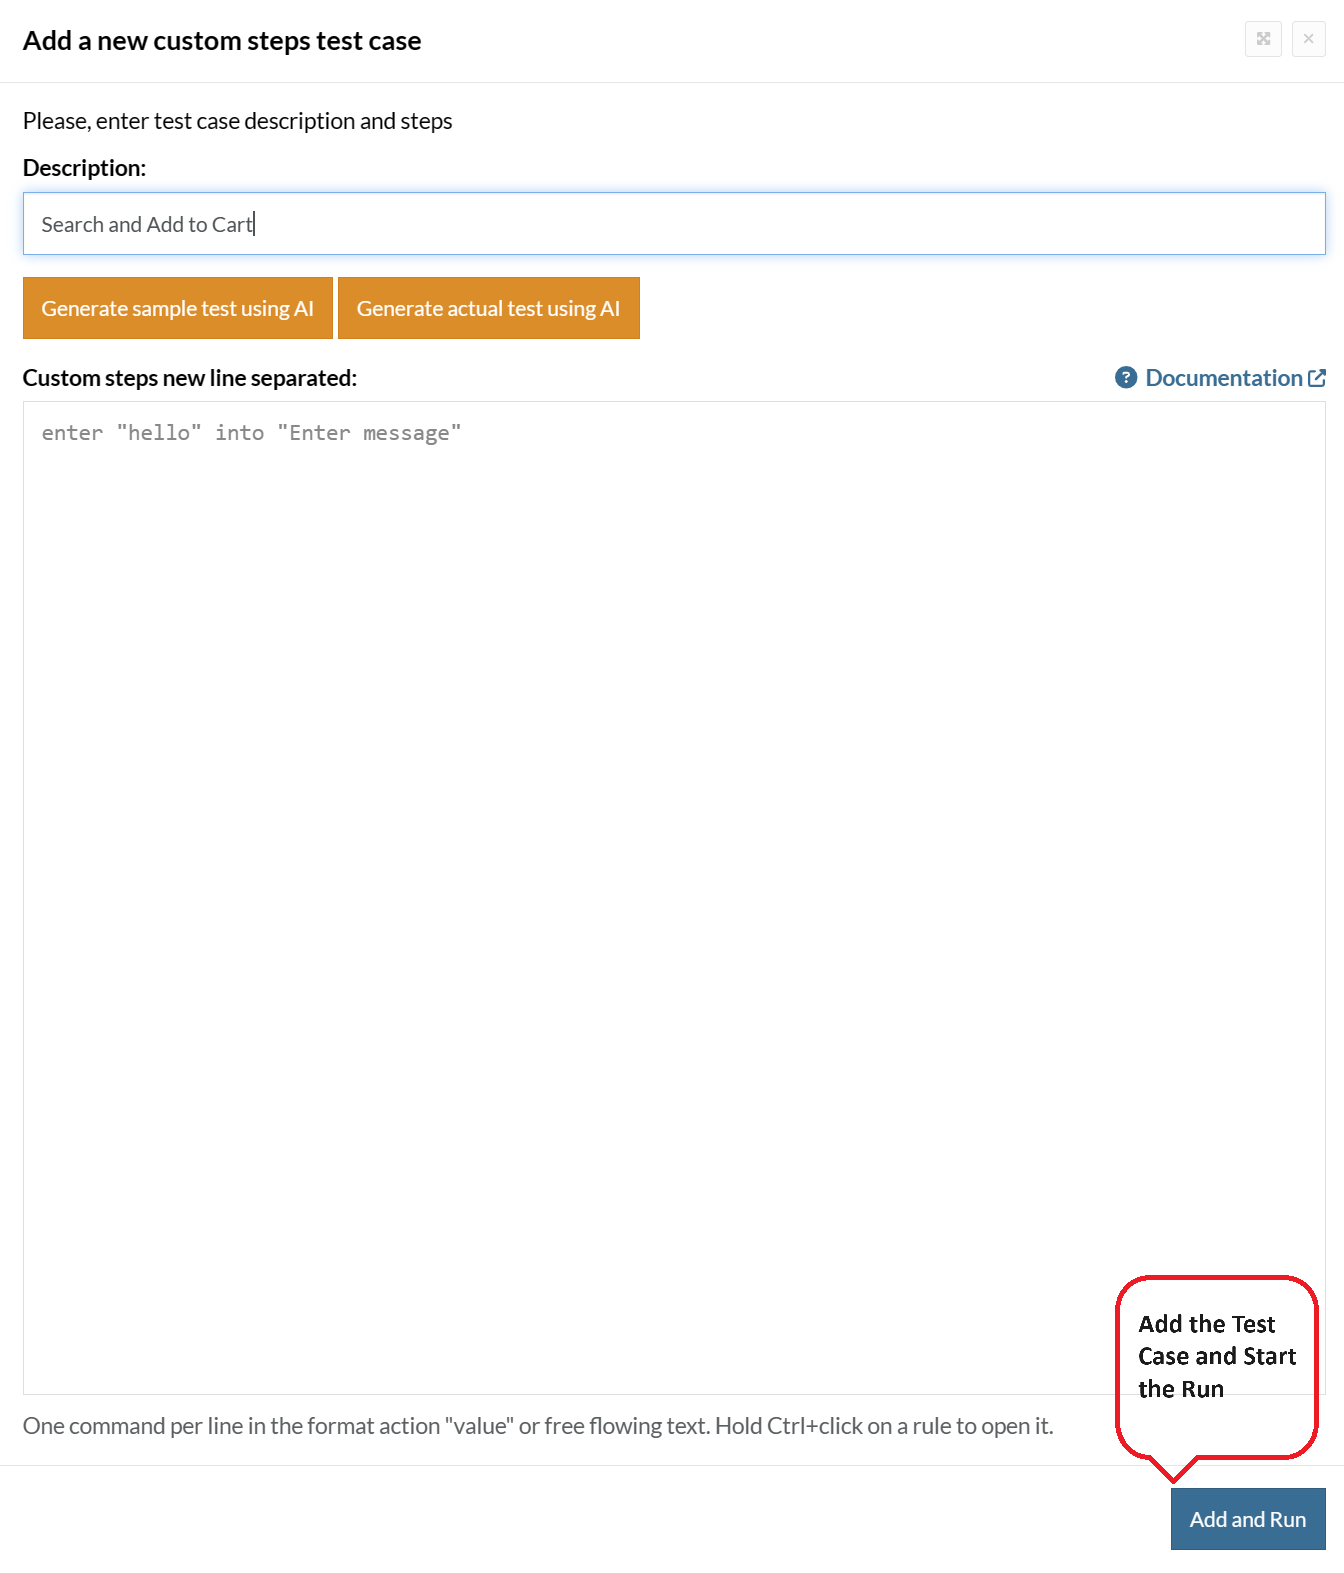
For the application under test, i.e., e-commerce website, we will perform below test steps:
- Search for a product
- Add it to the cart
- Verify that the product is present in the cart
Test Case: Search and Add to Cart
Step 1: We will add test steps on the test case editor screen one by one.
testRigor automatically navigates to the website URL you provided during the Test Suite creation. There is no need to use any separate function for it. Here is the website homepage, which we intend to test.

First, we want to search for a product in the search box. Unlike traditional testing tools, you can identify the UI element using the text you see on the screen. You need not use any CSS/XPath identifiers.
click "What are you looking for?"
Step 2: Once the cursor is in the search box, we will type the product name (lily), and press enter to start the search.
type "lily"
enter enter
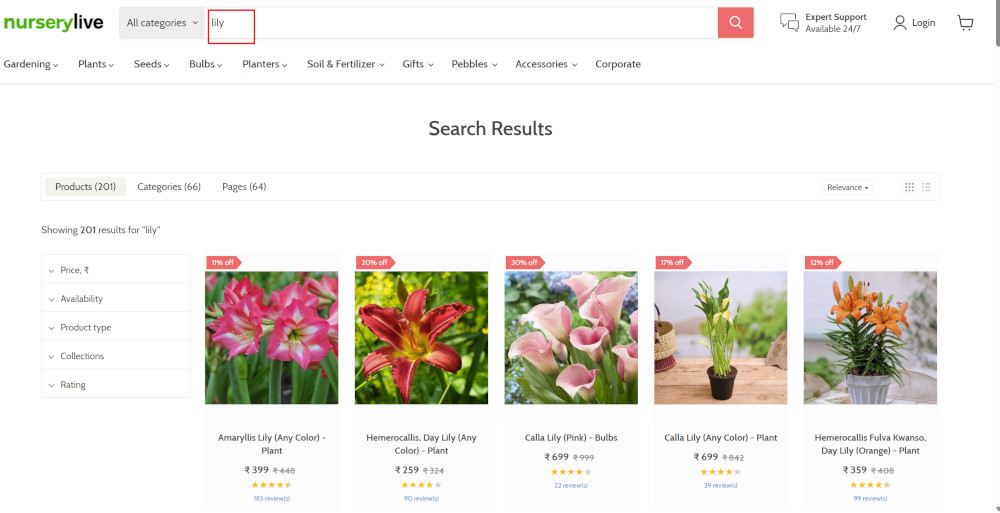
Search lists all products with the “lily” keyword on the webpage.
Step 3: The lily plant we are searching for needs the screen to be scrolled; for that testRigor provides a command. Scroll down until the product is present on the screen:
scroll down until page contains "Zephyranthes Lily, Rain Lily (Red)"

When the product is found on the screen, testRigor stops scrolling.
Step 4: Click on the product name to view the details:
click "Zephyranthes Lily, Rain Lily (Red)"
After the click, the product details are displayed on the screen as below, with the default Quantity as 1.

Step 5: Lets say, we want to change the Quantity to 3, so here we use the testRigor command to select from a list.
select "3" from "Quantity"
click "Add to cart"
The product is successfully added to the cart, and the “Added to your cart:” message is displayed on webpage.
Step 6: To assert that the message is successfully displayed, use a simple assertion command as below:
check that page contains "Added to your cart:"
Step 7: After this check, we will view the contents of the cart by clicking View cart as below:
click "View cart"

Step 8: Now we will again check that the product is present in the cart, under heading “Your cart” using the below assertion. With testRigor, it is really easy to specify the location of an element on the screen.
check that page contains "Zephyranthes Lily, Rain Lily (Red)" under "Your cart"

Complete Test Case
Here is how the complete test case will look in the testRigor app. The test steps are simple in plain English, enabling everyone in your team to write and execute them.
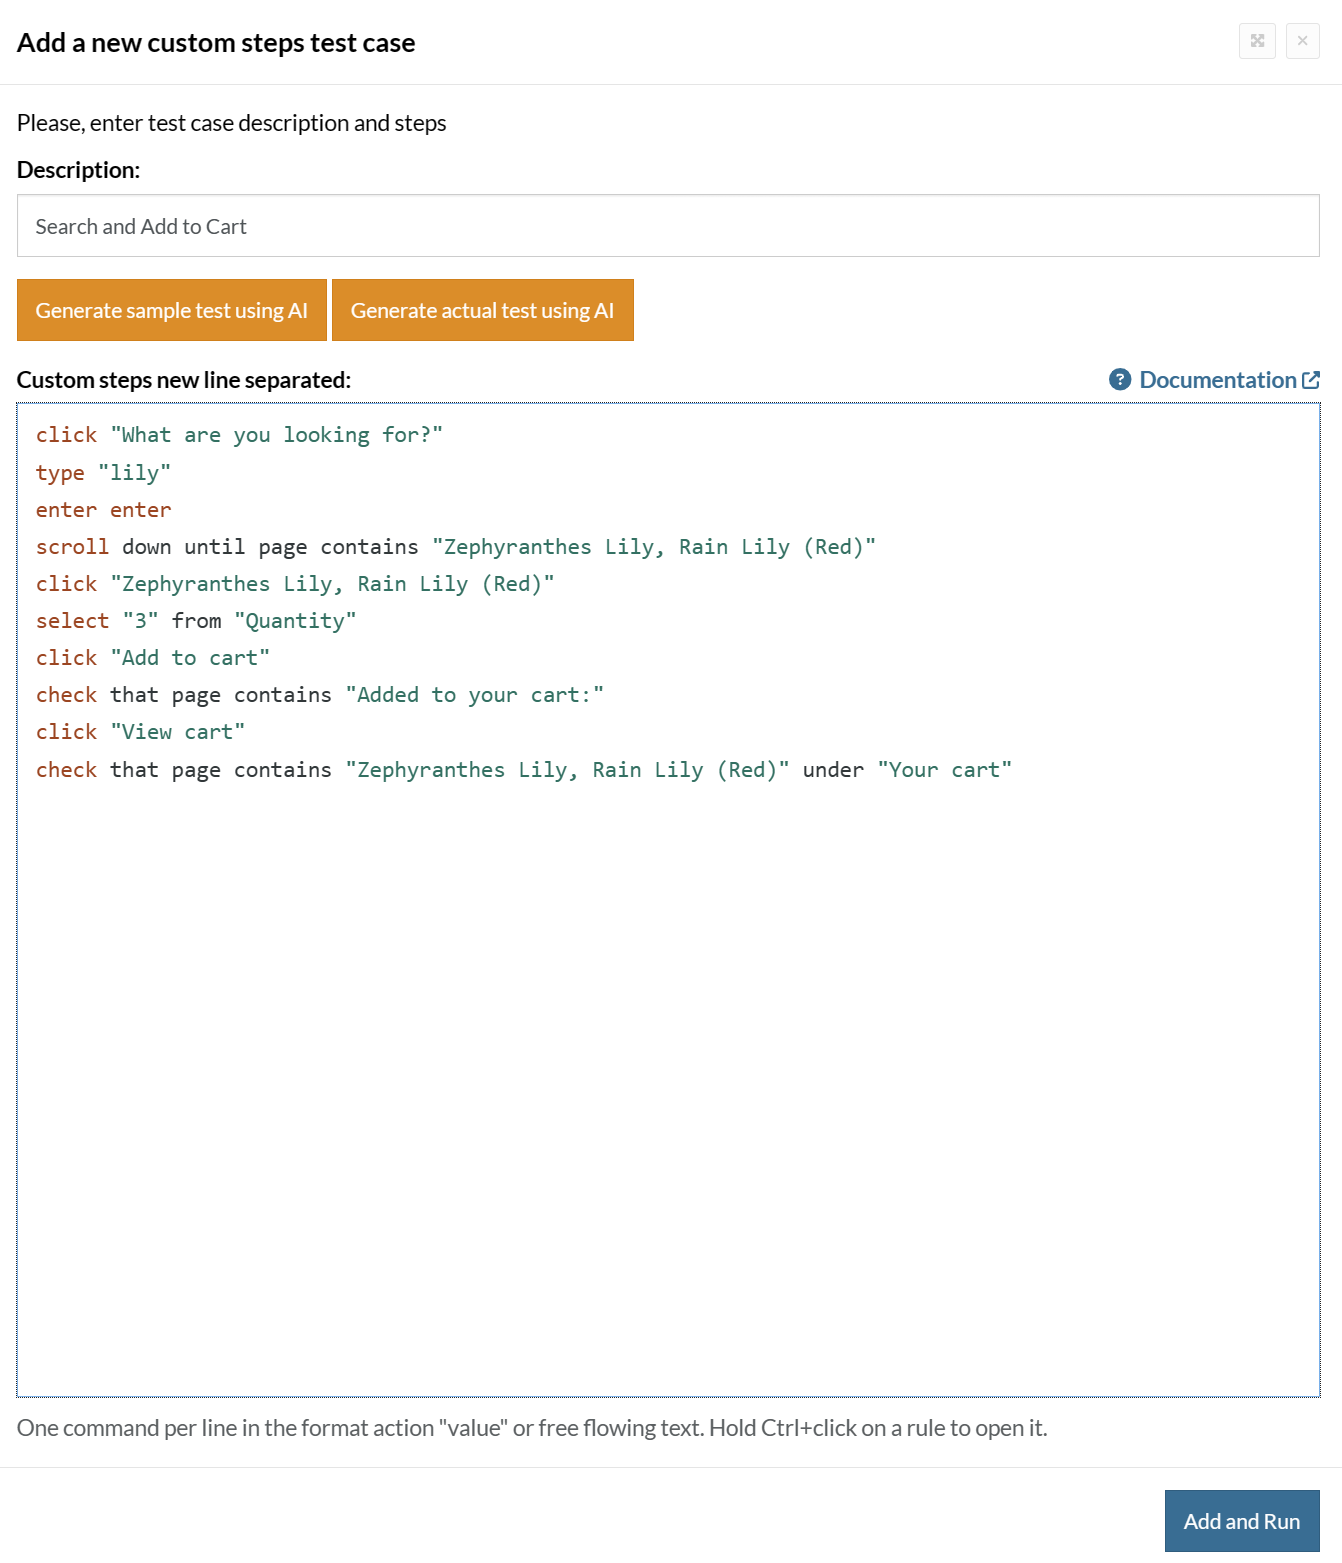
Click Add and Run.
Execution Results
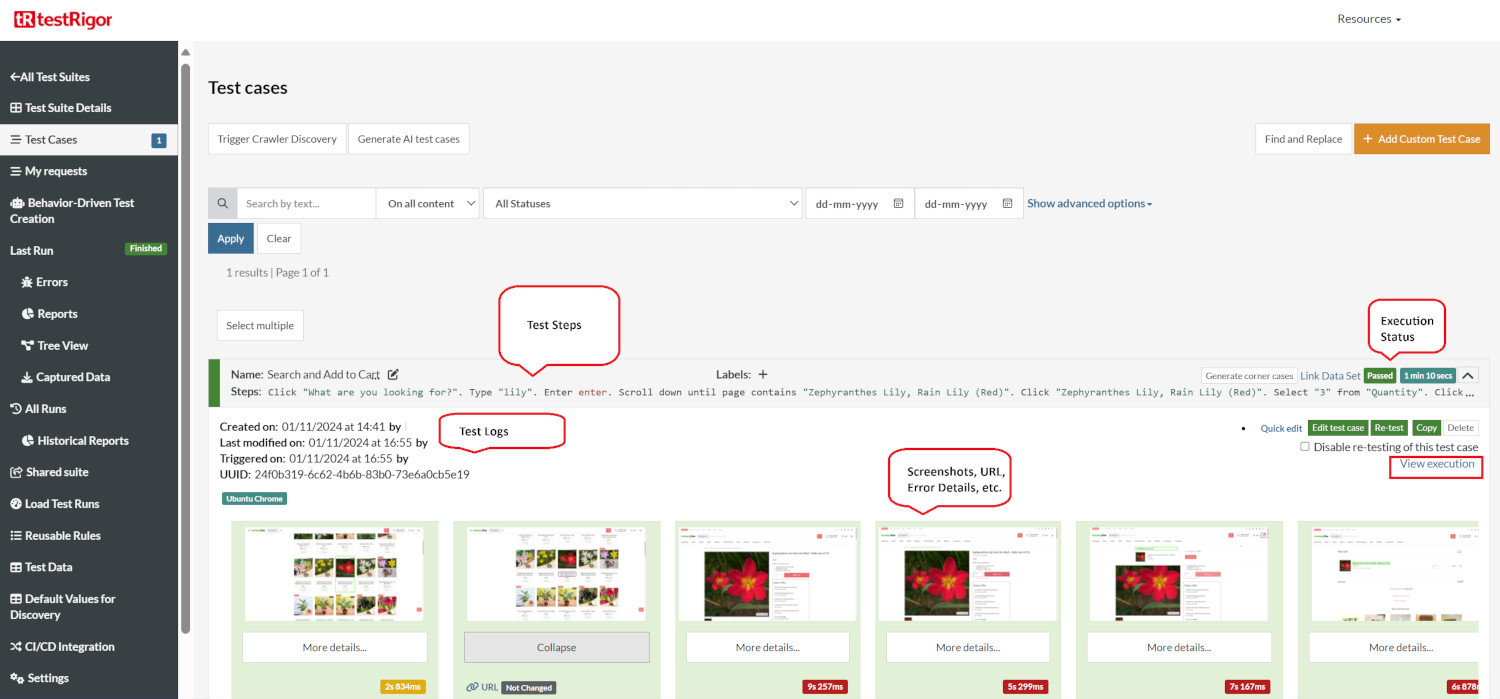
Once the test is executed, you can view the execution details, such as execution status, time spent in execution, screenshots, error messages, logs, video recordings of the test execution, etc. In case of any failure, there are logs and error text that are available easily in a few clicks.
You can also download the complete execution with steps and screenshots in PDF or Word format through the View Execution option.
testRigor’s Capabilities
Apart from the simplistic test case design and execution, there are some advanced features that help you test your application using simple English commands.
- Reusable Rules (Subroutines): You can easily create functions for the test steps that you use repeatedly. You can use the Reusable Rules to create such functions and call them in test cases by simply writing their names. See the example of Reusable Rules.
- Global Variables and Data Sets: You can import data from external files or create your own global variables and data sets in testRigor to use them in data-driven testing.
- 2FA, QR Code, and Captcha Resolution: testRigor easily manages the 2FA, QR Code, and Captcha resolution through its simple English commands.
- Email, Phone Call, and SMS Testing: Use simple English commands to test the email, phone calls, and SMS. These commands are useful for validating 2FA scenarios, with OTPs and authentication codes being sent to email, phone calls, or via phone text.
- File Upload/ Download Testing: Execute the test steps involving file download or file upload without the requirement of any third-party software. You can also validate the contents of the files using testRigor’s simple English commands.
- Database Testing: Execute database queries and validate the results fetched.
testRigor enables you to test web, mobile (hybrid, native), API, and desktop apps with minimum effort and maintenance.
Additional Resources
- Access testRigor documentation to know about more useful capabilities
- Top testRigor’s features
- How to perform end-to-end testing
Conclusion
Swift is a popular programming language for Apple devices, so choosing the right and effective testing tools for different testing phases is crucial. As discussed, there are various tools available for each type of testing. However, evaluating your specific requirements and choosing the tools that best suit your needs is essential. By considering your unique project needs, you can select a set of tools that will facilitate efficient and effective testing practices for your Swift-based applications.
| Achieve More Than 90% Test Automation | |
| Step by Step Walkthroughs and Help | |
| 14 Day Free Trial, Cancel Anytime |


