Drupal Testing
|
|
Drupal is a flexible, open-source CMS for building content-rich websites and digital experiences. Thanks to powerful content modeling (content types and fields), editorial workflows, multilingual support, and thousands of modules/themes, it scales from startups to enterprises. Because those experiences evolve rapidly, an effective way to validate them is to run end-to-end tests with testRigor.
E2E for Drupal
Drupal combines an admin UI, extensible modules, and APIs; therefore, the highest risk lives in cross-layer workflows: installation/first-run setup, enabling and configuring modules or themes, creating content types and fields, role and permission management, the authoring-review-publish path, menus/navigation, Views listings and search, and the differences between anonymous and authenticated access. End-to-end tests with testRigor verify these flows from a real editor and site-visitor perspective. End-to-end tests with testRigor verify these flows from a real editor’s and site visitor’s perspective.
testRigor
testRigor lets you write tests in plain English and runs them in the cloud against your app without brittle CSS/XPath selectors. That means:
- Readable tests your team (and Drupal contributors) can review.
- Resilient element targeting by visible text, labels, and relative anchors.
- Zero local browser infra; run locally or inside CI (we tunnel localhost for PR checks).
- Artifacts (video, screenshots, JUnit) for fast triage.
Setting up test suite
You can install Drupal with DDEV for local development or use the Drupal CMS local installer; either approach gives you a working app, after which you can start testing with testRigor:
Step 1: Log in to your testRigor app with your credentials.
Step 2: Set up the test suite for the website testing by providing the information below:
- Test Suite Name: Provide a relevant and self-explanatory name.
- Type of testing: Select from the following options: Desktop Web Testing, Mobile Web Testing, Native and Hybrid Mobile, based on your test requirements.
- URL to run test on: Provide the application URL that you want to test.
- Testing credentials for your web/mobile app to test functionality which requires user to login: You can provide the app’s user login credentials here and need not write them separately in the test steps then. The login functionality will be taken care of automatically using the keyword login.
- OS and Browser: Choose the OS Browser combination on which you want to run the test cases.
- Number of test cases to generate using AI: If you wish, you can choose to generate test cases based on the App Description text, which works on generative AI.

Step 3: Click Create Test Suite.
On the next screen, you can let AI generate the test case based on the App Description you provided during the Test Suite creation. However, for now, select do not generate any test, since we will write the test steps ourselves.
Step 4: To create a new custom test case yourself, click Add Custom Test Case.
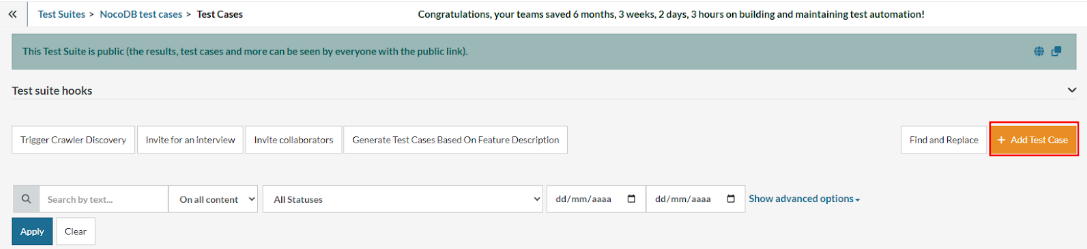
Step 5: Provide the test case Description and start adding the test steps.

For the Drupal application under test, we will perform below test steps:
- Login to the application;
- Create a new section;
- Configure the new section.
You can also check the following test case execution here.
Test Case: Creation of new Layout Section
Step 1: We will add test steps on the test case editor screen one by one.
testRigor automatically navigates to the website URL you provided during the Test Suite creation. There is no need to use any separate function for it. Here is the website homepage, which we intend to test.
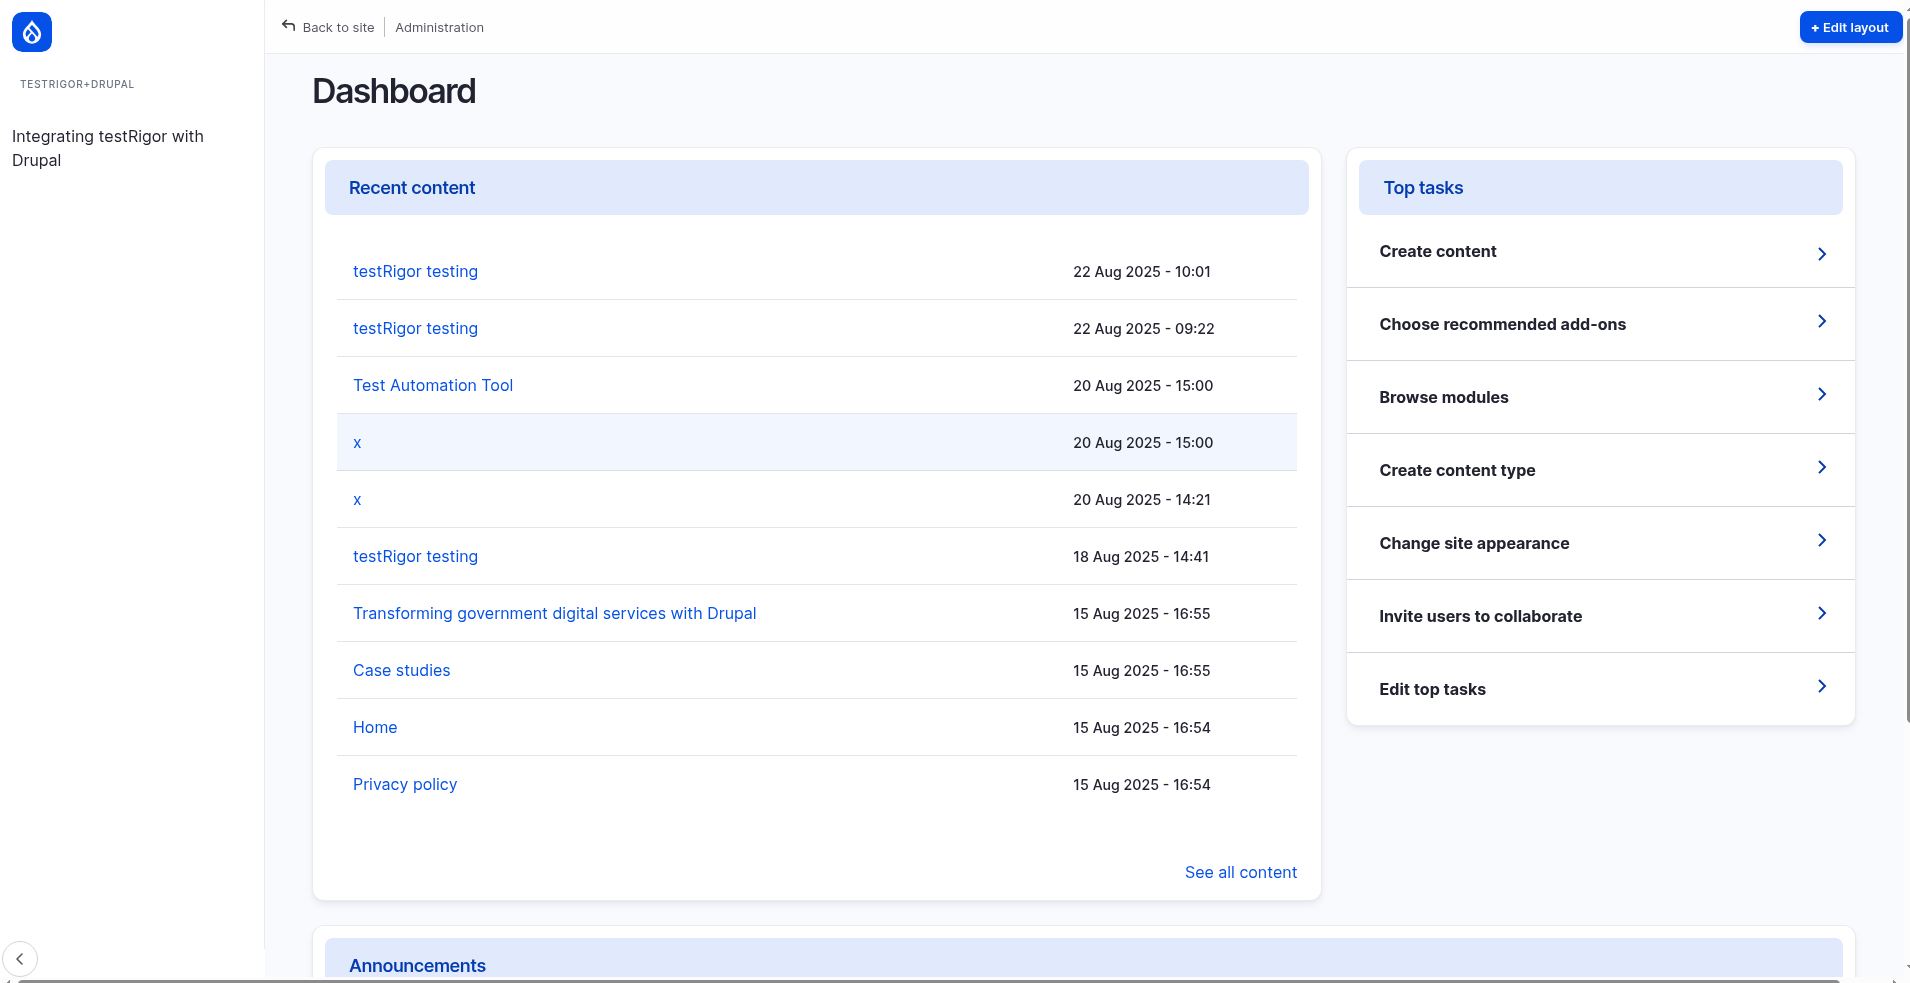
To have access to the main page, we need to login to our account. For that, testRigor has a built-in reusable rule “login”, that will use the variables “Username” and “Password” defined in the test suite creation to perform the login function.
First, we want to create our new table. Unlike traditional testing tools, you can identify the UI element using the text you see on the screen. You don’t need to use any CSS/XPath identifiers. For this function, we see the button “Edit Layout”. So, to go to the next page, we will use the exact text in the first test step using plain English:
click "Edit Layout"
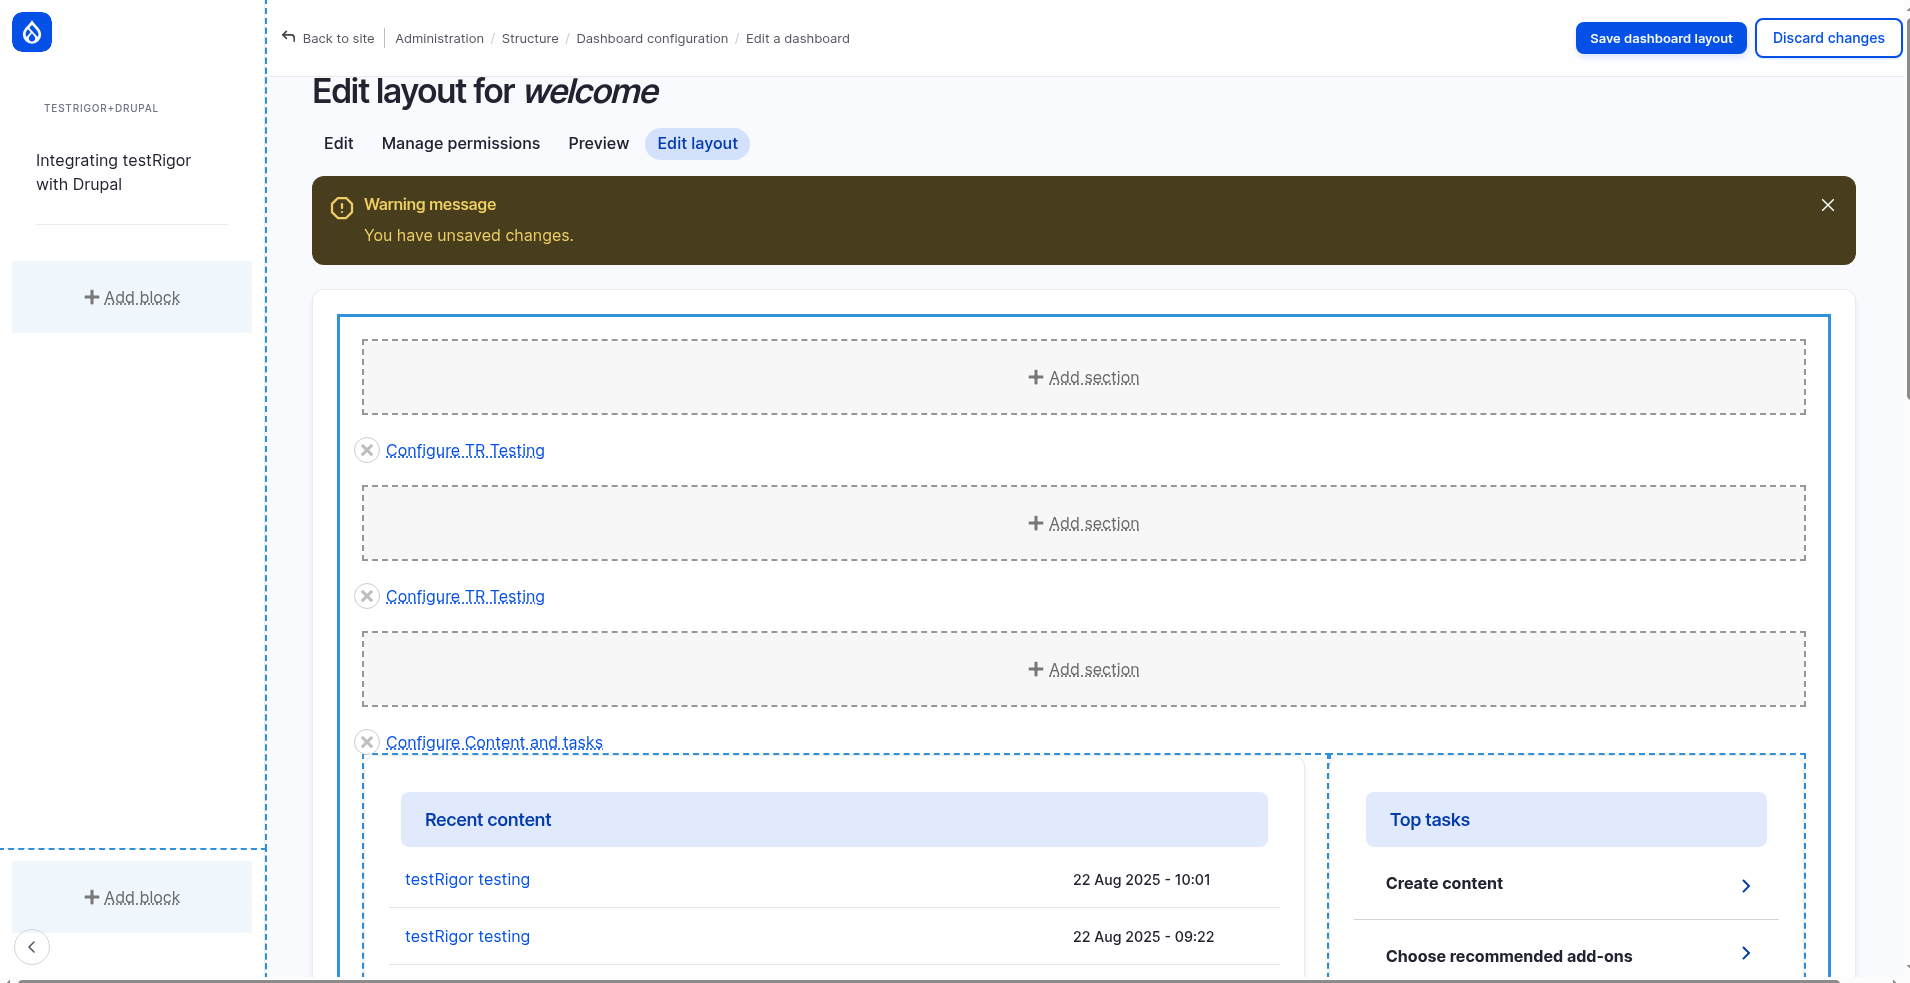
Step 2: Once we go to the “Edit Layout” page, we need to write the instructions of what to interact with.
click "Add Section"
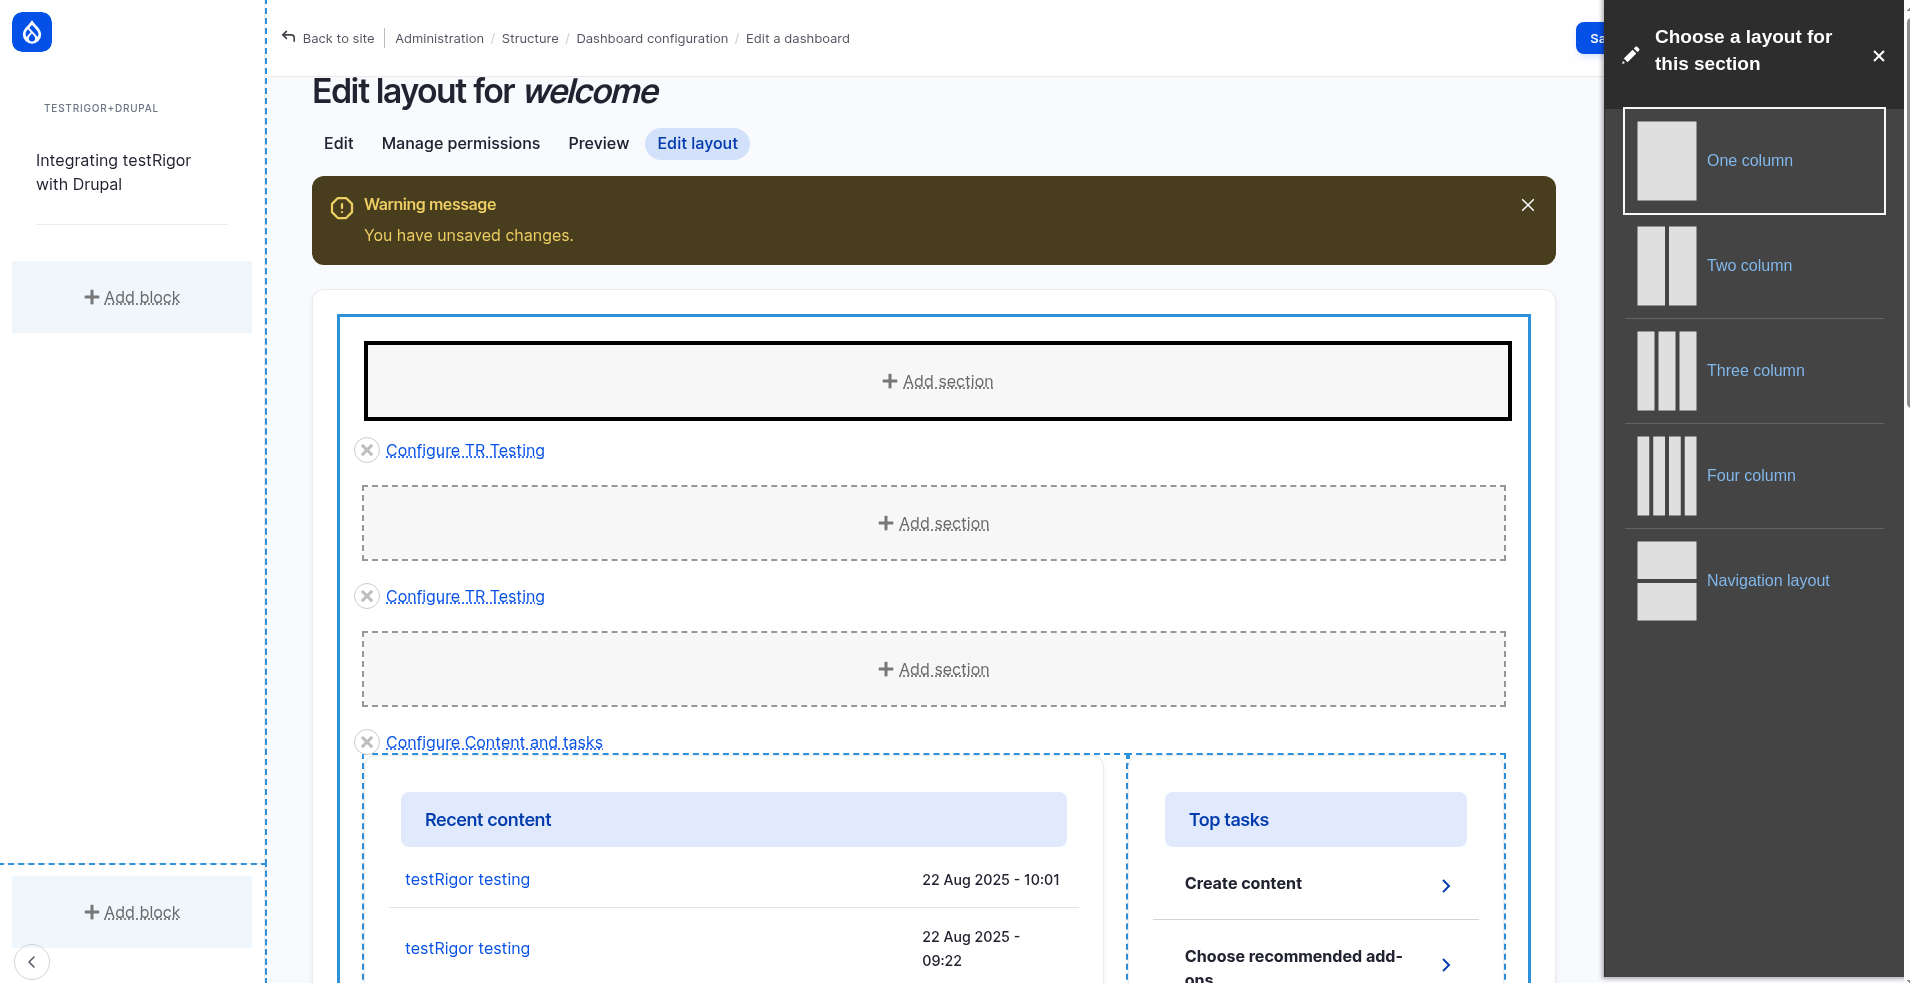
Step 3: Now we can finally add our new section, with what was shown on the screen, with the steps:
click "Navigation Layout"
enter "TR Testing" into "Administrative Label"
click "Add Section"
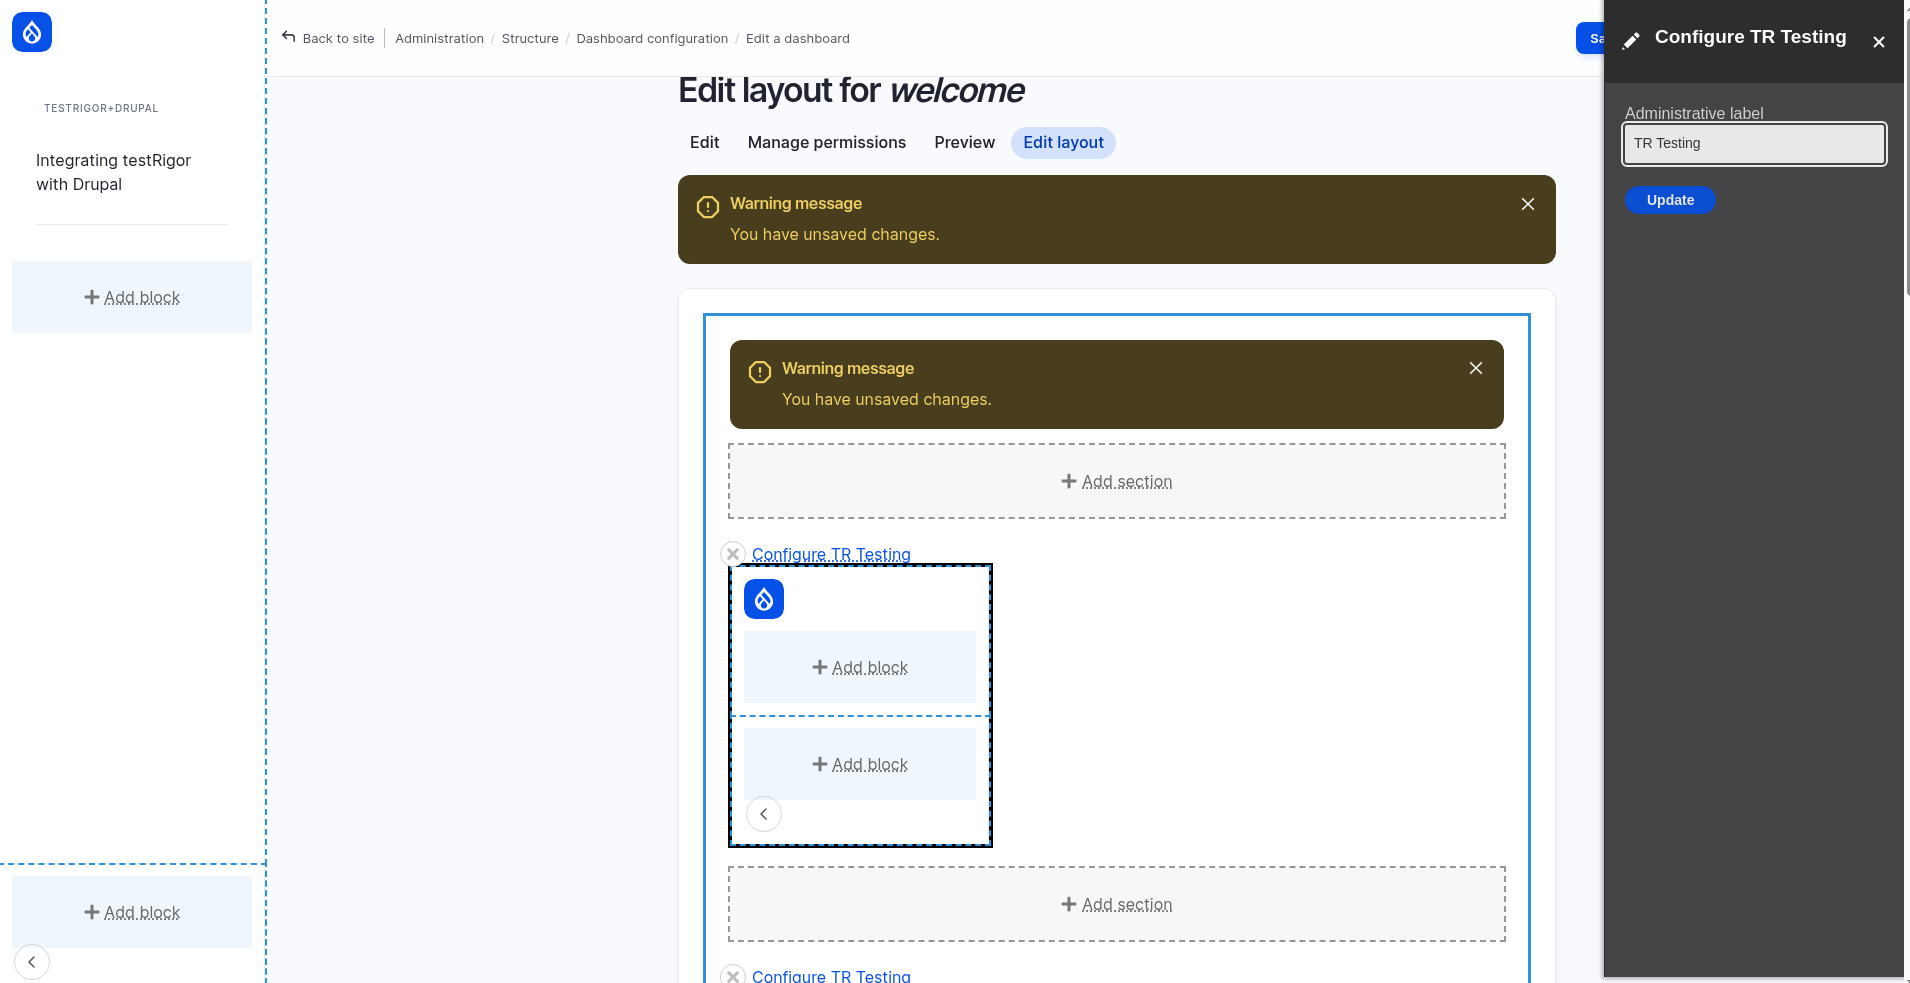
Step 4: We can as well add custom configurations for our new section.
click "Configure TR Testing"
click first "Add block"
click "Dashboard Text"
enter "testRigor+Drupal" into first input
enter "Integrating testRigor with Drupal" into first input above "About text formats"
click "Add Block" below "Text Format"
click "Save dashboard layout"
Step 5: Finally, we can verify that our instructions were correctly followed:
click "dashboard" on the left of "Dashboard configuration"
check that page contains "testRigor+Drupal"
check that page contains "Integrating testRigor with Drupal"
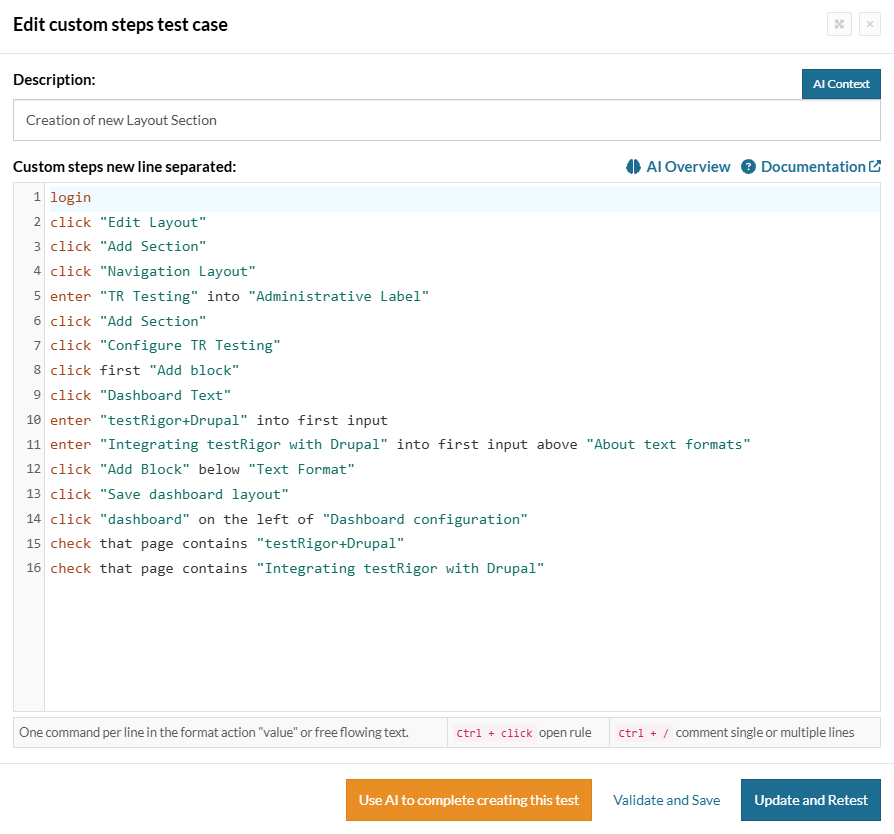
Complete Test Case
Here is how the complete test case will look in the testRigor app. The test steps are simple in plain English, enabling everyone in your team to write and execute them.
Full Suite’s Test Cases
This section will present an example of a few tests that may comprise a Drupal’s test suite.
Prerequisites
For the test suite to run properly, there is a few steps we must take before running the test cases, which is the Reusable Rules and Test Data.
Reusable Rules
The reusable rules are a set of custom steps that can be inserted in any test just by using the rule’s name. In this suite, there will be only one reusable rule, called “Delete Trash Content”:
click button on the right of "restore" at row "1"
click "Purge"
click "confirm" on the left of "cancel"
check that page contains "The content item testRigor testing has been permanently deleted."
Test Data
The test data consists in the global variables and data sets. The data sets are, as the name suggests, sets of data that can be either written or imported from a CSV file. In this case, wont be needed to create any data sets.
The global variables are the variables defined in the test suite that can be used anytime, in any test case in the suite. Here we’ll have a few variables that are either captured from the app during a test case or created beforehand:
-
theme_color0 = #a30f0f;
-
logo = tRlogo.webp (Image file);
-
fullDescription = testRigor is an executable specification engine designed to allow anyone on your team to build, maintain and understand tests created and executed in plain English. We provide a Chrome plugin to speed-up test creation, and our AI-powered system dramatically reduces test maintenance to a bare minimum and autonomously generates tests that reflect your end users’ behavior.;
Now, we can proceed with the test cases:
Creation of new Basic Page
In this test, we verify basic page creation and publication. First, we open the content form; then we add the title, body, and tags; finally, we confirm the page is published. Test Case Execution.
login
click "create content"
click "Basic page"
enter "testRigor testing" into first input
enter "What is testRigor" into first input roughly below "Description"
enter "With testRigor, you can use free-flowing plain English to build test automation. testRigor will understand and execute your instructions exactly as written." into first input roughly above "About text formats"
enter "tR" into first input roughly below "Tags"
click "Save" on the left of "Preview"
click "Apply" on the right of "Published"
check that page contains "Published" on the right of "testRigor testing"
Creation of new Content Type
This scenario validates defining a custom content type. To begin with, we create the type with a name and description; afterward, we save it and check the confirmation message. Test Case Execution.
login
click "create content type"
generate from template "%$$-Type", then enter into first input
enter "Addition of a new content type" into second input
enter "Test title" into third input
click "save" on the right of "Save and manage fields"
check that page contains "type has been added."
Creation of new User
This test exercises user onboarding. Initially, we try inviting a known email to confirm validation; next, we generate a unique account and then verify the new member appears correctly. Test Case Execution.
login
click "invite users to collaborate"
enter "[email protected]" into first input
generate from template "%$$$$$ Test" into second input and save it as "runUser"
enter "1" into "Content editor"
click "Create new account"
check that page contains "The email address [email protected] is already taken"
generate from template "[email protected]" then enter into first input
click "Create new account"
click stored value "runUser" on the right of "new user"
check that page contains "Member for"
Modifying Top Tasks
This case covers rearranging the Dashboard’s “Top tasks.” First, we change the order and weights; next, we save the menu; after that, we confirm the updates on the dashboard and later restore the original layout. Test Case Execution.
login
check that page contains "Create content" above "Choose recommended add-ons"
check that page contains "Browse modules"
click "edit top tasks"
drag "move" on the left of "Choose recommended add-ons" to "move" on the left of "Create Content"
enter "0" into input on the right of "Browse modules"
click "save" on the right of "Add link"
check that page contains "Menu Welcome has been updated."
click "Dashboard"
check that page does not contain "Create content" above "Choose recommended add-ons"
check that page does not contain "Browse modules"
click "edit top tasks"
drag "move" on the left of "Create Content" to "move" on the left of "Choose recommended add-ons"
enter "1" into input on the right of "Browse modules"
click "save" on the right of "Add link"
check that page contains "Menu Welcome has been updated."
click "Dashboard"
check that page contains "Create content" above "Choose recommended add-ons"
check that page contains "Browse modules"
Configuring theme and changing site appearance
This test validates theme configuration and appearance changes. Specifically, we switch the color scheme and administration theme; then we verify a UI element reflects the new color; finally, we revert to the default theme. Test Case Execution.
login
click "change site appearance"
click "settings" below "A clean, accessible, and flexible Drupal front-end theme."
scroll down until page contains "Primary base color"
select "Firehouse" from "Olivero Color Scheme"
check that page contains "Firehouse"
grab value from first input below "Primary base color" and save as "theme_color"
click "save configuration"
check that page contains "The configuration options have been saved."
click "list" on the left of "update extensions"
scroll down until page contains exactly "Administration theme"
select exactly "Olivero" from first dropdown above "Save Configuration"
click "Save configuration" below "Administration theme"
check that page contains "The configuration options have been saved."
click "Dashboard"
hover over "View all announcements"
check that "View all announcements" color is equal to stored value "theme_color"

//returning to default theme
click "change site appearance"
scroll down until page contains exactly "Administration theme"
select exactly "Gin" from first dropdown above "Save Configuration"
click "Save configuration" below "Administration theme"
check that page contains "The configuration options have been saved."
Scheduling new Case Study
This scenario ensures editors can schedule publishing. After drafting the case study, we set publish and unpublish dates; consequently, the status should indicate a scheduled publication. Test Case Execution.
login
click "Case Studies"
click "Add a Case study"
click "discard" if exists
generate from template "Test %$$$$" then enter into "Title" and save it as "studyTitle"
enter "With testRigor, you can use free-flowing plain English to build test automation. testRigor will understand and execute your instructions exactly as written." into second input
enter "testRigor" into third input
scroll down until page contains "Client link"
click "Text Editor" roughly above "Client link"
type stored value "fullDescription"
click "scheduling options"
click input "date"
type tab
type enter
type arrow right
type enter
click on second input roughly on the right of "About text formats" and roughly below "Publish on"
type tab
type enter
type enter
click input "date" roughly below "Unpublish on"
type tab
type enter
type arrow right
type arrow right
type enter
click on second input roughly on the right of "About text formats" and roughly below "Unpublish on"
type tab
type enter
type enter
select "Published" from "Save as"
click "Save" on the left of "Preview"
check that page contains string with parameters "${studyTitle} is scheduled to be published"
Updating an URL alias
This test confirms editors can update URL aliases safely. First, we open the existing page in a new tab; then we change the alias and afterward validate the new URL and content; finally, we revert to the original path. Test Case Execution.
login
click "Back to site"
hover over "configuration"
click "Search and Metadata"
click "URL aliases"
middle click "/testrigor-testing-3"
check that page contains "With testRigor, you can use free-flowing plain English to build test automation."
check that url is "http://159.223.98.145/testrigor-testing-3"
close tab
click "Edit" on the right of "/testrigor-testing-3"
enter "/testrigor-testing-3x" into second input
click "Save" on the left of "Delete"
check that page contains "The alias has been saved."
middle click "/testrigor-testing-3x"
check that page contains "With testRigor, you can use free-flowing plain English to build test automation."
check that url is "http://159.223.98.145/testrigor-testing-3x"
close tab
click "Edit" on the right of "/testrigor-testing-3x"
enter "/testrigor-testing-3" into second input
click "Save" on the left of "Delete"
check that page contains "The alias has been saved."
middle click "/testrigor-testing-3"
check that page contains "With testRigor, you can use free-flowing plain English to build test automation."
check that url is "http://159.223.98.145/testrigor-testing-3"
Cleaning Trash Content by Deleting Items
This scenario validates bulk deletion from Trash. From there, we run the reusable rule repeatedly until no items remain; as a result, the page shows an empty state. Test Case Execution.
login
click "Back to site"
click "Trash"
Delete Trash Content until page contains "There are no deleted content items."
Validate email sending to generated value
This test verifies outbound email logging. Using a generated address, we send a test message; subsequently, the email should appear in the log for confirmation. Test Case Execution.
login
click "back to site"
hover over "configuration"
click "System"
click "Drupal Symfony Mailer Lite"
click "Test" on the right of "Message Settings"
generate unique email then enter into "Recipient" and save as "generatedEmail"
click "Send test email" on the right of "Back to site"
check that page contains "An attempt has been made to send an e-mail"
hover over "Reports"
click "Email log"
check that page contains stored value "generatedEmail" at row "1"
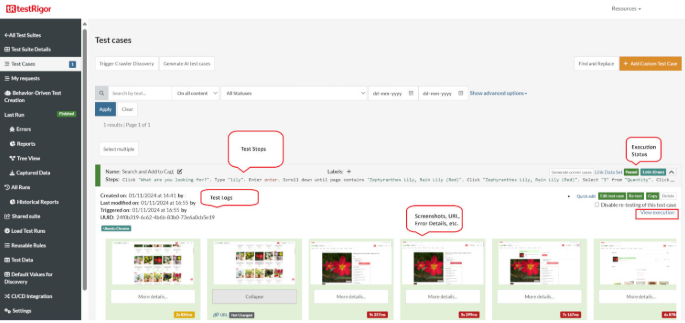
Execution Results
Once the test is executed, you can view the execution details, such as execution status, time spent in execution, screenshots, error messages, logs, video recordings of the test execution, etc. In case of any failure, there are logs and error text that are available easily in a few clicks.
You can also download the complete execution with steps and screenshots in PDF or Word format through the View Execution option.
testRigor’s Capabilities
- Reusable Rules (Subroutines): You can easily create functions for the test steps that you use repeatedly. You can use the Reusable Rules to create such functions and call them in test cases by simply writing their names. See the example of Reusable Rules.
- Global Variables and Data Sets: You can import data from external files or create your own global variables and data sets in testRigor to use them in data-driven testing.
- 2FA, QR Code, and Captcha Resolution: testRigor easily manages the 2FA, QR Code, and Captcha resolution through its simple English commands.
- Email, Phone Call, and SMS Testing: Use simple English commands to test the email, phone calls, and SMS. These commands are useful for validating 2FA scenarios, with OTPs and authentication codes being sent to email, phone calls, or via phone text.
- File Upload/ Download Testing: Execute the test steps involving file download or file upload without the requirement of any third-party software. You can also validate the contents of the files using testRigor’s simple English commands.
- Database Testing: Execute database queries and validate the results fetched.
testRigor enables you to test web, mobile (hybrid, native), API, and desktop apps with minimum effort and maintenance.
Additional Resources
- Access testRigor documentation to know about more useful capabilities
- Top testRigor’s features
- How to perform end-to-end testing
Setting up GitHub CI/CD Integration
For automated testing in your GitHub repository, you’ll need to configure your testRigor credentials as GitHub secrets. This approach differs from local testing by using GitHub’s secure environment variables instead of a local .env file.
Step 1 – Add GitHub Secrets
- Go to your GitHub repository
- Click on “Settings” → “Secrets and variables” → “Actions”
- Add the following:
- As a secret:
DRUPAL_AUTH_TOKEN: Your testRigor auth token (keep this private)
- As variables:
DRUPAL_TEST_SUITE_ID: Your testRigor Test Suite IDDRUPAL_BASE_URL: Your Drupal website URL
- As a secret:
For further information on creating secrets and variables in GitHub Actions, you can check the official GitHub documentation on secrets and variables.
Required GitHub Secrets and Variables:
DRUPAL_TEST_SUITE_ID: Your testRigor Test Suite ID (e.g., 12345)DRUPAL_AUTH_TOKEN: Your testRigor auth token (format: ########-####-####-####-############)DRUPAL_BASE_URL: Your Drupal website URL (e.g.,<a href="https://yourstore.com">https://yourstore.com</a>)
Step 2- Use in GitHub Actions
- name: Run testRigor Tests
  run: bin/mftf run:testrigor
  env:
    DRUPAL_AUTH_TOKEN: ${{ secrets. DRUPAL_AUTH_TOKEN }}
    DRUPAL_TEST_SUITE_ID: ${{ vars. DRUPAL_TEST_SUITE_ID }}
    DRUPAL_BASE_URL: ${{ vars. DRUPAL_BASE_URL }}
Key Difference: While local testing uses a .env file, CI/CD uses GitHub’s secure secret management system, ensuring your credentials are encrypted and only accessible to authorized workflows.
Troubleshooting Tips
- Make sure your Drupal site is running and accessible at the URL you specified
- Check your .env file – ensure all three values are correct and there are no extra spaces
- Verify your testRigor account – make sure you can log in and see the test suite
- Check your internet connection – testRigor needs to download some tools on first run
If you need to start over, simply delete the .mftf-tools folder and run the command again.
Conclusion
With Drupal, you can build flexible, content-rich sites and evolve them as your needs grow. Because it’s open-source with a vast module ecosystem, you can tailor workflows, permissions, and presentation to fit your organization. To keep those experiences reliable as complexity increases, pair Drupal with end-to-end automation, testRigor enables resilient, plain-English tests that run in CI with clear artifacts. Before you decide, map your critical editor/visitor journeys, evaluate tools against those needs, and choose the setup that best fits your team and environments.
| Achieve More Than 90% Test Automation | |
| Step by Step Walkthroughs and Help | |
| 14 Day Free Trial, Cancel Anytime |


