Express.js Testing

Express.js (also known as Express) is a framework that aids in working with Node.js. It is used for server-side development, such as creating middleware, routing, templating, and easy debugging. This framework can help you build your web and mobile applications with ease.
Unit Testing
Unit testing plays a crucial part in ensuring the application's quality. These tests are usually faster and less expensive in comparison to integration and end-to-end testing methods. For writing your test cases, you will need a framework that allows you to run the tests and an assertion library that will help validate outcomes. Though many options are available, listed below are some of the most popular tools.
Mocha: One of the most popular Express testing frameworks used for writing unit tests. You can get asynchronous execution and detailed reporting of your test cases through this framework. Pairing it with another assertion library can improve the quality of unit test cases. You can find the assertion library options that pair well with Mocha over here.
Chai is one such assertion library that can be paired with Mocha to write powerful unit test cases. It supports node BDD/TDD assertions. For example, when you execute 'mocha sellerDetails.js' in the command line, the sellerDetails.js file, which is a javascript file, will get executed. This file will contain the tests that have been written using special features and assertions that are available as a part of Mocha.
Below is an example of a unit test using Mocha and Chai where the test case is expected to verify if the code is calculating the volume and surface area of the cube.
const Cube = require('../src/app').Cube;
const expect = require('chai').expect;

describe('Testing the Cube Functions', function() {
  it('1. The side length of the Cube', function(done) {
    let c1 = new Cube(2);
    expect(c1.getSideLength()).to.equal(2);
    done();
  });
  it('2. The surface area of the Cube', function(done) {
    let c2 = new Cube(5);
    expect(c2.getSurfaceArea()).to.equal(150);
    done();
  });
  it('3. The volume of the Cube', function(done) {
    let c3 = new Cube(7);
    expect(c3.getVolume()).to.equal(343);
    done();
  });
});
- describe() - A suite of test cases with a string and a function as parameters.
- it() - It is the smallest unit test case. Multiple it() methods can be grouped inside a describe() method.
- expect() - A BDD-style library mainly used with booleans and numbers.
- should() - Another BDD-style library that extends each object with a should property to start the chain.
- assert() - This is a TDD-style library with additional tests available.
{
  "name": "chai",
  "version": "1.0.0",
  "description": "",
  "main": "index.js",
  "scripts": {
    "test": "mocha"
  }
},
  "keywords": [],
  "author": "",
  "license": "ISC",
  "devDependencies": {
    "chai": "^4.3.6",
    "mocha": "^9.2.2",
  }
}
Jest: Another popular framework often used for node testing, Jest is an open-source framework built over Jasmine. You can use Jest with other Node libraries like SuperTest, which can be used to test HTTP servers to get high-quality unit tests. Jest also supports CLI tools that can give you more features and ease of execution.
When working with these tools and frameworks, remember to install them as dev dependencies.
Integration Testing
- Checking routes for different kinds of responses. For example, a 404 is logged when an incorrect parameter is being passed.
- GET and POST call endpoints.
- Testing interactions between middleware, services, and controllers.
- Verifying that data is correctly fetched from and written to databases through API calls.
Not all integrations require integration test cases. If you are using third-party applications like Express framework or MongoDB, you don't need to test those portions of code that are provided as a part of these frameworks - as they've already been tested. You need to focus on those integrations where you have written custom logic and how these custom portions of code integrate with the framework's methods.
Although integration tests are lightweight in comparison to end-to-end tests, they can still be time-consuming if the entire system is booted. In this case, it's essential to balance between real-life data and the data or components that are stubbed.
End-to-End Testing
End-to-end testing involves verifying the entire workflow and is the most encompassing type of testing. Therefore it is generally done after both unit and integration tests pass for a given build.
- Selenium-based tools
- testRigor
Selenium-based tools for end-to-end testing
There are many such tools available that help with end-to-end testing. Most of them have wrappers over Selenium. However, most of these tools also inherit the limitations of Selenium to a certain degree.
testRigor for end-to-end testing
- Supports cross-platform and cross-browser testing without significant configuration steps.
- Test creation is up to 15X faster than Selenium-based tools.
- Test maintenance is practically eliminated and takes very little time.
- Has provision to support 2FA testing support for Gmail, text messages, and Google authenticator.
- Easy integration with most CI/CD tools.
- Facilitates easy mocking of API calls and accessing databases if needed.
- It's cloud-hosted and highly customizable, allowing for broad configuration types and speed of test execution.
Below is an example of an automated test case for a user management system:
Login
Click on “Menu” to the right of “Announcements”
Click on “User Management”
Check that page contains “User Management”
Click on “Manage Users” roughly below “User Preferences”
Click on “create new user” at the top
Enter stored value “full name” into “Name”
Enter stored value “newUserEmail”
Click on “Save”
Scroll down up to 5 times until page contains stored value “new user” roughly below “Username”
check that email to stored value "newUserEmail" and “Welcome” in subject  was delivered
How to do End-to-end Testing with testRigor
Let us take the example of an e-commerce website that sells plants and other gardening needs. We will create end-to-end test cases in testRigor using plain English test steps.
Step 1: Log in to your testRigor app with your credentials.
Step 2: Set up the test suite for the website testing by providing the information below:
- Test Suite Name: Provide a relevant and self-explanatory name.
- Type of testing: Select from the following options: Desktop Web Testing, Mobile Web Testing, Native and Hybrid Mobile, based on your test requirements.
- URL to run test on: Provide the application URL that you want to test.
- Testing credentials for your web/mobile app to test functionality which requires user to login: You can provide the app’s user login credentials here and need not write them separately in the test steps then. The login functionality will be taken care of automatically using the keyword
login. - OS and Browser: Choose the OS Browser combination on which you want to run the test cases.
- Number of test cases to generate using AI: If you wish, you can choose to generate test cases based on the App Description text, which works on generative AI.
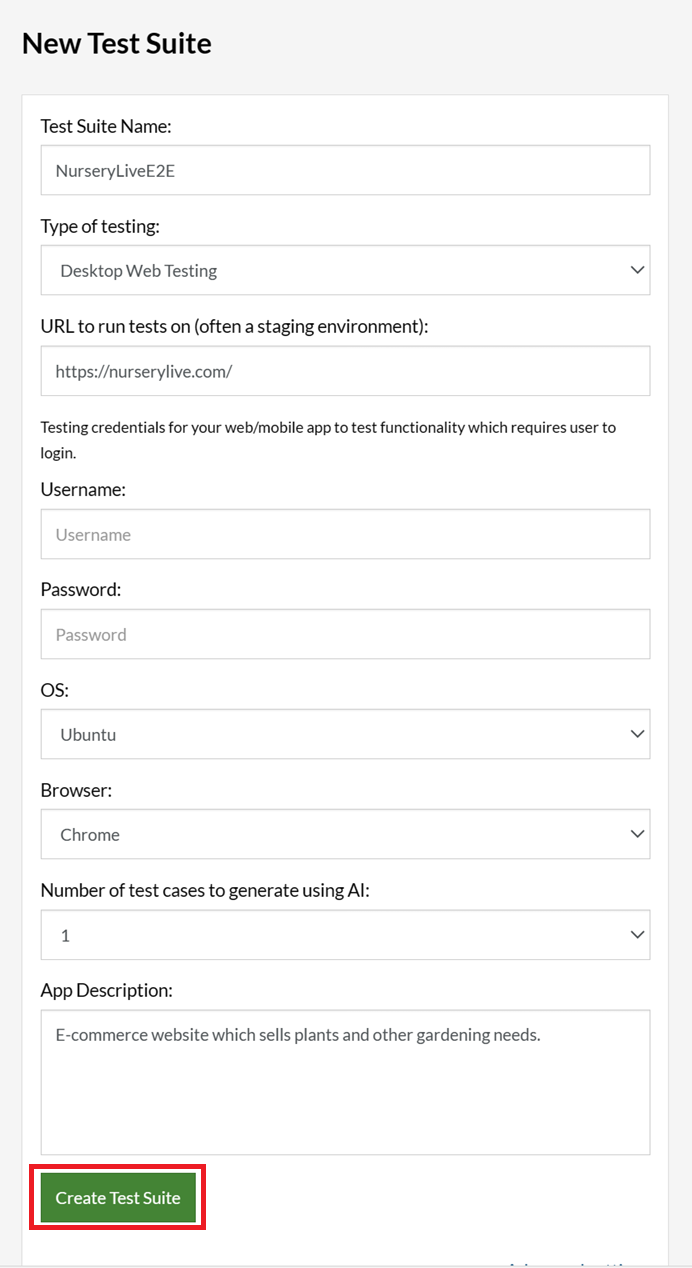
Step 3: Click Create Test Suite.
On the next screen, you can let AI generate the test case based on the App Description you provided during the Test Suite creation. However, for now, select do not generate any test, since we will write the test steps ourselves.
Step 4: To create a new custom test case yourself, click Add Custom Test Case.

Step 5: Provide the test case Description and start adding the test steps.
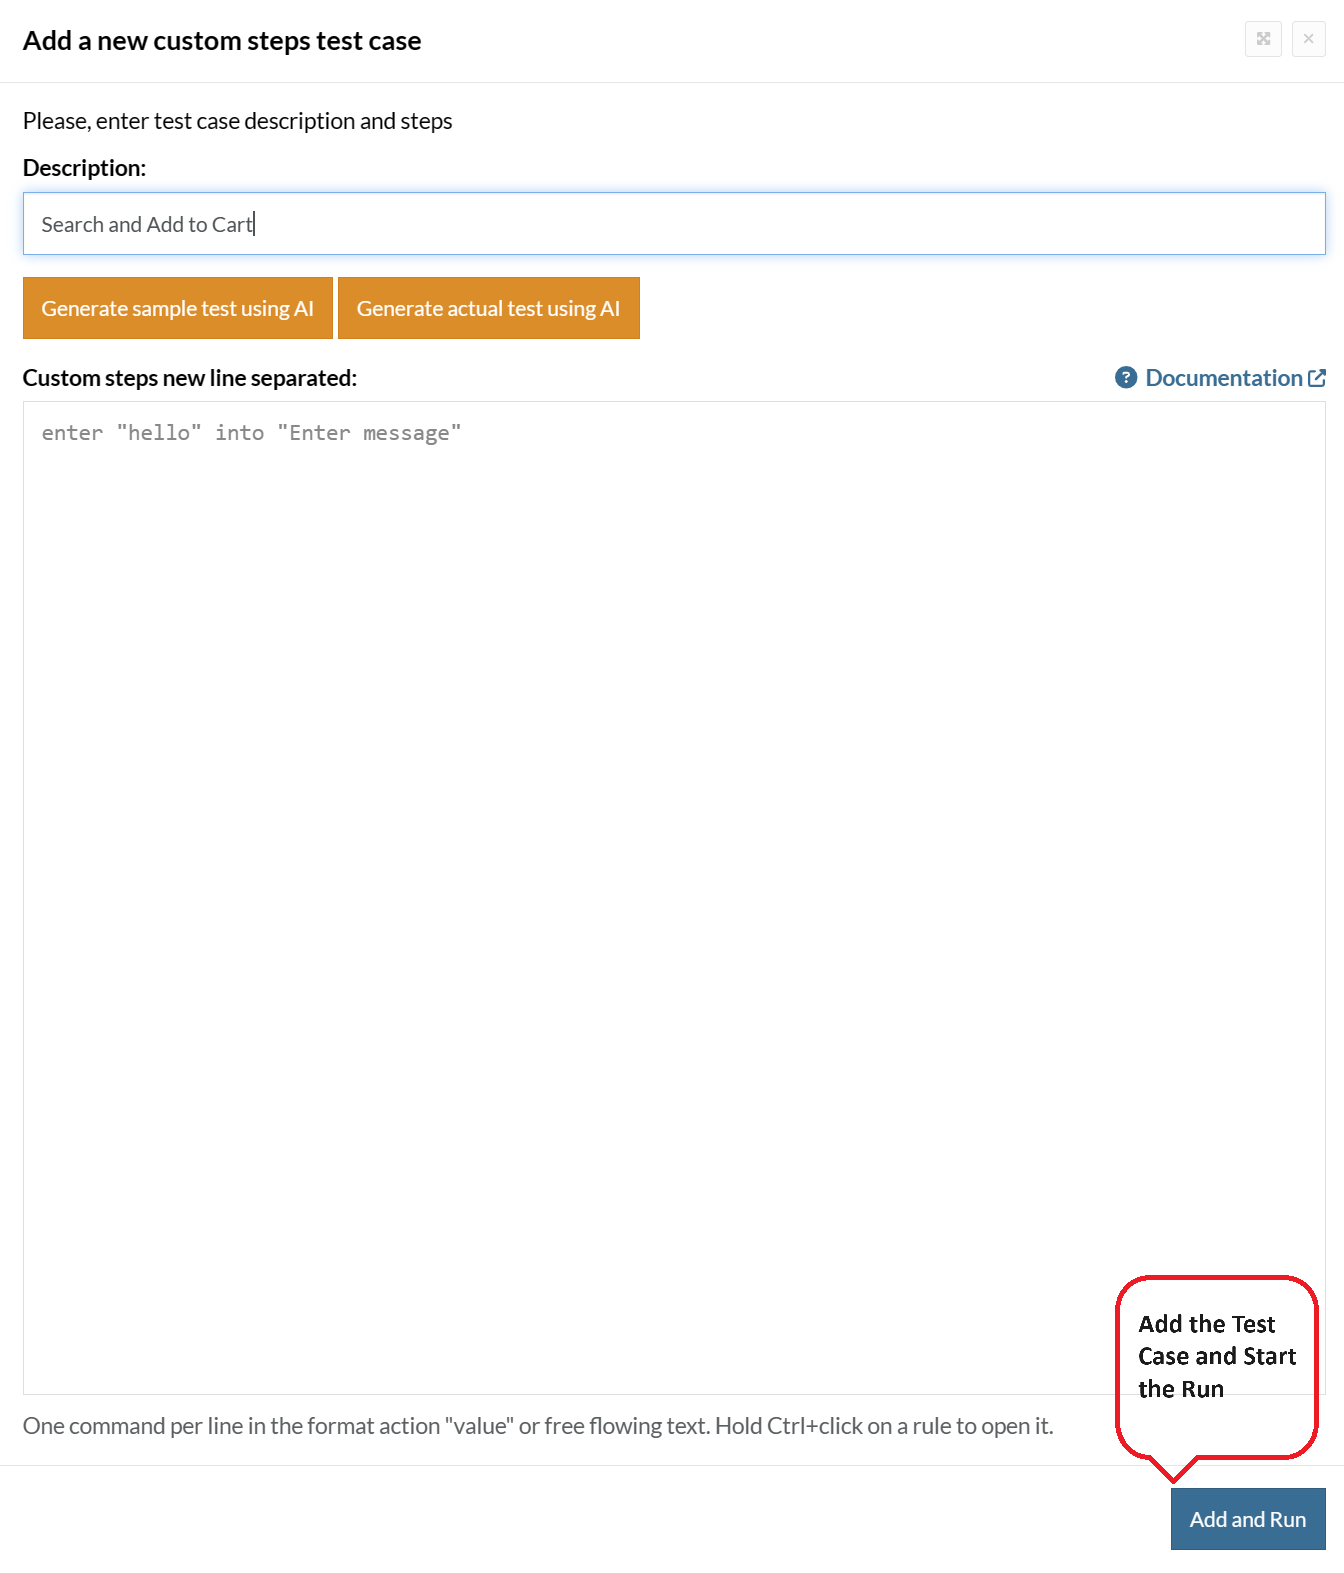
For the application under test, i.e., e-commerce website, we will perform below test steps:
- Search for a product
- Add it to the cart
- Verify that the product is present in the cart
Test Case: Search and Add to Cart
Step 1: We will add test steps on the test case editor screen one by one.
testRigor automatically navigates to the website URL you provided during the Test Suite creation. There is no need to use any separate function for it. Here is the website homepage, which we intend to test.

First, we want to search for a product in the search box. Unlike traditional testing tools, you can identify the UI element using the text you see on the screen. You need not use any CSS/XPath identifiers.
click "What are you looking for?"
Step 2: Once the cursor is in the search box, we will type the product name (lily), and press enter to start the search.
type "lily"
enter enter
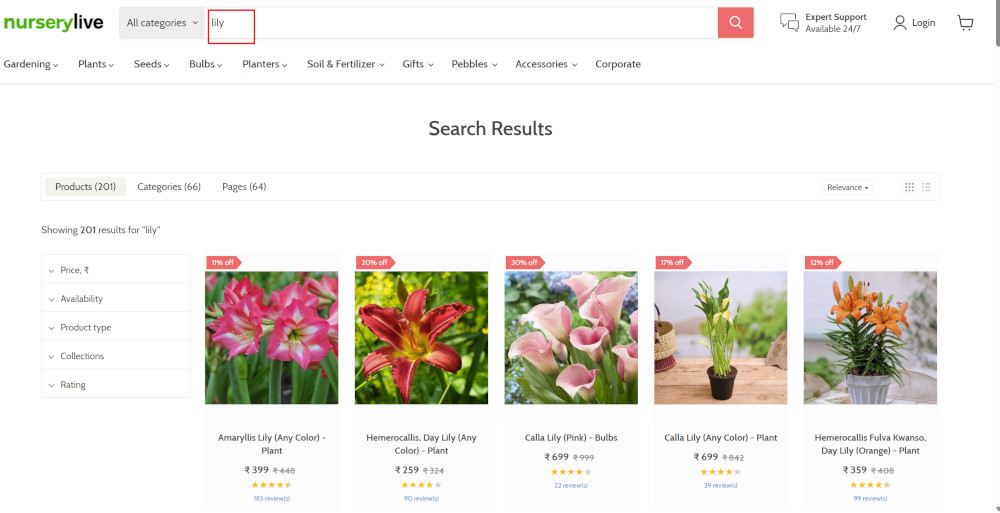
Search lists all products with the “lily” keyword on the webpage.
Step 3: The lily plant we are searching for needs the screen to be scrolled; for that testRigor provides a command. Scroll down until the product is present on the screen:
scroll down until page contains "Zephyranthes Lily, Rain Lily (Red)"
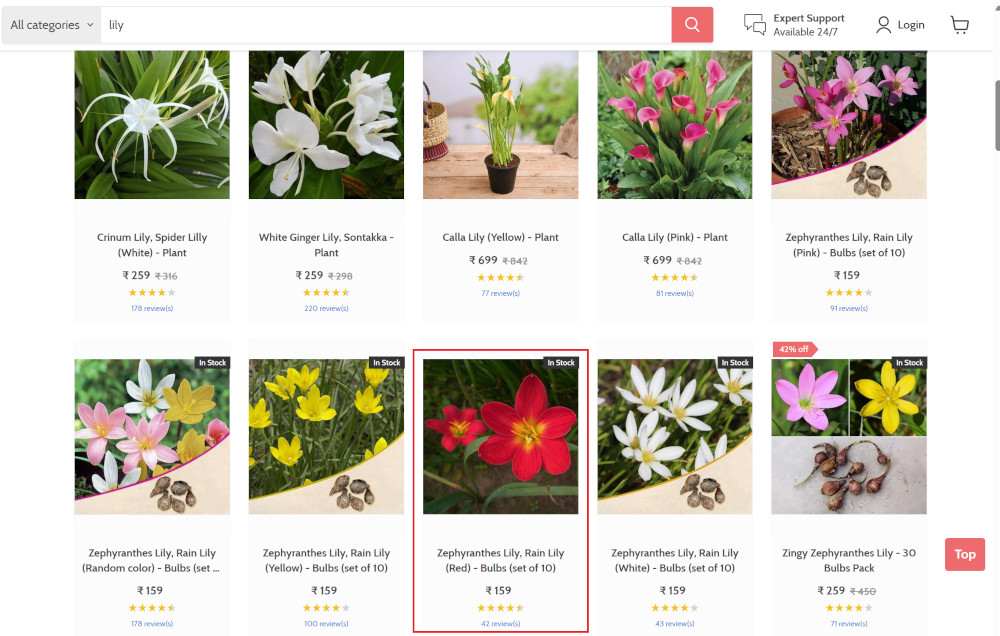
When the product is found on the screen, testRigor stops scrolling.
Step 4: Click on the product name to view the details:
click "Zephyranthes Lily, Rain Lily (Red)"
After the click, the product details are displayed on the screen as below, with the default Quantity as 1.
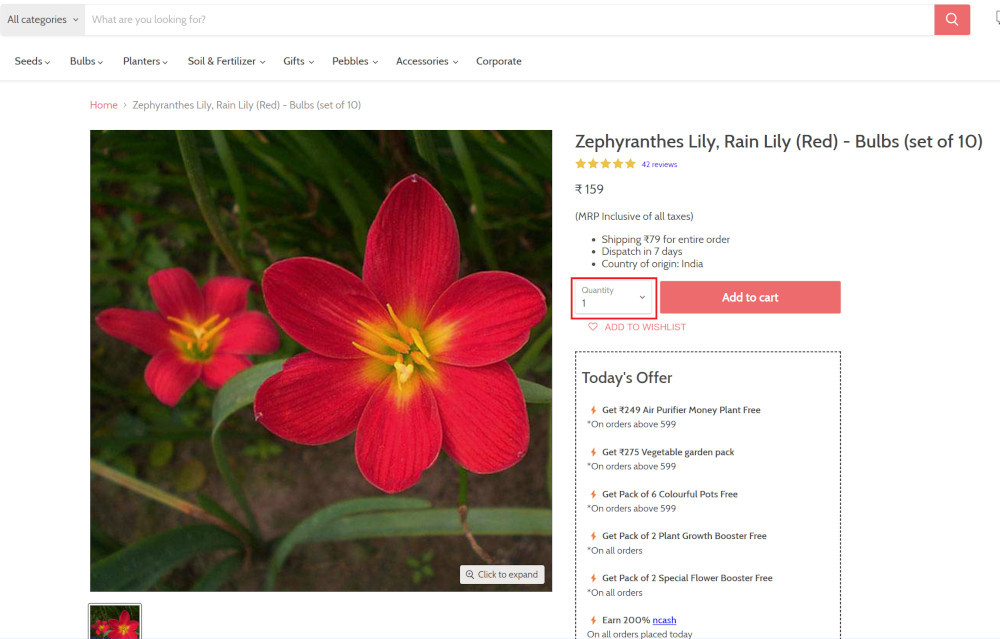
Step 5: Lets say, we want to change the Quantity to 3, so here we use the testRigor command to select from a list.
select "3" from "Quantity"
click "Add to cart"
The product is successfully added to the cart, and the “Added to your cart:” message is displayed on webpage.
Step 6: To assert that the message is successfully displayed, use a simple assertion command as below:
check that page contains "Added to your cart:"
Step 7: After this check, we will view the contents of the cart by clicking View cart as below:
click "View cart"

Step 8: Now we will again check that the product is present in the cart, under heading “Your cart” using the below assertion. With testRigor, it is really easy to specify the location of an element on the screen.
check that page contains "Zephyranthes Lily, Rain Lily (Red)" under "Your cart"

Complete Test Case
Here is how the complete test case will look in the testRigor app. The test steps are simple in plain English, enabling everyone in your team to write and execute them.
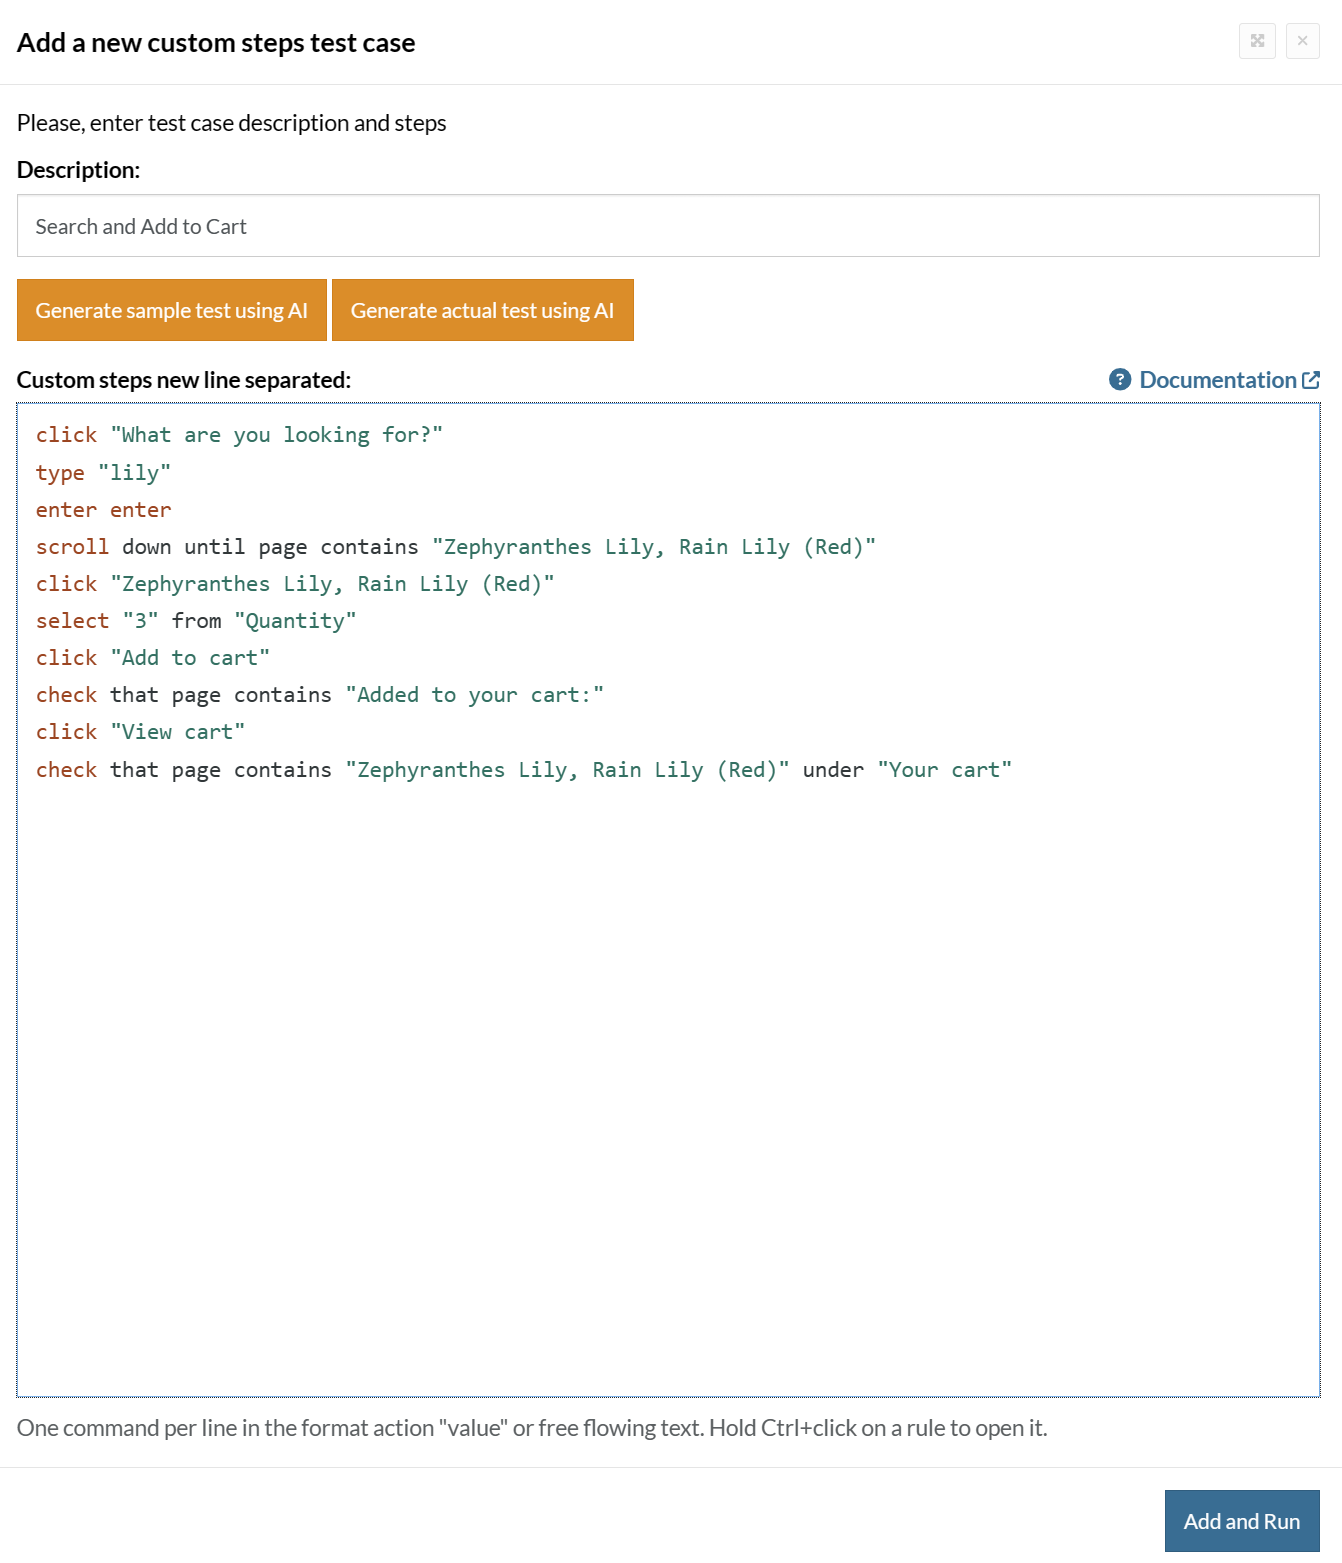
Click Add and Run.
Execution Results
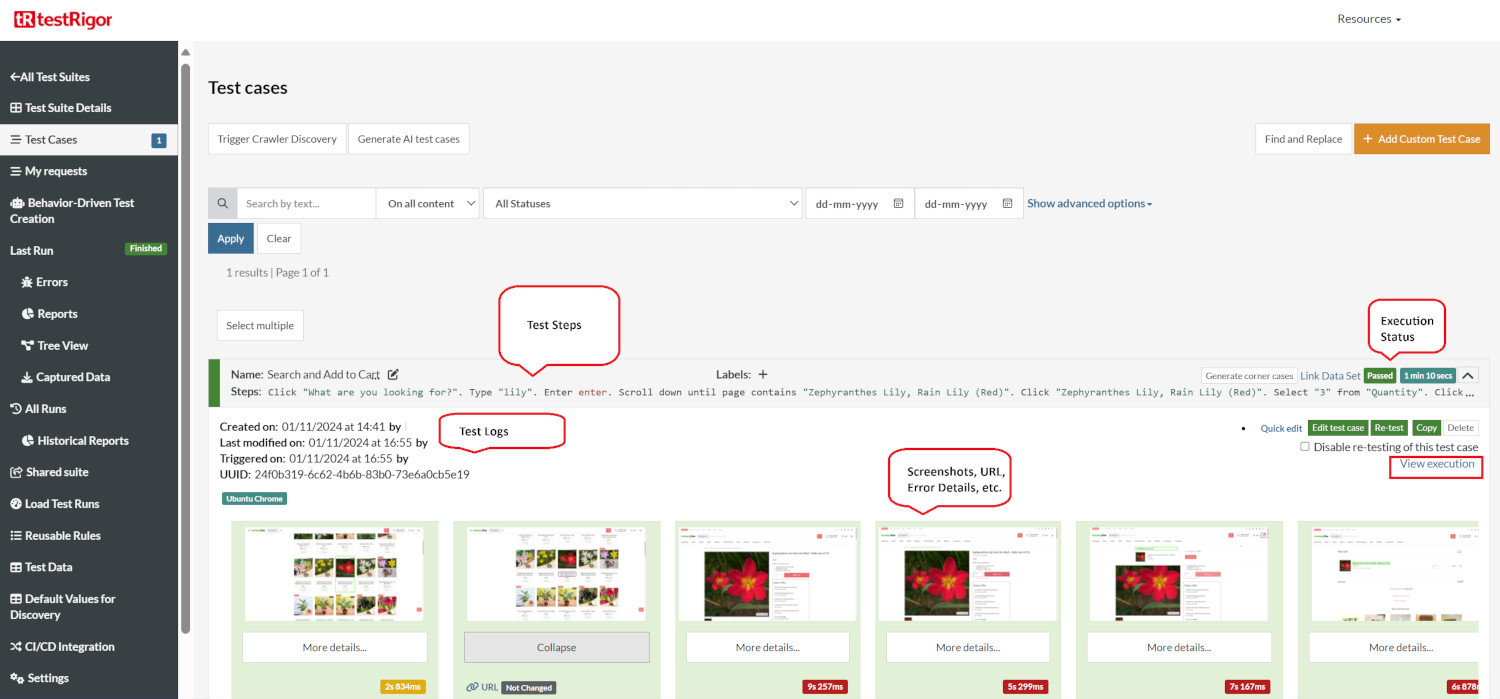
Once the test is executed, you can view the execution details, such as execution status, time spent in execution, screenshots, error messages, logs, video recordings of the test execution, etc. In case of any failure, there are logs and error text that are available easily in a few clicks.
You can also download the complete execution with steps and screenshots in PDF or Word format through the View Execution option.
testRigor’s Capabilities
Apart from the simplistic test case design and execution, there are some advanced features that help you test your application using simple English commands.
- Reusable Rules (Subroutines): You can easily create functions for the test steps that you use repeatedly. You can use the Reusable Rules to create such functions and call them in test cases by simply writing their names. See the example of Reusable Rules.
- Global Variables and Data Sets: You can import data from external files or create your own global variables and data sets in testRigor to use them in data-driven testing.
- 2FA, QR Code, and Captcha Resolution: testRigor easily manages the 2FA, QR Code, and Captcha resolution through its simple English commands.
- Email, Phone Call, and SMS Testing: Use simple English commands to test the email, phone calls, and SMS. These commands are useful for validating 2FA scenarios, with OTPs and authentication codes being sent to email, phone calls, or via phone text.
- File Upload/ Download Testing: Execute the test steps involving file download or file upload without the requirement of any third-party software. You can also validate the contents of the files using testRigor’s simple English commands.
- Database Testing: Execute database queries and validate the results fetched.
testRigor enables you to test web, mobile (hybrid, native), API, and desktop apps with minimum effort and maintenance.
Additional Resources
- Access testRigor documentation to know about more useful capabilities
- Top testRigor’s features
- How to perform end-to-end testing
Conclusion
Having a series of tests described above will help you deliver high-quality applications in the market. There are many options available for you to choose from when it comes to testing frameworks. However, considering your requirements will be the best step to picking a set of tools that work best for you.
| Achieve More Than 90% Test Automation | |
| Step by Step Walkthroughs and Help | |
| 14 Day Free Trial, Cancel Anytime |


