Padrino Testing

Padrino is a lightweight web framework for Ruby based on Sinatra. Padrino aims to provide a full-stack web framework with a modular and agnostic design. It is designed to be easy to use, flexible, and powerful, and it is built with the same principles as Sinatra, but with additional features and functionality.
Some of the key features of Padrino include support for multiple ORM/ODM libraries, routing, controllers, and views, as well as support for plugins, generators, and various helpers. It also provides a robust command-line interface for generating and managing applications and has built-in support for testing, security, and internationalization.
Web applications developed using Padrino can be tested using different tools since Padrino can easily integrate with different frameworks. However, in this post, we will look at the most widely used tools for testing Padrino, including those that are mentioned as defaults by the framework.
Unit Testing
According to the testing pyramid, your application should incorporate tests for each code unit, such as methods, functions, and classes. These tests primarily focus on whether the method's output is correct, given a specific set of parameters or conditions. Unit tests are intended to be granular and lightweight, with all dependencies being mocked. It's important to write tests that account for both positive and negative outcomes when creating these tests. Now, let's explore some of the available options for performing unit testing.
Using generators to create basic tests
In Padrino, generators are a set of command line tools that automate the creation of various parts of a Padrino application. They are similar to Rails generators in providing a convenient way to scaffold a new Padrino application and generate controllers, models, views, and other components. Generators in Padrino are implemented using the Thor gem, which is a toolkit for building command-line interfaces.
When you create a new Padrino application using the Padrino command line tool, you can specify which generators to use by passing the --app option. The reason for mentioning this here is that you can also tell Padrino to create basic tests for your components using the generators. You can mention different flags in the command to do this. Thus, you can create tests for controllers, models, mailers, helpers, and migrations using generators. Note that this approach only creates basic skeletal test cases under the test directory. To ensure that you have a robust testing suite, use other libraries and tools that aid in testing, like those mentioned below, to create a more comprehensive suite.
Testing using Minitest
Minitest is a lightweight testing framework for Ruby that is designed to be fast, easy to use, and extensible. It provides a simple API for writing and running tests, and it can be used to write a wide range of tests, including unit, integration, and acceptance tests. Minitest provides a simple API for writing unit tests, including methods like assert, assert_equal, assert_in_delta, and many others. One of the strengths of Minitest is its flexibility. It is designed to be easy to extend, so you can customize it to meet your specific testing needs.
require "minitest/test"

class TestSample < Minitest::Test
  def setup
    @sample = Sample.new
  end

  def test_are_you_an_employee
    assert_equal("Yes", @sample.are_you_an_employee?)
  end

  def test_is_it_your_birthday
    refute_match(/^no/i, @sample.is_it_your_birthday?)
  end

  def test_that_will_be_skipped
    skip("test this later")
  end
end
You can also use Minitest::Spec, which is a behavior-driven development (BDD) style of testing. It allows you to write tests that describe the behavior of your application. In this style, you define tests using the "describe", "it", and "assert" keywords. This style is useful when writing more descriptive and expressive tests. Minitest Spec is a more explicit syntax that provides an alternative way of writing tests. Both Minitest Test and Minitest Spec can be used for testing, and the choice between them largely depends on personal preference and the project's needs.
require "minitest/autorun"

describe Sample do
  before do
    @sample = Sample.new
  end

  describe "when asked employment status" do
    it "must respond positively" do
      _(@sample.are_you_an_employee?).must_equal "Yes"
    end
  end

  describe "when asked about birthday" do
    it "won't say no" do
      _(@sample.is_it_your_birthday?).wont_match /^no/i
    end
  end
end
Testing using Shoulda
Shoulda provides a collection of RSpec-style matchers and macros for testing common Padrino functionality. It simplifies the process of writing tests by allowing developers to use a more expressive syntax that can be easily read and understood. It also provides some useful helper methods to write concise, easy-to-read tests for models, controllers, and views. Shoulda is a meta gem and uses behaviors of Shoulda Context and Shoulda Matchers.
require_relative '../test_config'
require 'shoulda/matchers'

class UserTest < MiniTest::Test

  context "associations" do
    should have_many(:posts)
  end

  context "validations" do
    should validate_presence_of(:email)
    should allow_value("[email protected]").for(:email)
    should_not allow_value("not-an-email").for(:email)
  end

  context "#name" do
    should "consist of first and last name" do
      user = User.new(first_name: "John", last_name: "Smith")
      assert_equal "John Smith", user.name
    end
  end
end
Testing using Test::Unit
Test::Unit is a testing framework that is included with Ruby. It provides a simple and lightweight way to write and run unit tests in Ruby. Test::Unit was originally based on the xUnit testing framework family, which includes frameworks like JUnit (for Java) and NUnit (for .NET).
Test::Unit allows you to define test cases by creating classes that inherit from Test::Unit::TestCase. You can then define test methods inside these classes, using a naming convention of test_something (where "something" is a description of what you're testing). Test::Unit provides a number of assertion methods that you can use to test your code. These include methods like assert, assert_equal, assert_in_delta, and many others. You can also use setup and teardown methods to set up and clean up any test data that you need.
require 'test/unit'

class TestArray < Test::Unit::TestCase
  def test_array_can_be_created_with_no_arguments
    assert_instance_of Array, Array.new
  end

  def test_array_of_specific_length_can_be_created
    assert_equal 20, Array.new(20).size
  end
end
Testing using Bacon
Bacon is a small and lightweight clone of RSpec for Ruby that is often used in combination with Padrino. Tests are defined using the should method, which describes what the test is checking, and a block containing the code to be tested.
require 'bacon'

describe 'A new array' do
  before do
    @ary = Array.new
  end

  it 'should be empty' do
    @ary.should.be.empty
    @ary.should.not.include 1
  end
Testing using Rack::Test
Padrino supports Rack::Test, a testing library that provides a simple API for making HTTP requests to your application and testing the responses. Rack::Test is built on top of Rack, the underlying web server interface used by Padrino, making it an excellent choice for testing Padrino applications.
Testing using RSpec
RSpec is a popular testing framework for Ruby that provides a domain-specific language (DSL) for writing tests. To use RSpec with Padrino, you will need to add the rspec and rspec-core gems to your Gemfile, and run bundle install to install them. Once you have the gems installed, you can create a spec directory in the root of your Padrino application, and create spec files for your models, controllers, and other application components. The padrino-rspec gem provides support for Padrino-specific features such as controllers, routes, and views in RSpec tests.
Integration Testing
An application comprises different modules working together. Ensuring that they do so in harmony is achieved using integration testing. This type of testing focuses on areas where integrations are done between different modules, databases, file systems, network systems, APIs, helpers, and UI components. These tests utilize some degree of mocking, although not entirely. If you are going to check the integration of an API and the database, then you do not need to mock these two; but instead you can mock other aspects of the code like user inputs and business logic.
Tools for integration testing
You can write integration tests using the same tools used for unit testing, like MiniTest, Bacon, Test::Unit, Rack::Test, RSpec, and Shoulda, mixing them up as per your requirement. Minitest can be used with other testing tools and frameworks like Rack::Test to create integration tests. Minitest also provides a MiniTest::Mock class and a MiniTest::Stub module that can be used to mock and stub objects and methods in your tests.
Capybara for integration testing
describe "the signup process" do
  before :each do
    User.make(:email => '[email protected]', :password => 'caplin')
  end

  it "signs me in" do
    visit '/sessions/new'
    within("#session") do
      fill_in 'Login', :with => '[email protected]'
      fill_in 'Password', :with => 'password'
    end
    click_link 'Sign in'
    page.should have_content 'Success'
  end
End
End-to-End Testing
End-to-end testing forms the top of the testing pyramid. Through this form of testing, we focus on user scenarios, that is, whether the system is working as per the user's expectations and is able to satisfy those business needs. These tests comprise UI-level interactions that exercise other components internally, like APIs, helpers, databases, and network systems.
- Capybara
- Cucumber
- testRigor
Testing using Capybara
Capybara is a Ruby library that helps you simulate how a user interacts with your web application. It can be used to write acceptance tests for web applications by automating the process of simulating user actions such as clicking buttons, filling in forms, and following links. Capybara supports several popular web testing frameworks, such as Selenium and RackTest. Another gem called capybara-padrino provides integration testing support for Padrino applications using the Capybara framework.
Testing using Cucumber and Selenium
Cucumber is a popular choice for implementing BDD (Behavior Driven Development). The focus remains on automating test scenarios in understandable syntax, called Gherkin. When using Cucumber, you need to create a feature file with the Gherkin scenarios and then corresponding step definition files containing the code that will tell the system what needs to happen when encountering a particular step in a scenario.
In the below example, we will use Cucumber to outline our test case and Selenium to interact with the browser. We are interacting with a simple ToDo app to archive all the todos.
The feature file will look like this:
-
Feature: Job posting
- As an employer
- I want to post a job
- So that potential candidates can apply
-
Scenario: Posting a job
- Given I am on the home page
- When I click the "Post a Job" link
- And I fill in the job details
- And I click the "Submit" button
- Then I should see the job listed on the jobs page
require 'selenium-webdriver'

Given(/^I am on the home page$/) do
  @driver = Selenium::WebDriver.for :firefox
  @driver.navigate.to "http://localhost:3000/"
end

When(/^I click the "(.*?)" link$/) do |link_text|
  element = @driver.find_element(:link_text, link_text)
  element.click
end

When(/^I fill in the job details$/) do
  @driver.find_element(:id, "job_title").send_keys "Software Engineer"
  @driver.find_element(:id, "job_description").send_keys "We are looking for a software engineer with experience in Ruby on Rails."
  @driver.find_element(:id, "job_location").send_keys "San Francisco, CA"
end

When(/^I click the "Submit" button$/) do
  @driver.find_element(:name, "commit").click
end

Then(/^I should see the job listed on the jobs page$/) do
  element = @driver.find_element(:xpath, "//td[contains(text(), 'Software Engineer')]")
  expect(element).not_to be_nil
  @driver.quit
end
testRigor for End-to-End Testing
Utilizing the tools mentioned above for end-to-end testing can produce favorable outcomes, but they may not be as user-friendly as they appear. For BDD to be effective in development, multiple teams should be able to collaborate and contribute to the creation of test cases. While Cucumber does facilitate this to a significant degree, there remains a reliance on developers or automation engineers to comprehend or modify the actual step definitions, as they are coded. Additionally, a scalable, remotely accessible tool is advantageous for expanding business operations.
Fortunately, testRigor offers a no-code, cloud-based solution for end-to-end testing. Although many BDD tools purport to allow test writing using the Gherkin language, it can be inflexible and challenging to articulate complex test scenarios. In contrast, testRigor employs a more straightforward syntax based on plain English. testRigor also includes visual, audio, email, and SMS testing features, as well as support for loops and reusable rules. These rules are also defined in plain English, eliminating the need for coding.
Being a cloud-based application, testRigor enables easy automation setup without the hassle of installing and configuring software, which is common with other automation tools. It supports cross-platform testing across web, mobile, and desktop platforms, covering a broad range of devices. In a nutshell, testRigor is a one-stop system for end-to-end UI automation.
login //This is a reusable rule with the username and password saved
compare screen to stored value “Home Dashboard”
check that table does not contain “Software engineer”
click “Post a Job” to the left of “My Profile”
check page contains “Job Posting”
enter “Software Engineer” in “job title”
enter stored value “Software engineer JD” in “job description”
enter “San Francisco, CA” in “job location”
click “Save”
select “Jobs Dashboard” from “More”
click on "view responses" within the context of table "Jobs Dashboard" at row containing "Software Engineer" and column "Actions"
You can see that it is quite easy to refer to table data and compare screenshots with testRigor. This is just the tip of the iceberg though. You can check out more features over here.
How to do End-to-end Testing with testRigor
Let us take the example of an e-commerce website that sells plants and other gardening needs. We will create end-to-end test cases in testRigor using plain English test steps.
Step 1: Log in to your testRigor app with your credentials.
Step 2: Set up the test suite for the website testing by providing the information below:
- Test Suite Name: Provide a relevant and self-explanatory name.
- Type of testing: Select from the following options: Desktop Web Testing, Mobile Web Testing, Native and Hybrid Mobile, based on your test requirements.
- URL to run test on: Provide the application URL that you want to test.
- Testing credentials for your web/mobile app to test functionality which requires user to login: You can provide the app’s user login credentials here and need not write them separately in the test steps then. The login functionality will be taken care of automatically using the keyword
login. - OS and Browser: Choose the OS Browser combination on which you want to run the test cases.
- Number of test cases to generate using AI: If you wish, you can choose to generate test cases based on the App Description text, which works on generative AI.
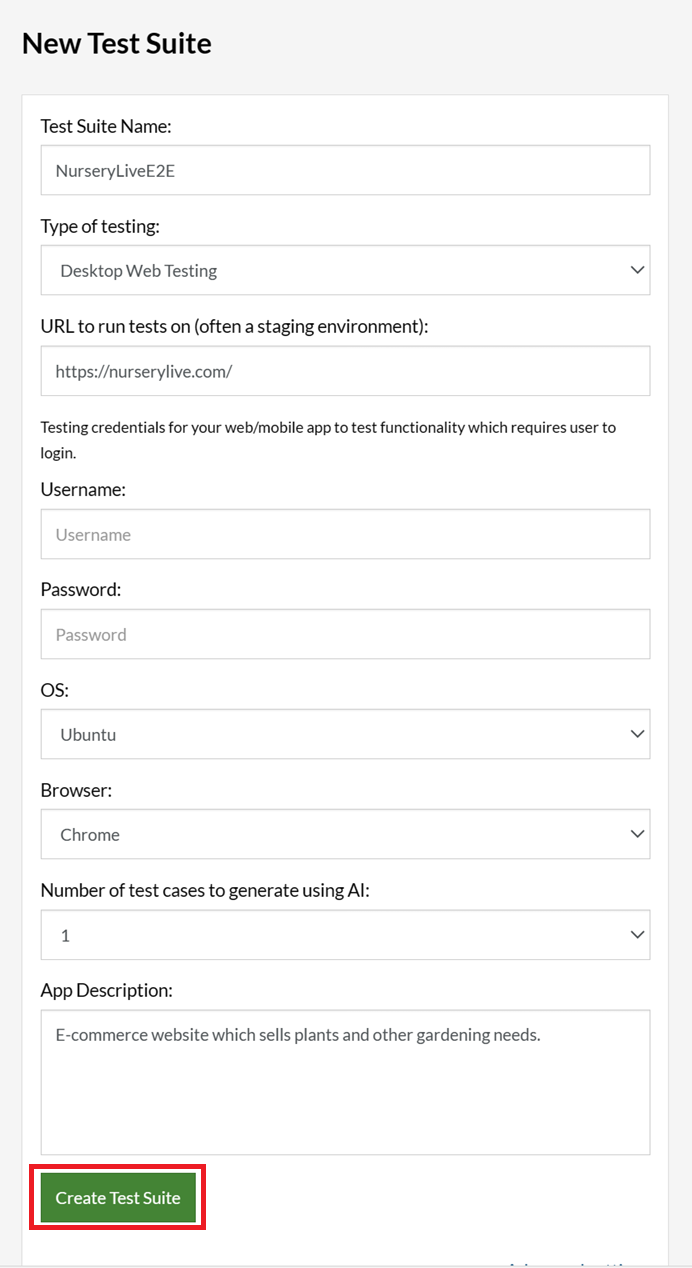
Step 3: Click Create Test Suite.
On the next screen, you can let AI generate the test case based on the App Description you provided during the Test Suite creation. However, for now, select do not generate any test, since we will write the test steps ourselves.
Step 4: To create a new custom test case yourself, click Add Custom Test Case.

Step 5: Provide the test case Description and start adding the test steps.
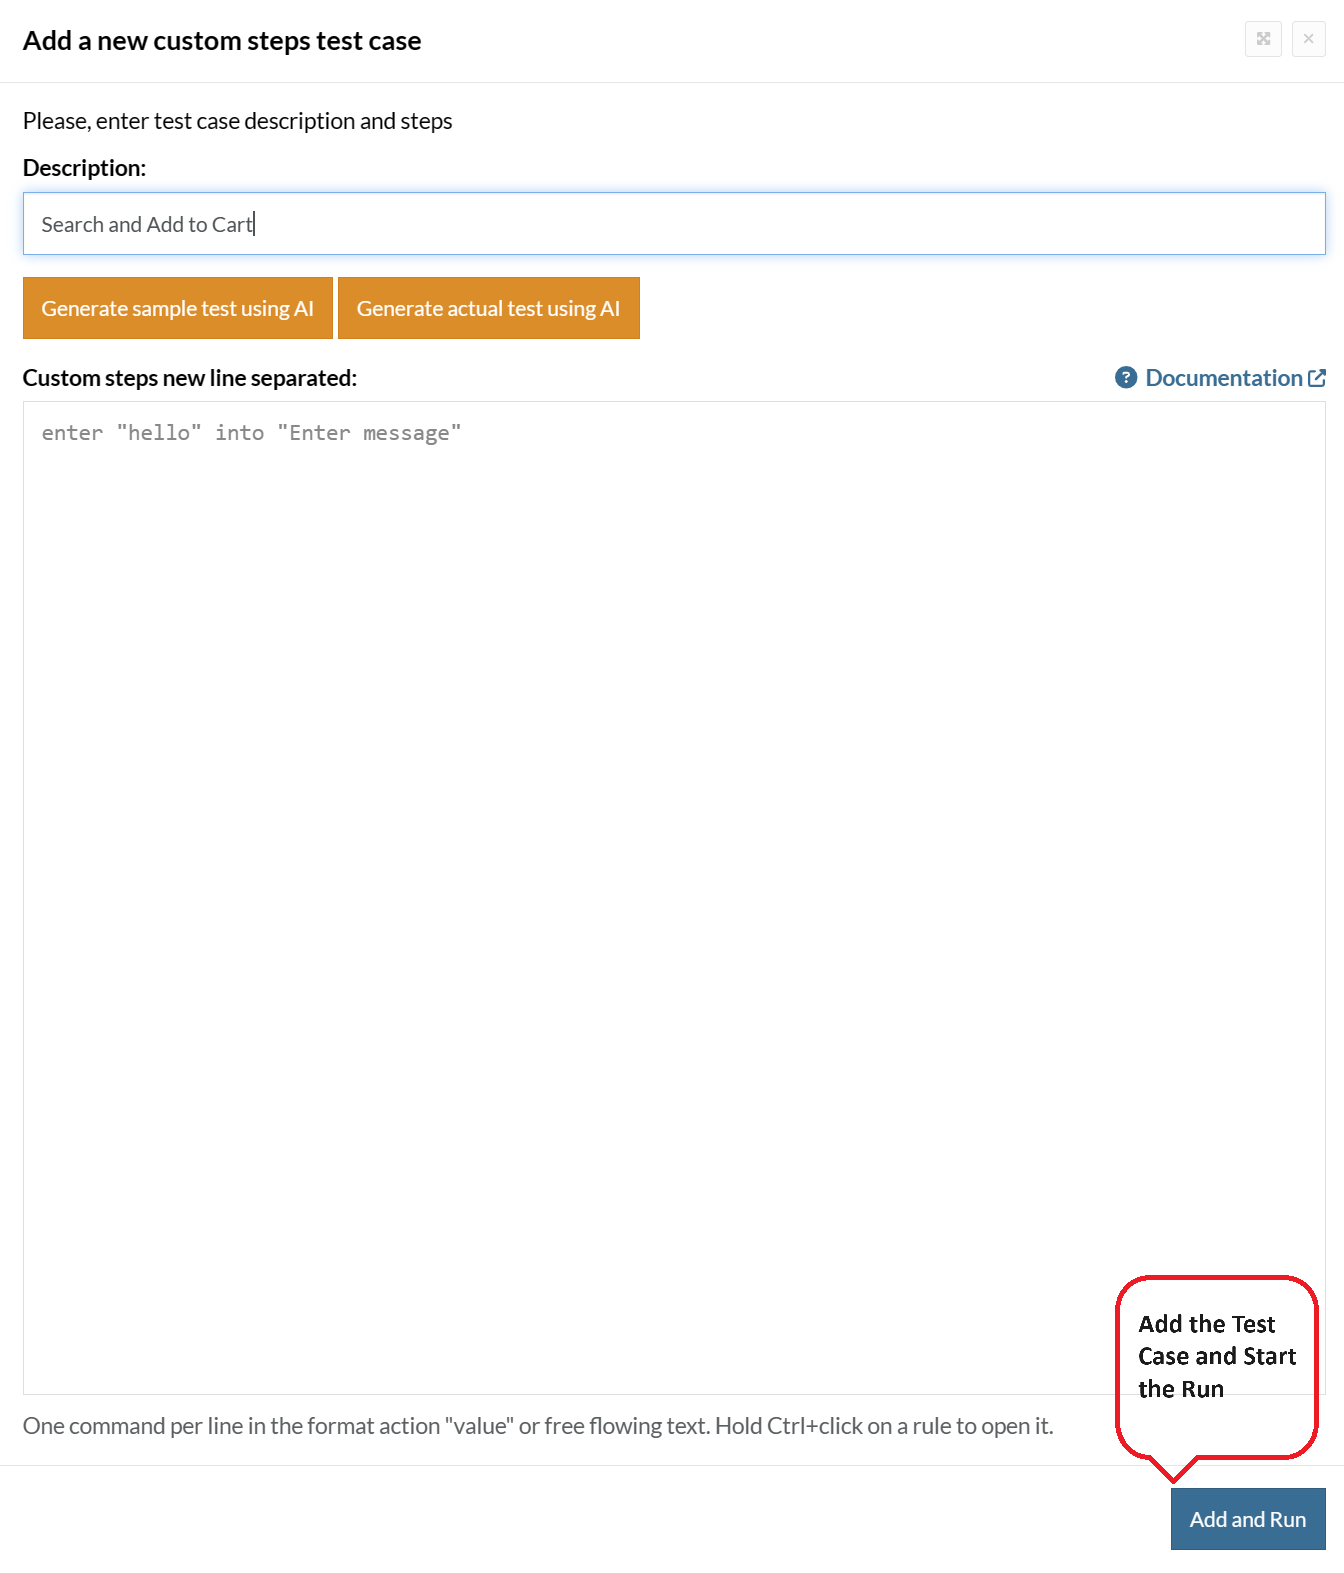
For the application under test, i.e., e-commerce website, we will perform below test steps:
- Search for a product
- Add it to the cart
- Verify that the product is present in the cart
Test Case: Search and Add to Cart
Step 1: We will add test steps on the test case editor screen one by one.
testRigor automatically navigates to the website URL you provided during the Test Suite creation. There is no need to use any separate function for it. Here is the website homepage, which we intend to test.

First, we want to search for a product in the search box. Unlike traditional testing tools, you can identify the UI element using the text you see on the screen. You need not use any CSS/XPath identifiers.
click "What are you looking for?"
Step 2: Once the cursor is in the search box, we will type the product name (lily), and press enter to start the search.
type "lily"
enter enter
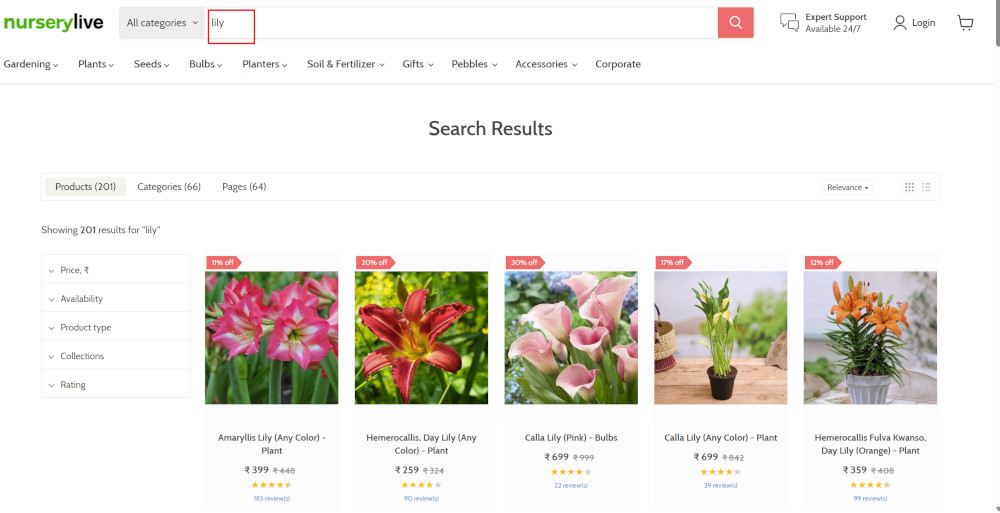
Search lists all products with the “lily” keyword on the webpage.
Step 3: The lily plant we are searching for needs the screen to be scrolled; for that testRigor provides a command. Scroll down until the product is present on the screen:
scroll down until page contains "Zephyranthes Lily, Rain Lily (Red)"
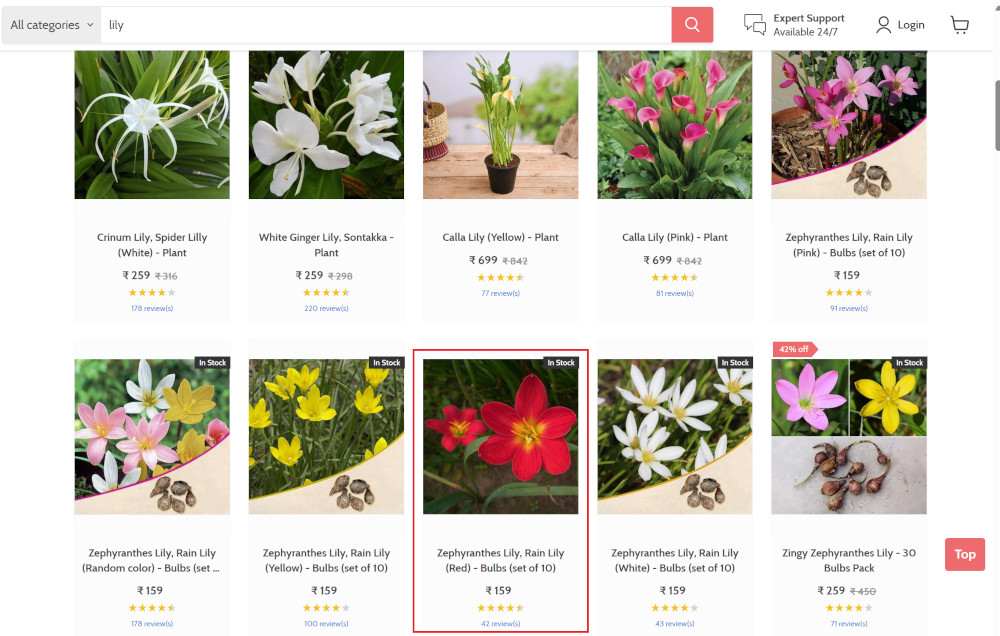
When the product is found on the screen, testRigor stops scrolling.
Step 4: Click on the product name to view the details:
click "Zephyranthes Lily, Rain Lily (Red)"
After the click, the product details are displayed on the screen as below, with the default Quantity as 1.
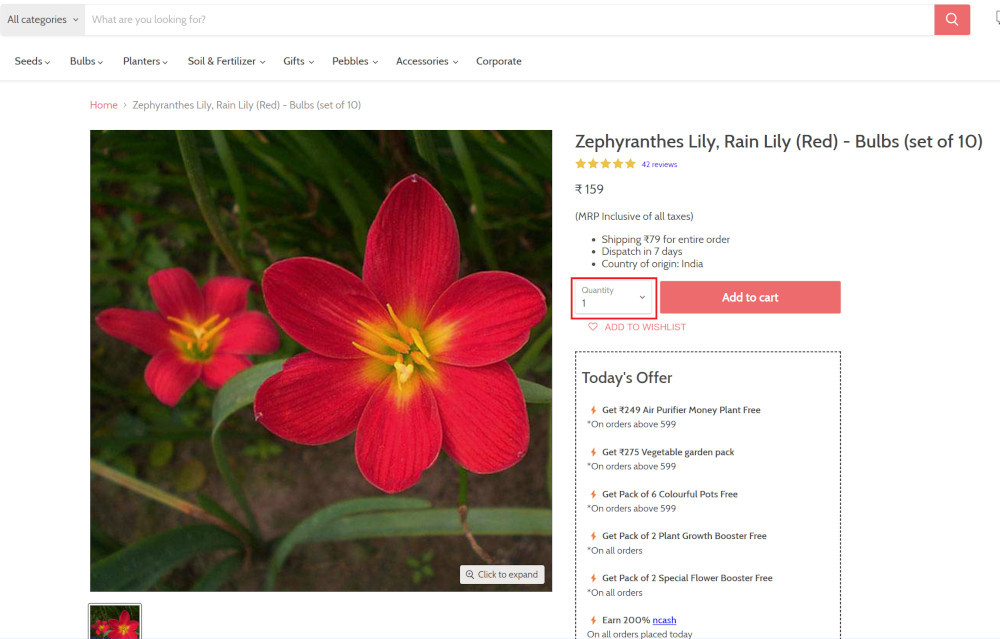
Step 5: Lets say, we want to change the Quantity to 3, so here we use the testRigor command to select from a list.
select "3" from "Quantity"
click "Add to cart"
The product is successfully added to the cart, and the “Added to your cart:” message is displayed on webpage.
Step 6: To assert that the message is successfully displayed, use a simple assertion command as below:
check that page contains "Added to your cart:"
Step 7: After this check, we will view the contents of the cart by clicking View cart as below:
click "View cart"

Step 8: Now we will again check that the product is present in the cart, under heading “Your cart” using the below assertion. With testRigor, it is really easy to specify the location of an element on the screen.
check that page contains "Zephyranthes Lily, Rain Lily (Red)" under "Your cart"

Complete Test Case
Here is how the complete test case will look in the testRigor app. The test steps are simple in plain English, enabling everyone in your team to write and execute them.
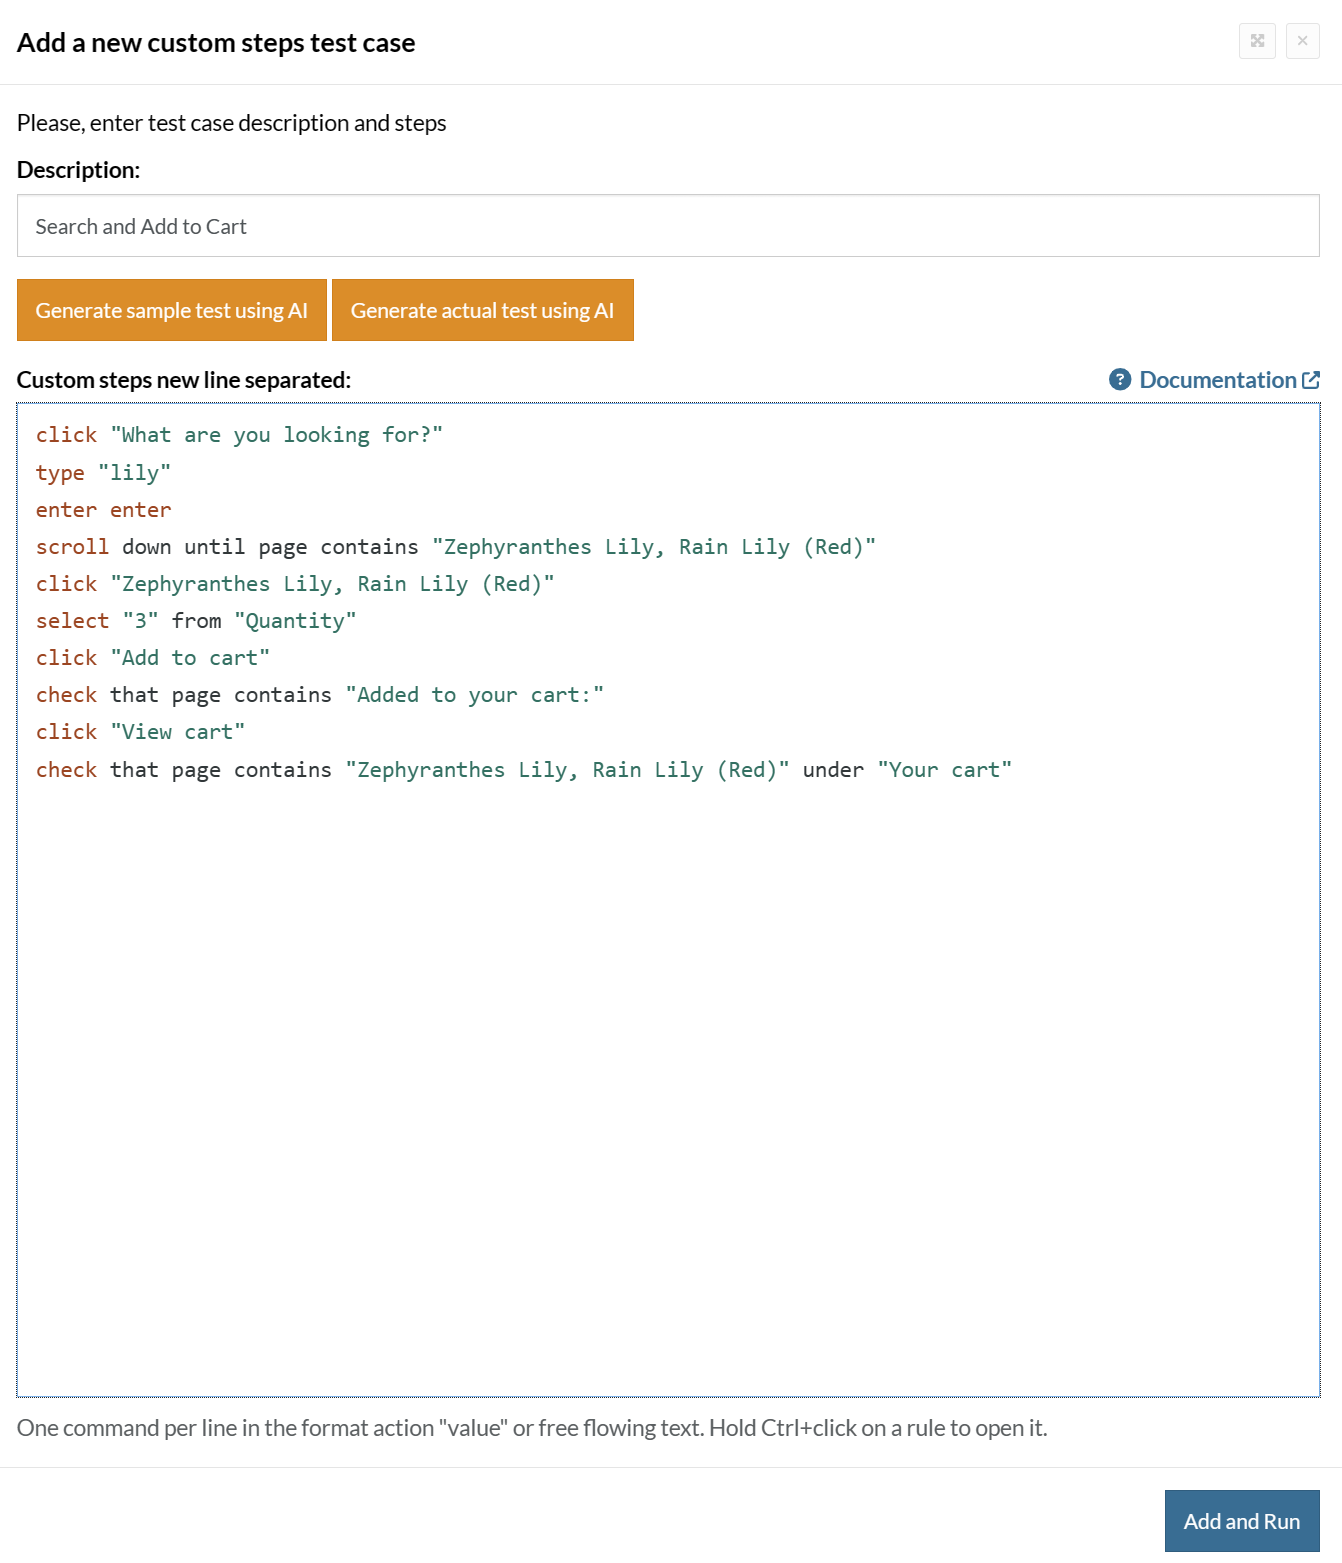
Click Add and Run.
Execution Results
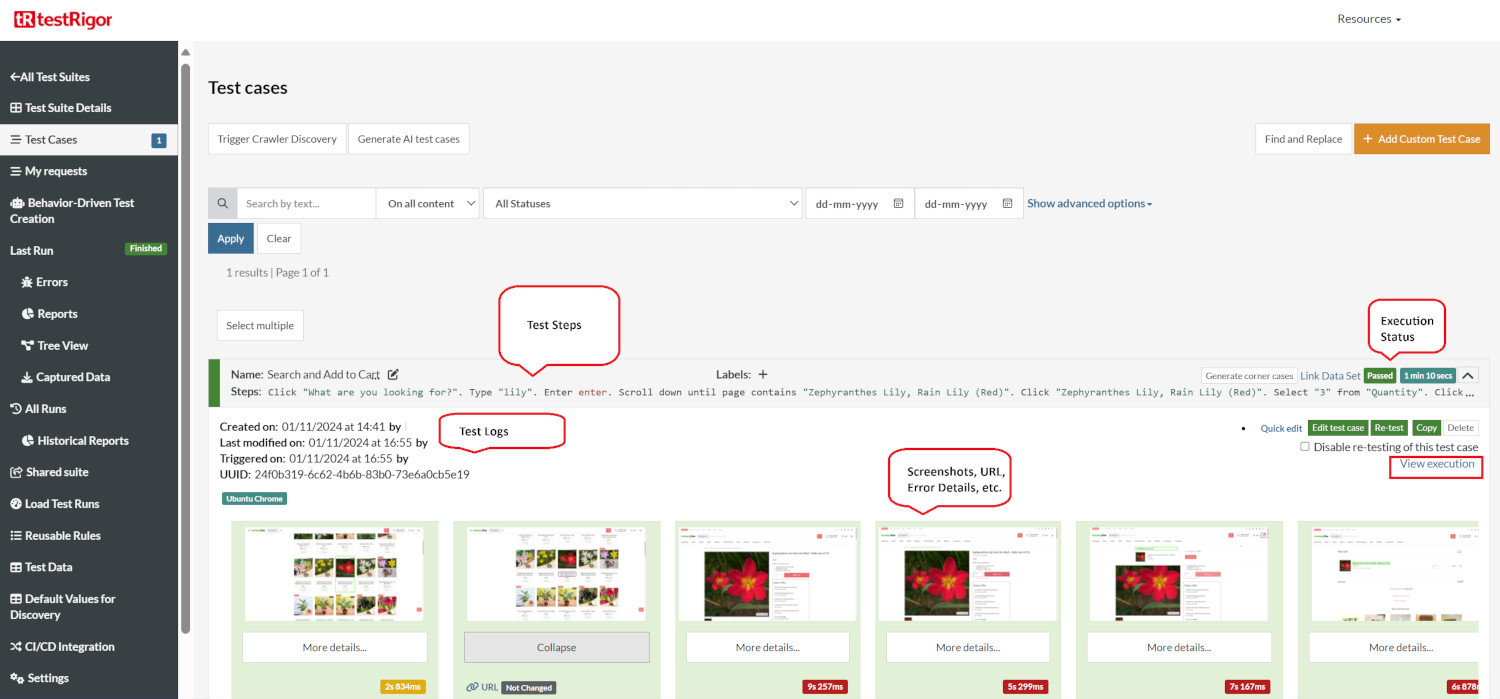
Once the test is executed, you can view the execution details, such as execution status, time spent in execution, screenshots, error messages, logs, video recordings of the test execution, etc. In case of any failure, there are logs and error text that are available easily in a few clicks.
You can also download the complete execution with steps and screenshots in PDF or Word format through the View Execution option.
testRigor’s Capabilities
Apart from the simplistic test case design and execution, there are some advanced features that help you test your application using simple English commands.
- Reusable Rules (Subroutines): You can easily create functions for the test steps that you use repeatedly. You can use the Reusable Rules to create such functions and call them in test cases by simply writing their names. See the example of Reusable Rules.
- Global Variables and Data Sets: You can import data from external files or create your own global variables and data sets in testRigor to use them in data-driven testing.
- 2FA, QR Code, and Captcha Resolution: testRigor easily manages the 2FA, QR Code, and Captcha resolution through its simple English commands.
- Email, Phone Call, and SMS Testing: Use simple English commands to test the email, phone calls, and SMS. These commands are useful for validating 2FA scenarios, with OTPs and authentication codes being sent to email, phone calls, or via phone text.
- File Upload/ Download Testing: Execute the test steps involving file download or file upload without the requirement of any third-party software. You can also validate the contents of the files using testRigor’s simple English commands.
- Database Testing: Execute database queries and validate the results fetched.
testRigor enables you to test web, mobile (hybrid, native), API, and desktop apps with minimum effort and maintenance.
Additional Resources
- Access testRigor documentation to know about more useful capabilities
- Top testRigor’s features
- How to perform end-to-end testing
Conclusion
This post mentions tools that are mostly used to test Padrino applications and will help you create a solid testing pyramid. Choosing a testing tool majorly depends on your requirements for the tool. This in fact is also applicable to your choice of a development tool. It is always better to keep those in mind before committing to any framework or tool.
| Achieve More Than 90% Test Automation | |
| Step by Step Walkthroughs and Help | |
| 14 Day Free Trial, Cancel Anytime |


