Cucumber JS with Selenium
|
|
Using a BDD(Behavior Driven Development) framework in QA automation is a questionable approach, although not an uncommon one. Today we’d like to talk about use cases for Cucumber.js framework and its pros and cons when used with Selenium.
First of all, let’s briefly discuss the Selenium Webdriver testing tool.
What is Selenium?
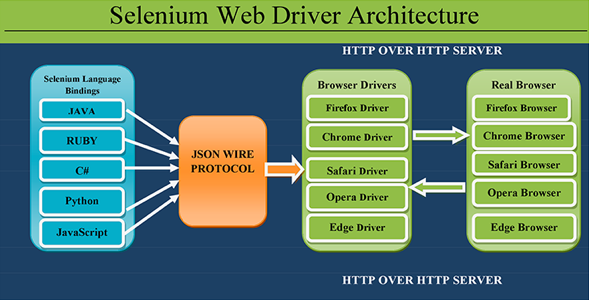
An open-source, cross-platform automation testing tool that lets us write automated tests in many programming languages, including JavaScript, Java, Python, Perl, etc., and run them against various web browsers, not limited to Chrome and Firefox.
Selenium WebDriver is a programming interface that enables us to interact with dynamic web pages and their elements for UI automation.
The common gold standard is writing our Selenium code using a POM (Page Object Model) approach. This is where a test engineer has the power to do anything by navigating through multiple web pages and interacting and performing actions on various web elements on those pages.
To enhance code maintenance and reliability, we tend to use POM for maintaining specific web elements and their actions for a particular web page inside a particular JS file. For example: consider the below page object file for “user-login.js.”
module.exports = {
  url: 'https://www.bing.com',

  // WebElement Locators
  elements: {
    emailInput: by.name('email'),
    nextButton: by.css('div > label > button')
  },

  // Actions on WebElements
  navigateToNextPage: function () {
    var selector = page.userLogin.elements.nextButton;
    return driver.findElement(selector).sendKeys(selenium.Key.ENTER);
  }
};
What are Web Elements in DOM?
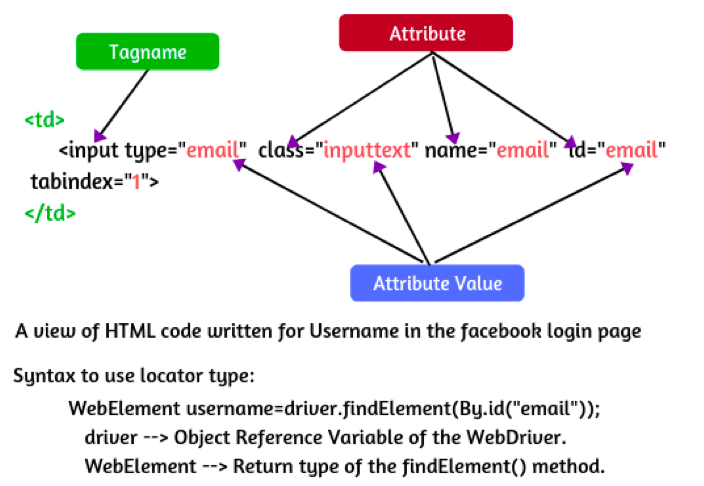
We can get every element you see on the web page using Selenium locators. Locators are a way to identify HTML elements present on a web page, and they act as building blocks for every automation script created using UI automation tools such as Selenium. We can uniquely identify web elements (text boxes, buttons, dropdowns, etc.) and perform user actions like clicking, entering text, hovering, selecting dropdown values, and checking radio buttons. Selenium makes use of these locators to interact with web elements.

Web Element Operations
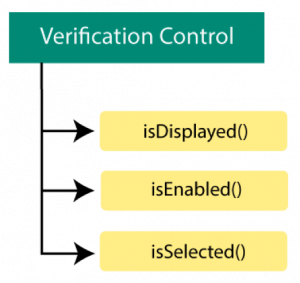
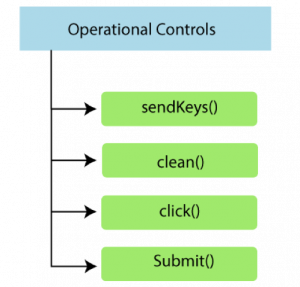
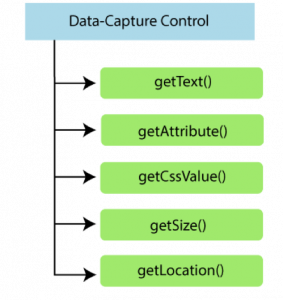
There are various web element operations, including but not limited to verification control, operational control, and data-capture control functions, that can be performed using Selenium Javascript to automate any test scenario.
What is Cucumber JS?
A software tool that works on the BDD(Behavior Driven Development) approach, which is used to write tests in a way to encourage increased collaboration between various stakeholders, including developers, testers, analysts, product managers, and business people. It adds a layer of shared understanding on top of your Selenium JS code for performing test automation.
In BDD style, we first discover the feature or user story that needs to be automated and write its specifications using the Gherkin language, where the Given-When-Then approach is used for writing test cases. Cucumber validates if the software behaves as per those specifications. These specifications contain multiple scenarios.
Cucumber automation process:
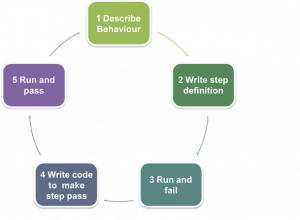
- Discovery – tester discovers he needs to automate the user login page on a website.
- Formulation – tester writes software specification steps in a feature file on what needs to be automated and how.
- Automation – tester writes step definitions in Javascript to test the system behavior. It includes your code to make your steps pass.
Feature file
A business readable file that lets you describe software’s behavior.
Feature Files Nomenclature
# Feature: Single file, ideally describing a single feature
# Scenario: A test case
# Given-When-Then: Test Preconditions, Execution, and Postconditions
# And: Additional test constructs
Example: user_login.feature
Feature: Automating a user login screen
Scenario: Google search for vote cards app
Given Launch the site URL
When Login using your website credentials
Then User navigates to the home page
Next, we write a step definition file – acting as a glue between your feature file and the software under test, where you write your Selenium Javascript code on how to implement each step.
Example: login_steps.js
Given('Launch the site url', function() {

    // sample JS code to get an understanding
    return this.driver.get('https://your-website-url.com');
  });

  When('Login using your-website credentials', function () {

    // sample JS code to get an understanding
    this.driver.findElement(webdriver.By.id("email")).sendKeys("[email protected]");
    this.driver.findElement(webdriver.By.id("password")).sendKeys("sample_password");
    return this.driver.findElement(webdriver.By.id("next-button")).click();
  });

  Then('User navigates to the home page', function() {

    // your JS code to navigate to your webpage
  });
}
Benefits of Cucumber JS in BDD
As you can see, Gherkin syntax with the Given-When-Then approach has its indisputable benefits. It is a domain-specific language made for Cucumber, filling the gap between business people and testers by promoting readability.
The other benefit of Gherkin is that it has some extra perks. Suppose you need to automate authorization for two different APIs. Your first thought might be to write two scenarios for each API with the same steps. However, that isn’t needed – since Gherkin offers a “Scenario Outline” with an “Examples” table to overcome that redundant situation.
Example: api-authorization.feature
Scenario Outline: Verify authorization of “<TestName>” API
Given Put authorization token in runtime property
When Run API where test-case is “<TestName>” and API endpoint is “<APIEndpoint>”
Then Verify status code is “401”
Examples:
| TestName | APIEndpoint |
| Customers Service | https://amazon.in/api/customers. |
| Products Service | https://amazon.in/api/products |
The above example will run those steps twice for those two APIs.
With angular brackets syntax and Examples table in the Gherkin feature file, all the steps specified will execute for all table values, thus reducing code redundancy and saving time.
All of the steps correspond to their JS function inside the step definition file, which implies these steps can be reused in different scenarios for the same feature file. For example, the login step can be reused in another scenario to, let’s say, create cart automation inside an e-commerce website – as it would be requiring you to log in first to go to cart.
To summarize the above, Cucumber’s goal is to offer increased readability, reusability, and decreased redundancy.
Downsides of Cucumber
While the Cucumber-Gherkin combination adds a cream of shared understanding between various stakeholders, it does have its downsides. Testers now also have an extra layer of complexity added – bearing the responsibility of writing generic steps that can be reused in another scenario or some other feature per se.
Keeping the code reusable is a very time-consuming task as it requires the tester to remember what steps in a feature file could be used for another new feature that he isn’t familiar with yet.
Another major downside is that although Cucumber’s main goal is to increase communication between all team members, the process easily breaks when a business person or an analyst advises any changes to a test case. They simply won’t be able to add these changes without knowing the internal code structure, thus there is a slight possibility that those steps might be changed or discarded.
Testers also need to write lengthy function names corresponding to each step as they are written in Gherkin, thus leading to increased wordiness.
Plus, Cucumber being an extra layer, isn’t adding robustness to the test structure (it’s quite the opposite as you might’ve guessed). And the more test cases the company will have, the more time will be wasted on daily test maintenance.
Is there a better way?
In case you’re not familiar with testRigor yet – it’s a powerful alternative to Selenium and Cucumber, without any of their downsides. You can create executable specifications in plain English (not Gherkin), and anyone on the team will be able to make sense and modify them. There’s no extra layer involved, and no coding skills needed to create even the most complex end-to-end UI tests. All tests are executed on a cloud-hosted platform, ensuring class-leading test robustness and stability.
Curious to try it out yourself? You can create a free account here, or simply request a demo – and let our team walk you through the whole process so that you can make a well-informed decision later.


