CakePHP Testing

CakePHP is an object-oriented, open-source PHP framework used for rapidly developing applications. It uses the MVC (Model-View-Controller) architectural pattern for development. MVC offers a strict yet natural separation between business logic, data, and presentation layers. By following CakePHP’s conventions for basic organizational structure, you can avoid unnecessary configuration and make a uniform application structure that makes it easy to work with various projects. Moreover, the convention over the configuration paradigm is beneficial in the long run, freeing up time and energy for focusing on logic building for the application. CakePHP offers some great features: a good caching framework, powerful code generation tools, and an integrated testing framework.
Unit Testing
As the testing pyramid suggests, unit testing is a crucial part of the testing process. With unit tests, you can check whether each method or each unit in the code is working as expected - and it's the first testing layer. CakePHP comes with built-in support for the PHPUnit framework. CakePHP provides extra features that facilitate testing in addition to the functionalities provided by PHPUnit to make testing easier. You can install PHPUnit either through the PHAR package or the composer. When it comes to writing tests in the CakePHP framework, there are some conventions you need to follow. First, to organize PHP files containing tests, it is recommended to place them in the tests/TestCase/[Type] directories. It's important to note that the filenames of these files must end in Test.php instead of just .php. Next, the test classes should extend either Cake\TestSuite\TestCase, Cake\TestSuite\IntegrationTestCase, or \PHPUnit\Framework\TestCase. The classnames of test cases should match the filenames. For instance, RouterTest.php should contain class RouterTest extends TestCase. Additionally, any method that contains a test (i.e. an assertion) should start with a test, such as testPublished(). Alternatively, you can also use the @test annotation to indicate which methods are test methods.namespace App\View\Helper;
use Cake\View\Helper;
class ProgressHelper extends Helper
{
public function bar($value)
{
$width = round($value / 100, 2) * 100;
return sprintf(
'<div class="progress-container">
<div class="progress-bar" style="width: %s%%"></div>
</div>', $width);
}
}
namespace App\Test\TestCase\View\Helper;

use App\View\Helper\ProgressHelper;
use Cake\TestSuite\TestCase;
use Cake\View\View;

class ProgressHelperTest extends TestCase
{
  public function setUp(): void
  {
    parent::setUp();
    $View = new View();
    $this->Progress = new ProgressHelper($View);
  }

  public function testBar(): void
  {
    $result = $this->Progress->bar(90);
    $this->assertStringContainsString('width: 90%', $result);
    $this->assertStringContainsString('progress-bar', $result);

    $result = $this->Progress->bar(33.3333333);
    $this->assertStringContainsString('width: 33%', $result);
  }
}
In the above example, the setUp() method is used to initialize the objects required for the test along with any other configurations that might be needed. Each test should have this method. Thus you can see how a unit test helps determine if the method gives us the desired output for a known set of inputs. You can easily achieve this using assertions.
Additionally, you can utilize other methods that help with the test case lifecycle, like setUp(), tearDown(), setupBeforeClass(), and tearDownAfterClass(). You can read more about their usage here. You can run your tests using the commands shown here, depending on how you installed PHPUnit. Also, you can generate code coverage reports using the commands mentioned here.
Integration Testing
These test cases target scenarios involving database integrations, file systems, network infrastructure, or other UI components. As opposed to unit tests, here you do not need to mock dependent methods, data, or services. You can write integration tests using the PHPUnit framework, but let's also take a look at some of CakePHP's offerings.Testing controllers
Though you can test controllers the same way you would test helpers, models, and components, you can instead utilize the IntegrationTestTrait for controller integration testing. Most likely, when you test your controller, it will also exercise any components, models, and helpers that would be involved in completing that request.namespace App\Controller;
use App\Controller\AppController;
class ArticlesController extends AppController
{
public $helpers = ['Form', 'Html'];
public function index($short = null)
{
if ($this->request->is('post')) {
$article = $this->Articles->newEntity($this->request->getData());
if ($this->Articles->save($article)) {
// Redirect as per PRG pattern
return $this->redirect(['action' => 'index']);
}
}
if (!empty($short)) {
$result = $this->Articles->find('all', [
'fields' => ['id', 'title']
])
->all();
} else {
$result = $this->Articles->find()->all();
}
$this->set([
'title' => 'Articles',
'articles' => $result
]);
}
}
namespace App\Test\TestCase\Controller;

use Cake\TestSuite\IntegrationTestTrait;
use Cake\TestSuite\TestCase;

class ArticlesControllerTest extends TestCase
{
  use IntegrationTestTrait;

  protected $fixtures = ['app.Articles'];

  public function testIndex(): void
  {
    $this->get('/articles');

    $this->assertResponseOk();
    // More asserts.
  }

  public function testIndexQueryData(): void
  {
    $this->get('/articles?page=1');

    $this->assertResponseOk();
    // More asserts.
  }

  public function testIndexShort(): void
  {
    $this->get('/articles/index/short');

    $this->assertResponseOk();
    $this->assertResponseContains('Articles');
    // More asserts.
  }

  public function testIndexPostData(): void
  {
    $data = [
      'user_id' => 1,
      'published' => 1,
      'slug' => 'new-article',
      'title' => 'New Article',
      'body' => 'New Body'
    ];
    $this->post('/articles', $data);

    $this->assertResponseSuccess();
    $articles = $this->getTableLocator()->get('Articles');
    $query = $articles->find()->where(['title' => $data['title']]);
    $this->assertEquals(1, $query->count());
  }
}
With such test cases, you need to dispatch the request first before you write any assertions. The assertions can be from PHPUnit or IntegrationTestTrait. Here are some examples of assertions provided by IntegrationTestTrait. You can read further about controller integration testing here.
Testing Plugins
CakePHP lets you create plugins, a combination of models, views, and controllers. You can reuse these plugins in your other projects as well. So now you can create your own methods while using other plugins in your application. You need to load the plugins into your test methods to test them along with your other methods, as shown here. However, if you intend to create tests just for plugins, you need to create them in the plugins directory. Refer to this section to see how to create tests for a plugin. Since applications tend to contain a large number of plugins, executing tests for each of them individually might be cumbersome. During such times you might want to segregate them into test suites.Testing with fixtures
If your tests require the same data and have a dependency on the same model, you can use fixtures to reduce the repetitive steps of initializing the same data before every test case. Fixtures are ideal for data that is common between tests. The utilization of the "test" connection specified in the config/app.php configuration file is necessary for CakePHP. Failure to utilize this connection may result in an exception being raised, preventing the use of database fixtures. If you have test-specific data, it is better to create it in specific tests as needed. At the start of a test run, the schema for fixtures is generated either through migrations or a SQL dump file. You can use CakePHP's migrations plugin to create and manage your application's schema. Make sure to check if your phpunit.xml file contains the fixtures extension before you start using fixtures. Once you have created fixtures, you need to load them in your test cases. For doing so, you can use the $fixtures property. With the newer versions of CakePHP, you can use getFixtures() to define your fixture list. You can also load fixtures from CakePHP core or plugins.Console integration testing
CakePHP offers built-in commands for aiding with speeding up the development and automation of routine tasks. Using these libraries, you can also create commands for your own applications. When it comes to testing these console applications, CakePHP offers ConsoleIntegrationTestTrait to help with testing and asserting these applications.End-to-End Testing
From a business perspective, end-to-end testing is an exceptionally important piece of the software testing process. In this approach, the entire software application is evaluated to validate that it meets the specified requirements and functions correctly as a complete system. It involves testing the application from the user's perspective, simulating real-world scenarios, and checking the integration of various components, such as software modules, databases, APIs, and user interfaces.- Using CakePHP's IntegrationTestTrait
- Selenium-based tools
- testRigor
CakePHP's IntegrationTestTrait
Testing HTML code directly is not advisable since UI keeps evolving, and maintaining these tests is a huge overheard due to their fragile nature. CakePHP's IntegrationTestTrait provides a way for you to inspect the rendered view content by setting the return option to 'view'. However, a more robust and manageable way of checking the view or UI of the application is by using other end-to-end testing tools.Selenium-based tools for end-to-end testing
Selenium is a widely used tool for end-to-end automation testing. Its web drivers allow manipulating the browser easily. Though it is a popular choice, it comes with its limitations.testRigor for end-to-end testing
With no-code and AI gaining momentum in the software testing industry, you have competent options such as testRigor. It is a powerful cloud-based end-to-end functional testing tool. This AI-driven solution gives you the advantage of having easy maintenance of your test suites, not worrying about XPaths thanks to its ability to identify an element through relative locations, and the ability to write test scripts in plain English. What's more, this tool comes with many features like email and SMS text testing, SQL testing, easy table content testing, and API testing, to name a few of its features. testRigor also supports visual testing wherein you can directly compare screens and brand their variances based on severity. Besides these capabilities, testRigor also integrates with a handful of tools for test management, CI/CD, and issue management tools. You can read more about the capabilities of this tool here.run sql query "select top 1 UserID, LastName, FirstName from Users;" open url "https://www.pivotalaccessibility.com/enroll" enter stored value "FirstName" into "First Name" check that stored value "LastName" itself contains "Jack Smith" run sql query "insert into Users(UserID, FirstName, LastName) values (11, 'Riya', 'Jones');"
login and navigate to dashboard //predefined rule
click on "column-group-container"
check if the page contains "multi-selector-power-table column-group-align"
click on "k-multiselect-wrap k-floatwrap"
type "enrollment activity" in "Column group"
check if the page contains "clear-columns-button"
click on "clear-columns-button"
How to do End-to-end Testing with testRigor
Let us take the example of an e-commerce website that sells plants and other gardening needs. We will create end-to-end test cases in testRigor using plain English test steps.
Step 1: Log in to your testRigor app with your credentials.
Step 2: Set up the test suite for the website testing by providing the information below:
- Test Suite Name: Provide a relevant and self-explanatory name.
- Type of testing: Select from the following options: Desktop Web Testing, Mobile Web Testing, Native and Hybrid Mobile, based on your test requirements.
- URL to run test on: Provide the application URL that you want to test.
- Testing credentials for your web/mobile app to test functionality which requires user to login: You can provide the app’s user login credentials here and need not write them separately in the test steps then. The login functionality will be taken care of automatically using the keyword
login. - OS and Browser: Choose the OS Browser combination on which you want to run the test cases.
- Number of test cases to generate using AI: If you wish, you can choose to generate test cases based on the App Description text, which works on generative AI.
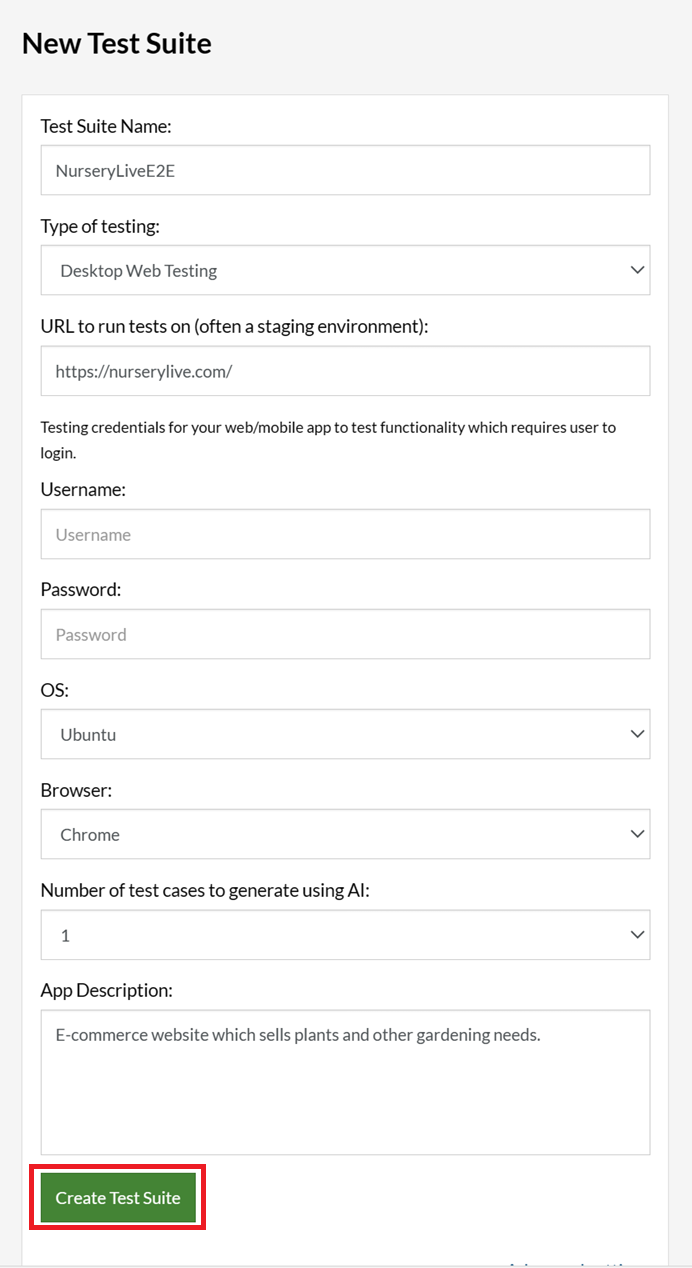
Step 3: Click Create Test Suite.
On the next screen, you can let AI generate the test case based on the App Description you provided during the Test Suite creation. However, for now, select do not generate any test, since we will write the test steps ourselves.
Step 4: To create a new custom test case yourself, click Add Custom Test Case.

Step 5: Provide the test case Description and start adding the test steps.
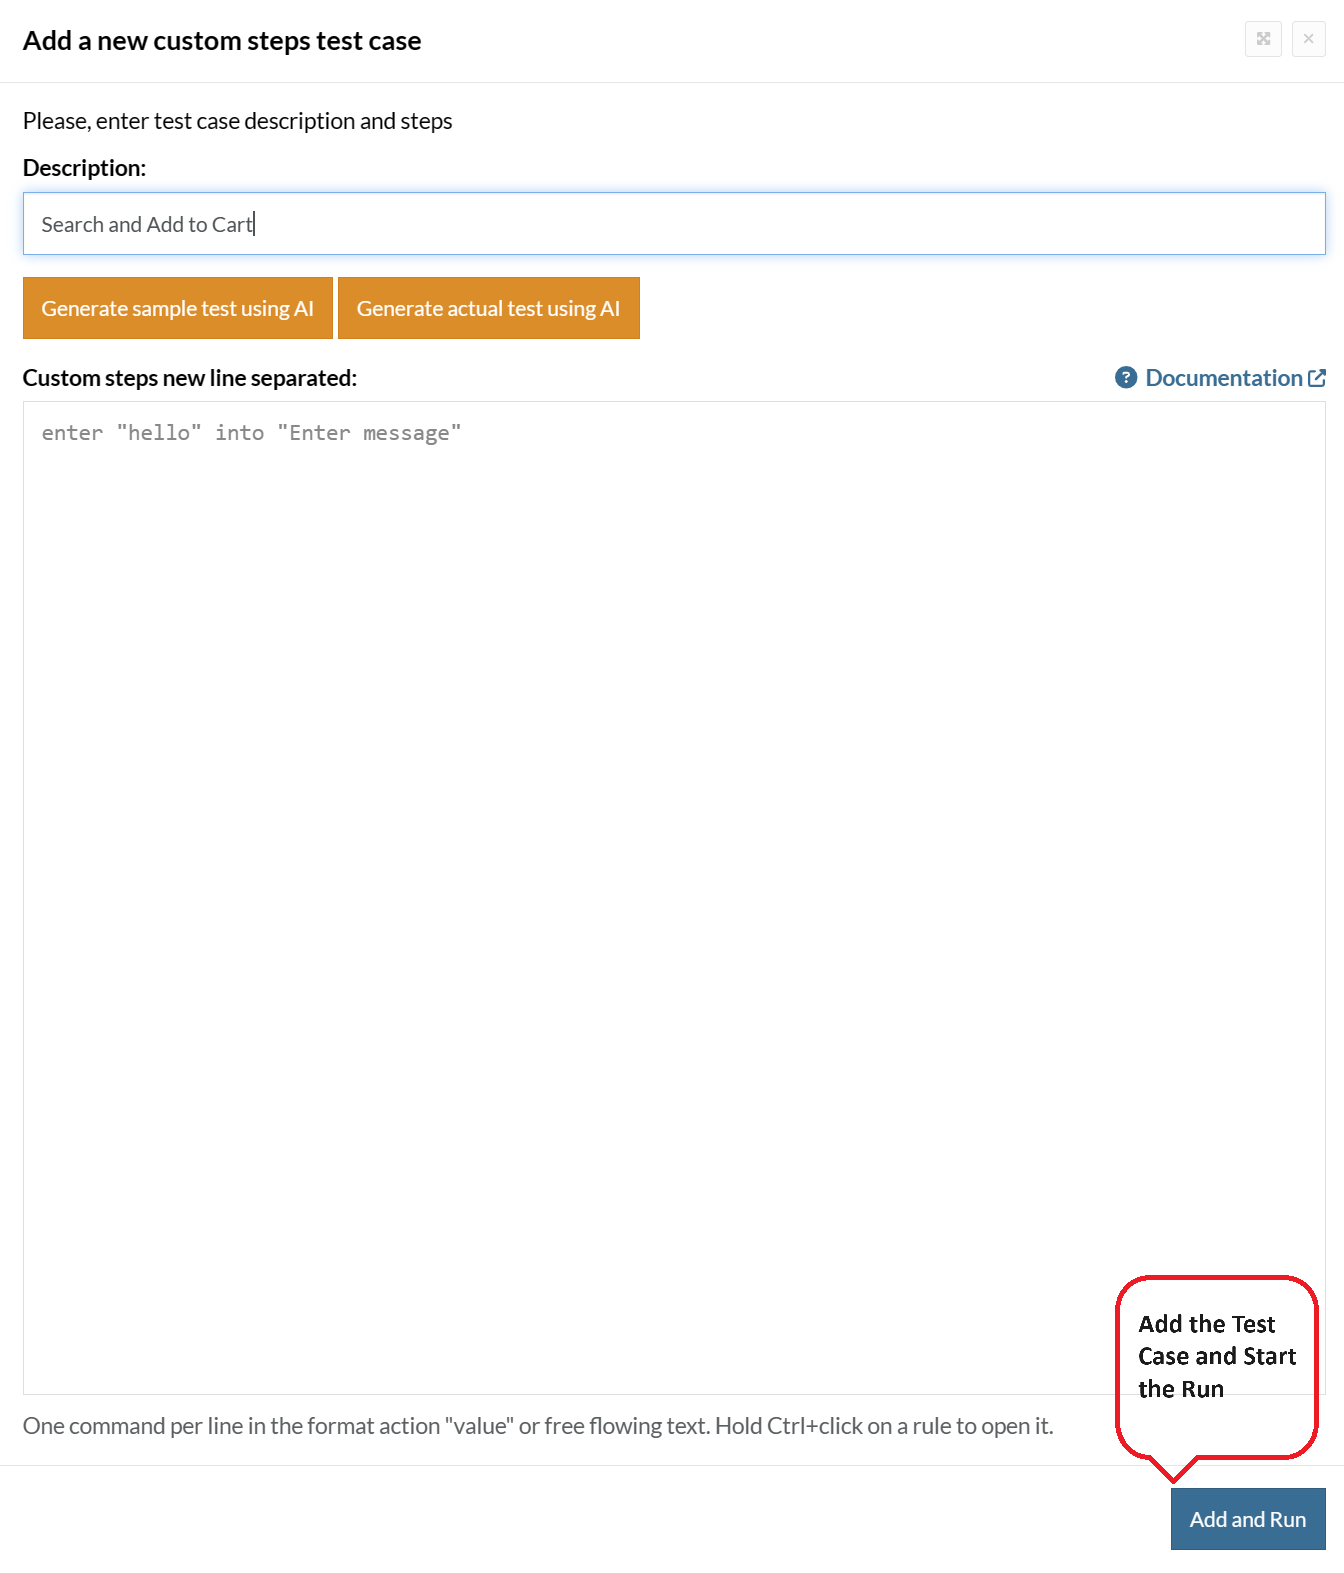
For the application under test, i.e., e-commerce website, we will perform below test steps:
- Search for a product
- Add it to the cart
- Verify that the product is present in the cart
Test Case: Search and Add to Cart
Step 1: We will add test steps on the test case editor screen one by one.
testRigor automatically navigates to the website URL you provided during the Test Suite creation. There is no need to use any separate function for it. Here is the website homepage, which we intend to test.

First, we want to search for a product in the search box. Unlike traditional testing tools, you can identify the UI element using the text you see on the screen. You need not use any CSS/XPath identifiers.
click "What are you looking for?"
Step 2: Once the cursor is in the search box, we will type the product name (lily), and press enter to start the search.
type "lily"
enter enter
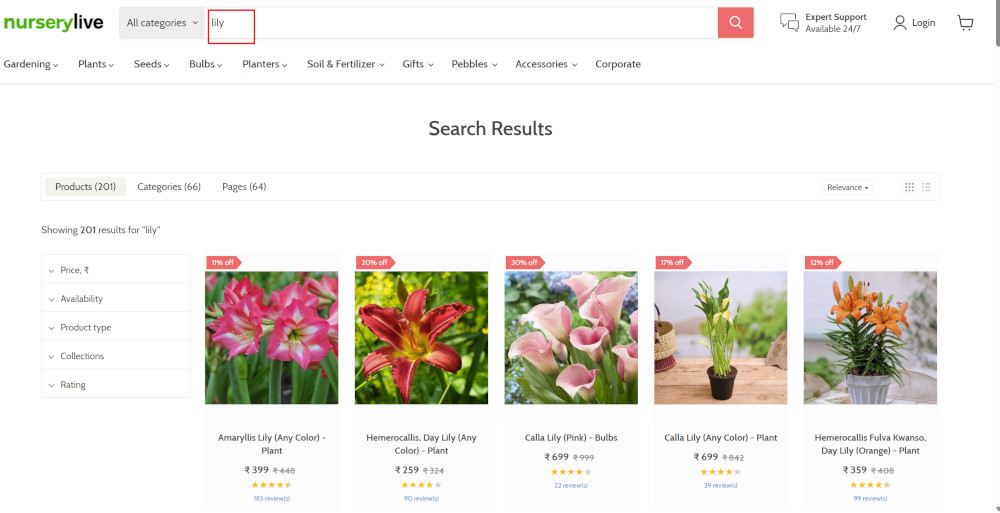
Search lists all products with the “lily” keyword on the webpage.
Step 3: The lily plant we are searching for needs the screen to be scrolled; for that testRigor provides a command. Scroll down until the product is present on the screen:
scroll down until page contains "Zephyranthes Lily, Rain Lily (Red)"
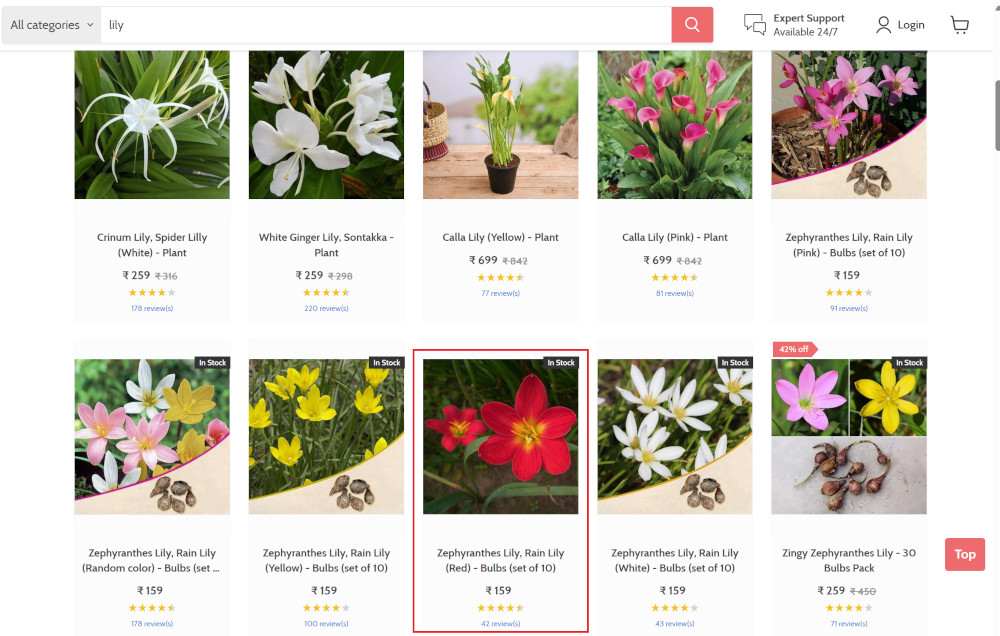
When the product is found on the screen, testRigor stops scrolling.
Step 4: Click on the product name to view the details:
click "Zephyranthes Lily, Rain Lily (Red)"
After the click, the product details are displayed on the screen as below, with the default Quantity as 1.
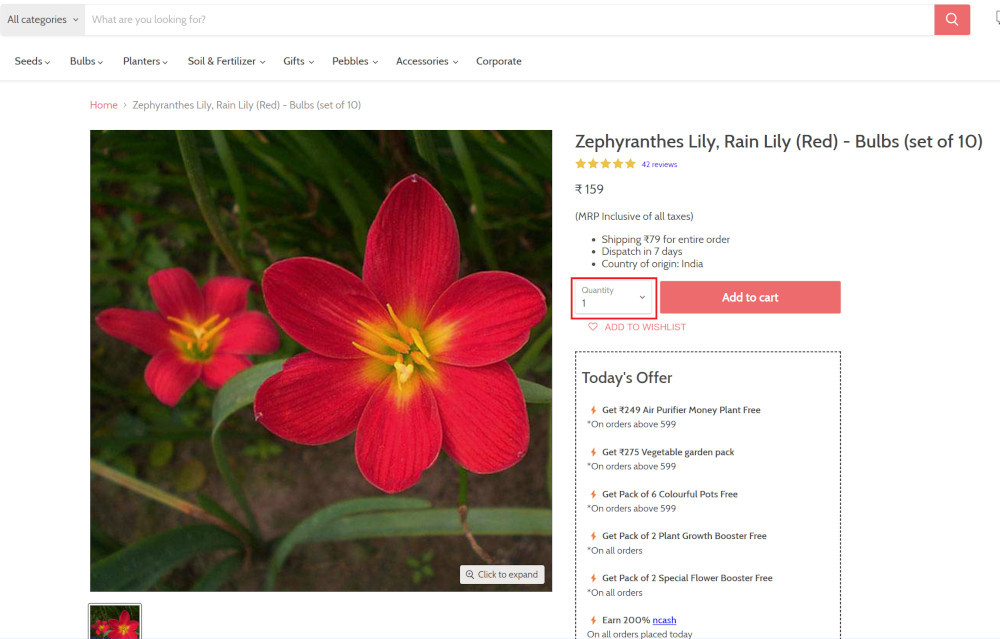
Step 5: Lets say, we want to change the Quantity to 3, so here we use the testRigor command to select from a list.
select "3" from "Quantity"
click "Add to cart"
The product is successfully added to the cart, and the “Added to your cart:” message is displayed on webpage.
Step 6: To assert that the message is successfully displayed, use a simple assertion command as below:
check that page contains "Added to your cart:"
Step 7: After this check, we will view the contents of the cart by clicking View cart as below:
click "View cart"

Step 8: Now we will again check that the product is present in the cart, under heading “Your cart” using the below assertion. With testRigor, it is really easy to specify the location of an element on the screen.
check that page contains "Zephyranthes Lily, Rain Lily (Red)" under "Your cart"

Complete Test Case
Here is how the complete test case will look in the testRigor app. The test steps are simple in plain English, enabling everyone in your team to write and execute them.
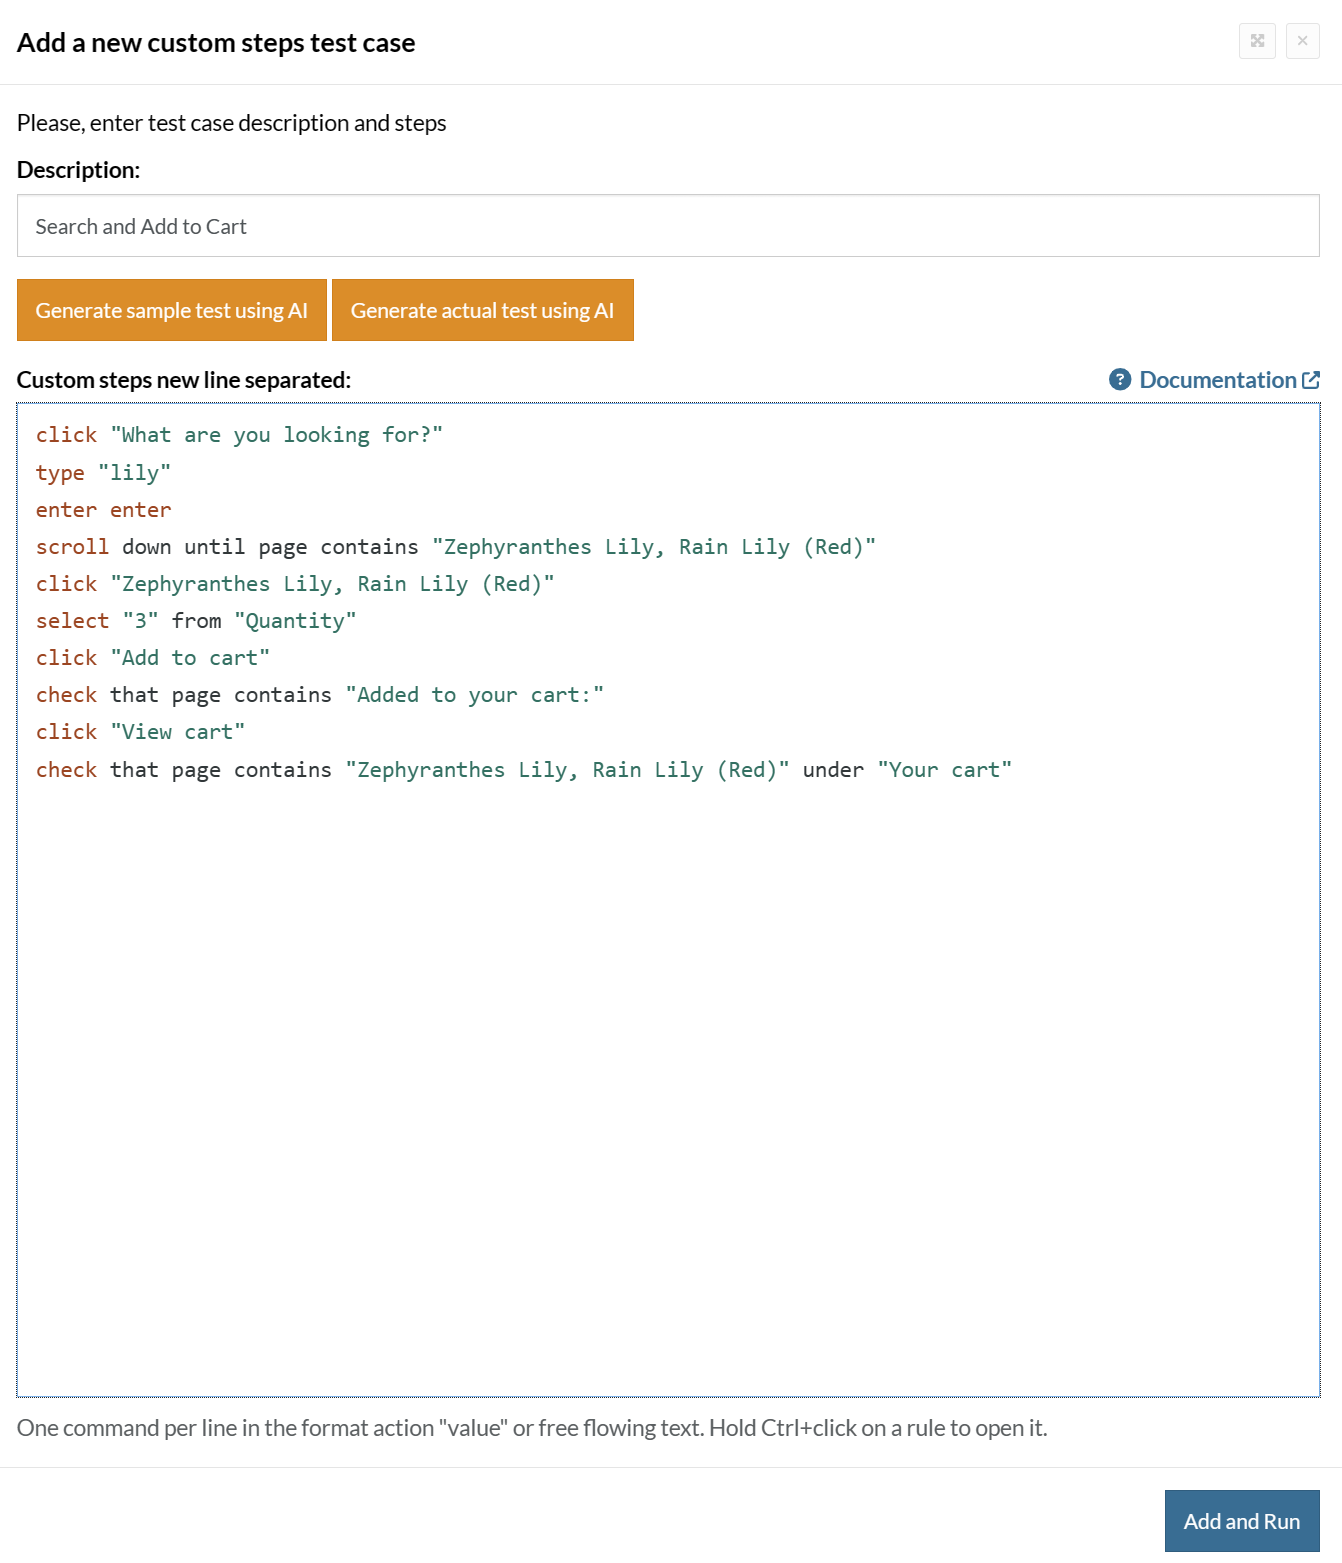
Click Add and Run.
Execution Results
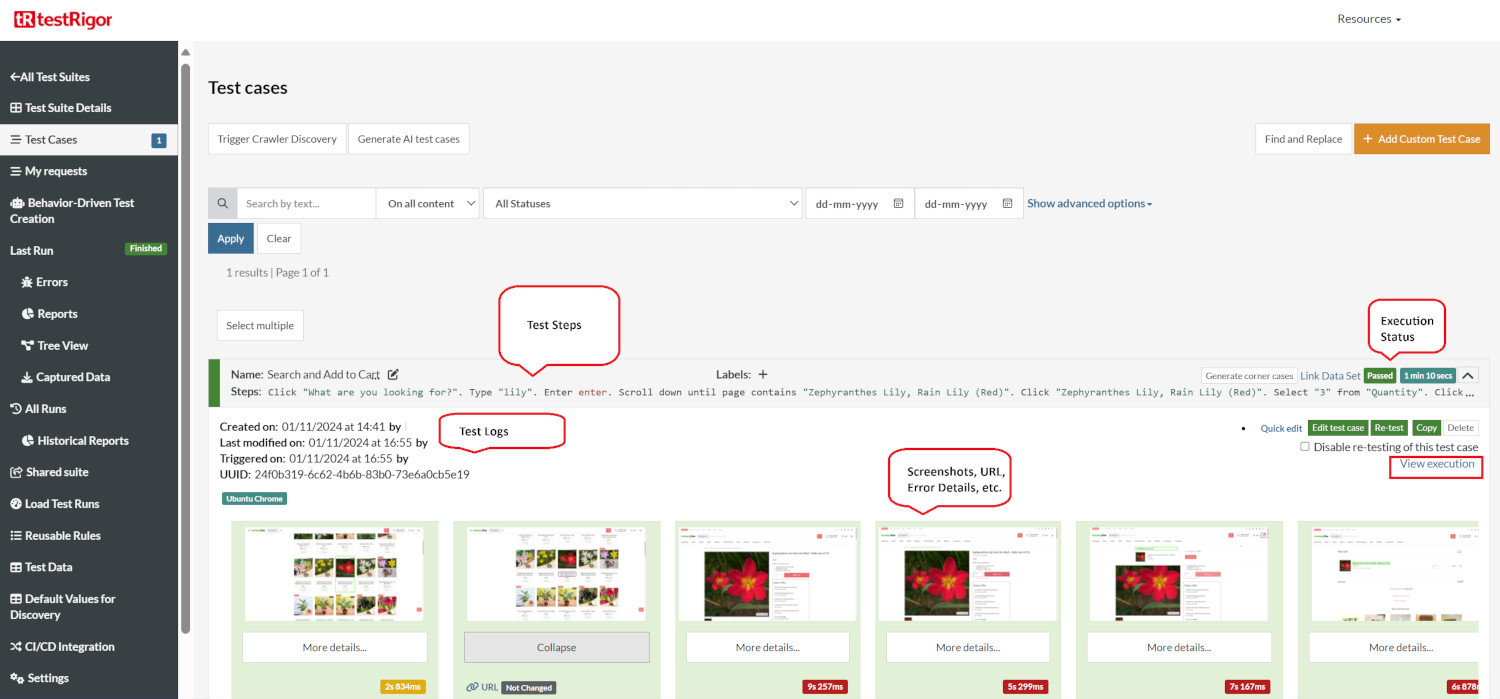
Once the test is executed, you can view the execution details, such as execution status, time spent in execution, screenshots, error messages, logs, video recordings of the test execution, etc. In case of any failure, there are logs and error text that are available easily in a few clicks.
You can also download the complete execution with steps and screenshots in PDF or Word format through the View Execution option.
testRigor’s Capabilities
Apart from the simplistic test case design and execution, there are some advanced features that help you test your application using simple English commands.
- Reusable Rules (Subroutines): You can easily create functions for the test steps that you use repeatedly. You can use the Reusable Rules to create such functions and call them in test cases by simply writing their names. See the example of Reusable Rules.
- Global Variables and Data Sets: You can import data from external files or create your own global variables and data sets in testRigor to use them in data-driven testing.
- 2FA, QR Code, and Captcha Resolution: testRigor easily manages the 2FA, QR Code, and Captcha resolution through its simple English commands.
- Email, Phone Call, and SMS Testing: Use simple English commands to test the email, phone calls, and SMS. These commands are useful for validating 2FA scenarios, with OTPs and authentication codes being sent to email, phone calls, or via phone text.
- File Upload/ Download Testing: Execute the test steps involving file download or file upload without the requirement of any third-party software. You can also validate the contents of the files using testRigor’s simple English commands.
- Database Testing: Execute database queries and validate the results fetched.
testRigor enables you to test web, mobile (hybrid, native), API, and desktop apps with minimum effort and maintenance.
Additional Resources
- Access testRigor documentation to know about more useful capabilities
- Top testRigor’s features
- How to perform end-to-end testing
Conclusion
CakePHP is a good option for PHP developers and has a lot to offer in terms of packages and plugins. Its convention over configuration policy makes it easier to avoid getting caught up in setting up too many configurations. Using the best testing practices of combining the unit, integration, and end-to-end testing techniques, you can develop a strong quality control process to ensure a high quality application.| Achieve More Than 90% Test Automation | |
| Step by Step Walkthroughs and Help | |
| 14 Day Free Trial, Cancel Anytime |


