Jam.py Testing

Jam.py is an open-source, object-oriented, and event-driven web framework meticulously developed for the construction of database-driven web applications. It is unique in its hierarchical structure, modular design, and intimate DB-GUI (Database-Graphical User Interface) coupling. This dynamic framework embraces the DRY (Don’t Repeat Yourself) principle, significantly reducing code redundancy and positioning itself as a robust, low-code/no-code, full-stack rapid development framework.
The framework, first introduced to the public by Andrew Yushew in 2015, utilizes a server-side written in Python while its client-side is based on JavaScript, jQuery, and Bootstrap. It employs an architectural pattern known as MVC (Model-View-Controller), effectively organizing code into separate but interconnected components that govern distinct areas of the application.
Jam.py is equipped with a plethora of tools and features to assist developers in building scalable, maintainable, and secure web applications. Some notable features of Jam.py include:
- An open framework that enables the use of any JavaScript or Python libraries, thereby expanding the possibilities of application functionalities.
- Compatibility with most popular databases, coupled with the capacity to switch from one database to another without necessitating changes in the project structure, thereby providing unmatched flexibility.
- Rich, informative reports that aid in decision-making and continuous improvement of the application.
- Pre-defined CSS themes that can enhance the aesthetic appeal and user experience of the application.
Now, let's delve into the ways of testing applications written in Jam.py. We will explore the three major levels of testing, namely:
Unit Testing
Unit testing is the first level of testing, wherein individual units or components of a software application are verified in isolation from the rest of the application. The objective of unit testing is to ensure that each code unit functions as anticipated and yields the desired results. Since unit testing operates at the code level, these tests are performed frequently, making automation pivotal. Automation codes are hence designed to stimulate the code under diverse conditions and inputs and ascertain that the code responds appropriately under all anticipated scenarios.
In Jam.py, unit testing can be executed using different tools. The commonly used ones include Pytest and Unittest.
Pytest
Pytest is a versatile Python testing framework that can be employed for testing Python applications. It supports various types of testing, including unit tests, integration tests, and functional tests. Pytest is known for its flexibility, extensibility, and an array of built-in features geared towards unit tests.
To conduct unit tests using Pytest, it is imperative to first install it. This can be accomplished via pip using the command pip install pytest. All unit tests should be stored inside the 'tests' folder. The command pytest tests/sample.py can be input into the terminal or command prompt to execute the test. Upon completion, the test result summary will be displayed directly in the terminal.
import pytest
from jam import create_app
from jam.modules.auth.models import User

@pytest.fixture
def app():
  """Create and configure a new Jam.py app instance for each test."""
  app = create_app()
  app.config['TESTING'] = True

  with app.app_context():
    yield app

@pytest.fixture
def client(app):
  """A test client for the app."""
  return app.test_client()

def test_login(client):
  """Test that a user can log in."""
  # Create a test user
  user = User(username='testuser', email='[email protected]', password='password')
  user.save()

  # Submit a login request
  response = client.post('/auth/login', data=dict(
      email='[email protected]',
      password='password'
  ), follow_redirects=True)

  # Check that the response is successful
  assert response.status_code == 200

  # Check that the user is redirected to the home page
  assert b'Welcome to your Jam.py application' in response.data
This code piece creates a new user, submits a login request for the user, and verifies the success of the request and the redirection to the home page, exemplifying the effectiveness of Pytest in testing Jam.py applications.
Unittest
The Unittest framework, included in Python's standard library, is based on the xUnit architecture and houses a collection of tools. Unittest offers numerous built-in assertion methods to validate expected results and a built-in test runner to execute multiple tests and compile the results into a single unit.
Unittest includes a class named TestCase, which provides general scaffolding for testing functions. The TestCase class autonomously identifies all the methods starting with 'test'. All the unit tests should be stored inside the 'tests' folder.
import unittest
from jam import create_app
from jam.modules.auth.models import User


class TestLogin(unittest.TestCase):
  def setUp(self):
    """Create a new Jam.py app instance and test client."""
    self.app = create_app()
    self.client = self.app.test_client()


  def test_login(self):
    """Test that a user can log in."""
    # Create a test user
    user = User(username='testuser', email='[email protected]', password='password')
    user.save()


    # Submit a login request
    response = self.client.post('/auth/login', data=dict(
      email='[email protected]',
      password='password'
    ), follow_redirects=True)


    # Check that the response is successful
    self.assertEqual(response.status_code, 200)


    # Check that the user is redirected to the home page
    self.assertIn(b'Welcome to your Jam.py application', response.data)
Integration Testing
Integration testing focuses on evaluating the interaction between various software components or modules. Its purpose is to identify any issues that may arise when individual software components are combined and tested as a group. Integration testing is performed after unit testing. During this phase, the different modules are combined and tested in a controlled environment to confirm they interact correctly and produce the expected results.
Integration testing in Jam.py applications can be performed using tools such as PyTest or through browser tests.
Pytest
PyTest is an effective tool for performing integration testing in Jam.py applications. Upon installing PyTest, it's necessary to define the fixtures, which are the setup and teardown scripts for the code. The setup functions include establishing the database connection and starting the application, following which the tests are run. Once the tests are completed, the teardown process is initiated.
import pytest
from jam import create_app
from jam.models import db

class TestApp:
  @pytest.fixture
  def client(self):
    app = create_app()
    app.config['TESTING'] = True
    app.config['SQLALCHEMY_DATABASE_URI'] = 'sqlite:///:memory:'
    client = app.test_client()

    with app.app_context():
      # Set up the test database
      db.create_all()

      yield client

      # Tear down the test database
      db.drop_all()

  def test_homepage(self, client):
    # Submit a request to the home page
    response = client.get('/')

    # Check that the response is successful
    assert response.status_code == 200

    # Check that the page contains the app name
    assert b'Welcome to your Jam.py application' in response.data

  def test_login(self, client):
    # Submit a login request
    response = client.post('/auth/login', data=dict(
      email='[email protected]',
      password='password'
    ), follow_redirects=True)

    # Check that the response is successful
    assert response.status_code == 200

    # Check that the user is redirected to the home page
    assert b'Welcome to your Jam.py application' in response.data
This script tests the functionality of the homepage and the login feature, indicating the successful application of PyTest for integration testing in Jam.py applications.
Browser Tests
Browser tests can be performed using any Selenium-based tool or testRigor. We'll delve deeper into these methods in the next section on E2E testing.
End-to-End Testing
End-to-End (E2E) testing focuses on verifying the entirety of a system, from start to finish, to ensure all components work together as expected. The system must fulfill all functional and non-functional requirements. E2E testing typically involves simulating user interactions with the system and confirming it behaves correctly in response to various inputs and scenarios.
For Jam.py applications, we can perform E2E testing using the below tools.
- Selenium
- testRigor
Selenium
Selenium until recently, was one of the industry's go-to tools. There's no need for a deep dive into Selenium in this article, given its widespread recognition and legacy status. There's a wealth of information and tutorials available online. However, due to its complex structure and relatively slow and unstable test running capabilities, many organizations have transitioned towards more lightweight tools.
testRigor
testRigor stands out as an innovative, AI-integrated, no-code automation tool designed primarily for end-to-end testing. Its distinguishing features include remarkable ease of use, lightning-fast test creation and execution, and extremely low maintenance requirements.
One of testRigor's most significant features is the ease of creating even very complex test scripts. Testers can create scripts in plain English, alleviating the need for programming language knowledge. This not only accelerates the test creation process, but also allows manual testers to author test scripts with both ease and precision. Here are some advantages of using testRigor for your testing needs:
- It's a cloud-hosted tool, thus saving time and costs associated with infrastructure setup.
- Supports cross-platform and cross-browser testing with minimal configuration changes.
- Its AI captures multiple locators of an element, ensuring that element identification won't fail even if any of the locators change.
- Can read text from images using OCR.
- Supports various types of testing, including web and mobile testing, native desktop testing, visual regression, API testing, load testing, etc.
- Has built-in integrations with most of the CI/CD tools, test management tools, infrastructure tools, and more.
click "Sign in"
enter "jacob" into "Username"
enter "jacobs-secure-password" into "Password"
click "Verify me"
check that sms to "+12345678902" is delivered and matches regex "Code\:\d\d\d\d" and save it as "sms"
extract value by regex "(?<=Code\:)[0-9]{4}" from "sms" and save it as "confirmationCode"
enter saved value "confirmationCode" into "code"
click "Continue to Login"
check that page contains text "Welcome, Jacob!"
In conclusion, testRigor provides a rapid and effective means of achieving robust functional UI coverage for your Jam.py application, all with an incredibly low learning curve. But you don't have to take our word for it - explore the tool’s capabilities firsthand by following the link below!
How to do End-to-end Testing with testRigor
Let us take the example of an e-commerce website that sells plants and other gardening needs. We will create end-to-end test cases in testRigor using plain English test steps.
Step 1: Log in to your testRigor app with your credentials.
Step 2: Set up the test suite for the website testing by providing the information below:
- Test Suite Name: Provide a relevant and self-explanatory name.
- Type of testing: Select from the following options: Desktop Web Testing, Mobile Web Testing, Native and Hybrid Mobile, based on your test requirements.
- URL to run test on: Provide the application URL that you want to test.
- Testing credentials for your web/mobile app to test functionality which requires user to login: You can provide the app’s user login credentials here and need not write them separately in the test steps then. The login functionality will be taken care of automatically using the keyword
login. - OS and Browser: Choose the OS Browser combination on which you want to run the test cases.
- Number of test cases to generate using AI: If you wish, you can choose to generate test cases based on the App Description text, which works on generative AI.
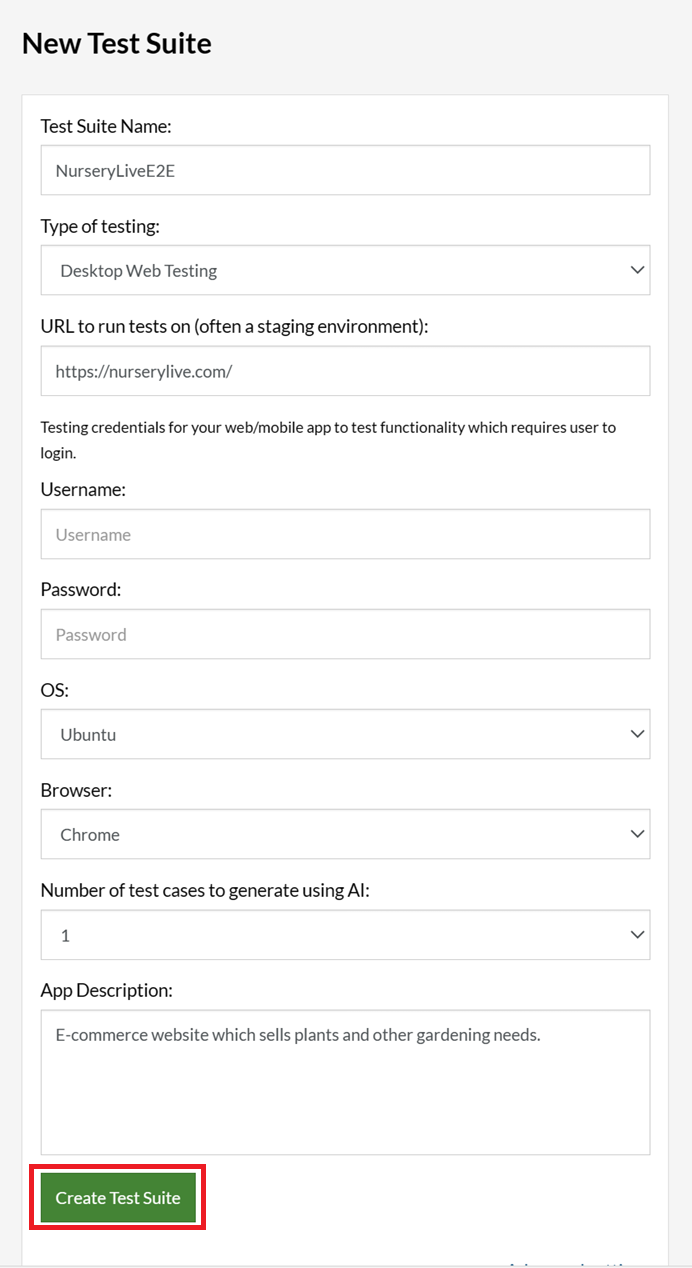
Step 3: Click Create Test Suite.
On the next screen, you can let AI generate the test case based on the App Description you provided during the Test Suite creation. However, for now, select do not generate any test, since we will write the test steps ourselves.
Step 4: To create a new custom test case yourself, click Add Custom Test Case.

Step 5: Provide the test case Description and start adding the test steps.
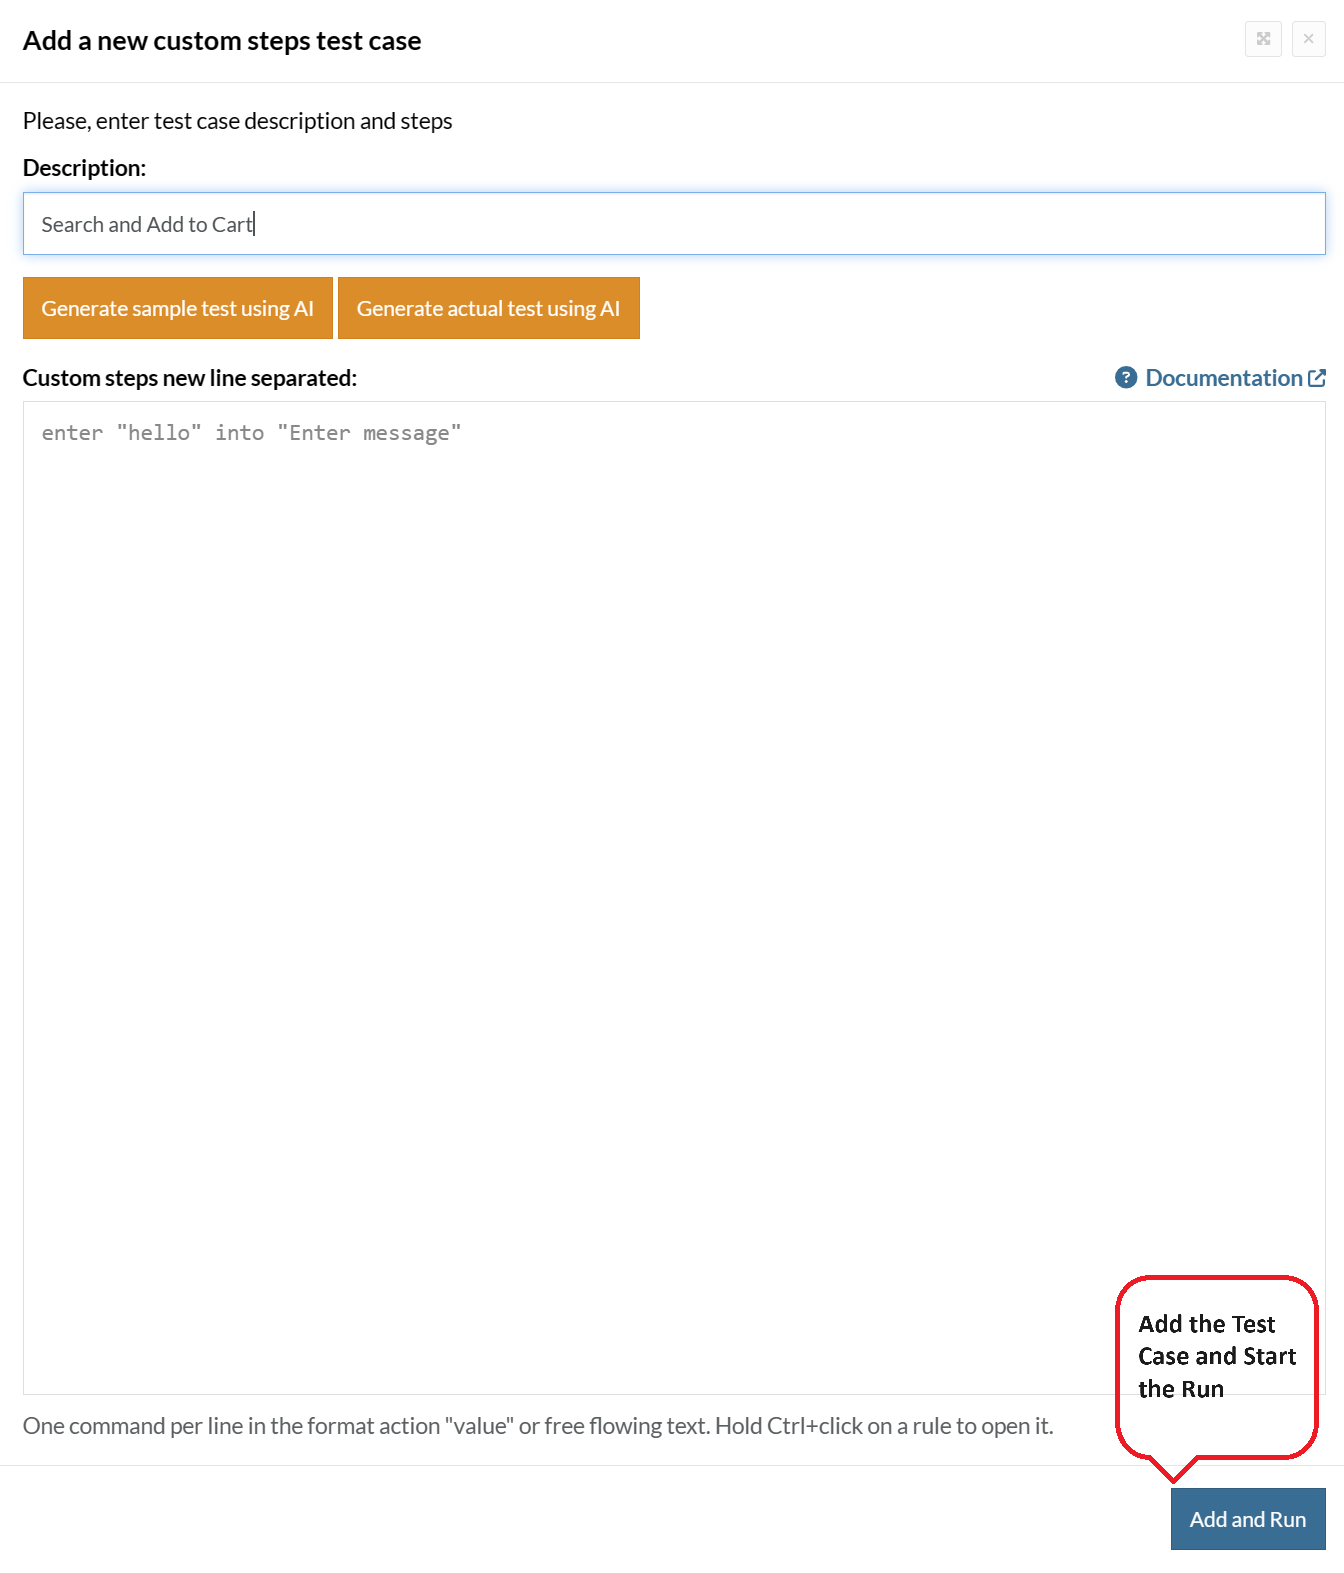
For the application under test, i.e., e-commerce website, we will perform below test steps:
- Search for a product
- Add it to the cart
- Verify that the product is present in the cart
Test Case: Search and Add to Cart
Step 1: We will add test steps on the test case editor screen one by one.
testRigor automatically navigates to the website URL you provided during the Test Suite creation. There is no need to use any separate function for it. Here is the website homepage, which we intend to test.

First, we want to search for a product in the search box. Unlike traditional testing tools, you can identify the UI element using the text you see on the screen. You need not use any CSS/XPath identifiers.
click "What are you looking for?"
Step 2: Once the cursor is in the search box, we will type the product name (lily), and press enter to start the search.
type "lily"
enter enter
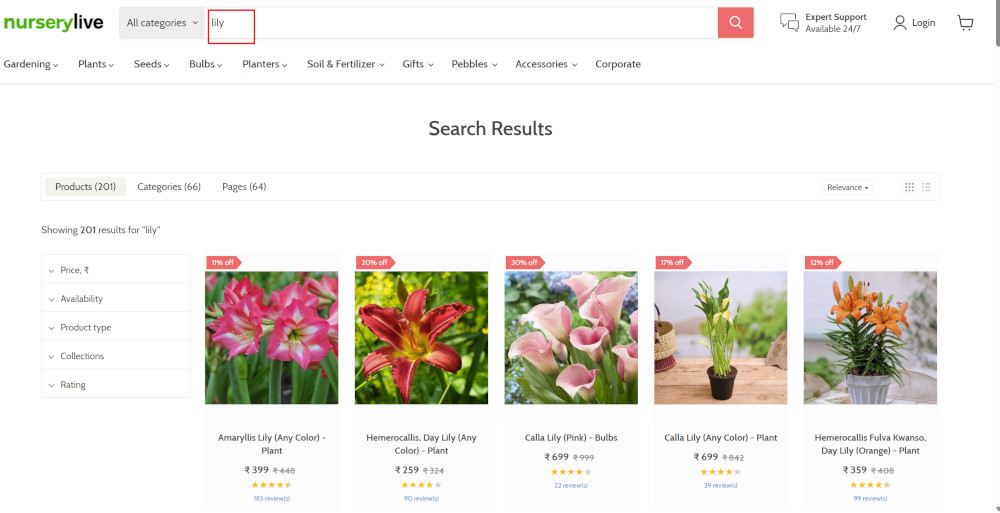
Search lists all products with the “lily” keyword on the webpage.
Step 3: The lily plant we are searching for needs the screen to be scrolled; for that testRigor provides a command. Scroll down until the product is present on the screen:
scroll down until page contains "Zephyranthes Lily, Rain Lily (Red)"
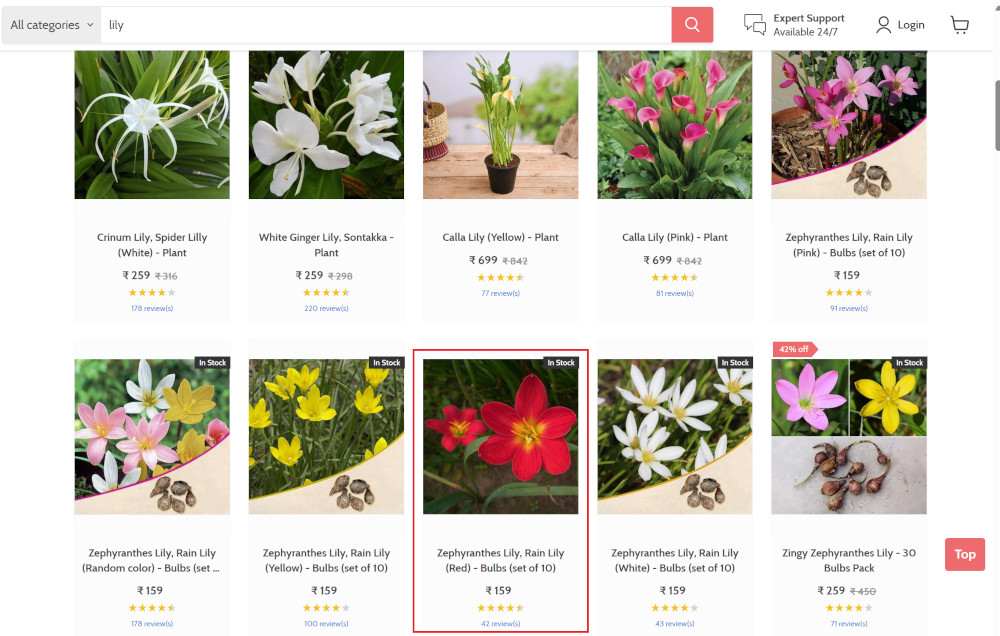
When the product is found on the screen, testRigor stops scrolling.
Step 4: Click on the product name to view the details:
click "Zephyranthes Lily, Rain Lily (Red)"
After the click, the product details are displayed on the screen as below, with the default Quantity as 1.
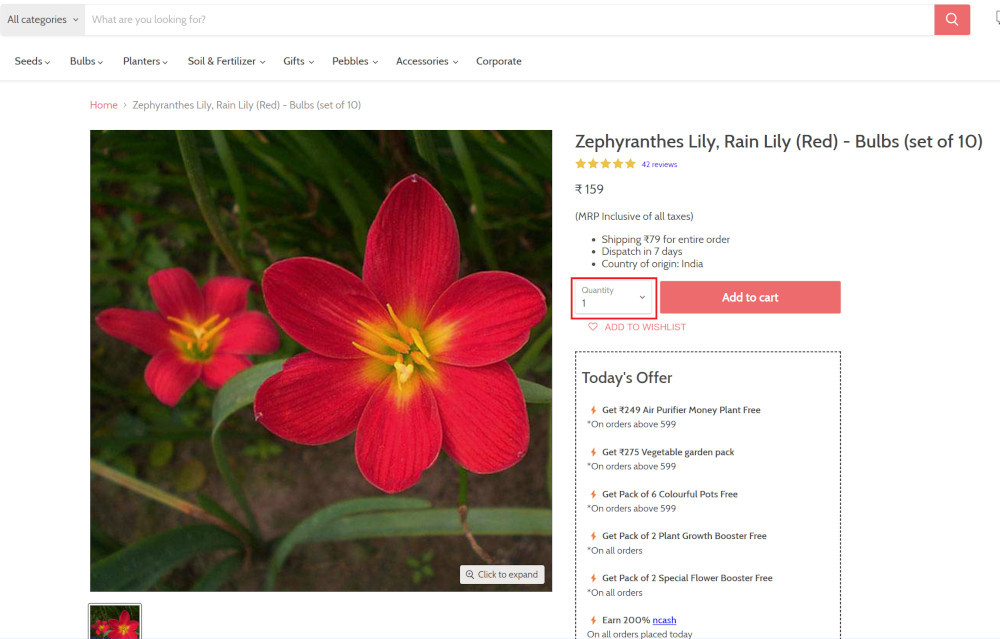
Step 5: Lets say, we want to change the Quantity to 3, so here we use the testRigor command to select from a list.
select "3" from "Quantity"
click "Add to cart"
The product is successfully added to the cart, and the “Added to your cart:” message is displayed on webpage.
Step 6: To assert that the message is successfully displayed, use a simple assertion command as below:
check that page contains "Added to your cart:"
Step 7: After this check, we will view the contents of the cart by clicking View cart as below:
click "View cart"

Step 8: Now we will again check that the product is present in the cart, under heading “Your cart” using the below assertion. With testRigor, it is really easy to specify the location of an element on the screen.
check that page contains "Zephyranthes Lily, Rain Lily (Red)" under "Your cart"

Complete Test Case
Here is how the complete test case will look in the testRigor app. The test steps are simple in plain English, enabling everyone in your team to write and execute them.
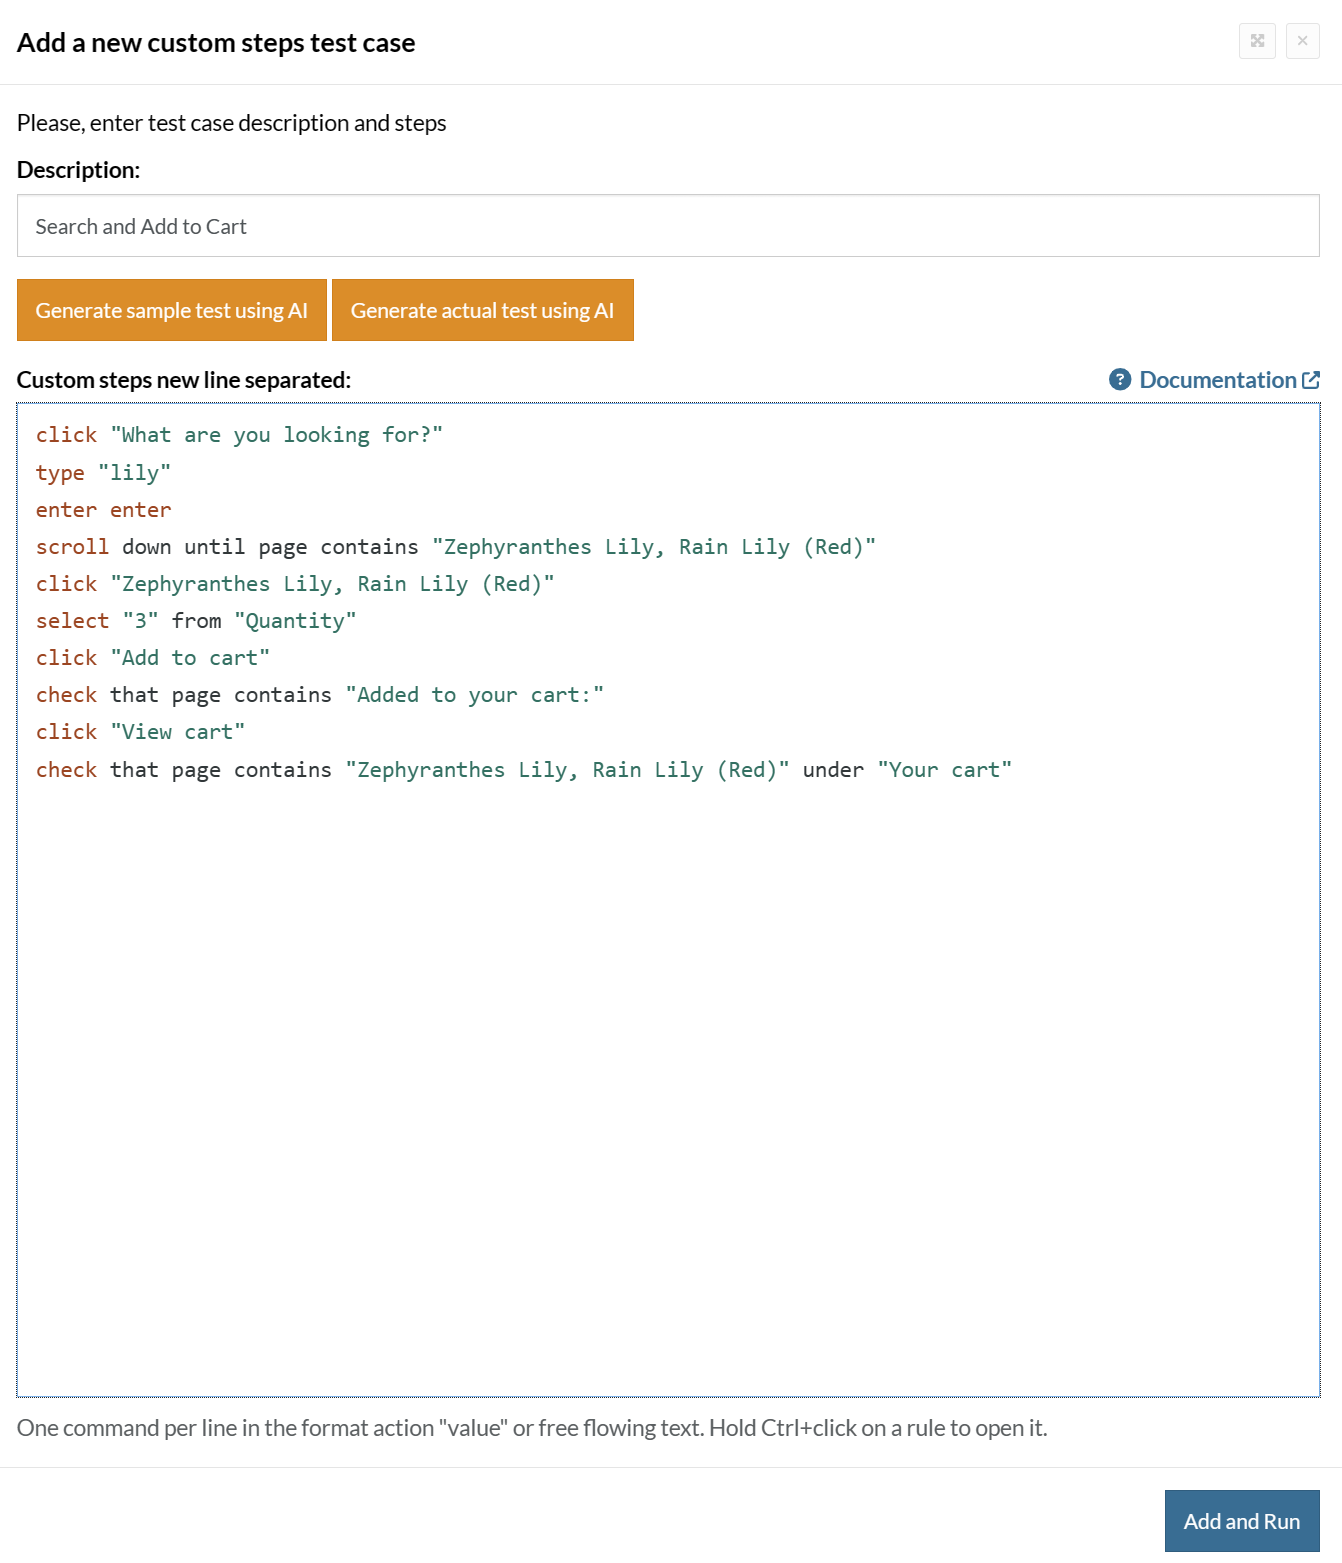
Click Add and Run.
Execution Results
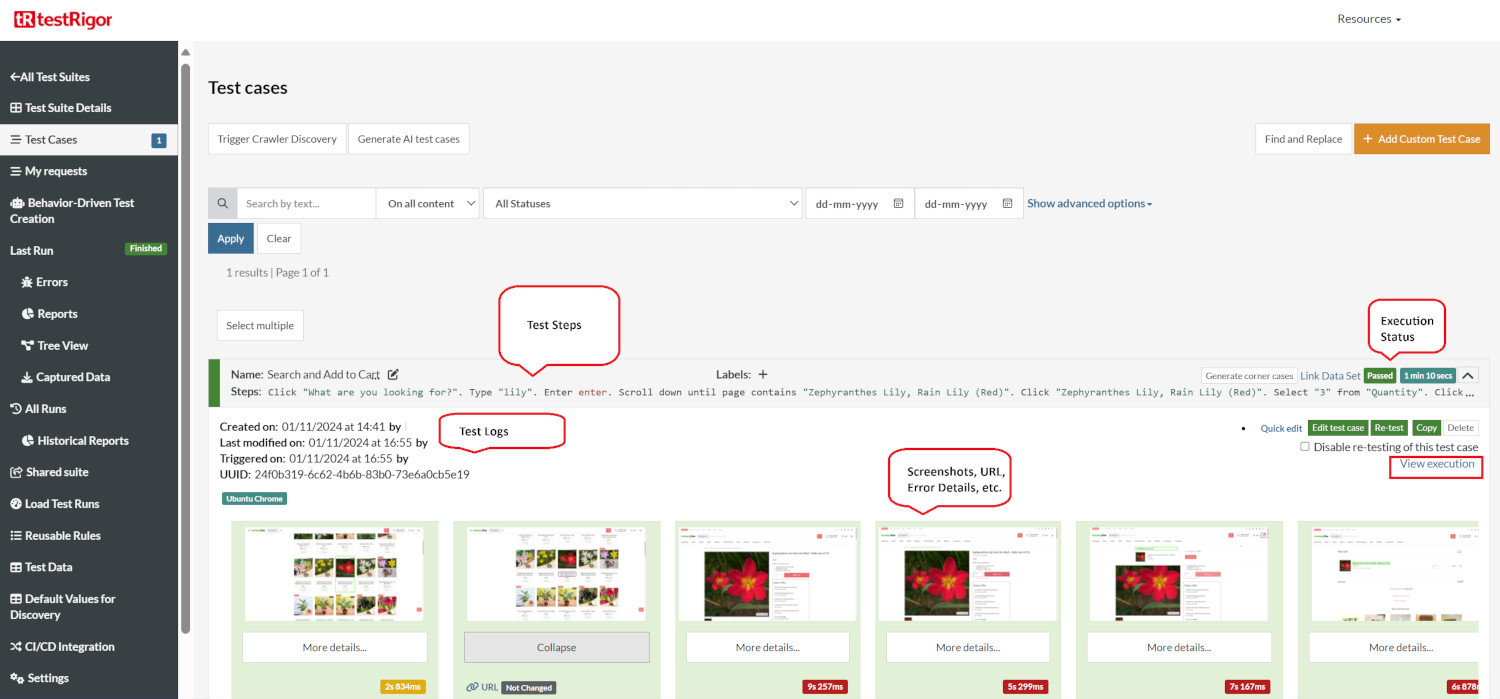
Once the test is executed, you can view the execution details, such as execution status, time spent in execution, screenshots, error messages, logs, video recordings of the test execution, etc. In case of any failure, there are logs and error text that are available easily in a few clicks.
You can also download the complete execution with steps and screenshots in PDF or Word format through the View Execution option.
testRigor’s Capabilities
Apart from the simplistic test case design and execution, there are some advanced features that help you test your application using simple English commands.
- Reusable Rules (Subroutines): You can easily create functions for the test steps that you use repeatedly. You can use the Reusable Rules to create such functions and call them in test cases by simply writing their names. See the example of Reusable Rules.
- Global Variables and Data Sets: You can import data from external files or create your own global variables and data sets in testRigor to use them in data-driven testing.
- 2FA, QR Code, and Captcha Resolution: testRigor easily manages the 2FA, QR Code, and Captcha resolution through its simple English commands.
- Email, Phone Call, and SMS Testing: Use simple English commands to test the email, phone calls, and SMS. These commands are useful for validating 2FA scenarios, with OTPs and authentication codes being sent to email, phone calls, or via phone text.
- File Upload/ Download Testing: Execute the test steps involving file download or file upload without the requirement of any third-party software. You can also validate the contents of the files using testRigor’s simple English commands.
- Database Testing: Execute database queries and validate the results fetched.
testRigor enables you to test web, mobile (hybrid, native), API, and desktop apps with minimum effort and maintenance.
Additional Resources
- Access testRigor documentation to know about more useful capabilities
- Top testRigor’s features
- How to perform end-to-end testing
Conclusion
Frameworks are indispensable for reducing the time and effort required to create test scripts from scratch. In today's fast-paced industries, time is of the essence, and testing plays a pivotal role in ensuring success. Bugs identified in the later stages of development can cost two to three times more than those discovered in the early stages. By using the right testing tools at each process stage, companies can achieve the coveted "first to market" advantage.
| Achieve More Than 90% Test Automation | |
| Step by Step Walkthroughs and Help | |
| 14 Day Free Trial, Cancel Anytime |


