#1 Intelligent AI-based
Mainframe Testing Tool
Thank you for your request. Please select date and time for a demo.

#1 Intelligent AI-based
Mainframe Testing Tool
purchase a Kindle into a more specific set of steps such as:enter "Kindle" into "Search" press enter click "Kindle" click "Add to cart"

What is a Mainframe?
- High Processing Power: Mainframes can process millions of transactions per second, which is essential for businesses with high-volume operations.
- Extreme Reliability (High Availability): They’re built to run 24/7 with minimal downtime. Some systems have been running continuously for decades.
- Massive Input/Output (I/O) Capability: Mainframes manage large volumes of simultaneous data inputs and outputs, such as thousands of users accessing data at once.
- Scalability: You can scale up a mainframe without major rework—just add more processing capacity.
- Security: Mainframes have advanced security and access control systems, which is why they’re trusted to handle sensitive information (like financial data or personal records).
Components of a Mainframe System
Today, mainframe systems have networks, crypto, storage, and compression cards. They have SAP (System Assist Processors) to have quick data transfer between OS, processors, and I/O devices. Here are a few of the core components of a mainframe system:
| Component | Description |
|---|---|
| CPUs & Specialty Processors | For handling general and specific workloads (e.g., Linux, Java) |
| Memory | Large shared memory with caching |
| I/O Subsystems | High-speed channels for network and storage I/O |
| Storage Systems | DASD, tape, SSD with tiering |
| Operating Systems | z/OS, Linux on Z, z/VM, etc. |
| Virtualization | LPARs, PR/SM, z/VM |
| Middleware | CICS, IMS, DB2, MQ |
| Security | RACF, ACF2, hardware crypto |
| Networking | TCP/IP, APIs, VTAM, Zowe |
| System Management | HMC, monitoring tools, automation |
| Integration | APIs, z/OS Connect, cloud-native tools |
| Modern Workload Support | AI, analytics, cloud, DevOps, containers |
How to do Mainframe Testing?
Mainframe testing involves validating the functionality, performance, and security of mainframe applications. This includes testing batch jobs, online transaction processing (OLTP), data integrity, and integration with external systems.
Types of mainframe testing include:
- Unit Testing: Test individual programs or modules, typically COBOL or PL/I routines.
- System Testing: Check that the entire mainframe system behaves as expected.
- Integration Testing: Test interfaces between the mainframe and external systems (like web apps or APIs).
- Regression Testing: Verify that new changes don’t break existing functionalities.
- Performance Testing: Measure transaction processing speed, job throughput, and system response times.
- Security Testing: Test proper authentication, authorization, and encryption.
Challenges in Mainframe Testing
- Legacy Code and Lack of Documentation: Many mainframe applications are decades old. They are written in outdated languages (like COBOL, Assembler, or PL/I) and often lack proper documentation or knowledgeable developers.
- Resource Constraints: Few professionals today are skilled in mainframe technologies. This talent gap makes it difficult to maintain and test mainframe applications effectively.
- Complex Environments: Mainframes often interact with multiple subsystems, such as IMS, DB2, CICS, and VSAM, which need to be tested as part of the complete system.
- Data-Intensive Testing: Mainframe applications process massive volumes of data. Ensuring the quality, consistency, and privacy of test data is a significant challenge.
- Tool Limitations: Traditional testing tools are often not compatible with mainframe environments. Testing is still done manually in many enterprises, leading to errors and inefficiencies.
Mainframe Testing Automation
Using test automation with mainframes may seem like a far-fetched idea due to the legacy nature of mainframes. But it’s very achievable and increasingly essential for organizations aiming to modernize and adopt DevOps or CI/CD practices. Here are the steps to execute test automation on mainframe apps.
Step 1: Understand the Mainframe Testing Scope
- Batch Jobs (e.g., JCL scripts)
- CICS Transactions
- IMS or DB2 Database Interactions
- VSAM or Flat File Validations
- Integration with APIs, web apps, or third-party systems
Step 2: Choose the Right Test Automation Tools
Not all testing tools work natively with mainframes. Look for tools that support terminal emulation, 3270 interfaces, database testing, or API testing, depending on your architecture. If your project/organization has applications which run on web, mobile, desktop, APIs, mainframes, then it is a good idea to use a tool which can singlehandedly execute test cases on all these platforms. One example is the AI agent for test automation: testRigor. We will learn more about its advanced capabilities in the next section.
Step 3: Automate Batch Job Testing
- Submitting jobs automatically via script or API.
- Monitoring job execution using job logs or exit codes.
- Validating job output (log files, datasets, DB2 entries).
Step 4: Automate CICS/IMS Screen Testing
Mainframe applications often involve 3270 green screen interfaces, which can be automated using terminal emulator scripting or tools that support 3270 protocols.
- Use testRigor to simulate user actions on the screen.
- Build automated test scripts that can:
- Navigate through panels
- Enter data and retrieve results
- Validate screen content against expected output
Here is an example from testRigor. This intelligent tool can identify fields, text, data, etc., on the UI and navigate through screens using just English commands. We will discuss this in detail in the next section.
Step 5: Automate Database Testing (DB2, IMS)
- Use SQL scripts to query DB2 or IMS databases before and after tests.
- Validate:
- Record insertion
- Data updates
- Referential integrity
- Automate this via tools like testRigor, IBM Data Studio, or custom scripts (Python, JDBC, REXX).
Step 6: Integrate with DevOps and CI/CD
Mainframe systems don’t have to be left out of your DevOps pipeline.
- Jenkins or GitLab CI/CD can trigger mainframe test jobs.
- Use z/OSMF REST APIs, Zowe CLI, or Endevor to interact with mainframe code during pipeline runs.
- Include:
- Static code analysis (e.g., with SonarQube for COBOL)
- Automated unit and integration testing
- Regression test execution
- Report publishing
Step 7: Manage Test Data Effectively
- IBM Optim – For data masking and subsetting
- Compuware File-AID – For test data creation and validation
- Mock or stub external dependencies where needed
- Create data sets tailored for different test scenarios
- Mask production data to ensure privacy
- Reuse consistent test data for regression testing
Step 8: Run Regression and Smoke Tests Automatically
- Smoke Tests – Quickly validate core functionalities after a deployment.
- Regression Tests – Ensure recent changes haven’t broken anything.
- After code check-in
- On a nightly schedule
- Before a release to production
Step 9: Analyze Results and Feed Back
- Pass/fail rates
- Defects discovered
- Test execution trends
- Coverage levels
Tools like testRigor, JIRA, qTest, TestRail, or custom dashboards help tie test results into your agile tracking process.
Mainframe Testing in Plain English Using testRigor
Let us take the example of a Mainframe System (banking app). We will create end-to-end test cases in testRigor using plain English test steps.
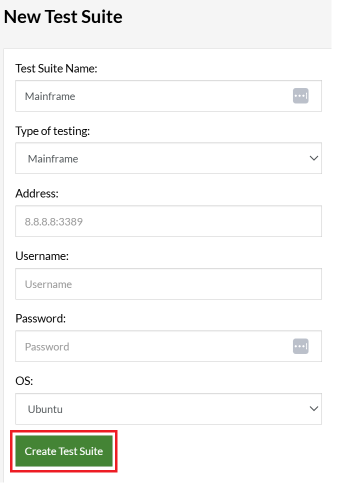
Step 1: Log in to your testRigor app with your credentials.
- Test Suite Name: Provide a relevant and self-explanatory name.
- Type of testing: App shows following options: Desktop Web Testing, Mobile Web Testing, Native and Hybrid Mobile, Mainframe. Select Mainframe.
- Address: Provide the mainframe app’s address, that you want to test.
-
Username and Password: You can provide the app’s user login credentials here and need not write them separately in the test steps then. Here, we are leaving it blank.Note: These credentials will work only if the mainframe uses standard input fields for the login form, such as “username”, “email”, “password” etc. In our example below, the app uses “userId”, so we should provide the value or use the testRigor variables username and password if we are providing this information while creating the test suite.
- OS: We are choosing Ubuntu to run the test cases.

Step 3: Click Create Test Suite.
Step 4: To create a new test case, click Add Test Case.
Step 5: Provide the test case Description and start adding the test steps.

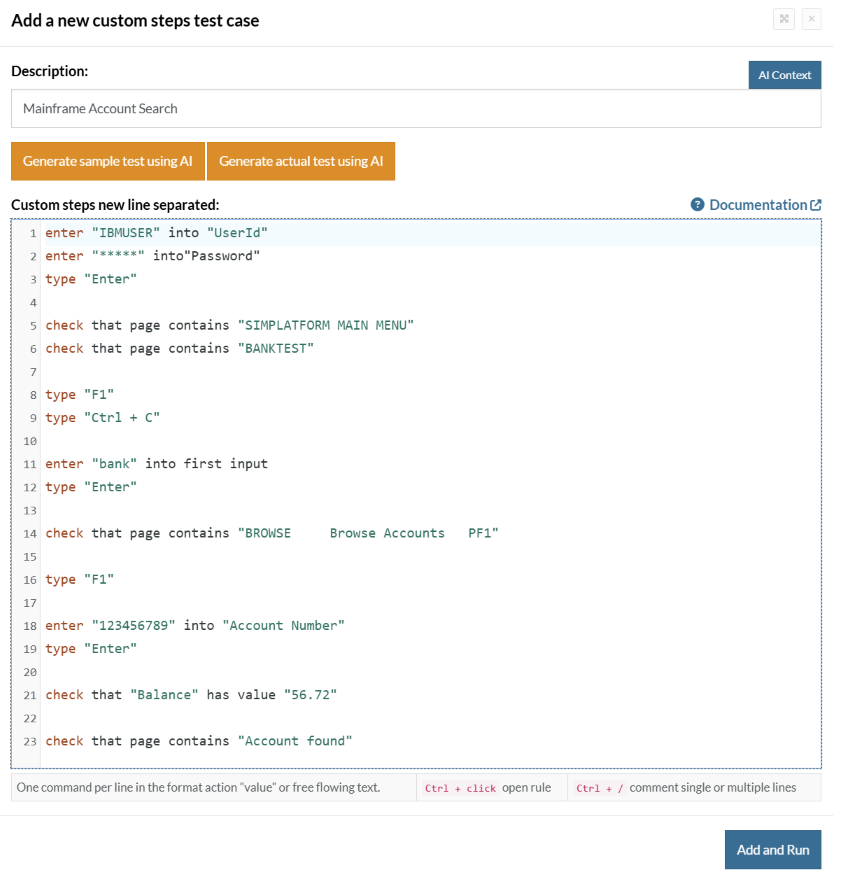
Test Case: Search for an Account
Step 1: We will add test steps on the test case editor screen one by one.
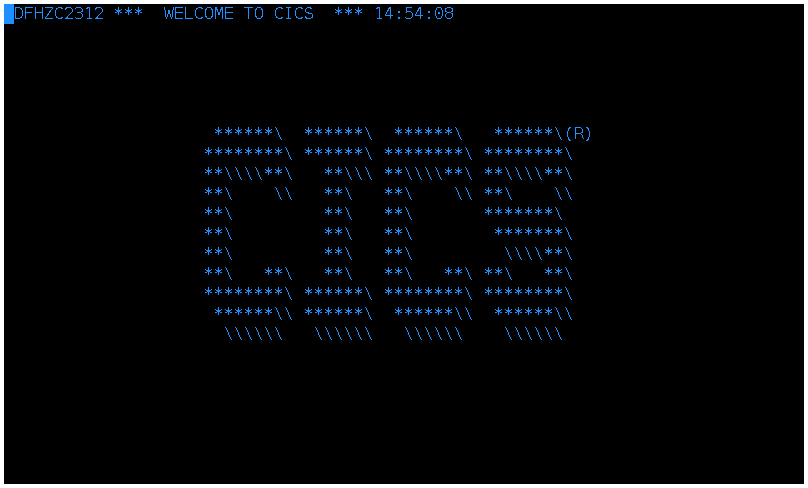
testRigor automatically connects to the Address you provided during the Test Suite creation. There is no need to use any separate function for it. Here is the mainframe app’s login screen, which we intend to test.
Let us enter the Userid and Password on the screen and then enter ‘Enter’.
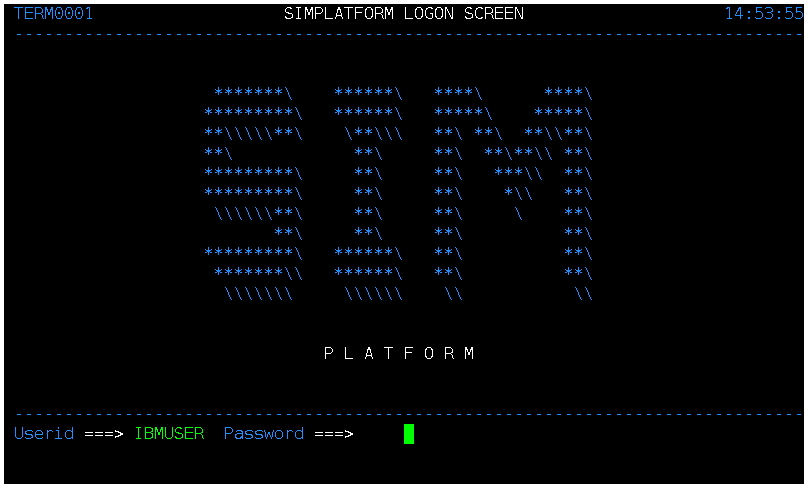
enter "IBMUSER" into "UserId"
  enter "*****" into"Password"
  type "Enter"
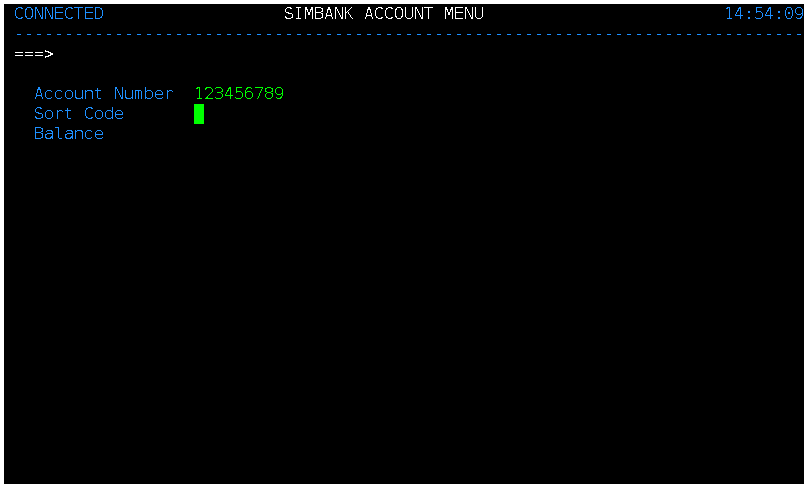
Step 2: Once we type ‘Enter’, the next screen is displayed as below:
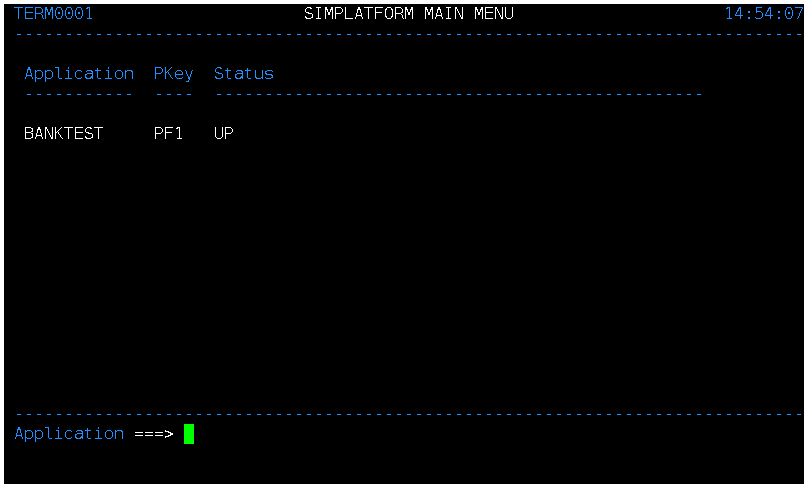
Now, we want to assert and check that the expected screen is displayed and user is able to login successfully. We will check that the screen has “SIMPLATFORM MAIN MENU” and “BANKTEST”. Just use plain English commands to check the presence of the text.
check that page contains "SIMPLATFORM MAIN MENU"
  check that page contains "BANKTEST"
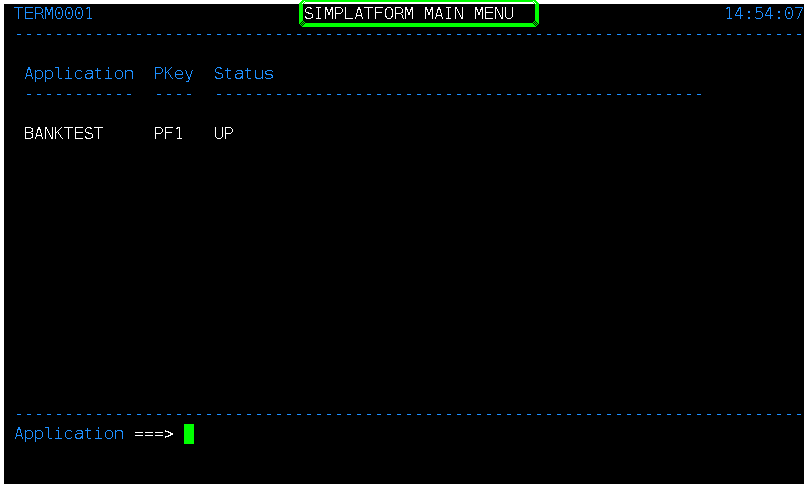
testRigor highlights the text as a result of the assertions on the screen captured during the test execution.
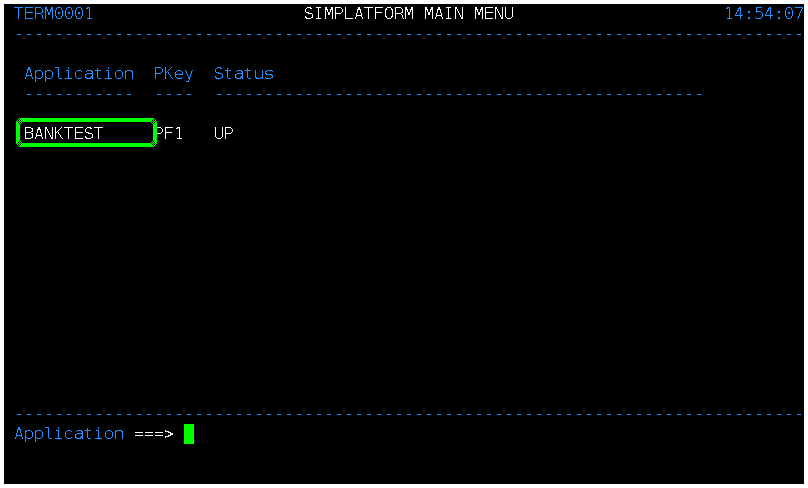
Step 3: The user is logged into the application. The next step is to enter F1, as shown in the above screen. Then, we will use the clear command, which in testRigor is mapped to Ctrl + C. As you might know, Clear is a standard command for mainframe applications.
type "F1"
  type "Ctrl + C"
Step 4: Now, we want to enter “bank” into the first input on the screen.

enter "bank" into first input
  type "Enter"
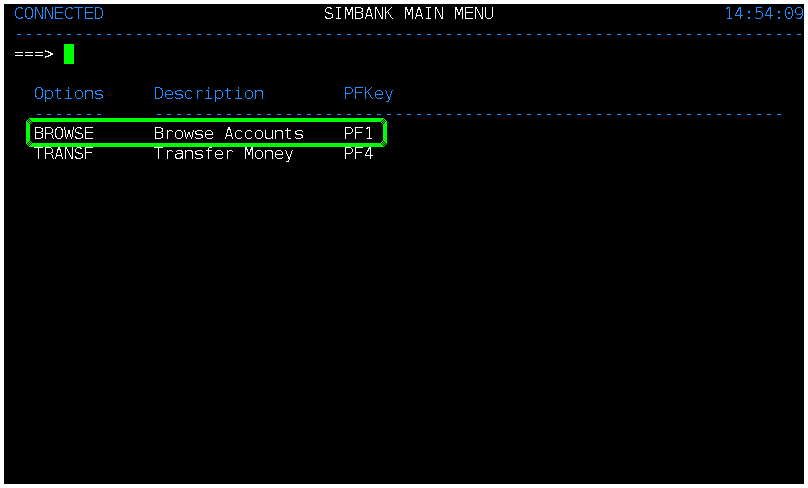
Step 6: Assert that the screen is displayed correctly and contains the ‘Browse’ option to search the accounts.

check that page contains "BROWSE Browse Accounts PF1"
testRigor is able to find the above text on mainframe screen, and hence moves to the next step of search.
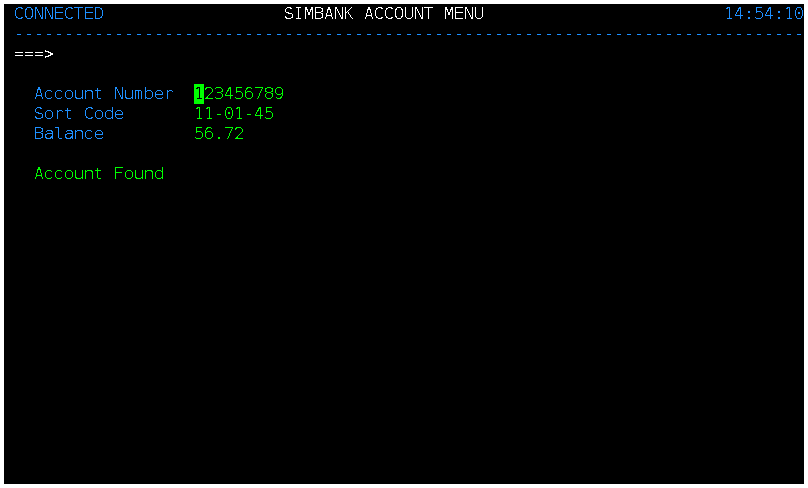
Step 7: First enter F1, and then we want to enter the account number in the ‘Account Number‘ field and then type ‘enter‘.
type "F1"
  enter "123456789" into "Account Number"
  type "Enter"
Step 8: The mainframe application is able to find the account details, as shown below, and displays the message ‘Account Found‘.

Now, we will perform the checks to ensure that the Account Balance is correct and that the message “Account Found” is displayed on the screen.
check that "Balance" has value "56.72"
  check that page contains "Account found"
testRigor highlights the assertion to make it clear that the text was found correctly, as shown below:

Complete Test Case
Here is how the complete test case will look in the testRigor app. The test steps are simple in plain English, enabling everyone in your team to write and execute them.
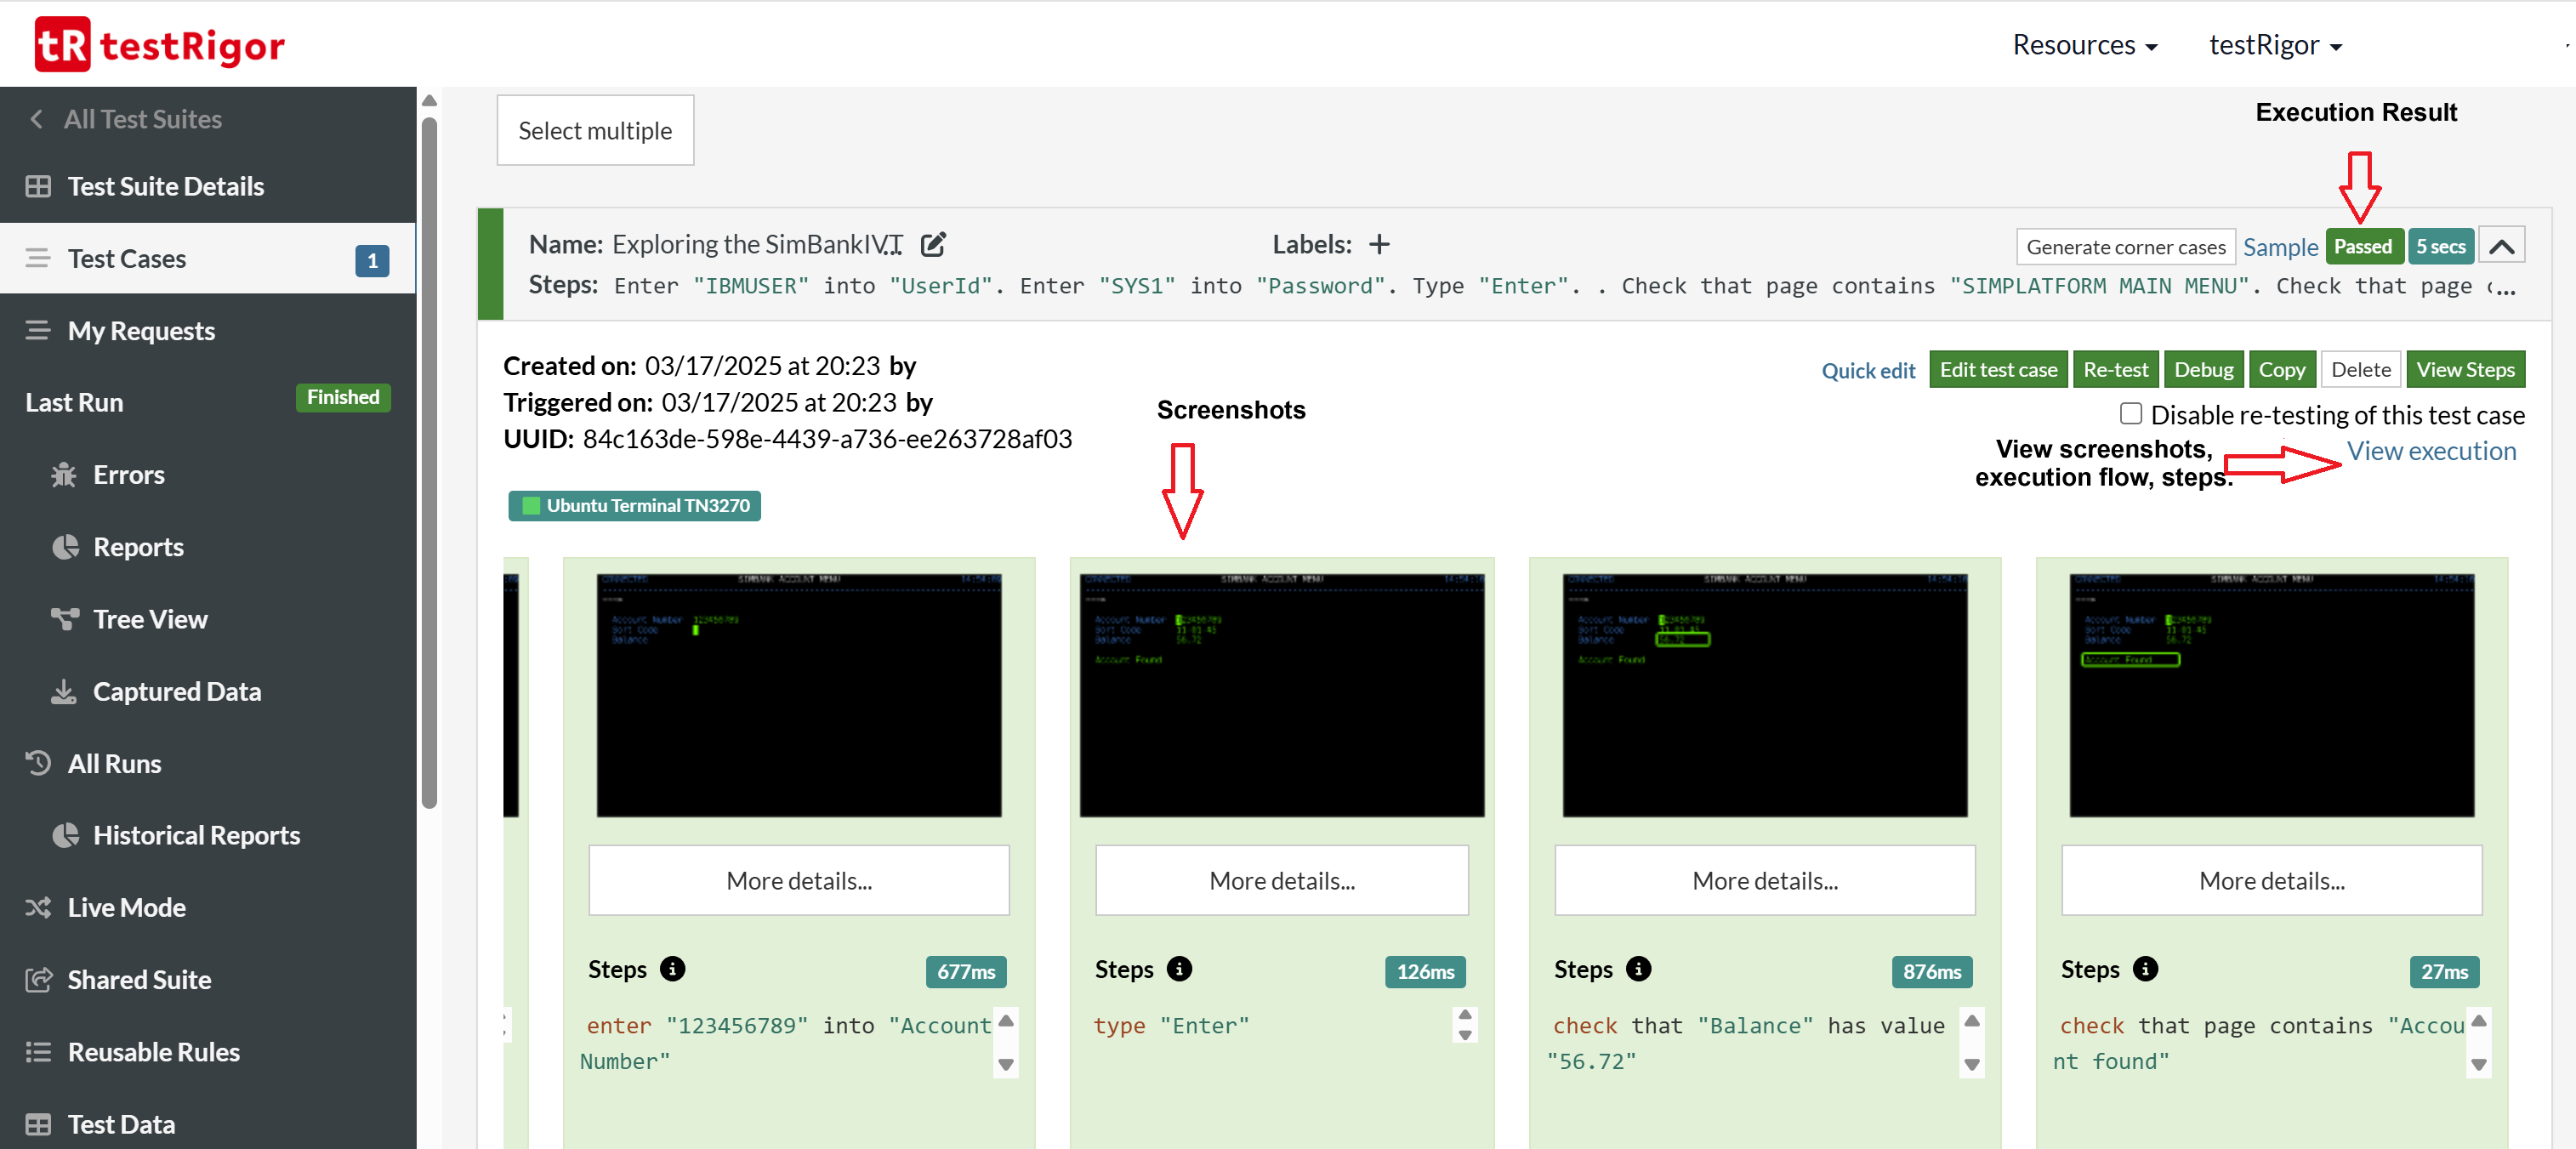
Click Add and Run.
Execution Results
Once the test is executed, you can view the execution details, such as execution status, time spent in execution, screenshots, error messages, logs, etc. In case of any failure, there are logs and error text that are available easily in a few clicks.
You can also download the complete execution with steps and screenshots in PDF or Word format through the View execution option.


Thank you for your request. Please select date and time for a demo.