Liferay Testing

Liferay provides a wide range of services and products to support the development and deployment of enterprise portals and web applications. Its modular architecture allows developers to add or remove features as needed, and it comes with various pre-built portlets, themes, and templates to accelerate development.
Liferay is written in Java and utilizes the Java Servlet API and JavaServer Pages (JSP) technology. It operates on various application servers, such as Apache Tomcat, JBoss, and IBM WebSphere, and supports multiple databases, including MySQL, Oracle, and PostgreSQL.
Some of Liferay's services are free, while others are paid. Here are some examples:
- Liferay Portal: This is the core product of the Liferay framework, providing a comprehensive platform for building and deploying web applications. Liferay Portal Community Edition is available as a free, open-source product, while Liferay Portal Enterprise Edition is a paid product offering additional features and support.
- Liferay DXP: Liferay DXP (Digital Experience Platform) is a paid product that encompasses various enterprise features and capabilities, such as advanced personalization, analytics, marketing automation, and support for multiple sites and languages.
- Liferay Cloud: This cloud-based platform offers hosting, management, and support for Liferay applications. It's a paid service that includes a range of deployment options, from public to private and hybrid cloud environments.
- Liferay Consulting: Liferay provides paid consulting services to assist organizations with the design, development, and implementation of Liferay applications.
- Liferay Training: Offering a variety of training courses and certifications for developers, administrators, and end-users, Liferay's educational resources are available both online and in-person, with some being free and others paid.
- Liferay Marketplace: A repository for plugins and extensions for Liferay applications, the Marketplace features many free items, along with some that are paid.
Liferay also provides a comprehensive set of APIs for integration with other enterprise systems and services.
You can test your Liferay application code using the following techniques:
Unit Testing
Writing unit tests is a good practice to ensure that every unit of code in your application is giving the expected output. At the heart of testing, you need to perform certain actions and then assert the output. A good unit test makes sure that the test has only one reason to fail while checking just one thing. Unit tests are meant to be lightweight so that they can be run in isolation. This is usually achieved via mocking other components or modules in the application to avoid external dependencies.
Let's take a look at some of the known tools used to test Liferay application code.
Using JUnit
JUnit is a popular open-source testing framework for Java. JUnit provides a simple and easy-to-use API for defining test cases and running them, and it includes a range of features that make it easy to write comprehensive test suites.
JUnit provides a number of useful features for writing and running tests, including:
- Annotations: JUnit uses annotations to identify methods that should be run as tests and to provide additional information about the tests.
- Assertions: JUnit provides a range of assertion methods that allow developers to check whether certain conditions are true or false.
- Test runners: JUnit provides a range of test runners that allow developers to run tests in different ways, such as running tests in parallel, running tests in a specific order, or running tests in a separate process.
- Test fixtures: JUnit provides a range of tools for creating and managing test fixtures, such as setting up test data before running tests, or tearing down test data after running tests.
Here is an example of a JUnit test case for a HelloWorld class. The HelloWorld class has a method called getName which takes a User object as input and returns a string. The test verifies that the getName method of the HelloWorld class returns the expected value when given a specific User object.
package com.test;

import static org.junit.Assert.assertEquals;
import static org.mockito.Mockito.mock;
import static org.mockito.Mockito.when;
import org.junit.Test;
import com.liferay.portal.kernel.bean.BeanLocator;
import com.liferay.portal.kernel.bean.PortalBeanLocatorUtil;
import com.liferay.portal.kernel.exception.PortalException;
import com.liferay.portal.kernel.exception.SystemException;
import com.liferay.portal.model.User;
import com.liferay.portal.service.UserLocalService;

public class HelloWorldTest {
  private final HelloWorld helloWorld = new HelloWorld();

  @Test
  public void testGetName()throws SystemException, PortalException {

    // Mocking of Objects
    BeanLocator beanLocator = mock(BeanLocator.class);
    PortalBeanLocatorUtil.setBeanLocator(beanLocator);

    UserLocalService userLocalService = mock(UserLocalService.class);
    User user = mock(User.class);

    when(beanLocator.locate(UserLocalService.class.getName())).thenReturn(userLocalService);
    when(userLocalService.getUser(1234)).thenReturn(user);
    when(user.getUserId()).thenReturn(1234L);
    when(user.getFirstName()).thenReturn("Jane");
    assertEquals("Ms Jane", helloWorld.getName(user));
  }
}
Using Liferay Portal test packages and classes
Liferay offers a group of packages for testing Liferay code. This is a set of Java packages and classes that are designed specifically for testing Liferay-based applications. The framework includes utilities for setting up a test environment, creating test data, and running unit and integration tests.
Here are some of the key packages:
- com.liferay.portal.kernel.test: This package includes a variety of testing utilities and helpers, such as classes for configuring the test environment, creating mock objects, and asserting test results.
- com.liferay.portal.test: This package includes classes for setting up a testing environment for Liferay applications, such as creating a mock portal instance, deploying plugins, and initializing the database.
- com.liferay.portal.search.test: This package includes classes for testing Liferay's search functionality, such as creating search indexes, executing search queries, and verifying search results.
- com.liferay.portal.security.auth.test: This package includes classes for testing Liferay's authentication and authorization functionality, such as simulating user logins, checking user permissions, and managing user roles.
- com.liferay.portal.service.test: This package includes classes for testing Liferay's service layer, such as invoking service methods, creating mock data, and verifying service responses.
These are just a few examples of the packages and classes included in the Liferay Portal Testing Framework. There are many more classes and utilities available for testing different aspects of Liferay-based applications.
Using Mockito
Mockito is a popular open-source mocking framework for Java. It is used for creating mock objects in unit tests. Mock objects are objects that simulate the behavior of real objects in a controlled way. They are useful for isolating the code being tested from its dependencies and providing a more controlled environment for testing.
By using Mockito, developers can focus on testing their code in isolation and without the need for external dependencies, which can make testing faster and more reliable. It is widely used in the Java ecosystem and is compatible with many popular testing frameworks such as JUnit and TestNG.
Using PowerMock
PowerMock is a Java framework that extends other popular testing frameworks such as JUnit and Mockito. It allows for the testing of code that is normally difficult to test, such as static, final, and private methods. PowerMock works by manipulating the bytecode of the classes being tested, which allows it to bypass certain restrictions that would normally make these types of tests impossible.
In addition to its core features, PowerMock also provides a number of utilities and tools to aid in testing, such as the ability to mock constructors and other types of object creation, the ability to test code that interacts with external systems and resources, and more. It can be used in conjunction with other testing frameworks to provide a more complete testing solution for Java applications.
Using TestNG
TestNG is a testing framework for Java that is inspired by JUnit and NUnit but with some additional functionality. It is designed to cover all categories of tests such as unit, functional, end-to-end, integration, etc. TestNG provides advanced features such as annotations, test dependencies, parameterization, data-driven testing, and parallel execution. It is widely used in the Java community for testing applications and is supported by popular IDEs such as Eclipse, IntelliJ IDEA, and NetBeans.
Integration Testing
Integration testing focuses on module integrations. Here too you can use techniques like mocking and dependency injection to reduce external dependencies. However, be sure to do this wisely since we want to exercise integrations of the modules under test. You can write integration tests using the same tools used for unit testing like JUnit, Mockito, Liferay test classes, and TestNG. However, there are some more tools that can be leveraged. They are mentioned below.
Using Arquillian
Arquillian is an integration testing framework that provides a simple way to write tests that interact with an application server or a web container. It allows developers to write and execute tests within the container, rather than having to set up and manage the container externally. This can greatly simplify the testing process and provide more accurate results.
Arquillian supports various types of containers, including Java EE containers, OSGi frameworks, and embedded containers. It also provides a flexible extension system that allows developers to customize the testing environment and behavior. Arquillian is often used in conjunction with other testing frameworks, such as JUnit or TestNG, to provide a complete testing solution for enterprise applications. Arquillian has a set of tools to test Liferay plugins called Arquillian Extension for Liferay.
package com.liferay.arquillian.test;

import com.google.common.io.Files;

import com.liferay.arquillian.containter.remote.enricher.Inject;
import com.liferay.arquillian.sample.service.SampleService;
import com.liferay.portal.kernel.exception.PortalException;

import java.io.File;
import java.io.IOException;

import org.jboss.arquillian.container.test.api.Deployment;
import org.jboss.arquillian.junit.Arquillian;
import org.jboss.shrinkwrap.api.ShrinkWrap;
import org.jboss.shrinkwrap.api.spec.JavaArchive;

import org.junit.Assert;
import org.junit.Test;
import org.junit.runner.RunWith;

@RunWith(Arquillian.class)
public class BasicPortletIntegrationTest {

  @Deployment
  public static JavaArchive create() throws Exception {
    final File tempDir = Files.createTempDir();

    String gradlew = "./gradlew";

    String osName = System.getProperty("os.name", "");
    if (osName.toLowerCase().contains("windows")) {
        gradlew = "./gradlew.bat";
    }

    final ProcessBuilder processBuilder = new ProcessBuilder(
        gradlew, "jar", "-Pdir=" + tempDir.getAbsolutePath());

    final Process process = processBuilder.start();

    process.waitFor();

    final File jarFile = new File(
      tempDir.getAbsolutePath() +
        "/com.liferay.arquillian.sample-1.0.0.jar");

    return ShrinkWrap.createFromZipFile(JavaArchive.class, jarFile);
  }

  @Test
  public void testAdd() throws IOException, PortalException {
    final long result = _sampleService.add(5, 3);

    Assert.assertEquals(8, result);
  }

  @Inject
  private SampleService _sampleService;

}
Using Liferay Test Integration Bridge
Liferay Test Integration Bridge is a testing tool provided by Liferay that enables integration testing of Liferay applications. It is designed to be used with popular Java testing frameworks such as JUnit and TestNG. The Test Integration Bridge provides a set of classes and annotations that allow you to write tests that simulate requests to a Liferay portal and verify the responses that are generated. This makes it possible to test Liferay applications in a more realistic environment, as you can interact with the portal's various components (such as portlets, services, and themes) just as you would in a live deployment.
The Test Integration Bridge also provides a number of utility methods for setting up and tearing down test environments, as well as methods for interacting with various parts of the portal (such as users, roles, and permissions).
Some popularly used classes and utilities provided by the Liferay Test Integration Bridge are:
- LiferayIntegrationTestRule: A JUnit TestRule that initializes the Liferay environment for integration testing.
- PortalLifecycleUtil: A utility class for managing the Portal lifecycle during integration testing.
- MockFacesContext: A class for mocking the JSF FacesContext object during testing.
- MockHttpServletRequest: A class for mocking the HttpServletRequest object during testing.
- MockHttpServletResponse: A class for mocking the HttpServletResponse object during testing.
- MockLiferayPortletActionRequest: A class for mocking the LiferayPortletActionRequest object during testing.
- MockLiferayPortletRenderRequest: A class for mocking the LiferayPortletRenderRequest object during testing.
- MockLiferayPortletConfig: A class for mocking the LiferayPortletConfig object during testing.
- MockLiferayPortletContext: A class for mocking the LiferayPortletContext object during testing.
- MockLiferayPortletPreferences: A class for mocking the LiferayPortletPreferences object during testing.
Using Liferay DXP's @Inject annotation
With the help of @Inject, which comes from the LiferayIntegrationTestRule class, you can inject service components into an integration test. You need to create a @Rule in your class of type com.liferay.portal.test.rule.LiferayIntegrationTestRule, create a field to hold the service component (preferably a static field) and add the @Inject annotation. You can further specify a filter string or type parameter to specify the service component object to inject.
public class Test {

  @ClassRule
  @Rule
  public static final AggregateTestRule aggregateTestRule =
    new LiferayIntegrationTestRule();

  @Test
  public void testSomething() {
    // your test code here
  }

  @Inject(
    filter = "(&(objectClass=com.liferay.dynamic.data.lists.internal.upgrade.DDLServiceUpgrade))"
  )
  private static UpgradeStepRegistrator _upgradeStepRegistrator;

}
End-to-End Testing
End-to-end testing focuses on the end user’s view of interacting with the application. End users are not interested in what lies under the hood, but rather in how well the application responds and aids in fulfilling their needs. So we can say that end-to-end tests are in a way validating user journeys rather than the output of various units of code. This does not mean that code output is not important, but rather, the focus now shifts to the bigger picture, whether all these units are successfully able to come together to form the bigger picture.
Here are the most popular end-to-end testing framework choices:
- Arquillian and Selenium
- testRigor
Using Arquillian and Selenium
When it comes to end-to-end testing, you need to interact with the application like an actual user, that is, via a browser. Selenium is a popular choice for browser automation, and when used with other tools like Arquillian, it can automate tests easily.
package com.liferay.arquillian.test;

import com.liferay.arquillian.portal.annotation.PortalURL;
import org.jboss.arquillian.drone.api.annotation.Drone;
import org.jboss.arquillian.junit.Arquillian;
import org.junit.Assert;
import org.junit.Test;
import org.junit.runner.RunWith;
import org.openqa.selenium.WebDriver;
import org.openqa.selenium.WebElement;
import org.openqa.selenium.support.FindBy;

@RunWith(Arquillian.class)
public class BasicPortletFunctionalTest {

  @Test
  public void testAdd() throws InterruptedException {
    _browser.get(_portletURL.toExternalForm());

    _firstParameter.clear();
    _firstParameter.sendKeys("5");

    _secondParameter.clear();
    _secondParameter.sendKeys("3");

    _add.click();

    Thread.sleep(5000);

    Assert.assertEquals("8", _result.getText());
  }

  @FindBy(css = "button[type=submit]")
  private WebElement _add;

  @Drone
  private WebDriver _browser;

  @FindBy(css = "input[id$='firstParameter']")
  private WebElement _firstParameter;

  @PortalURL("arquillian_sample_portlet")
  private URL _portletURL;

  @FindBy(css = "span[class='result']")
  private WebElement _result;

  @FindBy(css = "input[id$='secondParameter']")
  private WebElement _secondParameter;

}
Using testRigor
Take a look at the above example for an end-to-end test case. It's designed as a test for simple addition functionality but involves a lot of configuration, all expressed in code. So anyone who wants to write end-to-end tests needs to understand how to code and perform these initialization steps as well. But what if you could write your end-to-end tests without having to worry about these aspects, focusing instead on your test steps and assertions? You can easily achieve this with testRigor.
testRigor is an AI-powered automation tool that enables you to write tests in plain English. It also employs generative AI to further expedite test creation, crafting actual tests for you based solely on test case titles. Your test steps appear as simple English instructions given to the testRigor engine. The tool comes with an easy-to-use and intuitive user interface that enables you to configure complex settings like various integrations and execution-related specifications.
The testRigor platform greatly reduces the hassle of maintaining test suites thanks to the AI-powered engine that helps manage minor variations in UI element locators, so you can put your efforts into creating quality test cases. testRigor is a cloud-based platform and hence you need not worry about having to install it or set it up locally, though that is an option as well. With this tool, you can test across multiple platforms such as web, mobile and desktop.
You can perform regular browser and mobile interactions with ease while also testing more complex cases involving 2-factor authentication login, email testing, audio testing, visual testing, table data testing, accessibility testing and many more. This tool also supports mocking API calls, interacting with databases and creating test data.
open url "https://www.amazon.com"
check that page contains "Search Amazon.com"
enter "64GB drive" into "Search Amazon.com"
click "Go"
scroll down
grab value from "MAIN-SEARCH_RESULTS-5" and save it as "item1"
click on stored value "item1"
scroll down by 1/2 of the screen
select "2" from "Quantity:"
scroll up
click "Add to cart"
check that page contains "Added to cart"
grab value from "proceedToRetailCheckout" and save it as "button1"
check that stored value "button1" itself contains "2 items"
click by image from stored value "logo" with less than "10" % discrepancy
How to do End-to-end Testing with testRigor
Let us take the example of an e-commerce website that sells plants and other gardening needs. We will create end-to-end test cases in testRigor using plain English test steps.
Step 1: Log in to your testRigor app with your credentials.
Step 2: Set up the test suite for the website testing by providing the information below:
- Test Suite Name: Provide a relevant and self-explanatory name.
- Type of testing: Select from the following options: Desktop Web Testing, Mobile Web Testing, Native and Hybrid Mobile, based on your test requirements.
- URL to run test on: Provide the application URL that you want to test.
- Testing credentials for your web/mobile app to test functionality which requires user to login: You can provide the app’s user login credentials here and need not write them separately in the test steps then. The login functionality will be taken care of automatically using the keyword
login. - OS and Browser: Choose the OS Browser combination on which you want to run the test cases.
- Number of test cases to generate using AI: If you wish, you can choose to generate test cases based on the App Description text, which works on generative AI.
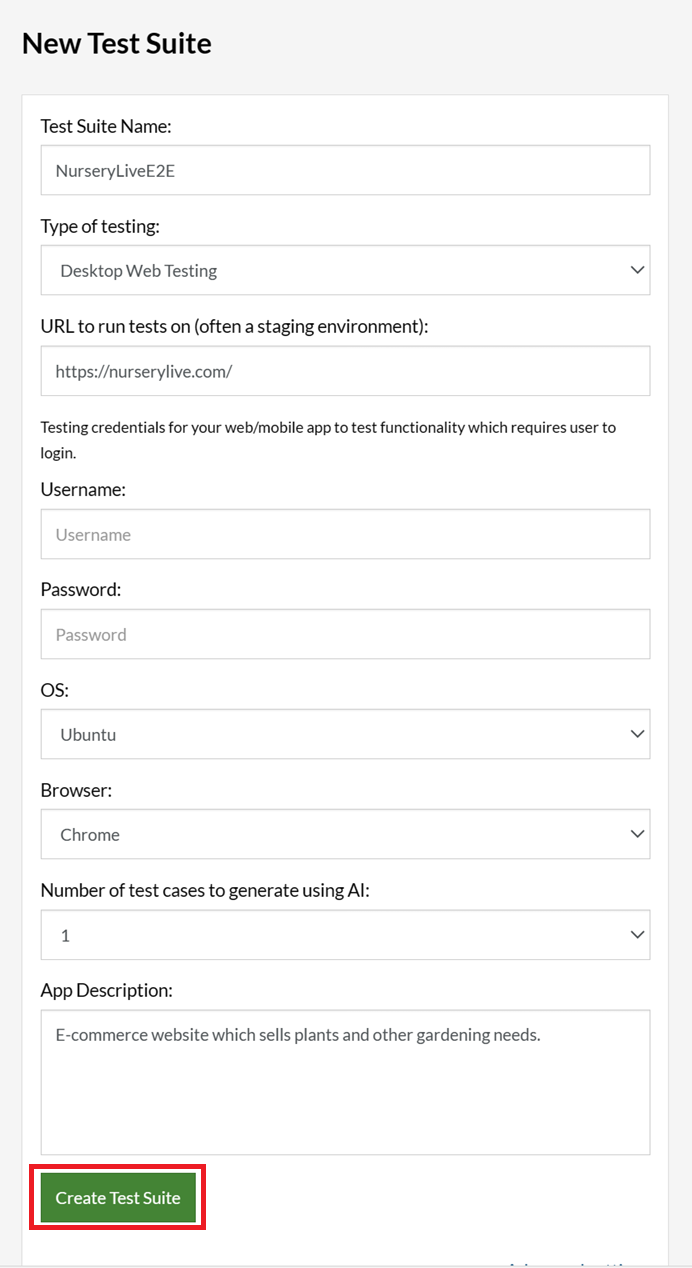
Step 3: Click Create Test Suite.
On the next screen, you can let AI generate the test case based on the App Description you provided during the Test Suite creation. However, for now, select do not generate any test, since we will write the test steps ourselves.
Step 4: To create a new custom test case yourself, click Add Custom Test Case.

Step 5: Provide the test case Description and start adding the test steps.
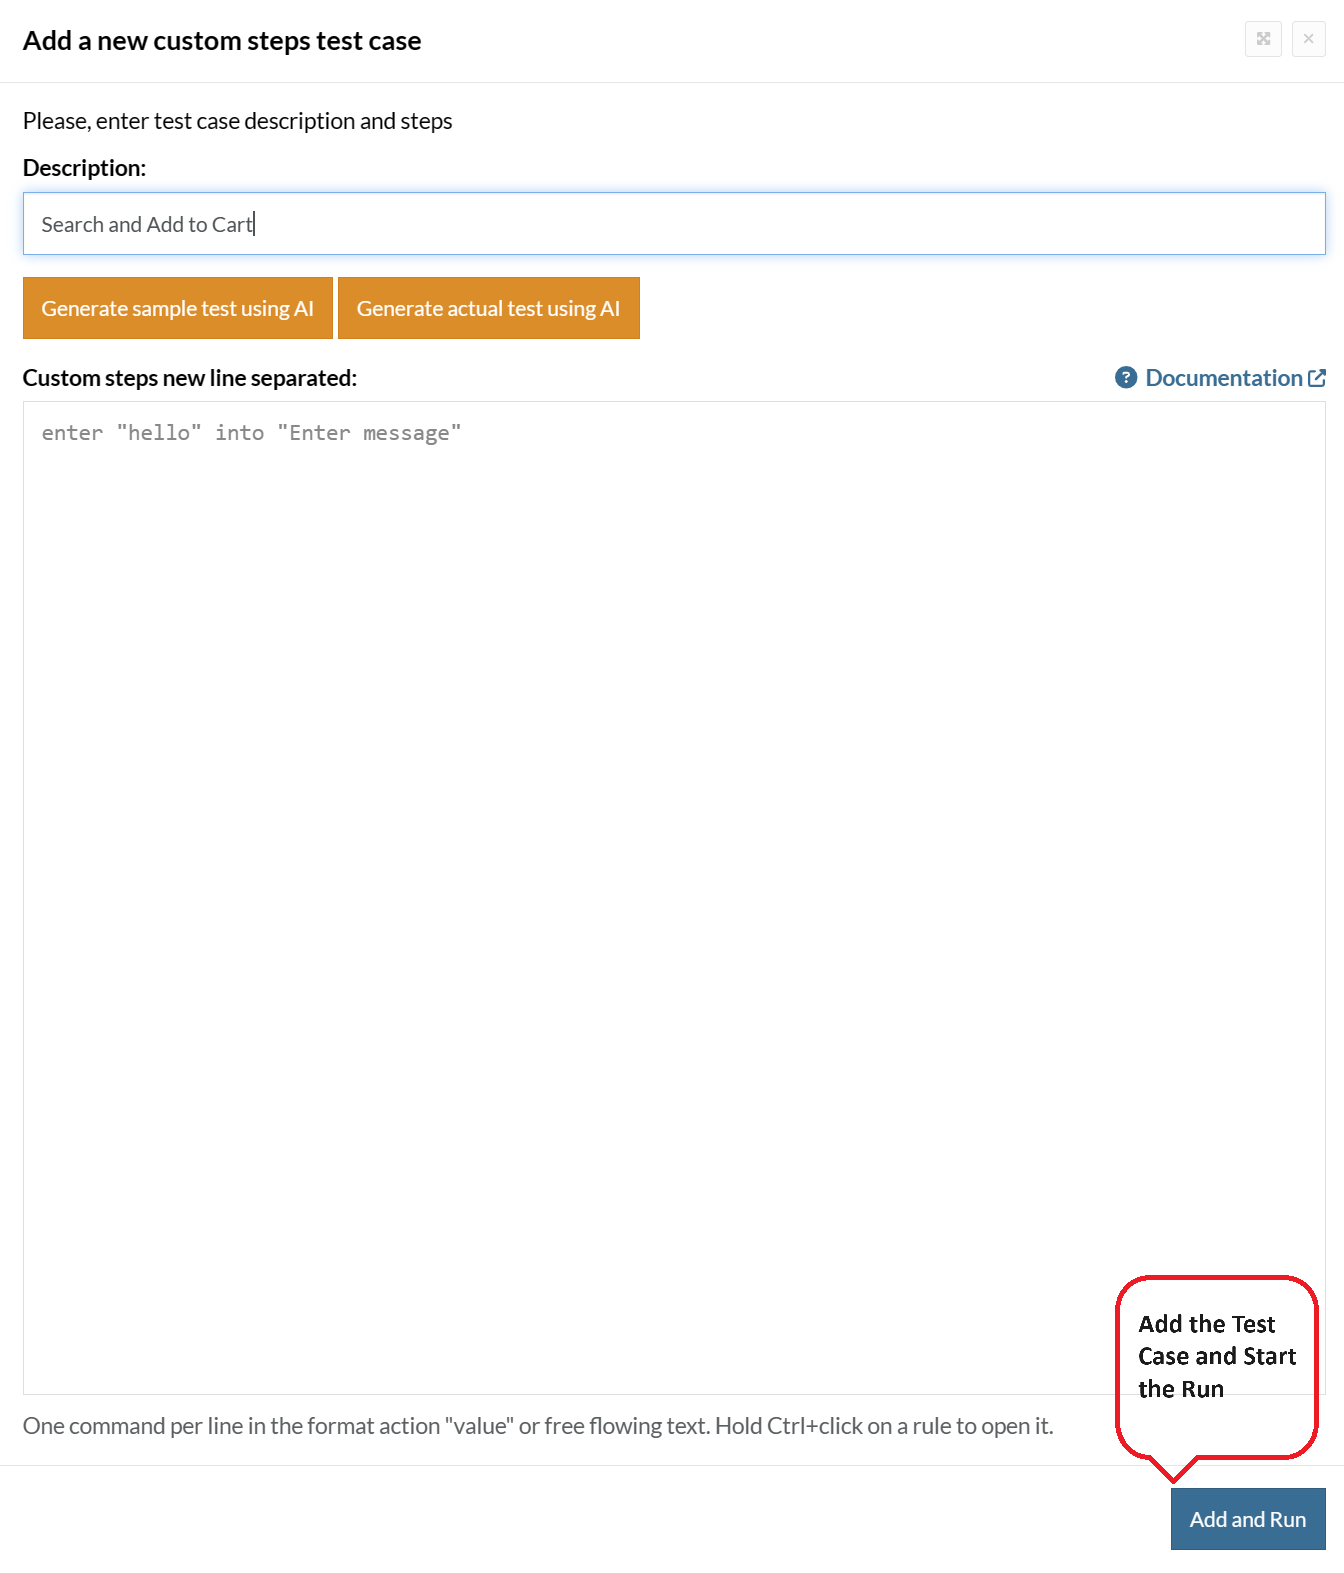
For the application under test, i.e., e-commerce website, we will perform below test steps:
- Search for a product
- Add it to the cart
- Verify that the product is present in the cart
Test Case: Search and Add to Cart
Step 1: We will add test steps on the test case editor screen one by one.
testRigor automatically navigates to the website URL you provided during the Test Suite creation. There is no need to use any separate function for it. Here is the website homepage, which we intend to test.

First, we want to search for a product in the search box. Unlike traditional testing tools, you can identify the UI element using the text you see on the screen. You need not use any CSS/XPath identifiers.
click "What are you looking for?"
Step 2: Once the cursor is in the search box, we will type the product name (lily), and press enter to start the search.
type "lily"
enter enter
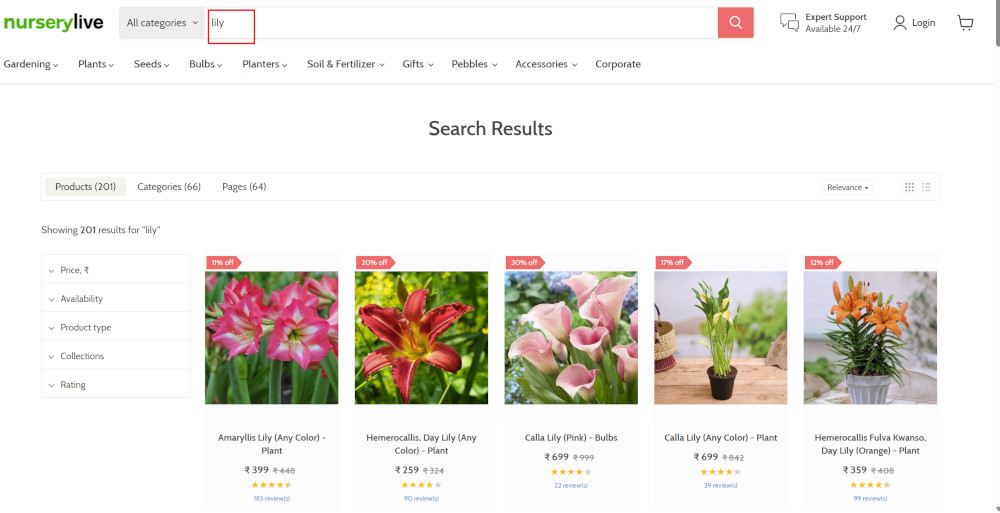
Search lists all products with the “lily” keyword on the webpage.
Step 3: The lily plant we are searching for needs the screen to be scrolled; for that testRigor provides a command. Scroll down until the product is present on the screen:
scroll down until page contains "Zephyranthes Lily, Rain Lily (Red)"
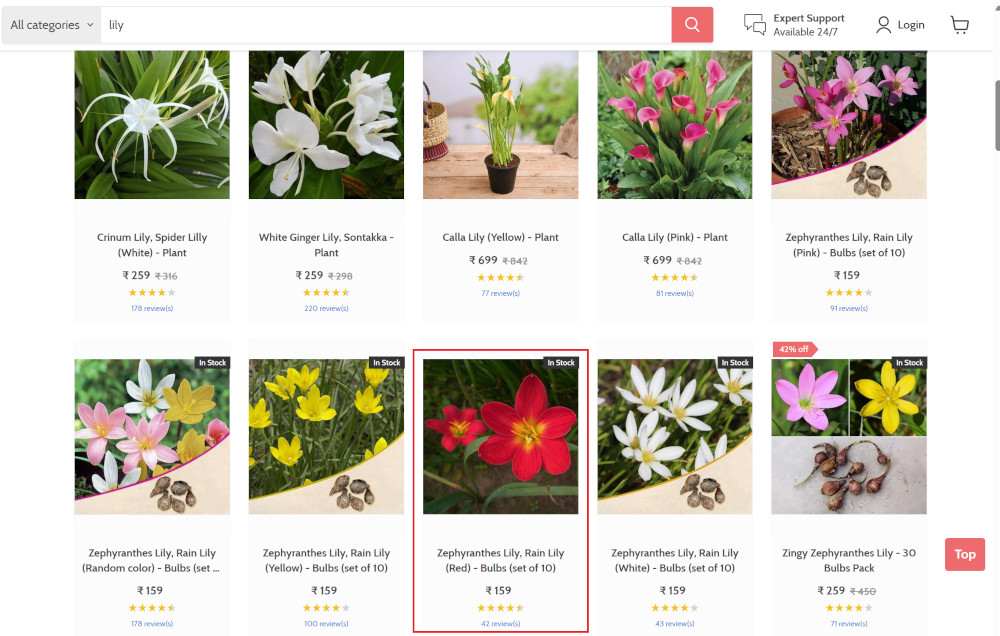
When the product is found on the screen, testRigor stops scrolling.
Step 4: Click on the product name to view the details:
click "Zephyranthes Lily, Rain Lily (Red)"
After the click, the product details are displayed on the screen as below, with the default Quantity as 1.
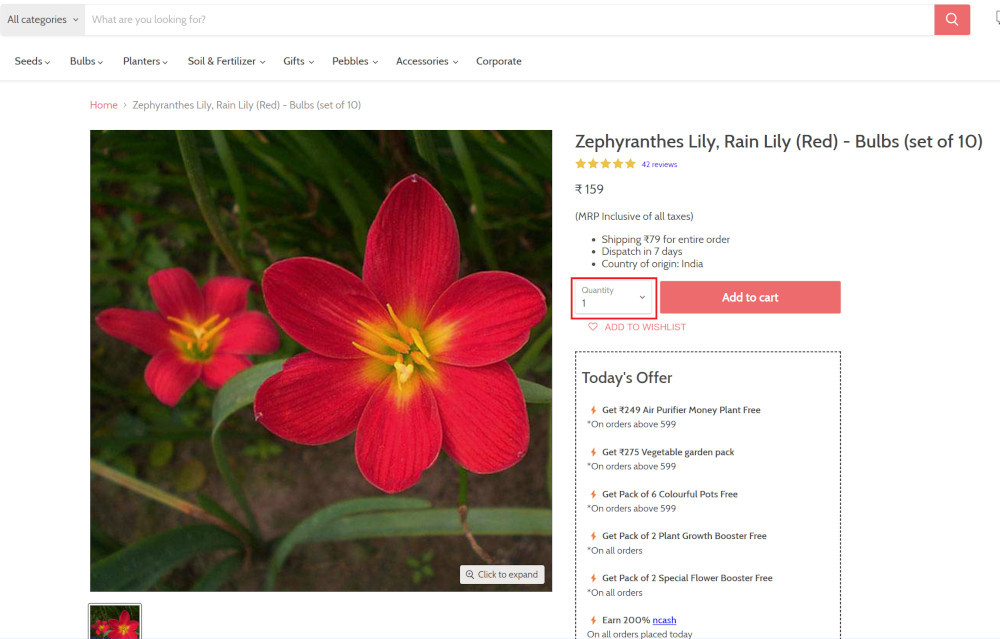
Step 5: Lets say, we want to change the Quantity to 3, so here we use the testRigor command to select from a list.
select "3" from "Quantity"
click "Add to cart"
The product is successfully added to the cart, and the “Added to your cart:” message is displayed on webpage.
Step 6: To assert that the message is successfully displayed, use a simple assertion command as below:
check that page contains "Added to your cart:"
Step 7: After this check, we will view the contents of the cart by clicking View cart as below:
click "View cart"

Step 8: Now we will again check that the product is present in the cart, under heading “Your cart” using the below assertion. With testRigor, it is really easy to specify the location of an element on the screen.
check that page contains "Zephyranthes Lily, Rain Lily (Red)" under "Your cart"

Complete Test Case
Here is how the complete test case will look in the testRigor app. The test steps are simple in plain English, enabling everyone in your team to write and execute them.
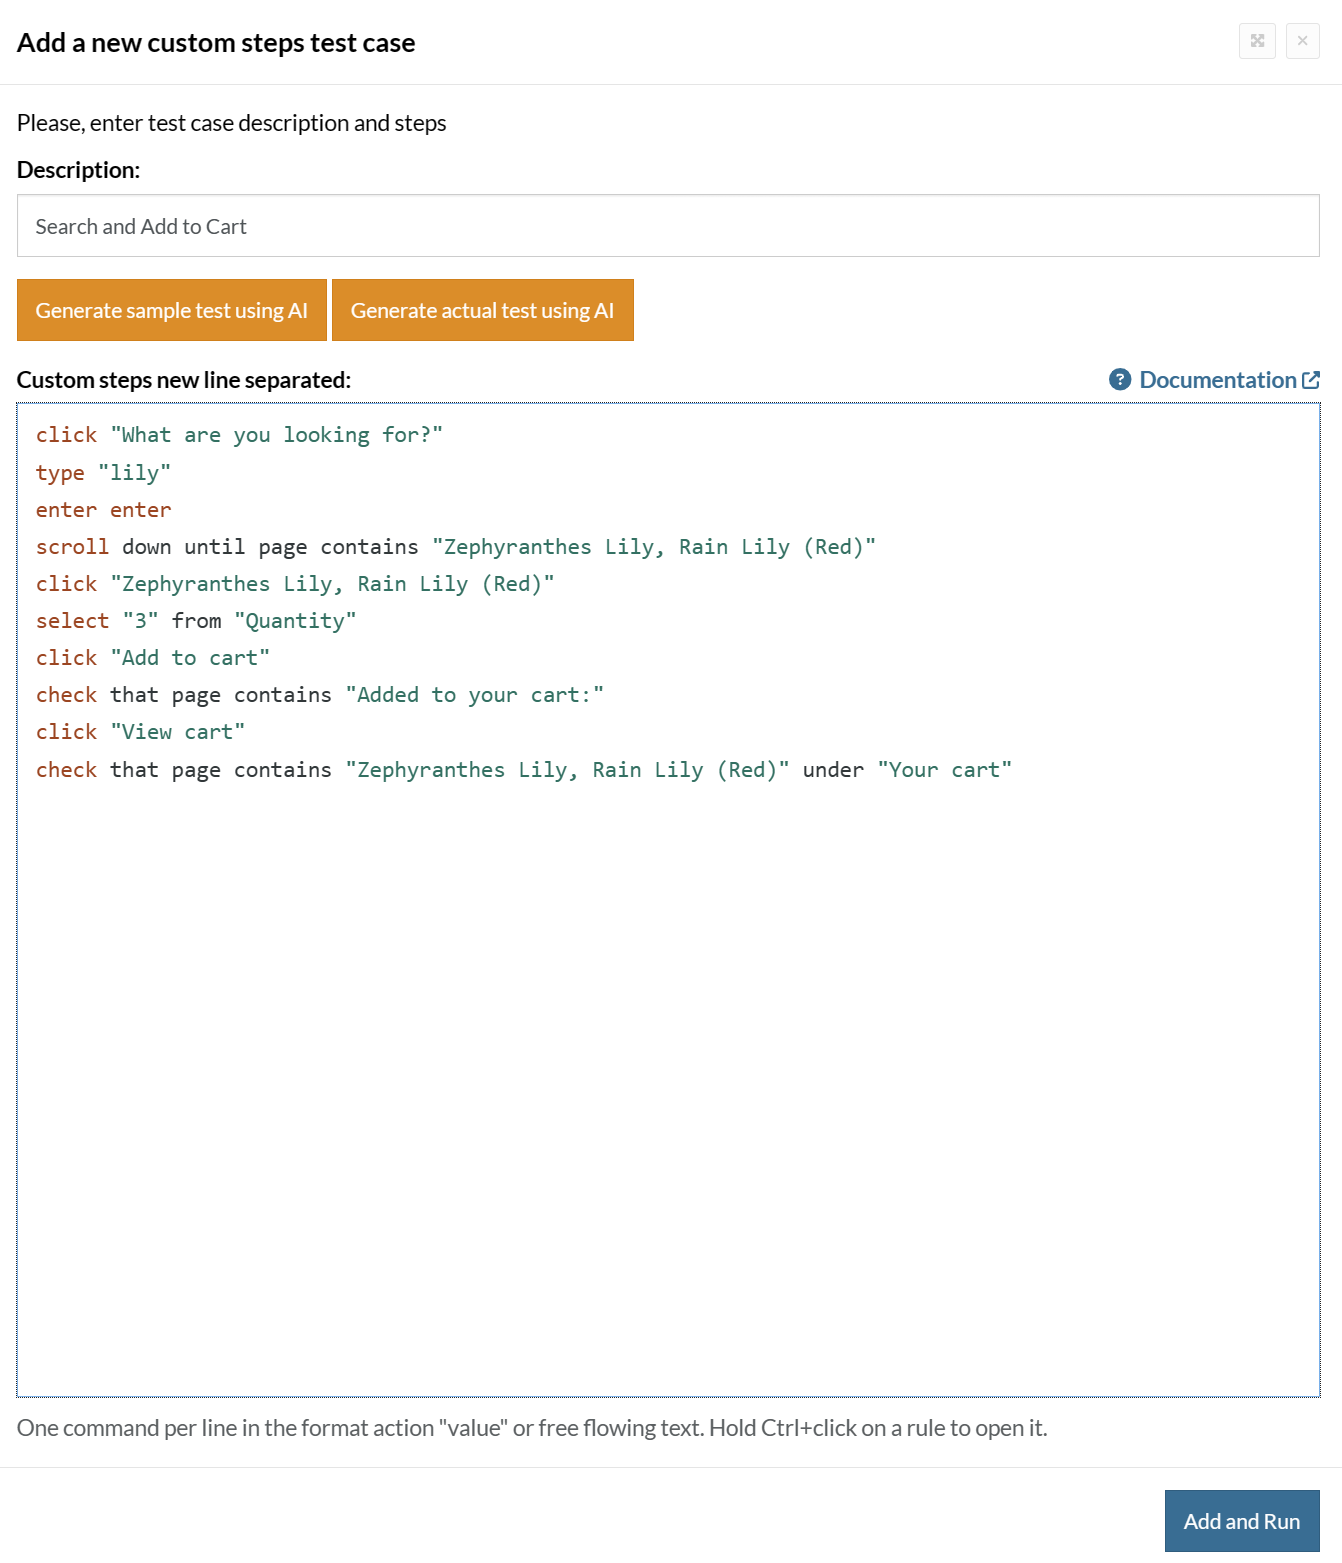
Click Add and Run.
Execution Results
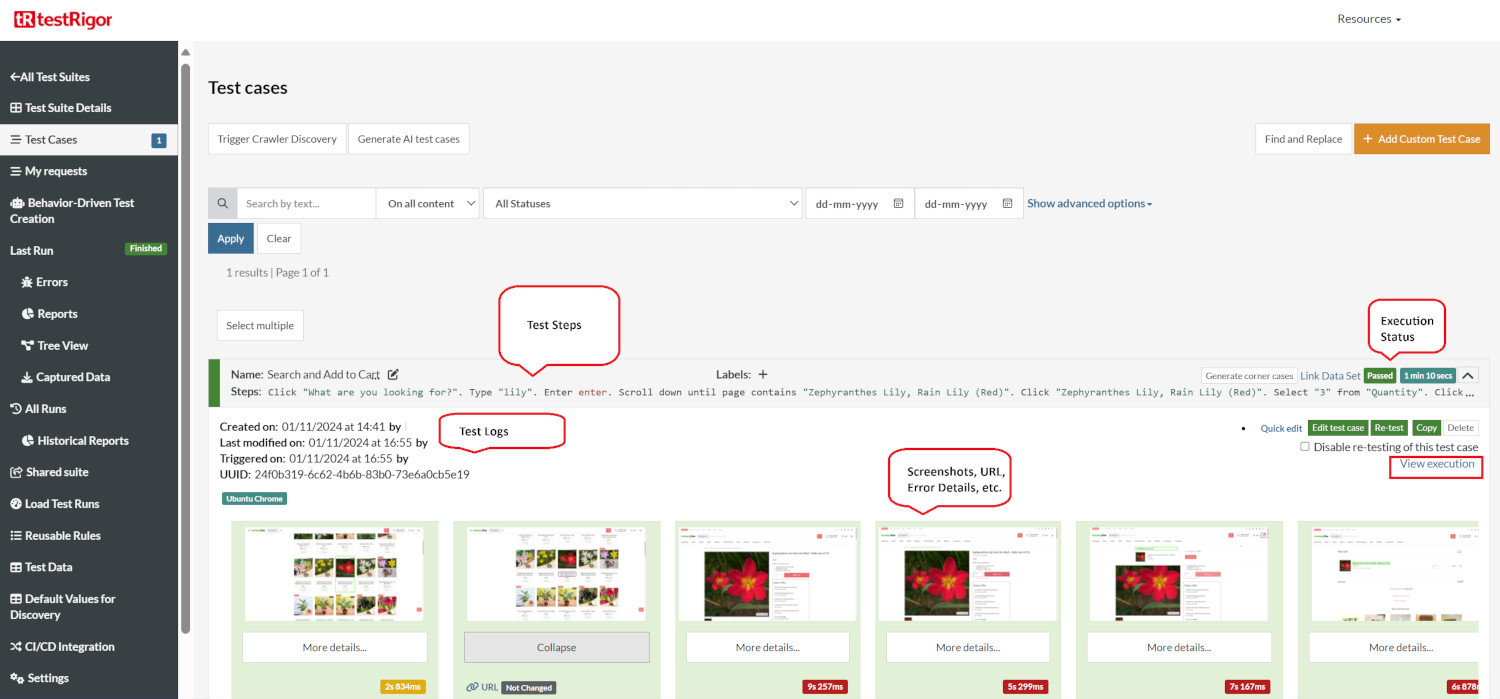
Once the test is executed, you can view the execution details, such as execution status, time spent in execution, screenshots, error messages, logs, video recordings of the test execution, etc. In case of any failure, there are logs and error text that are available easily in a few clicks.
You can also download the complete execution with steps and screenshots in PDF or Word format through the View Execution option.
testRigor’s Capabilities
Apart from the simplistic test case design and execution, there are some advanced features that help you test your application using simple English commands.
- Reusable Rules (Subroutines): You can easily create functions for the test steps that you use repeatedly. You can use the Reusable Rules to create such functions and call them in test cases by simply writing their names. See the example of Reusable Rules.
- Global Variables and Data Sets: You can import data from external files or create your own global variables and data sets in testRigor to use them in data-driven testing.
- 2FA, QR Code, and Captcha Resolution: testRigor easily manages the 2FA, QR Code, and Captcha resolution through its simple English commands.
- Email, Phone Call, and SMS Testing: Use simple English commands to test the email, phone calls, and SMS. These commands are useful for validating 2FA scenarios, with OTPs and authentication codes being sent to email, phone calls, or via phone text.
- File Upload/ Download Testing: Execute the test steps involving file download or file upload without the requirement of any third-party software. You can also validate the contents of the files using testRigor’s simple English commands.
- Database Testing: Execute database queries and validate the results fetched.
testRigor enables you to test web, mobile (hybrid, native), API, and desktop apps with minimum effort and maintenance.
Additional Resources
- Access testRigor documentation to know about more useful capabilities
- Top testRigor’s features
- How to perform end-to-end testing
Conclusion
Liferay provides an excellent platform for developing applications, and coupling it with the right testing tools ensures that your application remains free of bugs.
| Achieve More Than 90% Test Automation | |
| Step by Step Walkthroughs and Help | |
| 14 Day Free Trial, Cancel Anytime |


