
Mojolicious Testing
Mojolicious is an open-source full-stack web development framework for the Perl programming language. It was created by Sebastian Riedel in 2009 and is designed to be user-friendly, powerful, and flexible. Mojolicious utilizes an MVC (Model-View-Controller) approach for development. The framework provides many tools and features to aid developers in building web applications quickly and easily. These include a robust routing engine, a built-in web server, template rendering, session management, and support for web sockets, among others.
A key feature of Mojolicious is its emphasis on real-time web development, with built-in support for web sockets and server-sent events. This feature makes it an excellent fit for building interactive web applications, such as chat applications, real-time analytics dashboards, and more. It is also renowned for its modern and expressive syntax, making it easy to write clean and maintainable code. The framework is fully compatible with the latest versions of Perl and has a thriving community of developers and users who contribute to its development and support.
The goal of unit tests is to inspect various individual units in your code. These units could be part of the model, view, controller, route, or middleware. The main goal is to focus on individual methods and verify their outcomes using techniques such as mocking. Checking scenarios like positive and negative flows, and error-handling cases will help you create high-quality test cases.
Testing using the Test framework
The Test framework offers many helper modules that facilitate the testing of Perl code. Some examples of Test modules in Perl include Test::Exception, Test::MockObject, Test::Deep, and Test::WWW::Mechanize, among many others.
use strict;
use Test;

# use a BEGIN block so we print our plan before MyModule is loaded
BEGIN { plan tests => 14, todo => [3,4] }

# load your module...
use MyModule;

print "# I'm testing MyModule version $MyModule::VERSION\n";

ok(0); # failure
ok(1); # success

ok(0); # ok, expected failure (see todo list, above)
ok(1); # surprise success!

# and so on...
Next, we'll explore some of the modules that the Test framework offers to assist with testing.
Testing using Test::Mojo
Test::Mojo comes bundled with Mojolicious, offering a means to write tests that simulate HTTP requests and responses to your application. It makes it easy to test controllers, routes, and templates, and is typically used in conjunction with Test::More.
use Mojo::Base -strict;

use Test::Mojo;
use Test::More;

# Start a Mojolicious app named "Celestial"
my $t = Test::Mojo->new('Celestial');

# Post a JSON document
$t->post_ok('/notifications' => json => {event => 'full moon'})
  ->status_is(201)
  ->json_is('/message' => 'notification created');

# Perform GET requests and look at the responses
$t->get_ok('/sunrise')
  ->status_is(200)
  ->content_like(qr/ am$/);
$t->get_ok('/sunset')
  ->status_is(200)
  ->content_like(qr/ pm$/);

# Post a URL-encoded form
$t->post_ok('/insurance' => form => {name => 'Jimmy', amount => '€3.000.000'})
  ->status_is(200);

# Use Test::More's like() to check the response
like $t->tx->res->dom->at('div#thanks')->text, qr/thank you/, 'thanks';

done_testing();
The above test makes several HTTP requests to the application using Test::Mojo's testing methods, such as post_ok, get_ok, status_is, content_like, and json_is. The responses are then verified using Test::More's like method. The done_testing() method at the end of the script signifies the completion of the unit tests, and the number of tests executed is automatically determined by the testing framework.
Testing using Test::More
Test::More offers a simple yet powerful API for writing and executing tests. It includes an array of methods for making assertions about the behavior of your code, such as ok(), is(), like(), cmp_ok(), and isa_ok(). These methods allow developers to test a wide range of conditions, from simple equality checks to more complex object comparisons. Test::More also includes features for test planning, output formatting, and error reporting.
Testing using Test::Unit
Test::Unit is another module used for testing Perl code. However, for Mojolicious, Test::Mojo is generally the preferred choice. If you're accustomed to Test::Unit, you can certainly write your tests using this module.
Integration Testing
Integration testing focuses on verifying the interaction and communication between different components or modules of a software system. It is performed after unit testing, where individual units or components are tested in isolation. The purpose of integration testing is to expose defects in the interfaces and interactions between these units when they are integrated.
The main objective of integration testing is to ensure that the integrated components work together correctly as a whole and fulfill the intended functionality and requirements. It aims to identify any issues such as incompatible interfaces, data inconsistencies, communication failures, or incorrect assumptions made by the individual components.
These tests are expected to be lighter weight compared to end-to-end tests, and hence, you can use mocking or data fixtures in place of the real deal to simulate your integration tests. However, certain parts of the test, such as the modules being tested for integration, should not be simulated.
- Mojo::Client: This module allows you to make requests to URLs, handling the low-level details of setting up the connection, sending the request, and managing the response. It offers various methods for making different types of requests, including GET, POST, PUT, DELETE, and PATCH. Additionally, it also supports WebSocket connections using the websocket() method.
- Mojo::DOM: Built on top of the Mojo::DOM::HTML and Mojo::DOM::XML parsers (which are in turn based on the Mojo::DOM::Tree module), Mojo::DOM can manage different markup languages and encodings, automatically detecting and repairing errors in the input document. With Mojo::DOM, you can select elements in an HTML or XML document using CSS-like selectors and then manipulate those elements by adding or modifying attributes, changing their text content, or even adding or removing entire nodes.
- Test::WWW::Mechanize::Mojo: This module enables you to test Mojolicious applications using the WWW::Mechanize interface, incorporating features of web application testing. It supports various HTTP methods and offers methods for checking the status code, headers, and content of the response. Importantly, the module doesn't require you to launch a server or make real HTTP requests.
- Test::Mojo::Role::*: With roles, you can extend the Test::Mojo module with additional functionalities. Some examples of available roles include Test::Mojo::Role::Session, Test::Mojo::Role::Debug, and Test::Mojo::Role::SubmitForm.
my $req_number = 0;
$client->websocket(
  # First request
  '/' => sub {
    my $self = shift;
    $self->receive_message(
      sub {
        my ($self, $message) = @_;
        if ($req_number == 0) { # first request
          like($message, qr/{"text":"Guest\d+ has joined chat"}/);
        } elsif {
        ...
        # end of last message
        $self->finish;
      }
    $req_number++;
  });
This example uses the websocket() method to simulate a WebSocket connection and perform integration testing on client-server interaction.
End-to-End Testing
- Test::Mojo's modules
- testRigor
Test::Mojo's modules
Test::Mojo provides modules for writing and testing end-to-end scenarios. Some of these modules include Test::Mojo::Role::Phantom, Test::Mojo::Role::Selenium, Test::Mojo::Role::JSON, Test::Mojo::Role::XML, Test::Mojo::Role::Content, Test::Mojo::Role::Header, Test::Mojo::Role::UA, Test::Mojo::Role::WebSocket, and Test::Mojo::Role::Moai, which are used for different testing purposes.
use Mojo::Base -strict;
use Test::Mojo::WithRoles "Selenium";
use Test::More;

$ENV{MOJO_SELENIUM_DRIVER} ||= 'Selenium::Chrome';

my $t = Test::Mojo::WithRoles->new->setup_or_skip_all;

$t->set_window_size([1024, 768]);

$t->navigate_ok('/perldoc');
$t->current_url_is("http://mojolicious.org/perldoc");
$t->live_text_is('a[href="#GUIDES"]' => 'GUIDES');

$t->driver->execute_script(qq[document.querySelector("form").removeAttribute("target")]);
$t->element_is_displayed("input[name=q]")
  ->send_keys_ok("input[name=q]", ["render", \"return"]);

$t->wait_until(sub { $_->get_current_url =~ qr{q=render} });
$t->live_value_is("input[name=search]", "render");

done_testing;
testRigor
While Mojolicious offers built-in support for web testing, implementing complex business scenarios can be challenging. For those unfamiliar with Perl or coding, such as manual testers and business analysts, a more accessible tool like testRigor may be necessary.
testRigor is a no-code cloud-platform that supports web, mobile and desktop testing. The scripts are written in plain English, thus eliminating the hassle of writing code. Moreover, test runs are so stable that you can even use them to monitor your application's health. Known for its ease of test maintenance, it is a great tool for end-to-end automation testing. It comes loaded with features like visual testing, API testing, referencing UI elements using relative locations (instead of XPaths or other locators), generating test data, accessing databases, audio testing, and many more. It comes with support for third-party integrations with various CI/CD tools, test case management, infrastructure and databases.
check that “GUIDES” is clickable
execute JavaScript in the browser text starting from next line and ending with [END]
document.querySelector("form").removeAttribute("target");
[END]
check if page contains “Search…”
enter “render” in “Search…”
enter enter
grab url and save it as "URL"
check that stored value "URL" itself contains "q=render"
check that input “Search” has value “render”
How to do End-to-end Testing with testRigor
Let us take the example of an e-commerce website that sells plants and other gardening needs. We will create end-to-end test cases in testRigor using plain English test steps.
Step 1: Log in to your testRigor app with your credentials.
Step 2: Set up the test suite for the website testing by providing the information below:
- Test Suite Name: Provide a relevant and self-explanatory name.
- Type of testing: Select from the following options: Desktop Web Testing, Mobile Web Testing, Native and Hybrid Mobile, based on your test requirements.
- URL to run test on: Provide the application URL that you want to test.
- Testing credentials for your web/mobile app to test functionality which requires user to login: You can provide the app’s user login credentials here and need not write them separately in the test steps then. The login functionality will be taken care of automatically using the keyword
login. - OS and Browser: Choose the OS Browser combination on which you want to run the test cases.
- Number of test cases to generate using AI: If you wish, you can choose to generate test cases based on the App Description text, which works on generative AI.
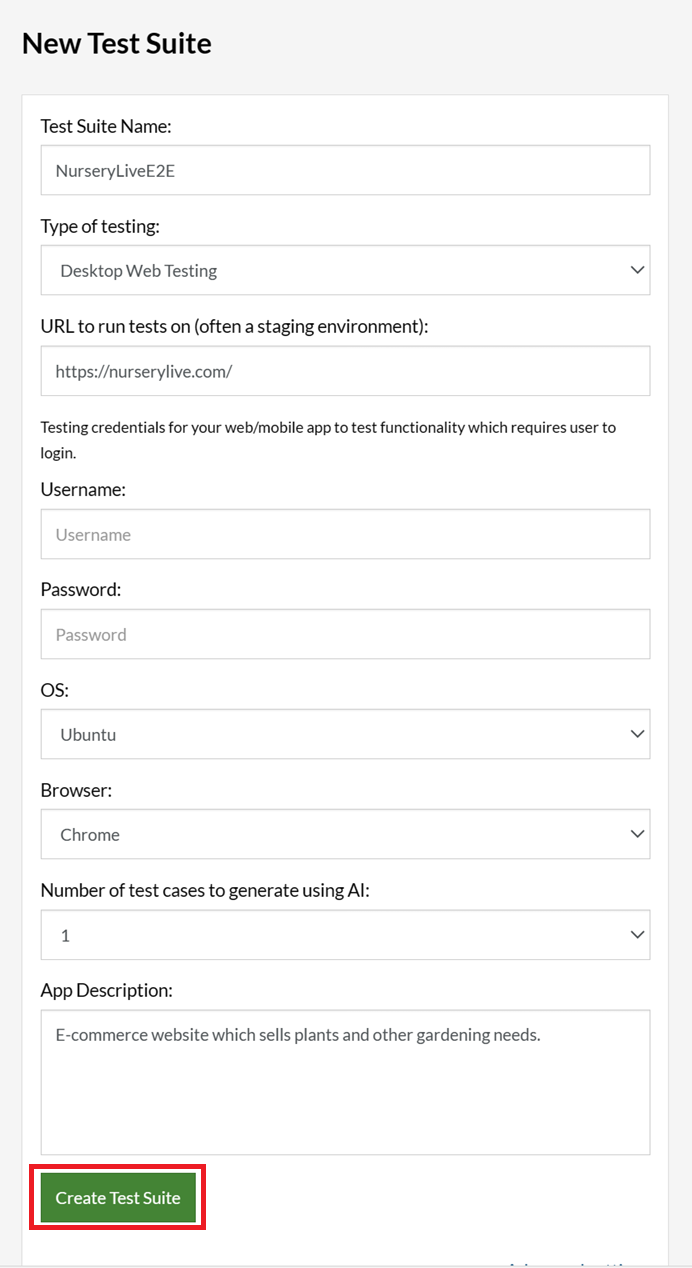
Step 3: Click Create Test Suite.
On the next screen, you can let AI generate the test case based on the App Description you provided during the Test Suite creation. However, for now, select do not generate any test, since we will write the test steps ourselves.
Step 4: To create a new custom test case yourself, click Add Custom Test Case.

Step 5: Provide the test case Description and start adding the test steps.
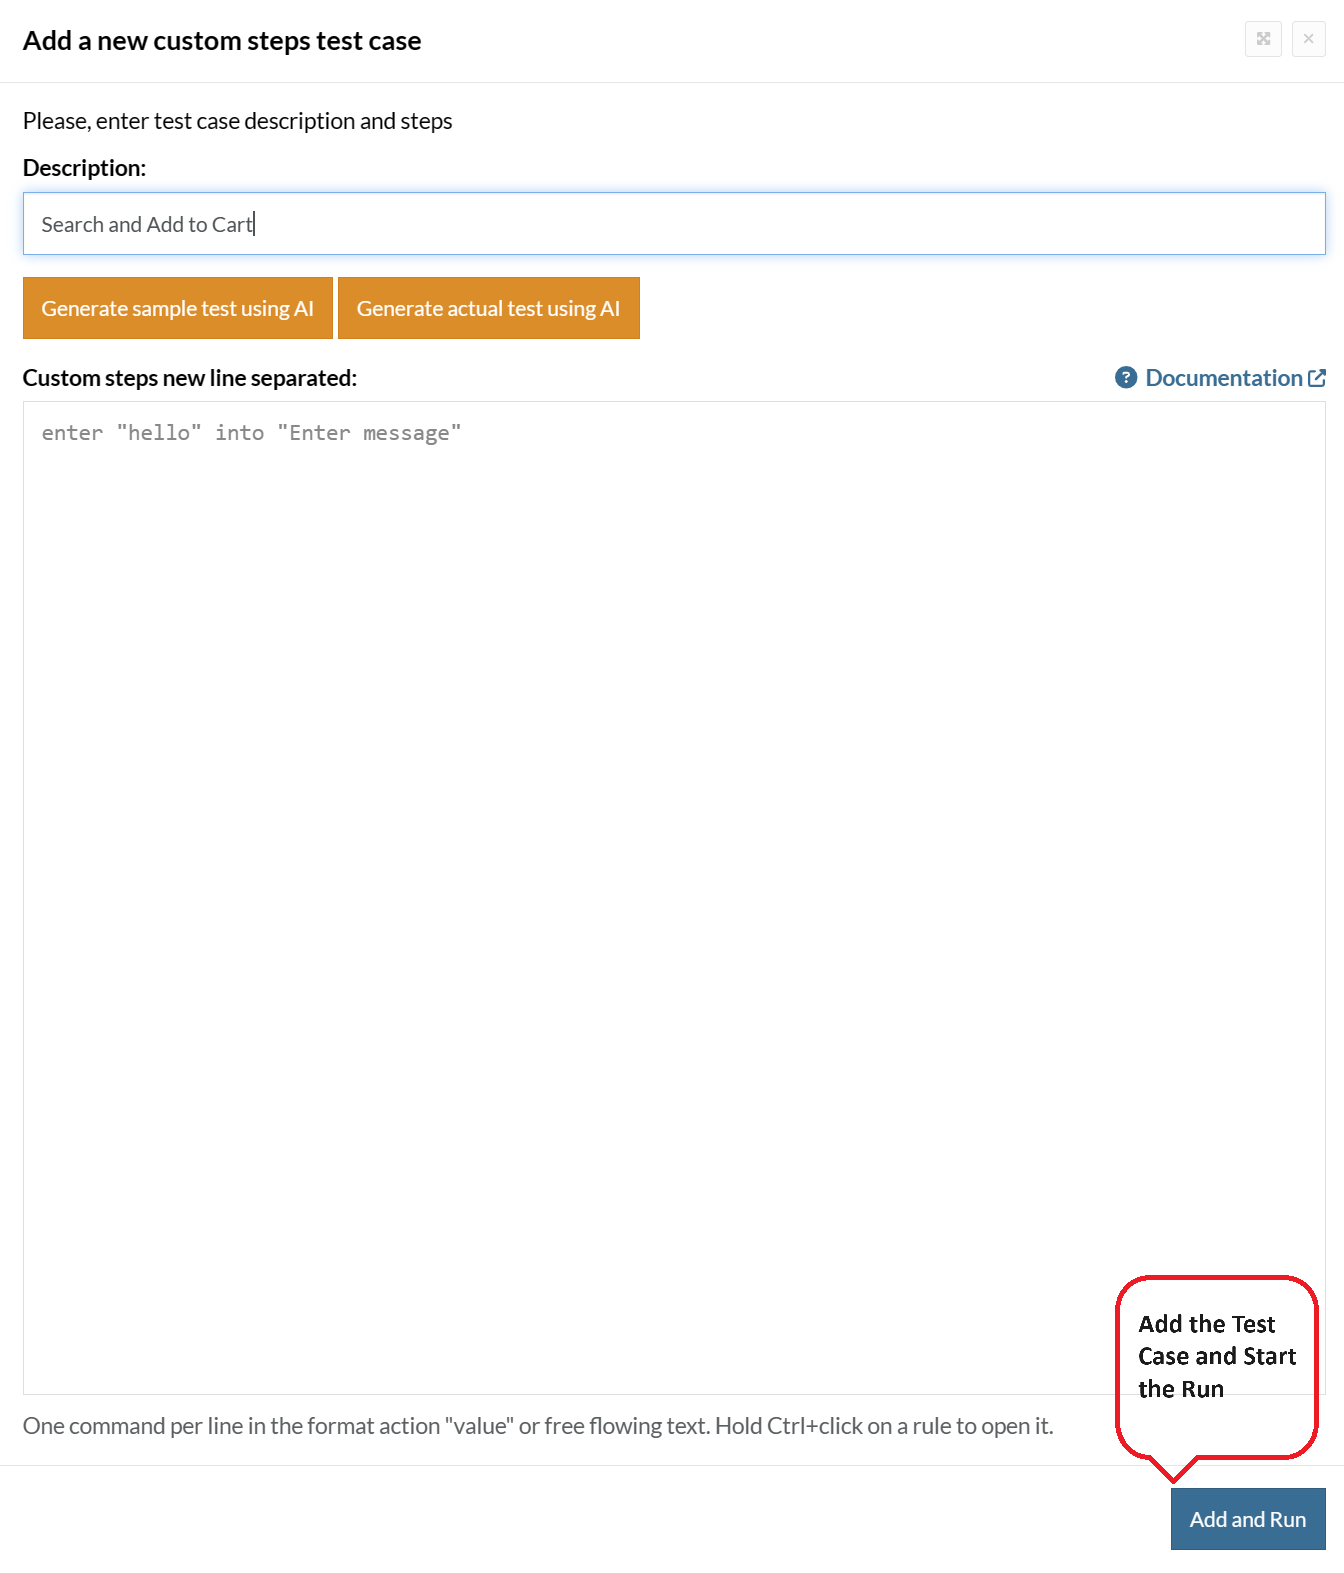
For the application under test, i.e., e-commerce website, we will perform below test steps:
- Search for a product
- Add it to the cart
- Verify that the product is present in the cart
Test Case: Search and Add to Cart
Step 1: We will add test steps on the test case editor screen one by one.
testRigor automatically navigates to the website URL you provided during the Test Suite creation. There is no need to use any separate function for it. Here is the website homepage, which we intend to test.

First, we want to search for a product in the search box. Unlike traditional testing tools, you can identify the UI element using the text you see on the screen. You need not use any CSS/XPath identifiers.
click "What are you looking for?"
Step 2: Once the cursor is in the search box, we will type the product name (lily), and press enter to start the search.
type "lily"
enter enter
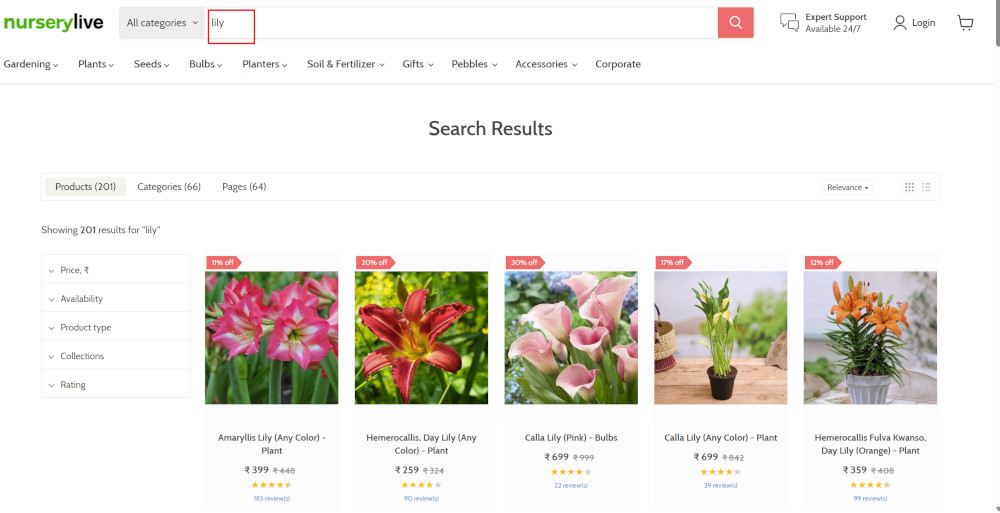
Search lists all products with the “lily” keyword on the webpage.
Step 3: The lily plant we are searching for needs the screen to be scrolled; for that testRigor provides a command. Scroll down until the product is present on the screen:
scroll down until page contains "Zephyranthes Lily, Rain Lily (Red)"
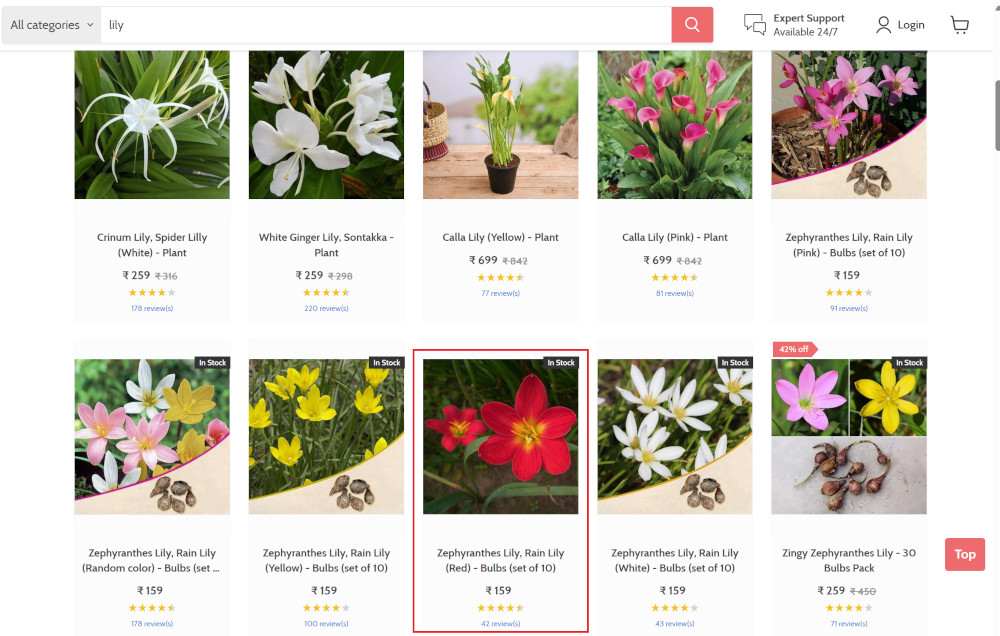
When the product is found on the screen, testRigor stops scrolling.
Step 4: Click on the product name to view the details:
click "Zephyranthes Lily, Rain Lily (Red)"
After the click, the product details are displayed on the screen as below, with the default Quantity as 1.
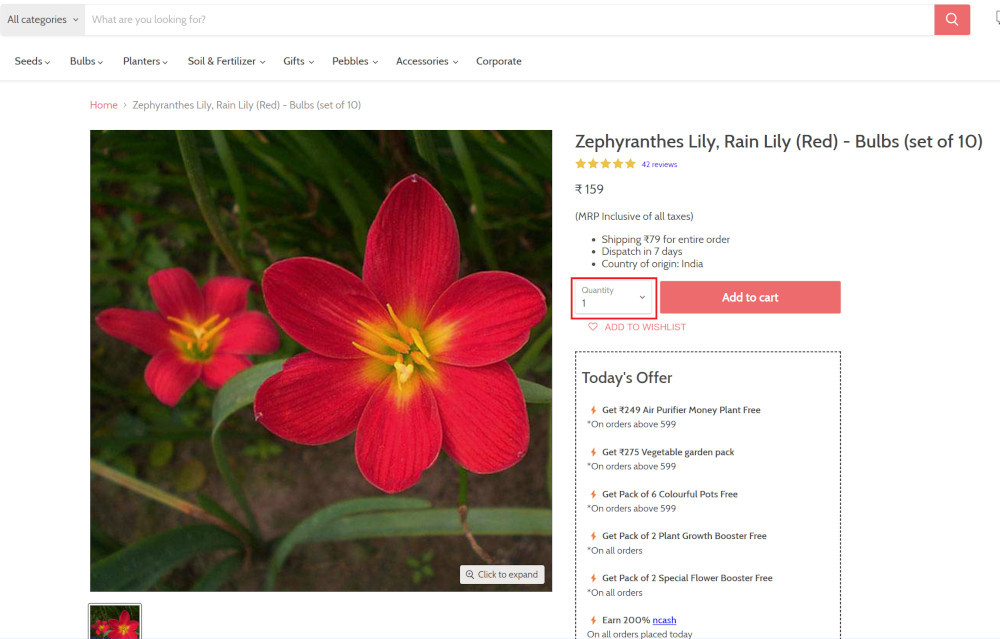
Step 5: Lets say, we want to change the Quantity to 3, so here we use the testRigor command to select from a list.
select "3" from "Quantity"
click "Add to cart"
The product is successfully added to the cart, and the “Added to your cart:” message is displayed on webpage.
Step 6: To assert that the message is successfully displayed, use a simple assertion command as below:
check that page contains "Added to your cart:"
Step 7: After this check, we will view the contents of the cart by clicking View cart as below:
click "View cart"

Step 8: Now we will again check that the product is present in the cart, under heading “Your cart” using the below assertion. With testRigor, it is really easy to specify the location of an element on the screen.
check that page contains "Zephyranthes Lily, Rain Lily (Red)" under "Your cart"

Complete Test Case
Here is how the complete test case will look in the testRigor app. The test steps are simple in plain English, enabling everyone in your team to write and execute them.
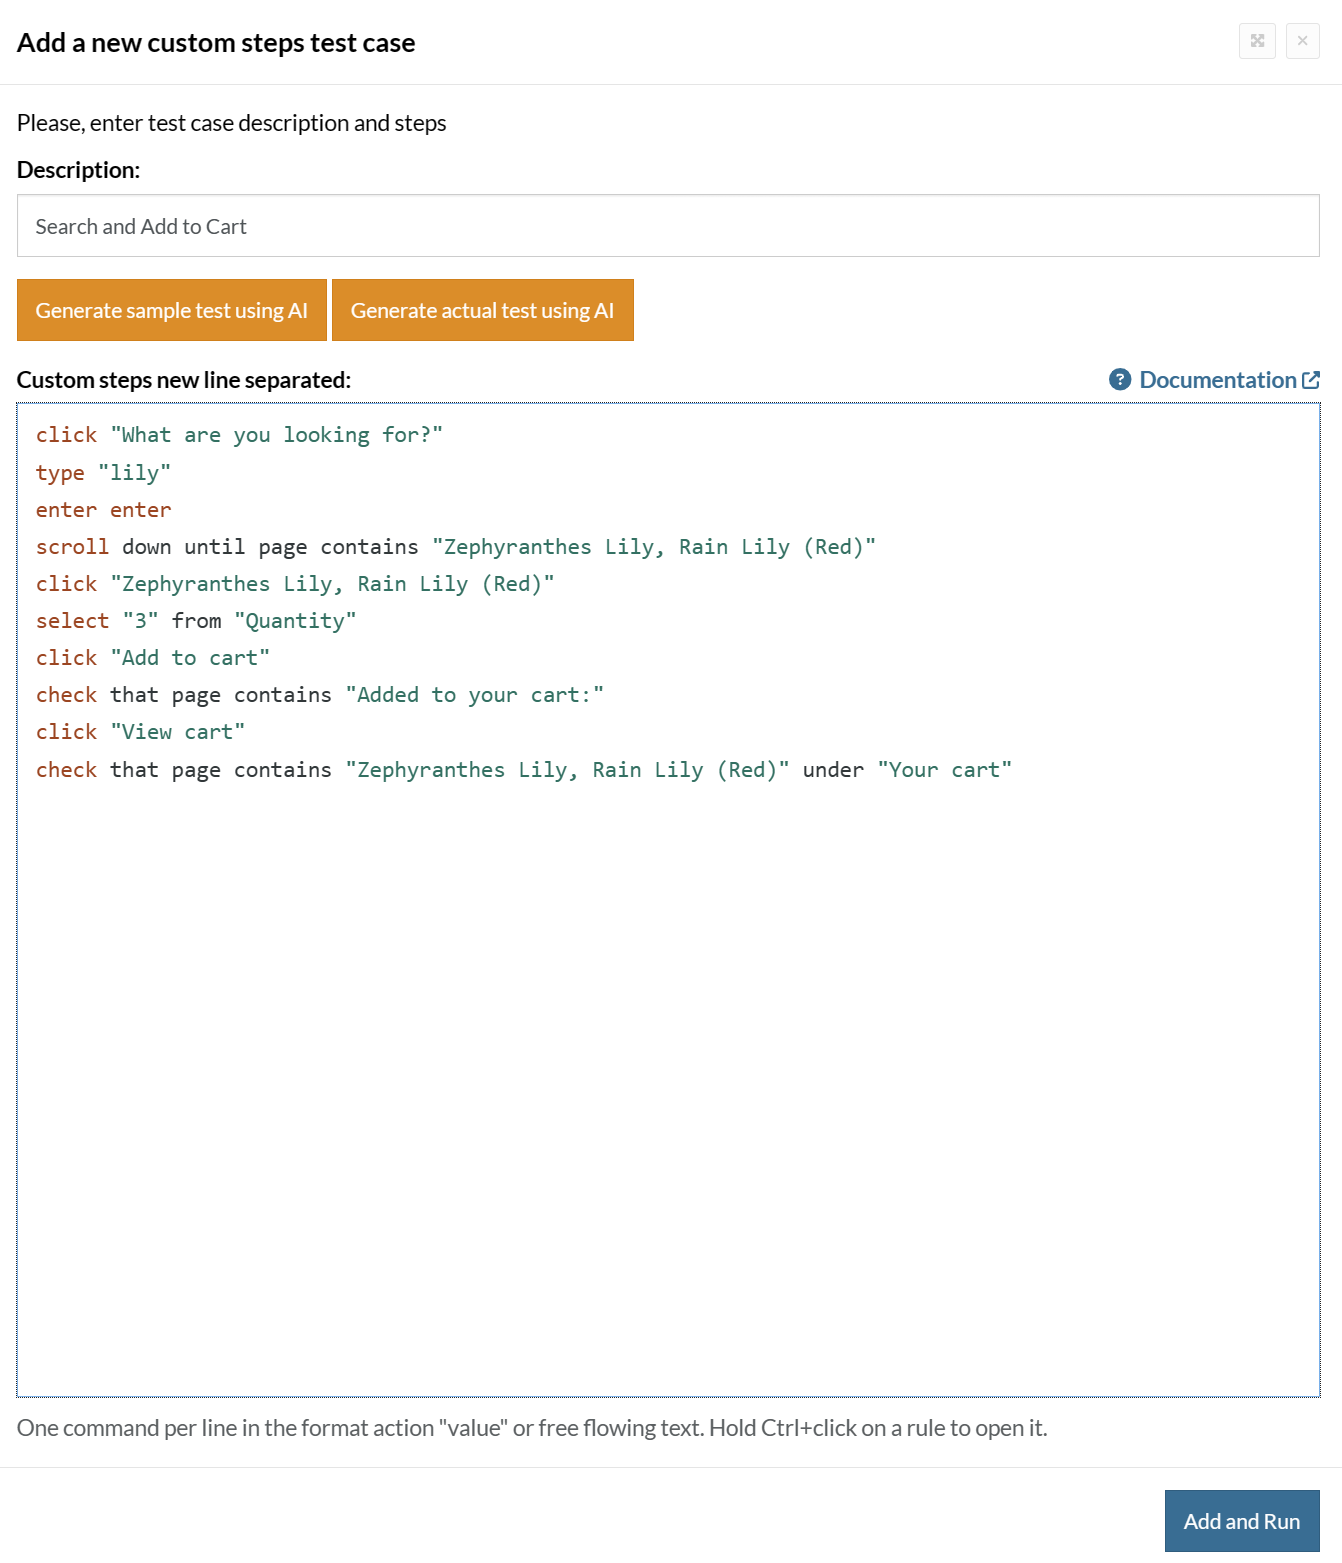
Click Add and Run.
Execution Results
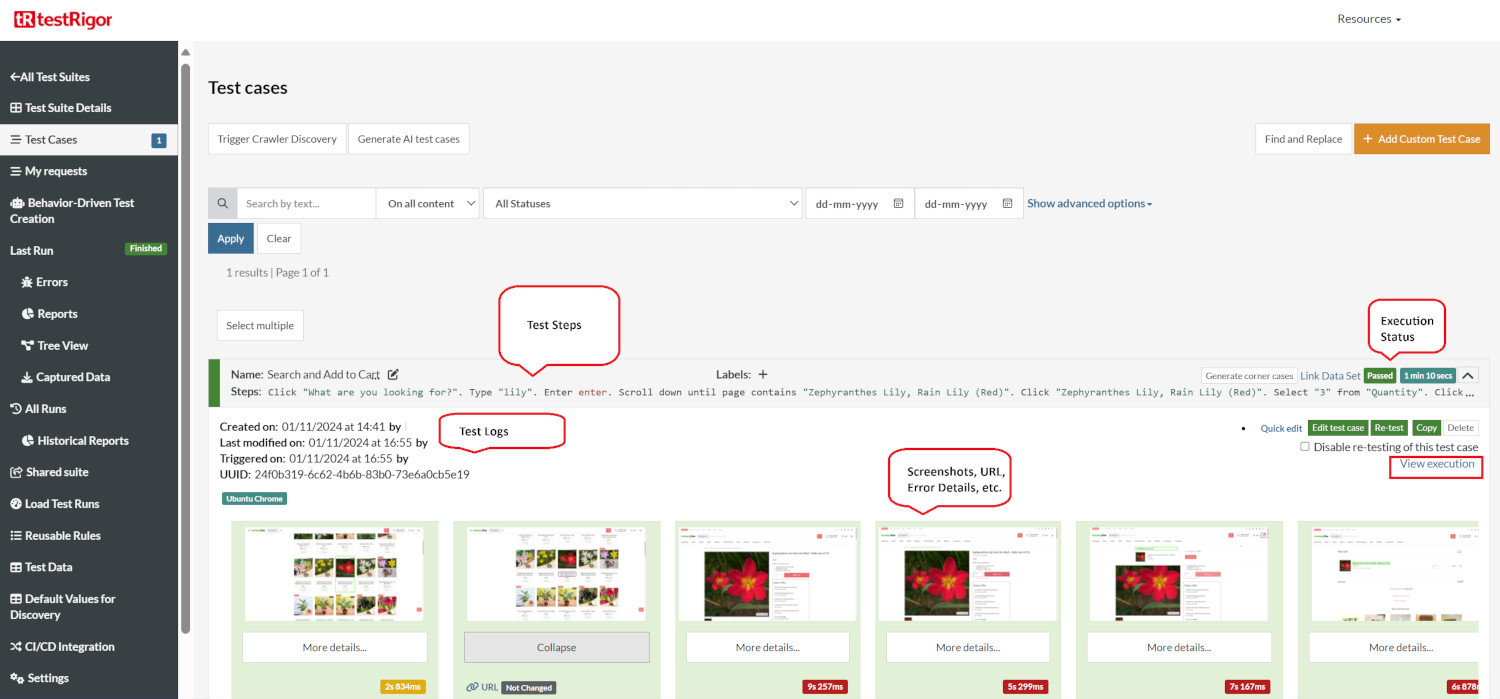
Once the test is executed, you can view the execution details, such as execution status, time spent in execution, screenshots, error messages, logs, video recordings of the test execution, etc. In case of any failure, there are logs and error text that are available easily in a few clicks.
You can also download the complete execution with steps and screenshots in PDF or Word format through the View Execution option.
testRigor’s Capabilities
Apart from the simplistic test case design and execution, there are some advanced features that help you test your application using simple English commands.
- Reusable Rules (Subroutines): You can easily create functions for the test steps that you use repeatedly. You can use the Reusable Rules to create such functions and call them in test cases by simply writing their names. See the example of Reusable Rules.
- Global Variables and Data Sets: You can import data from external files or create your own global variables and data sets in testRigor to use them in data-driven testing.
- 2FA, QR Code, and Captcha Resolution: testRigor easily manages the 2FA, QR Code, and Captcha resolution through its simple English commands.
- Email, Phone Call, and SMS Testing: Use simple English commands to test the email, phone calls, and SMS. These commands are useful for validating 2FA scenarios, with OTPs and authentication codes being sent to email, phone calls, or via phone text.
- File Upload/ Download Testing: Execute the test steps involving file download or file upload without the requirement of any third-party software. You can also validate the contents of the files using testRigor’s simple English commands.
- Database Testing: Execute database queries and validate the results fetched.
testRigor enables you to test web, mobile (hybrid, native), API, and desktop apps with minimum effort and maintenance.
Additional Resources
- Access testRigor documentation to know about more useful capabilities
- Top testRigor’s features
- How to perform end-to-end testing
Conclusion
No application is entirely immune to bugs, even one as powerful as Mojolicious. Therefore, it's important to have a robust testing strategy in place. The tools discussed above are among the best available in the market and will likely deliver the desired results.
| Achieve More Than 90% Test Automation | |
| Step by Step Walkthroughs and Help | |
| 14 Day Free Trial, Cancel Anytime |


