OpenEMR Testing
|
|
What is OpenEMR?
OpenEMR is open-source medical practice management software that supports Electronic Medical Records (EMR). It helps healthcare organizations to record, organize, and manage patient’s health information with features like e-Prescriptions, customizable forms, medical chart tracking, note-taking capabilities, and digital document management. Additionally, OpenEMR software provides a patient portal through which patients can fill the registration forms online easily, view test reports and prescriptions.
OpenEMR Technical Aspects
The server side is written in PHP and can be used in conjunction with a LAMP "stack" on any operating system with PHP support. Consequently, the system can run on Windows, Linux, and MacOS. Furthermore, the official OpenEMR code repository was migrated from CVS to GitHub.
OpenEMR Testing
Unit Testing
Unit testing is a software testing methodology in which individual components, modules, or functions of a software application are tested in isolation. Specifically, unit testing aims to verify that each part of the software behaves as expected and meets its design specifications. As a result, this helps developers identify and fix issues, bugs, or logic errors early in the development process, which ultimately leads to more robust and reliable software.
In unit testing, developers create test cases or test scripts for each unit (function, method, or class) to validate its correctness. Test cases typically consist of input data, expected output, and the actual output generated by the unit being tested.
- Each test should validate a single piece of logical code
- Name of the methods should be self-explanatory
- Assertions should be used in methods to validate individual pieces of code working fine.
Below is a sample unit test:
<?php

use PHPUnit\Framework\TestCase;

class BMICalculatorTest extends TestCase
{
  public function testCalculateBMI()
  {
    // Test cases and expected results
    $testCases = [
      ['weight' => 70, 'height' => 1.75, 'expectedBMI' => 22.9],
      ['weight' => 60, 'height' => 1.60, 'expectedBMI' => 23.4],
      ['weight' => 80, 'height' => 1.80, 'expectedBMI' => 24.7],
    ];

    foreach ($testCases as $testCase) {
      $actualBMI = calculateBMI($testCase['weight'], $testCase['height']);
      $this->assertEquals($testCase['expectedBMI'], $actualBMI);
    }
  }

  public function testCalculateBMIWithInvalidInput()
  {
    $this->expectException(InvalidArgumentException::class);

    calculateBMI(0, 1.75);
    calculateBMI(70, 0);
    calculateBMI(-70, 1.75);
    calculateBMI(70, -1.75);
  }
}
- testCalculateBMI(): This method tests the calculateBMI() function with valid input values. It contains an array of test cases, each with weight, height, and the expected BMI value. The test asserts that the calculated BMI matches the expected value for each test case.
- testCalculateBMIWithInvalidInput(): This method tests the calculateBMI() function with invalid input values. It expects the function to throw an InvalidArgumentException when either weight or height is less than or equal to zero.
Integration Testing
Integration testing focuses on testing the interactions and interfaces between individual software application components, modules, or units. The primary goal of integration testing is to ensure that the various parts of the system work together correctly and as expected when combined. Moreover, integration testing helps identify issues related to communication, data exchange, and coordination between components that might not be evident during unit testing.
Integration testing typically follows unit testing in the software development process. While unit testing verifies the correctness of individual components in isolation, integration testing checks how these components function when combined. Therefore, this ensures that the overall system behavior is correct and that data flows and interactions between components are consistent and error-free.
We can perform integration testing on API and DB layers, as well as at the user interface level (which can also be a part of E2E testing)
Sample integration test:
An example of an integration test might involve verifying the correct interaction between a patient registration form and the database. In this scenario, the integration test checks if the patient's information is correctly saved and retrieved from the database after submitting the registration form.
You can use a testing framework like PHPUnit for PHP to perform this integration test. To start, first create a test file named PatientRegistrationIntegrationTest.php. For this example, suppose the application has a Patient class and a PatientRepository class responsible for handling patient data in the database.
<?php

use PHPUnit\Framework\TestCase;

class PatientRegistrationIntegrationTest extends TestCase
{
  protected $patientRepository;

  protected function setUp(): void
  {
    // Initialize the PatientRepository
    $this->patientRepository = new PatientRepository();
  }

  public function testPatientRegistration()
  {
    // Create a new patient
    $patient = new Patient();
    $patient->setFirstName('John');
    $patient->setLastName('Doe');
    $patient->setDateOfBirth('1980-01-01');
    $patient->setGender('Male');

    // Save the patient to the database
    $savedPatientId = $this->patientRepository->savePatient($patient);
    $this->assertNotNull($savedPatientId, 'Patient ID should not be null after saving');

    // Retrieve the patient from the database
    $retrievedPatient = $this->patientRepository->getPatientById($savedPatientId);

    // Verify the retrieved patient data
    $this->assertEquals('John', $retrievedPatient->getFirstName());
    $this->assertEquals('Doe', $retrievedPatient->getLastName());
    $this->assertEquals('1980-01-01', $retrievedPatient->getDateOfBirth());
    $this->assertEquals('Male', $retrievedPatient->getGender());
  }

  protected function tearDown(): void
  {
    // Clean up the test data from the database
    $this->patientRepository->deleteAllPatients();
  }
}
- First, create a new Patient object and set its properties.
- Next, save the patient to the database using the PatientRepository.
- Then, retrieve the patient from the database using the saved patient ID.
- Finally, verify that the retrieved patient's properties match the original patient's properties.
End-to-End Testing
End-to-end (E2E) testing focuses on evaluating the functionality, performance, and user experience of a complete software application or system from the user's perspective. The goal of E2E testing is to ensure that the application behaves as expected and meets the defined requirements when used in real-world scenarios. Essentially, E2E testing simulates the entire user journey, from the initial interaction with the application to the outcome.
Unlike unit testing and integration testing, which focus on individual components and their interactions, E2E testing validates the entire system, including front-end user interfaces, back-end services, databases, and any third-party integrations. E2E tests are typically executed after unit and integration tests and serve as a final verification step before deploying the software to production.
- Selenium with PHPUnit
- testRigor
Selenium
You will first need to install and set up Selenium WebDriver and PHPUnit. Once you have the necessary tools installed, you can create a test file named OpenEMRUserAdditionE2ETest.php.
<?php

use PHPUnit\Framework\TestCase;
use Selenium\WebDriver\Remote\RemoteWebDriver;
use Selenium\WebDriver\WebDriverBy;
use Selenium\WebDriver\WebDriverExpectedCondition;
use Selenium\WebDriver\WebDriverSelect;

class OpenEMRUserAdditionE2ETest extends TestCase
{
  protected $webDriver;

  protected function setUp(): void
  {
    // Set up the WebDriver connection
    $host = 'http://localhost:4444/wd/hub';
    $this->webDriver = RemoteWebDriver::create($host, DesiredCapabilities::chrome());
  }

  public function testAddUser()
  {
    $this->webDriver->get('http://localhost/openemr');

    // Log in
    $usernameInput = $this->webDriver->findElement(WebDriverBy::name('authUser'));
    $passwordInput = $this->webDriver->findElement(WebDriverBy::name('clearPass'));
    $loginButton = $this->webDriver->findElement(WebDriverBy::xpath("//button[@type='submit']"));

    $usernameInput->sendKeys('admin');
    $passwordInput->sendKeys('*****');
    $loginButton->click();

    // Wait for the main OpenEMR page to load
    $this->webDriver->wait(10, 500)->until(
      WebDriverExpectedCondition::titleContains('openEMR')
    );

    // Navigate to the "Add Users" tab
    $addUsersTab = $this->webDriver->findElement(WebDriverBy::linkText('Add Users'));
    $addUsersTab->click();

    // Enter user details
    $firstNameInput = $this->webDriver->findElement(WebDriverBy::name('fname'));
    $lastNameInput = $this->webDriver->findElement(WebDriverBy::name('lname'));
    $departmentSelect = new WebDriverSelect($this->webDriver->findElement(WebDriverBy::name('department')));
    $shiftSelect = new WebDriverSelect($this->webDriver->findElement(WebDriverBy::name('shift')));
    $dobInput = $this->webDriver->findElement(WebDriverBy::name('dob'));
    $submitButton = $this->webDriver->findElement(WebDriverBy::xpath("//button[@type='submit']"));

    $firstNameInput->sendKeys('jenna');
    $lastNameInput->sendKeys('smith');
    $departmentSelect->selectByVisibleText('General medicine');
    $shiftSelect->selectByVisibleText('Day');
    $dobInput->sendKeys('09/10/1998');
    $submitButton->click();

    // Wait for the success message to appear
    $this->webDriver->wait(10, 500)->until(
      WebDriverExpectedCondition::textToBePresentInElement(WebDriverBy::cssSelector('.alert-success'), 'Details saved successfully')
    );

    // Verify the success message
    $successMessage = $this->webDriver->findElement(WebDriverBy::cssSelector('.alert-success'))->getText();
    $this->assertEquals('Details saved successfully', $successMessage);
  }

  protected function tearDown(): void
  {
    // Close the WebDriver connection
    $this->webDriver->quit();
  }
}
- First, navigate to the login page.
- Then, enter the username and password and click the "Log In" button.
- Next, wait for the main OpenEMR page to load and verify that the page title contains "openEMR".
- After that, click the "Add Users" tab to navigate to the user addition form.
- Subsequently, enter the user details, such as first name, last name, department, shift, and date of birth, in the appropriate input fields.
- Then, click the "Submit" button to save the user details.
- Finally, wait for the success message to appear on the screen and verify that it contains the text "Details saved successfully".
testRigor
testRigor is an excellent choice for end-to-end testing for QA teams. It is a powerful no-code AI-driven tool, which allows users to automate lengthy functional UI tests with ease. In addition, test maintenance is virtually eliminated, saving the team countless hours and allowing them to increase test coverage quickly. For example, you can look into a case study of how a large company was stuck at 34% test coverage, and then got to 90% within a year.
Key Benefits of testRigor
- Usage of plain English: Allows anyone to build and understand tests purely from an end-user's point of view, without relying on locators. This makes it easier for team members with varying technical expertise to create and maintain tests.
- Support for web testing on Desktop and Mobile: testRigor supports testing on almost all browsers and multiple operating systems, thereby ensuring compatibility and smooth functioning of the OpenEMR application across different environments.
- API testing: Helps verify the correct functioning of APIs, which are crucial for the seamless integration of various services and components in an OpenEMR application.
- Data-driven testing: Supports testing with datasets, including data from CSVs, thus ensuring that the OpenEMR application can handle different types of input data correctly.
- Validation of downloaded files: Enables testing and validation of files, such as PDFs, CSVs, and Microsoft Office documents, ensuring that OpenEMR generates and handles these files correctly.
- Accessing databases: Allows testers to interact with databases, consequently enabling them to verify data integrity and proper handling of data by the application.
- Built-in login support: Facilitates testing of authentication processes, which is essential for ensuring security and access control in the application.
- Integrations with CI platforms and infrastructure providers: testRigor integrates with popular CI platforms and infrastructure providers, such as Jenkins, CircleCI, Azure DevOps, BrowserStack, LambdaTest, and SauceLabs, thereby enabling seamless testing within the development workflow and improving overall application quality.
testRigor Syntax Comparison
enter "admin" into "Enter your username"
enter "*****" into "Enter your password"
press "Log In"
check that page contains "openEMR"
click "Add Users" tab
enter "jenna" into "First Name:"
enter "smith" into "Last Name:"
select "General medicine" from "Department:"
select "Day" from "shift"
enter "09/10/1998" into "Date of birth:"
click "Submit"
check that page contains "Details saved successfully"
OpenEMR testRigor Test Suite
- User Management: Creating staff users and providers with validation (CreateNewStaffUser.txt, CreateProvider.txt)
- Patient Management: Patient creation, updating patient information, and patient portal operations (CreatePatient.txt, UpdatePatientInformation.txt, CreatePatientPortal.txt)
- Appointments: Creating and managing patient appointments (CreateAppointment.txt)
- Messaging: Testing the internal messaging system (SendMessage.txt)
- Authentication & Security: Login validation, logout flows, and security checks (WrongLogin.txt, Logout.txt, OpeningInternalPageShouldRedirectToLogin.txt)
- Reports: Exporting patient reports (ExportPatientReport.txt)
Example: Creating a Staff User
LoginAndValidate
NavigateToUsersGroups
click button "Add User"
check that button "Save" is visible
save "Testing#123" as "staff_pwd"
generate by template "$$$$$$$$" and save it as "generated_username"
enter saved value "generated_username" into field "rumple"
enter saved value "staff_pwd" into field "stiltskin"
generate unique name, then enter into "First Name:" and save as "gen_first_name"
generate unique name, then enter into "Last Name:" and save as "gen_last_name"
enter saved value "password" into field "adminPass"
check that button "Save" is visible
click button "Save"
// assert staff was added to list
check that page contains "User / Groups"
check that page doesn't contain button "Save"
check that table "table-responsive" at row saved value "generated_username" and column "Real Name" contains string with parameters "${gen_first_name} ${gen_last_name}"
// login as staff in a new session
start browser "Staff User" and switch
check that page contains input "Username"
check that page contains input "Password"
check that page contains button "Login"
LoginAsStaff
ValidateLogin
// Back to admin and clean up
switch to browser "default"
check that page contains "User / Groups"
click saved value "generated_username"
click "active__on" above the "mname"
click button "Save"
// assert is not in list anymore
check that page contains "User / Groups"
check that page doesn't contain saved value "generated_username"
start browser "Inactive Staff" and switch
LoginAsStaff
ValidateUnsuccessfulLogin
- Dynamic data generation: Generates unique usernames and names to avoid test data conflicts
- Multi-browser testing: Opens multiple browser sessions to test staff login while admin remains logged in
- Table validation: Verifies the new user appears correctly in the user list table
- Complete workflow: Tests the entire lifecycle - creation, validation, deactivation, and access denial
- Reusable rules: Leverages
LoginAndValidate,NavigateToUsersGroups,LoginAsStaff, and other modular rules
Reusable Rules
/testRigor/rules directory, making test maintenance easier. These rules include:Authentication Rules
LoginAndValidate - Handles user authenticationlogin check that page contains button "Current user" check that page contains "Patient" check that page contains "Popups" check that page contains "Providers" check that page contains button "Day" check that page contains button "Week" check that page contains button "Month"
ValidateLogin - Authentication validation for successful logins// TODO: add conditionals to use this in patient login too check that page contains button "Current user" check that page contains "Patient" check that page contains "Popups" check that page contains "Providers" check that page contains button "Day" check that page contains button "Week" check that page contains button "Month"
ValidateUnsuccessfulLogin - Authentication validation for failed login attemptscheck that page contains "Invalid username or password"
Navigation Rules
NavigateToUsersGroups - Navigation helper for user managementclick "Admin" click "Users" check that page contains "User / Groups" check that page contains button "Add User"
Patient Management Rules
CreatePatient - Encapsulates patient creation logicselect "Mr." from "Title" generate from template "First$$$$$$$", then enter into "First Name" and save as "firstName" generate from template "Last$$$$$$$", then enter into "Last Name" and save as "lastName" select "Male" from "Sex" enter "2001-01-01" into "Date of Birth" click "Contact" generate unique email, then enter into "Contact Email" and save as "email" click "Choices" select "YES" from "Allow email messages" select "YES" from "Allow Patient Portal" select "YES" from "Allow Email" scroll down until page contains "Create New Patient" click "Create New Patient" scroll down until page contains "Confirm Create New Patient" click "Confirm Create New Patient" up to 10 times using the mouse until page doesn't contain "Confirm Create New Patient" HandleBrowserAlert check that page contains saved value "firstName"
Portal Configuration Rules
EnablePortal - Patient portal configuration to enable portal accessclick "Admin" click "Config" click "Portal" click checkbox on the right of exactly "Enable Patient Portal" if checkbox on the right of exactly "Enable Patient Portal" is not checked click button "Save"
DisablePortal - Patient portal configuration to disable portal accessLoginAndValidate click "Admin" click "Config" click "Portal" click checkbox on the right of exactly "Enable Patient Portal" if checkbox on the right of exactly "Enable Patient Portal" is checked click button "Save" OpenPortalPage validate that page doesn't contain "OpenEMR Portal Login"
Running the Tests
git clone https://github.com/amandassa/openemr.git cd openemr/tests/testRigor ./run_testrigor_tests.sh
run_testrigor_tests.sh script. Additionally, detailed setup instructions are available in the README.md file.How to do End-to-end Testing with testRigor
Let us take the example of OpenEMR, a medical practice management application. We will create end-to-end test cases in testRigor using plain English test steps.
Step 1: Log in to your testRigor app with your credentials.
Step 2: Set up the test suite for the website testing by providing the information below:
- Test Suite Name: Provide a relevant and self-explanatory name.
- Type of testing: Select from the following options: Desktop Web Testing, Mobile Web Testing, Native and Hybrid Mobile, based on your test requirements.
- URL to run test on: Provide the application URL that you want to test.
- Testing credentials for your web/mobile app to test functionality which requires user to login: You can provide the app’s user login credentials here and need not write them separately in the test steps then. The login functionality will be taken care of automatically using the keyword
login. - OS and Browser: Choose the OS Browser combination on which you want to run the test cases.
- Number of test cases to generate using AI: If you wish, you can choose to generate test cases based on the App Description text, which works on generative AI.
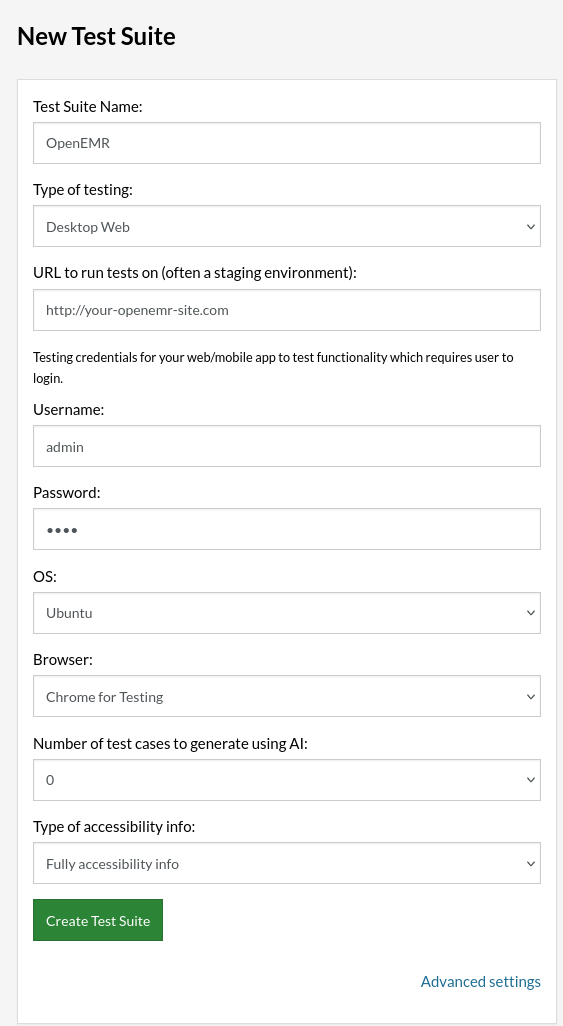
Step 3: Click Create Test Suite.
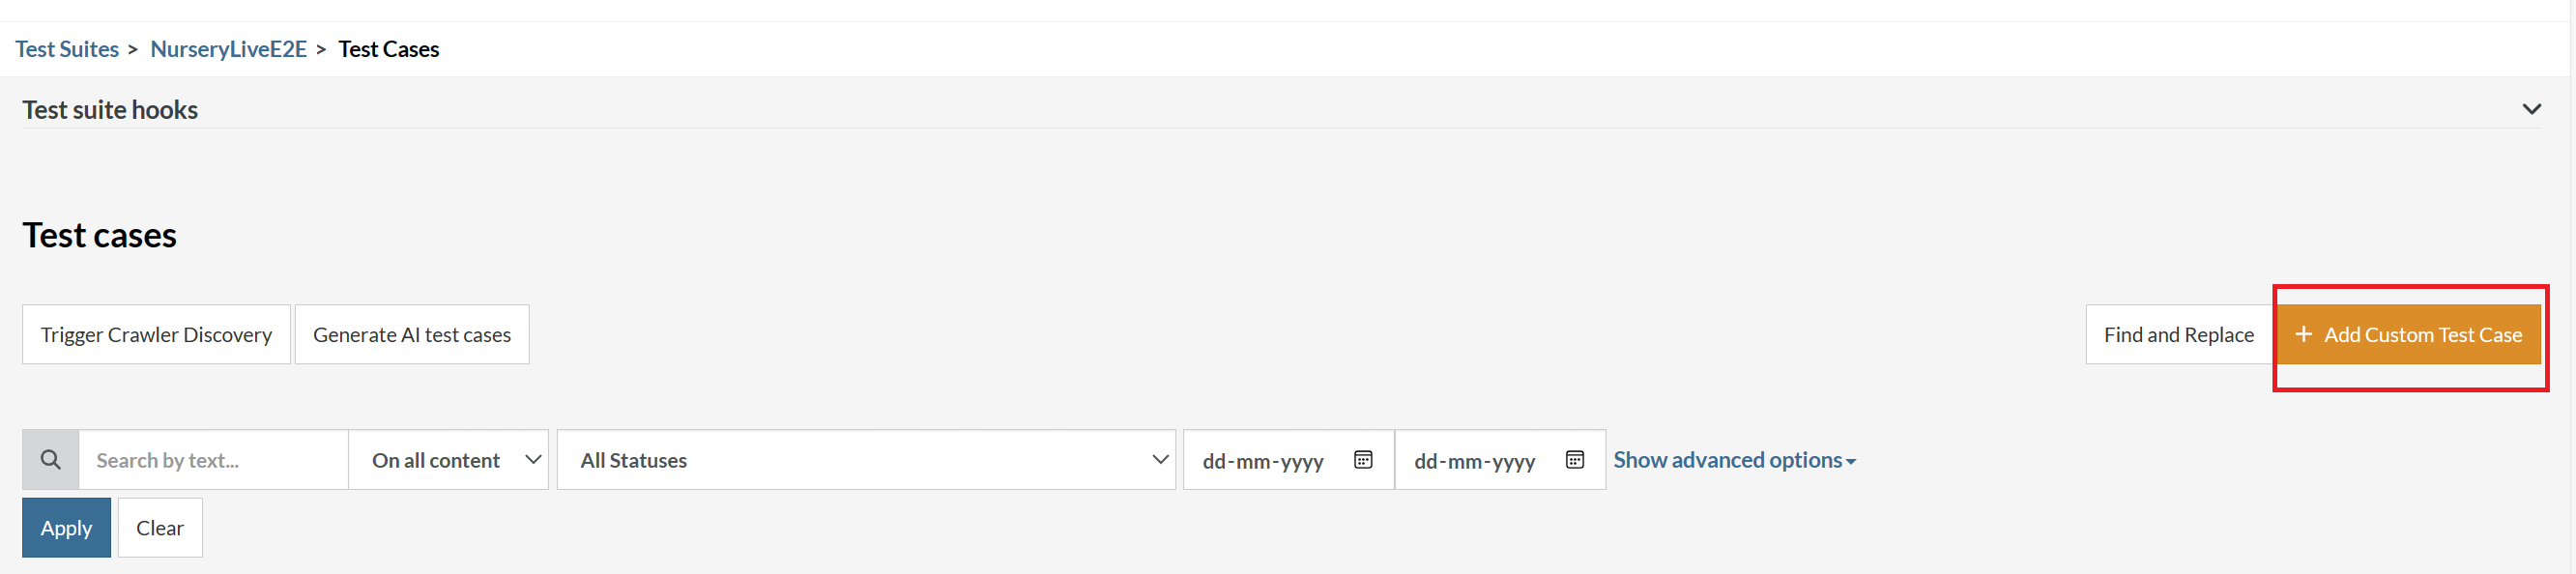
On the next screen, you can let AI generate the test case based on the App Description you provided during the Test Suite creation. However, for now, select do not generate any test, since we will write the test steps ourselves.
Step 4: To create a new custom test case yourself, click Add Custom Test Case.
Step 5: Provide the test case Description and start adding the test steps.

For the OpenEMR application under test, we will perform the test steps below:
- Log in to the OpenEMR application
- Navigate to the patient creation form
- Create a new patient with generated data
- Verify that the patient was successfully created
Test Case: Create a New Patient
Step 1: We will add test steps on the test case editor screen one by one.
testRigor automatically navigates to the OpenEMR URL you provided during the Test Suite creation. There is no need to use any separate function for it.
First, we need to log in to OpenEMR. Since we’ve provided login credentials during Test Suite creation, we can simply use:
login
Step 2: Navigate to the patient creation screen. In OpenEMR, this involves clicking on the Patient menu and then the New/Search option:
click "Patient" click "New/Search" roughly below "Patient"
This navigation can also be encapsulated as a reusable rule called NavigateToPatientCreationSearch, which we’ll discuss later.
Step 3: Now we’re on the patient creation form. Let’s start filling in the patient details. First, select the title from the dropdown:
select "Mr." from "Title"
Step 4: Generate and enter unique patient names. testRigor can generate dynamic data to avoid conflicts with existing records:
generate from template "First$$$$$$$", then enter into "First Name" and save as "firstName" generate from template "Last$$$$$$$", then enter into "Last Name" and save as "lastName"
The template uses dollar signs ($) as placeholders for random characters. The generated values are saved as variables (firstName and lastName) for later verification.
Step 5: Continue filling in the required patient information:
select "Male" from "Sex" enter "2001-01-01" into "Date of Birth"
Step 6: Navigate to the Contact section and add contact information:
click "Contact" generate unique email, then enter into "Contact Email" and save as "email"
Step 7: Configure patient portal and communication preferences by clicking the Choices section:
click "Choices" select "YES" from "Allow email messages" select "YES" from "Allow Patient Portal" select "YES" from "Allow Email"
Step 8: Scroll down to locate the Create New Patient button. testRigor will automatically scroll until the button is visible:
scroll down until page contains "Create New Patient"
Step 9: Click the Create New Patient button:
click "Create New Patient"
Step 10: After clicking, a confirmation dialog appears. We need to confirm the patient creation. Since the dialog might take a moment to appear or multiple clicks might be needed, we use a robust approach:
scroll down until page contains "Confirm Create New Patient" click "Confirm Create New Patient" up to 10 times using the mouse until page doesn't contain "Confirm Create New Patient"
This command will keep clicking the confirmation button until the dialog disappears, with a maximum of 10 attempts.
Step 11: Handle any browser alerts that might appear (such as clinical reminders):
accept prompt with value "" if page contains "New Due Clinical Reminders" using OCR only
Step 12: Finally, verify that the patient was successfully created by checking if the patient’s first name appears on the page:
check that page contains saved value "firstName"
Complete Test Case
Here is how the complete test case will look in the testRigor app for testing the OpenEMR application. The test steps are simple in plain English, enabling everyone in your team to write and execute them.
login click "Patient" click "New/Search" roughly below "Patient" select "Mr." from "Title" generate from template "First$$$$$$$", then enter into "First Name" and save as "firstName" generate from template "Last$$$$$$$", then enter into "Last Name" and save as "lastName" select "Male" from "Sex" enter "2001-01-01" into "Date of Birth" click "Contact" generate unique email, then enter into "Contact Email" and save as "email" click "Choices" select "YES" from "Allow email messages" select "YES" from "Allow Patient Portal" select "YES" from "Allow Email" scroll down until page contains "Create New Patient" click "Create New Patient" scroll down until page contains "Confirm Create New Patient" click "Confirm Create New Patient" up to 10 times using the mouse until page doesn't contain "Confirm Create New Patient" accept prompt with value "" if page contains "New Due Clinical Reminders" using OCR only check that page contains saved value "firstName"
Click Add and Run.
Using Reusable Rules
To make test cases more maintainable and readable, we can create reusable rules (subroutines) for common operations. For example:
NavigateToPatientCreationSearch Rule:
click "Patient" click "New/Search" roughly below "Patient"
CreatePatient Rule:
select "Mr." from "Title"
generate from template "First$$$$$$$", then enter into "First Name" and save as "firstName"
generate from template "Last$$$$$$$", then enter into "Last Name" and save as "lastName"
select "Male" from "Sex"
enter "2001-01-01" into "Date of Birth"
click "Contact"
generate unique email, then enter into "Contact Email" and save as "email"
click "Choices"
select "YES" from "Allow email messages"
select "YES" from "Allow Patient Portal"
select "YES" from "Allow Email"
scroll down until page contains "Create New Patient"
click "Create New Patient"
scroll down until page contains "Confirm Create New Patient"
click "Confirm Create New Patient" up to 10 times using the mouse until page doesn't contain "Confirm Create New Patient"
HandleBrowserAlert
check that page contains saved value "firstName"
HandleBrowserAlert Rule:
accept prompt with value "" if page contains "New Due Clinical Reminders" using OCR only
With these reusable rules defined, your main test case becomes much simpler:
login
NavigateToPatientCreationSearch
CreatePatient
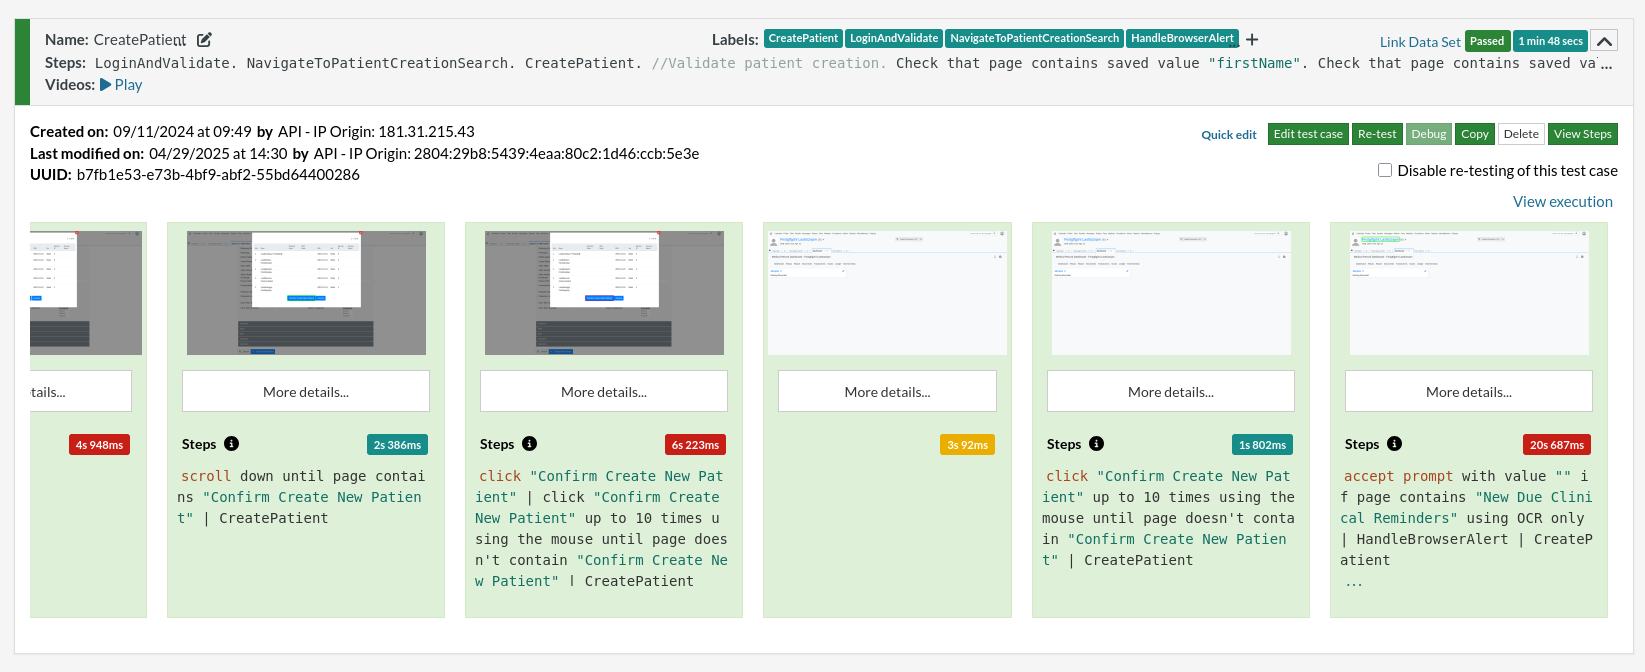
Execution Results
Once the OpenEMR test is executed, you can view the execution details, such as execution status, time spent in execution, screenshots, error messages, logs, video recordings of the test execution, etc by clicking the down arrow on the left side of the test case item. In case of any failure, there are logs and error text that are available easily in a few clicks.
You can also download the complete execution with steps and screenshots in PDF or Word format through the View Execution option.
testRigor’s Capabilities
Apart from the simplistic test case design and execution, there are some advanced features that help you test your application using simple English commands.
- Reusable Rules (Subroutines): You can easily create functions for the test steps that you use repeatedly. You can use the Reusable Rules to create such functions and call them in test cases by simply writing their names. See the example of Reusable Rules.
- Global Variables and Data Sets: You can import data from external files or create your own global variables and data sets in testRigor to use them in data-driven testing.
- 2FA, QR Code, and Captcha Resolution: testRigor easily manages the 2FA, QR Code, and Captcha resolution through its simple English commands.
- Email, Phone Call, and SMS Testing: Use simple English commands to test the email, phone calls, and SMS. These commands are useful for validating 2FA scenarios, with OTPs and authentication codes being sent to email, phone calls, or via phone text.
- File Upload/ Download Testing: Execute the test steps involving file download or file upload without the requirement of any third-party software. You can also validate the contents of the files using testRigor’s simple English commands.
- Database Testing: Execute database queries and validate the results fetched.
testRigor enables you to test OpenEMR web applications, mobile apps (hybrid, native), APIs, and desktop applications with minimum effort and maintenance.
Additional Resources
- View the complete OpenEMR testRigor test suite on GitHub
- Access testRigor documentation to know about more useful capabilities
- Top testRigor’s features
- How to perform end-to-end testing
Conclusion
In conclusion, ensuring the quality, reliability, and security of OpenEMR applications is of paramount importance, given the critical nature of healthcare data and services. A robust testing strategy, encompassing unit, integration, and end-to-end testing, is essential for verifying individual components' proper functioning, interactions, and overall user experience.
Moreover, leveraging advanced testing tools like testRigor can significantly enhance the testing process by simplifying test creation and maintenance, supporting multiple platforms and devices, and integrating with popular CI platforms and infrastructure providers. With its natural language-based approach and extensive feature set, testRigor empowers both technical and non-technical team members to contribute effectively to the testing process, thereby ensuring comprehensive test coverage and ultimately delivering a high-quality, reliable, and secure OpenEMR application.
Ultimately, by investing in a well-rounded testing strategy and leveraging state-of-the-art testing tools, healthcare organizations, and developers can effectively mitigate risks, reduce potential downtime, and ensure the delivery of a seamless, dependable, and compliant OpenEMR system that meets the diverse needs of patients, medical professionals, and administrative staff alike.
| Achieve More Than 90% Test Automation | |
| Step by Step Walkthroughs and Help | |
| 14 Day Free Trial, Cancel Anytime |


