Phalcon Framework Testing

Phalcon is an open-source, full-stack PHP framework for web application development, optimized for low server consumption and high performance. It was designed to increase performance and reduce overhead compared to traditional PHP frameworks. Phalcon is implemented as a web server extension written in C, which makes it faster and more efficient than other PHP frameworks that are written in PHP and executed as scripts.
Phalcon is loosely coupled, which allows developers to use only the objects that they need as components based on the needs of their applications. Some key features of Phalcon include MVC (Model-View-Controller) architecture, caching, security, ORM (Object-Relational Mapping), and routing. These features allow developers to build fast, scalable, and secure web applications in a streamlined and efficient manner.
It's important to note that testing is an integral part of the development process and should be a part of your workflow from the start. This can help catch bugs early on and ensure that your application works as desired.
Unit testing
Unit testing is the testing of individual components of the application in isolation. As a rule of thumb, make sure to write small unit tests. This means that your methods focus on a single functionality so that its corresponding unit test is straightforward. For unit testing, if your method depends on other methods, data sources, or APIs, then you will have to mock the response values in your unit test cases.
Phalcon supports PHPUnit for testing PHP code. All tests need to be stored under the 'tests' directory. To help build unit tests, Phalcon offers a few abstract classes that can be used to bootstrap the unit tests. These files exist in the Phalcon Incubator. You can use the Incubator library by adding it as a dependency or by adding it to composer.json.
Below is an example of a unit test. First, create a base unit test called UnitTestCase.php in your tests directory.
<?php

use Phalcon\Di;
use Phalcon\Test\UnitTestCase as PhalconTestCase;

abstract class UnitTestCase extends PhalconTestCase
{
  /**
   * @var bool
   */
  private $_loaded = false;

  public function setUp()
  {
    parent::setUp();

    // Load any additional services that might be required during testing
    $di = Di::getDefault();

    // Get any DI components here. If you have a config, be sure to pass it to the parent

    $this->setDi($di);

    $this->_loaded = true;
  }

  /**
   * Check if the test case is setup properly
   *
   * @throws \PHPUnit_Framework_IncompleteTestError;
   */
  public function __destruct()
  {
    if (!$this->_loaded) {
      throw new \PHPUnit_Framework_IncompleteTestError(
        "Please run parent::setUp()."
It is a good idea to separate your unit tests into namespaces. Hence for this test, we will use the namespace 'Test'. The file will look like this: tests\Test\UnitTest.php.
<?php

  namespace Test;

  /**
   * Class UnitTest
   */
  class UnitTest extends \UnitTestCase
  {
    public function testTestCase()
    {
      $this->assertEquals(
        "works",
        "works",
        "This is OK"
      );

      $this->assertEquals(
        "works",
        "works1",
        "This will fail"
Besides PHPUnit, Phalcon also supports Codeception for writing tests (we will cover this tool in the next section).
Integration testing
Integration tests aim to verify if two or more components work properly together. The test cases often target scenarios involving integrations with databases, file systems, network infrastructure, or other components. Unlike unit tests, where you fake or mock input parameters, integration tests utilize real data.
- Verifying crucial read-write operations in databases.
- Services can be tested by mocking HTTP calls.
- Checking GET and POST routes, controllers, and pipelines.
Here is an example of an HTTP test:
<?php
namespace Tests\Feature;
use Illuminate\Foundation\Testing\RefreshDatabase;
use Illuminate\Foundation\Testing\WithoutMiddleware;
use Tests\TestCase;

class ExampleTest extends TestCase
{
  /**
  * A basic test example.
  *
  * @return void
  */
  public function test_a_basic_request()
  {
    $response = $this->get('/');

    $response->assertStatus(200);
  }
}
Codeception for integration testing
Codeception is a testing framework for PHP that allows you to write and run tests for web applications. It provides an easy-to-use interface for writing unit and integration tests. To use Codeception for integration testing of Phalcon applications, you first need to install it along with a Phalcon module.
You can install Codeception using Composer:composer require codeception/codeception
Next, you need to install the Phalcon module for Codeception:composer require codeception/module-phalcon
Next, you can create a new test by running the following command:php vendor/bin/codecept generate:cest Integration LogIn
The above command will create a new LogIn test. To write your integration tests, you will need to define a test scenario using the Codeception API. Here's an example:
<?php

use Codeception\Util\Fixtures;
use Codeception\Module\Phalcon;

class LogInCest
{
    /**
     * @var Phalcon
     */
    protected $phalcon;

    public function _before(Phalcon $phalcon)
    {
        $this->phalcon = $phalcon;
    }

    public function tryToTest(Phalcon $phalcon)
    {
        $phalcon->amOnPage('/');
        $phalcon->see('Welcome to the store');
        $phalcon->fillField('username', 'my-username');
        $phalcon->fillField('password', 'my-password');
        $phalcon->click('Sign In');
        $phalcon->see('You are logged in');
    }
}
Finally, to run the tests, you can simply run the following command:./vendor/bin/codecept run
This command will execute all the tests defined in the test file and output the results to the console.
End-to-End testing
End-to-end (E2E) testing focuses on verifying the behavior of an entire system, from start to finish, simulating a real user's interaction. The aim of E2E testing is to catch bugs and issues that might not be detected by unit or integration tests.
- Selenium-based tools
- Nightwatch.js
- testRigor
Selenium-based tools for end-to-end testing
Selenium is a dated but still popular open-source tool for automating browser testing. With Selenium, you can write E2E tests that simulate a user's interaction with a web application, including clicking buttons, filling out forms, and navigating through the application.
Nightwatch.js for end-to-end testing
Nightwatch.js is an automated testing framework for Node.js applications that provides a simple API for writing E2E tests. Nightwatch.js uses the WebDriver API to interact with a web browser, and can be used to test Phalcon applications by simulating a user's interaction with the application through a web browser.
testRigor for end-to-end testing
With the testRigor cloud-hosted AI tool, you can achieve the closest representation of the actual user behavior. Tests are created based on the visual layer and don’t rely on implementation details - making them as close to the real human view as technically possible. As an added benefit, it gives extra stability - tests will survive scenarios where an element locator is accidentally changed, although the UI stays the same.
testRigor is no-code, meaning even manual QA testers are able to automate and maintain any tests, add assertions, and modify as desired. Tests in testRigor look more like manual test steps than typical automated scenarios. Thus, the speed of test creation is up to 15X more, and the test maintenance issue is solved entirely. Tests are extremely stable, and you can receive results in as soon as 30 minutes.
You can easily test web, API calls, databases, emails, SMS alerts, and much more. Below are a couple of examples.
enter "My_input!" into table "Actions" at row "251" and column "Additional Data"
click "Open channel" within the context of second table at row "184" and column "Action"
send email to "[email protected]" with subject "Test message" and  body "Hi, new content is available."
check that email from "[email protected]" is delivered
Besides these capabilities, testRigor has integrations with issue management, test management, CI/CD, and monitoring tools. Feel free to explore more here.
How to do End-to-end Testing with testRigor
Let us take the example of an e-commerce website that sells plants and other gardening needs. We will create end-to-end test cases in testRigor using plain English test steps.
Step 1: Log in to your testRigor app with your credentials.
Step 2: Set up the test suite for the website testing by providing the information below:
- Test Suite Name: Provide a relevant and self-explanatory name.
- Type of testing: Select from the following options: Desktop Web Testing, Mobile Web Testing, Native and Hybrid Mobile, based on your test requirements.
- URL to run test on: Provide the application URL that you want to test.
- Testing credentials for your web/mobile app to test functionality which requires user to login: You can provide the app’s user login credentials here and need not write them separately in the test steps then. The login functionality will be taken care of automatically using the keyword
login. - OS and Browser: Choose the OS Browser combination on which you want to run the test cases.
- Number of test cases to generate using AI: If you wish, you can choose to generate test cases based on the App Description text, which works on generative AI.
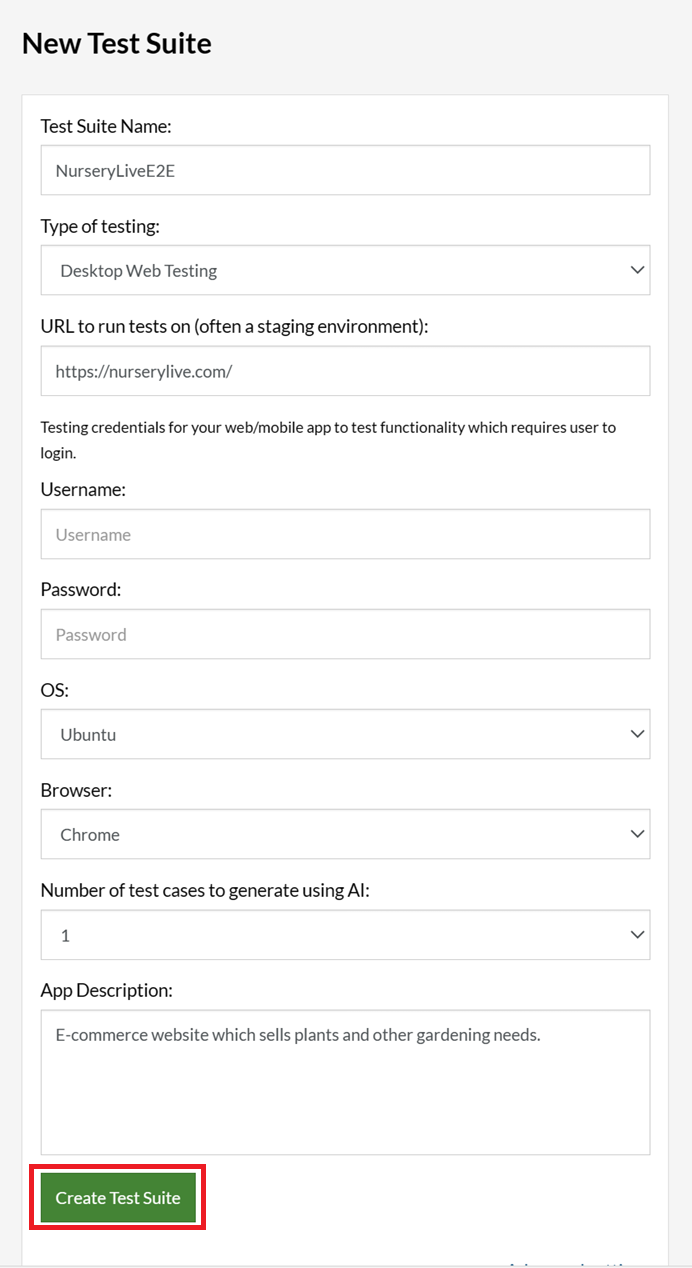
Step 3: Click Create Test Suite.
On the next screen, you can let AI generate the test case based on the App Description you provided during the Test Suite creation. However, for now, select do not generate any test, since we will write the test steps ourselves.
Step 4: To create a new custom test case yourself, click Add Custom Test Case.

Step 5: Provide the test case Description and start adding the test steps.
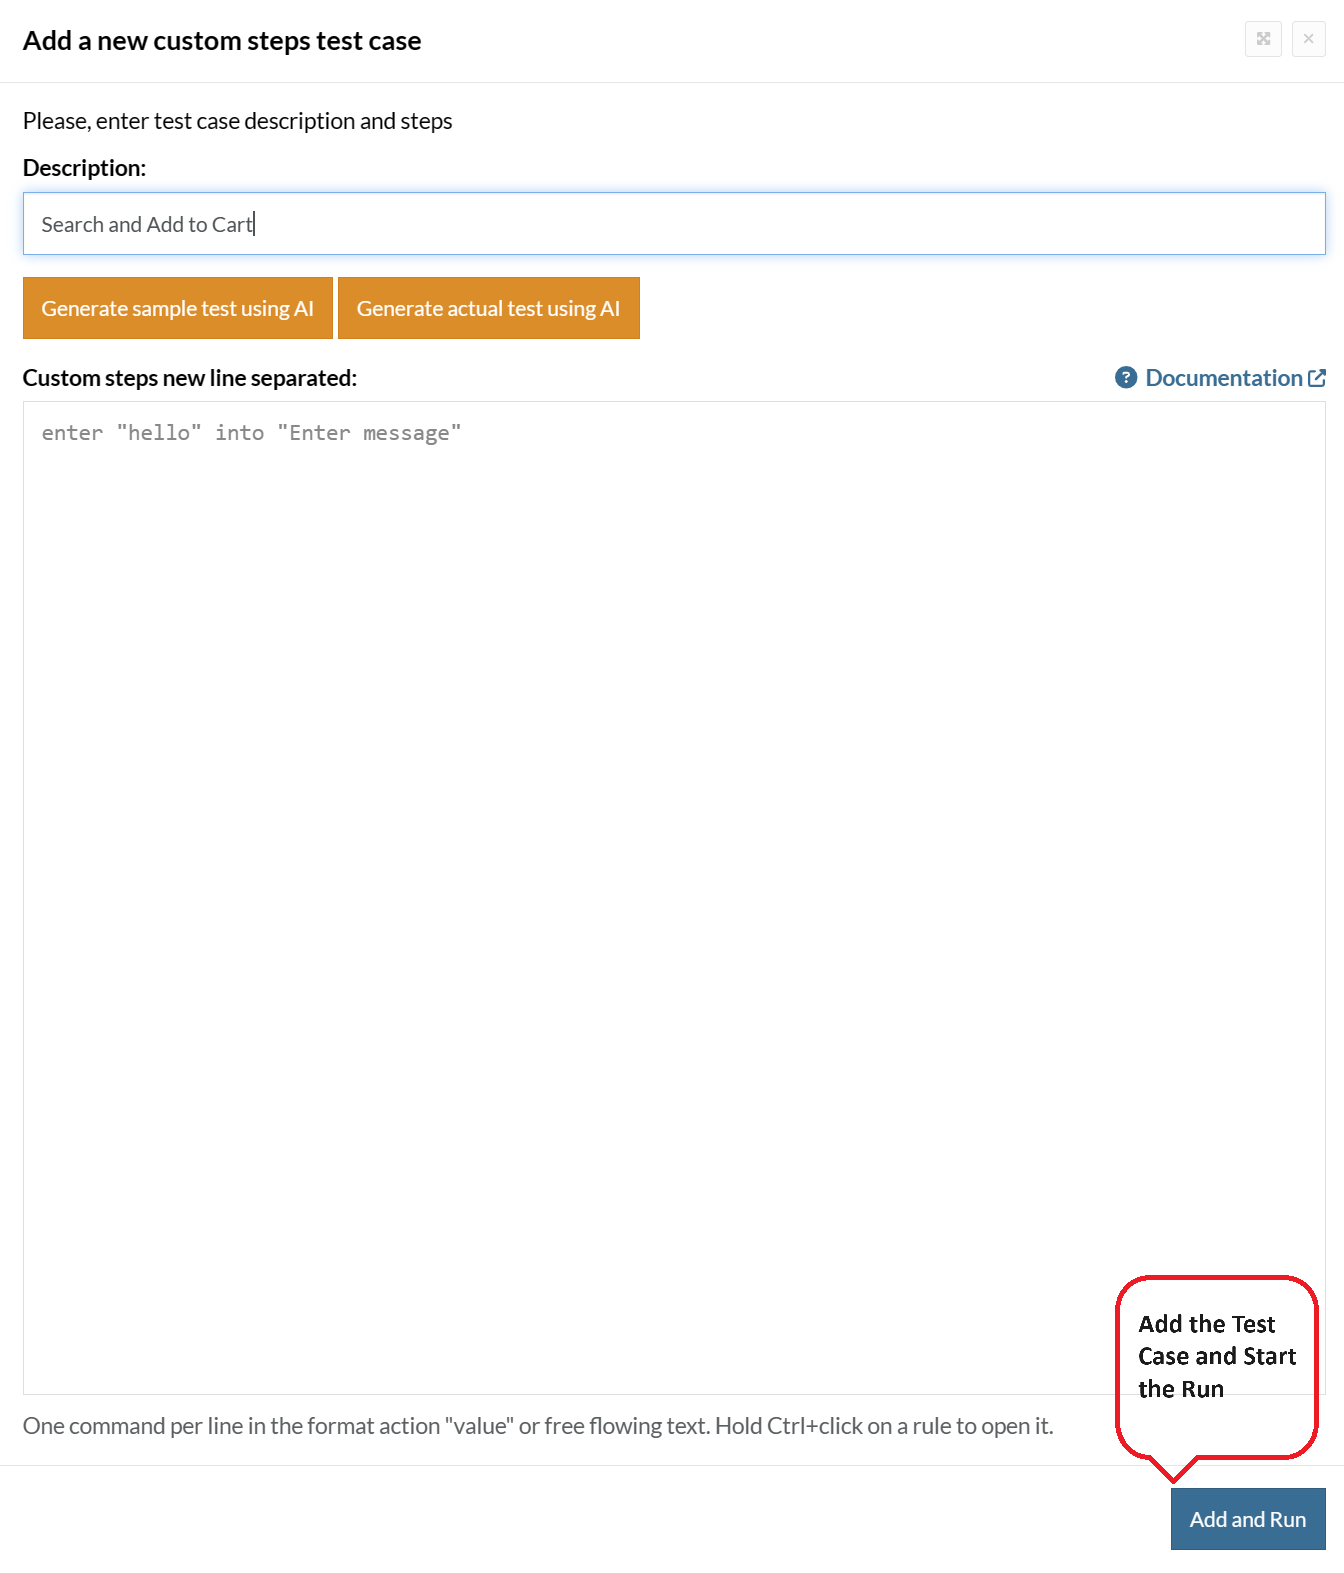
For the application under test, i.e., e-commerce website, we will perform below test steps:
- Search for a product
- Add it to the cart
- Verify that the product is present in the cart
Test Case: Search and Add to Cart
Step 1: We will add test steps on the test case editor screen one by one.
testRigor automatically navigates to the website URL you provided during the Test Suite creation. There is no need to use any separate function for it. Here is the website homepage, which we intend to test.

First, we want to search for a product in the search box. Unlike traditional testing tools, you can identify the UI element using the text you see on the screen. You need not use any CSS/XPath identifiers.
click "What are you looking for?"
Step 2: Once the cursor is in the search box, we will type the product name (lily), and press enter to start the search.
type "lily"
enter enter
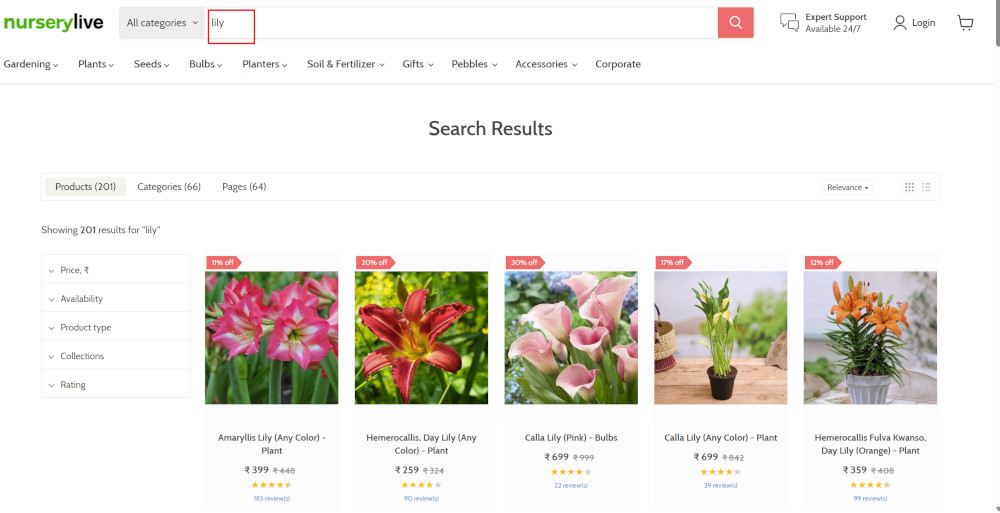
Search lists all products with the “lily” keyword on the webpage.
Step 3: The lily plant we are searching for needs the screen to be scrolled; for that testRigor provides a command. Scroll down until the product is present on the screen:
scroll down until page contains "Zephyranthes Lily, Rain Lily (Red)"

When the product is found on the screen, testRigor stops scrolling.
Step 4: Click on the product name to view the details:
click "Zephyranthes Lily, Rain Lily (Red)"
After the click, the product details are displayed on the screen as below, with the default Quantity as 1.
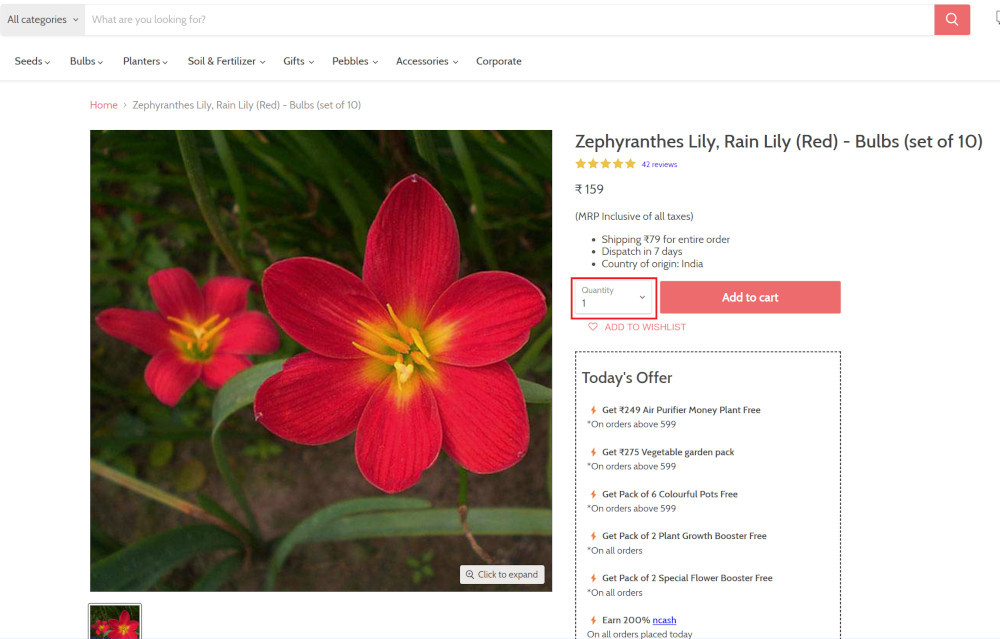
Step 5: Lets say, we want to change the Quantity to 3, so here we use the testRigor command to select from a list.
select "3" from "Quantity"
click "Add to cart"
The product is successfully added to the cart, and the “Added to your cart:” message is displayed on webpage.
Step 6: To assert that the message is successfully displayed, use a simple assertion command as below:
check that page contains "Added to your cart:"
Step 7: After this check, we will view the contents of the cart by clicking View cart as below:
click "View cart"

Step 8: Now we will again check that the product is present in the cart, under heading “Your cart” using the below assertion. With testRigor, it is really easy to specify the location of an element on the screen.
check that page contains "Zephyranthes Lily, Rain Lily (Red)" under "Your cart"

Complete Test Case
Here is how the complete test case will look in the testRigor app. The test steps are simple in plain English, enabling everyone in your team to write and execute them.
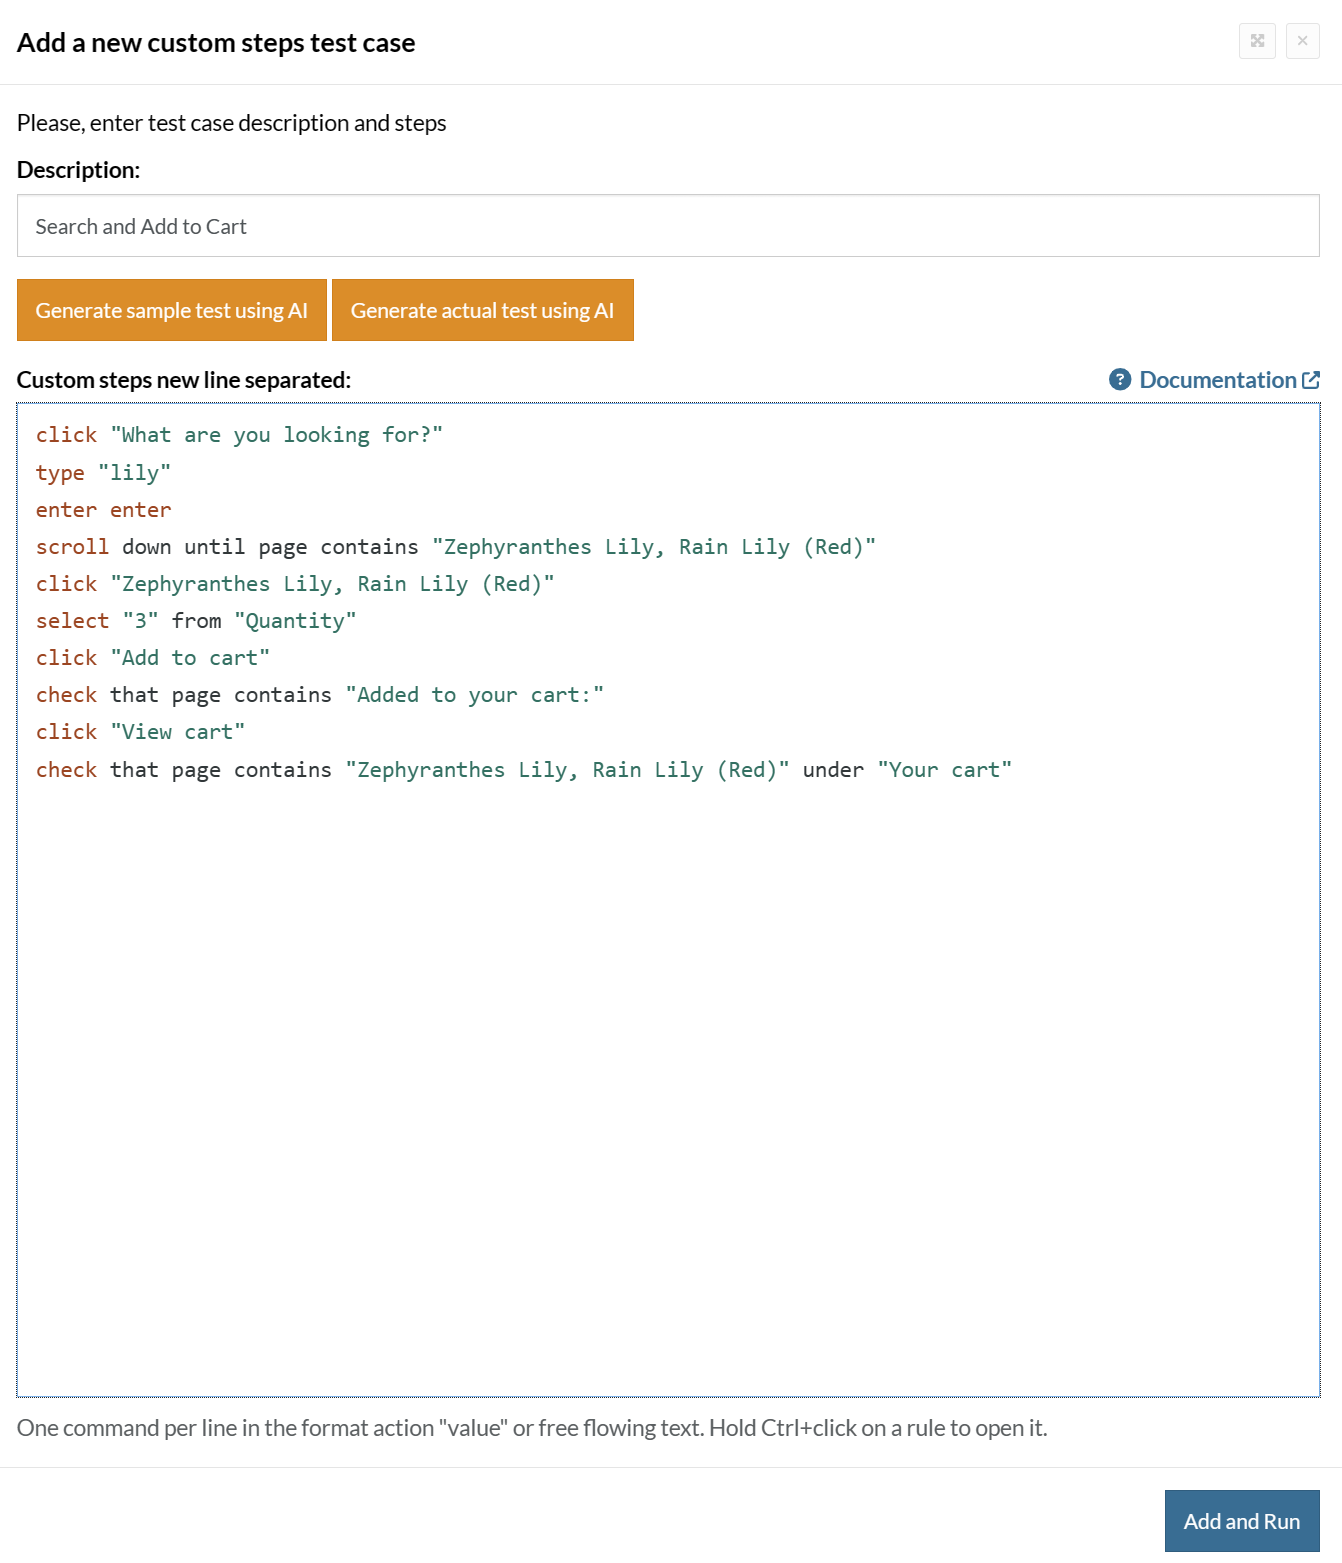
Click Add and Run.
Execution Results
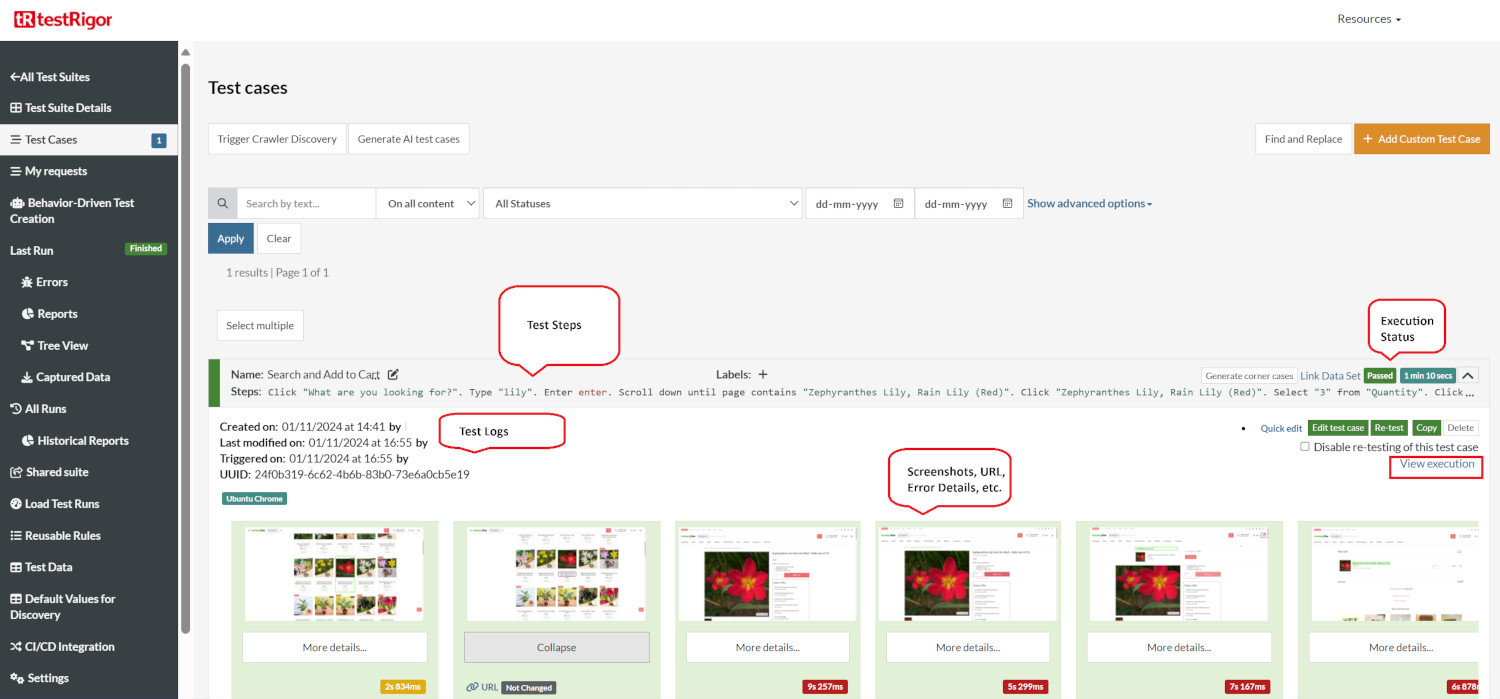
Once the test is executed, you can view the execution details, such as execution status, time spent in execution, screenshots, error messages, logs, video recordings of the test execution, etc. In case of any failure, there are logs and error text that are available easily in a few clicks.
You can also download the complete execution with steps and screenshots in PDF or Word format through the View Execution option.
testRigor’s Capabilities
Apart from the simplistic test case design and execution, there are some advanced features that help you test your application using simple English commands.
- Reusable Rules (Subroutines): You can easily create functions for the test steps that you use repeatedly. You can use the Reusable Rules to create such functions and call them in test cases by simply writing their names. See the example of Reusable Rules.
- Global Variables and Data Sets: You can import data from external files or create your own global variables and data sets in testRigor to use them in data-driven testing.
- 2FA, QR Code, and Captcha Resolution: testRigor easily manages the 2FA, QR Code, and Captcha resolution through its simple English commands.
- Email, Phone Call, and SMS Testing: Use simple English commands to test the email, phone calls, and SMS. These commands are useful for validating 2FA scenarios, with OTPs and authentication codes being sent to email, phone calls, or via phone text.
- File Upload/ Download Testing: Execute the test steps involving file download or file upload without the requirement of any third-party software. You can also validate the contents of the files using testRigor’s simple English commands.
- Database Testing: Execute database queries and validate the results fetched.
testRigor enables you to test web, mobile (hybrid, native), API, and desktop apps with minimum effort and maintenance.
Additional Resources
- Access testRigor documentation to know about more useful capabilities
- Top testRigor’s features
- How to perform end-to-end testing
Conclusion
You can ensure the quality of your PHP code by performing unit tests, integration tests, and end-to-end tests. You can deliver a superior product by leveraging Phalcon's advanced development capabilities and utilizing the right testing tools.
| Achieve More Than 90% Test Automation | |
| Step by Step Walkthroughs and Help | |
| 14 Day Free Trial, Cancel Anytime |


