Pylons Project Testing

The Pylons Project is a collection of open-source web application technologies developed in Python. Together, these applications form an ecosystem that facilitates the development of Python applications. Some of the web applications included in the Pylons Project are:
- Pyramid: This is a web framework that enables you to start your project quickly and simply, while supporting extensibility at later stages.
- Deform: This is a library for building web forms.
- Colander: This is a library for validating and deserializing data structures.
- WebOb: This is a library for working with HTTP requests and responses in Python. It provides a simple, consistent interface for parsing and generating HTTP messages, making it easier to build web applications that handle complex HTTP interactions.
- Webtest: This lets you test your Pylons application code without starting up a server.
As applications built using any of the Pylons Project frameworks are Python compliant, you can test them using testing tools that are designed for Python. In this post, we will discuss the following approaches to testing Pylons Project applications:
Unit Testing
Unit testing serves as the first layer of verification for the application. It is a good practice to try to write both positive and negative unit tests for as many functions as possible. Unit tests should be lightweight and fast, hence they should not have dependencies. This means that dependencies, such as API calls, data requirements, UI interactions, or any others, will be mocked. Therefore, you can run your tests in isolation as needed. One important point to remember is that every unit test should focus on a single output. Therefore, your functions should be written to produce a single output.
Testing using Unittest
Unittest is a very popular choice for unit testing Python code. It supports the creation and maintenance of test fixtures, test suites, and provides a test runner to execute test cases. Using the assert methods provided by Unittest, you can verify the expected outcomes. These assertions are available in the TestCase class.
Here's a simple example of fetching a name and checking if it returns the expected value.
import unittest
from myapp.model import MyModel

class TestMyModel(unittest.TestCase):
  def test_get_name(self):

    name = 'Alice'
    mymodel = MyModel(name=name)

    # Call the get_name method and check that it returns the expected name
    expected_name = name
    actual_name = mymodel.get_name()
    self.assertEqual(expected_name, actual_name)
Testing using Pytest
Pytest is another widely used option for writing unit tests. It supports running Unittest and Nose test cases. Pytest offers many features such as a rich set of assertions, a plugin ecosystem, fixtures, mocking and patching using Pytest's monkeypatch fixture, parameterized testing, and test coverage plugins. Pytest needs to be added as a requirement in the setup.py file along with other configurations. For applications that use asynchronous programming, Pytest offers a plugin called pytest-asyncio, which can be used for testing. However, this plugin might be more useful for integration or functional testing, rather than unit testing.
Using Pyramid test utilities
If you're using the Pyramid framework to develop your application, you can utilize pyramid.testing to access other testing utilities such as:
- TestConfig: This class in pyramid.testing enables you to configure your application and its components in a test environment. It can be used to register views, routes, templates, and other application dependencies, as well as to set up custom configuration settings for testing.
- DummyRequest: This class in pyramid.testing allows the creation of a mock request object for testing. You can set attributes such as the method, path, headers, and params to simulate various types of requests.
- DummyResource: This class in pyramid.testing allows the creation of a mock resource object for testing. You can set attributes such as _parent_, _name_, and _acl_ to simulate the behavior of different types of resources.
- MockTemplate: This class in pyramid.testing allows the creation of a mock template object for testing. You can set attributes such as name, renderer, and implementation to simulate the behavior of your application's actual templates.
- setUp and tearDown methods: These methods can be used to establish and dismantle the testing environment before and after each test. For example, you can use setUp to create a database connection and tearDown to close the connection.
- TestingAuthenticationPolicy: This class provides a convenient way to test authentication and authorization in Pyramid applications.
These examples demonstrate the variety of testing utilities and helpers that Pyramid provides. By leveraging these utilities and combining them with other testing frameworks like Unittest or Pytest, you can create comprehensive tests to ensure your application behaves as expected under a range of conditions.
Test case example
Let's consider testing a function written in Pyramid. Here's an example function:
from pyramid.httpexceptions import HTTPForbidden

def view_fn(request):
  if request.has_permission('edit'):
    raise HTTPForbidden
  return {'greeting':'hello'}
Now, here's a unit test for this function, using both Unittest for writing the test and Pytest for running it. This test also uses Pyramid's own test utilities:
import unittest
from pyramid import testing

class MyTest(unittest.TestCase):
  def setUp(self):
    self.config = testing.setUp()

  def tearDown(self):
    testing.tearDown()

  def test_view_fn_forbidden(self):
    from pyramid.httpexceptions import HTTPForbidden
    from my.package import view_fn
    self.config.testing_securitypolicy(userid='hank', permissive=False)
    request = testing.DummyRequest()
    request.context = testing.DummyResource()
    self.assertRaises(HTTPForbidden, view_fn, request)

  def test_view_fn_allowed(self):
    from my.package import view_fn
    self.config.testing_securitypolicy(userid='hank', permissive=True)
    request = testing.DummyRequest()
    request.context = testing.DummyResource()
    response = view_fn(request)
    self.assertEqual(response, {'greeting':'hello'})
This test class, MyTest, inherits from unittest.TestCase. If it's properly set up, it will be available when Pytest runs. The test_view_fn_forbidden tests view_fn when the current user doesn't have 'edit' permissions per the security policy. A dummy request and dummy resource are created using Pyramid's testing module, and then we assert that calling view_fn with this request raises an HTTPForbidden exception.
The second test method, test_view_fn_allowed, checks that the security policy grants access. A dummy request and dummy resource are created using Pyramid's testing module, thenview_fn is called with this request. We then assert that the response returned by view_fn is a dictionary with a single key 'greeting' and value 'hello'.
Thus, this test class is testing the behavior of the view_fn function under two different security policies (permissive and non-permissive). It does this by creating dummy requests and resources using Pyramid's testing module, and by asserting that the function behaves as expected under each condition.
Testing using Nose
Nose is a testing framework for the Python programming language that extends the capabilities of Python's built-in unittest module. It provides additional features and plugins that make it easier to write, discover, and run tests. Nose can also integrate with other Python tools such as coverage and profiling tools.
You can easily install Nose for your project with the following command:
$ easy_install -U nose
Nose will automatically discover and run all tests in the directory and its subdirectories.
Testing using WebTest
WebTest is a versatile testing library particularly beneficial for testing WSGI applications. TestApp, a key component of WebTest, serves as a wrapper for WSGI applications. You can employ WebTest for writing unit tests for APIs, non-HTTP protocols like SMTP and FTP, webhooks, OAuth clients, HTTP-based services, and RESTful services. The following example demonstrates how to use WebTest's TestApp to validate the response body of an API call:
from webtest import TestApp
from myapp import main  # replace "myapp" with the name of your application

def test_api_view():

  app = TestApp(main())

  response = app.get('/api')

  # Check that the response status code is 200 OK
  assert response.status_code == 200

  # Check that the response content type is application/json
  assert response.content_type == 'application/json'

  # Check that the response body contains the expected JSON data
  expected_data = {'message': 'Hello, world!'}
  assert response.json == expected_data
Integration Testing
Integration testing enables you to verify that various units of code are operating correctly in conjunction. Such tests are not required for every function but are essential for scenarios involving integration between different components such as the database, UI views, or other network-related elements. Writing these tests serves as a valuable precursor to end-to-end testing as they examine the junctions between different components. These tests should be more lightweight than end-to-end tests and often use both mocking and actual resources. For instance, to test if an API is writing data into the database upon a button click, you can invoke the API and the database write operation while mocking the UI button click.
It's a good practice to set up test data or a test database to ensure there are no impacts on the production environment.
Much like unit test creation, you can utilize Unittest, Nose, Pytest, and Pyramid utilities to write integration tests. The following example uses them to test if a database write operation occurs upon a button click:
from unittest import TestCase
from pyramid import testing
from nose.plugins.attrib import attr
from myapp import main
import mysql.connector

@attr(integration=True)
class IntegrationTests(TestCase):
  def setUp(self):
    # Connect to the test database
    self.cnx = mysql.connector.connect(
      user='testuser',
      password='testpassword',
      host='localhost',
      database='testdb'
    )

    # Create a test application
    app = main({}, **settings)
    self.testapp = TestApp(app)

    def tearDown(self):
      # Clean up the test database and application
      cursor = self.cnx.cursor()
      cursor.execute('DROP DATABASE testdb')
      cursor.close()
      self.cnx.close()
      testing.tearDown()

    def test_button_click_writes_to_database(self):
      # Simulate a button click
      request = testing.DummyRequest(post={'foo': 'bar'})
      response = self.testapp.post('/my_view', params=request.params)
      assert 'Success' in response

      # Verify that the data is written to the database
      cursor = self.cnx.cursor()
      cursor.execute('SELECT * FROM mytable WHERE foo = "bar"')
      result = cursor.fetchone()
      self.assertIsNotNone(result)
      cursor.close()
In this example, Nose's attr decorator labels the test as an integration test. We use the pyramid.testing utilities to create a test application and dummy request object. The setUp method creates a test application by invoking the main function with necessary configuration settings, and stores a reference to the test application in self.testapp. The tearDown method calls testing.tearDown() to clean up any test fixtures.
Finally, in the test_button_click_writes_to_database method, a button click is simulated by creating a dummy request with POST data and sending it to our view function using self.testapp.post(). An assertion checks that the response contains the string 'Success'. Finally, the data is verified to have been written to the database by querying the database session and looking for a record with the correct 'foo' value.
You can also use WebTest's TestApp to write integration tests. In the example below, we use the TestApp class from WebTest to simulate HTTP requests to our Pylons application. A test application is created in the setUp method and stored in self.testapp.
In the test_button_click_writes_to_database method, we simulate a button click by sending a POST request to the my_view URL with a 'foo' parameter set to 'bar'. We then assert that the response contains the string 'Success'. Finally, we verify that the data has been written to the database by querying the database using the DBSession object and checking that a row with the correct value for 'foo' exists.
from unittest import TestCase
from webtest import TestApp
from pyramid import testing

from myapp import main

class IntegrationTests(TestCase):
  def setUp(self):
    # Create a test application
    app = main({}, **settings)
    self.testapp = TestApp(app)

  def tearDown(self):
    # Clean up the test application
    testing.tearDown()

  def test_button_click_writes_to_database(self):
    # Simulate a button click
    response = self.testapp.post('/my_view', {'foo': 'bar'})

    # Verify that the response contains the expected string
    assert 'Success' in response

    # Verify that the data was written to the database
    with transaction.manager:
      result = DBSession.query(MyModel).filter(MyModel.foo == 'bar').first()
      self.assertIsNotNone(result)
End-to-End Testing
Unit and integration tests help check the functioning of the code. But that is not enough. You also need to make sure when the end user interacts with your application, it is able to operate smoothly while fulfilling business cases. This is where end-to-end testing comes into play. Since the end user’s perspective is given more importance when formulating these tests, it is good to include manual testers and business team members for gaining perspective. You can perform end-to-end testing for your Pylons project using:
- WebTest
- Robot framework
- testRigor
WebTest
Using WebTest, you can create functional test cases that will help you verify whether different modules work properly. You can simulate HTTP requests and responses, different types of web browsers, including sending browser-specific headers and inspecting browser-specific behaviour and also simulate cookies and session data. Here is an example of adding an item to the cart on Amazon while checking if the pages load without issues.
import unittest
from webtest import TestApp

class TestAddToCart(unittest.TestCase):
  def setUp(self):

    self.app = TestApp("http://www.amazon.com")

  def test_add_to_cart(self):

    response = self.app.get("/s?k=python+book")

    # assert that the search results page loaded successfully
    self.assertEqual(response.status_code, 200)
    self.assertIn("Python book", response)

    response = response.click("Python Crash Course")

    # assert that the product page loaded successfully
    self.assertEqual(response.status_code, 200)
    self.assertIn("Python Crash Course", response)

    form = response.forms["addToCart"]
    response = form.submit()

    # assert that the item was added to the cart successfully
    self.assertEqual(response.status_code, 200)
    self.assertIn("Added to Cart", response)

    # check that the item was added to the cart
    response = self.app.get("/gp/cart/view.html/ref=lh_cart")

    # assert that the cart page loaded successfully
    self.assertEqual(response.status_code, 200)

    # assert that the item is present in the cart
    self.assertIn("Python Crash Course", response)

if __name__ == "__main__":
  unittest.main()
You can read more about the various functions of WebTest and their uses over here.
Robot Framework
This open-source test automation framework utilizes a keyword-driven testing approach. It is used for acceptance testing and Robotic Process Automation (RPA). It comes with a rich library of keywords for creating test cases. However, when creating custom keywords, you need to write Python or Java code to define their actions. This requirement could pose a challenge when automating tests. Furthermore, you need a proper setup before using this framework, which can be time-consuming compared to cloud-based platforms that only require login credentials. Another point to consider is identifying UI elements in your Robot scripts; you still need to specify HTML attributes for identification.
testRigor
testRigor is an AI-driven, codeless test automation platform, presenting a more efficient solution for automating your end-to-end tests. It allows manual testers to develop complex test automation without requiring coding skills and spend almost no time on maintenance.
The innovative feature of testRigor lies in its natural language processing capability that enables the creation of test cases resembling plain English sentences. It offers excellent scalability and advanced AI functionality, including generative AI test creation, simplified test creation and execution, and minimal maintenance. These features set testRigor apart from other tools in the market.
In the context of UI testing, testRigor allows you to use relative locations to identify UI elements, making the process more intuitive. For instance, a button present to the right of the search bar can be referred to as 'click on "Add to cart" to the right of "Search"'. However, you also have the flexibility to specify HTML attributes of UI elements, if preferred.
Unlike many tools requiring you to write explicit conditions to wait for elements to load, testRigor's intelligent design automatically waits for the element to appear. The platform supports conditional execution using 'if' statements and offers a library of validations for creating assertions, which are a crucial part of testing.
Moreover, testRigor provides comprehensive solutions for testing web, native and hybrid mobile applications, native desktop applications, and more. It integrates seamlessly with third-party tools for test management, CI/CD, and issue management, making it a robust choice for modern software testing needs.
Here is an example of a testRigor test case, mirroring the one shown in the 'end-to-end test using WebTest' section:
check that page contains "Amazon"
enter "Python book" in "Search"
click on "Search button" to the right of "Search"
check that page contains "Python Crash Course"
click "Python Crash Course"
check that page contains "Add to cart"
click "Add to cart"
check that page contains "Added to cart!"
click "Cart" at the top of the page
check that page contains "Python Crash Course"
It's quite impressive, isn't it? With testRigor, you even have the ability to combine different platforms within a single test. For instance, you can start a test in a mobile app and finish it in a browser. These capabilities position testRigor as a superior choice for end-to-end testing.
The tool has a lot more to offer. You can read more here.
How to do End-to-end Testing with testRigor
Let us take the example of an e-commerce website that sells plants and other gardening needs. We will create end-to-end test cases in testRigor using plain English test steps.
Step 1: Log in to your testRigor app with your credentials.
Step 2: Set up the test suite for the website testing by providing the information below:
- Test Suite Name: Provide a relevant and self-explanatory name.
- Type of testing: Select from the following options: Desktop Web Testing, Mobile Web Testing, Native and Hybrid Mobile, based on your test requirements.
- URL to run test on: Provide the application URL that you want to test.
- Testing credentials for your web/mobile app to test functionality which requires user to login: You can provide the app’s user login credentials here and need not write them separately in the test steps then. The login functionality will be taken care of automatically using the keyword
login. - OS and Browser: Choose the OS Browser combination on which you want to run the test cases.
- Number of test cases to generate using AI: If you wish, you can choose to generate test cases based on the App Description text, which works on generative AI.
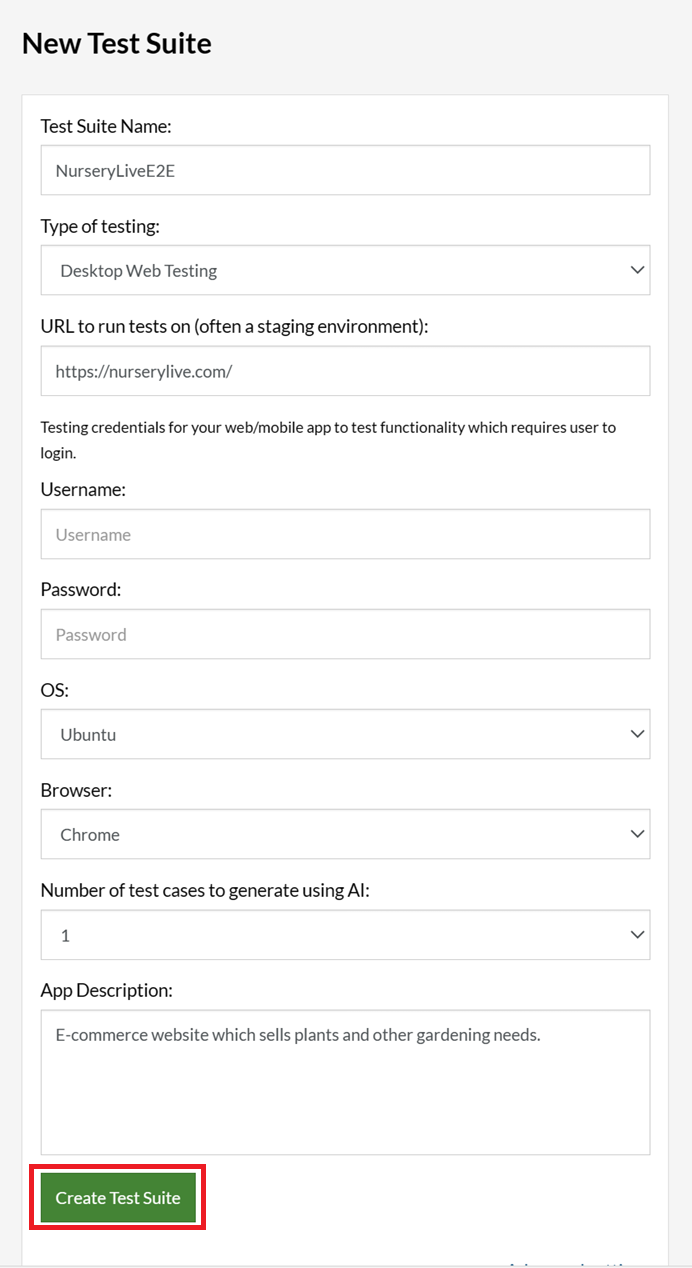
Step 3: Click Create Test Suite.
On the next screen, you can let AI generate the test case based on the App Description you provided during the Test Suite creation. However, for now, select do not generate any test, since we will write the test steps ourselves.
Step 4: To create a new custom test case yourself, click Add Custom Test Case.

Step 5: Provide the test case Description and start adding the test steps.
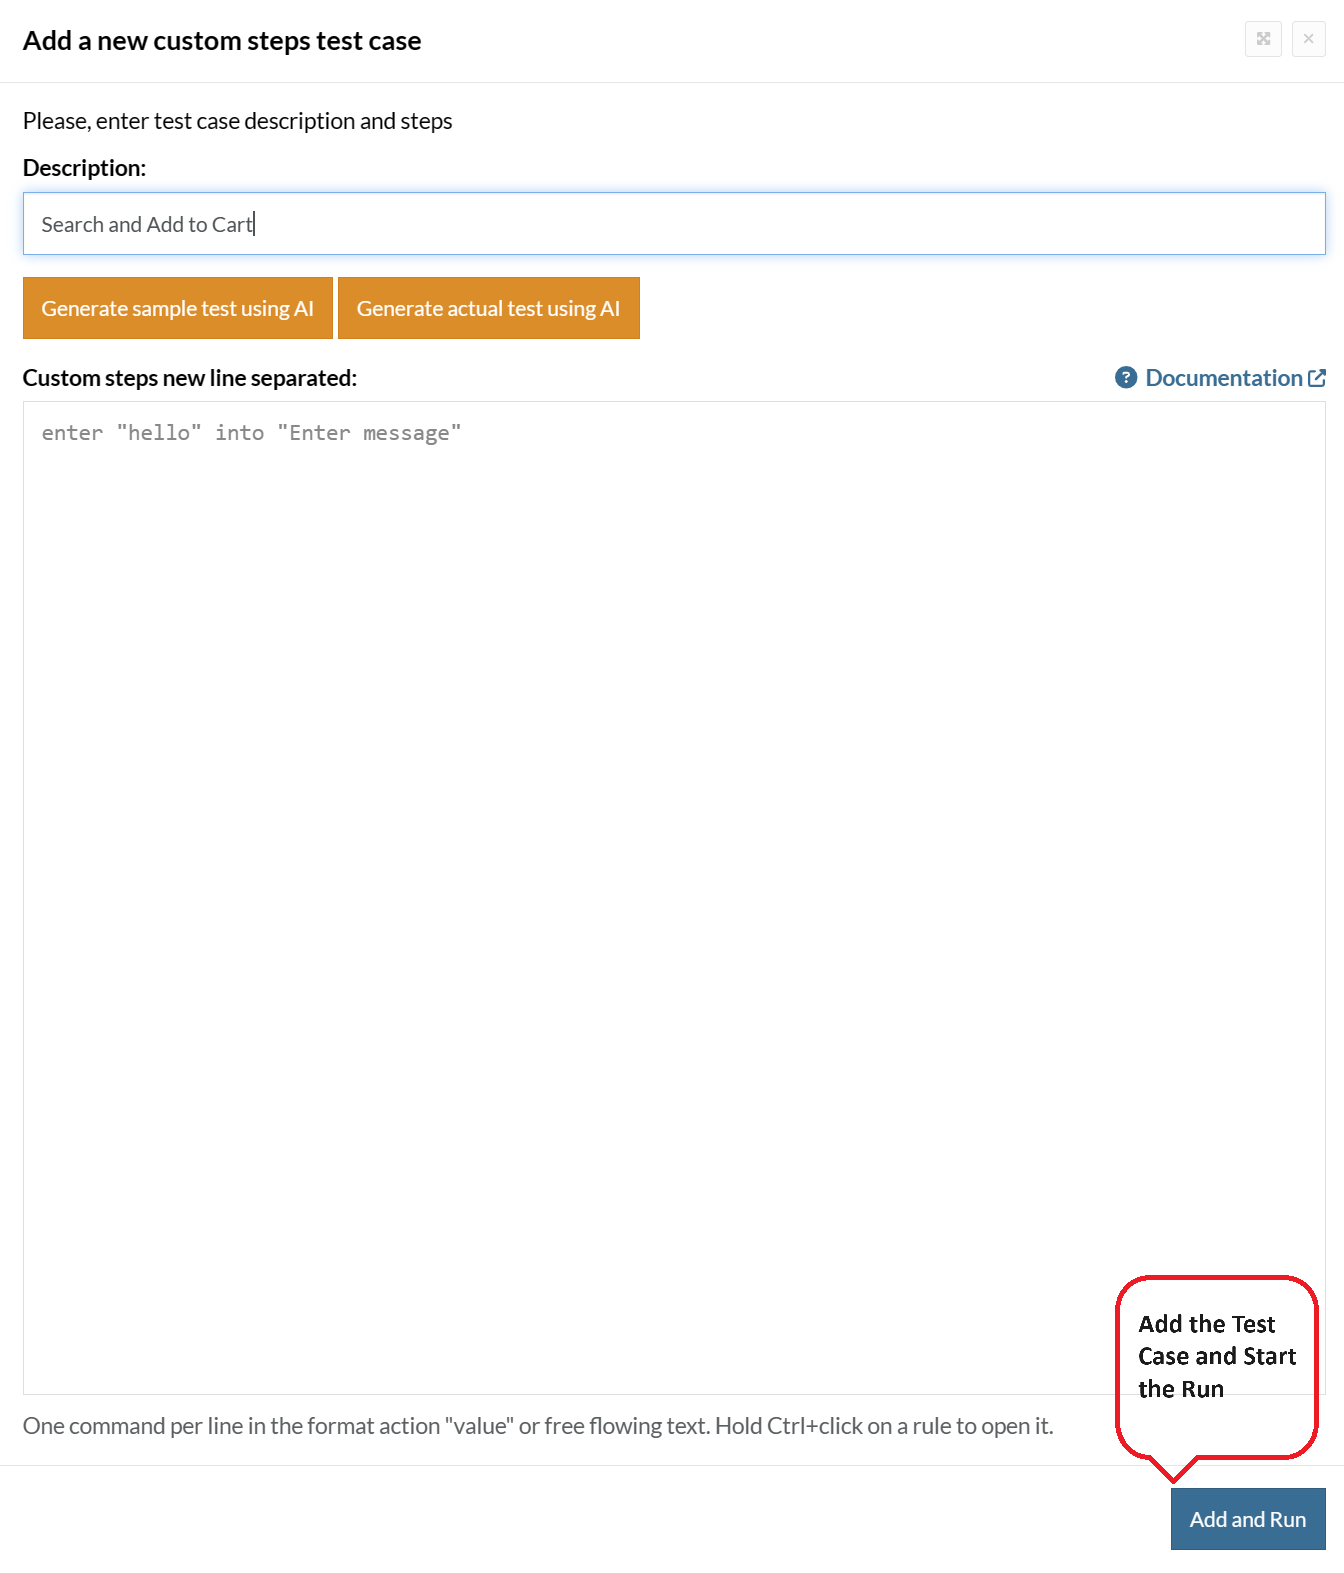
For the application under test, i.e., e-commerce website, we will perform below test steps:
- Search for a product
- Add it to the cart
- Verify that the product is present in the cart
Test Case: Search and Add to Cart
Step 1: We will add test steps on the test case editor screen one by one.
testRigor automatically navigates to the website URL you provided during the Test Suite creation. There is no need to use any separate function for it. Here is the website homepage, which we intend to test.

First, we want to search for a product in the search box. Unlike traditional testing tools, you can identify the UI element using the text you see on the screen. You need not use any CSS/XPath identifiers.
click "What are you looking for?"
Step 2: Once the cursor is in the search box, we will type the product name (lily), and press enter to start the search.
type "lily"
enter enter
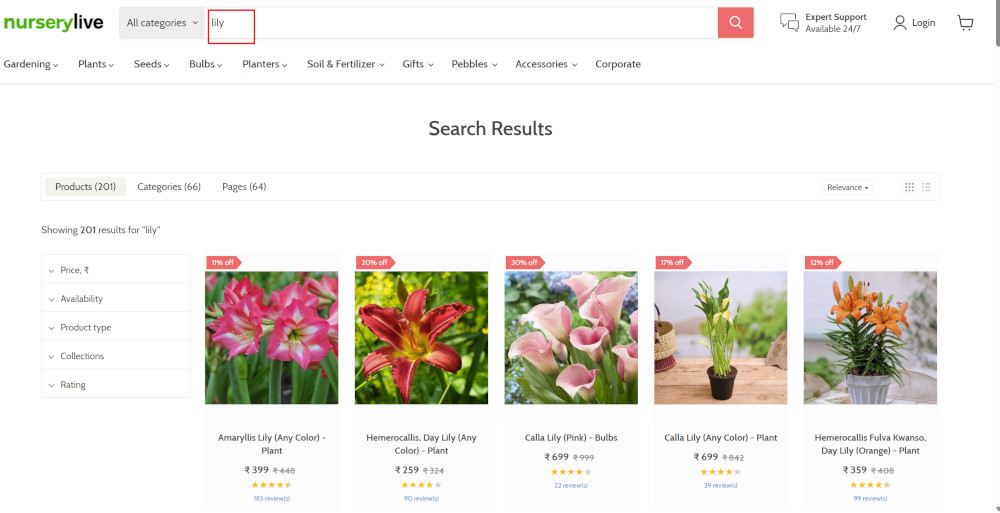
Search lists all products with the “lily” keyword on the webpage.
Step 3: The lily plant we are searching for needs the screen to be scrolled; for that testRigor provides a command. Scroll down until the product is present on the screen:
scroll down until page contains "Zephyranthes Lily, Rain Lily (Red)"
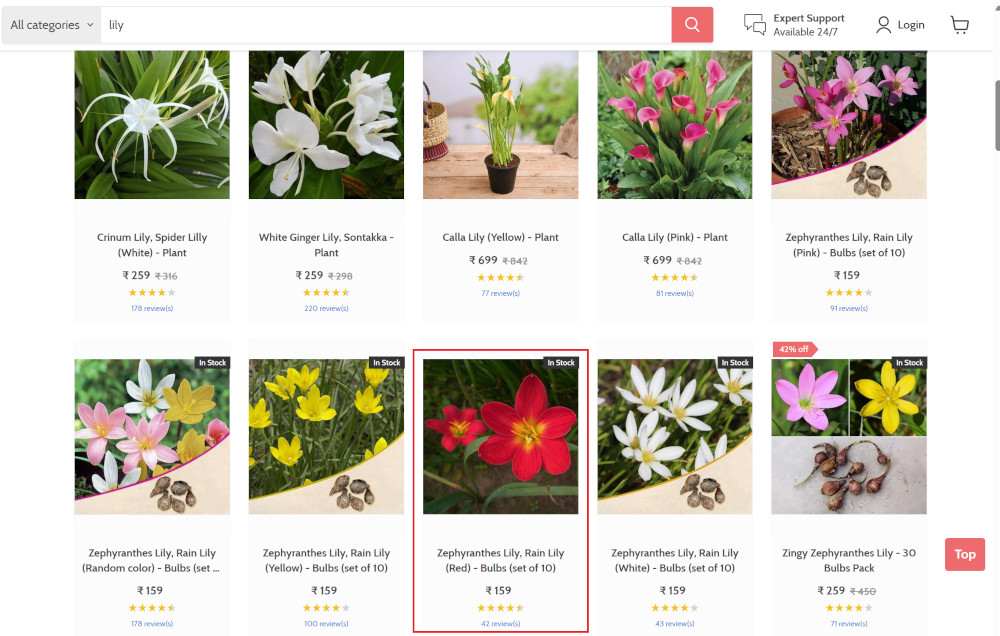
When the product is found on the screen, testRigor stops scrolling.
Step 4: Click on the product name to view the details:
click "Zephyranthes Lily, Rain Lily (Red)"
After the click, the product details are displayed on the screen as below, with the default Quantity as 1.
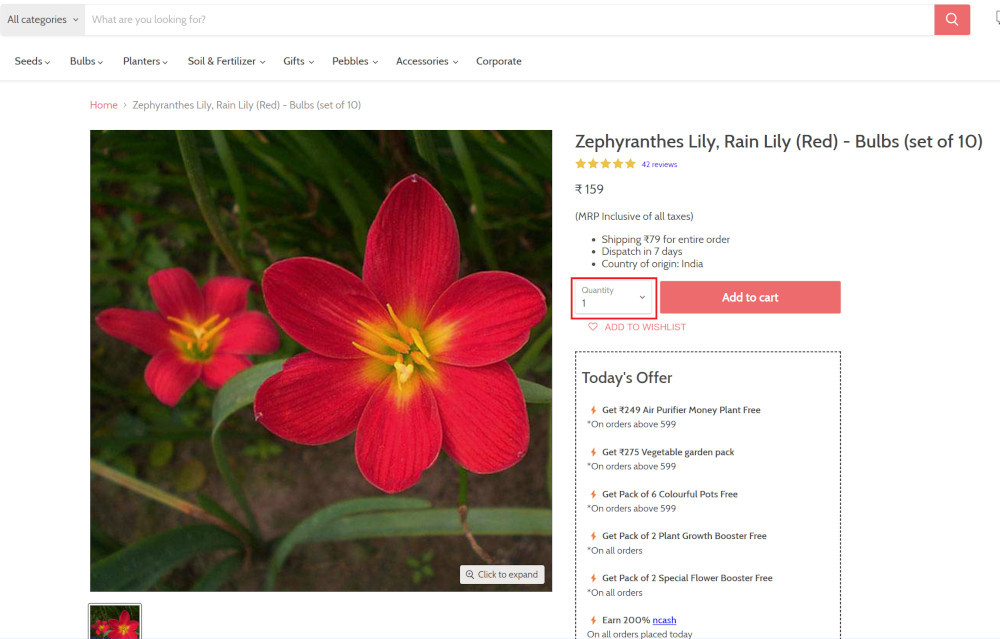
Step 5: Lets say, we want to change the Quantity to 3, so here we use the testRigor command to select from a list.
select "3" from "Quantity"
click "Add to cart"
The product is successfully added to the cart, and the “Added to your cart:” message is displayed on webpage.
Step 6: To assert that the message is successfully displayed, use a simple assertion command as below:
check that page contains "Added to your cart:"
Step 7: After this check, we will view the contents of the cart by clicking View cart as below:
click "View cart"

Step 8: Now we will again check that the product is present in the cart, under heading “Your cart” using the below assertion. With testRigor, it is really easy to specify the location of an element on the screen.
check that page contains "Zephyranthes Lily, Rain Lily (Red)" under "Your cart"

Complete Test Case
Here is how the complete test case will look in the testRigor app. The test steps are simple in plain English, enabling everyone in your team to write and execute them.
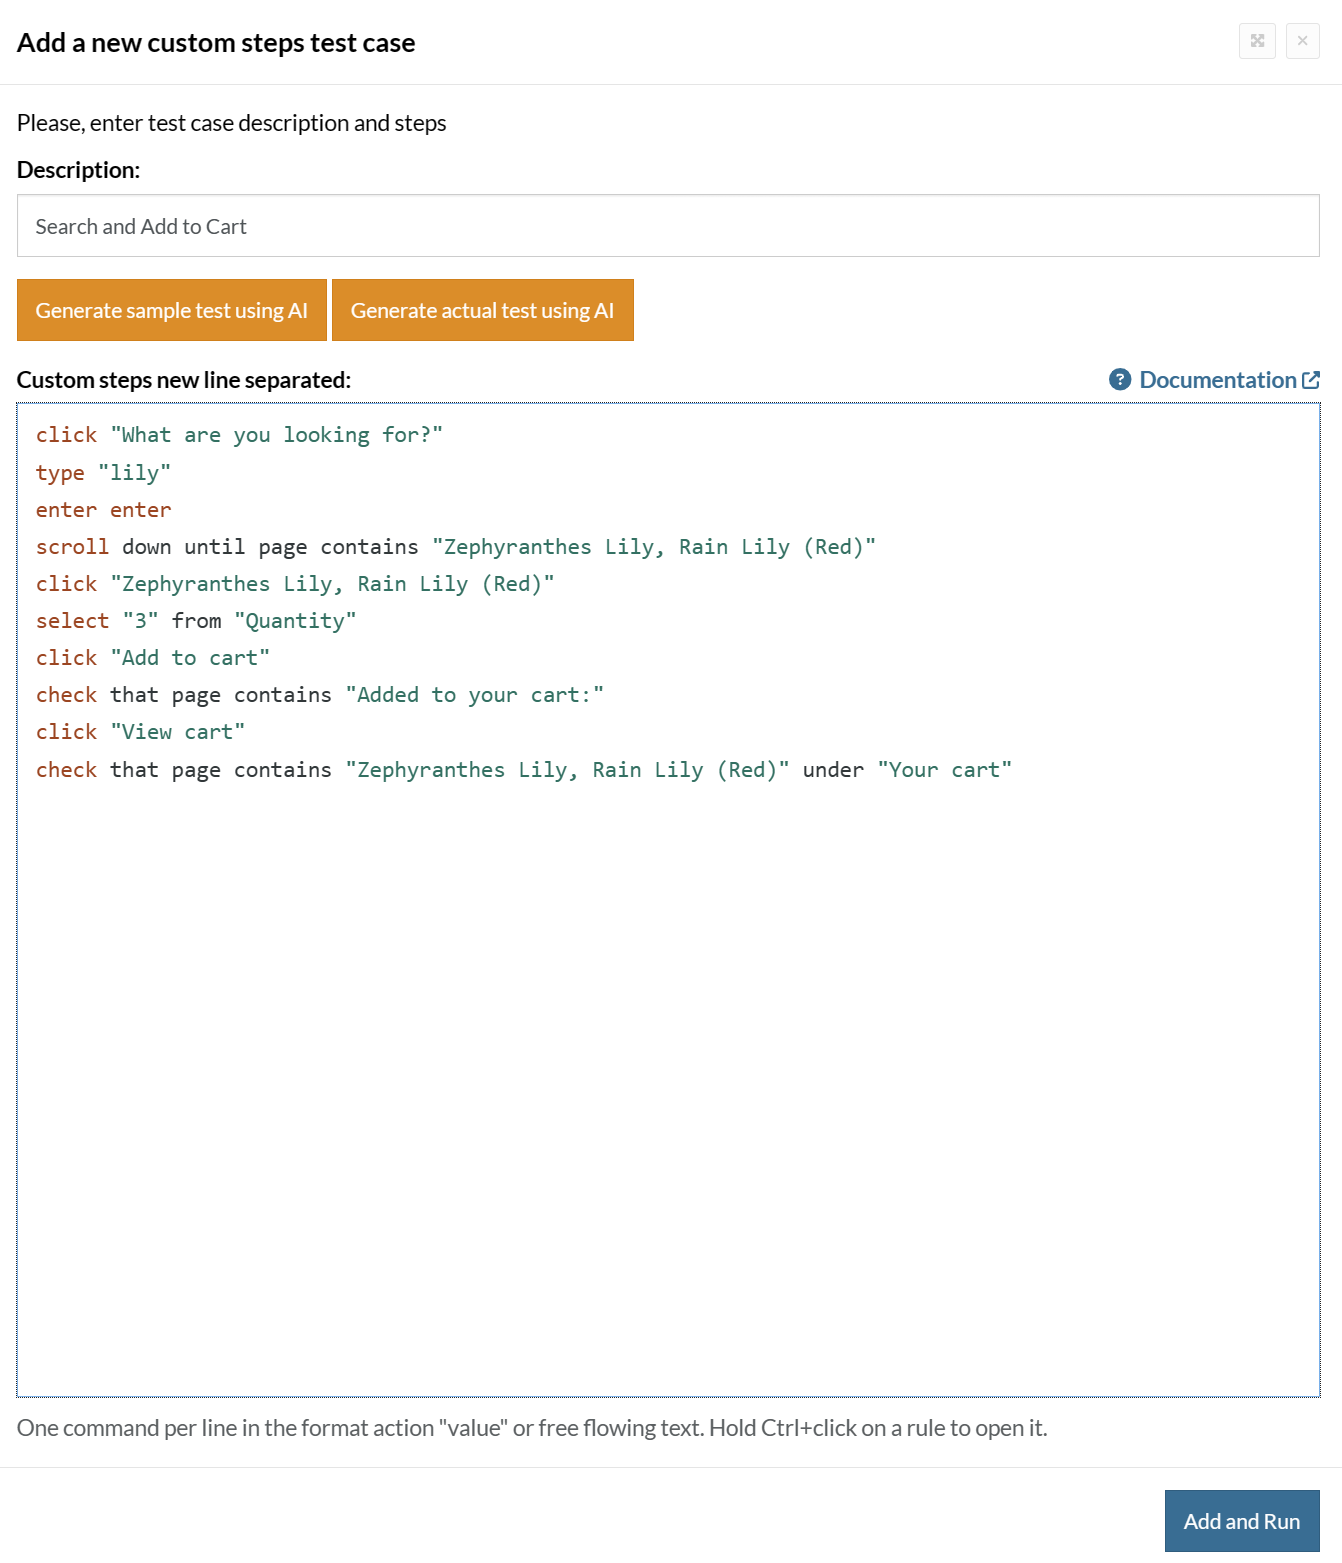
Click Add and Run.
Execution Results
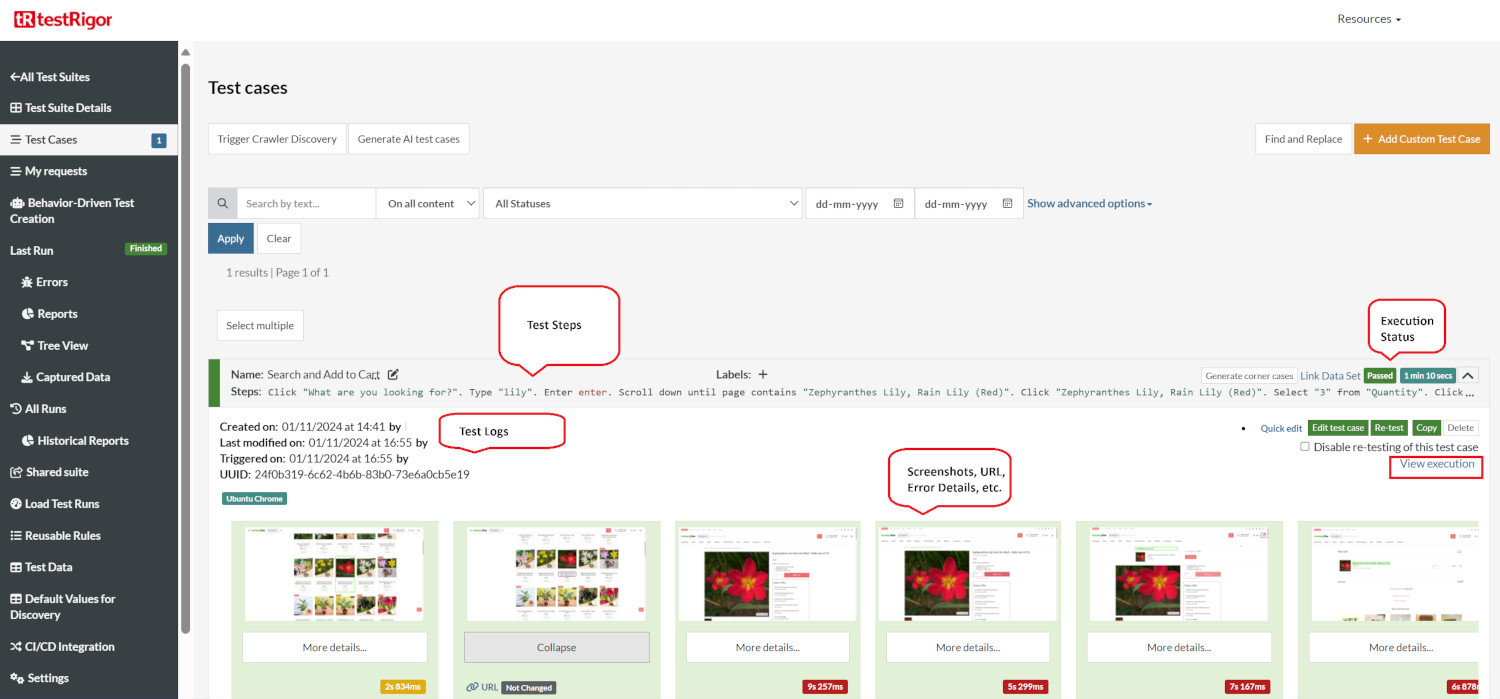
Once the test is executed, you can view the execution details, such as execution status, time spent in execution, screenshots, error messages, logs, video recordings of the test execution, etc. In case of any failure, there are logs and error text that are available easily in a few clicks.
You can also download the complete execution with steps and screenshots in PDF or Word format through the View Execution option.
testRigor’s Capabilities
Apart from the simplistic test case design and execution, there are some advanced features that help you test your application using simple English commands.
- Reusable Rules (Subroutines): You can easily create functions for the test steps that you use repeatedly. You can use the Reusable Rules to create such functions and call them in test cases by simply writing their names. See the example of Reusable Rules.
- Global Variables and Data Sets: You can import data from external files or create your own global variables and data sets in testRigor to use them in data-driven testing.
- 2FA, QR Code, and Captcha Resolution: testRigor easily manages the 2FA, QR Code, and Captcha resolution through its simple English commands.
- Email, Phone Call, and SMS Testing: Use simple English commands to test the email, phone calls, and SMS. These commands are useful for validating 2FA scenarios, with OTPs and authentication codes being sent to email, phone calls, or via phone text.
- File Upload/ Download Testing: Execute the test steps involving file download or file upload without the requirement of any third-party software. You can also validate the contents of the files using testRigor’s simple English commands.
- Database Testing: Execute database queries and validate the results fetched.
testRigor enables you to test web, mobile (hybrid, native), API, and desktop apps with minimum effort and maintenance.
Additional Resources
- Access testRigor documentation to know about more useful capabilities
- Top testRigor’s features
- How to perform end-to-end testing
Conclusion
Using different frameworks and utilities provided by the Pylons Project, you can create competent and effective applications. This post provides some recommendations for automation testing tools that you can use when writing and executing test cases. Remember, the ultimate choice of tool depends on your project and team's requirements.
| Achieve More Than 90% Test Automation | |
| Step by Step Walkthroughs and Help | |
| 14 Day Free Trial, Cancel Anytime |


