Sails.js Testing

Sails.js is a highly favored web application framework built on top of the Node.js runtime environment. Its popularity stems from its suitability for creating real-time features, making it an optimal choice for building customized enterprise applications with high data demands. Sails.js is built on Express.js, a high-performing backend web application platform capable of creating REST APIs. This relationship allows developers to swiftly create REST APIs using Sails.js.
The framework adheres to the model-view-controller (MVC) architectural pattern, providing a robust structure for web applications. Launched by Mike McNeil in 2012, Sails.js has been incorporated into over 10,000 websites globally. Its connectivity with Socket.io, a Javascript library for real-time and event-based system features, makes it even more powerful. This relationship enables developers to build real-time applications such as online chat platforms.
In addition, Sails.js integrates Waterline.js, an abstraction tool for database interaction. Waterline.js provides a uniform API irrespective of the database underlying the application. Sails.js has been adopted by major clients, including Amazon, Verizon, Postman, Microsoft, and Solarwinds, to name a few.
In this article, we'll delve into three testing strategies for Sails.js applications:
Unit Testing
Unit testing is the foundational step in the testing process, with the goal of identifying, isolating, and rectifying problematic code. When we perform unit testing, we scrutinize individual units of code. Mocha or Jest can facilitate unit testing for Sails.js applications.
Mocha
lifecycle.test.js
var sails = require('sails');
// Before running any tests...

before(function(done) {
  sails.lift({
    hooks: { grunt: false },
    log: { level: 'warn' },
  }, function(err) {
    return done();
  });
});
// After all tests have finished...
after(function(done) {
  sails.lower(done);
});
describe('User (model)', function() {
  describe('#findBestStudents()', function() {
    it('should return 5 users', function (done) {
      User.findBestStudents()
        .then(function(bestStudents) {
        if (bestStudents.length !== 5) {
          return done(new Error(
            'Should return exactly 5 students -- the students '+
            'from our test fixtures who are considered the "best".  '+
            'But instead, got: '+util.inspect(bestStudents, {depth:null})+''
          ));
        }
        return done();
      })
      .catch(done);
    });
  });
});
Jest
Jest is another popular open-source unit testing framework designed for JavaScript applications. However, integrating Jest with Sails.js can be complex and time-consuming. Therefore, for the purposes of this article, we will not delve into using Jest with Sails.js.
Integration Testing
Integration testing concentrates on assessing the interaction between different components, such as the model and view, the view and controller, or even the application's integration with external systems. For Sails.js applications, this type of testing can be carried out with a variety of tools, including Supertest or any browser testing tool. Integration testing checks the functionality of actions and controllers by sending HTTP requests and validating their responses. Additionally, this process can be performed using browser tests. For the purpose of this article, we will first discuss the usage of Supertest in Integration testing.
Supertest
var supertest = require('supertest');

describe('UserController.login', function() {
  describe('#login()', function() {
    it('should redirect to /my/page', function (done) {
      supertest(sails.hooks.HTTP.app)
      .post('/users/login')
      .send({ name: 'test', password: 'test' })
      .expect(302)
      .expect('location','/my/page', done);
    });
  });
});
To execute the test, you can use the Mocha command line. This will require passing arguments along with the 'mocha' command in the terminal. Alternatively, you can use the 'npm test' command, but this will require updating the script in the package.json file. In both cases, the lifecycle.test.js should be run first, as testing will be carried out in a local environment.
Browser testing tool
To test the integration between the View and Controller components, several tools can be used. Here are two examples:
- Selenium-based tools - We won't delve into much detail here, as Selenium is a well-established tool with numerous online tutorials available.
- testRigor - We will elaborate on the use of testRigor in the next section.
End-to-End Testing
End-to-End (E2E) testing is a comprehensive validation technique that assesses an application from start to finish, ensuring it fulfills user expectations. It confirms the proper functionality of all integrations with third-party applications and internal components. E2E testing primarily aims to simulate the end user's perspective. Test cases are framed as user flows, replicating and validating actual user scenarios for integration and data integrity at a high level. This form of testing often uncovers issues related to top-level components, request handling, and network configurations.
E2E testing for Sails.js applications can be conducted in several ways, with WebdriverIO and testRigor being among the most commonly used methods.
WebdriverIO
WebdriverIO is an open-source JavaScript testing framework that operates within a Node.js environment. This versatile automation tool is especially popular for Node.js applications. Supporting both JavaScript and TypeScript, WebdriverIO is rooted in the Behavior-Driven Development (BDD) approach. Moreover, it offers the flexibility to opt for the Cucumber, Jasmine, or Mocha testing frameworks.
import { browser, expect } from '@wdio/globals'

describe('Login Test is being started for user : ' + userName , function () {
  it('Should display the login page', async () => {
    await browser.url('https://samplesailssite.com')
  })

  it('Enter Email', async function () {
    await page.focus('#username_box')
    await page.keyboard.type(userName)
  });

  it('Enter Password', async function () {
    await page.focus('#password_box')
    await page.keyboard.type(userPass)
  });

  it('Click "Login in Here" button', async function () {
    await page.click('input[value="Log in Here"]'); // With type
    await page.waitForNavigation();
  });
});
While WebdriverIO offers flexibility, it does require substantial infrastructure setup, making parallel execution complex when scaling across multiple devices. Testing mobile browsers necessitates reliance on the Appium framework. Additionally, WebdriverIO doesn't provide comprehensive built-in integration; each integration arrives as a node module package that needs to be installed separately. This can lead to conflicts during version updates, and establishing certain integrations can be challenging due to a lack of sufficient documentation. Building tests correctly is challenging, and maintaining these tests tends to be burdensome when using this tool.
testRigor
testRigor is a cloud-hosted no-code automation tool primarily designed for E2E testing. It supports a wide range of testing types, including web and mobile browser testing, mobile app testing, native desktop application testing, visual regression testing, API testing, load testing, and more.
One of the key strengths of AI-based testRigor is that it enables the creation of test scripts in plain English, which reduces dependency on programming language expertise. The tool can perform actions on elements just by identifying their name or position, such as select "MD" from dropdown, or click on image from stored value "Logo". This approach simplifies the scripting process, essentially allowing testers to transcribe manual test case steps.
testRigor also boasts other impressive features, including:
- Capability to create and execute test scripts on web and mobile browsers with minimal configuration changes.
- Test maintenance is virtually eliminated: AI engine helps make tests ultra-stable, and fixing tests that legitimately fail after code changes are extremely easy to debug and fix.
- Text validation on canvases and images using Optical Character Recognition (OCR).
- Verify 2-Factor Authentication (2FA) logins, including email, text message, and Google authenticator.
Moreover, testRigor supports numerous integrations, including CI platforms, infrastructure providers, test management and enterprise communication tools.
login
click "Profile" to the left of "Users"
generate unique name, then enter into "First name" and save as "newName"
click "Update"
check that page contains stored value "newName"
How to do End-to-end Testing with testRigor
Let us take the example of an e-commerce website that sells plants and other gardening needs. We will create end-to-end test cases in testRigor using plain English test steps.
Step 1: Log in to your testRigor app with your credentials.
Step 2: Set up the test suite for the website testing by providing the information below:
- Test Suite Name: Provide a relevant and self-explanatory name.
- Type of testing: Select from the following options: Desktop Web Testing, Mobile Web Testing, Native and Hybrid Mobile, based on your test requirements.
- URL to run test on: Provide the application URL that you want to test.
- Testing credentials for your web/mobile app to test functionality which requires user to login: You can provide the app’s user login credentials here and need not write them separately in the test steps then. The login functionality will be taken care of automatically using the keyword
login. - OS and Browser: Choose the OS Browser combination on which you want to run the test cases.
- Number of test cases to generate using AI: If you wish, you can choose to generate test cases based on the App Description text, which works on generative AI.
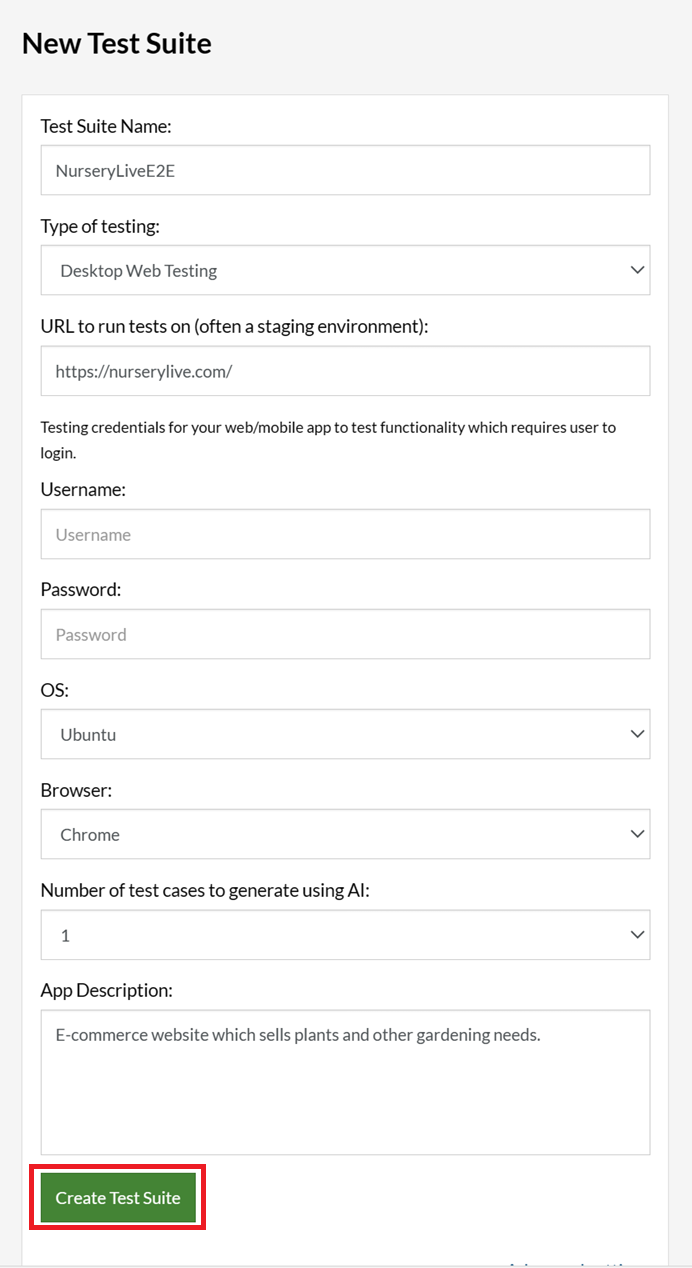
Step 3: Click Create Test Suite.
On the next screen, you can let AI generate the test case based on the App Description you provided during the Test Suite creation. However, for now, select do not generate any test, since we will write the test steps ourselves.
Step 4: To create a new custom test case yourself, click Add Custom Test Case.

Step 5: Provide the test case Description and start adding the test steps.
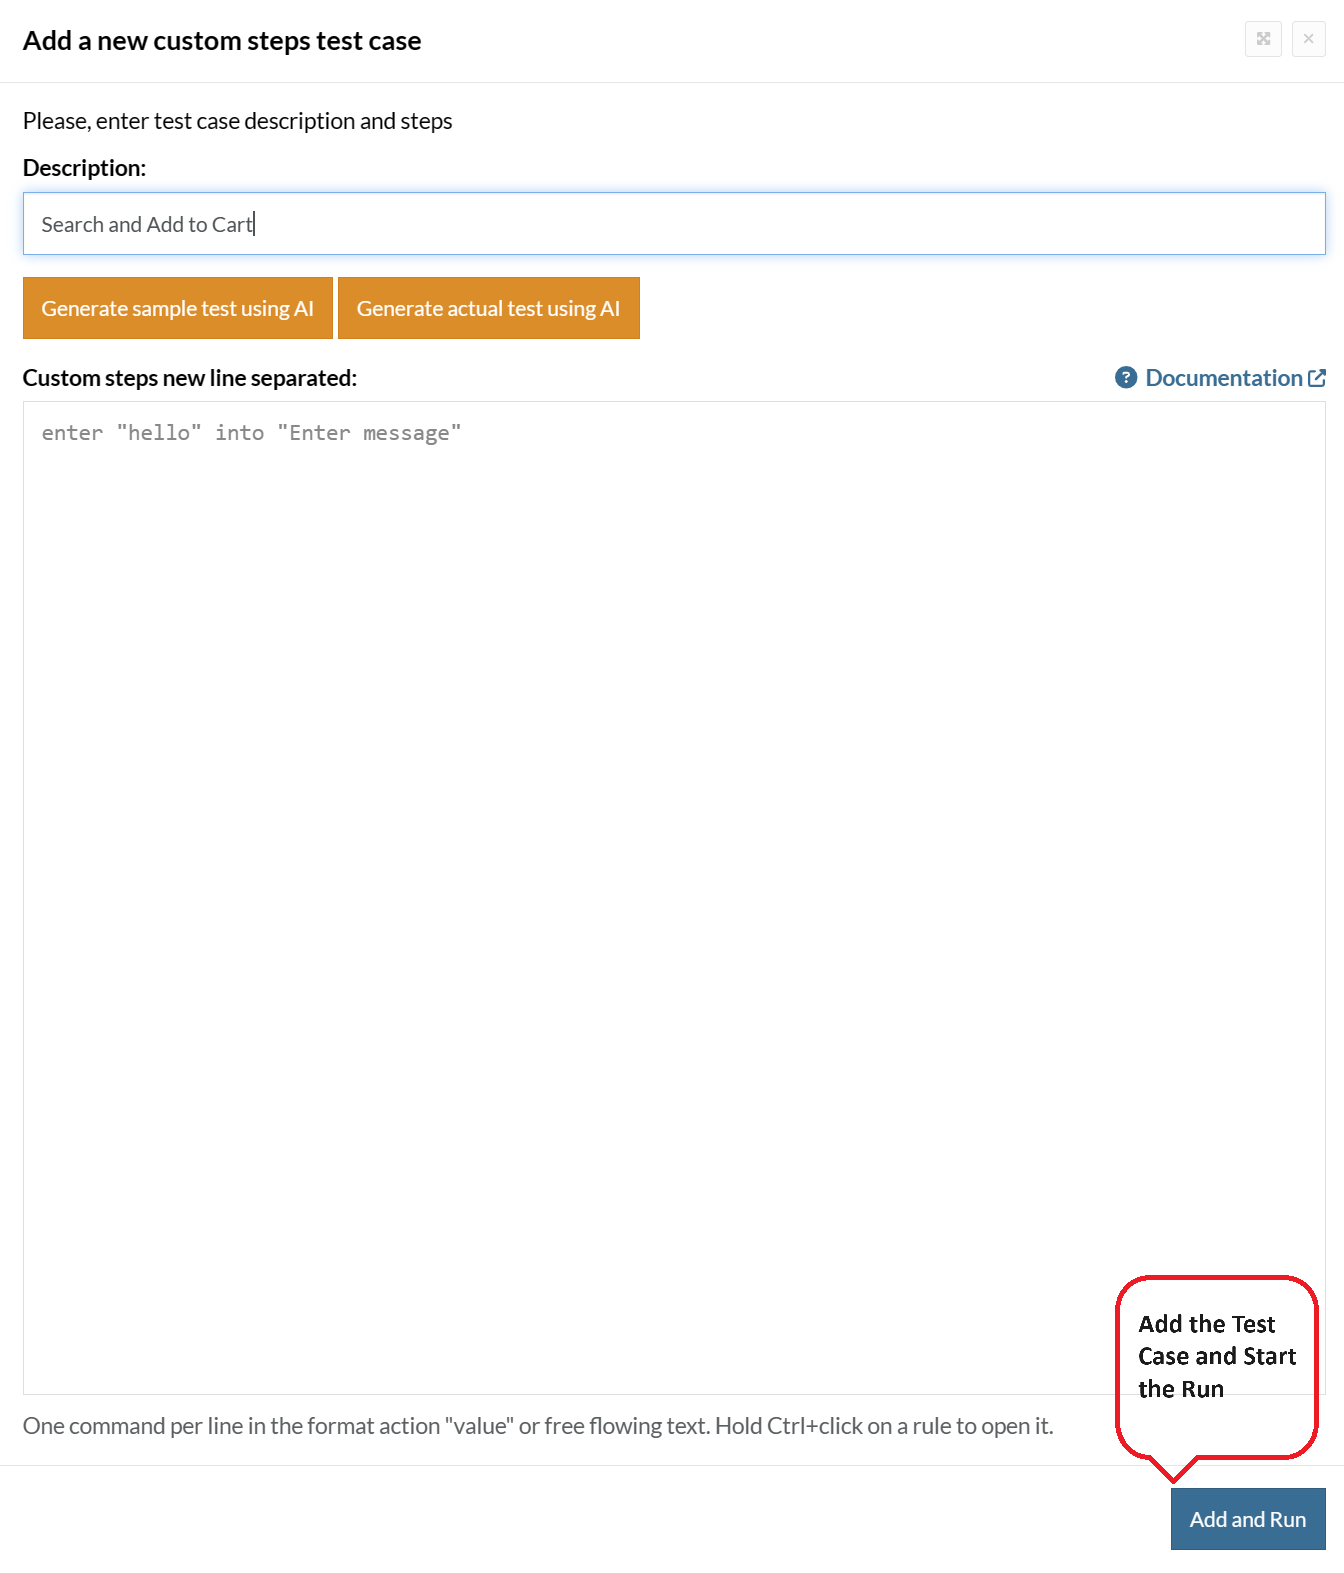
For the application under test, i.e., e-commerce website, we will perform below test steps:
- Search for a product
- Add it to the cart
- Verify that the product is present in the cart
Test Case: Search and Add to Cart
Step 1: We will add test steps on the test case editor screen one by one.
testRigor automatically navigates to the website URL you provided during the Test Suite creation. There is no need to use any separate function for it. Here is the website homepage, which we intend to test.

First, we want to search for a product in the search box. Unlike traditional testing tools, you can identify the UI element using the text you see on the screen. You need not use any CSS/XPath identifiers.
click "What are you looking for?"
Step 2: Once the cursor is in the search box, we will type the product name (lily), and press enter to start the search.
type "lily"
enter enter
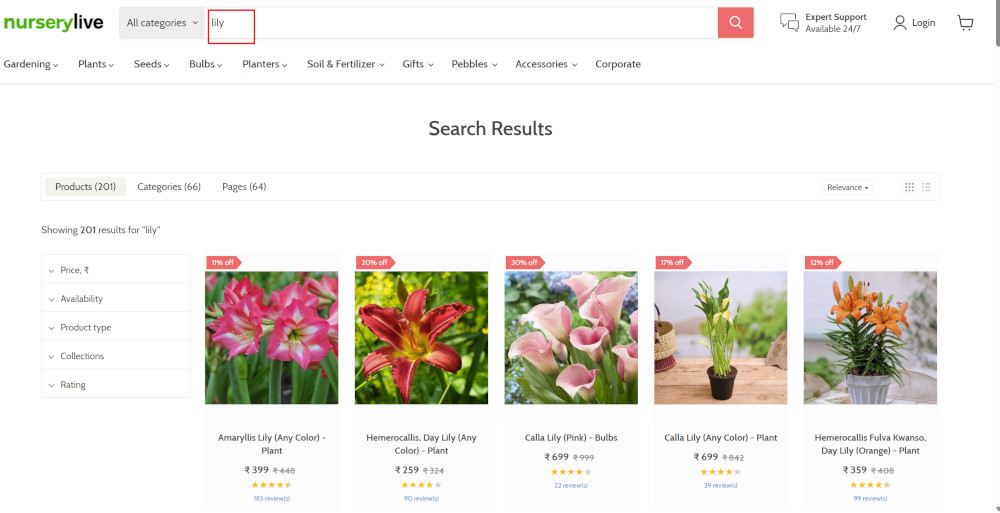
Search lists all products with the “lily” keyword on the webpage.
Step 3: The lily plant we are searching for needs the screen to be scrolled; for that testRigor provides a command. Scroll down until the product is present on the screen:
scroll down until page contains "Zephyranthes Lily, Rain Lily (Red)"
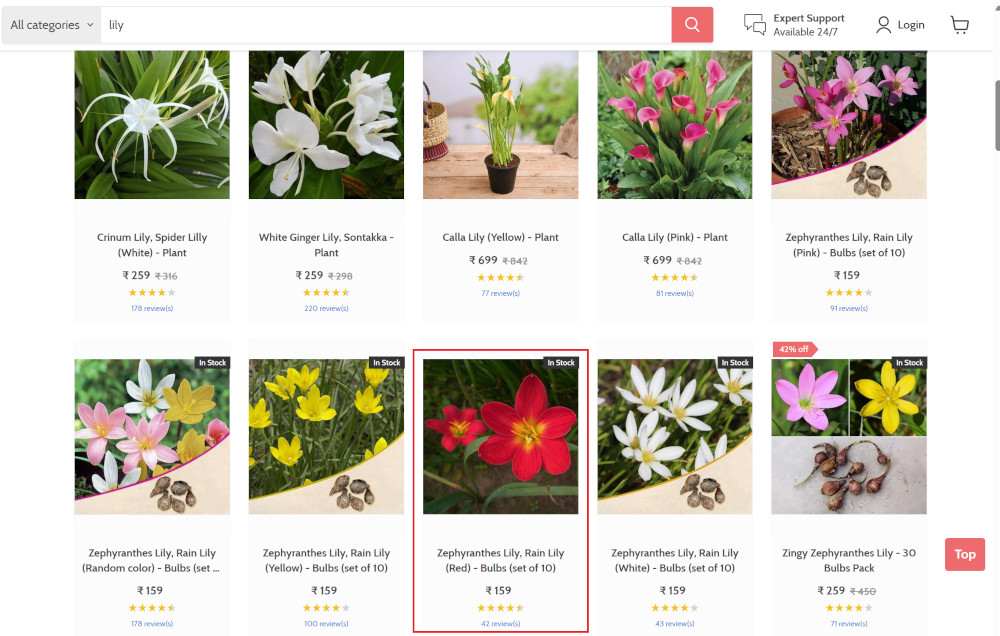
When the product is found on the screen, testRigor stops scrolling.
Step 4: Click on the product name to view the details:
click "Zephyranthes Lily, Rain Lily (Red)"
After the click, the product details are displayed on the screen as below, with the default Quantity as 1.
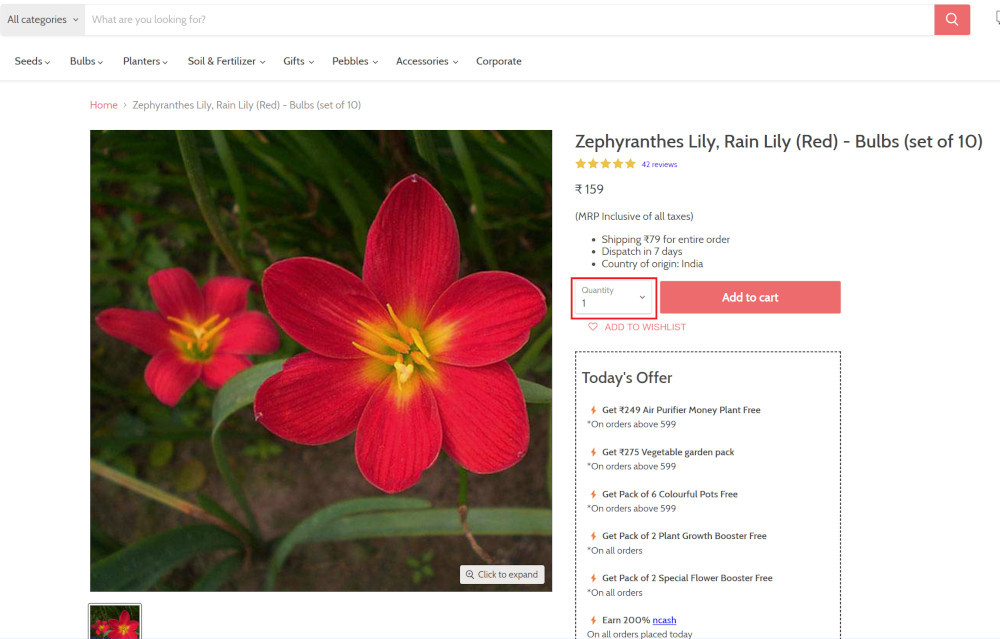
Step 5: Lets say, we want to change the Quantity to 3, so here we use the testRigor command to select from a list.
select "3" from "Quantity"
click "Add to cart"
The product is successfully added to the cart, and the “Added to your cart:” message is displayed on webpage.
Step 6: To assert that the message is successfully displayed, use a simple assertion command as below:
check that page contains "Added to your cart:"
Step 7: After this check, we will view the contents of the cart by clicking View cart as below:
click "View cart"

Step 8: Now we will again check that the product is present in the cart, under heading “Your cart” using the below assertion. With testRigor, it is really easy to specify the location of an element on the screen.
check that page contains "Zephyranthes Lily, Rain Lily (Red)" under "Your cart"

Complete Test Case
Here is how the complete test case will look in the testRigor app. The test steps are simple in plain English, enabling everyone in your team to write and execute them.
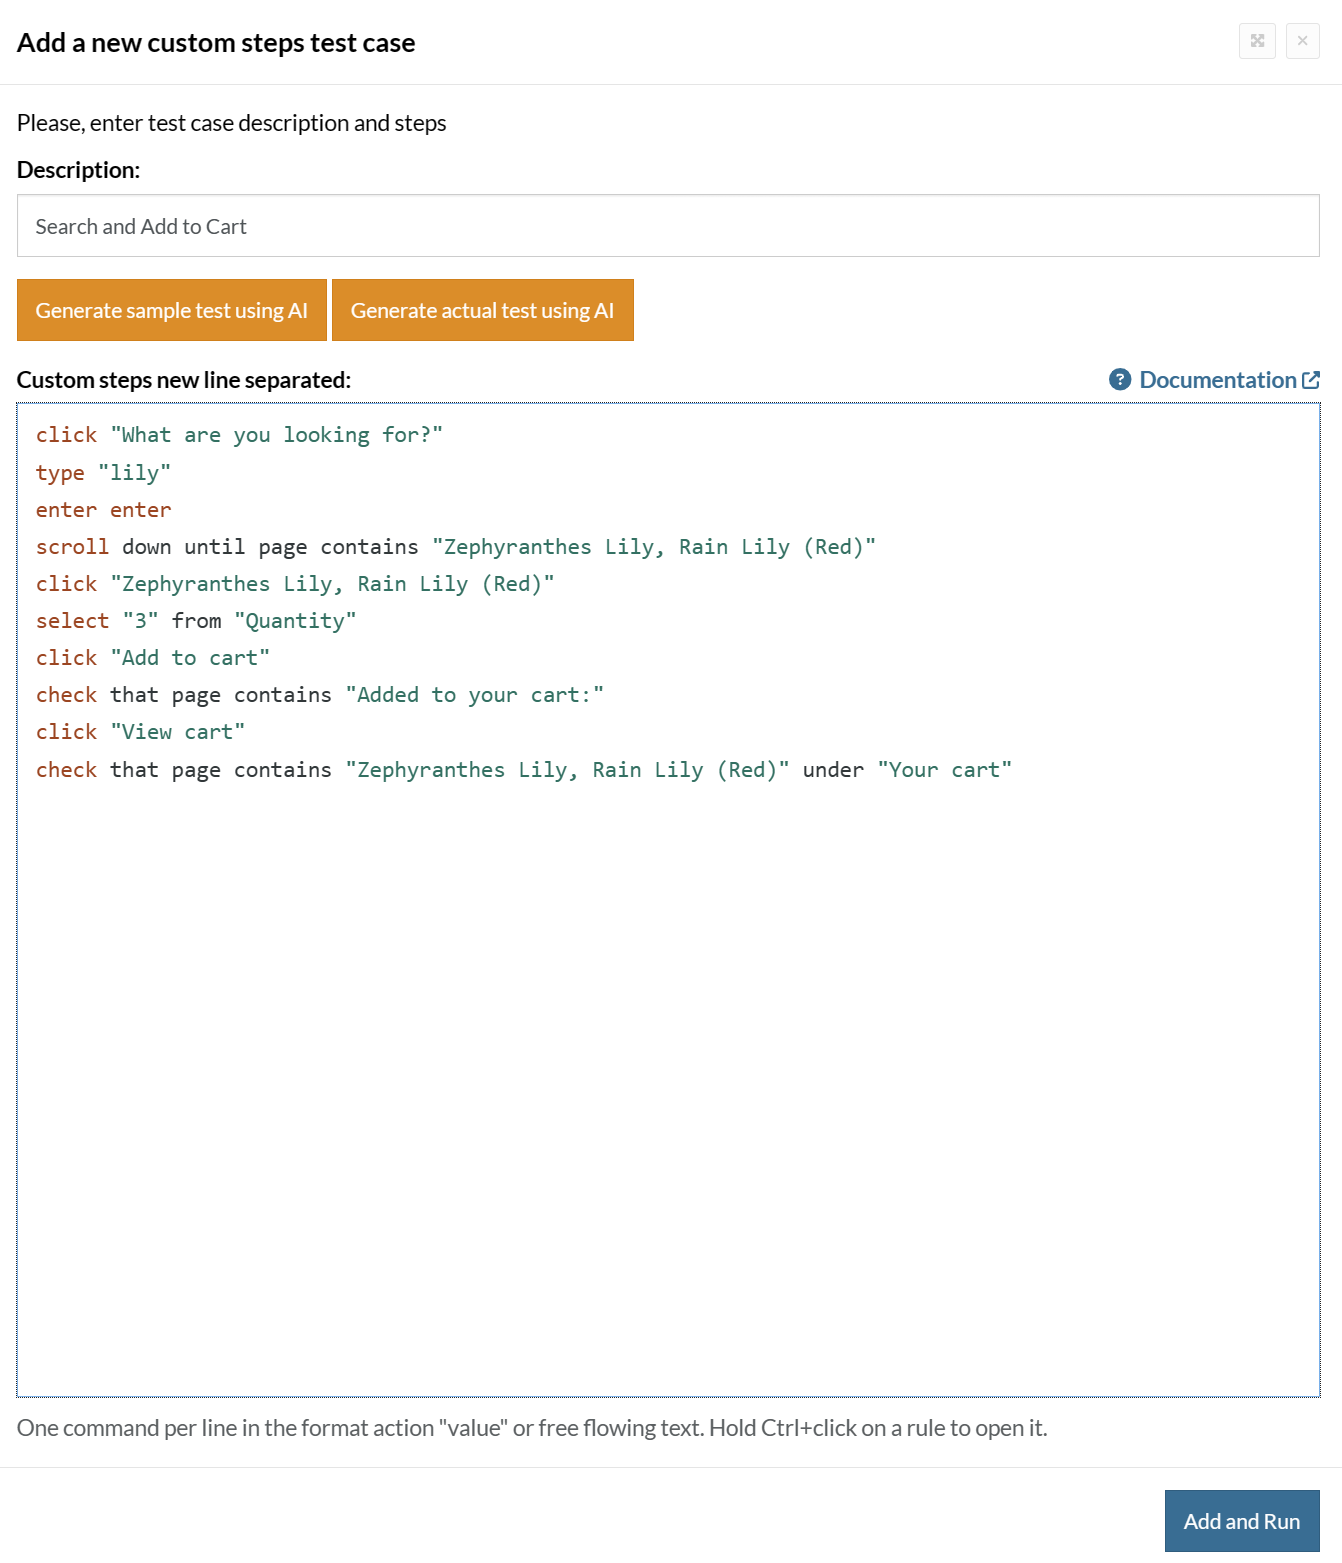
Click Add and Run.
Execution Results
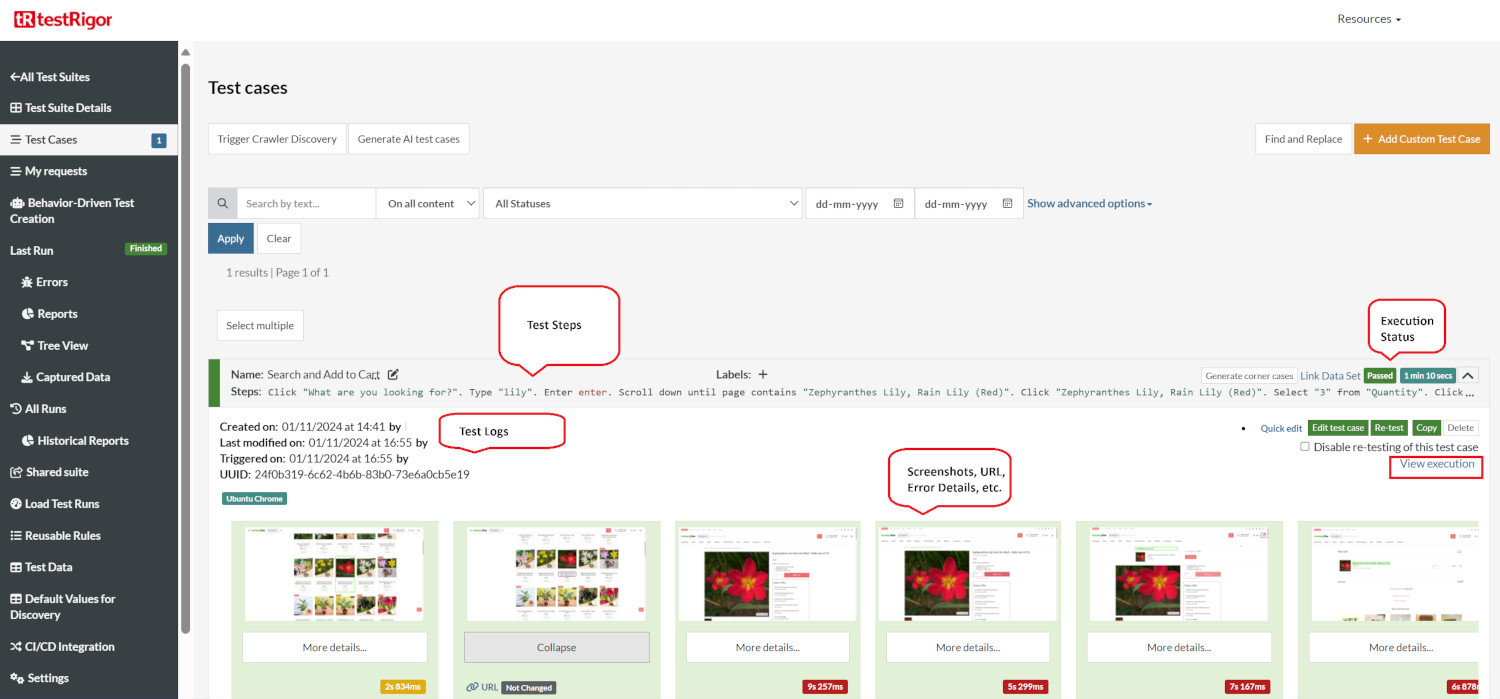
Once the test is executed, you can view the execution details, such as execution status, time spent in execution, screenshots, error messages, logs, video recordings of the test execution, etc. In case of any failure, there are logs and error text that are available easily in a few clicks.
You can also download the complete execution with steps and screenshots in PDF or Word format through the View Execution option.
testRigor’s Capabilities
Apart from the simplistic test case design and execution, there are some advanced features that help you test your application using simple English commands.
- Reusable Rules (Subroutines): You can easily create functions for the test steps that you use repeatedly. You can use the Reusable Rules to create such functions and call them in test cases by simply writing their names. See the example of Reusable Rules.
- Global Variables and Data Sets: You can import data from external files or create your own global variables and data sets in testRigor to use them in data-driven testing.
- 2FA, QR Code, and Captcha Resolution: testRigor easily manages the 2FA, QR Code, and Captcha resolution through its simple English commands.
- Email, Phone Call, and SMS Testing: Use simple English commands to test the email, phone calls, and SMS. These commands are useful for validating 2FA scenarios, with OTPs and authentication codes being sent to email, phone calls, or via phone text.
- File Upload/ Download Testing: Execute the test steps involving file download or file upload without the requirement of any third-party software. You can also validate the contents of the files using testRigor’s simple English commands.
- Database Testing: Execute database queries and validate the results fetched.
testRigor enables you to test web, mobile (hybrid, native), API, and desktop apps with minimum effort and maintenance.
Additional Resources
- Access testRigor documentation to know about more useful capabilities
- Top testRigor’s features
- How to perform end-to-end testing
Conclusion
Regardless of whether you are undertaking unit, integration, or end-to-end testing, it's critical to have a robust test plan and the right tools for each phase. We have explored various tools that can facilitate different stages of testing a Sails.js application. This guide should serve as a solid foundation as you embark on ensuring the reliability and robustness of your applications.
| Achieve More Than 90% Test Automation | |
| Step by Step Walkthroughs and Help | |
| 14 Day Free Trial, Cancel Anytime |


