Spring Framework Testing

What is Spring Framework (Spring)?
Spring is a popular open-source framework in the Java community. Spring can be considered both an application framework and an Inversion of Control (IoC) container for the Java platform. At a high level, IoC means that the custom-written code receives the flow of control from the framework, as opposed to traditional programming. The primary purpose of doing this is to increase modularity and make the code extensible. Spring framework adopts the Enterprise JavaBeans programming model. Rod Johnson wrote the Spring Framework, with the initial release in October 2002, and the current stable version is 5.3.23. Spring has several inbuilt modules like Core, Data Access, Web, Integration, and Testing. These modules support various services.
The Spring framework has in-built modules that support Unit and Integration testing. We'll also discuss the best options for end-to-end testing.
Unit Testing
- General Testing Utilities: For general testing utilities, we use the org.springframework.test.util package. This package offers multiple general testing utilities that can be used in Unit and Integration testing. This package covers all the scenarios that arise while writing unit test classes.
- Spring MVC Testing Utilities: For Spring MVC testing utilities, we use the org.springframework.test.web package that contains the ModelAndViewAssert method. This method can be used with JUnit to perform unit tests that incorporate the ModelAndView objects.
public class TestWebApp extends SpringBootHelloWorldTests {
  @Autowired
  private WebApplicationContext webApplicationContext;
  private MockMvc mockMvc;

  @Before
  public void setup() {
    mockMvc = MockMvcBuilders.webAppContextSetup(webApplicationContext).build();
  }

  @Test
  public void validateBookDetails() throws Exception {
  mockMvc.perform(MockMvcRequestBuilders.get("/bookDetails"))
    .andExpect(status().isOk())
    .andExpect(content().contentType("application/json;charset=UTF-8"))
    .andExpect(jsonPath("$.name").value("Science Encyclopedia for Kids"))
    .andExpect(jsonPath("$.ISBN").value("190-122-45-901"))
    .andExpect(jsonPath("$.price").value(25));
  }
}
In this example, we are testing the validateBookDetails() method with a GET request. MockMvc.perform() accepts a MockMvcRequest and mocks the API call given the fields of the object. Here, we built a request via MockMvcRequestBuilders, specifying only the GET path and contentType property. For this call, we've set four assertions within the andExpect() methods: that the response returns a 200 (OK status code), the name field of the returned object equals "Science Encyclopedia for Kids", the ISBN field equals "190-122-45-901", and the price field equals 25.
Integration testing
Integration testing is the process of testing the interface between two software units or modules. It focuses on determining the correctness of the interface. It's crucial to perform integration testing without deploying to an application server or connecting to other enterprise infrastructure.
- Correct Spring IoC container contexts wiring
- Data access using JDBC or an ORM tool
@SpringBootTest
@ExtendWith(SpringExtension.class)
@AutoConfigureMockMvc
class RegisterUseCaseIntegrationTest {

  @Autowired
  private MockMvc mockMvc;

  @Autowired
  private ObjectMapper objectMapper;

  @Autowired
  private UserRepository userRepository;

  @Test
  void registrationWorksThroughAllLayers() throws Exception {
    UserResource user = new UserResource("demotest", "[email protected]");
    mockMvc.perform(post("/forums/{forumId}/register", 42L)
      .contentType("application/json")
      .param("sendWelcomeMail", "true")
      .content(objectMapper.writeValueAsString(user)))
      .andExpect(status().isOk());
    UserEntity userEntity = userRepository.findByName("demotest");
    assertThat(userEntity.getEmail()).isEqualTo("[email protected]");
  }
}
The above example demonstrates a sample testing scenario that uses the @ExtendWith annotation to tell JUnit 5 to enable Spring support. Additionally, @AutoConfigureMockMvc is used to add a MockMvc instance to the application context. This MockMvc object is used to perform a POST request to the application and validate that it responds as expected. UserRepository from the application context is used to validate that the request has led to an expected change in the state of the database.
E2E Testing
End-to-End, or System testing, is performed to ensure that the entire application from start to end, along with integrated modules, dependencies, interfaces, and communication with other systems, is working as expected. It focuses on validating end-user interaction with the system.
- Selenium with Spring Boot
- Cypress with Spring Boot
- testRigor
Selenium using Spring Boot
In the following example, Selenium with Spring Boot is used to perform E2E testing on a 'Sample WebTable', validating the table title and entering data into the second and third rows of the last column.
import org.openqa.selenium.WebElement;
import org.openqa.selenium.support.FindBy;
import org.springframework.beans.factory.annotation.Autowired;
import org.springframework.stereotype.Component;

@Component
public class HomePage implements BasePage{
  @Autowired
  private VisibilityHelper visibilityHelper;

  @FindBy(xpath = "//input[@id='result']")
  public WebElement sec_rw;

  @FindBy(xpath = "//section[@id='table1']/div[1]/div[1]/div[1]/div[1]/" +
  "table[1]/tbody[1]/tr[3]/td[4]/input[1]")
  public WebElement third_rw;

  @FindBy(xpath = "//h1[text()='Sample Table']")
  public WebElement table_hdr;

  public void assertTableData() {
    visibilityHelper.waitForVisibilityOf(table_hdr);
    visibilityHelper.waitForVisibilityOf(sec_rw);
    sec_rw.sendKeys("This is second row data");
    third_rw.sendKeys("This is third row data");
  }
}
Cypress with Spring Boot
Cypress is an end-to-end testing tool that enables developers and QA professionals to write and run tests against any web application. It's simple syntax, real-time reloading, and automatic waiting features make it an excellent choice for E2E testing, even with Spring Boot applications.
describe('Home Page Form Submission', function() {
  it('Submits user data', function() {
    // Visit the home page
    cy.visit('http://localhost:8080');

    // Find the input fields and type test data
    cy.get('input[name=name]').type('Test User');
    cy.get('input[name=email]').type('[email protected]');

    // Submit the form
    cy.get('form').submit();

    // Verify the success message
    cy.contains('Thank you for your submission, Test User!');
  });
});
In the script above, cy.visit() is used to load the homepage, cy.get().type() to find the form fields and enter test data, cy.get().submit() to submit the form, and cy.contains() to verify the success message.
testRigor
When it comes to end-to-end testing, it's hard to beat testRigor for its ease of use, rapid speed of test creation, and minimal maintenance. testRigor is a powerful cloud-hosted AI no-code automation tool with auto-heal capabilities, enabling the entire QA team (including manual testers) to create robust E2E tests quickly. Here are some of the benefits of using it for your testing needs:
- Supports cross-platform and cross-browser testing without significant configuration steps.
- Test creation is up to 15X faster than with other tools.
- Test maintenance is practically eliminated and takes little to no time.
- Provides support for 2FA testing for Gmail, text messages, and Google authenticator.
- Easy integration with most CI/CD tools.
- Facilitates easy mocking of API calls and accessing databases if needed.
- Shared suite can be used to perform parallel testing of apps on both iOS and Android platforms. You can read more about the key features of testRigor here.
check that page contains "Sample Table"
click on the second button within the context of table at row containing "york1" and column "Action"
click on the second button within the context of table at row containing "spk2" and column "Action"
enter "This is second row" into table "actions" at row "102" and column "Additional Data"
How to do End-to-end Testing with testRigor
Let us take the example of an e-commerce website that sells plants and other gardening needs. We will create end-to-end test cases in testRigor using plain English test steps.
Step 1: Log in to your testRigor app with your credentials.
Step 2: Set up the test suite for the website testing by providing the information below:
- Test Suite Name: Provide a relevant and self-explanatory name.
- Type of testing: Select from the following options: Desktop Web Testing, Mobile Web Testing, Native and Hybrid Mobile, based on your test requirements.
- URL to run test on: Provide the application URL that you want to test.
- Testing credentials for your web/mobile app to test functionality which requires user to login: You can provide the app’s user login credentials here and need not write them separately in the test steps then. The login functionality will be taken care of automatically using the keyword
login. - OS and Browser: Choose the OS Browser combination on which you want to run the test cases.
- Number of test cases to generate using AI: If you wish, you can choose to generate test cases based on the App Description text, which works on generative AI.
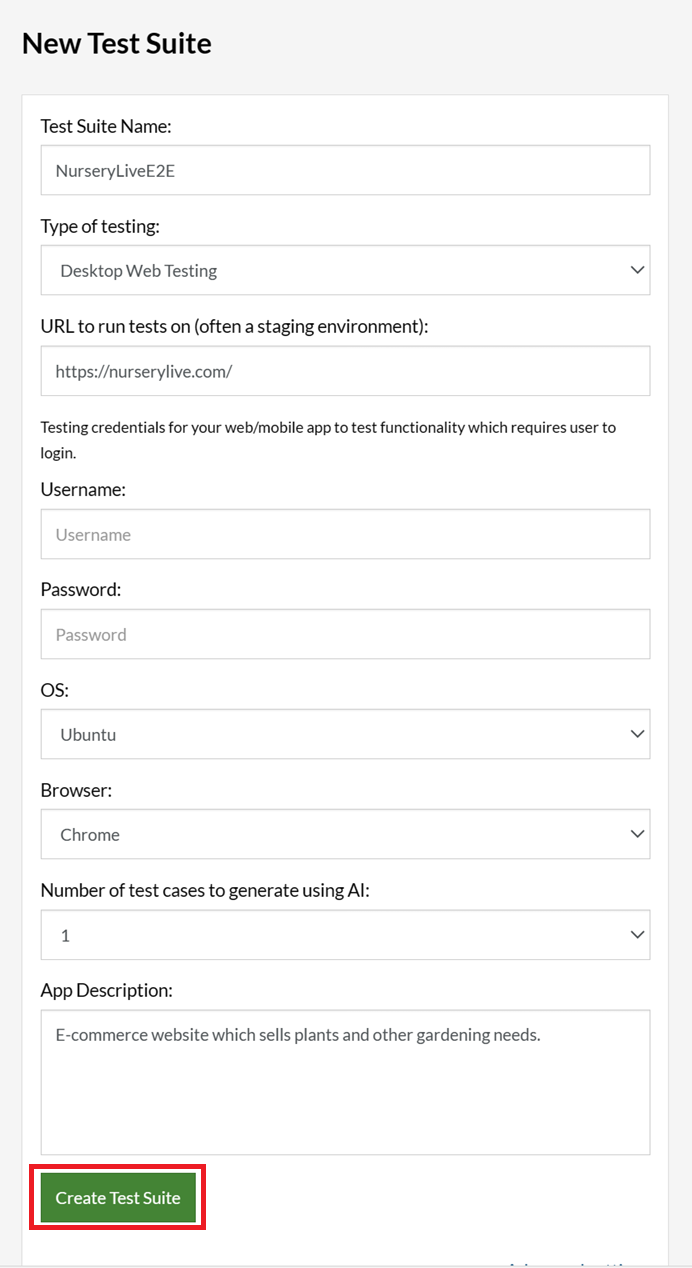
Step 3: Click Create Test Suite.
On the next screen, you can let AI generate the test case based on the App Description you provided during the Test Suite creation. However, for now, select do not generate any test, since we will write the test steps ourselves.
Step 4: To create a new custom test case yourself, click Add Custom Test Case.

Step 5: Provide the test case Description and start adding the test steps.
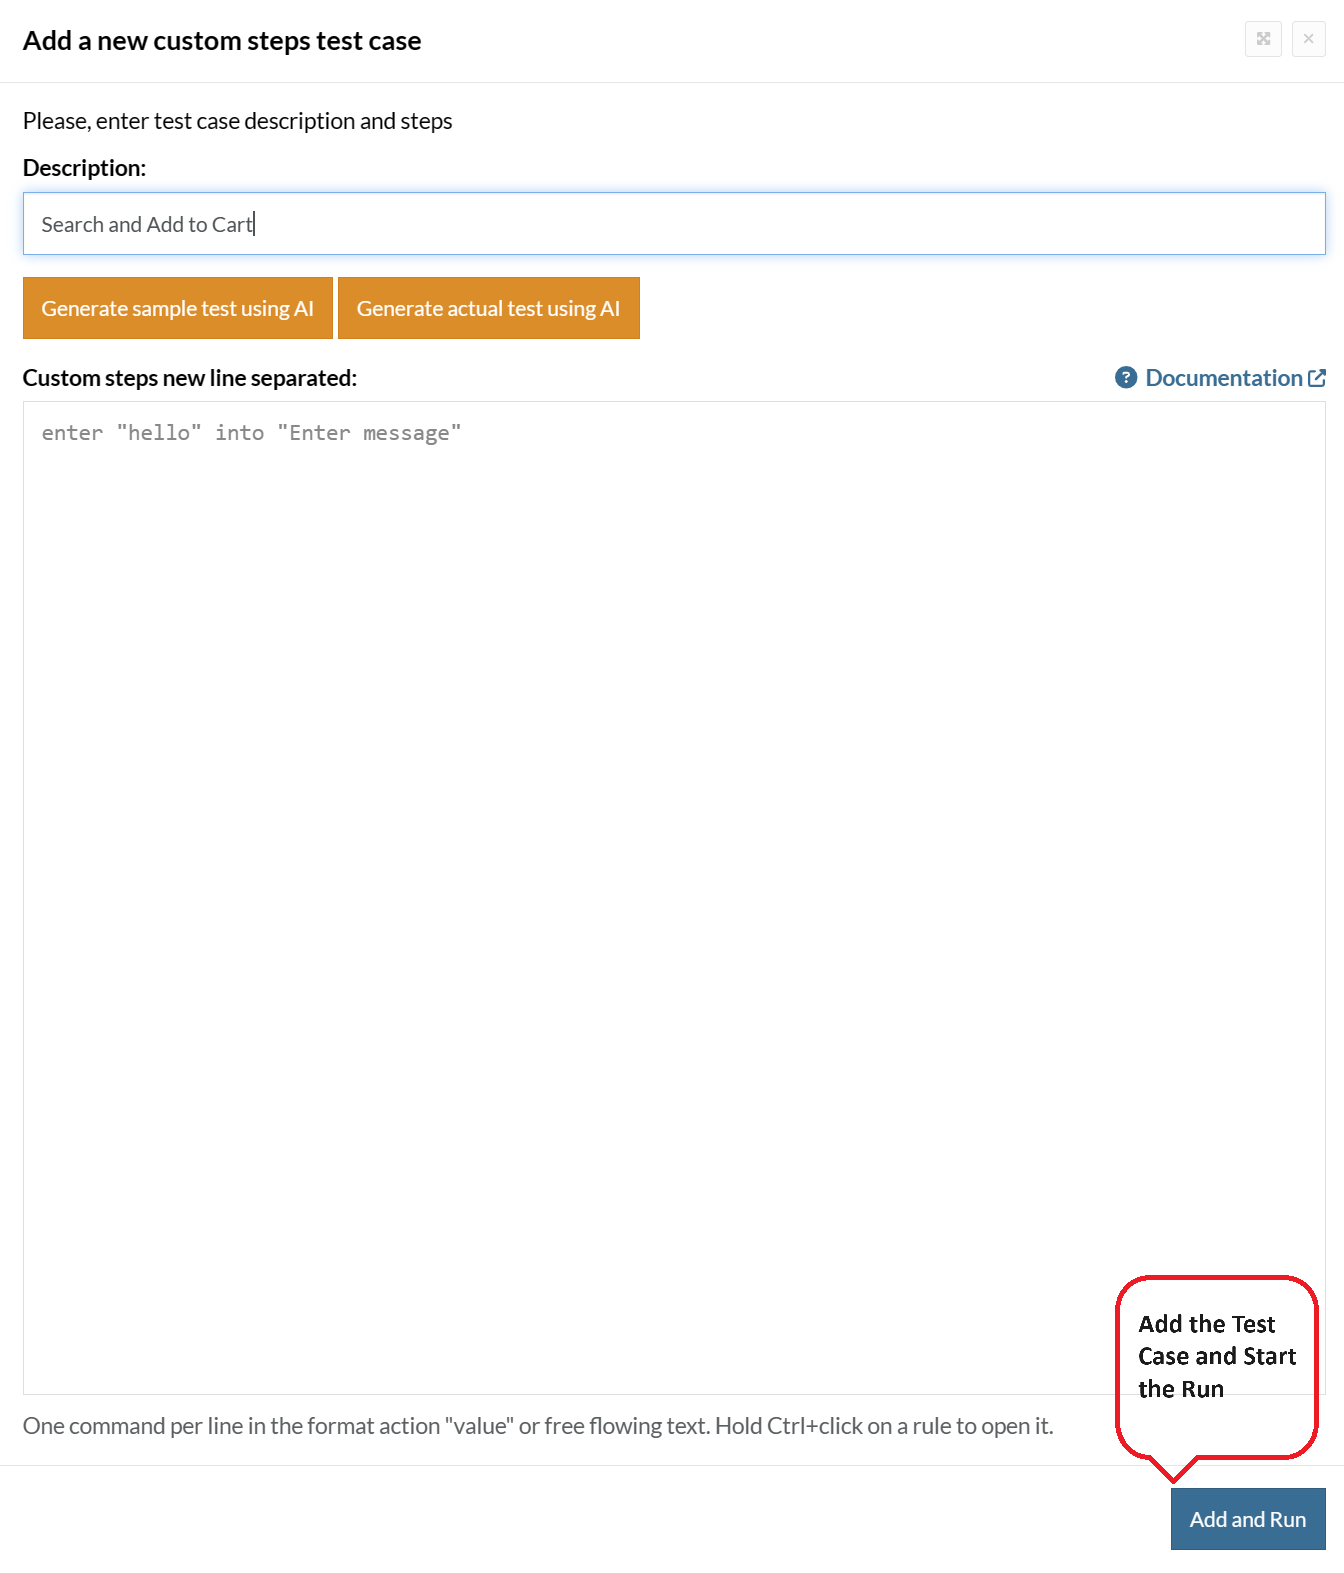
For the application under test, i.e., e-commerce website, we will perform below test steps:
- Search for a product
- Add it to the cart
- Verify that the product is present in the cart
Test Case: Search and Add to Cart
Step 1: We will add test steps on the test case editor screen one by one.
testRigor automatically navigates to the website URL you provided during the Test Suite creation. There is no need to use any separate function for it. Here is the website homepage, which we intend to test.

First, we want to search for a product in the search box. Unlike traditional testing tools, you can identify the UI element using the text you see on the screen. You need not use any CSS/XPath identifiers.
click "What are you looking for?"
Step 2: Once the cursor is in the search box, we will type the product name (lily), and press enter to start the search.
type "lily"
enter enter
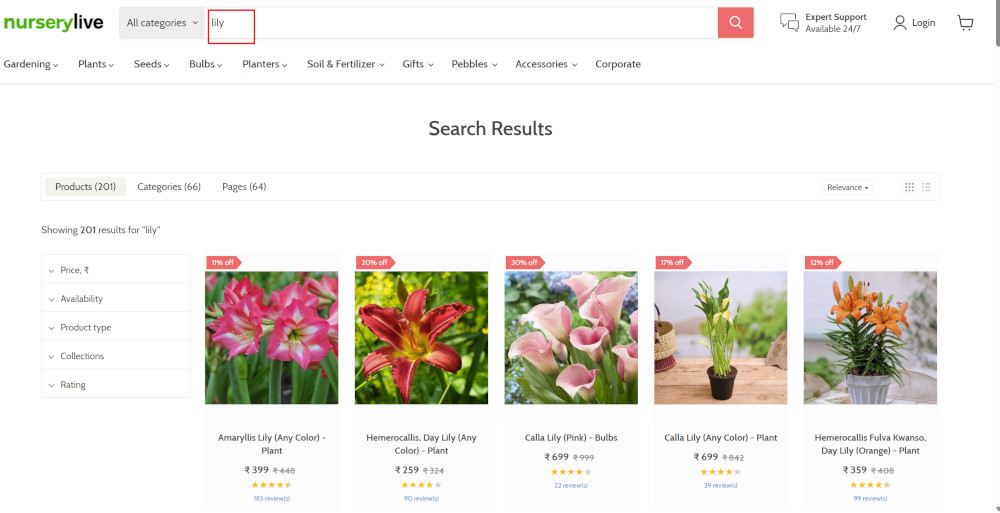
Search lists all products with the “lily” keyword on the webpage.
Step 3: The lily plant we are searching for needs the screen to be scrolled; for that testRigor provides a command. Scroll down until the product is present on the screen:
scroll down until page contains "Zephyranthes Lily, Rain Lily (Red)"
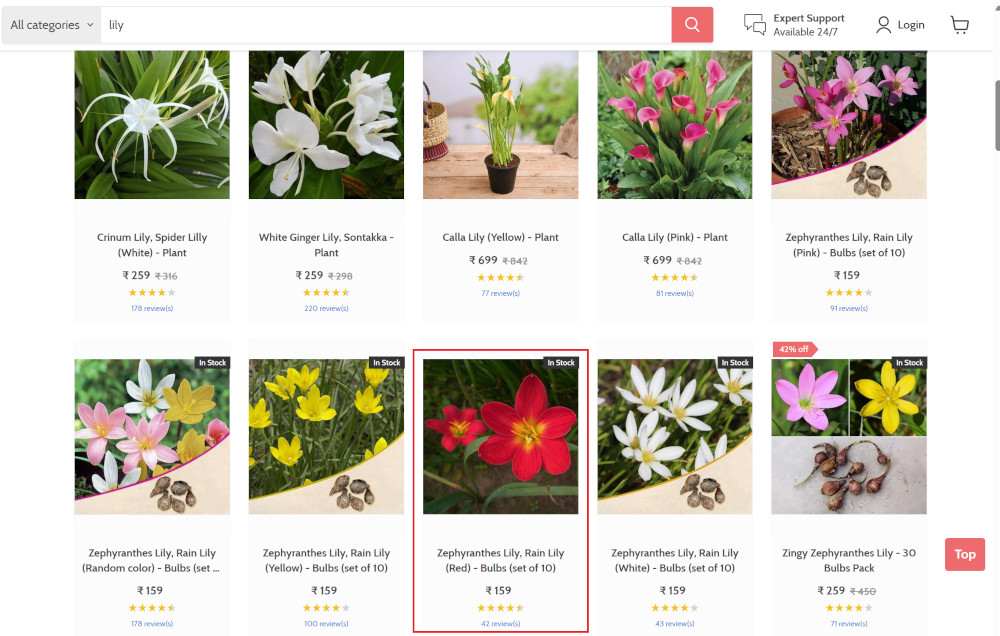
When the product is found on the screen, testRigor stops scrolling.
Step 4: Click on the product name to view the details:
click "Zephyranthes Lily, Rain Lily (Red)"
After the click, the product details are displayed on the screen as below, with the default Quantity as 1.
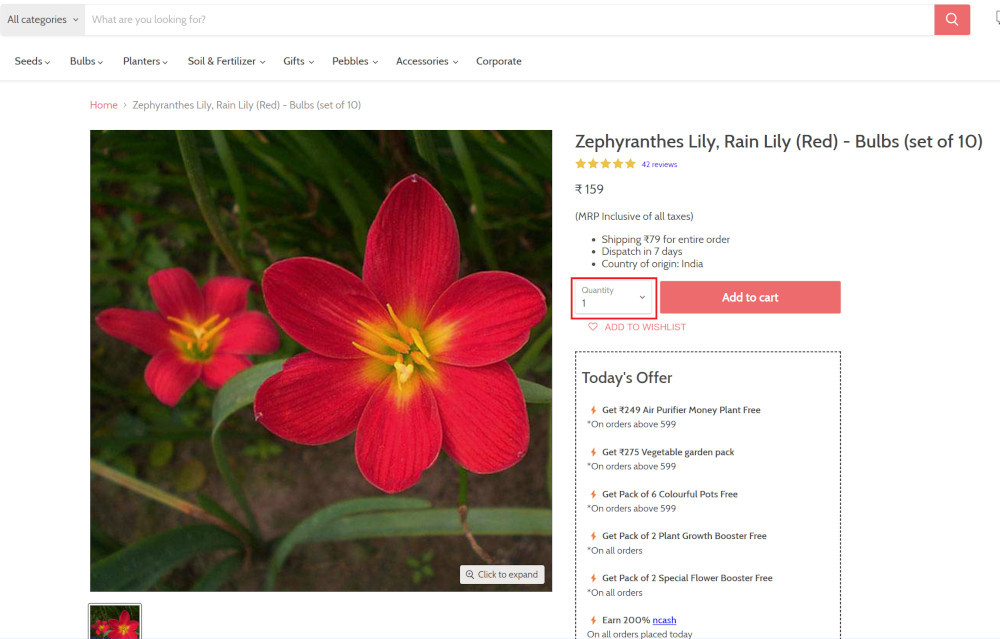
Step 5: Lets say, we want to change the Quantity to 3, so here we use the testRigor command to select from a list.
select "3" from "Quantity"
click "Add to cart"
The product is successfully added to the cart, and the “Added to your cart:” message is displayed on webpage.
Step 6: To assert that the message is successfully displayed, use a simple assertion command as below:
check that page contains "Added to your cart:"
Step 7: After this check, we will view the contents of the cart by clicking View cart as below:
click "View cart"

Step 8: Now we will again check that the product is present in the cart, under heading “Your cart” using the below assertion. With testRigor, it is really easy to specify the location of an element on the screen.
check that page contains "Zephyranthes Lily, Rain Lily (Red)" under "Your cart"

Complete Test Case
Here is how the complete test case will look in the testRigor app. The test steps are simple in plain English, enabling everyone in your team to write and execute them.
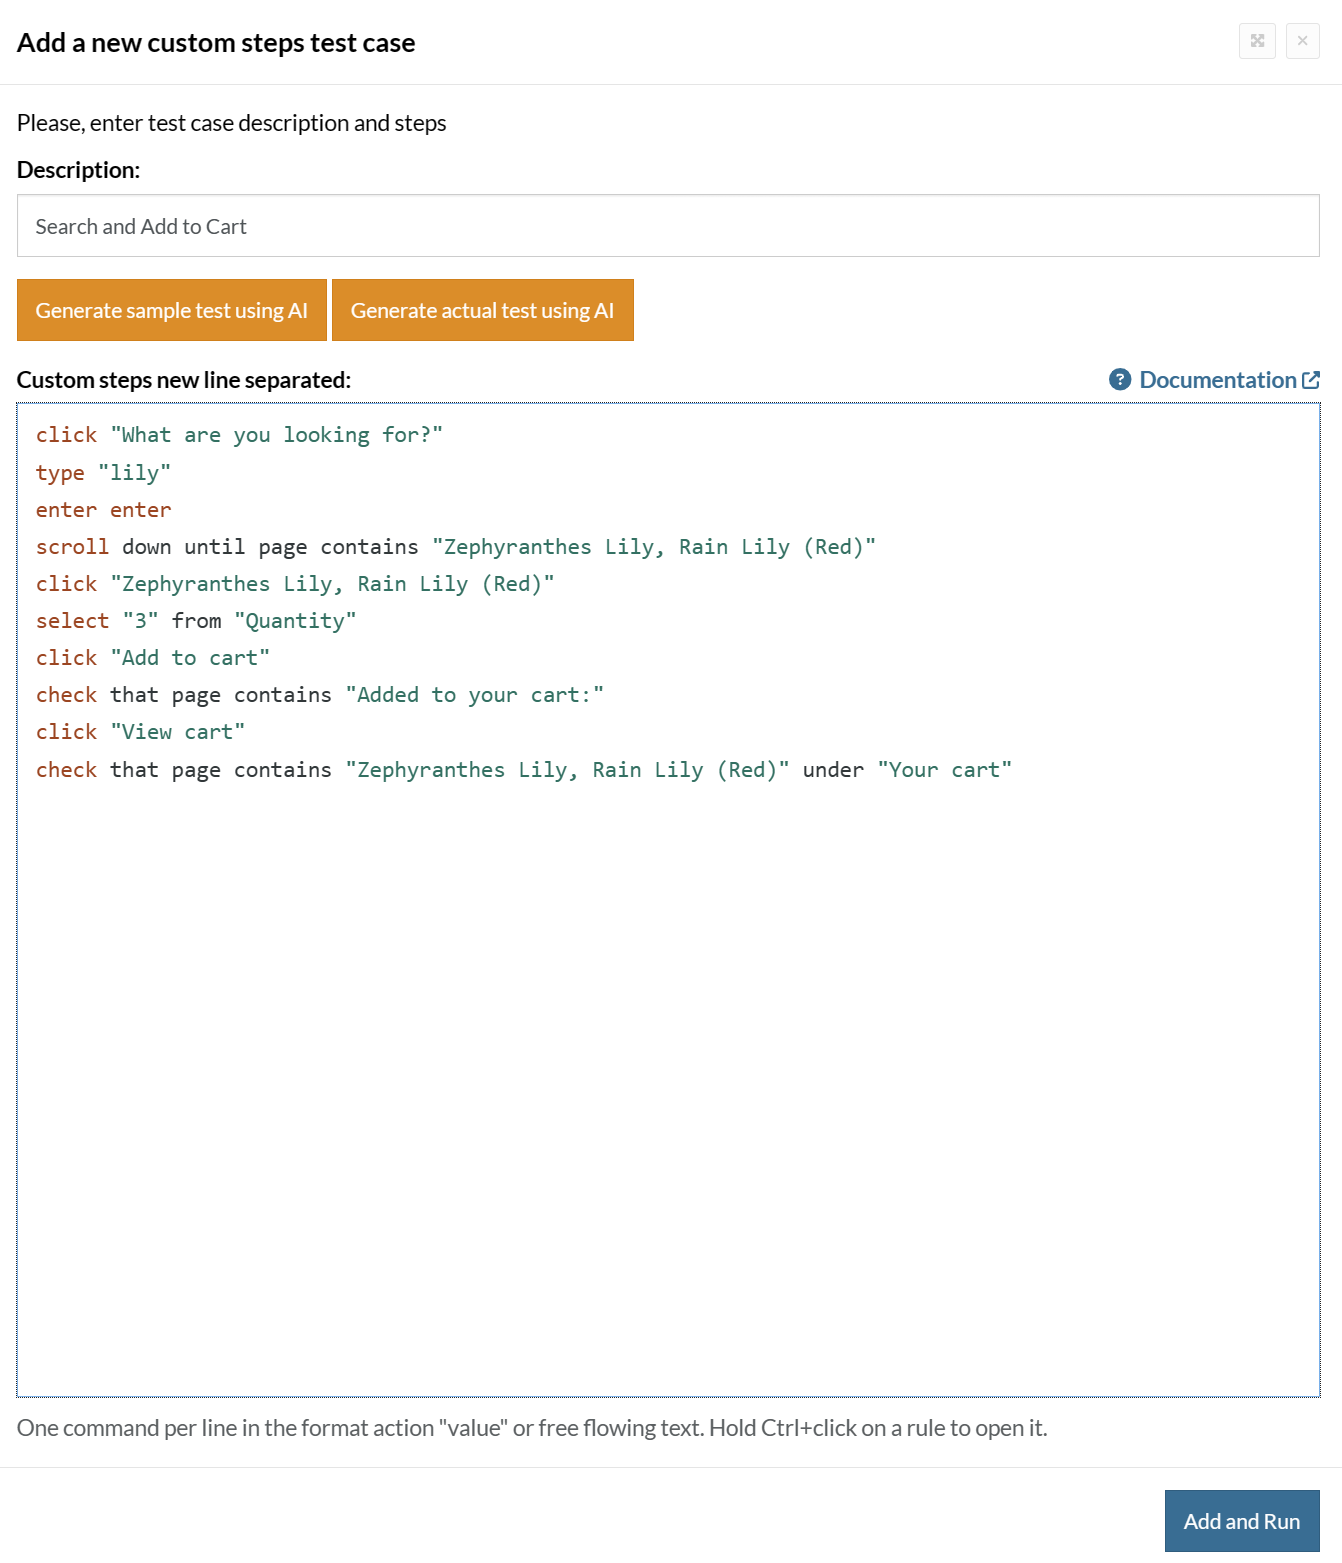
Click Add and Run.
Execution Results
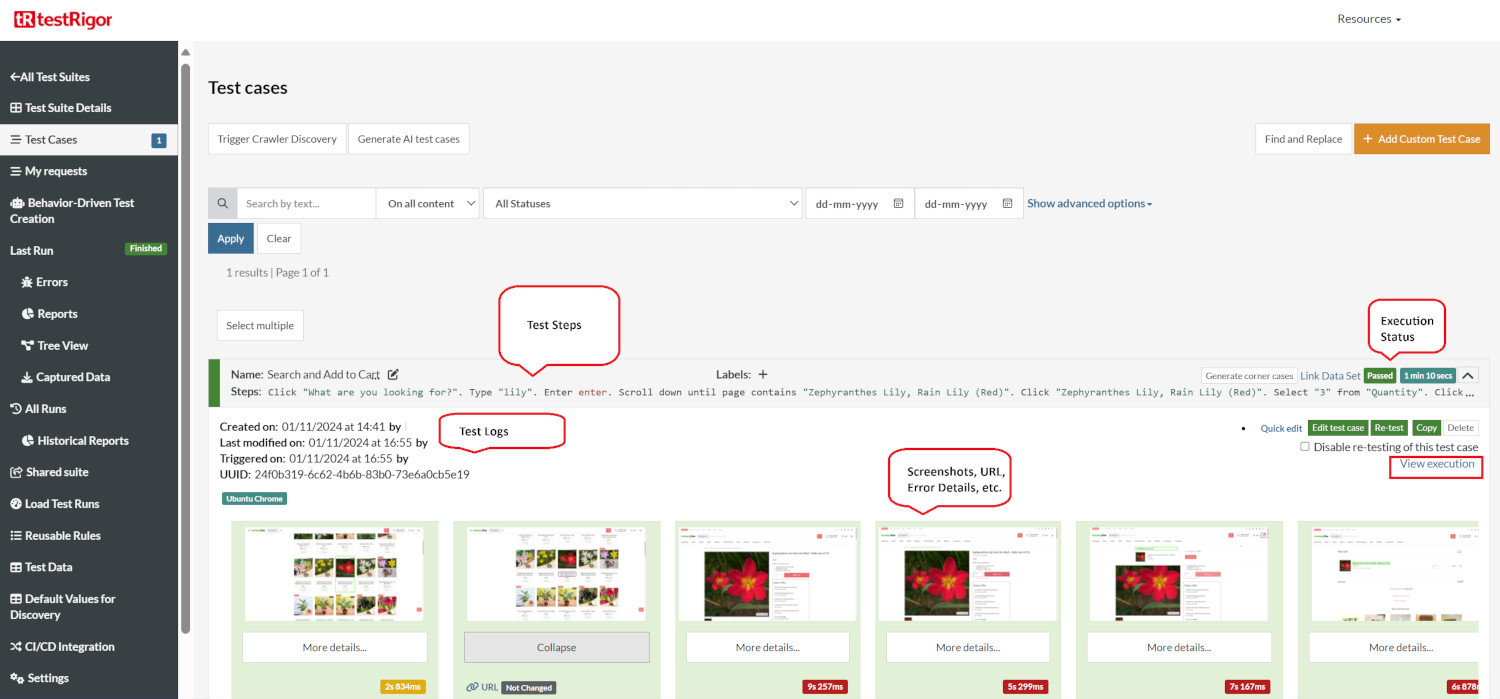
Once the test is executed, you can view the execution details, such as execution status, time spent in execution, screenshots, error messages, logs, video recordings of the test execution, etc. In case of any failure, there are logs and error text that are available easily in a few clicks.
You can also download the complete execution with steps and screenshots in PDF or Word format through the View Execution option.
testRigor’s Capabilities
Apart from the simplistic test case design and execution, there are some advanced features that help you test your application using simple English commands.
- Reusable Rules (Subroutines): You can easily create functions for the test steps that you use repeatedly. You can use the Reusable Rules to create such functions and call them in test cases by simply writing their names. See the example of Reusable Rules.
- Global Variables and Data Sets: You can import data from external files or create your own global variables and data sets in testRigor to use them in data-driven testing.
- 2FA, QR Code, and Captcha Resolution: testRigor easily manages the 2FA, QR Code, and Captcha resolution through its simple English commands.
- Email, Phone Call, and SMS Testing: Use simple English commands to test the email, phone calls, and SMS. These commands are useful for validating 2FA scenarios, with OTPs and authentication codes being sent to email, phone calls, or via phone text.
- File Upload/ Download Testing: Execute the test steps involving file download or file upload without the requirement of any third-party software. You can also validate the contents of the files using testRigor’s simple English commands.
- Database Testing: Execute database queries and validate the results fetched.
testRigor enables you to test web, mobile (hybrid, native), API, and desktop apps with minimum effort and maintenance.
Additional Resources
- Access testRigor documentation to know about more useful capabilities
- Top testRigor’s features
- How to perform end-to-end testing
Conclusion
Testing is an essential part of the software development lifecycle, particularly for complex frameworks like Spring. Ultimately, ensuring high-quality standards for software involves performing all levels of testing. This ensures that the application functions correctly at each level and as a whole, leading to robust and reliable software products.
| Achieve More Than 90% Test Automation | |
| Step by Step Walkthroughs and Help | |
| 14 Day Free Trial, Cancel Anytime |


