Svelte Testing

Svelte is an open-source framework for building front-end applications. Using Svelte, you can quickly construct web applications as it simplifies writing UI components like navigation bars, comment sections, or contact forms. Although Svelte is similar to JavaScript frameworks like React and Vue, it distinguishes itself by converting your application into optimized JavaScript at build time, rather than run time. This strategy helps to mitigate performance costs usually incurred from the abstractions that a framework provides.
With Svelte, you can construct your entire application or create components as standalone packages that can be integrated into existing applications. However, to write an entire application, you need more than just Svelte. By employing SvelteKit, which is built on Svelte, you can utilize features like a router and server-side rendering.
Applications built using Svelte are composed of one or more components. Components are self-contained blocks of code that include HTML, CSS, and JavaScript, which belong together. These components are reusable and written in a .svelte file. You can test these components in the following ways:
Unit Testing
Unit Testing forms the base of the testing pyramid. The primary focus is on testing individual functions and the edge cases of these functions. Your unit test suite needs to be lightweight so it can be run in isolation whenever needed. For this, you ought to mock external dependencies of a function like database calls, API calls, helper and service calls, browser-related UI element calls, or network calls. It's a good practice to write both positive and negative test cases for functions. Since Svelte is about the front end, testing various functions that are part of the UI components you've built is necessary. You can do this using the following tools:
Testing using Vitest
Vitest is a Vite-native unit testing framework. When setting up a SvelteKit project, you have the option to configure Vitest for unit testing. It comes with features like multi-threading via Tinypool, built-in Chai assertions, Jest-compatible APIs, and built-in Tinyspy for mocking, among others. Below is an example using the mock capability of Vitest to perform unit testing. This test verifies that the 'fn' function is a mock function, that it was called with the correct arguments, and that it returns its argument when called with the 'mockImplementation' method.
import { expect, vi } from 'vitest'

const fn = vi.fn()

fn('hello', 1)

expect(vi.isMockFunction(fn)).toBe(true)
expect(fn.mock.calls[0]).toEqual(['hello', 1])

fn.mockImplementation(arg => arg)

fn('world', 2)

expect(fn.mock.results[1].value).toBe('world')
Testing using Jest
Jest is a popular tool for testing JavaScript-based applications. It boasts features like parallel execution of tests, generating code coverage, mocking functions, and handling exceptions effectively. By default, Jest looks for filenames ending with 'test.js'. Below is an example of a test case using Jest. In this test case, after creating a new instance of the component and passing in some props, initial assertions about the rendered output are made. Then, a user interaction is simulated by updating one of the component's props using '$set' and waiting for the component to update using 'await tick()' before making additional assertions about the updated output.
import { tick } from 'svelte';
import MyComponent from './MyComponent.svelte';

describe('MyComponent', () => {
  it('should render correctly', async () => {
    const target = document.createElement('div');
    const props = {
      name: 'John',
      age: 30
    };
    const component = new MyComponent({ target, props });

    expect(component).toBeTruthy();
    expect(target.textContent).toContain('Hello John! You are 30 years old.');

    // Simulate a user interaction by updating a prop and checking the updated output
    component.$set({ age: 31 });
    await tick();
    expect(target.textContent).toContain('Hello John! You are 31 years old.');
  });
});
Testing using the Svelte Testing Library
The Svelte Testing Library is a lightweight utility built on top of the Svelte and DOM Testing Library. It's used alongside tools like Vitest or Jest to simulate different functions and user interactions.
In the example below, the test uses the Svelte library to test the 'Hello Svelte' component. The test creates a new HTML element and sets it as the target for the 'Hello' component. Then, it asserts that the component was created successfully, the rendered HTML contains the expected content, and the rendered HTML matches a snapshot. The test also simulates user interaction by clicking a button in the rendered HTML and waiting for the component to update using the 'tick' function from the Svelte library. After the component updates, the test asserts that the rendered HTML contains the expected content again.
import { tick } from 'svelte'
import Hello from '../components/Hello.svelte'

let host: HTMLElement

afterEach(() => {
  host.remove()
})

test('mount component', async () => {
  host = document.createElement('div')
  host.setAttribute('id', 'host')
  document.body.appendChild(host)
  const instance = new Hello({ target: host, props: { count: 4 } })
  expect(instance).toBeTruthy()
  expect(host.innerHTML).toContain('4 x 2 = 8')
  expect(host.innerHTML).toMatchSnapshot()
  const btn = host.getElementsByTagName('button')[0]
  btn.click() // or btn.dispatchEvent(new window.Event('click', { bubbles: true }))
  await tick()
  expect(host.innerHTML).toContain('4 x 3 = 12')
  btn.click()
  await tick()
  expect(host.innerHTML).toContain('4 x 4 = 16')
})
Here's another example of how the Svelte Testing Library is used. These tests check the basic functionality of the 'Comp' component by verifying that it renders correctly and that its button updates its text properly when clicked.
import '@testing-library/jest-dom'

import {render, fireEvent, screen} from '@testing-library/svelte'

import Comp from '../Comp'

test('shows proper heading when rendered', () => {
  render(Comp, {name: 'World'})
  const heading = screen.getByText('Hello World!')
  expect(heading).toBeInTheDocument()
})

test('changes button text on click', async () => {
  render(Comp, {name: 'World'})
  const button = screen.getByRole('button')

  expect(button).toHaveTextContent('Button Clicked')
})
Using Chai and Mocha
You can also use Mocha and Chai to automate unit tests for your Svelte application. Once the dependencies for Mocha and Chai are installed, you need to add a script in the package.json file of your application to run the tests. The rule to have test files ending with test.js applies here as well.
Integration Testing
Unit tests focus on individual functions, ensuring they behave as expected. Now, let's broaden the scope a bit. Each of these functions needs to integrate smoothly with others and with other dependencies like databases, file systems, and network systems. If we focus on areas where a function exercises its dependencies, we are checking whether the function has been properly integrated into the system—this is integration testing. Unlike unit tests, you needn't write integration tests for every single component. Instead, strategically pick those components where crucial integrations occur. In integration testing, you can use actual resources as well as mocks. This decision depends on the specific integration you are testing. For example, if you're testing the integration of the database with the UI, all other APIs expected to work for that test can be mocked.
You can write your integration tests using Vitest, Jest, and the Svelte Testing Library. Here's an example of a component with a counter. The tests check if the counter increments and whether this is reflected in the footer and header, which are separate components.
// ExampleComponent.test.js
import { render, screen, fireEvent } from '@testing-library/svelte';
import ExampleComponent from './ExampleComponent.svelte';

describe('ExampleComponent', () => {
  it('renders title and count', () => {
    render(ExampleComponent, { title: 'Test Component' });
    const title = screen.getByText('Test Component');
    const count = screen.getByText('Count: 0');
    expect(title).toBeInTheDocument();
    expect(count).toBeInTheDocument();
  });

  it('increments count when button is clicked', async () => {
    render(ExampleComponent);
    const button = screen.getByText('Increment Count');
    fireEvent.click(button);
    const count = await screen.findByText('Count: 1');
    expect(count).toBeInTheDocument();
  });
});
Here's another example using the Vitest library, which uses Jest as the test runner and provides additional helpers to simplify testing React applications. The test is designed to check the interaction between multiple components and events. It is testing the behavior of the form component on successful submission, which involves simulating user input events and checking the resulting state of the form's input fields. Additionally, it is using the waitFor function from the @testing-library/react library to wait for a change in the state of the component.
/**
 * @jest-environment jsdom
 */
import { fireEvent, waitFor } from '@testing-library/react';
// note: you can make these globally available from vite.config.js
// see the Vitest docs for more: https://vitest.dev/config/#globals
import { describe, expect, it, vi } from 'vitest';
import { formSetup } from '../client-utils';

describe('Form', () => {
  it('resets on successful submission', async () => {
    const { nameInput, hexCodeInput, submitButton } = formSetup(vi);
    fireEvent.input(nameInput, { target: { value: 'Evan Who?' } });
    fireEvent.input(hexCodeInput, { target: { value: '#ccc' } });
    expect(nameInput.value).toEqual('Evan Who?');
    expect(hexCodeInput.value).toEqual('#ccc');

    await waitFor(() => {
      fireEvent.click(submitButton);
      expect(nameInput.value).toEqual('');
      expect(hexCodeInput.value).toEqual('');
    });
  });
});
Component Testing
When it comes to Svelte, we deal with components. It's necessary to test each of them before they interact with the entire application system, for which we use component testing. Svelte considers the context of the test important. This means if a component is tested in isolation—its scenarios are checked without dependence on any other resources like components or APIs—then it is a component test. A component test may exercise one or more functions of the component.
Using Svelte Testing Library, Jest or Vitest
You can use Jest, Vitest along with the Svelte Testing Library to write component tests.
Here is an example of a to-do list application. In this test, the render function from @testing-library/svelte is used to render the component, and the fireEvent function is used to simulate user interaction with the component. The test verifies that a new todo is added correctly by checking the length of the todo list after clicking the "Add" button, and that the new todo appears in the list.
import { render, screen, fireEvent } from "@testing-library/svelte";
import App from "./App.svelte";

describe("App", () => {
  const PREDEFINED_TODOS = 3;

  // other stuff

  test("should add a todo", async () => {
    render(App);
    const input = screen.getByLabelText("Todo");
    const value = "Buy milk";
    await fireEvent.input(input, { target: { value } });
    await fireEvent.click(screen.getByText("Add"));
    const todoListItems = screen.getAllByRole("listitem");
    expect(screen.getByText(value)).toBeInTheDocument();
    expect(todoListItems.length).toEqual(PREDEFINED_TODOS + 1);
  });

});
Using Cypress
Cypress is a well-known end-to-end testing tool that can also be used for component testing in Svelte. It supports writing tests with Vite or Webpack. Once you install Cypress into your project, you will be guided by Cypress's UI to set up component tests. If you're using Vite, you need to update the same in the cypress.config.js file, and the same applies to other bundlers like Webpack. Here's a simple example of a component test for a Stepper component that has zero dependencies and one internal state: a counter that can be incremented or decremented.
import Stepper from './Stepper.svelte'

describe('Stepper', () => {
  it('mounts', () => {
    cy.mount(Stepper)
  })
})
Using WebdriverIO
WebdriverIO is built on the WebDriver protocol and allows you to control a browser using the same APIs as a user. It supports multiple programming languages and test runners and provides many useful features such as synchronization, smart selectors, and a fluent API that simplifies writing and organizing tests. WebdriverIO is commonly used for end-to-end testing, but it can also be used for other types of tests such as integration and component testing.
End-to-End Testing
Until now, we've been testing the code to ensure it produces the expected results. Let's now focus on testing the application as a whole to ensure it behaves as expected. With end-to-end testing, the focus is on user scenarios to see if the modules or components function together to deliver the desired outcome.
Here are some tools you can use to test your application developed with Svelte or SvelteKit:
- Playwright
- Cypress
- WebdriverIO
- testRigor
Playwright
Playwright is a testing tool that allows developers to write end-to-end tests simulating user interactions with web browsers like Chrome, Firefox, and Safari. It provides a high-level API that enables developers to write tests in JavaScript, TypeScript, Python, or C#.
Here's an example of how a test using Playwright might look:
import { test, expect } from '@playwright/experimental-ct-svelte';
import HelloWorld from './HelloWorld.svelte';

test.use({ viewport: { width: 500, height: 500 } });

test('should work', async ({ mount }) => {
  const component = await mount(HelloWorld, {
    props: {
      msg: 'Greetings',
    },
  });

  await expect(component).toContainText('Greetings');
});
Cypress
Cypress offers many capabilities that facilitate writing end-to-end tests. Below is an example of a test that clicks on the increment and decrement buttons while asserting that the output is as expected.
import Stepper from './Stepper.svelte'

describe('Stepper', () => {

  it('when the increment button is pressed, the counter is incremented', () => {
    cy.mount(Stepper)
    cy.get('[data-cy=increment]').click()
    cy.get('[data-cy=counter]').should('have.text', '1')
  })
  it('when the decrement button is pressed, the counter is decremented', () => {
    cy.mount(Stepper)
    cy.get('[data-cy=decrement]').click()
    cy.get('[data-cy=counter]').should('have.text', '-1')
  })

})
WebDriver I/O
You can use WebDriverIO to write end-to-end tests for your Svelte application. In this example, the test simulates a long press on a button, waits for 2.5 seconds, and then checks if a paragraph element is displayed. It then moves the cursor out of the button and back in, and checks if the paragraph element is no longer displayed.
import { $, browser, expect } from '@wdio/globals'
import { render } from '@testing-library/svelte'
import Longpress from '../lib/Longpress.svelte'

describe('Svelte Component Testing', () => {
  it('increments value on click', async () => {
    const { getByText } = render(Longpress)
    const $btn = await $(getByText('press and hold'))

    await expect($('p')).not.toBeExisting()

    await browser.action('pointer')
      .move({ origin: $btn })
      .down()
      .pause(2500)
      .up()
      .perform()

    await expect($('p')).toBeExisting()

    await browser.action('pointer')
      .move({ x: 0, y: 0 }) // move out
      .move({ origin: $btn }) // move back in
      .perform()

    await expect($('p')).not.toBeExisting()
  })
})
testRigor
While the tools mentioned above effectively accomplish their tasks, they all require coding knowledge. However, for scenarios where a cloud-based, scalable solution is needed or where input is desired in the form of test cases and reviews from manual testers and business team members, these tools might fall short. For these scenarios, a tool like testRigor can be an invaluable asset.
testRigor is an AI-driven, codeless test automation platform that enables teams to develop complex end-to-end test automation without requiring coding skills. This no-code tool allows for ease of collaboration without dependence on other tools to act as intermediaries. It allows you to write tests in plain English, without needing to define the behavior of these English sentences, as long as you refer to the documentation guide on their website. Locating UI elements becomes hassle-free: simply refer to any element how you see it on the screen.
With testRigor, organizations can experience significant enhancements in software testing and a reduction in defect escape rate. Its advanced AI engine allows for plain English test statements, generative AI test creation, simplified test creation and execution, and minimal maintenance. Furthermore, testRigor can test a comprehensive set of functionalities such as web, native and hybrid mobile applications, native desktop applications, emails, SMS, phone calls, 2FA, downloaded files, databases, and more.
Here is the testRigor equivalent of the test scenario mentioned under Cypress:
//navigate to the page having the 2 buttons
grab value from "counter" and save it as "currentCount"
click "increase" to the left of "counter"
check that page contains expression "${currentCount}+1"
click "decrease" to the right of "counter"
check that page contains stored value "currentCount"
Here is another example of a purchase on an e-commerce website.
login
click "Cart"
click "Proceed to payment"
check that url is "https://www.snapdeal.com/proceedToCheckoutPage#makePayment"
click "Credit Card"
enter stored value "cardnumber" into "Card Number" roughly above the "/"
click "MM" on the left of "/"
click "04" below "MM"
click "YY" on the right of "/"
click "27" below "YY"
enter stored value "cvv" into "CVV"
click "Pay"
check that url contains value "https://api.juspay.in/v2/txns"
How to do End-to-end Testing with testRigor
Let us take the example of an e-commerce website that sells plants and other gardening needs. We will create end-to-end test cases in testRigor using plain English test steps.
Step 1: Log in to your testRigor app with your credentials.
Step 2: Set up the test suite for the website testing by providing the information below:
- Test Suite Name: Provide a relevant and self-explanatory name.
- Type of testing: Select from the following options: Desktop Web Testing, Mobile Web Testing, Native and Hybrid Mobile, based on your test requirements.
- URL to run test on: Provide the application URL that you want to test.
- Testing credentials for your web/mobile app to test functionality which requires user to login: You can provide the app’s user login credentials here and need not write them separately in the test steps then. The login functionality will be taken care of automatically using the keyword
login. - OS and Browser: Choose the OS Browser combination on which you want to run the test cases.
- Number of test cases to generate using AI: If you wish, you can choose to generate test cases based on the App Description text, which works on generative AI.
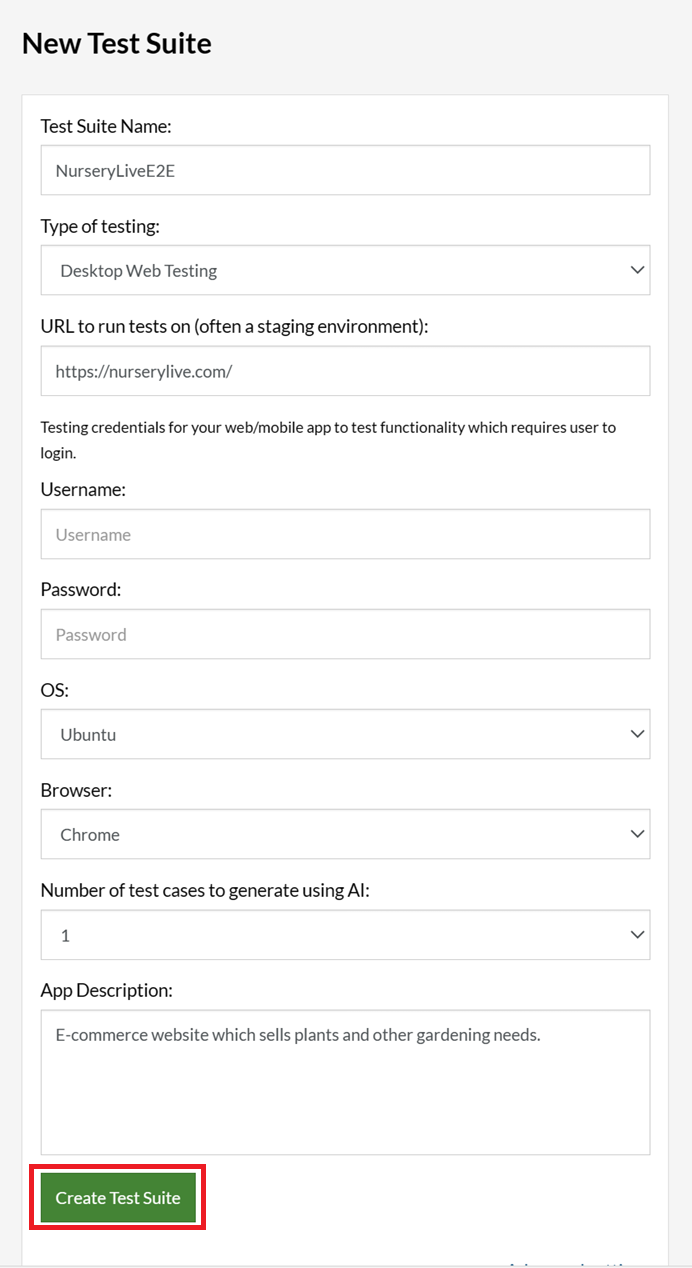
Step 3: Click Create Test Suite.
On the next screen, you can let AI generate the test case based on the App Description you provided during the Test Suite creation. However, for now, select do not generate any test, since we will write the test steps ourselves.
Step 4: To create a new custom test case yourself, click Add Custom Test Case.

Step 5: Provide the test case Description and start adding the test steps.
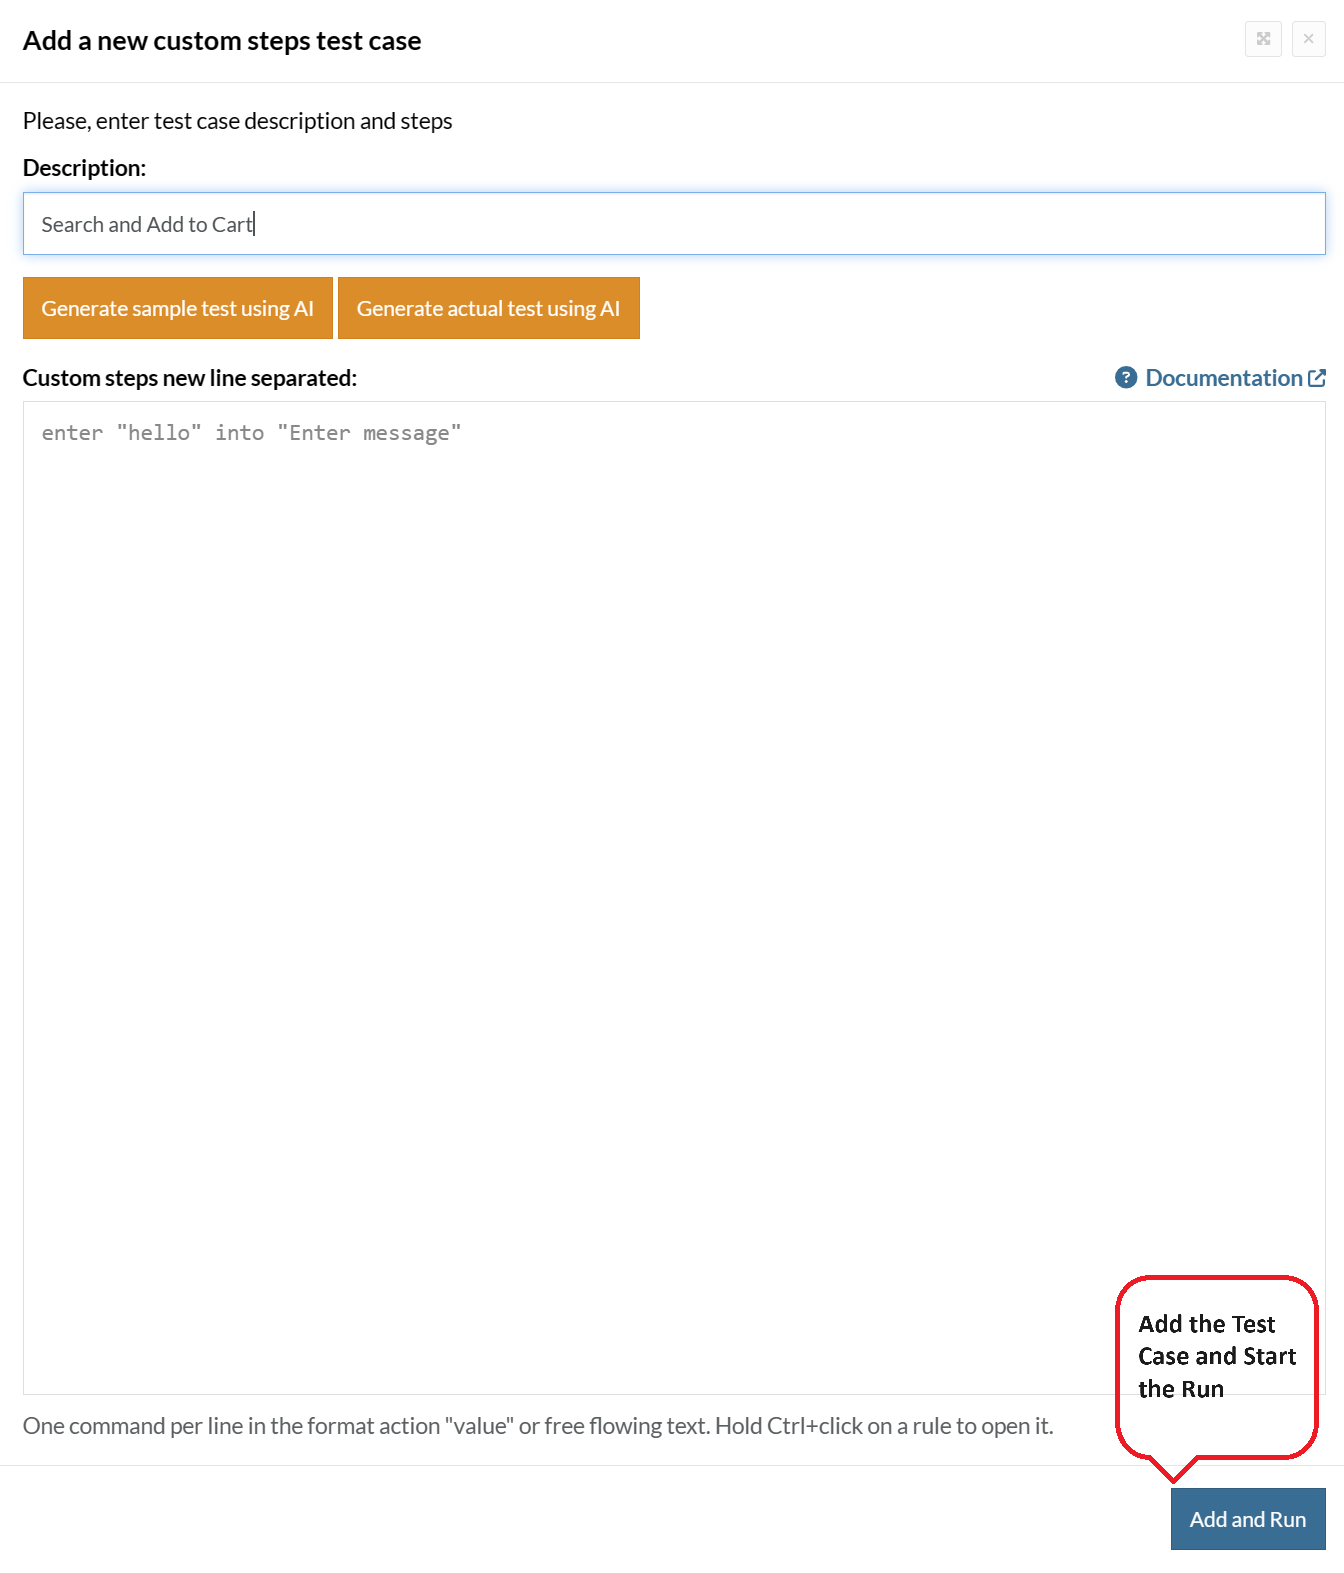
For the application under test, i.e., e-commerce website, we will perform below test steps:
- Search for a product
- Add it to the cart
- Verify that the product is present in the cart
Test Case: Search and Add to Cart
Step 1: We will add test steps on the test case editor screen one by one.
testRigor automatically navigates to the website URL you provided during the Test Suite creation. There is no need to use any separate function for it. Here is the website homepage, which we intend to test.

First, we want to search for a product in the search box. Unlike traditional testing tools, you can identify the UI element using the text you see on the screen. You need not use any CSS/XPath identifiers.
click "What are you looking for?"
Step 2: Once the cursor is in the search box, we will type the product name (lily), and press enter to start the search.
type "lily"
enter enter
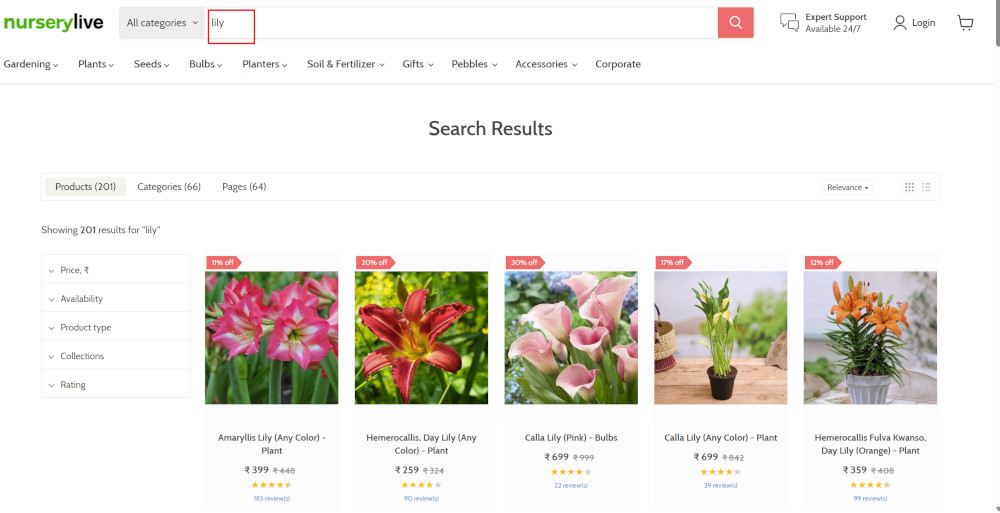
Search lists all products with the “lily” keyword on the webpage.
Step 3: The lily plant we are searching for needs the screen to be scrolled; for that testRigor provides a command. Scroll down until the product is present on the screen:
scroll down until page contains "Zephyranthes Lily, Rain Lily (Red)"
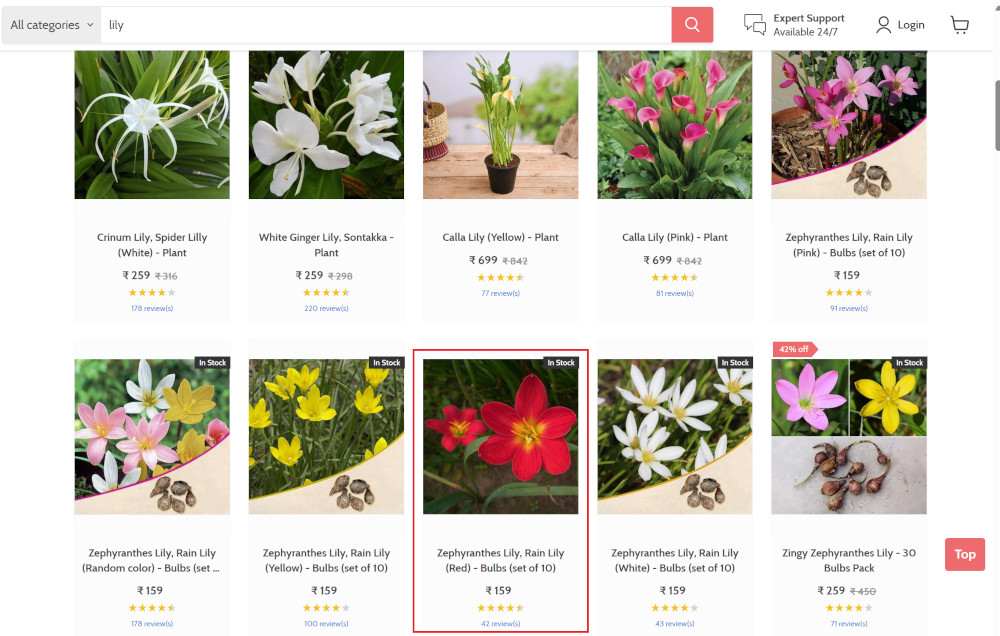
When the product is found on the screen, testRigor stops scrolling.
Step 4: Click on the product name to view the details:
click "Zephyranthes Lily, Rain Lily (Red)"
After the click, the product details are displayed on the screen as below, with the default Quantity as 1.
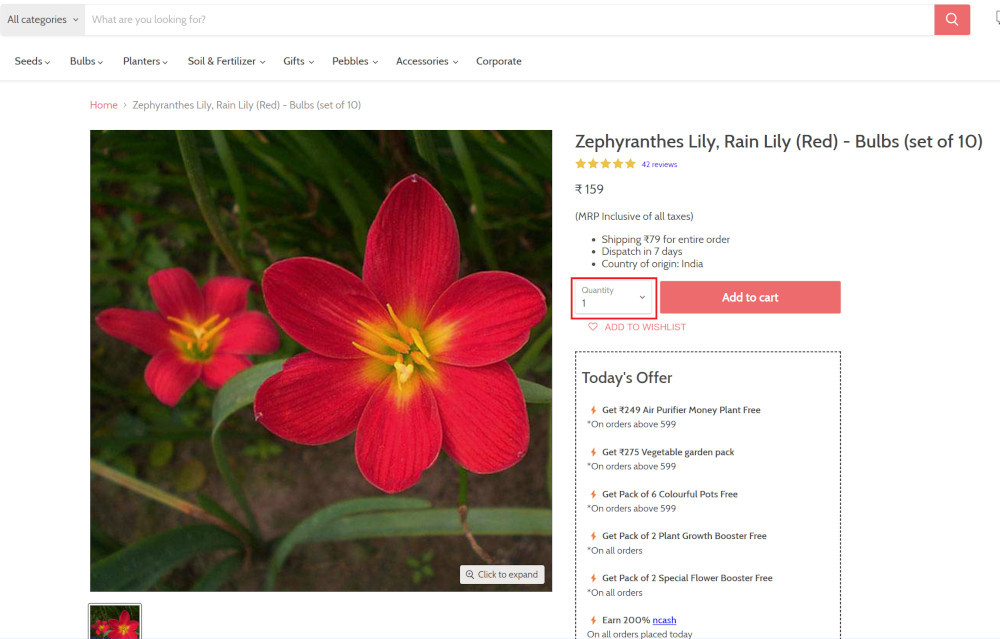
Step 5: Lets say, we want to change the Quantity to 3, so here we use the testRigor command to select from a list.
select "3" from "Quantity"
click "Add to cart"
The product is successfully added to the cart, and the “Added to your cart:” message is displayed on webpage.
Step 6: To assert that the message is successfully displayed, use a simple assertion command as below:
check that page contains "Added to your cart:"
Step 7: After this check, we will view the contents of the cart by clicking View cart as below:
click "View cart"

Step 8: Now we will again check that the product is present in the cart, under heading “Your cart” using the below assertion. With testRigor, it is really easy to specify the location of an element on the screen.
check that page contains "Zephyranthes Lily, Rain Lily (Red)" under "Your cart"

Complete Test Case
Here is how the complete test case will look in the testRigor app. The test steps are simple in plain English, enabling everyone in your team to write and execute them.
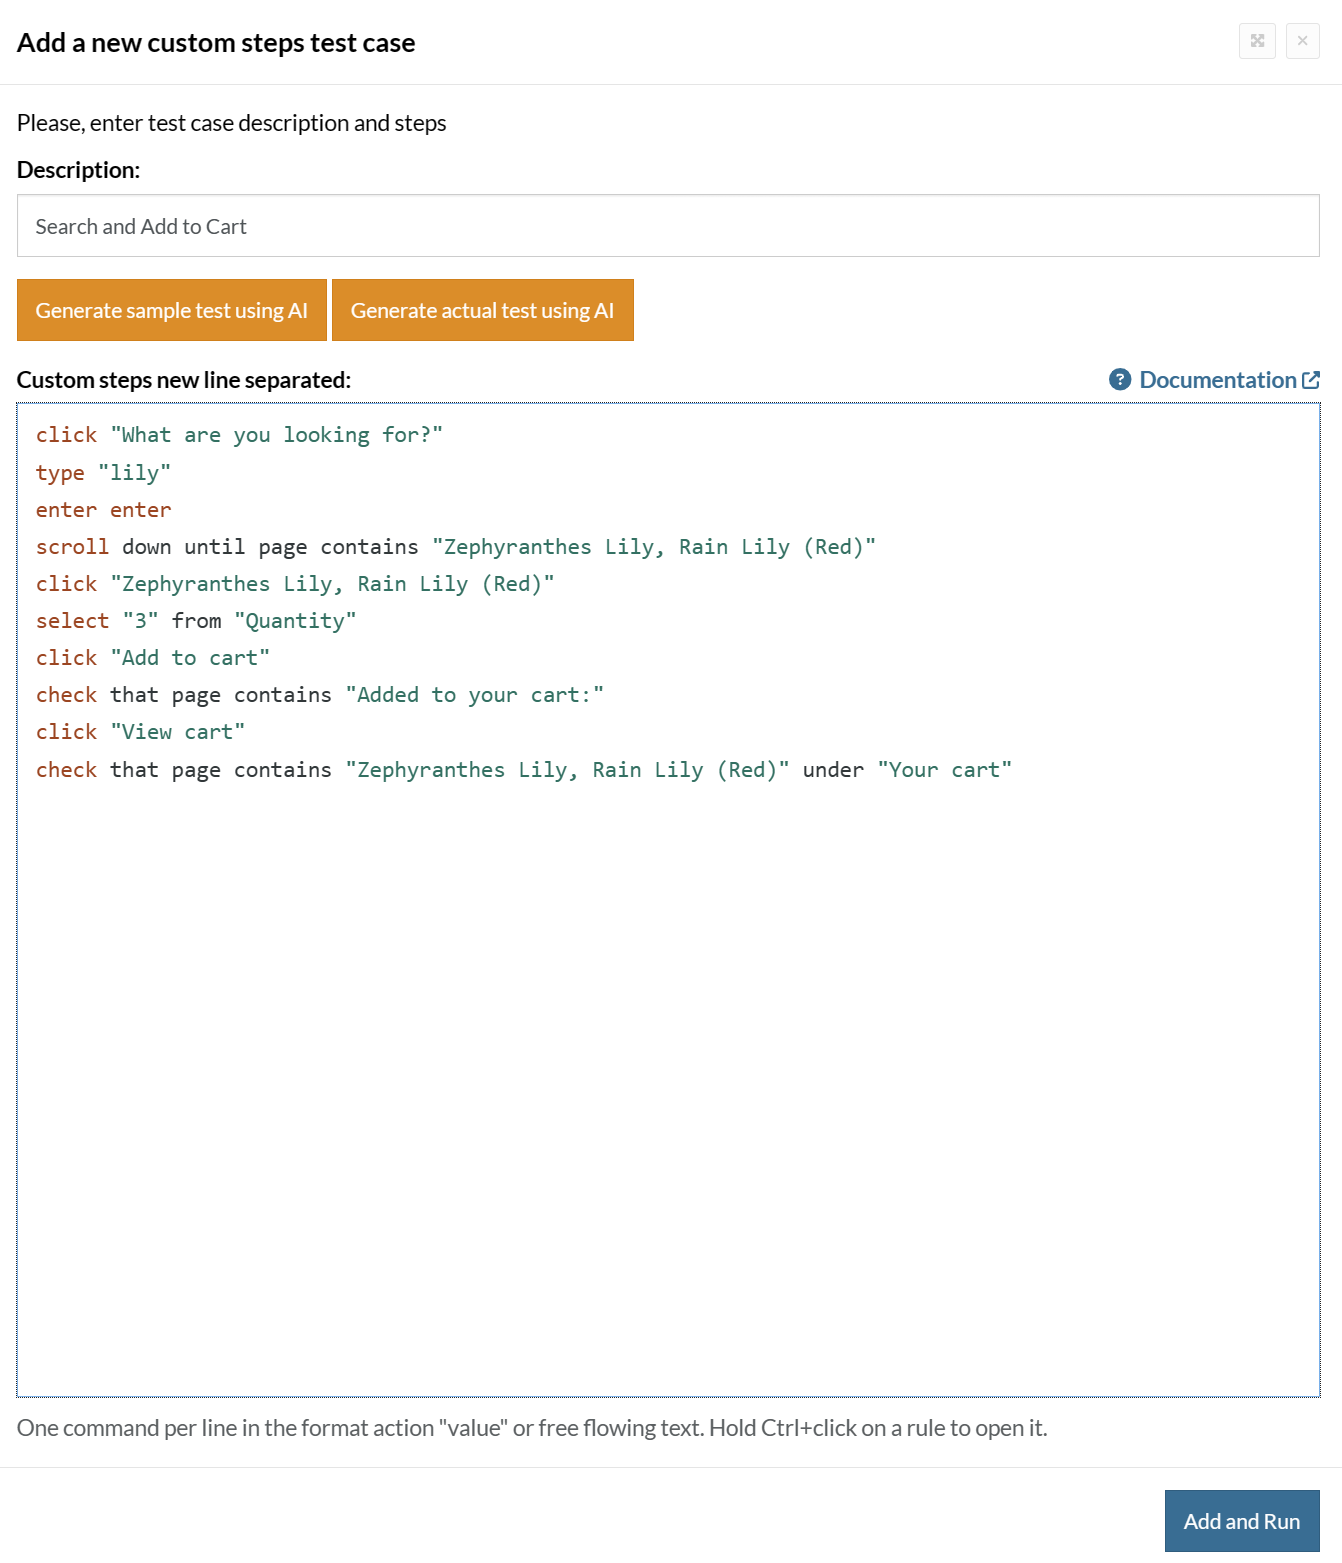
Click Add and Run.
Execution Results
Once the test is executed, you can view the execution details, such as execution status, time spent in execution, screenshots, error messages, logs, video recordings of the test execution, etc. In case of any failure, there are logs and error text that are available easily in a few clicks.
You can also download the complete execution with steps and screenshots in PDF or Word format through the View Execution option.
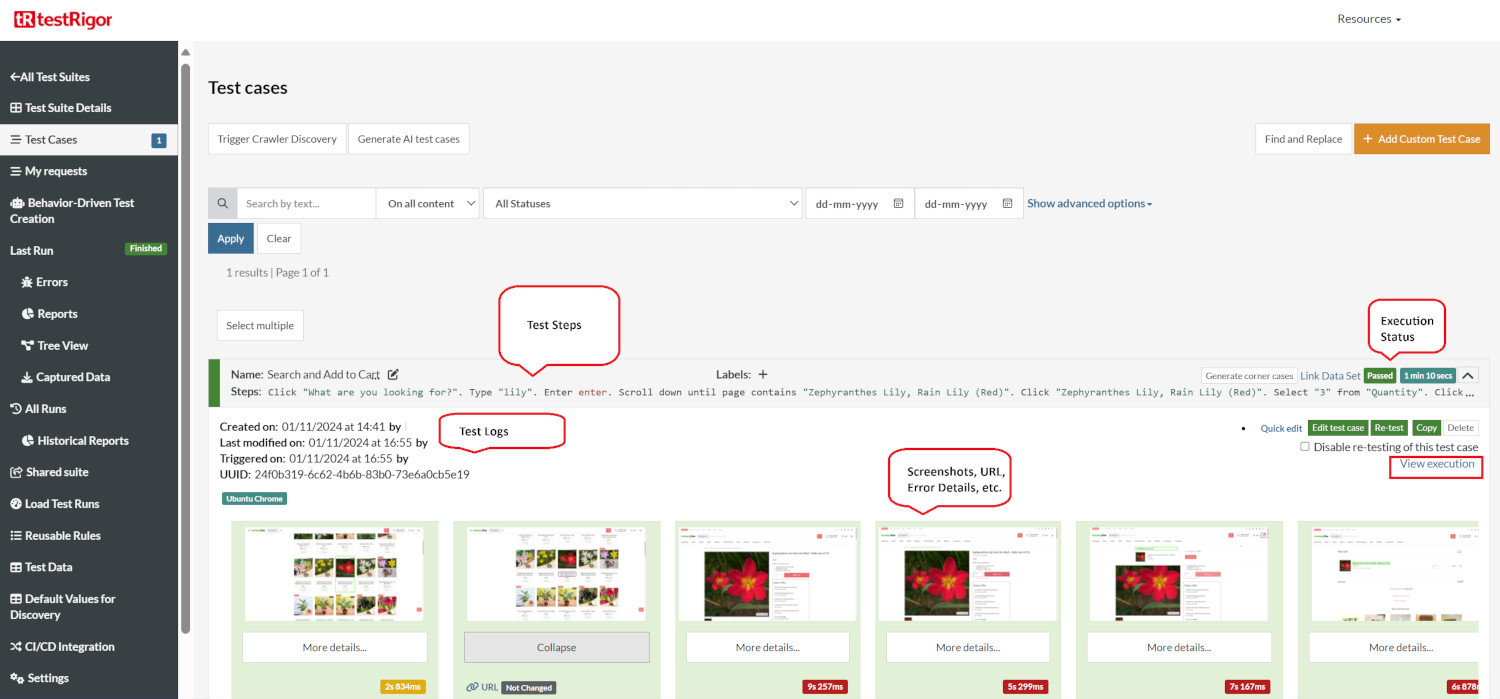
testRigor’s Capabilities
Apart from the simplistic test case design and execution, there are some advanced features that help you test your application using simple English commands.
- Reusable Rules (Subroutines): You can easily create functions for the test steps that you use repeatedly. You can use the Reusable Rules to create such functions and call them in test cases by simply writing their names. See the example of Reusable Rules.
- Global Variables and Data Sets: You can import data from external files or create your own global variables and data sets in testRigor to use them in data-driven testing.
- 2FA, QR Code, and Captcha Resolution: testRigor easily manages the 2FA, QR Code, and Captcha resolution through its simple English commands.
- Email, Phone Call, and SMS Testing: Use simple English commands to test the email, phone calls, and SMS. These commands are useful for validating 2FA scenarios, with OTPs and authentication codes being sent to email, phone calls, or via phone text.
- File Upload/ Download Testing: Execute the test steps involving file download or file upload without the requirement of any third-party software. You can also validate the contents of the files using testRigor’s simple English commands.
- Database Testing: Execute database queries and validate the results fetched.
testRigor enables you to test web, mobile (hybrid, native), API, and desktop apps with minimum effort and maintenance.
Additional Resources
- Access testRigor documentation to know about more useful capabilities
- Top testRigor’s features
- How to perform end-to-end testing
Conclusion
Using Svelte with SvelteKit is a great choice for developing frontend components. As you do so, be sure to give equal importance to testing your work using the appropriate test tools. Remember, the tool you choose will depend on your specific requirements.
| Achieve More Than 90% Test Automation | |
| Step by Step Walkthroughs and Help | |
| 14 Day Free Trial, Cancel Anytime |


