Vaadin Testing

Vaadin is a comprehensive, open-source Java framework for building complete web applications. It bundles UI components, frameworks, and tools for collaboration, design, and testing into a single web development stack. The framework is renowned for its Flow and Hilla sub-frameworks.
For developers proficient in Java, the Flow framework is an excellent choice, as its components are Java objects that can be arranged using layouts to create views. On the other hand, developers with a frontend background may find Hilla's TypeScript-based views, which utilize the LiteElement library, more appropriate. Both frameworks are designed to complement each other so that developers can choose either one or combine them.
With Vaadin, developers can create single-page applications primarily using Java, while also incorporating CSS, HTML, and JavaScript for customization. The framework is particularly well-suited for applications that handle large amounts of data in data grids, forms, and charts. Additionally, Vaadin supports the development of mobile apps, offering progressive web apps (PWAs) by default for easy installation on mobile devices.
Unit Testing
Unit testing serves as the foundation of the testing pyramid. This approach is essential because writing tests for individual methods as they are developed helps prevent issues from arising later on. Since unit tests focus on single methods, they should be small, concise, and have a limited number of inputs. To ensure that these tests run in isolation, it is necessary to use mocked inputs at this stage of testing.
Test cases should reside in a separate test folder that mocks a similar structure as the source code folder. When creating tests, it is important to add the 'Test' suffix to the test class file name. Since you will run and debug these tests, having meaningful names for test methods is advisable.
Unit testing with JUnit
Vaadin supports writing unit tests for Java code using the JUnit framework. It is one of the most used frameworks for writing automated tests. It offers assertions for verification, test fixtures for sharing common test data, and a test runner for running tests.
Here is an example of a unit test that creates a ContactForm object for initialization and then verifies that the values of the form fields match the values of the Contact object.
@Test
public void formFieldsPopulated() {
  ContactForm form = new ContactForm(companies, statuses);
  form.setContact(marcUsher);
  Assert.assertEquals("Marc", form.firstName.getValue());
  Assert.assertEquals("Usher", form.lastName.getValue());
  Assert.assertEquals("[email protected]", form.email.getValue());
  Assert.assertEquals(company2, form.company.getValue());
  Assert.assertEquals(status1, form.status.getValue());
}
Unit testing with Mockito
Mockito is a mocking framework that is widely used with JUnit for writing unit tests. Mocking refers to creating object substitutes for testing purposes. These mock objects are then used to generate outputs for verifying code. Below is an example of a unit test using Junit and Mockito to check the functionality of a basic age calculator application for the scenario when 'null' is passed as an input.
package com.example;

import org.junit.Test;
import static org.mockito.Matchers.anyObject;
import static org.mockito.Mockito.*;

public class MainViewTest {
  @Test
  public void shouldShowErrorAndNoAgeOnNullDate() {
    MainView mainView = mock(MainView.class);
    doCallRealMethod().when(mainView).calculateAge(anyObject());
    mainView.calculateAge(null);
    verify(mainView).showError();
    verify(mainView, never()).showAge(anyObject());
  }
}
UI unit testing with TestBench
TestBench is a testing tool specifically designed for Vaadin applications. Initially, this tool was meant just for end-to-end testing; however, with recent releases, they have added capabilities to make it perform UI unit testing as well. You can now bypass the need to launch the servlet container or the browser, and directly call methods on your server-side view classes and server-side Java Vaadin components.
Once you add the dependencies to your project, as mentioned here, you need to extend your test class to UIUnitTest (for JUnit5). This instantiates a UI along with all the necessary Vaadin environment, which is available to your test methods. You can run these tests directly from your IDE, as explained here.
class HelloWorldViewTest extends UIUnitTest {
  @Test
  public void setText_clickButton_notificationIsShown() {
    final HelloWorldView helloView = navigate(HelloWorldView.class);
    // TextField and Button are available as package protected in the view
    // So we can use those from there
    test(helloView.name).setValue("Test");
    test(helloView.sayHello).click();
    // Notification isn't referenced in the view so we need to use the component
    // query API to find the notification that opened
    Notification notification = $(Notification.class).first();
    Assertions.assertEquals("Hello Test", test(notification).getText());
  }
}
The base class scans the whole classpath for routes by default. You can change this behavior by using the ViewPackages annotation and providing the required classes.
@ViewPackages(
  classes={ MyView.class, OtherView.class },
  packages={ "com.example.app.pgk1", "com.example.app.pgk2" }
)
You can find more details about TestBench's unit testing capabilities here.
UI unit testing for Spring-based projects using TestBench
In Spring-based projects, views often utilize dependency injection to obtain references to services or other components. Vaadin employs SpringInstantiator to create these specialized internal implementations, ensuring the proper handling of views and navigation. For a comprehensive understanding of Vaadin's offerings for such projects and guidance on their implementation, refer to their official documentation.
Testing using the Karibu-Testing library
When working with Vaadin Flow, your application manipulates the server-side code. With the Karibu-Testing approach, you can use the UI.getCurrent() to call straight from your JUnit test methods to get the UI view. Likewise, this library offers other commands like UI.navigate() to navigate around in your app. Moreover, you can instantiate your components and views directly from your JUnit test methods. This library is compatible with Java, Groovy, and Kotlin. You can read more about it here.
Integration Testing
Integration testing focuses on validating the interactions and communication between multiple components or modules of an application. The primary goal of integration testing is to ensure that these interconnected units work together seamlessly.
During the development process, individual units or components of the software are often tested separately using unit testing. However, unit testing alone is insufficient to guarantee that the entire system will function correctly. Integration testing addresses this issue by combining these units and verifying their combined behavior.
There are a couple of ways to perform integration testing for Vaadin applications.
Integration testing with JUnit
The JUnit framework can also be utilized for writing integration tests. An example of this type of test, demonstrating the validation of form data save functionality, is provided below.
In this test case, a ContactForm object is created and manipulated. Subsequently, the save button is clicked to initiate the save event. The test case then verifies whether the correct values were saved by examining the values of the Contact object that was stored.
@Test
public void saveEventHasCorrectValues() {
  ContactForm form = new ContactForm(companies, statuses);
  Contact contact = new Contact();
  form.setContact(contact);
  form.firstName.setValue("John");
  form.lastName.setValue("Doe");
  form.company.setValue(company1);
  form.email.setValue("[email protected]");
  form.status.setValue(status2);

  AtomicReference savedContactRef = new AtomicReference<>(null);
  form.addListener(ContactForm.SaveEvent.class, e -> {
    savedContactRef.set(e.getContact());
  });
  form.save.click();
  Contact savedContact = savedContactRef.get();

  assertEquals("John", savedContact.getFirstName());
  assertEquals("Doe", savedContact.getLastName());
  assertEquals("[email protected]", savedContact.getEmail());
  assertEquals(company1, savedContact.getCompany());
  assertEquals(status2, savedContact.getStatus());
}
Integration testing with Spring Boot test runner
If your project is in Spring and uses annotations like @Autowired, @Inject, @Resource, or other Spring-specific capabilities, then your tests need more than JUnit. You can use the Spring Boot test runner.
@SpringBootTest is an annotation provided by the Spring Boot framework to facilitate integration testing. When applied to a test class, it configures and launches a complete Spring application context, providing all the necessary components, configurations, and services required for running the test.
Using @SpringBootTest in your integration tests ensures that your test cases operate within a realistic environment that closely resembles your production setup. This allows you to test the interactions and integrations between various components of your application more effectively.
Integration testing with TestNG
TestNG is a versatile testing framework that can be used for various types of testing, including unit, integration, and functional tests. It supports a wide range of features, such as parallel test execution, test configuration through XML, and annotations to control test execution flow.
- Add TestNG as a dependency in your project (Maven or Gradle).
- Create a test class for your integration test.
- Import the necessary TestNG annotations, such as
@Test,@BeforeClass, and@AfterClass. - Implement your test methods using TestNG annotations and Vaadin-specific testing techniques, such as interacting with components and asserting the expected behavior.
- Configure your test runner (e.g., Maven Surefire or Gradle Test) to use TestNG instead of the default JUnit.
End-to-End Testing
End-to-end (E2E) testing focuses on validating the entire application workflow from a user's perspective. It simulates real-world scenarios and verifies that all components and systems, including frontend, backend, databases, and third-party integrations, work together as expected. E2E testing helps ensure that an application behaves correctly and meets user requirements in real-life situations.
Even the simple action of clicking a save button after filling out a form involves various helpers, controllers, and database involvement.
- Vaadin's TestBench
- Selenium-based tools
- testRigor
Using Vaadin's TestBench
TestBench is a testing tool designed explicitly for Vaadin applications. It enables developers to create and execute automated end-to-end (E2E) tests for web applications built using the Vaadin framework. TestBench tests help verify the functionality and user experience of an application by simulating user interactions and validating the UI elements.
- Browser automation: TestBench uses the WebDriver API to automate browser interactions, allowing tests to run on various browsers and platforms.
- Vaadin-specific APIs make it easier to interact with and test Vaadin components, simplifying the process of writing and maintaining test scripts.
- TestBench can be integrated with popular testing frameworks, such as JUnit, to create a seamless testing experience and facilitate test execution and reporting.
TestBench can also work with JBehave to allow you to use the BDD (Behavior Driven Development) approach when creating test cases.
Here is an example of a simple test where the age calculator application checks whether a notification message is displayed on selecting a null value using the date picker.
public class MainViewIT extends AbstractViewTest {
  @Test
  public void shouldShowNotificationOnNullDate() {
    DatePickerElement datePicker = $(DatePickerElement.class).first();
    datePicker.clear();
    ButtonElement button = $(ButtonElement.class).first();
    button.click();
    NotificationElement notification = $(NotificationElement.class).waitForFirst();
    boolean isOpen = notification.isOpen();
    assertThat(isOpen, is(true));
  }
}
You can find more details about how the TestBench integrates and operates in the Vaadin ecosystem here.
Selenium-based tools for end-to-end testing
Selenium is a widely used tool for end-to-end automation testing. Its web drivers allow manipulation of the browser as well as HTML elements. You can find many tools in the market that use Selenium capabilities, however, we wouldn't recommend these tools due to a myriad of Selenium's limitations.
testRigor for end-to-end testing
- No-code automation: testRigor enables users to write test scripts in plain English, making it accessible to manual testers and business analysts who may not have extensive coding knowledge.
- Being a cloud-based solution, testRigor offers greater flexibility in terms of scalability, accessibility, and collaboration.
- Easy UI element identification: testRigor simplifies locating UI elements by allowing users to utilize relative locations, eliminating the need for complex XPaths or nested element attribute references.
- The tool supports visual testing, enabling direct screen comparisons and classification of differences based on severity.
- testRigor provides a library of validation options and supports the Behavior-Driven Development (BDD) testing approach. Users can also create test data and reusable rules for test cases.
- testRigor seamlessly integrates with various test management, CI/CD, and issue tracking tools, making it a versatile option for end-to-end testing in diverse development environments.
To summarize the above, testRigor offers the cleanest and easiest approach for automated end-to-end testing, with ultra-stable tests and minimal maintenance.
Below is an example of a testRigor test for adding an item to a cart. It's important to mention that this is the entire test code, which looks more like an executable specification - making it an ideal E2E test from a human's perspective.
open url "https://www.amazon.in"
check that page contains "Search Amazon.com"
enter "blue shirt" into "Search Amazon.com"
click "Go"
Scroll down
grab value from "Men's Regular Casual Shirt" and save it as "Shirt"
click on stored value "Shirt"
scroll down by 1/2 of the screen
select "L " from "Size:"
scroll up
select "2" from "Quantity"
click "Add to cart"
check that page contains "Added to cart"
check that page contains stored value "Shirt"
How to do End-to-end Testing with testRigor
Let us take the example of an e-commerce website that sells plants and other gardening needs. We will create end-to-end test cases in testRigor using plain English test steps.
Step 1: Log in to your testRigor app with your credentials.
Step 2: Set up the test suite for the website testing by providing the information below:
- Test Suite Name: Provide a relevant and self-explanatory name.
- Type of testing: Select from the following options: Desktop Web Testing, Mobile Web Testing, Native and Hybrid Mobile, based on your test requirements.
- URL to run test on: Provide the application URL that you want to test.
- Testing credentials for your web/mobile app to test functionality which requires user to login: You can provide the app’s user login credentials here and need not write them separately in the test steps then. The login functionality will be taken care of automatically using the keyword
login. - OS and Browser: Choose the OS Browser combination on which you want to run the test cases.
- Number of test cases to generate using AI: If you wish, you can choose to generate test cases based on the App Description text, which works on generative AI.
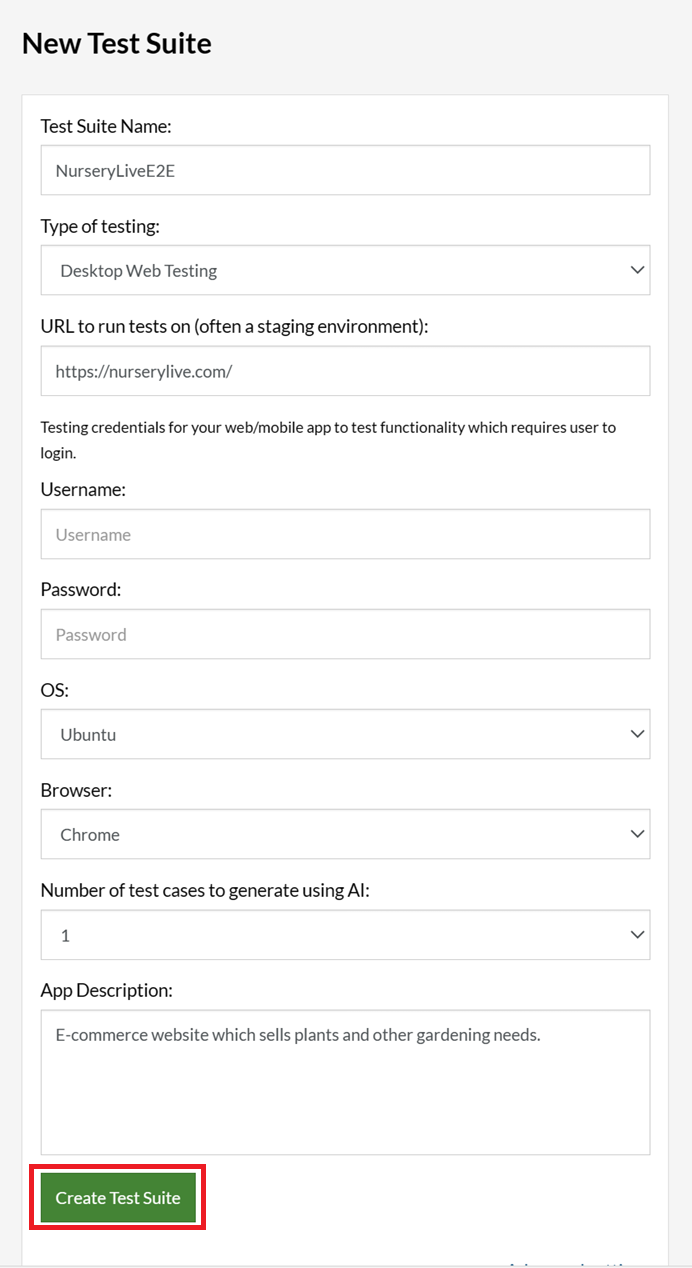
Step 3: Click Create Test Suite.
On the next screen, you can let AI generate the test case based on the App Description you provided during the Test Suite creation. However, for now, select do not generate any test, since we will write the test steps ourselves.
Step 4: To create a new custom test case yourself, click Add Custom Test Case.

Step 5: Provide the test case Description and start adding the test steps.
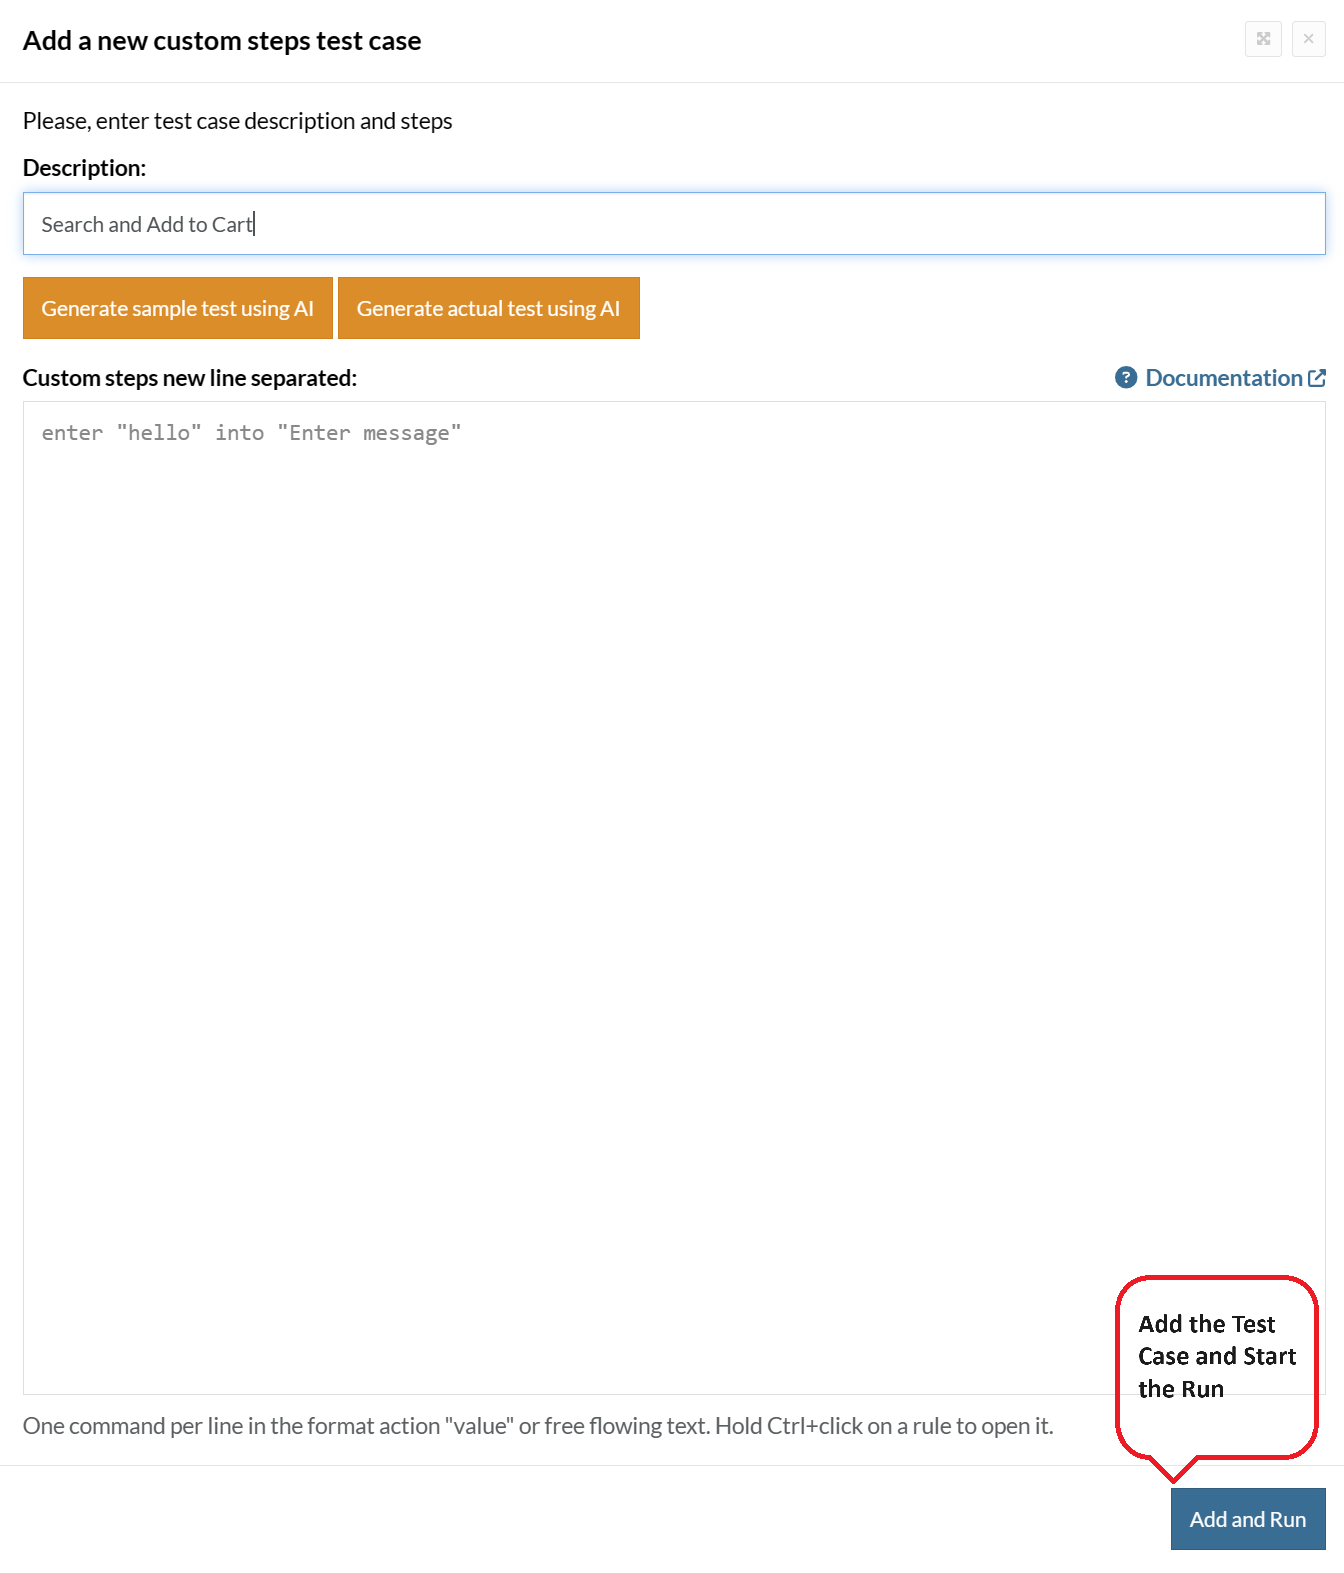
For the application under test, i.e., e-commerce website, we will perform below test steps:
- Search for a product
- Add it to the cart
- Verify that the product is present in the cart
Test Case: Search and Add to Cart
Step 1: We will add test steps on the test case editor screen one by one.
testRigor automatically navigates to the website URL you provided during the Test Suite creation. There is no need to use any separate function for it. Here is the website homepage, which we intend to test.

First, we want to search for a product in the search box. Unlike traditional testing tools, you can identify the UI element using the text you see on the screen. You need not use any CSS/XPath identifiers.
click "What are you looking for?"
Step 2: Once the cursor is in the search box, we will type the product name (lily), and press enter to start the search.
type "lily"
enter enter
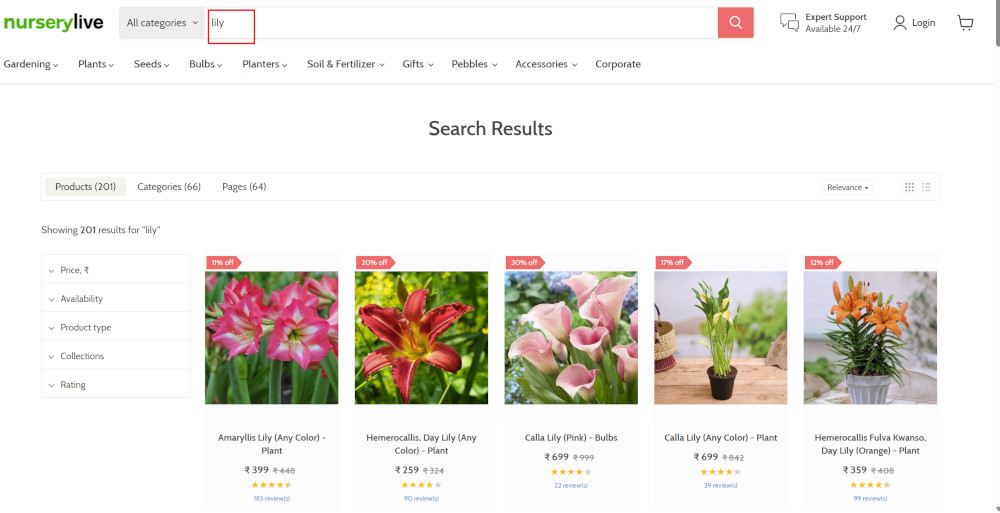
Search lists all products with the “lily” keyword on the webpage.
Step 3: The lily plant we are searching for needs the screen to be scrolled; for that testRigor provides a command. Scroll down until the product is present on the screen:
scroll down until page contains "Zephyranthes Lily, Rain Lily (Red)"
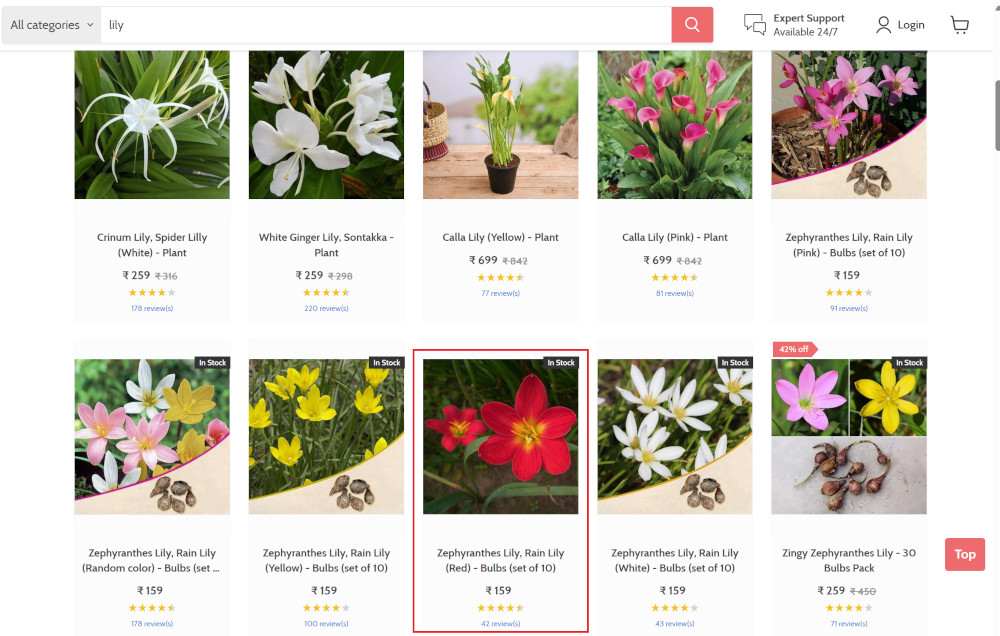
When the product is found on the screen, testRigor stops scrolling.
Step 4: Click on the product name to view the details:
click "Zephyranthes Lily, Rain Lily (Red)"
After the click, the product details are displayed on the screen as below, with the default Quantity as 1.
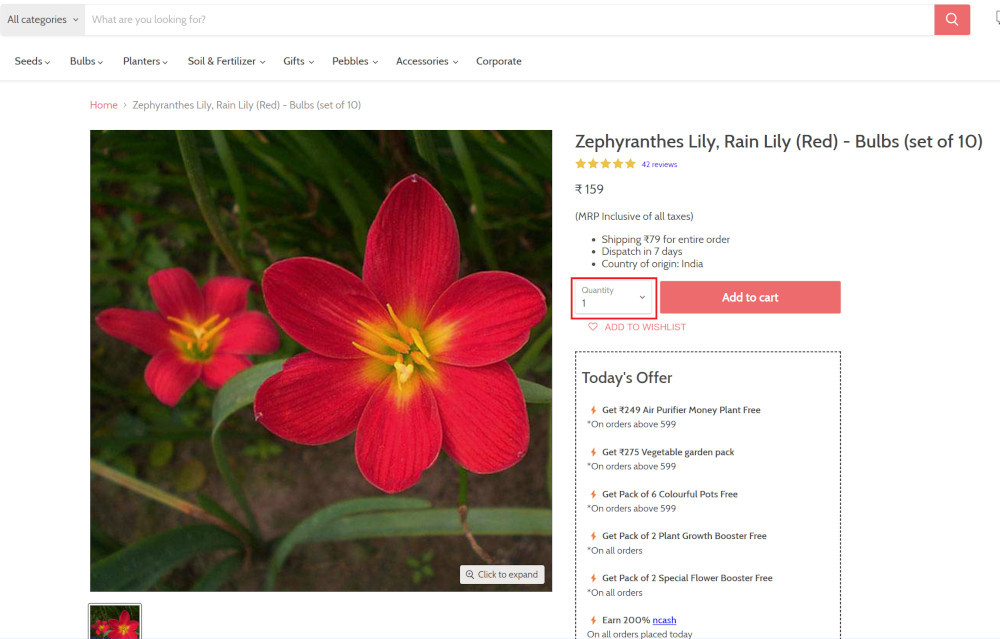
Step 5: Lets say, we want to change the Quantity to 3, so here we use the testRigor command to select from a list.
select "3" from "Quantity"
click "Add to cart"
The product is successfully added to the cart, and the “Added to your cart:” message is displayed on webpage.
Step 6: To assert that the message is successfully displayed, use a simple assertion command as below:
check that page contains "Added to your cart:"
Step 7: After this check, we will view the contents of the cart by clicking View cart as below:
click "View cart"

Step 8: Now we will again check that the product is present in the cart, under heading “Your cart” using the below assertion. With testRigor, it is really easy to specify the location of an element on the screen.
check that page contains "Zephyranthes Lily, Rain Lily (Red)" under "Your cart"

Complete Test Case
Here is how the complete test case will look in the testRigor app. The test steps are simple in plain English, enabling everyone in your team to write and execute them.
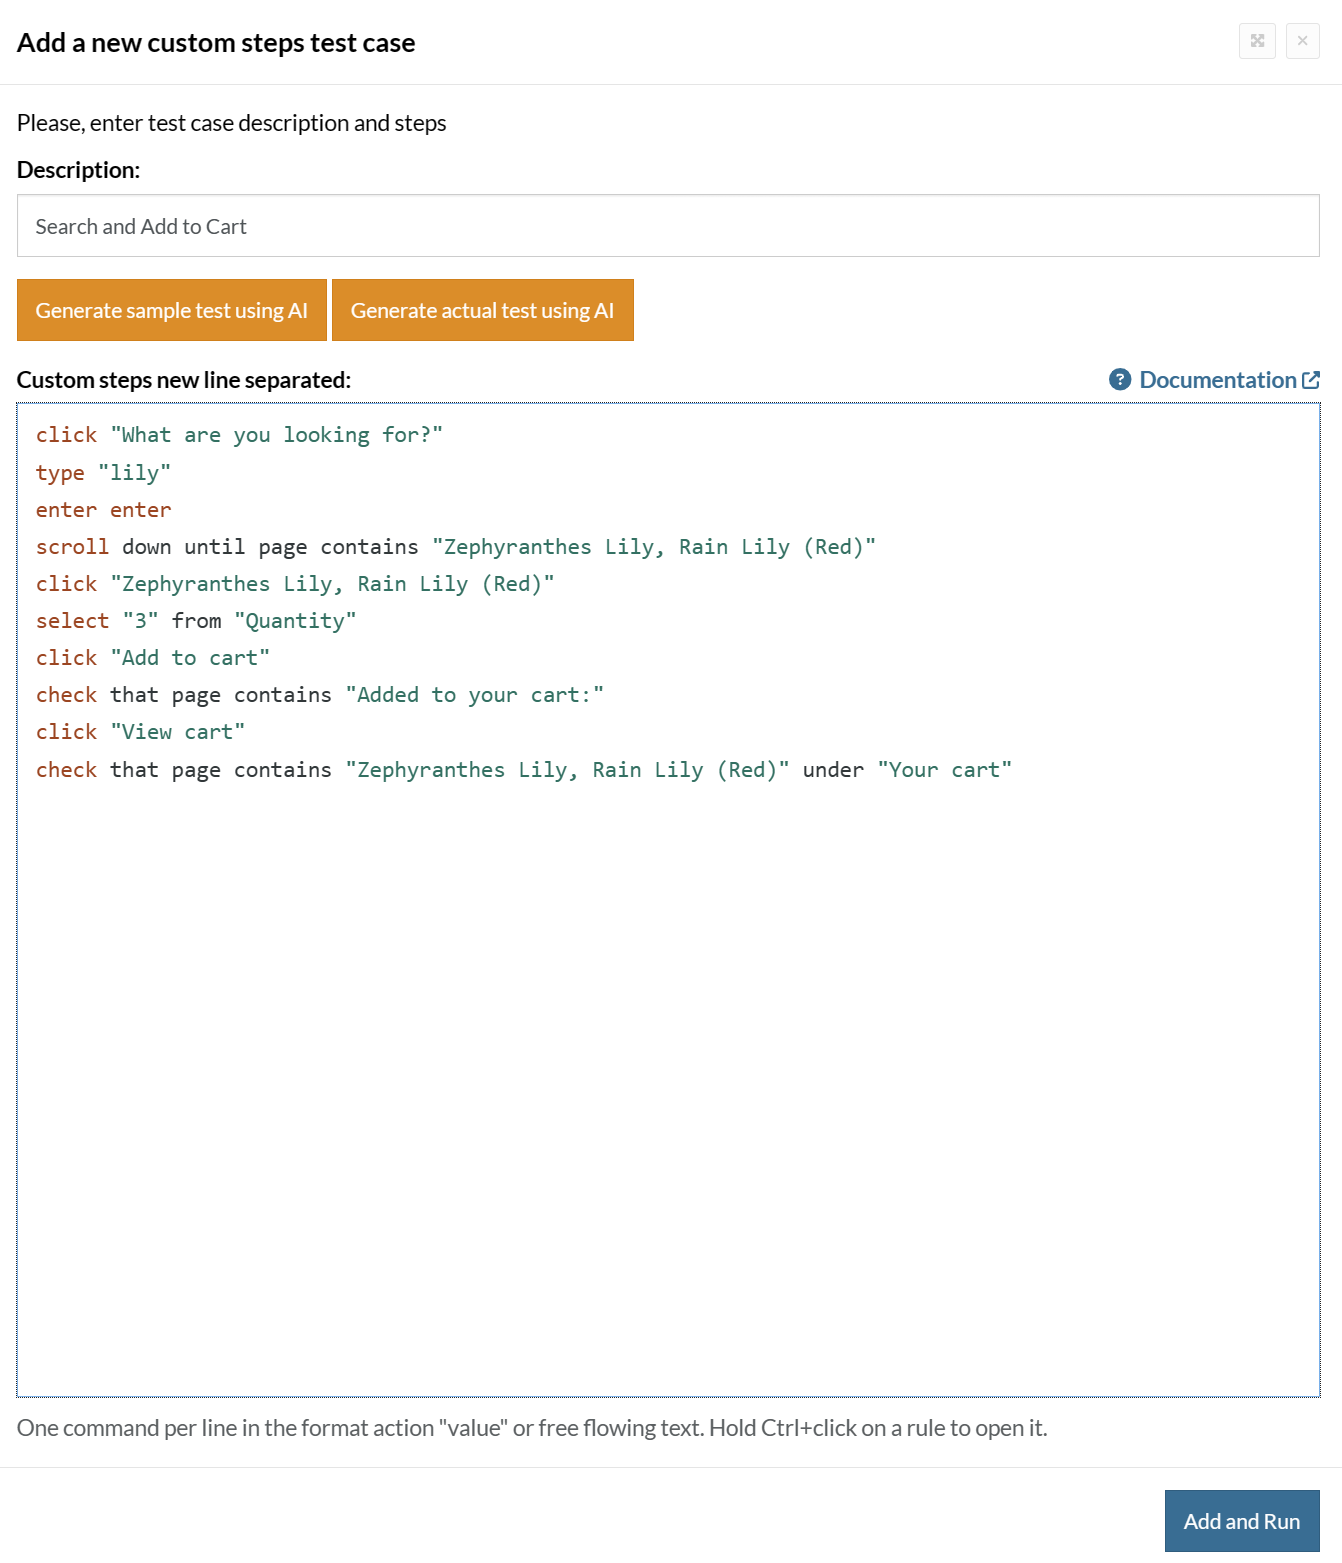
Click Add and Run.
Execution Results
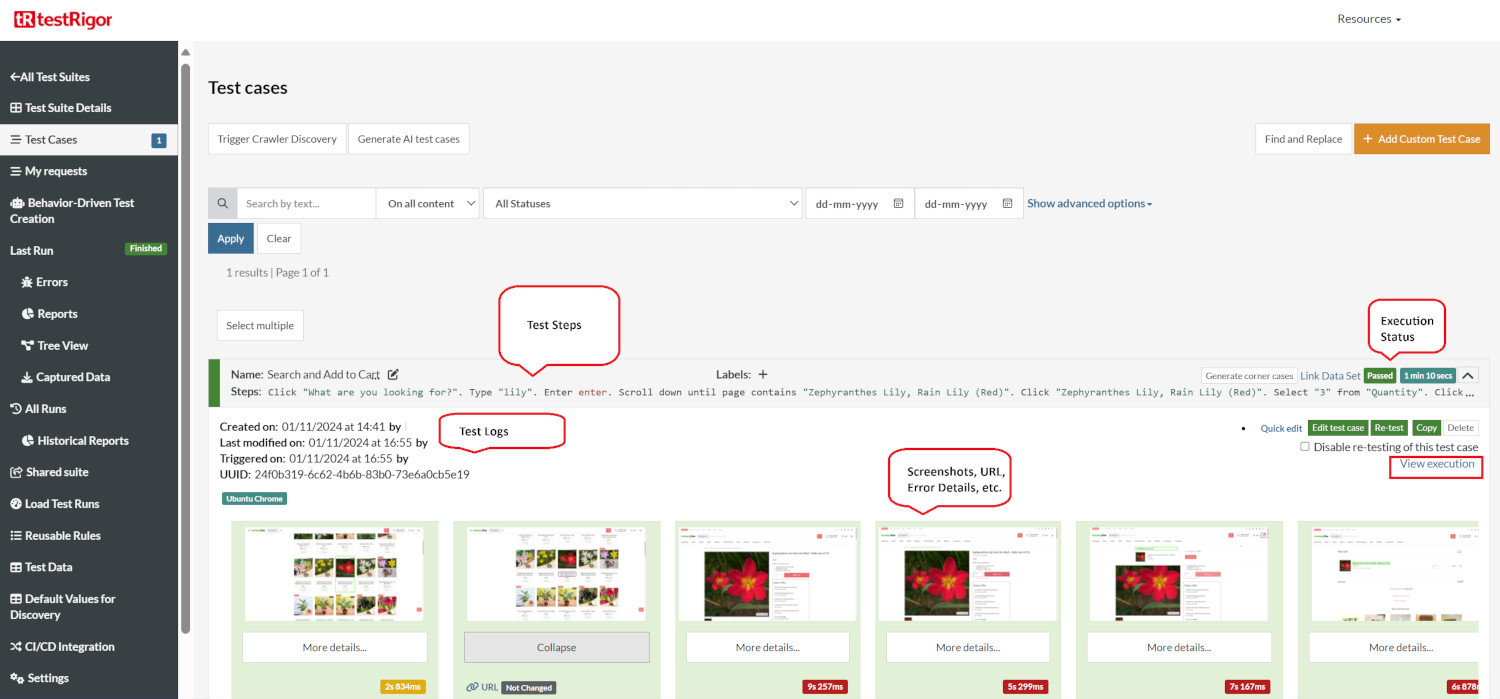
Once the test is executed, you can view the execution details, such as execution status, time spent in execution, screenshots, error messages, logs, video recordings of the test execution, etc. In case of any failure, there are logs and error text that are available easily in a few clicks.
You can also download the complete execution with steps and screenshots in PDF or Word format through the View Execution option.
testRigor’s Capabilities
Apart from the simplistic test case design and execution, there are some advanced features that help you test your application using simple English commands.
- Reusable Rules (Subroutines): You can easily create functions for the test steps that you use repeatedly. You can use the Reusable Rules to create such functions and call them in test cases by simply writing their names. See the example of Reusable Rules.
- Global Variables and Data Sets: You can import data from external files or create your own global variables and data sets in testRigor to use them in data-driven testing.
- 2FA, QR Code, and Captcha Resolution: testRigor easily manages the 2FA, QR Code, and Captcha resolution through its simple English commands.
- Email, Phone Call, and SMS Testing: Use simple English commands to test the email, phone calls, and SMS. These commands are useful for validating 2FA scenarios, with OTPs and authentication codes being sent to email, phone calls, or via phone text.
- File Upload/ Download Testing: Execute the test steps involving file download or file upload without the requirement of any third-party software. You can also validate the contents of the files using testRigor’s simple English commands.
- Database Testing: Execute database queries and validate the results fetched.
testRigor enables you to test web, mobile (hybrid, native), API, and desktop apps with minimum effort and maintenance.
Additional Resources
- Access testRigor documentation to know about more useful capabilities
- Top testRigor’s features
- How to perform end-to-end testing
Conclusion
Vaadin is a well-established framework used by many big companies, and testing is a crucial aspect of building robust and reliable Vaadin applications. With a variety of testing approaches available, including unit, integration, and end-to-end testing, software teams can ensure their applications meet user requirements and deliver a consistent, high-quality user experience. Frameworks like JUnit and TestNG, as well as specialized tools like Vaadin TestBench, can streamline the testing process for Vaadin applications.
Additionally, innovative tools like testRigor offer no-code automation and enhanced testing capabilities, making end-to-end testing more accessible to a wider range of users. By leveraging these powerful tools and methodologies, you can create well-tested, resilient Vaadin applications that stand up to real-world demands and expectations.
| Achieve More Than 90% Test Automation | |
| Step by Step Walkthroughs and Help | |
| 14 Day Free Trial, Cancel Anytime |


