Vue.js Testing

What is Vue.js
Vue is an open-source JavaScript framework for building single-page web applications and user interfaces. Evan-You, an Angular.js developer at Google, created Vue, and the first stable version hit the market in 2014. Vue is based on Model-View-Viewmodel(MVVM) architecture. From a broader perspective, MVVM is an architectural pattern where the development of the User Interface(view) can be separated from the business logic or backend logic(model). So developers can build UI and backend in a fully independent platform.
Vue is a progressive framework, and the ecosystem is designed to be flexible and incrementally adaptable. Vue provides a declarative and component-based model for developing user interfaces efficiently. Vue is extensively used for creating single-page applications, embedding web components to any page, server-side rendering, status site generation, etc.
Unit testing
Unit testing is referred to as the first pillar in the testing cycle. It's a way of testing the smallest piece of code called a unit that can be logically isolated. Usually done from the developer side, its primary intention is to identify and fix the issues at the earliest stage. Since components are the building blocks of Vue, unit testing is performed on the component level.
- Vitest
- Peeky
A sample project in Vue can be created using the command "create-vue", which forms the pre-configured base with the features we choose and delegates the rest to Vite. Vite is the front-end build tool used in Vue.
Vitest
Vitest is a Jest-compatible unit test framework with faster test execution. Vitest can use the same configurations Vite used and share a standard transformation pipeline during development, build, and test time. Vite is created and maintained by Vue team members. Vitest provides the generic functionality to write unit tests, and Vue Test Utils provides the necessary test utilities.
"<componentName>.spec.js". There should be one unit test file for one component, and this file should be under the sub-folder within the component. A sample Vitest unit test looks like this:import { describe, it, expect } from 'vitest'
import { shallowMount } from '@vue/test-utils'
import WeatherHeader from '../WeatherHeader.vue'
describe('WeatherHeader.vue Test', () => {
it('renders message when component is created', () => {
// render the component
const wrapper = shallowMount(WeatherHeader, {
propsData: {
title: 'Vue Project'
}
})
// check that the title is rendered
expect(wrapper.text()).toMatch('Vue Project')
})
})
Peeky
Peeky is a fast unit test runner that has integration support with Vite. Peeky offers a visual user interface. Peeky uses Vite and integrates with the project without any additional configuration. Also, Peeky supports parallel execution.
import { describe, test, expect } from '@peeky/test'
  import Hello from './Hello.vue'
  describe('vue + peeky demo', () => {
    test('mount component', async () => {
      console.log(Hello)
      const wrapper = mount(Hello, {
        props: {
          count: 4,
        },
      })
      expect(wrapper.text()).toContain('4 x 2 = 8')
      expect(wrapper.html()).toMatchSnapshot()
      await wrapper.get('button').trigger('click')
      expect(wrapper.text()).toContain('4 x 3 = 12')
      await wrapper.get('button').trigger('click')
      expect(wrapper.text()).toContain('4 x 4 = 16')
    })
  })
Component testing
Component integration testing, or component testing, checks how the components behave as a combined entity. Component testing aims to capture issues related to the component's props, events, and slots. In component testing, the interactions with child components are not mocked. Here we are testing what the component does, not how it does it.
- Vitest for components
- Cypress component testing
Vitest for components
One of the key features of Vitest is its ability to mount Vue.js components and test their output and behavior. Here, we are running our tests rendered headlessly. The components are tested using the library - @testing-library/vue.
import {render, fireEvent} from '@testing-library/vue'
  import Component from './Component.vue'

  test('properly handles v-model', async () => {
    const {getByLabelText, getByText} = render(Component)
    // Asserts initial state.
    getByText('Hi, my name is Alice')
    // Get the input DOM node by querying the associated label.
    const usernameInput = getByLabelText(/username/i)
    // Updates the <input> value and triggers an 'input' event.
    // fireEvent.input() would make the test fail.
    await fireEvent.update(usernameInput, 'Bob')
    getByText('Hi, my name is Bob')
  })
Cypress for component testing
Cypress testing provides a testable component workbench. With the support of a workbench, users can quickly build and test any component. The test executions are running on actual browsers. Using Cypress, we can understand how the rendering of components happens, and any issue related to rendering can be captured in competent testing.
// Set up some constants for the selectors
  const counterSelector = '[data-cy=counter]'
  const incrementSelector = '[aria-label=increment]'
  const decrementSelector = '[aria-label=decrement]'
  it('stepper should default to 0', () => {
    cy.mount(Stepper)
    cy.get(counterSelector).should('have.text', '0')
  })
  it('supports an "initial" prop to set the value', () => {
    cy.mount(Stepper, { props: { initial: 100 } })
    cy.get(counterSelector).should('have.text', '100')
  })
We can capture style issues, cookies, etc. Since Cypress is integrated with Vite, test execution is swift. @testing-library/cypress library is used for Cypress component testing.
End-to-end testing
Cypress
Cypress, as discussed above, provides support for component testing and E2E testing. It has got built-in assertions and can execute test cases in parallel. Cypress has an excellent graphical interface report for viewing the test execution result. A disadvantage of Cypress is that the support is limited to Chromium-based browsers, WebKit (currently very limited and experimental), and Firefox. So it's not a great choice for Safari or Edge browsers. You can read more about Cypress here.
Playwright
Playwright is an open-source Node.js library for automating web browsers, including Chrome, Firefox, and Safari. It provides a high-level API for interacting with web pages and applications, and supports various testing frameworks such as Jest, Mocha, and Jasmine.
Playwright can be used to automate end-to-end testing scenarios, where the entire application is tested from the user's perspective. This can include testing the functionality of Vue.js components, routing, state management, and interactions with external APIs.
const { chromium } = require('playwright');
  const { expect } = require('chai');
  const baseUrl = 'http://localhost:8080/';
  const adminPassword = 'ADMIN_PASSWORD';
  const adminUserName = 'Admin username';
  const normalUserName = 'User username';
  const normalUserPassword = 'USER_PASSWORD';
  describe('Authenticated Vue App: ', () => {
    let browser;
    let page;
    before(async () => {
      browser = await chromium.launch();
      page = await browser.newPage();
      await page.goto(baseUrl);
    });
    after(async () => {
      await page.close();
      await browser.close();
    });
    it('Clicking on login should redirect to login', async () => {
      await page.click('a.login');
      expect(page.url()).to.equal('${baseUrl}login');
    });
  });
Nightwatch
Nightwatch is a Node.js-based end-to-end testing framework that uses the Selenium WebDriver API to automate browser interactions. It provides a simple and intuitive syntax for writing tests, and supports a wide range of browsers, including Chrome, Firefox, and Safari.
In terms of testing Vue.js applications, Nightwatch can be used to automate end-to-end testing scenarios, where the entire application is tested from the user's perspective. This can include testing the functionality of Vue.js components, routing, state management, and interactions with external APIs. It's integrated with Allure reports for reporting; and also has integrations with Azure and Jenkins.
testRigor
testRigor is a no-code AI-integrated automation tool that allows the entire team to create cross-browser and cross-platform end-to-end scenarios in plain English. It is the easiest and fastest way to cover your entire application with functional end-to-end tests, and spend less time on maintenance than with most other similar tools.
- QA team (including manual testers) can comfortably own the entire process from an initial setup, to writing test cases, to maintenance.
- It's a one-stop solution for mobile, web, desktop, and API testing, including the additional capability of visual testing when needed.
- Supported integrations with market-leading CI/CD tools, test management, and issue management tools (Jira, Azure, TestRail, etc).
- Tests are so stable that some companies even use them for monitoring; you can run them as often as needed and get results in under an hour.
click "Sign Up"
  enter email into "Email"
  enter password into "Password"
  enter password into "Confirm Password"
  enter homeName into "Billing Address"
  enter phoneNum as "Phone Number"
  click "Submit"
Some BDD tools allow you to write a similar test in an English-like language, which will later be transferred into code. With testRigor, however, the above test is all you need. Notice also that it doesn't mention any element locators, such as XPaths. This is because testRigor tests emulate how a real user would interact with your application, and are abstract from implementation details.
How to do End-to-end Testing with testRigor
Let us take the example of an e-commerce website that sells plants and other gardening needs. We will create end-to-end test cases in testRigor using plain English test steps.
Step 1: Log in to your testRigor app with your credentials.
Step 2: Set up the test suite for the website testing by providing the information below:
- Test Suite Name: Provide a relevant and self-explanatory name.
- Type of testing: Select from the following options: Desktop Web Testing, Mobile Web Testing, Native and Hybrid Mobile, based on your test requirements.
- URL to run test on: Provide the application URL that you want to test.
- Testing credentials for your web/mobile app to test functionality which requires user to login: You can provide the app’s user login credentials here and need not write them separately in the test steps then. The login functionality will be taken care of automatically using the keyword
login. - OS and Browser: Choose the OS Browser combination on which you want to run the test cases.
- Number of test cases to generate using AI: If you wish, you can choose to generate test cases based on the App Description text, which works on generative AI.
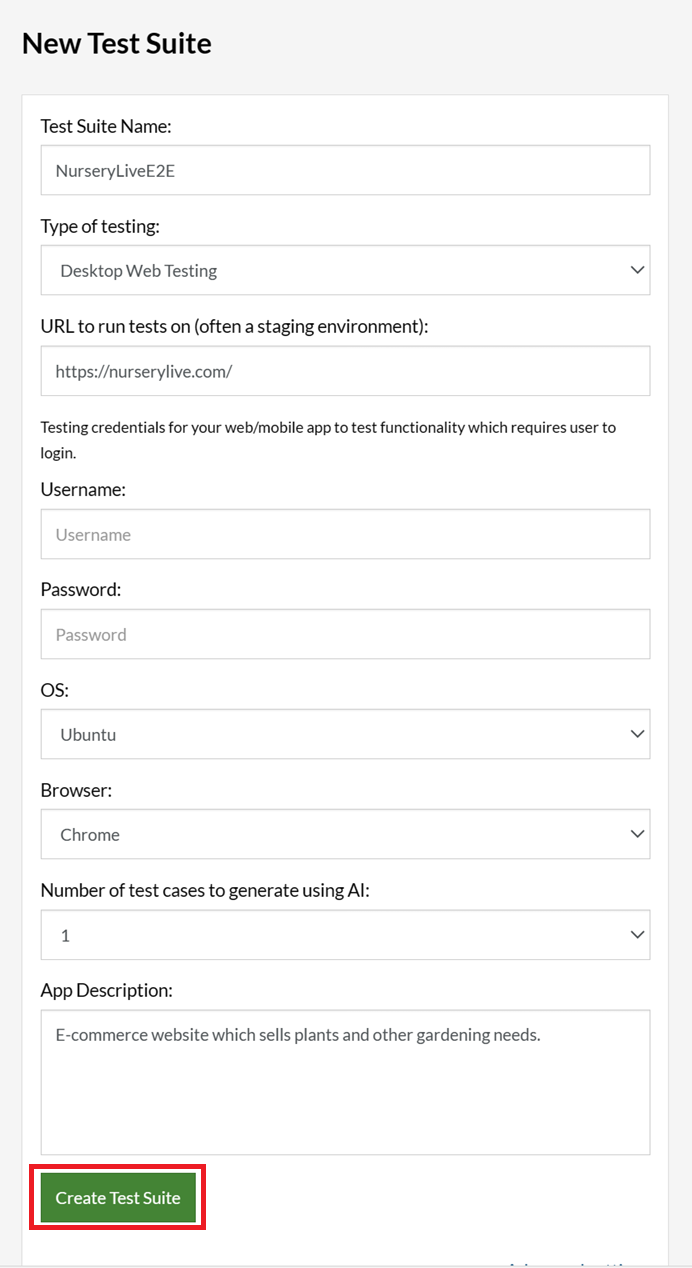
Step 3: Click Create Test Suite.
On the next screen, you can let AI generate the test case based on the App Description you provided during the Test Suite creation. However, for now, select do not generate any test, since we will write the test steps ourselves.
Step 4: To create a new custom test case yourself, click Add Custom Test Case.

Step 5: Provide the test case Description and start adding the test steps.
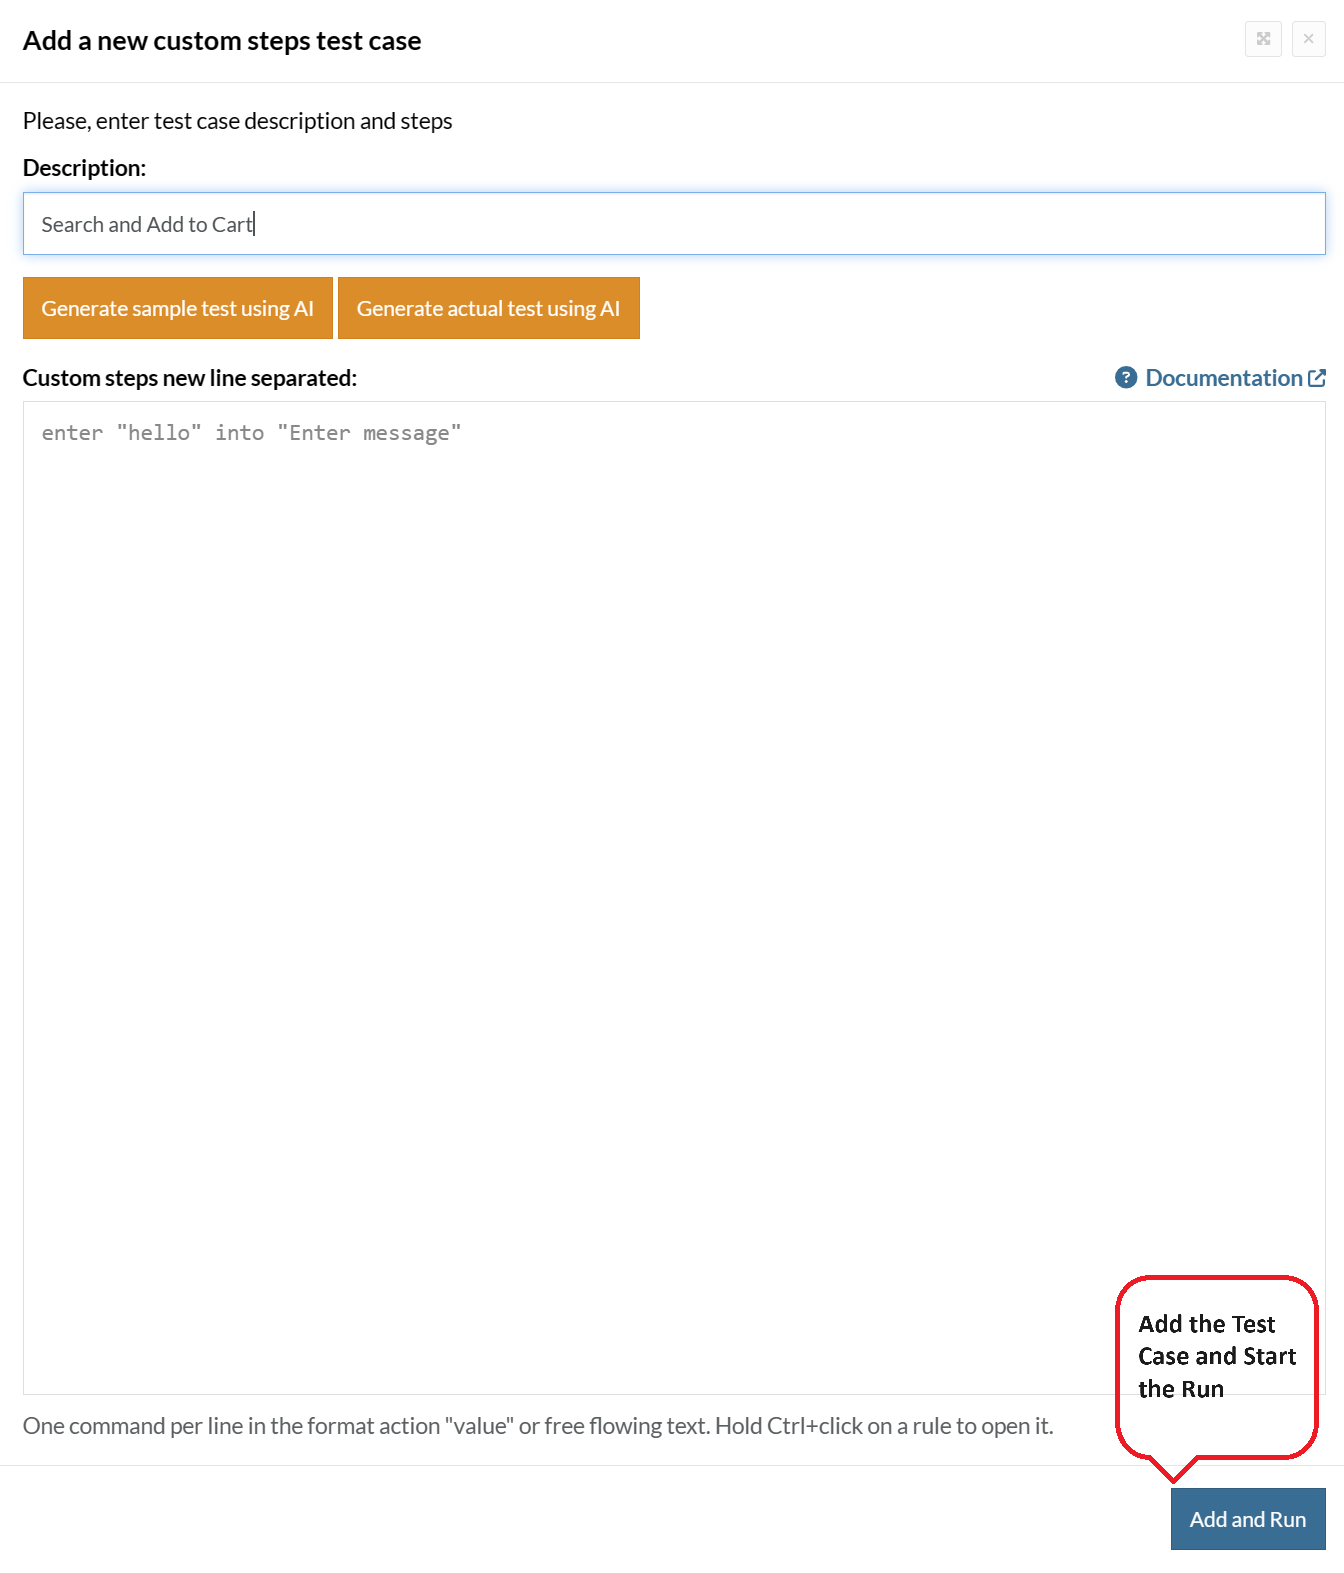
For the application under test, i.e., e-commerce website, we will perform below test steps:
- Search for a product
- Add it to the cart
- Verify that the product is present in the cart
Test Case: Search and Add to Cart
Step 1: We will add test steps on the test case editor screen one by one.
testRigor automatically navigates to the website URL you provided during the Test Suite creation. There is no need to use any separate function for it. Here is the website homepage, which we intend to test.

First, we want to search for a product in the search box. Unlike traditional testing tools, you can identify the UI element using the text you see on the screen. You need not use any CSS/XPath identifiers.
click "What are you looking for?"
Step 2: Once the cursor is in the search box, we will type the product name (lily), and press enter to start the search.
type "lily"
enter enter
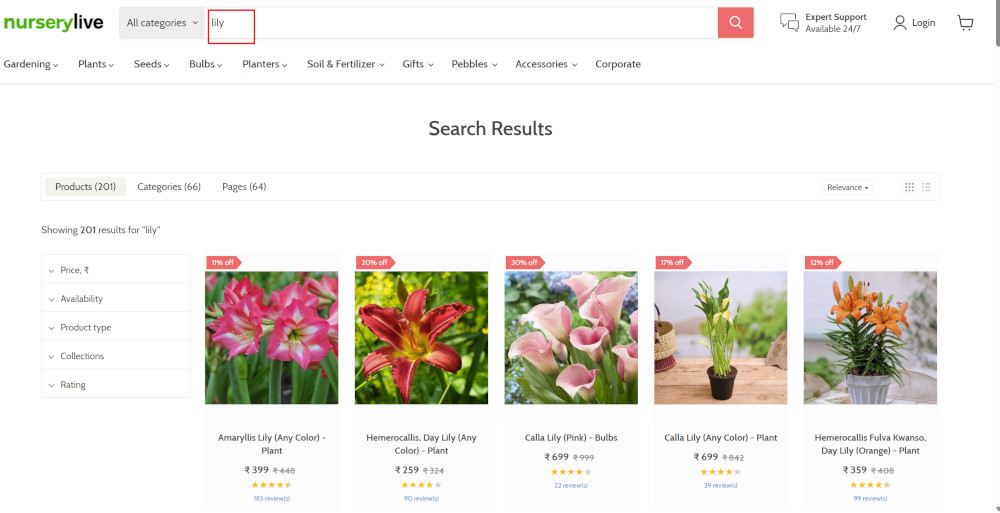
Search lists all products with the “lily” keyword on the webpage.
Step 3: The lily plant we are searching for needs the screen to be scrolled; for that testRigor provides a command. Scroll down until the product is present on the screen:
scroll down until page contains "Zephyranthes Lily, Rain Lily (Red)"
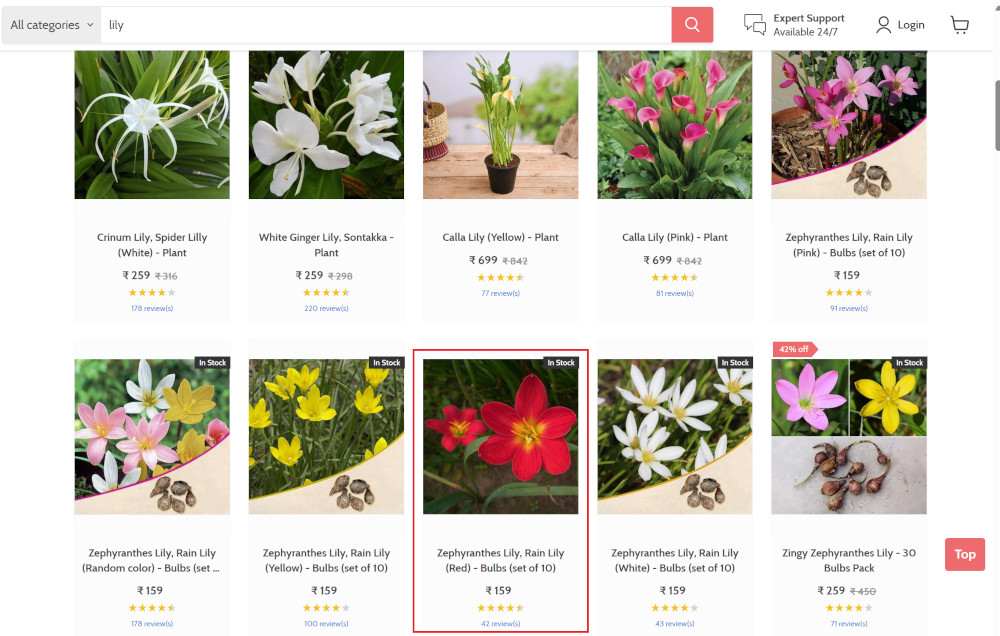
When the product is found on the screen, testRigor stops scrolling.
Step 4: Click on the product name to view the details:
click "Zephyranthes Lily, Rain Lily (Red)"
After the click, the product details are displayed on the screen as below, with the default Quantity as 1.
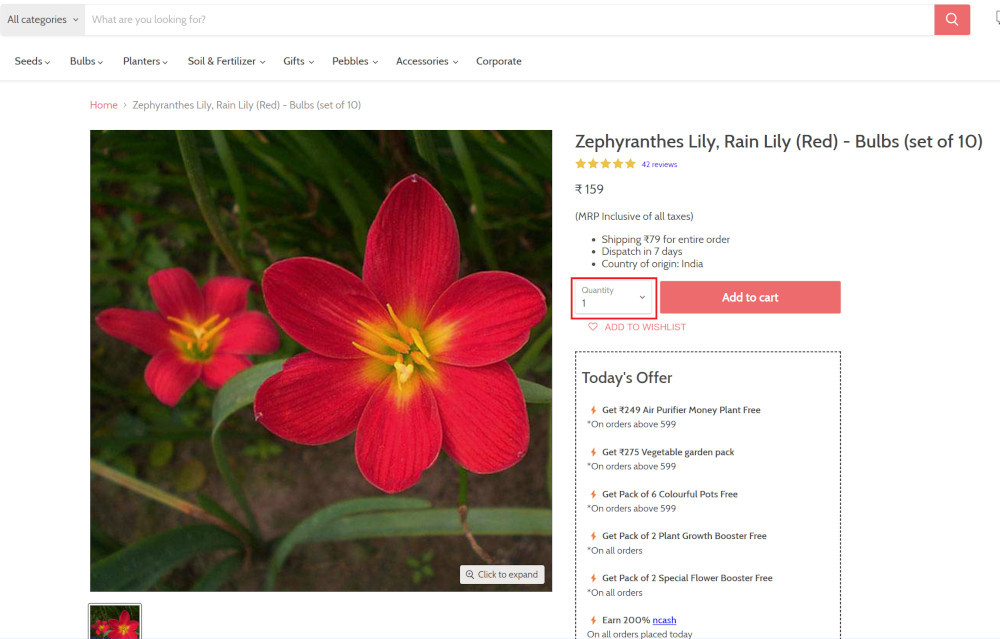
Step 5: Lets say, we want to change the Quantity to 3, so here we use the testRigor command to select from a list.
select "3" from "Quantity"
click "Add to cart"
The product is successfully added to the cart, and the “Added to your cart:” message is displayed on webpage.
Step 6: To assert that the message is successfully displayed, use a simple assertion command as below:
check that page contains "Added to your cart:"
Step 7: After this check, we will view the contents of the cart by clicking View cart as below:
click "View cart"

Step 8: Now we will again check that the product is present in the cart, under heading “Your cart” using the below assertion. With testRigor, it is really easy to specify the location of an element on the screen.
check that page contains "Zephyranthes Lily, Rain Lily (Red)" under "Your cart"

Complete Test Case
Here is how the complete test case will look in the testRigor app. The test steps are simple in plain English, enabling everyone in your team to write and execute them.
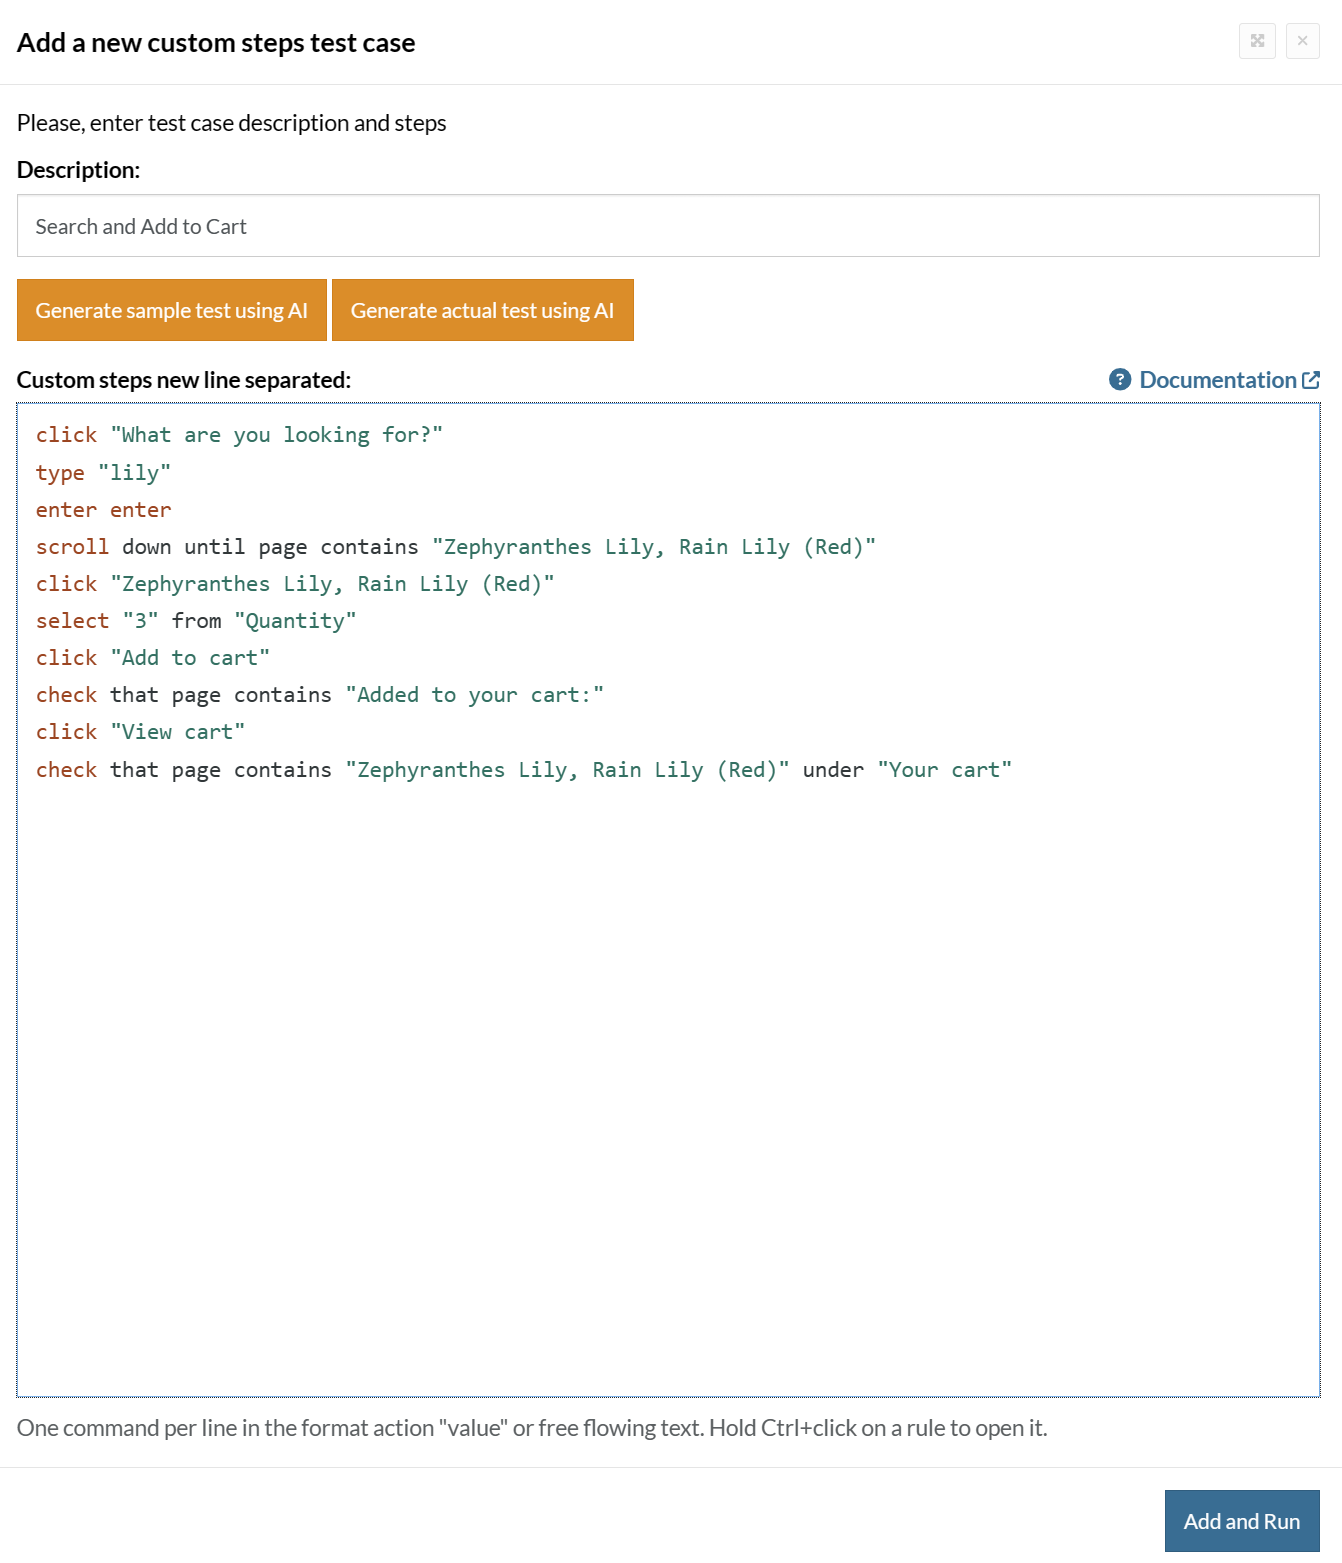
Click Add and Run.
Execution Results
Once the test is executed, you can view the execution details, such as execution status, time spent in execution, screenshots, error messages, logs, video recordings of the test execution, etc. In case of any failure, there are logs and error text that are available easily in a few clicks.
You can also download the complete execution with steps and screenshots in PDF or Word format through the View Execution option.
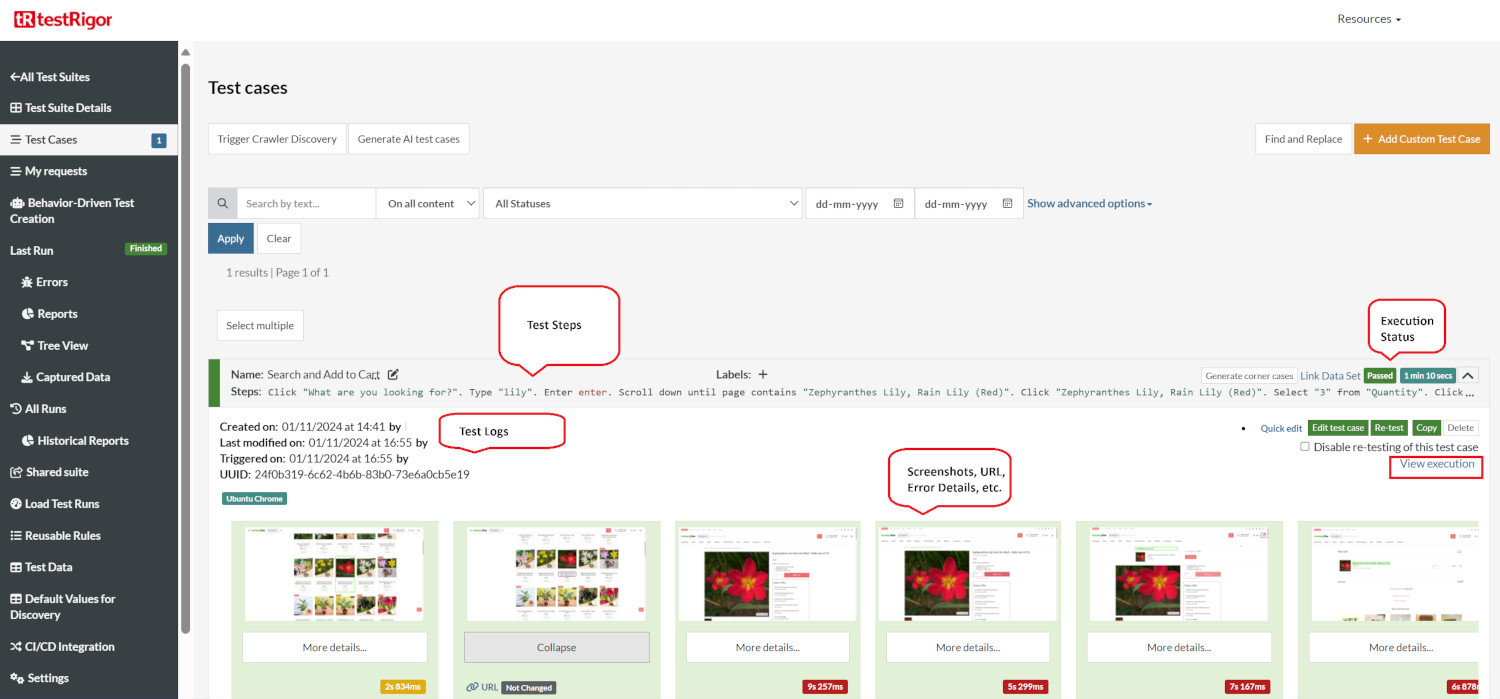
testRigor’s Capabilities
Apart from the simplistic test case design and execution, there are some advanced features that help you test your application using simple English commands.
- Reusable Rules (Subroutines): You can easily create functions for the test steps that you use repeatedly. You can use the Reusable Rules to create such functions and call them in test cases by simply writing their names. See the example of Reusable Rules.
- Global Variables and Data Sets: You can import data from external files or create your own global variables and data sets in testRigor to use them in data-driven testing.
- 2FA, QR Code, and Captcha Resolution: testRigor easily manages the 2FA, QR Code, and Captcha resolution through its simple English commands.
- Email, Phone Call, and SMS Testing: Use simple English commands to test the email, phone calls, and SMS. These commands are useful for validating 2FA scenarios, with OTPs and authentication codes being sent to email, phone calls, or via phone text.
- File Upload/ Download Testing: Execute the test steps involving file download or file upload without the requirement of any third-party software. You can also validate the contents of the files using testRigor’s simple English commands.
- Database Testing: Execute database queries and validate the results fetched.
testRigor enables you to test web, mobile (hybrid, native), API, and desktop apps with minimum effort and maintenance.
Additional Resources
- Access testRigor documentation to know about more useful capabilities
- Top testRigor’s features
- How to perform end-to-end testing
| Achieve More Than 90% Test Automation | |
| Step by Step Walkthroughs and Help | |
| 14 Day Free Trial, Cancel Anytime |


