Web2py Testing

Web2py is an open-source, full-stack Python framework. It focuses on the rapid development of web applications that need to be scalable, fast, and secure. Web2py follows the Model-View-Controller (MVC) architectural pattern and includes a web server, a SQL database, an administrative interface, and a powerful API for data manipulation. It supports multiple database backends including MySQL, PostgreSQL, SQLite, Oracle, Microsoft SQL Server, and MongoDB. Web2py allows developers to quickly prototype, develop, and deploy web applications with minimal code and configuration.
Unit Testing
Testing parts of the code like individual functions and their outputs is unit testing. This helps ensure that at a granular level, each function is behaving as expected. When writing unit tests, you'd want to mock parts involving interactions with other functions, components, and APIs to keep your tests lightweight and independent of dependencies. Let's take a look at some tools that can be used to write tests for Web2py applications.
Using Doctest
Doctest is a testing framework in Python that tests code snippets in the documentation strings (docstrings) of a module, function or method. It is built into the Python standard library and is useful for testing small examples of usage in a module's documentation. The idea behind Doctest is that documentation should always be correct, and Doctests provide a way to test that the examples given in the documentation actually work as expected. Doctests are written inside triple quotes ('''...''' or """...""") in the docstring of the function, and are executed automatically by the Doctest module when it is run or the Python command is used.
def index():

'''
This is a docstring. The following 3 lines are a doctest:
>>> request.vars.name='Max'
>>> index()
{'name': 'Max'}
'''
return dict(name=request.vars.name)
Using Unittest
import unittest
from gluon.globals import Request

 execfile("applications/api/controllers/10.py", globals())

 db(db.game.id>0).delete()  # Clear the database
 db.commit()

 class TestListActiveGames(unittest.TestCase):

  def setUp(self):
    request = Request()  # Use a clean Request object

  def testListActiveGames(self):
    # Set variables for the test function
    request.post_vars["game_id"] = 1
    request.post_vars["username"] = "spiffytech"
    resp = list_active_games()
    db.commit()
    self.assertEquals(0, len(resp["games"]))

 suite = unittest.TestSuite()
 suite.addTest(unittest.makeSuite(TestListActiveGames))
 unittest.TextTestRunner(verbosity=2).run(suite)
#!/usr/bin/python
# -*- coding: utf-8 -*-

import sys
import os

web2py_path = '../../..'
sys.path.append(os.path.realpath(web2py_path))
os.chdir(web2py_path)

import unittest
from gluon.globals import Request, Response, Session
from gluon.shell import exec_environment
from gluon.storage import Storage

class TestDefaultController(unittest.TestCase):

  def setUp(self):
    self.request = Request()
    self.controller = exec_environment('applications/myapp/controllers/default.py', request=self.request)
    self.controller.response.view = 'unittest.html' # must specify a view. can be specified in the test method.

  def testContactWithInvalidEmail(self):
    self.request.env.request_method = 'POST'
    self.request.vars = Storage(email='bad_address')
    self.controller.contact()
    form = self.controller.response._vars['form']
    self.assertTrue(form.errors) # do we have any errors?
    self.assertTrue(form.errors.has_key('email'))  # does email have an error?
    self.assertEqual(form.errors['email'], 'invalid email!') # do we have an invalid email error?

if __name__ == '__main__':
  unittest.main()
Using gluon.globals.Request object
It is a global object that provides access to the current request object in a web application. By importing gluon.globals.Request in a controller or module, you can access the current request object without having to pass it around as a function argument. The Request object contains information such as the request method (GET, POST, etc.), headers, parameters, and session data.
Using Pytest
def test_index_exists(web2py):

'''
Test that the people index page exists.
'''

# Run the people controller's index() function with a web2py instance
# as input, and retrieve the result dictionary.
result = web2py.run('people', 'index', web2py)

# Render the people/index.html view with the result dictionary,
# and retrieve the HTML string.
html = web2py.response.render('people/index.html', result)

# Assert that the HTML string contains a specific text string.
assert "Hi. I'm the people index" in html
Using Nose
Nose is a test runner for Python that extends the unittest module, allowing for more automation and simplicity when writing and running tests. It can be used for testing web2py applications, as it is able to discover and execute tests written using Unittest, Doctest, and other testing frameworks. Nose can be easily installed via pip and integrated into a web2py project's testing workflow. However, it is worth noting that the latest version of Nose which was released in 2014 is no longer actively maintained, so you may want to consider using a more recent and actively maintained testing framework such as Pytest or Unittest in your web2py projects.
Integration Testing
With integration testing, you can check instances where different components are meant to depend on each other to give an output. This could involve integrations between different functions, helpers, APIs, controllers, UI components, network systems or databases. These kinds of tests are lighter than end-to-end tests and should be executable without having to boot up the entire system.
Like unit testing, you can utilize different tools like Unittest, Pytest, Doctest, and Nose to write integration tests. All that changes here is the focus of testing, that is, to check integrations rather than solo functions. Along with these, you can use some other tools like.
Using TestClient
The TestClient class is a web2py-specific class that allows you to simulate requests to your web application. You can use TestClient to write tests that verify the behavior of your web application.
from gluon import *
from gluon.globals import Request, Response, Session
from gluon.tools import Auth
from gluon.contrib.test_helpers import TestClient

def test_signup():

    app = request.env.app
    db = DAL('sqlite:memory')
    auth = Auth(globals(), db)
    client = TestClient(app)

    # Create a user
    auth.register(username='testuser', password='password')

    # Login as the user
    client.post('/user/login', data=dict(username='testuser', password='password'))

    # Make a request to a protected page
    response = client.get('/protected')

    # Check that the user is authorized to access the page
    assert response.status == '200 OK'
Using WebTest
WebTest is a library that allows you to simulate HTTP requests and responses, which makes it a good choice for testing web applications. You can import it into your Web2py project and use it to write tests.
End-to-End Testing
End-to-end testing focuses on testing the system from the end user's perspective. This includes workflows that are likely to be executed by users like placing an order for a product through an e-commerce website. These types of tests exercise the entire system, thus testing multiple modules at once. Let's take a look at tools that can help you do this.
- TestClient or WebTest
- PyAutoGUI
- Selenium
- testRigor
Using TestClient or WebTest
You can use the TestClient and WebTest libraries as well to write end-to-end test cases. You need to import the necessary libraries first, set up a TestClient or WebTest instance and then write the test case to simulate user behavior.
Using PyAutoGUI
import pyautogui
import time

# Launch the browser and navigate to the e-commerce website
pyautogui.hotkey('winleft')
pyautogui.write('chrome')
pyautogui.press('enter')
time.sleep(2)
pyautogui.write('https://www.example.com')
pyautogui.press('enter')

# Wait for the website to load and check if the title is correct
time.sleep(5)
assert pyautogui.locateOnScreen('example_title.png') is not None

# Search for a product and add it to the cart
pyautogui.write('smartphone')
pyautogui.press('enter')
time.sleep(5)
pyautogui.click(pyautogui.locateOnScreen('smartphone.png'))
time.sleep(5)
pyautogui.click(pyautogui.locateOnScreen('add_to_cart.png'))

# Check if the product is added to the cart
time.sleep(5)
assert pyautogui.locateOnScreen('cart_item.png') is not None

# Proceed to checkout
pyautogui.click(pyautogui.locateOnScreen('checkout.png'))
time.sleep(5)

# Check if the order is successful
assert pyautogui.locateOnScreen('order_success.png') is not None
Using Selenium
Selenium is a popular testing tool for web applications that allows you to automate browser interactions. You can use Selenium with Web2py to write end-to-end tests that simulate user behavior and verify that your web application is functioning correctly.
from selenium import webdriver
import unittest

class TestEcommerceSite(unittest.TestCase):

  def setUp(self):
    self.driver = webdriver.Chrome()

  def test_search_and_add_to_cart(self):

    # Navigate to the e-commerce website
    self.driver.get("http://localhost:8000/ecommerce_site/default/index")

    # Search for a product
    search_bar = self.driver.find_element_by_id("search_bar")
    search_bar.send_keys("laptop")
    search_bar.submit()

    # Click on the first product
    product_link = self.driver.find_element_by_css_selector(".product_list li:first-child a")
    product_link.click()

    # Add the product to cart
    add_to_cart_button = self.driver.find_element_by_id("add_to_cart_button")
    add_to_cart_button.click()

    # Check if the product was added to cart
    cart_link = self.driver.find_element_by_css_selector("#header .cart_link")
    self.assertIn("1", cart_link.text)

  def tearDown(self):
    self.driver.quit()
if __name__ == '__main__':
    unittest.main()
Using testRigor
So far we have seen tools that rely heavily on the tester's ability to write code, and some of them aren't entirely from an end user's point of view. How about a tool that can let you write end-to-end test cases in plain English? With testRigor this is possible. This no-code, AI-based tool offers a powerful platform for testers to write and execute test cases. Since the test cases are written in plain English, it is easy to understand and promotes collaboration among different team members like developers, testers and business analysts.
With testRigor, you can write test cases for mobile, web and desktop applications. It allows for easy identification of UI elements using relative locations as opposed to having to mention XPaths. You can also perform visual testing, API testing, and audio testing. You can also test workflows that involve interacting with emails, SMS and text messages easily using their powerful commands. You can take a look at how easy it is to test emails over here. Being a cloud-based platform, you can easily scale your testing.
login
enter "Red monsoon boots" in "Search"
enter enter
check that page contains "Red monsoon boots" below "Here are your results"
click by image from stored value "Red monsoon boots" with less than "10" % discrepancy
compare screen to stored value "Required boots"
scroll down until page contains "Add to Cart"
click "Add to Cart" to the right of "Add to Wishlist"
compare screen to stored value "Success message"
click "Cart" at the top of the page
click on "clear" to the right of "Red monsoon boots"
open url "https://testrigor.com/samples/table1/"
click on table "table table table-striped table-hover table-bordered tr-styled-table" at row containing "spk2" and column "Actions"
enter "John" into first table at row containing "Spock" and column "Additional Data"
generate from template "%$$$$$$$$$$", then enter into "User Name" and save as "username"
Feel free to take a peek into documentation to see what features testRigor supports.
How to do End-to-end Testing with testRigor
Let us take the example of an e-commerce website that sells plants and other gardening needs. We will create end-to-end test cases in testRigor using plain English test steps.
Step 1: Log in to your testRigor app with your credentials.
Step 2: Set up the test suite for the website testing by providing the information below:
- Test Suite Name: Provide a relevant and self-explanatory name.
- Type of testing: Select from the following options: Desktop Web Testing, Mobile Web Testing, Native and Hybrid Mobile, based on your test requirements.
- URL to run test on: Provide the application URL that you want to test.
- Testing credentials for your web/mobile app to test functionality which requires user to login: You can provide the app’s user login credentials here and need not write them separately in the test steps then. The login functionality will be taken care of automatically using the keyword
login. - OS and Browser: Choose the OS Browser combination on which you want to run the test cases.
- Number of test cases to generate using AI: If you wish, you can choose to generate test cases based on the App Description text, which works on generative AI.
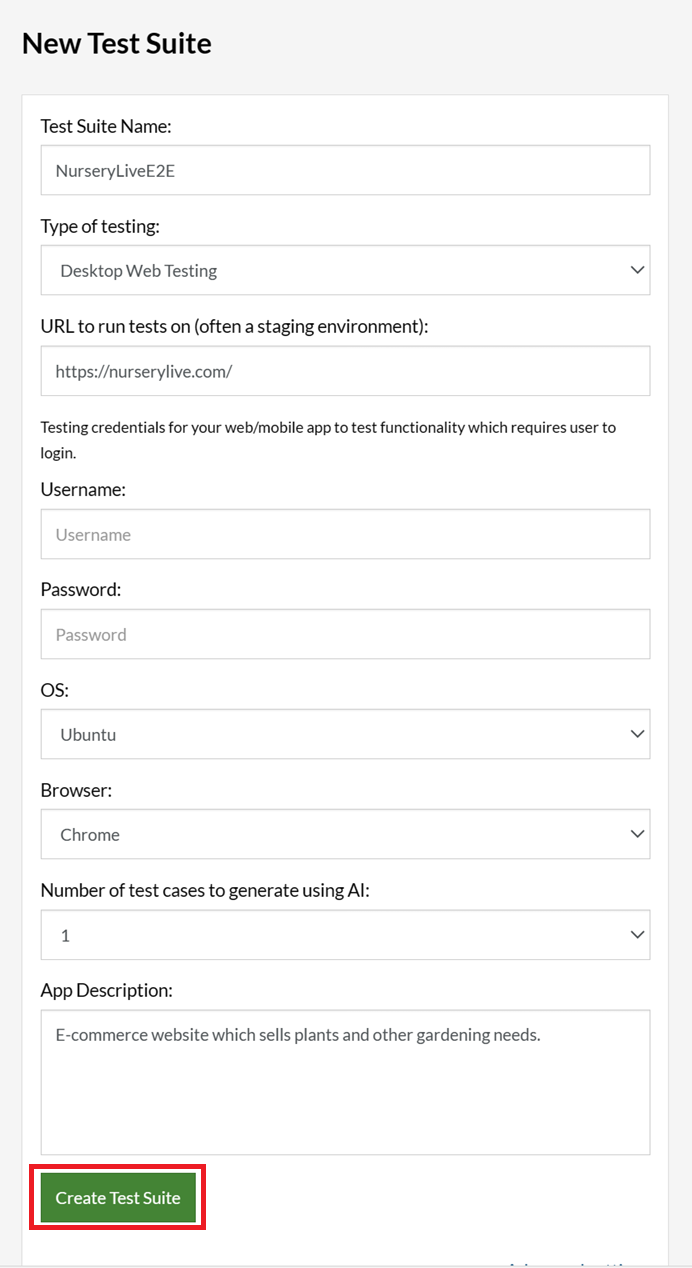
Step 3: Click Create Test Suite.
On the next screen, you can let AI generate the test case based on the App Description you provided during the Test Suite creation. However, for now, select do not generate any test, since we will write the test steps ourselves.
Step 4: To create a new custom test case yourself, click Add Custom Test Case.

Step 5: Provide the test case Description and start adding the test steps.
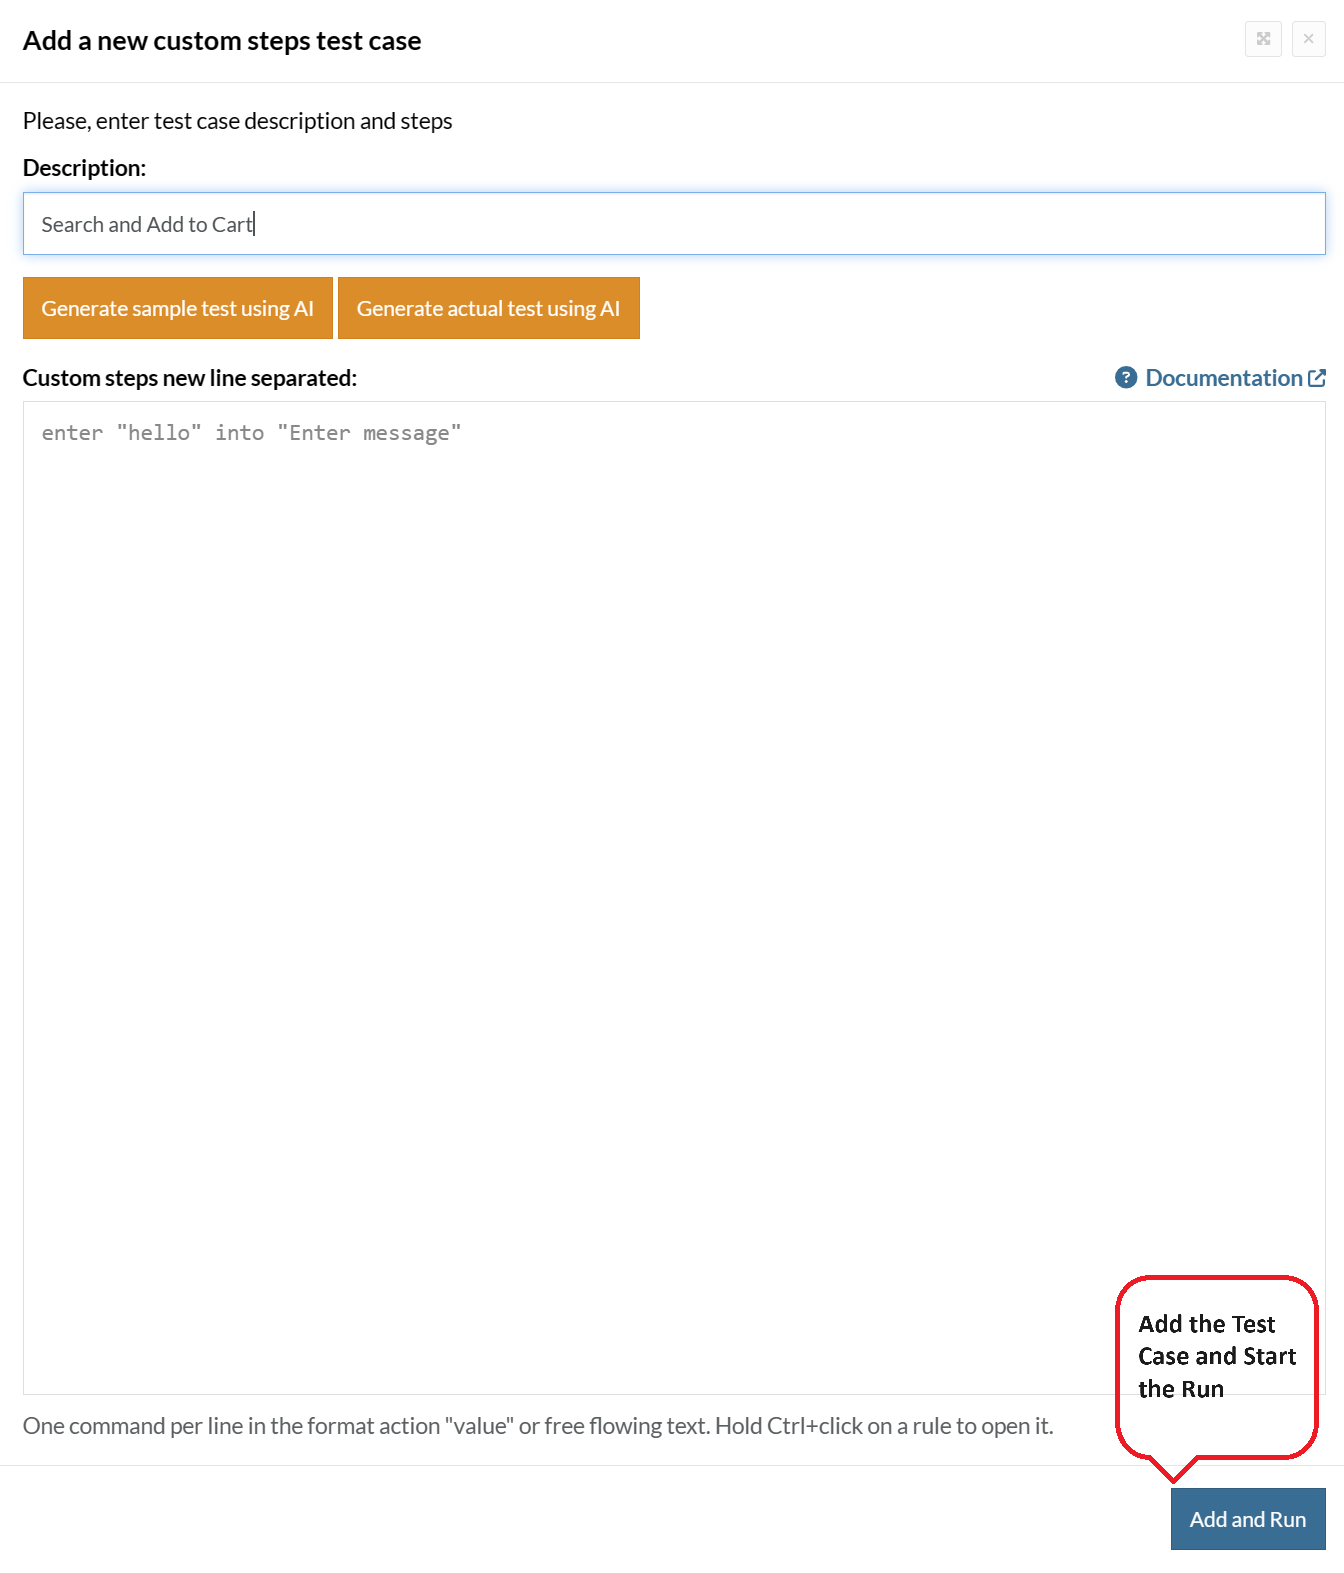
For the application under test, i.e., e-commerce website, we will perform below test steps:
- Search for a product
- Add it to the cart
- Verify that the product is present in the cart
Test Case: Search and Add to Cart
Step 1: We will add test steps on the test case editor screen one by one.
testRigor automatically navigates to the website URL you provided during the Test Suite creation. There is no need to use any separate function for it. Here is the website homepage, which we intend to test.

First, we want to search for a product in the search box. Unlike traditional testing tools, you can identify the UI element using the text you see on the screen. You need not use any CSS/XPath identifiers.
click "What are you looking for?"
Step 2: Once the cursor is in the search box, we will type the product name (lily), and press enter to start the search.
type "lily"
enter enter
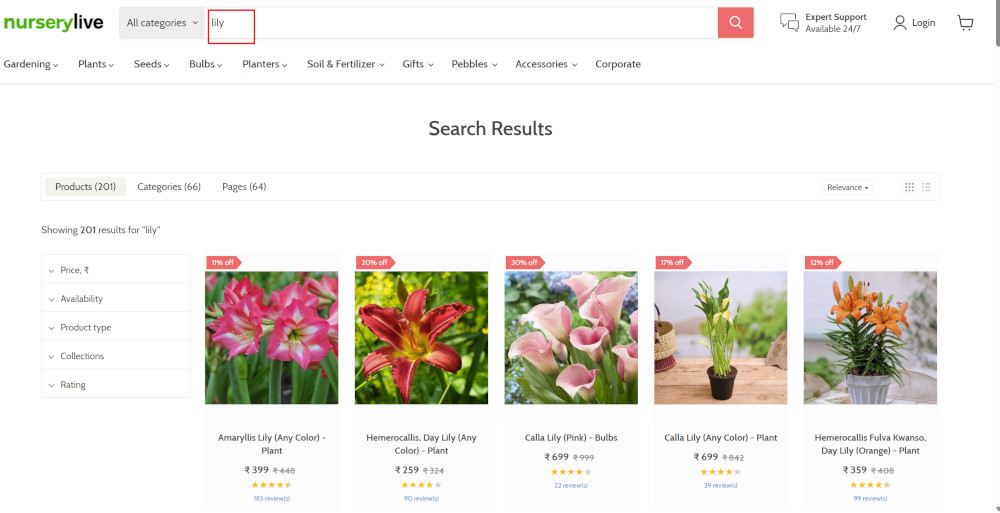
Search lists all products with the “lily” keyword on the webpage.
Step 3: The lily plant we are searching for needs the screen to be scrolled; for that testRigor provides a command. Scroll down until the product is present on the screen:
scroll down until page contains "Zephyranthes Lily, Rain Lily (Red)"
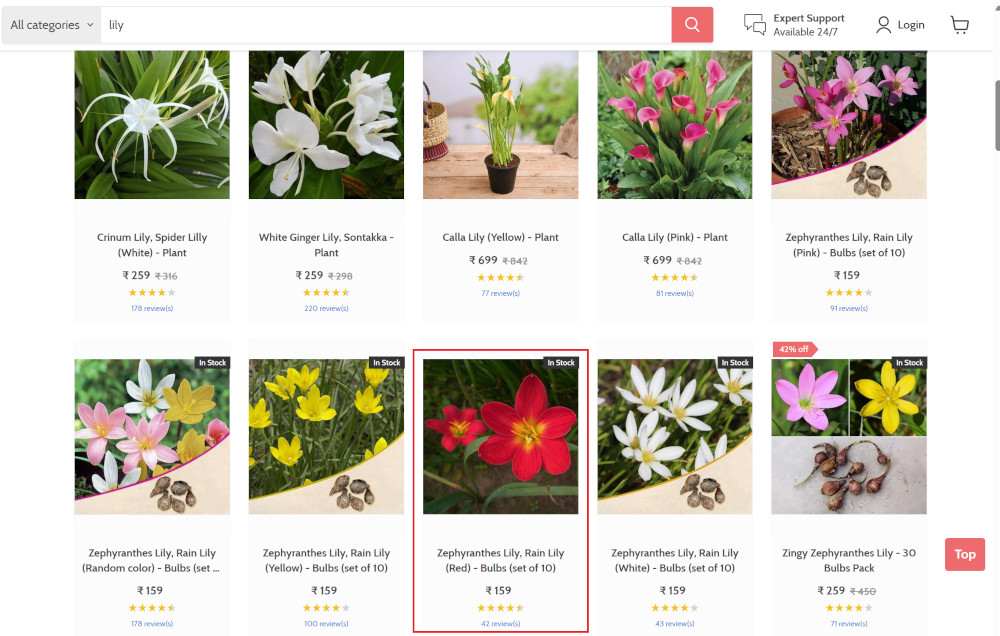
When the product is found on the screen, testRigor stops scrolling.
Step 4: Click on the product name to view the details:
click "Zephyranthes Lily, Rain Lily (Red)"
After the click, the product details are displayed on the screen as below, with the default Quantity as 1.
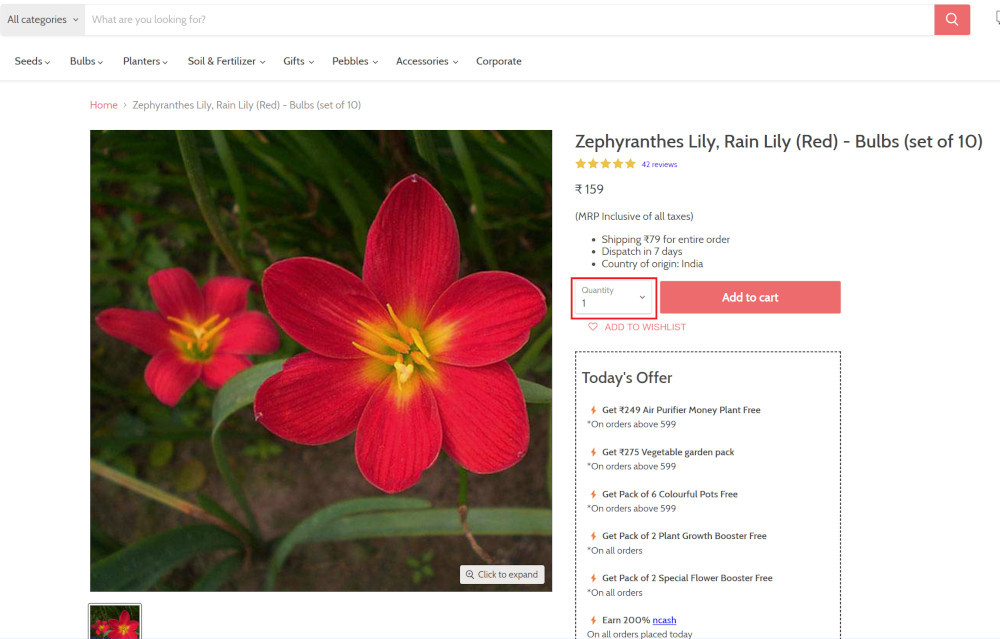
Step 5: Lets say, we want to change the Quantity to 3, so here we use the testRigor command to select from a list.
select "3" from "Quantity"
click "Add to cart"
The product is successfully added to the cart, and the “Added to your cart:” message is displayed on webpage.
Step 6: To assert that the message is successfully displayed, use a simple assertion command as below:
check that page contains "Added to your cart:"
Step 7: After this check, we will view the contents of the cart by clicking View cart as below:
click "View cart"

Step 8: Now we will again check that the product is present in the cart, under heading “Your cart” using the below assertion. With testRigor, it is really easy to specify the location of an element on the screen.
check that page contains "Zephyranthes Lily, Rain Lily (Red)" under "Your cart"

Complete Test Case
Here is how the complete test case will look in the testRigor app. The test steps are simple in plain English, enabling everyone in your team to write and execute them.
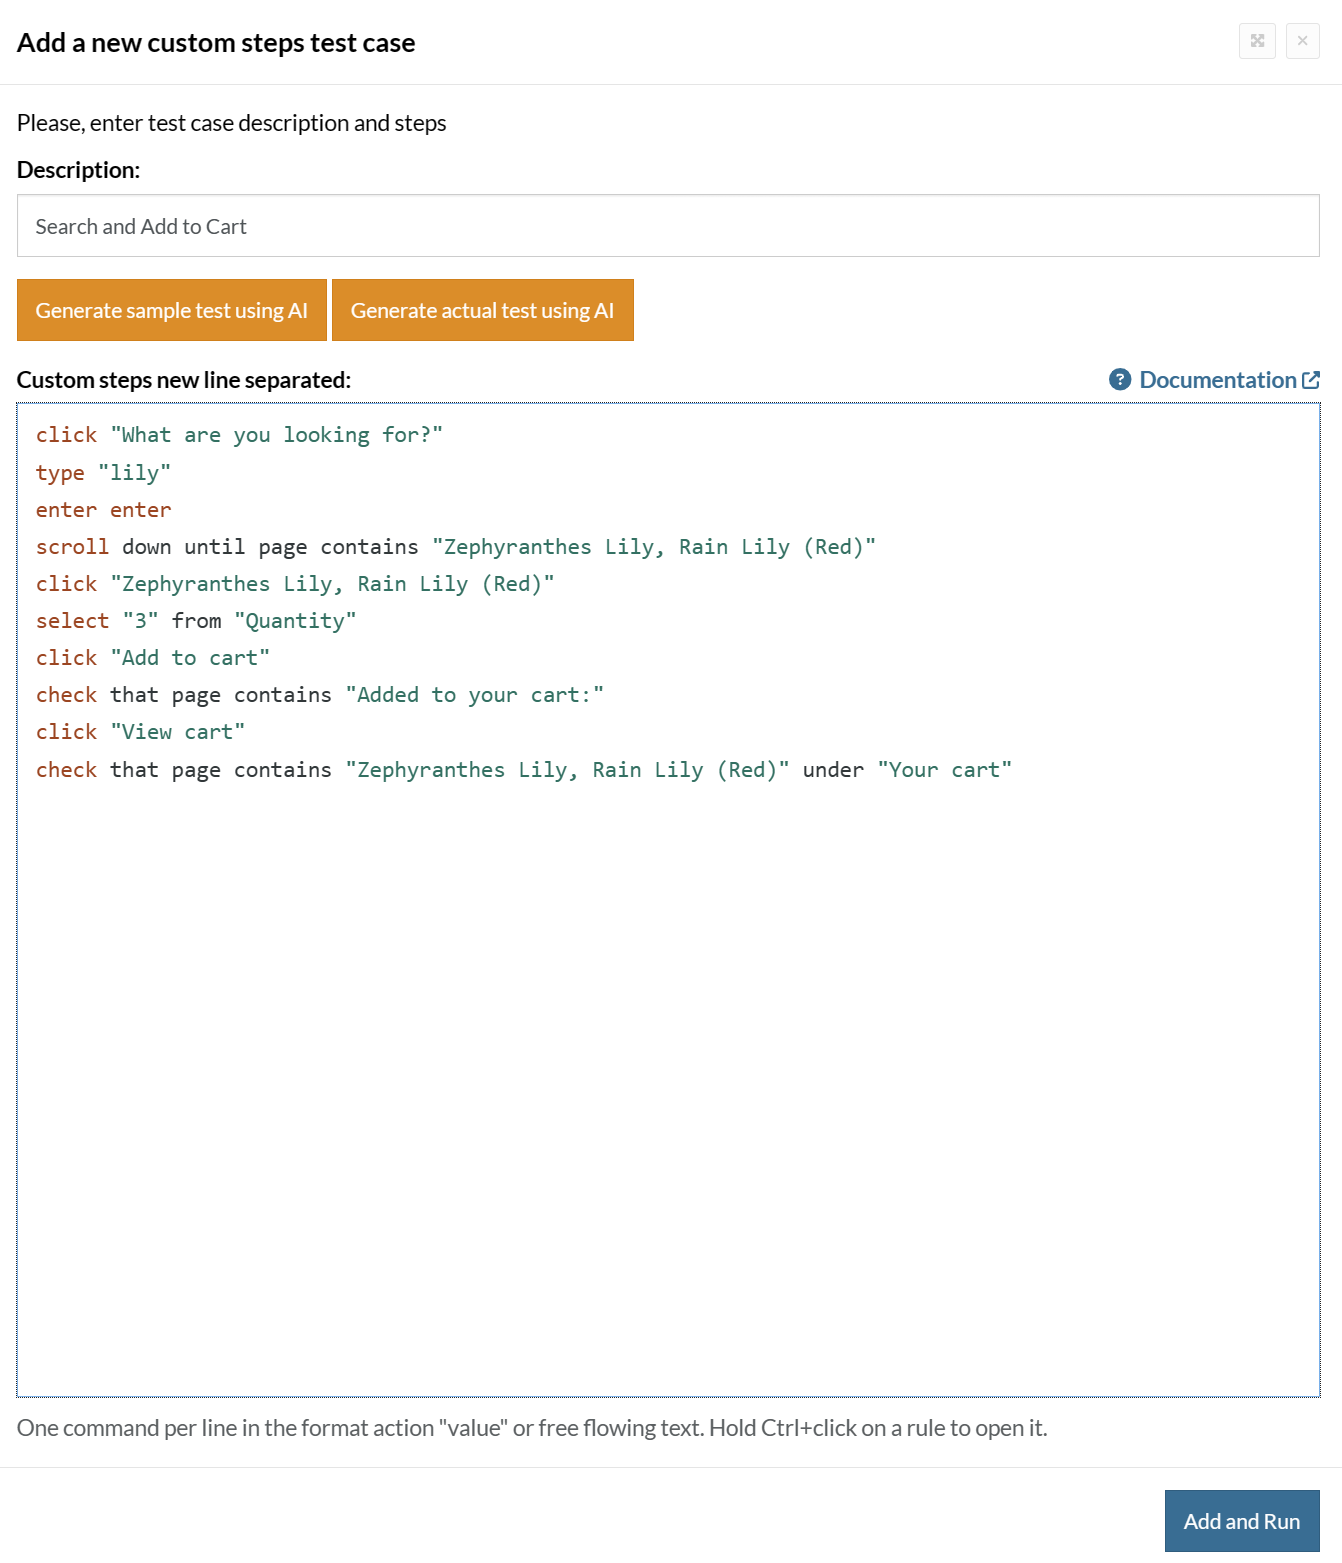
Click Add and Run.
Execution Results
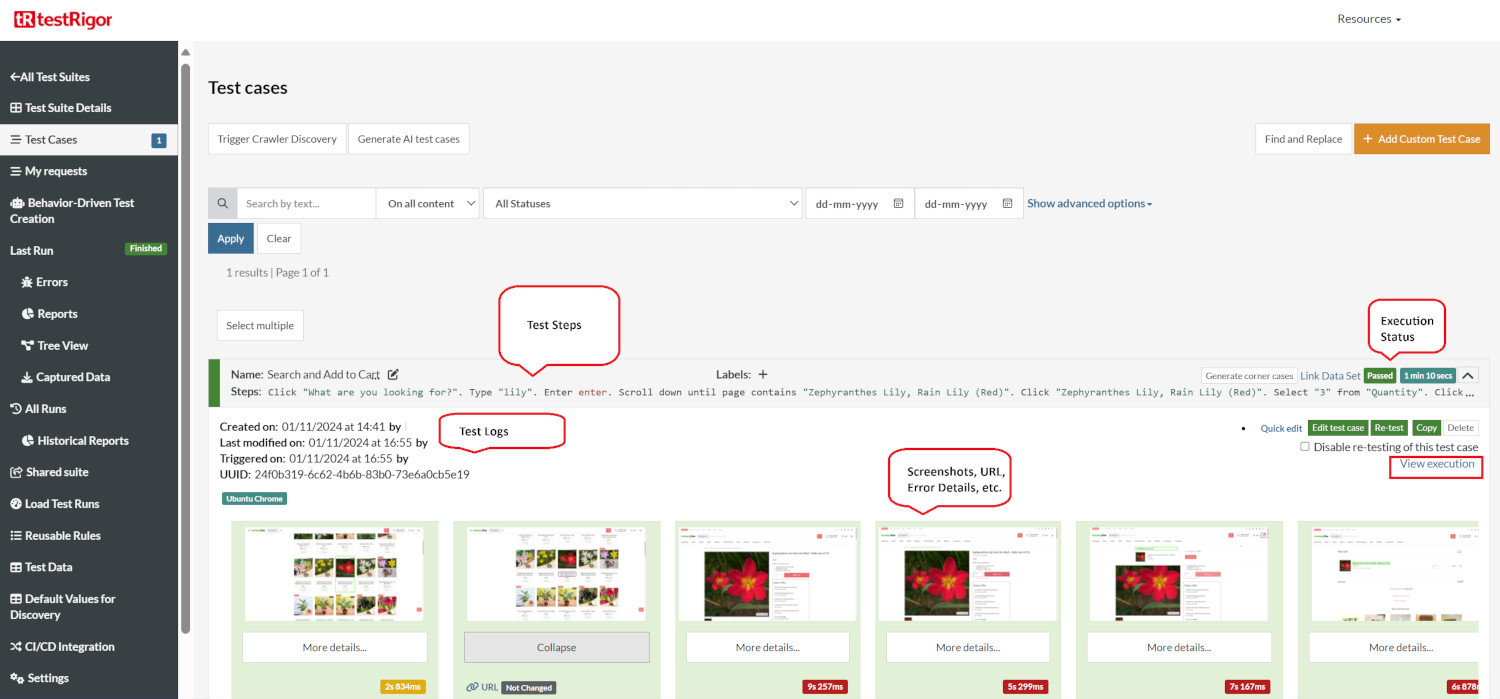
Once the test is executed, you can view the execution details, such as execution status, time spent in execution, screenshots, error messages, logs, video recordings of the test execution, etc. In case of any failure, there are logs and error text that are available easily in a few clicks.
You can also download the complete execution with steps and screenshots in PDF or Word format through the View Execution option.
testRigor’s Capabilities
Apart from the simplistic test case design and execution, there are some advanced features that help you test your application using simple English commands.
- Reusable Rules (Subroutines): You can easily create functions for the test steps that you use repeatedly. You can use the Reusable Rules to create such functions and call them in test cases by simply writing their names. See the example of Reusable Rules.
- Global Variables and Data Sets: You can import data from external files or create your own global variables and data sets in testRigor to use them in data-driven testing.
- 2FA, QR Code, and Captcha Resolution: testRigor easily manages the 2FA, QR Code, and Captcha resolution through its simple English commands.
- Email, Phone Call, and SMS Testing: Use simple English commands to test the email, phone calls, and SMS. These commands are useful for validating 2FA scenarios, with OTPs and authentication codes being sent to email, phone calls, or via phone text.
- File Upload/ Download Testing: Execute the test steps involving file download or file upload without the requirement of any third-party software. You can also validate the contents of the files using testRigor’s simple English commands.
- Database Testing: Execute database queries and validate the results fetched.
testRigor enables you to test web, mobile (hybrid, native), API, and desktop apps with minimum effort and maintenance.
Additional Resources
- Access testRigor documentation to know about more useful capabilities
- Top testRigor’s features
- How to perform end-to-end testing
Conclusion
Web2py provides several testing options to ensure the quality of your code. The above-mentioned testing options can help you catch errors early in the development process and make sure your web application is functioning correctly. By implementing a comprehensive testing strategy, you can ensure the quality and reliability of your web2py application.
| Achieve More Than 90% Test Automation | |
| Step by Step Walkthroughs and Help | |
| 14 Day Free Trial, Cancel Anytime |


