Xray Cloud Integration
How to Enable the Integration
Settings -> Integrations
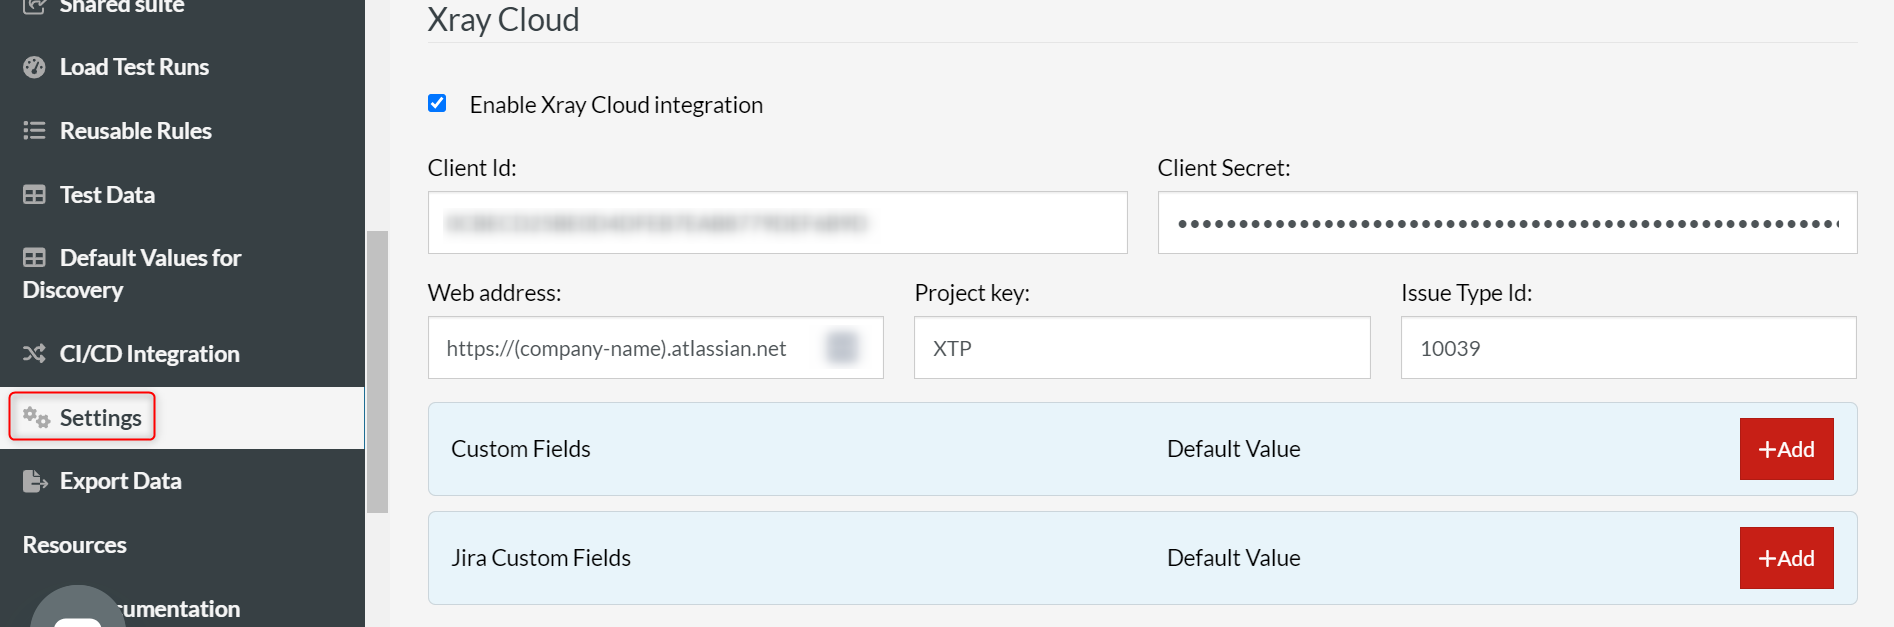
First, you need to allow Xray Cloud integration by navigating to Settings > Integrations.
Make sure the integration is enabled, and fill in the required fields.
- You can obtain the Client Id and Client Secret by following the steps in the next section.
- Your Project Key can be located in the project URL, which should have the following template or similar:
https://{environment_name}.atlassian.net/jira/software/projects/{KEY}/boards/1
Alternatively, you can find it by going to your project board and clicking on Project settings > Details. All these actions are present in the left panel menu.
-
You need to create the test run in ‘execution type‘ in JIRA by providing the associated Issue Type Id. You can find this Id by again going to Project settings > Issue types > Test Execution. The URL at this point will also contain the id. (E.g. https://{environment_name}.atlassian.net/jira/software/projects/{KEY}/settings/issuetypes/10039)Opt for Issue Type Id for test execution so that testRigor can update every test run into XRay JIRA.
- We can add as many custom fields as needed.
Don’t forget to click the Save button at the bottom of the page after filling in the fields!
How to Obtain an API Key in Xray Cloud
- Click on the settings icon (
 ) in the top right corner of Jira.
 - Click Apps.
- On the Apps Manager page, in the left-side navigation pane, click on API Keys under Xray (you may need to scroll down on the navigation pane to find it).
- Click the Create API Key button, choose a user and click Generate.
- Copy the Client Id and Client Secret that we will use in the integration settings.
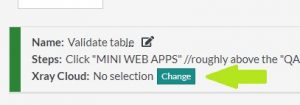
Link testRigor test cases to the test cases in Xray Cloud
- Copy the Key of the test case in Xray Cloud, which is found at the bottom of the task card of your test case.

- In testRigor, find the test case you wish to link, then click the Change button on the right of Xray Cloud label at the bottom of the test case summary info.
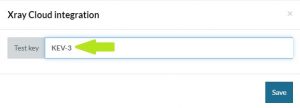
- Paste (or type) the Key into Test key field and click Save.
Using Custom Fields
The Xray Cloud allows the user to set custom fields and make them required or optional on their test executions.
testRigor is ready to work with these custom fields by adding them when setting up the Xray Cloud integration. Custom fields can also be added at any time after setup.
We can add as many custom fields as needed, and each custom field will have a default value. testRigor will send this default value if no other value is provided.
On the Test Suite Details page, when we will run a full retest, there will be a corresponding field for each custom field added in the integration settings. When we fill in this field and request a retest, this data will override the default data defined on the integration settings, as they will be more specific for that execution.
In the testRigor linked test case, on the right of the Xray Cloud label, we can click Custom Fields and set values to the custom fields. As this value is more specific for this test case, the value is defined has high priority and will override the default value and the value defined in the Test Suite Details page.
Test Run results
Now every time you do a full Rerun of your testRigor tests, we will automatically create a Test Run in Xray Cloud, and you will have a pass/fail status for each linked test case.
Additionally, you can run a test suite without creating a test cycle in Xray Cloud by checking the Do not update Xray Cloud checkbox on the Test Suite Details page before rerunning the test suite.


