What is Screenshot Testing? (+Examples)
|
|
A checkout button can fall below the fold. The price and discount icons can overlap. The text in a dark-mode background can be hard to read. On iPhone SE, the navigation can be obscured only by the banner. None of these are “logic bugs,” but they’re the type of issues that drive support tickets, churn, and brand distrust because they’re so immediately visible.
Screenshot testing exists for exactly this category of risk.
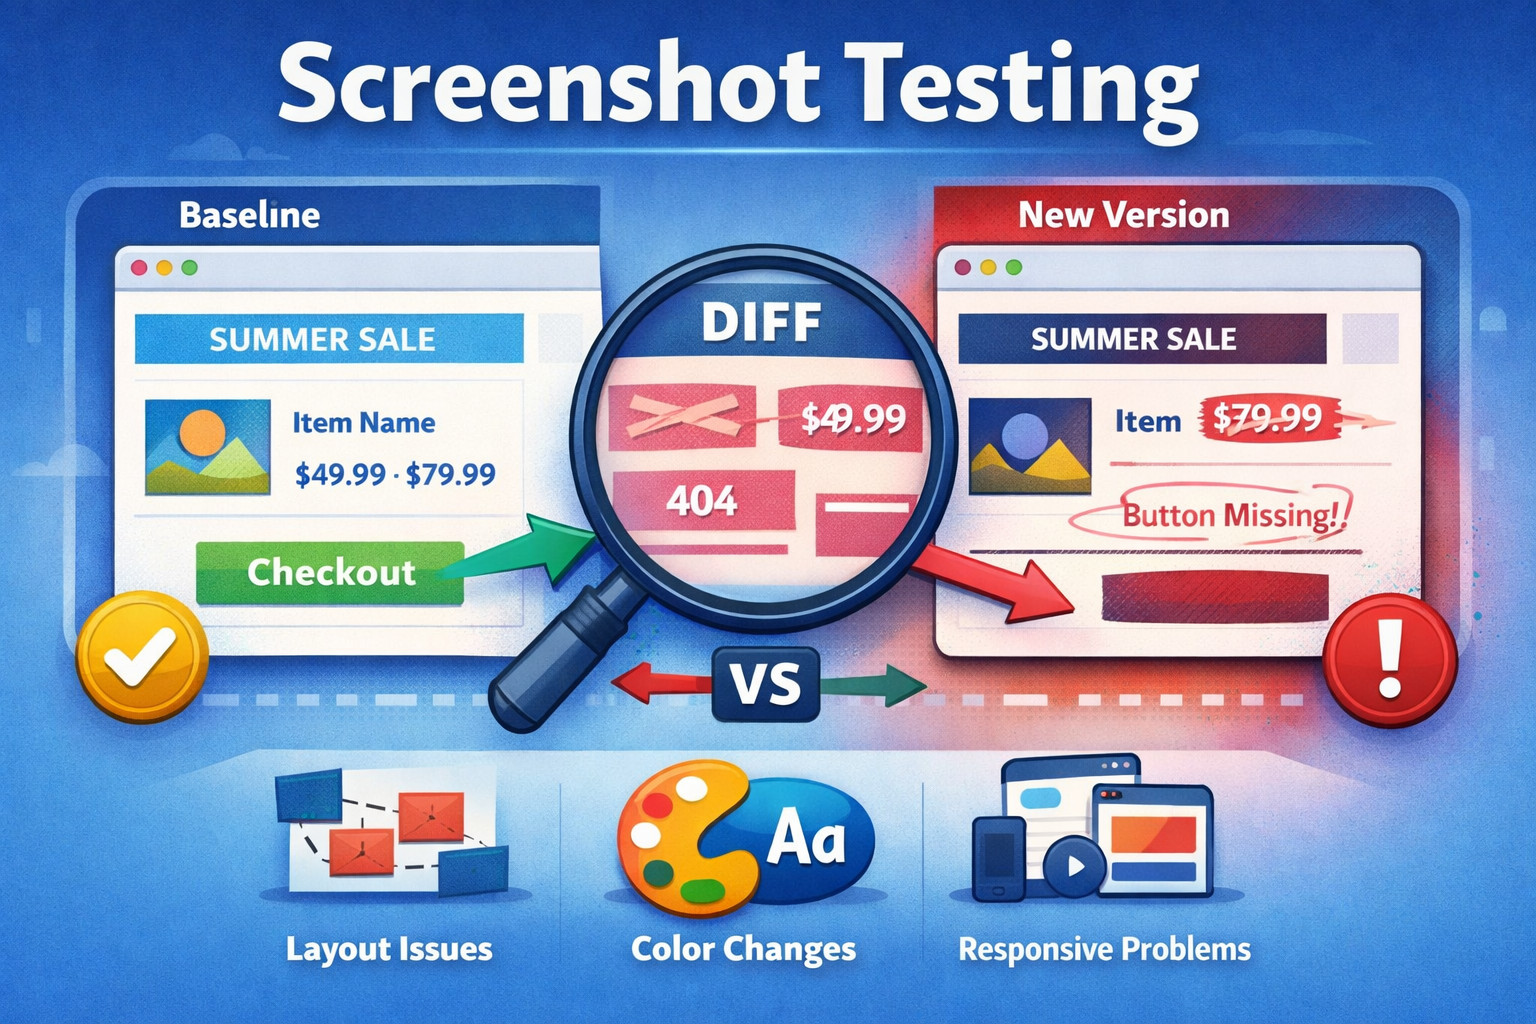
Screenshot testing (often called visual regression testing) is a method to check an application for unexpected visual changes by taking screenshots of pages, components, or flows and comparing them with historical values. If the new screenshot deviates too much, the test fails and raises a concern.
| Key Takeaways: |
|---|
|
What is Screenshot Testing: Core Idea Behind it
At its simplest, screenshot testing is based on one principle: If the UI changes, the pixels will change.
You run your app in a fixed environment, take a screenshot, and compare it to an earlier “golden” screenshot. If something changed, including a layout shift, a missing icon, the wrong font, or a broken grid, it shows up as a difference.
The approach feels deceptively simple. The truth is that there are lots of variables at play in UI rendering, such as browser engines, operating systems, fonts, device pixel ratios, animations, data variability, and even subpixel rounding. Good screenshot testing is more than just “take screenshots and do a diff.” It’s a practice that demands meticulous control over inputs and environments.
Still, done well, screenshot testing becomes one of the most powerful ways to protect user experience. Read: How to do visual testing using testRigor?
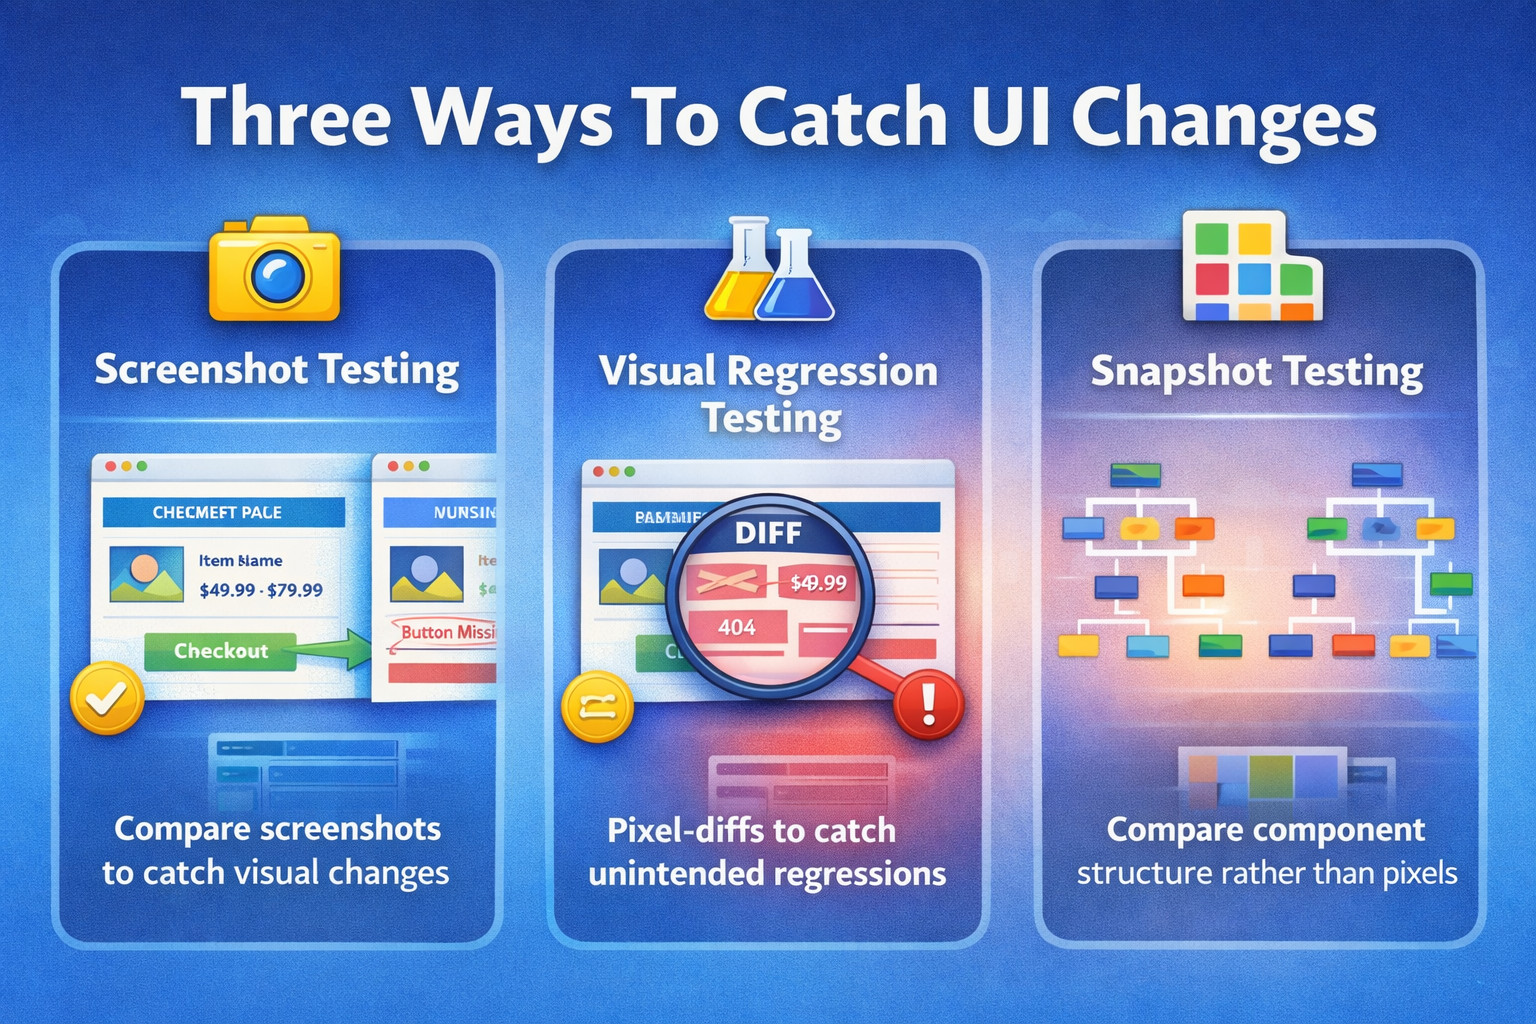
Three Ways to Catch UI Changes
Screenshot testing, visual regression testing, and snapshot testing are common terms that are often used interchangeably, but they’re not always the same.
Screenshot vs. Visual vs. Snapshot Testing
| Technique | Description | Examples |
|---|---|---|
| Screenshot Testing | A broad label for any technique where screenshots are taken and used as the assertion mechanism. | Golden image checks for key pages (login/checkout), cross-browser layout screenshots, and email template rendering screenshots. |
| Visual Regression Testing | Screenshot testing is specifically aimed at catching unintended visual changes between versions, typically via baseline comparison. | Pixel-diff vs. baseline to catch spacing/alignment shifts, font/color regressions, responsive breakpoint issues, theme/dark-mode regressions. |
| Snapshot Testing (UI Sense) | Captures a structural representation of UI (component tree/DOM/HTML) rather than pixels; detects changes, but not always what users visually see. | Jest React component snapshots, DOM/HTML markup snapshots, template output snapshots, and ARIA attribute snapshots. |
A helpful way to think about it:
- Snapshot testing checks “did the structure change?”
- Screenshot testing checks “did the screen change?”
Read: Top 7 Visual Testing Tools for 2026.
Why Screenshot Testing Matters?
UI is where users live, on the surface of the product, and it has grown more fragile over time. Teams move fast, interfaces are reusable through components and design systems, and responsive layouts need to look good on a lot of different screens. Factor in personalization, localization, dynamic content, third-party widgets, and CSS complexity that never seems to stop growing, and every single styling change can have a multiplier effect across dozens of screens.
Most automated functional tests miss this because they validate behavior, not appearance: “can I click the button?” rather than “does it look right and sit where it should?” Visual issues like misalignment, clipping, spacing shifts, and broken typography can slip through while all clicks still pass. Screenshot testing fills that gap by asserting the UI’s visual output directly.
What Screenshot Testing Can Catch?
The value of screenshot testing is most evident when the difference would be obvious to a human, but they might struggle to express it as a DOM assertion. It’s handy for catching layout drift (misalignment or spacing changes), typography and color regressions, broken icons/images, and breakage at your responsive breakpoints. It catches “death by a thousand cuts” issues, small CSS or component updates that subtly degrade many screens without breaking any functional flows.
- Layout Regressions: Show up when elements shift unexpectedly, spacing changes (padding/margins), or columns collapse and break the intended structure. They also include content overflowing containers, buttons dropping below the fold, and fixed headers overlapping sections, issues users notice immediately, even though functional clicks may still work.
- Styling Regressions: These occur when designs change accidentally without being noticed; colors change (for example, a primary button turning grey), border radius and shadows disappear, fonts/weight changes. If in your screenshots you also have interaction states, that can take care of wrong hover/active styles.
- Missing or Incorrect UI Elements: Screenshot testing is fast to show when things don’t render (or render incorrectly) at all, icons that refuse to load, images that become broken, banners that disappear off the screen, or a vitally important CTA like “Add to cart” suddenly vanishing at one particular media query breakpoint or another. It also detects such things as missing or incorrect visual treatment, such as an error message being unstyled.
- Responsive and Breakpoint Issues: They make an appearance when layouts act differently within screen sizes, mobile navigation breaks, the hamburger is on top of the logo or a tablet grid collapses while desktop looks great. Orientation transforms (e.g., from portrait to landscape) can lead to overlap and spacing bugs that screenshots reveal.
- Localization and Long Text Issues: Longer strings (German/Finnish) can overflow, break badly or push UI elements out of place, and RTL languages like Arabic can disrupt alignment and flow. Screenshots also indicate formatting inconsistencies, such as currency formats that have decimals misaligned.
- Theme Issues: This type of visual diff will catch dark mode contrast issues, high-contrast/accessibility mode regressions, and custom theme branding mismatches. These problems may even survive functional test cases, but suffer severely from a usability point of view.
Read: Visual Regression Testing
How Screenshot Testing Works?
Screenshot testing works by rendering the UI in a controlled, repeatable environment, capturing screenshots at specific states, and comparing them to approved baseline images. When differences exceed defined thresholds or ignore rules, the pipeline produces before, after, and difference artifacts so teams can approve intended changes or fix unintended regressions.
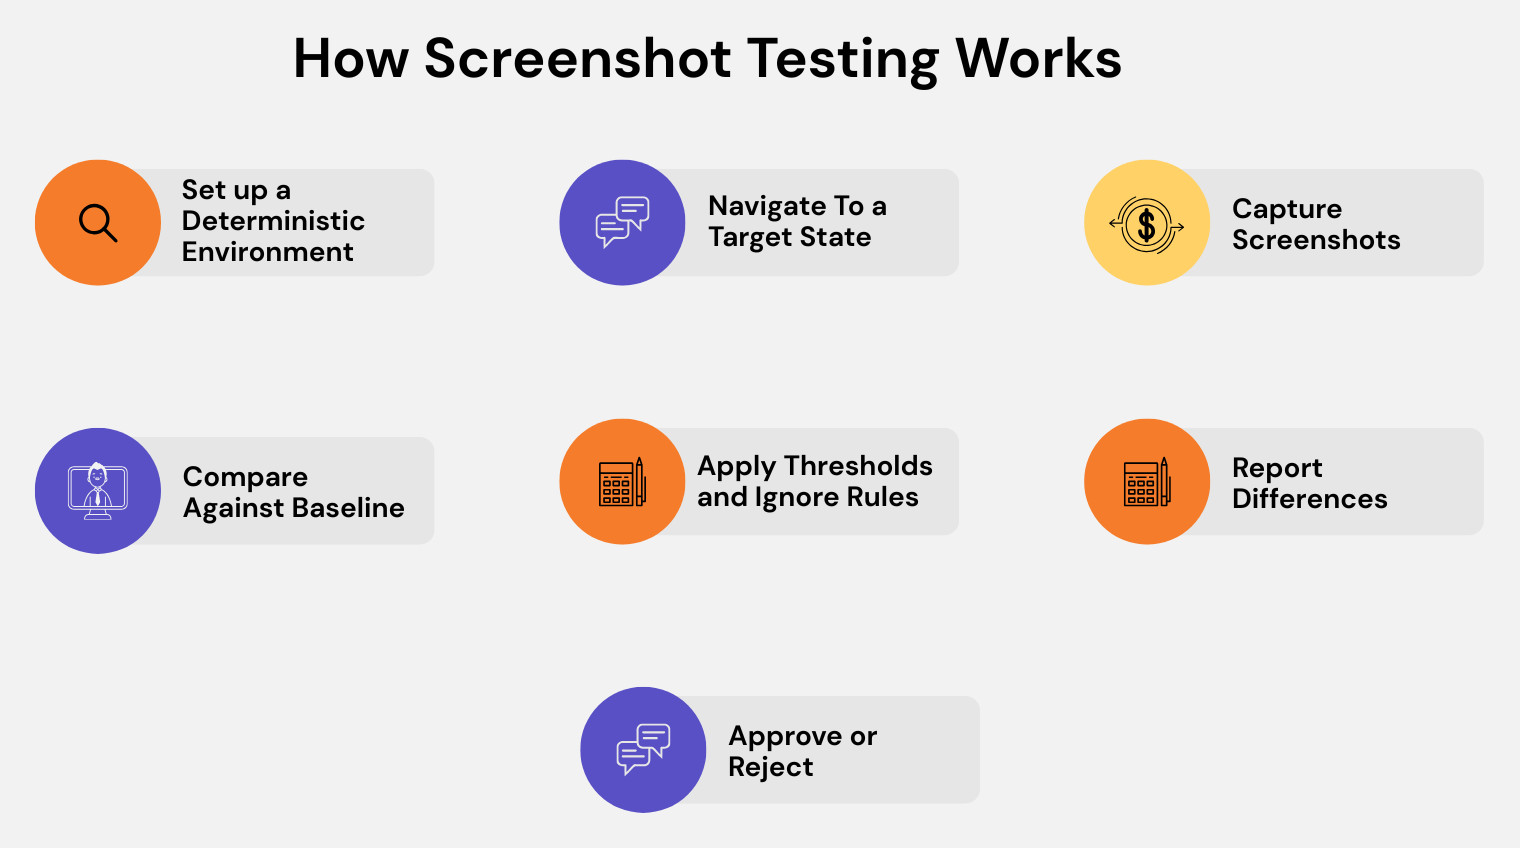
- Set up a Deterministic Environment: Keep the rendering stack consistent, same browser/OS, fonts, viewport, and stable test data, so visual diffs reflect real changes, not environmental noise.
- Navigate to a Target State: Drive the UI to the exact moment you want to validate: load a page, render a component, complete a flow, or force a state like “modal open.”
- Capture Screenshots: Take the right kind of snapshot for the risk: full-page, viewport, element-only, or component-level renders for focused coverage.
- Compare Against Baseline: Diff the new image against a stored “known good” baseline using pixel-by-pixel or perceptual comparison to surface meaningful changes.
- Apply Thresholds and Ignore Rules: Reduce false positives by allowing tiny variations, disabling animations, and masking dynamic regions like timestamps, ads, or rotating content.
- Report Differences: Generate clear artifacts before/after/diff images, so reviewers can immediately see what changed and where.
- Approve or Reject: If the change is expected, update the baseline; if not, treat it like a UI regression and fix the underlying code.
Baselines: The Key to Screenshot Testing
A screenshot test requires some baseline to compare it with, i.e., a trusted reference, and that’s the baseline or golden image. Baselines could come from a known-good release, the main branch after approval, a state of the design system component library, or even a manually curated list.
Baselines aren’t just files; they’re a contract that says, “this is what the UI should look like,” and the key operational question is where they live and who updates them. Common options are keeping baselines in the repo, storing them in an artifact store, or managing them in a visual testing platform with approval workflows, and each choice impacts speed, review quality, and merge-conflict risk.
Types of Screenshot Testing
Screenshot testing isn’t one thing. There are multiple levels and scopes. Some approaches validate small UI units (such as a single component), while others validate entire pages or end-to-end flows in real browsers. The right type depends on what you’re trying to protect: design system consistency, critical user journeys, or broad UI stability across viewports and themes.
| Type | What it covers | Pros | Cons |
|---|---|---|---|
| Component-level Screenshot Tests | Individual UI pieces (button, card, modal, table), often via storybook/component harness | Fast, narrow scope, easier to debug, great for design systems | Can miss integration/layout issues across real pages |
| Page-level Screenshot Tests | Entire screens (home, product, settings) | Closer to real user experience, catches layout issues that components miss | Heavier to maintain, more dynamic content noise |
| Flow-level Screenshot Tests | Multiple states across a journey (search → product → checkout → confirmation) | Catches “in-between” state regressions, validates continuity and consistency | Hardest to stabilize (test data, timing, async behavior) |
| Element-level Screenshot Tests | A specific element (tooltip, dropdown, chart) | Reduces noise, isolates dynamic areas outside the element | May miss context issues like overlap or neighbor interactions |
| Cross-browser and Cross-device Screenshot Tests | Same screen across browsers and viewports (Chrome/Firefox/Safari, different sizes) | Detects browser-specific rendering bugs, essential for consumer web apps | Larger test matrix, higher execution cost |
Screenshot Comparison Techniques
Screenshot comparison is the method you use to decide whether a new screenshot is “the same” as the approved baseline. Different techniques trade off sensitivity, noise tolerance, and operational complexity.
Pixel-by-pixel Diff
This is the most direct approach: every pixel in the new screenshot is compared with the baseline. It’s very effective when your environment is deterministic, and you want maximum sensitivity.
| Strength | Weakness |
|---|---|
| Exact and highly sensitive to changes. | Brittle if the environment (fonts, rendering, OS, GPU) isn’t perfectly stable. |
Threshold-based Pixel Diff
This approach still uses pixel comparison, but allows a certain count or percentage of pixels to differ. It’s commonly used to reduce failures caused by minor rendering jitters.
| Strength | Weakness |
|---|---|
| More practical for real CI pipelines with minor rendering variance. | If thresholds are too loose, small but important regressions can slip through. |
Perceptual Diff
Perceptual diff uses algorithms designed to approximate human vision, such as tolerating anti-aliasing differences or using color-distance scoring. The goal is to flag changes that people would notice, while ignoring tiny render noise.
| Strength | Weakness |
|---|---|
| Reduces false positives from tiny rendering differences that users wouldn’t notice. | Depending on the configuration, it may miss extremely subtle shifts. |
DOM-Anchored Visual Checks
This combines DOM context with screenshots to compare only meaningful regions or to treat dynamic areas differently. It helps focus diffs on what matters instead of comparing the entire bitmap equally.
| Strength | Weakness |
|---|---|
| Handles dynamic areas more intelligently by scoping what matters. | Adds complexity and increases dependence on specific tools/frameworks. |
In practice, most teams use pixel diff with smart thresholds, masking, and stable environments. That combination tends to give the best balance of signal vs. noise.
Stabilizing Screenshot Tests
Most teams don’t fail at screenshot testing because of the diff algorithm; they fail because the screenshots aren’t stable run to run. Stabilization is the hidden engineering work that turns visual testing from noisy and flaky into a reliable safety net.
Fonts and Text Rendering Differences
Text can render differently across OS, browser versions, GPU settings, and font libraries, creating pixel diffs even when nothing “meaningful” changed. Teams usually fix this by running tests in consistent CI runners or containers, bundling/pinning fonts, avoiding system fonts where possible, and pinning the browser version. Once fonts are deterministic, a huge chunk of flakiness disappears.
Dynamic Data
Dynamic content like timestamps, rotating banners, personalized modules, and randomized IDs will constantly change screenshots unless controlled. The usual mitigation is to use fixtures or seeded test data, mock time and randomness, and mask dynamic regions like “Last Updated” labels. If the data can’t be stabilized, teams isolate the screenshot to a smaller stable region.
Animations and Transitions
Animations introduce “timing sensitivity” where a screenshot might be captured mid-transition, producing inconsistent results across runs. A common approach is disabling animations in test mode using CSS (prefers-reduced-motion or a global test flag) and freezing transitions. If animations must remain, teams wait explicitly for the animation to finish before capturing.
Async Rendering and Loading States
Modern UIs often render in phases; skeleton loaders, delayed components, lazy images, and post-load hydration can all cause inconsistent captures. Reliable pipelines wait for “network idle” where supported, wait for key selectors to be visible, and verify skeletons/loaders are gone. Teams also tune deterministic timeouts carefully and avoid blind sleeps unless there’s no better signal.
Ads Third-Party Widgets A/B Tests
Third-party scripts and experiments can change layout, insert content, or shift rendering unpredictably from run to run. Teams stabilize by disabling third-party scripts in test mode, running in a feature-flagged environment, and forcing a “test user” cohort with fixed experiment variants. This also makes failures easier to reproduce locally.
Charts and Canvases
Charts and canvas-based visuals can vary slightly due to anti-aliasing, subpixel positioning, and rendering differences across environments. A practical approach is to screenshot the chart container with tolerant thresholds and focus on a few key chart states rather than every data permutation. For exact values, teams often add separate functional assertions alongside visual checks.
Screenshot Testing and AI
Modern teams increasingly use AI-driven tooling to reduce noise and improve signal. Instead of treating every pixel change as equal, AI can prioritize human-perceived differences, group related diffs, separate meaningful UI changes from rendering jitter, suggest masks for dynamic regions, and generate short summaries of what changed.
That said, AI doesn’t remove the fundamentals; you still need baselines and stable environments for reliable results. Where Vision AI becomes a step-change is when it moves beyond “compare images” and starts understanding the UI like a user would (buttons, fields, labels, dialogs, state), which is exactly how testRigor approaches UI automation. It uses Vision AI to recognize and interact with on-screen elements in a resilient way, so tests are less tied to brittle DOM/CSS details and less likely to break with minor UI refactors. In practice, this can be better than pure screenshot-diff workflows because you get user-centric validation and interaction without drowning in pixel-noise reviews, especially when the UI evolves frequently.
Read: Vision AI and how testRigor uses it.
Conclusion
Screenshot testing is a practical guardrail for the visual layer of your product, the part users notice first and forgive least, by comparing what the UI actually looks like against an approved baseline. When you stabilize the environment, tame dynamic content, and use smart diffs, it becomes a reliable way to catch layout, styling, responsive, and theme regressions that functional tests simply don’t see. AI-driven approaches can further reduce noisy pixel diffs and move teams toward more user-centric validation, turning visual testing from a flaky chore into a dependable signal for UI quality.
| Achieve More Than 90% Test Automation | |
| Step by Step Walkthroughs and Help | |
| 14 Day Free Trial, Cancel Anytime |


