Next.js Testing

Overview of Next.js
Next.js is a versatile React framework that offers you the components required to develop fast and robust web applications. As a framework, Next.js manages the necessary tooling and configuration for React, while supplying added structure, features, and optimizations for your application. This framework enables the creation of web and mobile applications with ease across various platforms, such as Windows, Linux, and macOS.
- Server-Side Rendering: In this method, HTML page components are generated before the response is sent to the client. This occurs for every request.
- Static Site Generation: With static sites, HTML is produced at build time and reused for each request. This rendering approach is ideal for creating static websites and blogs.
- Client-Side Rendering: In this case, rendering takes place on the client or user machine, with no server activity involved.
For more information on Next.js, refer to the following link.
Next.js testing essentials
Next.js is a renowned framework for building websites and web applications. Nonetheless, it is crucial to perform website testing for Next.js and its enterprise applications, along with their bundled components. Testing ensures that product requirements and related scenarios are thoroughly tested before deployment on the production server. Additionally, testing verifies code changes on the staging or pre-production server before implementation on the customer site.
- Maintaining code quality
- Ensuring key performance metrics meet expectations
- Verifying and validating test cases for each component
- Facilitating collaboration among necessary teams and stakeholders if testing requirements are met
Possible challenges in Next.js testing
- Since it is JavaScript-based, and JS variables can hold any data type value, this can result in disorder in the codebase, leading to numerous bugs and decreased productivity.
- A minor code change can cause performance issues. Carelessness regarding server-side rendering may lead to increased service costs.
- Working knowledge of React and Next.js is required before writing test cases.
- Version upgrades are inevitable, and without a clear strategy, it can be difficult to maintain backward compatibility and efficiently conduct upgrade testing.
- Next.js automation testing can be challenging without prior knowledge or experience.
Primary types of testing that you can cover
Other types of testing that you can cover
- Native mobile apps testing
- Cross-browser testing
Unit Testing
Unit testing involves testing individual code units that can be logically isolated in a system to determine if they function as intended. Unit tests are faster and can help detect early faults in the code, which may be more challenging to identify in later testing stages.
How to perform unit testing in Next.js?
Using Jest and React Testing libraries, unit testing can be conducted on JavaScript files.
Jest - Jest is a testing platform capable of adapting to any JavaScript library or framework, designed to ensure the correctness of any JavaScript codebase. Jest and React Testing Libraries are used in conjunction for unit testing. Jest functions as a pure JavaScript function runner: it takes a function, runs it in an isolated environment with a user-defined configuration, and compares the function's behavior to the expected outcome.
React - React Testing consists of a set of packages that help test UI components in a user-defined manner. React Testing Library is a lightweight solution for testing React components. It offers light utility functions on top of react-dom and react-dom/test-utils, leading to better testing practices. In this case, tests will work with actual DOM nodes rather than instances of rendered React components. The utilities this library provides support DOM querying in the same way a user would.
For more details on Jest and React-based unit testing, refer to the following link.
import sum from './math.js';

describe('sum', () => {
  it('sums of two values', () => {
    expect(sum(2, 4)).toBe(6);
  });

  it('product of two values', () => {
    expect(sum(4, 3)).toBe(12);
  });
});
Above example uses describe () and it () function where describe (): acts as test suites and it (): acts as test cases. Here there are no react components used. In addition, Jest offers assertions which are implemented using expect().
Sample unit test code for React and Jest
Below is a sample unit test code for a Next.js application using React and Jest. In this example, we will test a simple Counter component that allows users to increment and decrement a counter value.
import React, { useState } from 'react';

const Counter = () => {
  const [count, setCount] = useState(0);

  return (
    <div>
      <h2 data-testid="counter-value">Count: {count}</h2>
      <button data-testid="increment-button" onClick={() => setCount(count + 1)}>
        Increment
      </button>
      <button data-testid="decrement-button" onClick={() => setCount(count - 1)}>
        Decrement
      </button>
    </div>
  );
};

export default Counter;
import React from 'react';
import { render, fireEvent, screen } from '@testing-library/react';
import Counter from './Counter';

describe('Counter component', () => {
  it('renders initial counter value', () => {
    render(<Counter />);

    expect(screen.getByTestId('counter-value')).toHaveTextContent('Count: 0');
  });

  it('increments the counter value when the increment button is clicked', () => {
    render(<Counter />);

    fireEvent.click(screen.getByTestId('increment-button'));

    expect(screen.getByTestId('counter-value')).toHaveTextContent('Count: 1');
  });

  it('decrements the counter value when the decrement button is clicked', () => {
    render(<Counter />);

    fireEvent.click(screen.getByTestId('decrement-button'));

    expect(screen.getByTestId('counter-value')).toHaveTextContent('Count: -1');
  });
});
In this test file, we use the render function from the @testing-library/react package to render the Counter component. We then use the fireEvent function to simulate user interactions, such as clicking the increment and decrement buttons. Finally, we use the screen object to access the DOM elements and assert that they have the expected content after the interactions.
Integration Testing
Integration testing is the process of testing the interactions between different units or components in a system. This type of testing ensures that individual components work together correctly when combined, and helps identify issues that may arise from their integration.
How to perform integration testing in Next.js?
- Integration testing at the API layer. For example, a 401/404 is logged for unauthorized access when the server cannot find the resources being requested by the client.
- Integration testing can also be performed at the user interface level (which can also be part of E2E testing) which we’ll discuss in the following section.
- Integration testing can be performed at the database layer, like validating that the data is correctly fetched from and written to the database through API calls.
- Testing interactions between layers, such as middleware, services, and controllers.
Sample integration code at the API layer
In this example, we will test a simple Next.js API route for adding two numbers.
export default async function handler(req, res) {
  const { method, query: { a, b } } = req;

  if (method !== 'GET') {
    res.status(405).json({ message: 'Method not allowed' });
    return;
  }

  if (!a || !b) {
    res.status(400).json({ message: 'Both parameters "a" and "b" are required' });
    return;
  }

  const result = parseInt(a) + parseInt(b);

  res.status(200).json({ result });
}
import { createMocks } from 'node-mocks-http';
import addHandler from './add';

describe('/api/add', () => {
  it('adds two numbers correctly', async () => {
    const { req, res } = createMocks({
      method: 'GET',
      query: { a: '3', b: '4' },
    });

    await addHandler(req, res);

    expect(res._getStatusCode()).toBe(200);
    expect(res._getJSONData()).toEqual({ result: 7 });
  });

  it('returns 400 if one or both parameters are missing', async () => {
    const { req, res } = createMocks({
      method: 'GET',
      query: { a: '3' },
    });

    await addHandler(req, res);

    expect(res._getStatusCode()).toBe(400);
    expect(res._getJSONData()).toEqual({ message: 'Both parameters "a" and "b" are required' });
  });

  it('returns 405 if the method is not GET', async () => {
    const { req, res } = createMocks({
      method: 'POST',
      query: { a: '3', b: '4' },
    });

    await addHandler(req, res);

    expect(res._getStatusCode()).toBe(405);
    expect(res._getJSONData()).toEqual({ message: 'Method not allowed' });
  });
});
In this test file, we use the createMocks function from the node-mocks-http package to create mock req and res objects. We then pass these objects to the addHandler function and assert that the returned response has the expected status code and JSON content based on the input query parameters and method.
The res object in the node-mocks-http package has helper methods such as _getStatusCode() and _getJSONData() to retrieve the response status code and JSON data for testing purposes.
End-to-end testing
End-to-end testing is a comprehensive testing approach that validates the correct functioning of an application from start to finish. This testing method simulates real-world user scenarios and ensures that the application behaves as expected, from the user interface to the backend systems.
How to perform end-to-end testing in Next.js?
You can create automated end-to-end tests using the following ways:
Cypress
Cypress is a popular end-to-end testing framework for Next.js applications. It allows you to write tests for your entire application, including the frontend and backend. With Cypress, you can simulate user actions and verify that your application works as expected from the user's perspective. Refer here.
describe('Counter App', () => {
  beforeEach(() => {
    cy.visit('/');
  });

  it('should display the initial counter value', () => {
    cy.get('[data-testid="counter"]').contains('0');
  });

  it('should increment the counter when the button is clicked', () => {
    cy.get('[data-testid="increment-button"]').click();
    cy.get('[data-testid="counter"]').contains('1');
  });
});
Playwright
Playwright helps to execute E2E tests on browsers like Chrome, Edge, Firefox, Opera, and Safari. It’s a platform-independent tool that can work with most operating systems. Playwright has useful features like auto-wait, parallel executions, and trace viewer. Refer here.
import { test, expect } from '@playwright/test'
const { default: Input } = require("../src/components/Input");

test('should navigate to the about page', async ({ page }) => {
  await page.goto('http://localhost:3000/')
  await page.click('text=About Page')
  await expect(page).toHaveURL('/about')
  await expect(page.locator('h1')).toContainText('About Page')
  const getStarted = page.locator("text=Get Started");
  await expect(getStarted).toHaveAttribute("href", "http://localhost:3000");
  await getStarted.click();
  const inputField = await page.locator("id=nameInput");
  await inputField.fill("test feature");
  await expect(inputField).toHaveValue("test feature");
  await page.screenshot({ path: "screenshot/inputField.png" });
})
testRigor
testRigor is one of the easiest and most advanced tools for end-to-end testing. It is a cloud-based AI-driven system that empowers anyone to write complex tests using no code. Tests are so stable that some teams even use them for monitoring, and test maintenance takes minimal time compared to Cypress or Playwright.
testRigor tests most accurately represent end-to-end tests on the UI level, since they do not rely on underlying implementation details, as you can see from an example below.
check that page contains "QA Playground"
scroll down until page contains "Tags Input Box"
click on "Tags Input Box"
check that page contains "Tags"
enter the value "web3.0"
enter enter
click on "Click Me!" on the right of "web3.0"
enter the value "hello"
enter the value ","
enter the value "world"
enter the value ","
enter enter
check that page contains "6 tags are remaining"
- Server-Side Rendering (SSR) and Static Generation (SG)
- Client-Side Rendering (CSR) and dynamic imports
- Third-party integrations
- Authentication and authorization
- Navigation and routing
- API routes and data fetching
How to do End-to-end Testing with testRigor
Let us take the example of an e-commerce website that sells plants and other gardening needs. We will create end-to-end test cases in testRigor using plain English test steps.
Step 1: Log in to your testRigor app with your credentials.
Step 2: Set up the test suite for the website testing by providing the information below:
- Test Suite Name: Provide a relevant and self-explanatory name.
- Type of testing: Select from the following options: Desktop Web Testing, Mobile Web Testing, Native and Hybrid Mobile, based on your test requirements.
- URL to run test on: Provide the application URL that you want to test.
- Testing credentials for your web/mobile app to test functionality which requires user to login: You can provide the app’s user login credentials here and need not write them separately in the test steps then. The login functionality will be taken care of automatically using the keyword
login. - OS and Browser: Choose the OS Browser combination on which you want to run the test cases.
- Number of test cases to generate using AI: If you wish, you can choose to generate test cases based on the App Description text, which works on generative AI.
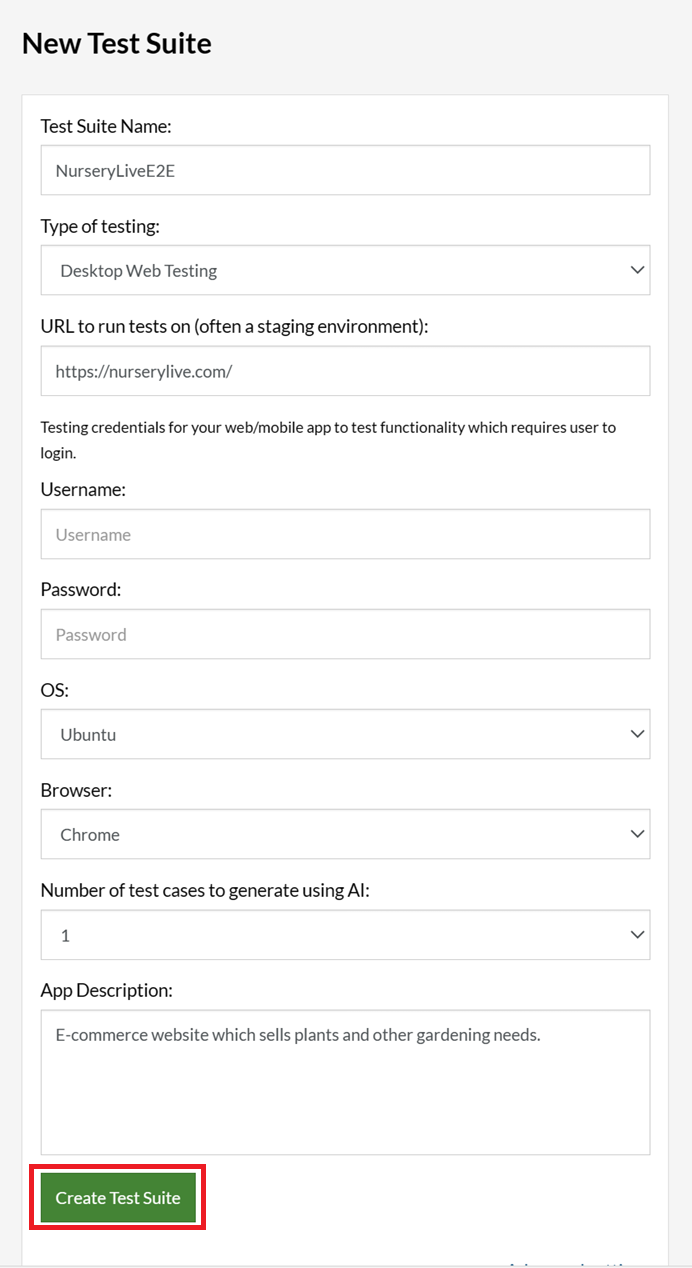
Step 3: Click Create Test Suite.
On the next screen, you can let AI generate the test case based on the App Description you provided during the Test Suite creation. However, for now, select do not generate any test, since we will write the test steps ourselves.
Step 4: To create a new custom test case yourself, click Add Custom Test Case.

Step 5: Provide the test case Description and start adding the test steps.
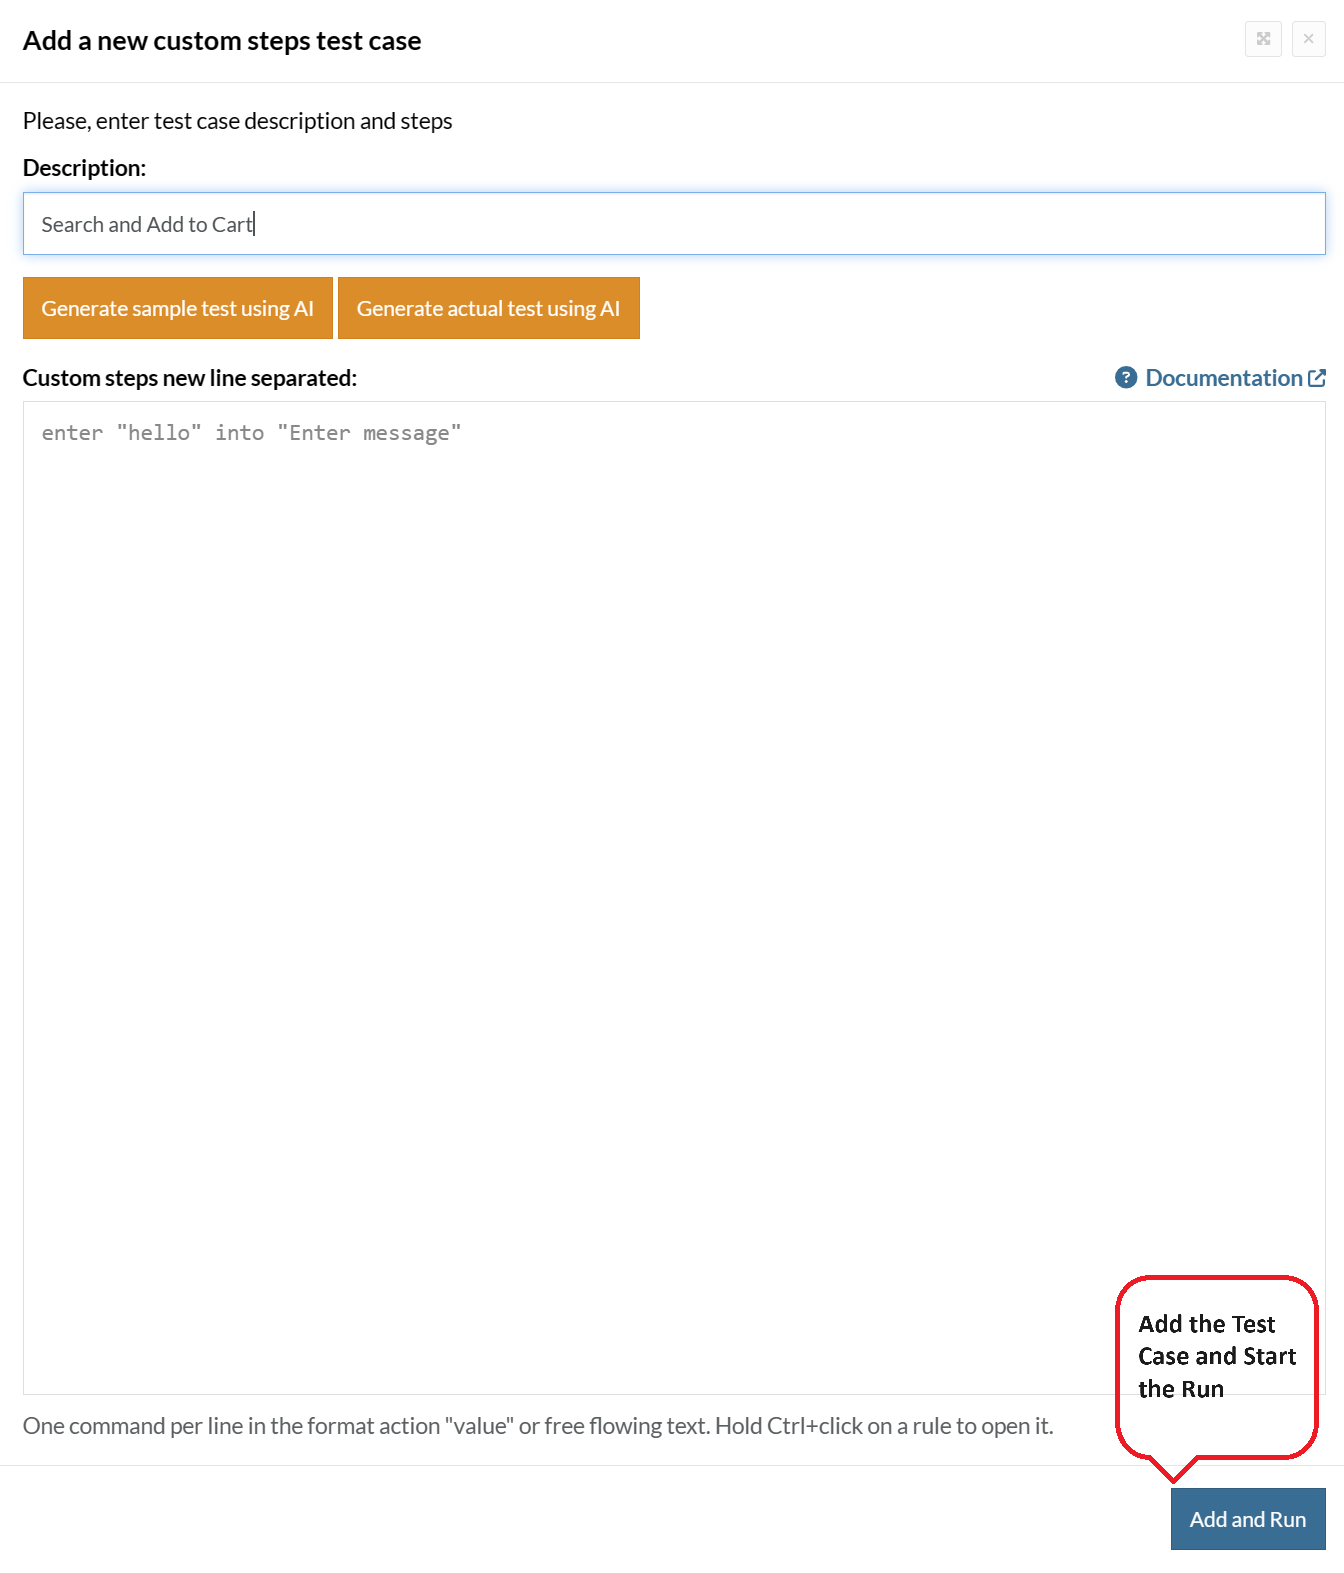
For the application under test, i.e., e-commerce website, we will perform below test steps:
- Search for a product
- Add it to the cart
- Verify that the product is present in the cart
Test Case: Search and Add to Cart
Step 1: We will add test steps on the test case editor screen one by one.
testRigor automatically navigates to the website URL you provided during the Test Suite creation. There is no need to use any separate function for it. Here is the website homepage, which we intend to test.

First, we want to search for a product in the search box. Unlike traditional testing tools, you can identify the UI element using the text you see on the screen. You need not use any CSS/XPath identifiers.
click "What are you looking for?"
Step 2: Once the cursor is in the search box, we will type the product name (lily), and press enter to start the search.
type "lily"
enter enter
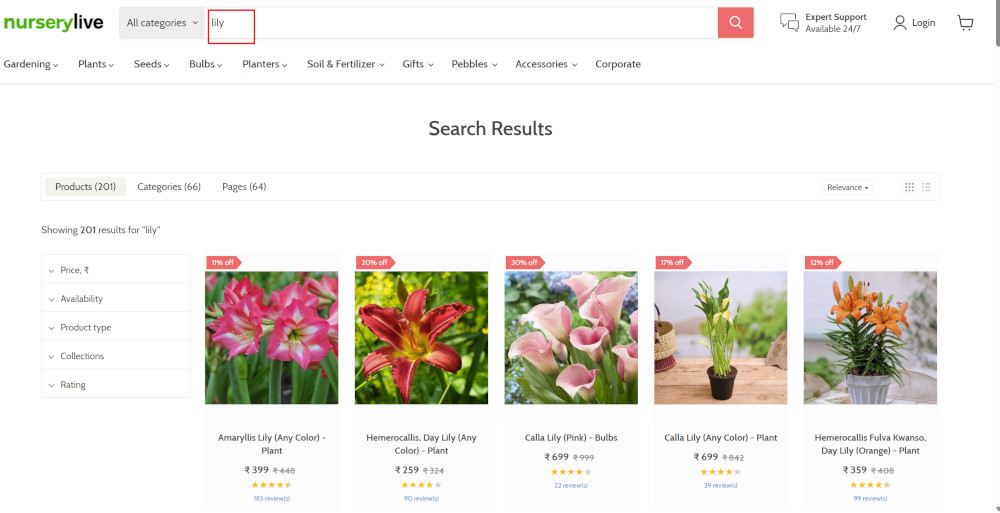
Search lists all products with the “lily” keyword on the webpage.
Step 3: The lily plant we are searching for needs the screen to be scrolled; for that testRigor provides a command. Scroll down until the product is present on the screen:
scroll down until page contains "Zephyranthes Lily, Rain Lily (Red)"

When the product is found on the screen, testRigor stops scrolling.
Step 4: Click on the product name to view the details:
click "Zephyranthes Lily, Rain Lily (Red)"
After the click, the product details are displayed on the screen as below, with the default Quantity as 1.

Step 5: Lets say, we want to change the Quantity to 3, so here we use the testRigor command to select from a list.
select "3" from "Quantity"
click "Add to cart"
The product is successfully added to the cart, and the “Added to your cart:” message is displayed on webpage.
Step 6: To assert that the message is successfully displayed, use a simple assertion command as below:
check that page contains "Added to your cart:"
Step 7: After this check, we will view the contents of the cart by clicking View cart as below:
click "View cart"

Step 8: Now we will again check that the product is present in the cart, under heading “Your cart” using the below assertion. With testRigor, it is really easy to specify the location of an element on the screen.
check that page contains "Zephyranthes Lily, Rain Lily (Red)" under "Your cart"

Complete Test Case
Here is how the complete test case will look in the testRigor app. The test steps are simple in plain English, enabling everyone in your team to write and execute them.
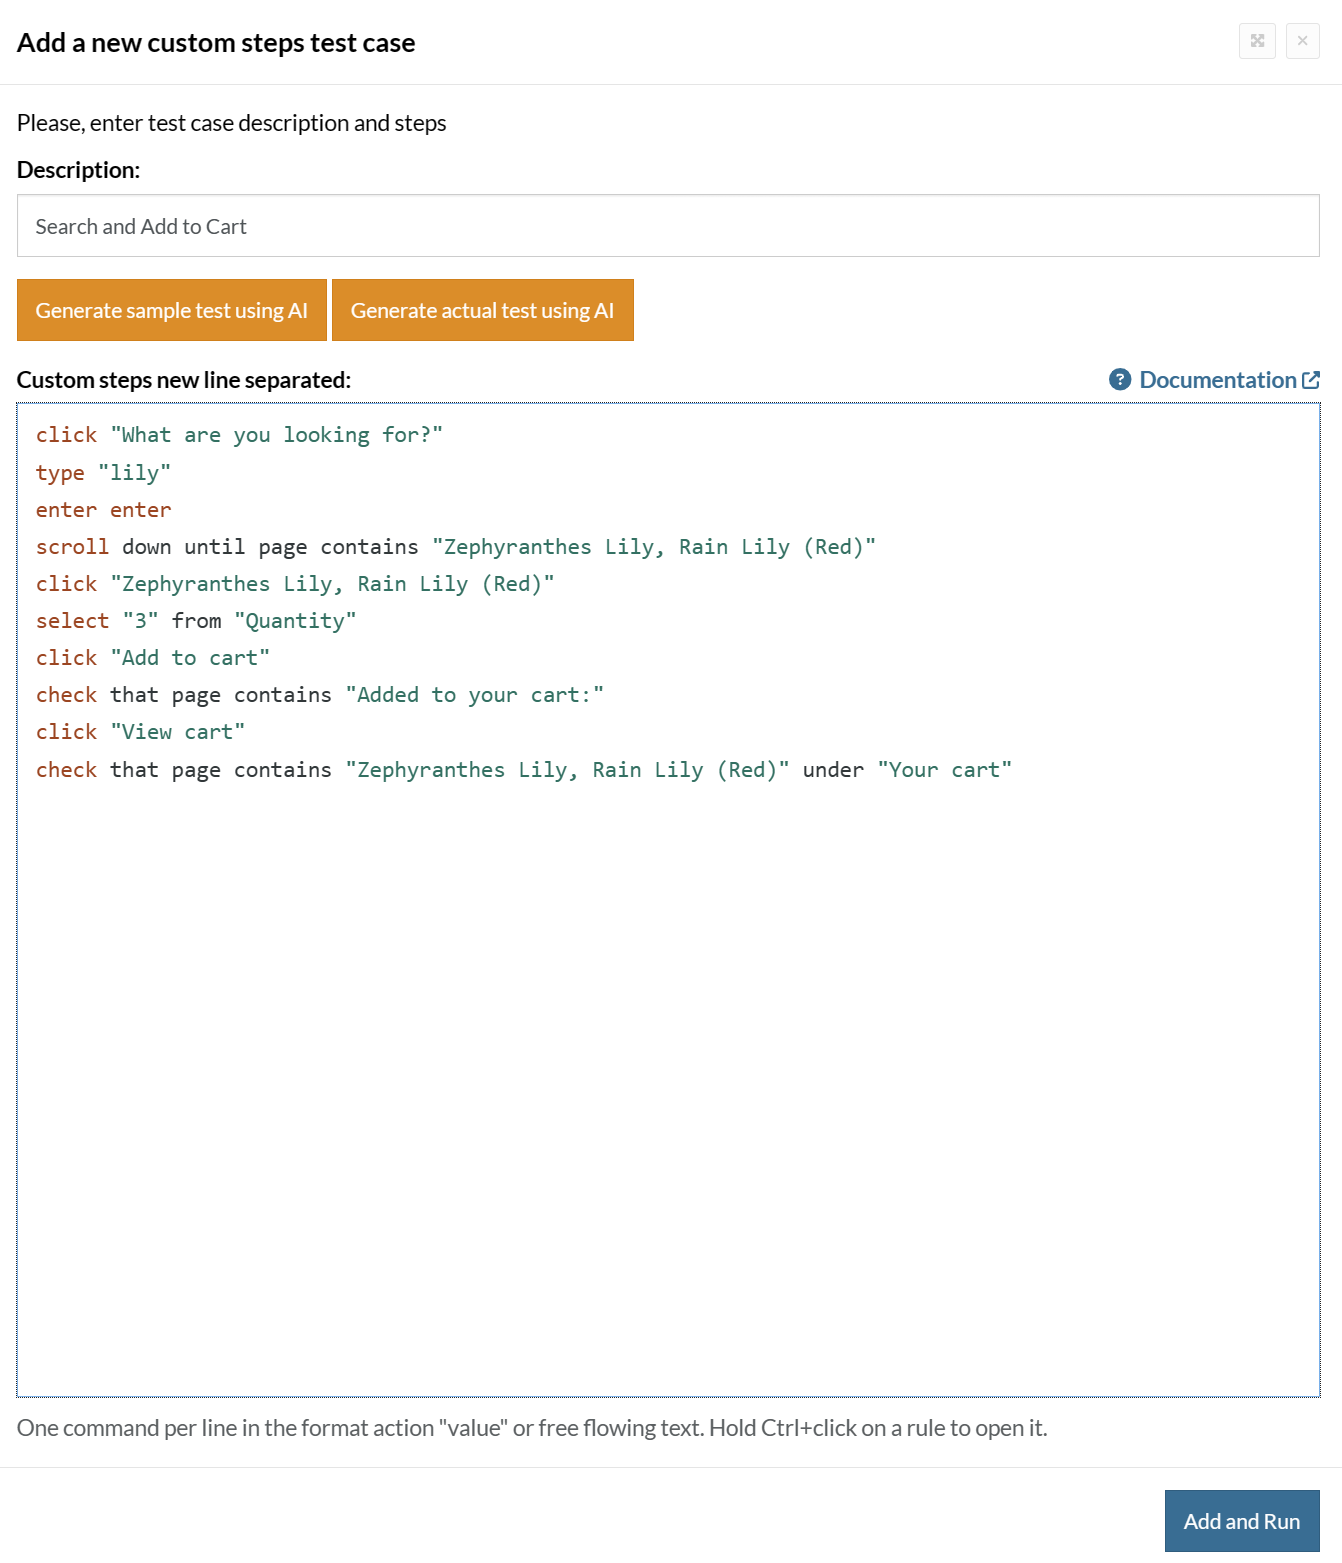
Click Add and Run.
Execution Results
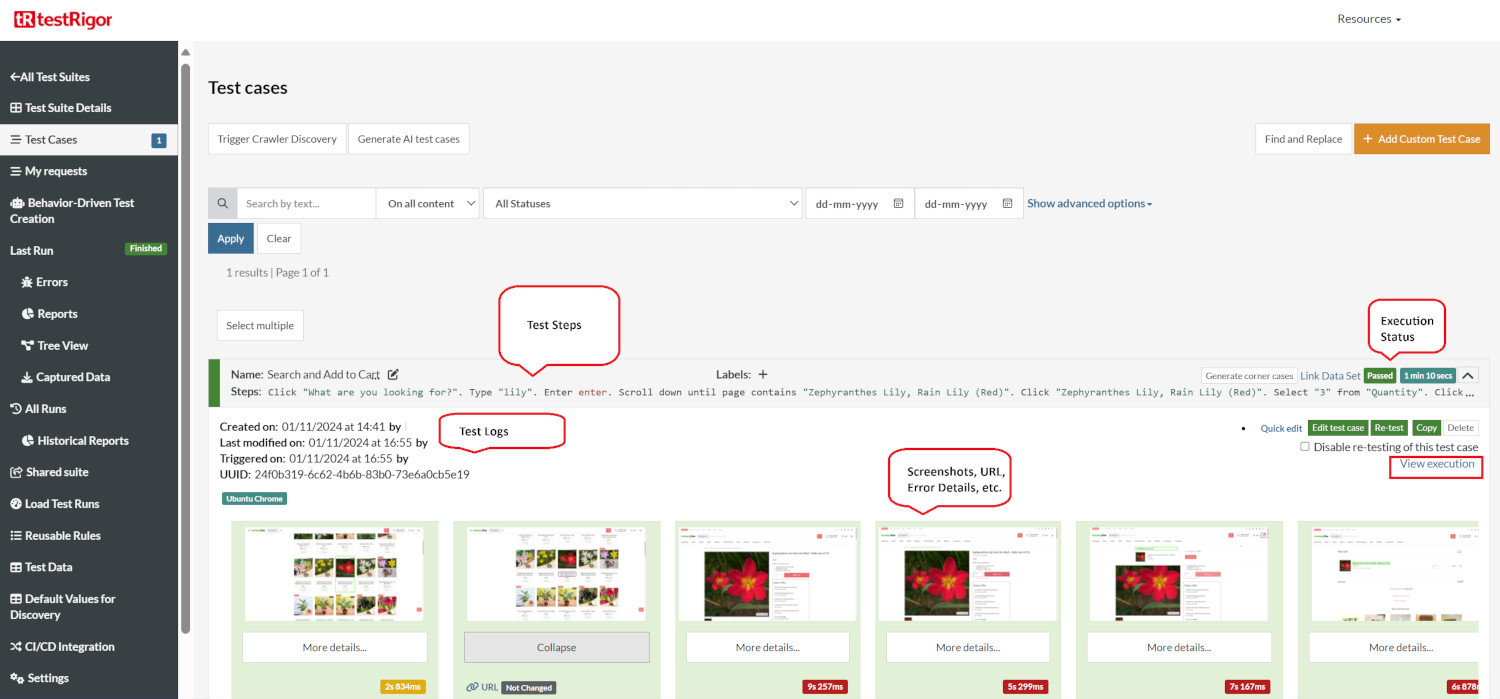
Once the test is executed, you can view the execution details, such as execution status, time spent in execution, screenshots, error messages, logs, video recordings of the test execution, etc. In case of any failure, there are logs and error text that are available easily in a few clicks.
You can also download the complete execution with steps and screenshots in PDF or Word format through the View Execution option.
testRigor’s Capabilities
Apart from the simplistic test case design and execution, there are some advanced features that help you test your application using simple English commands.
- Reusable Rules (Subroutines): You can easily create functions for the test steps that you use repeatedly. You can use the Reusable Rules to create such functions and call them in test cases by simply writing their names. See the example of Reusable Rules.
- Global Variables and Data Sets: You can import data from external files or create your own global variables and data sets in testRigor to use them in data-driven testing.
- 2FA, QR Code, and Captcha Resolution: testRigor easily manages the 2FA, QR Code, and Captcha resolution through its simple English commands.
- Email, Phone Call, and SMS Testing: Use simple English commands to test the email, phone calls, and SMS. These commands are useful for validating 2FA scenarios, with OTPs and authentication codes being sent to email, phone calls, or via phone text.
- File Upload/ Download Testing: Execute the test steps involving file download or file upload without the requirement of any third-party software. You can also validate the contents of the files using testRigor’s simple English commands.
- Database Testing: Execute database queries and validate the results fetched.
testRigor enables you to test web, mobile (hybrid, native), API, and desktop apps with minimum effort and maintenance.
Additional Resources
- Access testRigor documentation to know about more useful capabilities
- Top testRigor’s features
- How to perform end-to-end testing
Recap and conclusion
A robust testing strategy in Next.js applications should include unit, integration, and end-to-end tests to ensure that your application works as expected at every level. This comprehensive approach to testing will help you catch potential bugs and issues before they make their way to production, ultimately leading to a more reliable and high-quality application.
- Adopt a consistent naming convention for your test files. Typically, developers use the format [ComponentName].test.js for unit and integration tests, and [FeatureName].spec.js for end-to-end tests.
- Strive for high test coverage, meaning that a significant portion of your application's code is covered by tests. This can help you catch issues early on and give you confidence in the stability of your application. However, don't get too focused on achieving 100% coverage, as it may not always be possible or valuable.
- Integrate your testing strategy with a continuous integration (CI) pipeline. This ensures that your tests are automatically run whenever you make changes to your code, helping you catch issues before they are merged into the main codebase.
- When writing tests, focus on the most common user scenarios and critical application paths. This helps you ensure that the most important parts of your application are thoroughly tested and working as expected.
- When testing components in isolation, it's essential to mock or stub any external dependencies, such as API calls. This ensures that your tests remain focused on the component being tested and are not affected by external factors.
- As your application evolves, it's crucial to keep your tests up to date. Regularly review and update your test suite to ensure it remains relevant and effective at catching issues in your application.
By following these best practices and leveraging the powerful tools and libraries available for Next.js, you can build a robust testing strategy that helps ensure the reliability, stability, and overall quality of your web applications.
| Achieve More Than 90% Test Automation | |
| Step by Step Walkthroughs and Help | |
| 14 Day Free Trial, Cancel Anytime |


