Angular Testing
Angular is an open-source framework based on TypeScript. It also has a lot of similarities with its predecessor AngularJS, since the same team created it. The main difference between them is that AngularJS is JavaScript-based. Angular is a popular choice for building dynamic modern web and mobile applications, as well as native desktop applications. It’s actually more of a platform now than just a framework, providing development teams with design patterns and templates.
Websites built with Angular are meant to be thoroughly tested with some of the tools provided by the Angular team. This article gives you a good overview of the tools you ought to use to optimize your testing strategy.
- Unit testing
- Integration testing
- End-to-end testing
Angular Unit Testing
Per the testing pyramid, unit testing forms the base and acts as the first layer of verification. You should try to cover every single unit of code, like methods, functions, and some classes.
Using the Angular CLI, you get access to a host of frameworks that are shipped with Angular. Additionally, your project can be tested by just running a single command. Jasmine and Karma are available out of the box to you for writing and executing unit tests, respectively. However, you can use other frameworks as well to do the same. If the unit tests are being run in the build pipeline, then they undergo headless execution, else Karma opens the browser window for test runs. All test cases are saved with the .spec.ts file extensions.
In Angular, you can test components and services using TestBed, pipes, and attribute directives.
You can further read up on the setup and configuration of the test environment and CI setup over here.
Angular Integration Testing
After testing every unit of code, you need to check if two or more units can work together. This is what integration testing is meant to assess. With integration testing, your focus should be on checking if all external or third-party applications are getting invoked or written properly. You can create integration tests using Angular’s built-in testing tools.
- Components can be tested by invoking them from templates. They can also be tested by mocking data. Angular TestBed class facilitates this kind of testing.
- Services can be tested by mocking HTTP calls.
- You can write DOM tests to test pipes.
Below is an example of an integration test that verifies that the component displays the correct list acquired through a mocked API call:
import { async, TestBed } from '@angular/core/testing';
import { UsersComponent } from './users.component';
import { HttpClientTestingModule, HttpTestingController } from '@angular/common/http/testing';
import { UserService } from '../services/user.service';

const testUsers = [
  { name: 'User1', email: '[email protected]' },
  { name: 'User2', email: '[email protected]' },
  { name: 'User3', email: '[email protected]' }
];

describe('Integration: UsersComponent', () => {
  beforeEach(async(() => {
    TestBed.configureTestingModule({
      imports: [HttpClientTestingModule],
      declarations: [UsersComponent],
      providers: [UserService]
    }).compileComponents();
  }));

  it('creates the component', () => {
    const fixture = TestBed.createComponent(UsersComponent);

    expect(fixture.componentInstance).toBeTruthy();
  });

  it('loads the users and displays them if user clicks on button', () => {
    // acquire services and set up spies
    const fixture = TestBed.createComponent(UsersComponent);
    const userService: UserService = TestBed.get(UserService);

    spyOn(userService, 'get').and.callThrough();

    const httpController: HttpTestingController = TestBed.get(HttpTestingController);

    // tap on Load button
    const button = fixture.nativeElement.querySelector('#load');
    button.click();

    // validate outgoing request to API and provide test data
    expect(userService.get).toHaveBeenCalled();

    expect(fixture.componentInstance.users$).toBeTruthy();

    fixture.detectChanges();

    const testRequest = httpController.expectOne('https://placeholder.test.com/users');
    expect(testRequest.request.method).toEqual('GET');
    testRequest.flush(testUsers);

    // validate presentational changes
    fixture.detectChanges();

    const listItems = fixture.nativeElement.querySelectorAll('li');
    expect(listItems.length).toEqual(testUsers.length);
  });
});
Angular End-to-End Testing
End-to-end testing is the tip of the testing iceberg, covering the entire user paths. End-to-end tests are the most representative of all; however, they can be costly to build and slower to execute – therefore, they are done after unit and integration tests. End-to-end tests are extremely important to have, however, since they can easily point out any issues within your application.
- Protractor
- Selenium-based tools
- testRigor
Protractor end-to-end testing
Protractor can be used for both Angular and AngularJS for executing your end-to-end tests. It is a wrapper around the Selenium WebDriver and is written in NodeJS. The test scripts can be written using Jasmine or another tool of your choice. Protractor acts as an interpreter of these scripts and sends necessary commands to the Selenium server.
npm install -g protractor
Then run protractor -version to verify that it’s working, along with webdriver-manager update and webdriver-manager start to start a server. Once that is done, you will have your Selenium server up and running, and can see status informatioт at localhost:4444/wd/hub
All end-to-end test cases are saved in an e2e folder in .spec files. When executing these tests using the Angular CLI, you can execute the e2e folder from the command prompt. You can also choose to run specific cases if you wish to do so. However, with Protractor being in sunset mode, there are other options out there that can help smoothen end-to-end testing.
Selenium-based tools for end-to-end testing
There are a lot of Selenium-based tools on the market, which might be your preferred choice if you’re looking strictly for an open-source framework. The downsides are slow execution speed, complex test creation, and hefty test maintenance. You can look into the official documentation here, and the main downsides you might encounter here.
testRigor end-to-end testing
testRigor is a powerful tool created to make functional end-to-end testing accessible to virtually anyone. The biggest advantages are the ease of creating even lengthy cross-platform tests and virtually non-existent test maintenance. You can easily cover web and mobile scenarios in one test, which is something very few tools can perform well. testRigor is also an excellent choice for BDD environments since it incorporates BDD principles without additional coding and syntax complications.
- No-code tests mean anyone on the team is able to contribute to test creation.
- Cross-browser and cross-platform tests
- Proven way to create tests 15x faster and with 95% less test maintenance
- Out of the box support for many additional features, such as 2FA testing for Gmail, text messages, and Google authenticator.
- No reliance on the implementation details. Tests are built purely from an end-user’s perspective
- Its AI-powered engine can interpret the relative position of the element from the mentioned command. Thus any changes in the locator value of the element do not break the test.
- No need to set up additional infrastructure to execute test cases.
- Has provision to support 2FA testing support for Gmail, text messages, and Google authenticator.
- … and many more. You can see the full list here
click on "QUICK VIEW" if exists
check that table "options" at row "12" and column "Name" contains "David"
check checkbox within the context of row "12" is checked
click on "Delete" within the context of "section2"
check that page contains stored value from "successDeleteMsg"
From the above test script you can see that identifying elements on the UI is as easy as mentioning their relative position, as seen on the screen.
How to do End-to-end Testing with testRigor
Let us take the example of an e-commerce website that sells plants and other gardening needs. We will create end-to-end test cases in testRigor using plain English test steps.
Step 1: Log in to your testRigor app with your credentials.
Step 2: Set up the test suite for the website testing by providing the information below:
- Test Suite Name: Provide a relevant and self-explanatory name.
- Type of testing: Select from the following options: Desktop Web Testing, Mobile Web Testing, Native and Hybrid Mobile, based on your test requirements.
- URL to run test on: Provide the application URL that you want to test.
- Testing credentials for your web/mobile app to test functionality which requires user to login: You can provide the app’s user login credentials here and need not write them separately in the test steps then. The login functionality will be taken care of automatically using the keyword
login. - OS and Browser: Choose the OS Browser combination on which you want to run the test cases.
- Number of test cases to generate using AI: If you wish, you can choose to generate test cases based on the App Description text, which works on generative AI.
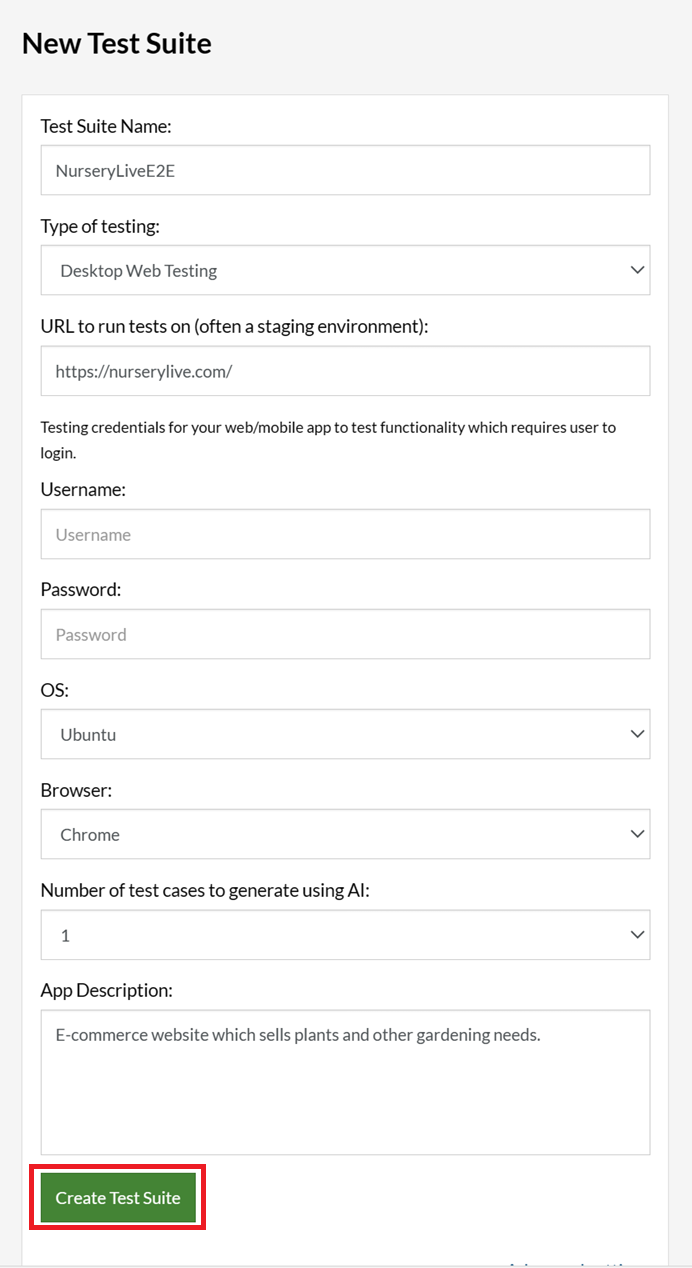
Step 3: Click Create Test Suite.
On the next screen, you can let AI generate the test case based on the App Description you provided during the Test Suite creation. However, for now, select do not generate any test, since we will write the test steps ourselves.
Step 4: To create a new custom test case yourself, click Add Custom Test Case.

Step 5: Provide the test case Description and start adding the test steps.
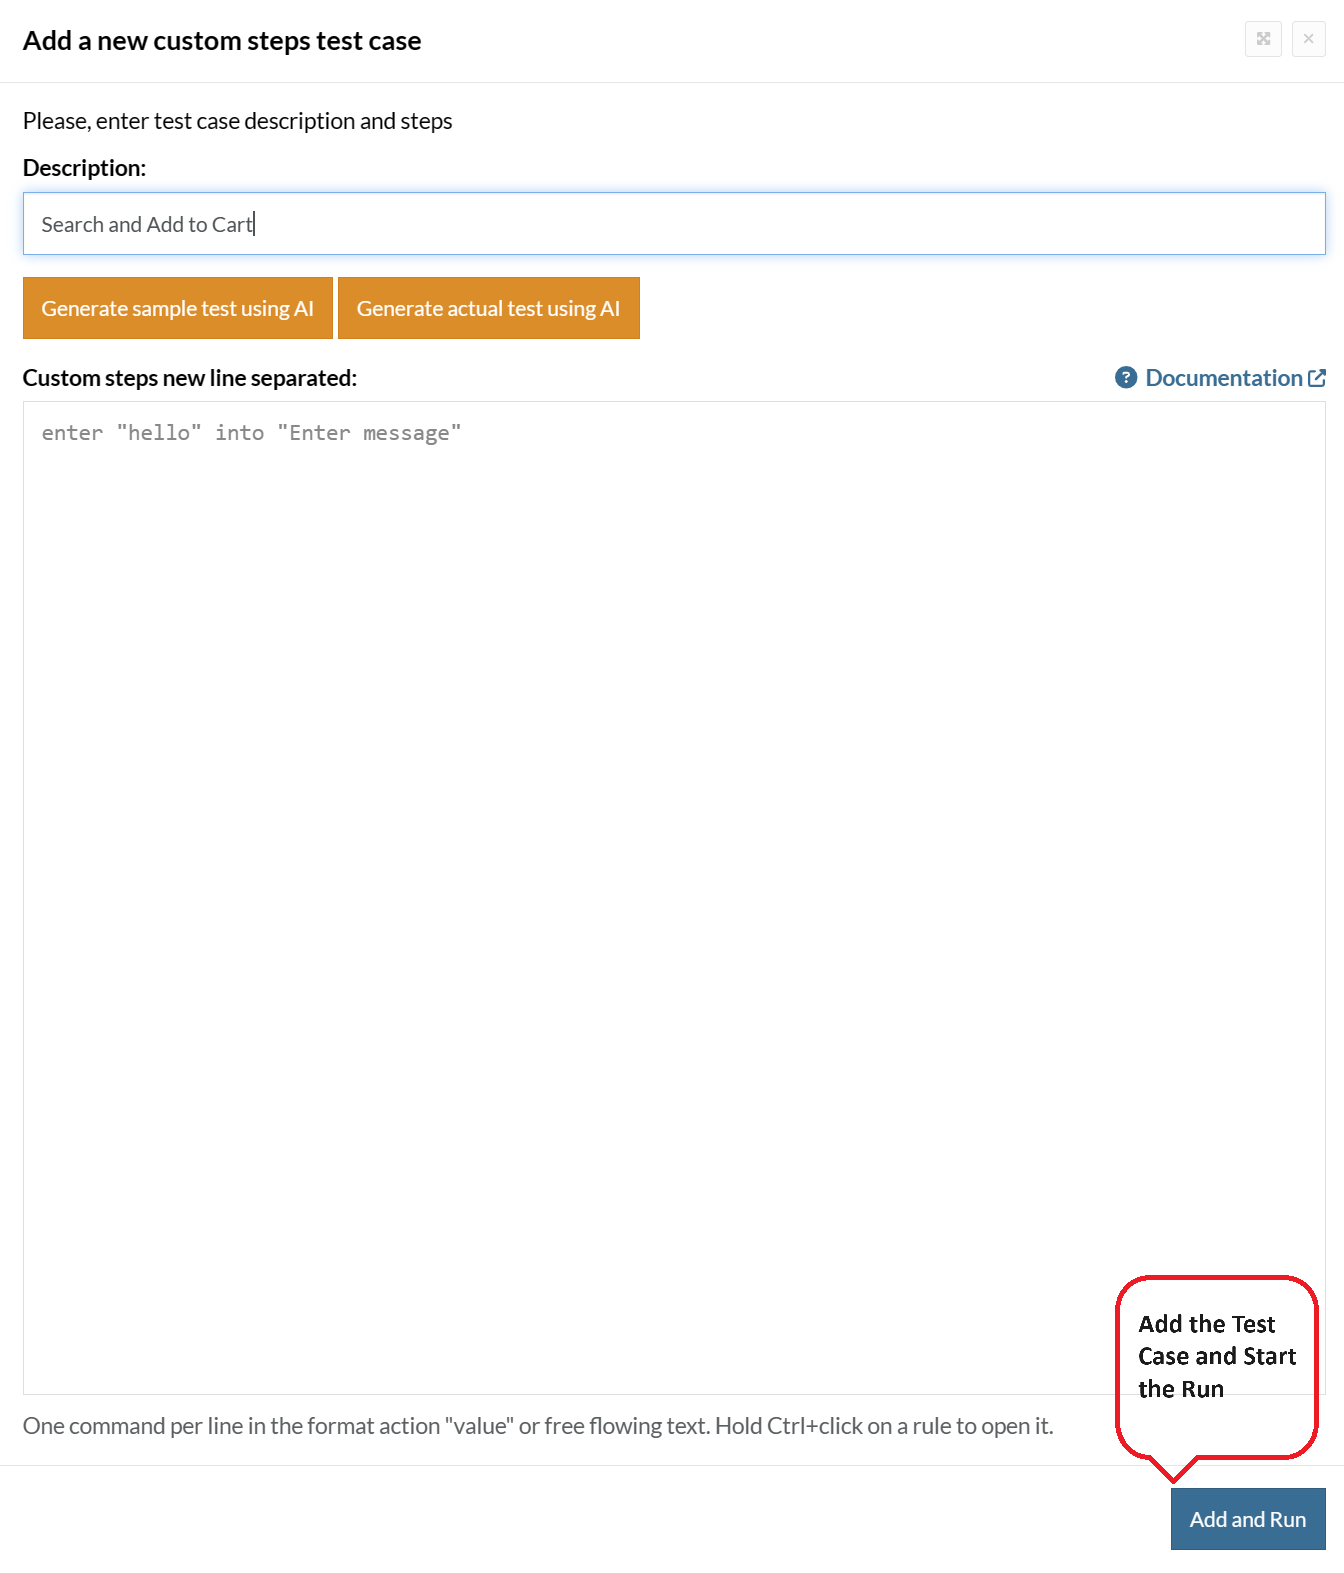
For the application under test, i.e., e-commerce website, we will perform below test steps:
- Search for a product
- Add it to the cart
- Verify that the product is present in the cart
Test Case: Search and Add to Cart
Step 1: We will add test steps on the test case editor screen one by one.
testRigor automatically navigates to the website URL you provided during the Test Suite creation. There is no need to use any separate function for it. Here is the website homepage, which we intend to test.

First, we want to search for a product in the search box. Unlike traditional testing tools, you can identify the UI element using the text you see on the screen. You need not use any CSS/XPath identifiers.
click "What are you looking for?"
Step 2: Once the cursor is in the search box, we will type the product name (lily), and press enter to start the search.
type "lily"
enter enter
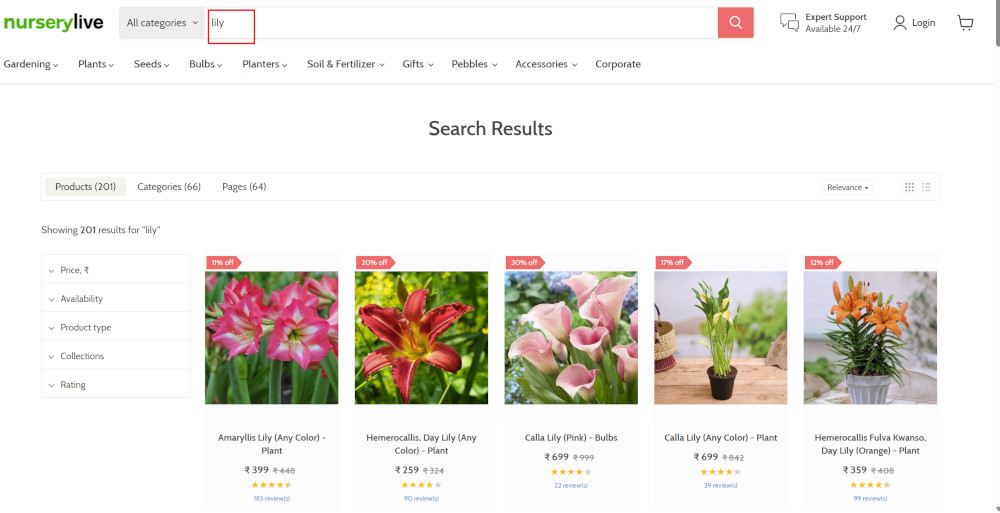
Search lists all products with the “lily” keyword on the webpage.
Step 3: The lily plant we are searching for needs the screen to be scrolled; for that testRigor provides a command. Scroll down until the product is present on the screen:
scroll down until page contains "Zephyranthes Lily, Rain Lily (Red)"
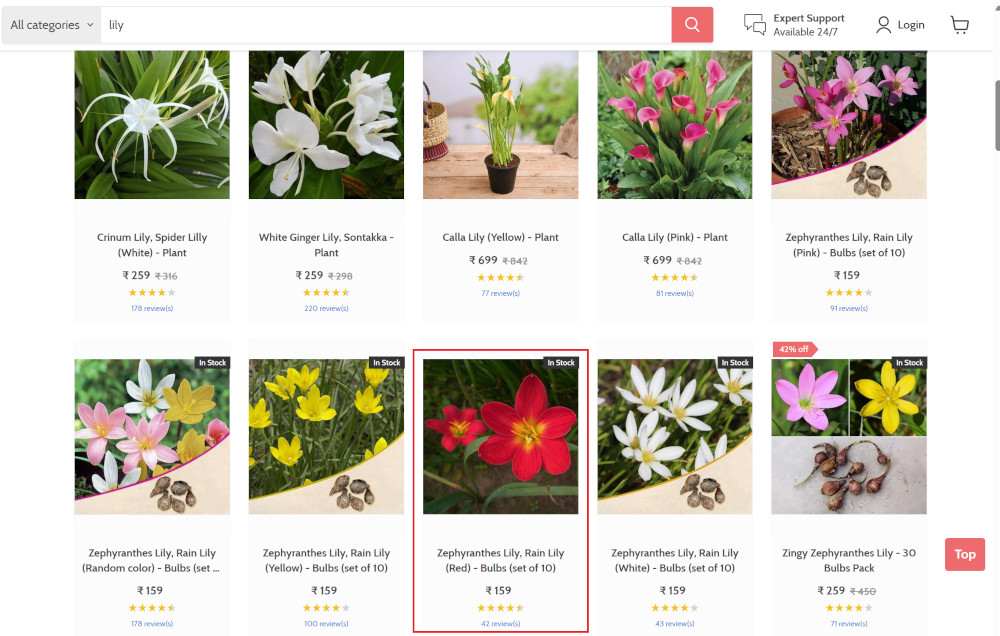
When the product is found on the screen, testRigor stops scrolling.
Step 4: Click on the product name to view the details:
click "Zephyranthes Lily, Rain Lily (Red)"
After the click, the product details are displayed on the screen as below, with the default Quantity as 1.
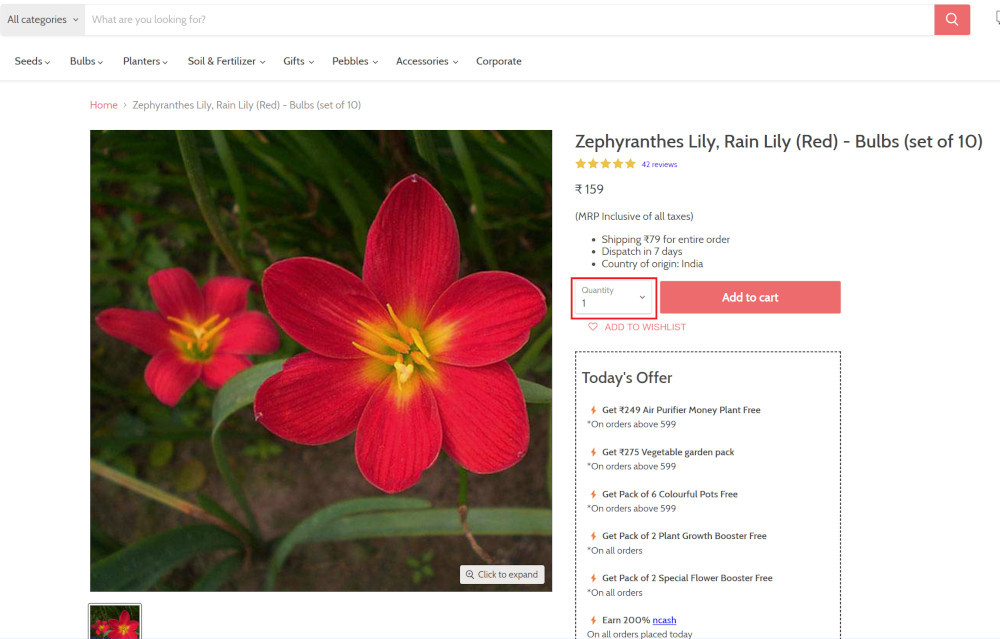
Step 5: Lets say, we want to change the Quantity to 3, so here we use the testRigor command to select from a list.
select "3" from "Quantity"
click "Add to cart"
The product is successfully added to the cart, and the “Added to your cart:” message is displayed on webpage.
Step 6: To assert that the message is successfully displayed, use a simple assertion command as below:
check that page contains "Added to your cart:"
Step 7: After this check, we will view the contents of the cart by clicking View cart as below:
click "View cart"

Step 8: Now we will again check that the product is present in the cart, under heading “Your cart” using the below assertion. With testRigor, it is really easy to specify the location of an element on the screen.
check that page contains "Zephyranthes Lily, Rain Lily (Red)" under "Your cart"

Complete Test Case
Here is how the complete test case will look in the testRigor app. The test steps are simple in plain English, enabling everyone in your team to write and execute them.
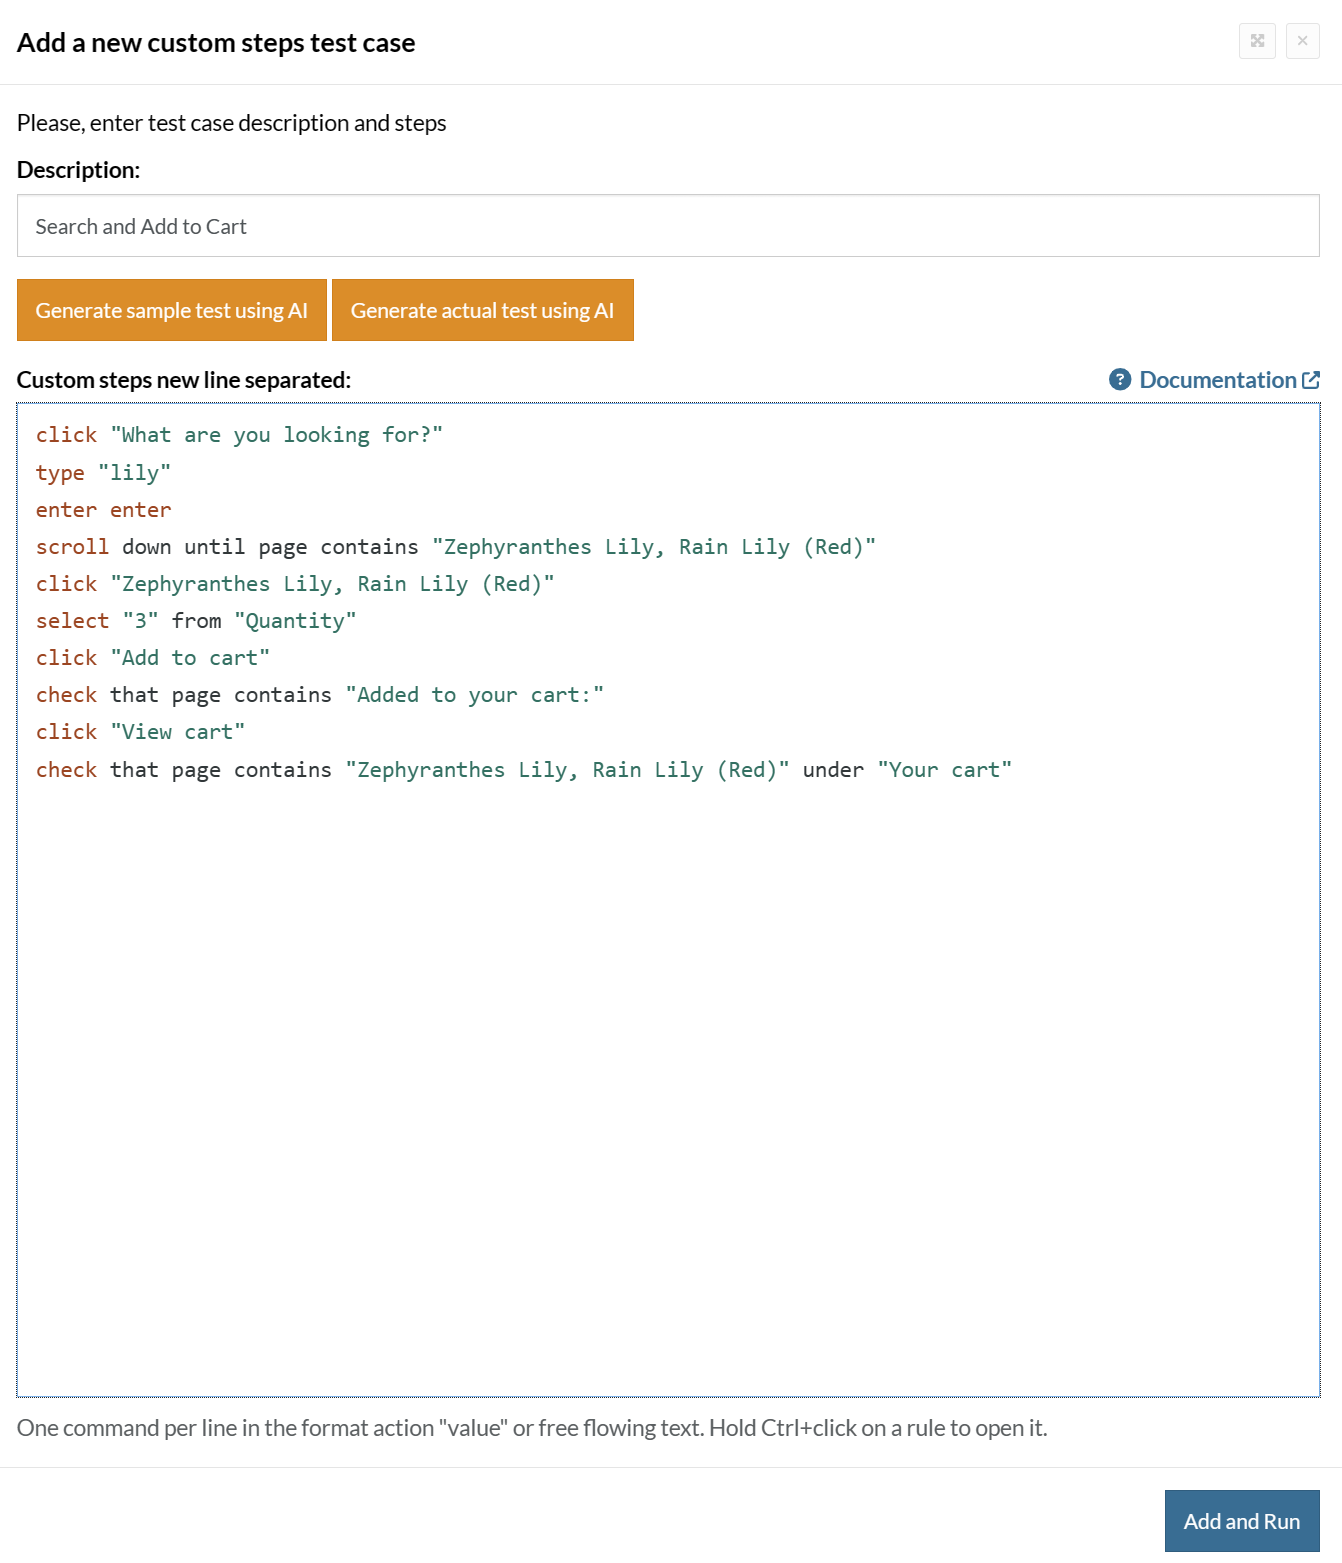
Click Add and Run.
Execution Results
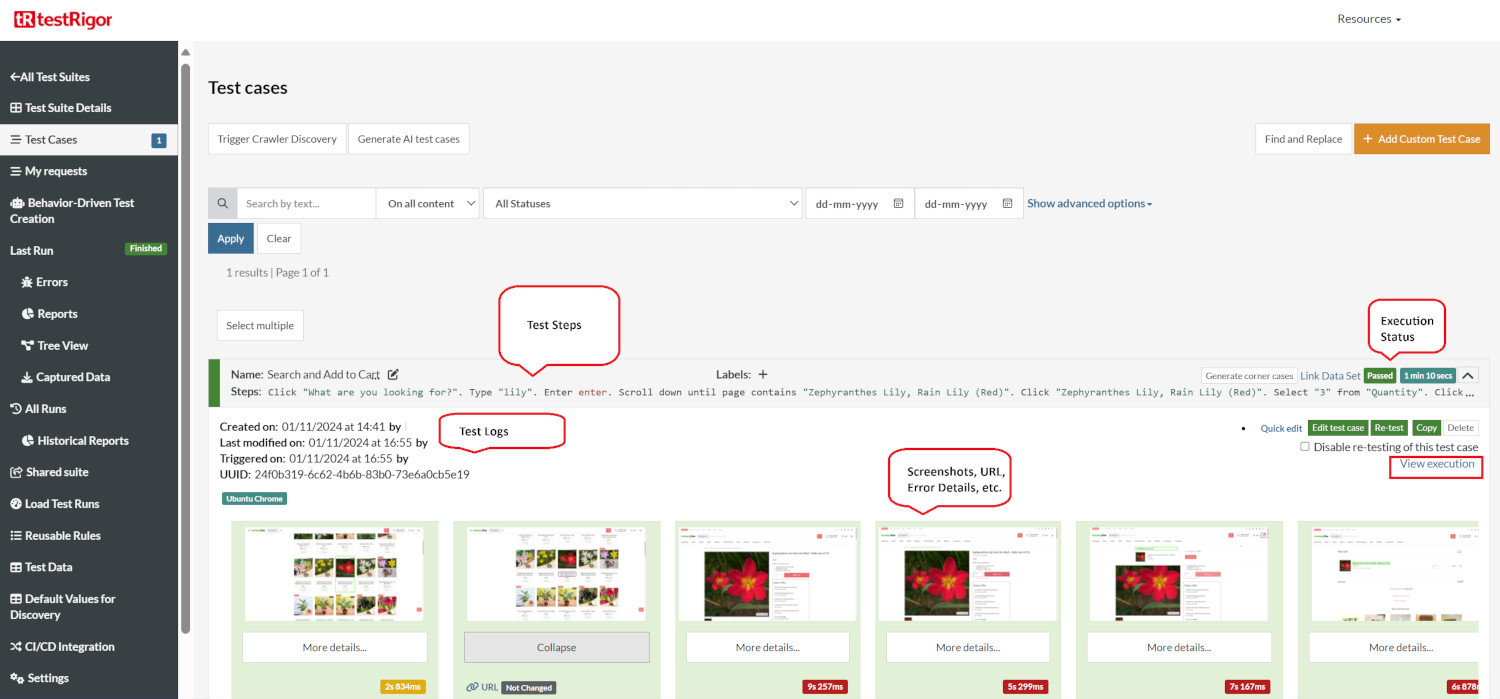
Once the test is executed, you can view the execution details, such as execution status, time spent in execution, screenshots, error messages, logs, video recordings of the test execution, etc. In case of any failure, there are logs and error text that are available easily in a few clicks.
You can also download the complete execution with steps and screenshots in PDF or Word format through the View Execution option.
testRigor’s Capabilities
Apart from the simplistic test case design and execution, there are some advanced features that help you test your application using simple English commands.
- Reusable Rules (Subroutines): You can easily create functions for the test steps that you use repeatedly. You can use the Reusable Rules to create such functions and call them in test cases by simply writing their names. See the example of Reusable Rules.
- Global Variables and Data Sets: You can import data from external files or create your own global variables and data sets in testRigor to use them in data-driven testing.
- 2FA, QR Code, and Captcha Resolution: testRigor easily manages the 2FA, QR Code, and Captcha resolution through its simple English commands.
- Email, Phone Call, and SMS Testing: Use simple English commands to test the email, phone calls, and SMS. These commands are useful for validating 2FA scenarios, with OTPs and authentication codes being sent to email, phone calls, or via phone text.
- File Upload/ Download Testing: Execute the test steps involving file download or file upload without the requirement of any third-party software. You can also validate the contents of the files using testRigor’s simple English commands.
- Database Testing: Execute database queries and validate the results fetched.
testRigor enables you to test web, mobile (hybrid, native), API, and desktop apps with minimum effort and maintenance.
Additional Resources
- Access testRigor documentation to know about more useful capabilities
- Top testRigor’s features
- How to perform end-to-end testing
Conclusion
Angular is a popular framework used extensively to create web pages. Just like any other application, testing Angular projects is essential. With the above mentioned testing tools, you can ensure that your application is in tip top shape and competent in the market.
| Achieve More Than 90% Test Automation | |
| Step by Step Walkthroughs and Help | |
| 14 Day Free Trial, Cancel Anytime |


