CI/CD Series: testRigor and GitHub Actions
|
|
TestRigor integrates seamlessly with various CI/CD tools to bring the power of AI-driven test automation directly into your workflows and pipelines. In this guide, we’ll focus on optimizing your processes using GitHub Actions with TestRigor’s AI capabilities.
GitHub Actions Brief Concept
GitHub Actions is a CI/CD tool integrated directly into GitHub, enabling automation of workflows for building, testing, and deploying code. It is tightly coupled with GitHub repositories, making it ideal for developers who already use GitHub for version control. Compared to Azure DevOps, which offers a broader suite of enterprise-scale tools (e.g., project management, pipelines), GitHub Actions is more streamlined and GitHub-centric. GitLab CI/CD offers similar automation but is deeply integrated within the GitLab platform, with more DevSecOps features. GitHub Actions stands out for its ease of use and tight integration with the GitHub ecosystem.
GitHub Actions: Tools and Considerations:
- GitHub offers a tool to convert any pipeline (Azure Pipelines, GitLab CICD pipelines) to Actions workflows called GH Actions Importer. You can find more info here: https://github.com/github/gh-actions-importer .
- If you’re using third-party integrations or extensions (e.g., Azure Marketplace or GitLab integrations), find their equivalent GitHub Actions or integrate via custom scripts.
Comparison to other Platform Concepts:
- Jobs and Steps: In GitHub Actions, jobs and steps are equivalent to GitLab’s jobs and stages, or Azure DevOps pipelines. Multiple jobs can run in parallel or sequentially in workflows.
- Triggers: GitHub Actions uses on: to define triggers for events like push, pull requests, or scheduled events, similar to GitLab’s only: or except: and Azure’s trigger: for branches, tags, and PRs.
- Marketplace: GitHub Actions has its own GitHub Marketplace, offering reusable actions for CI/CD tasks, similar to GitLab’s CI templates and Azure DevOps extensions.
Version-control your CI/CD pipelines
Your workflows live in Git
By storing your .github/workflows/*.yml files and any helper scripts (bash, PowerShell, Python, etc.) directly in the same repo as your application and test-cases, GitHub Actions and testRigor together makes your pipeline definitions first-class citizens of your source tree. Each change to:
- the workflow YAML
- your
test-cases/*.yaml - any bootstrap or helper script
gets tracked naturally via commits, PRs, branches, tags and releases. You always have a full audit trail of what changed, who changed it, and when.
snippet: sample commit structure
my-app/
├── .github/
│   └── workflows/
│       └── testRigor.yml        ← versioned workflow
├── test-cases/
│   └── Simple Search.yaml       ← versioned test-case
├── scripts/
│   └── convert-to-json.sh       ← versioned helper
└── src/
    └── …
Branch-based experiments & PR-gated releases
The key principle is Pipeline-as-Code, and nearly every modern CI/CD tool supports it (Click on the links for more info):
• Jenkins
- Keep a
Jenkinsfileat the repo root - Stages, steps, credentials, testRigor calls… all described in Groovy and versioned alongside code.
- Store an
azure-pipelines.ymlin your repo - Pipeline, stages, variables, testRigor script tasks, secrets in Azure Key Vault/Git Secrets.
- Push a
.gitlab-ci.ymlinto your project - Define jobs, stages, and use the same bash/yq/jq script to fire testRigor APIs.
No matter the CI/CD engine, the approach is identical:
- Check out your code & test-cases.
- Run the converter/runner script.
- Post to the testRigor API.
- Poll for results.
Each YAML or code snippet you write sits in Git, so your pipeline is always under version control just like your application.
How does testRigor work with GitHub Actions?
CICD Content
testRigor smooths the testing process in the CI cycle when using GitHub actions by adding a Bash script that you can add in order to automate your Tests. You can find this prepopulated CI Script by going to testRigor workspace -> CI/CD Integration and click on Bash variation next to PowerShell option:
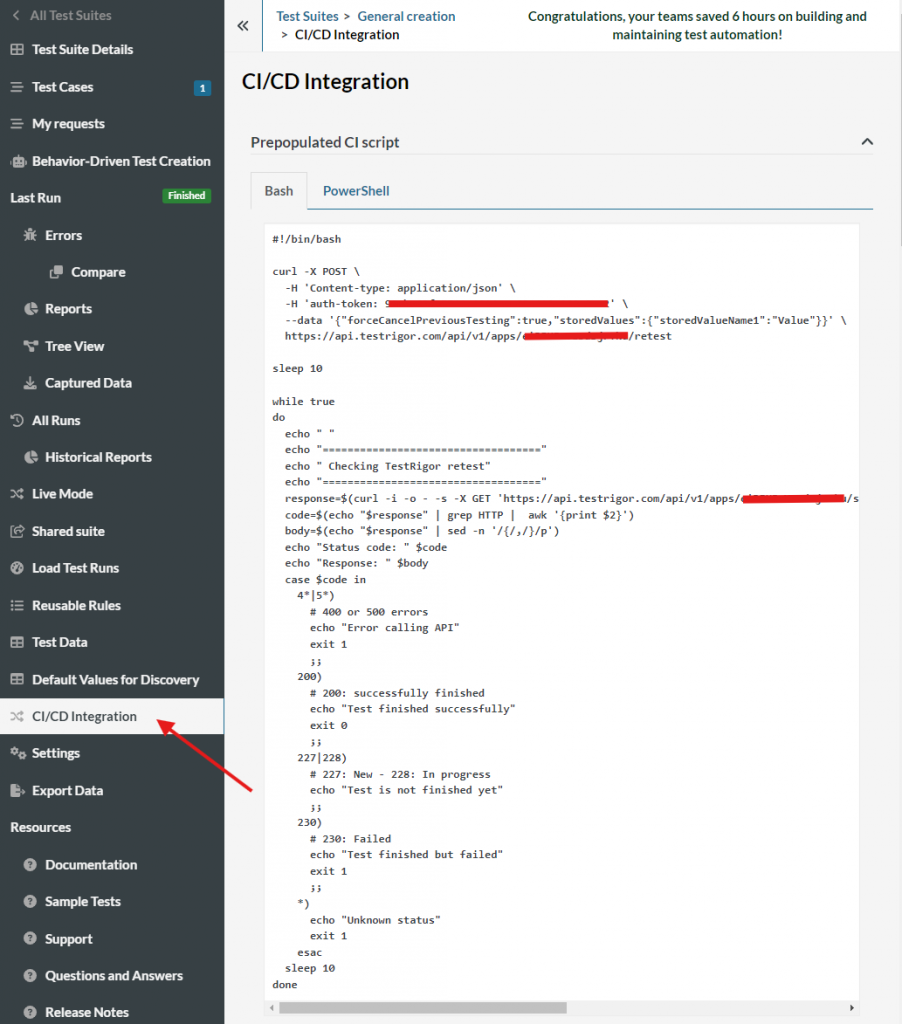
Caption: CI/CD integration and content.
Depending on the job that you would like to perform, there’s a great variety of APIs and scripts that you can use in order to automate your CI. Each one of them with their own documentation and info about what it does, elements that it contains and how they’re used. You only have to click on “Show/Hide More Info” button in order to show you the current content and info related about each API.
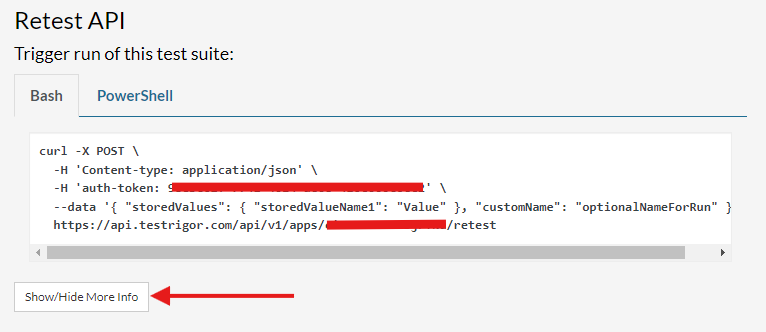
Caption: API script example: Retest API.
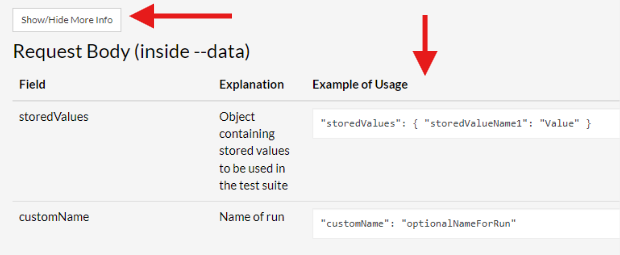
Caption: More info about the API content.
Knowing this, we’ll perform a small example using a CI workflow with TestRigor:
Run a workflow
The repo of this project can be found here: testRigorGithubActions
Create Test Cases
Step 1: Create a repo in GitHub with the following content:
- A .github folder: This is the parent folder of our workflows. It also contains a subfolder named workflows, where inside, we’ll create a .yml file named
testRigor.yml. - A test-cases folder: We’ll name this folder as test-cases. This folder contains all the test cases in .yaml format, which we’re going to use to add to our test suite in testRigor. The test case example that we’re going to use is is a simple search named
Simple Search.yamlfile.
The structure would visually look like this:
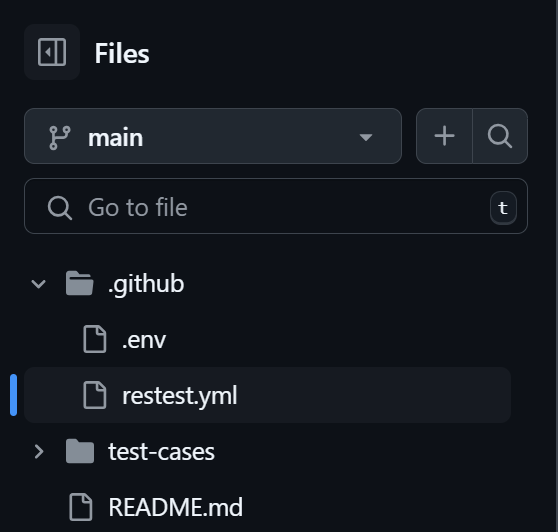
Caption: GitHub Repo schema.
IMPORTANT: For security purposes, we added a .env file to store auth tokens and testId, so they can be called them for other files from it. We’ll use the {$auth-token} and {$test-Id}variables for the current example, but you can use your own variables and name them accordingly. GitHub Actions does not automatically load variables from a .env file. Instead, you need to store the token in GitHub Secrets or use an external action to load the .env file.
Once here, we’ll fill the test case with a simple testRigor execution to search an element in a Search engine:
Enter “testRigor”
Enter enter
Check page contains "testRigor"
Take into consideration that testRigor has a schema for API calls, known as Test case mutations, which is the following:
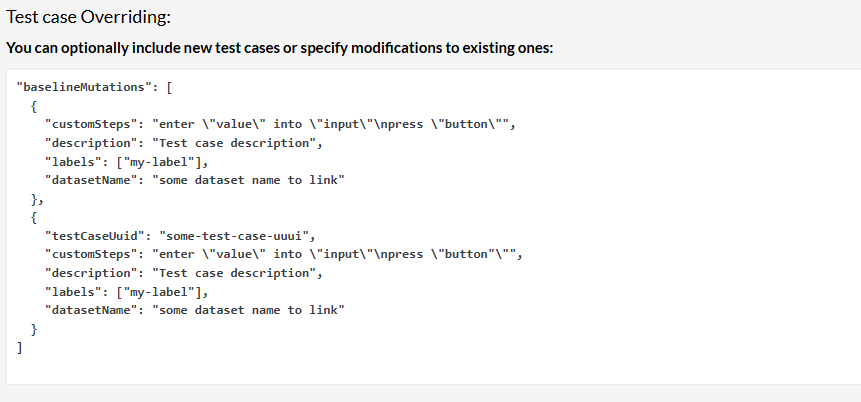
Caption: Test Case schema.
This depends on the current operation you’re performing (Create, Update, Delete, Retest). Due to we’re creating a test case from zero, we’ll use the first option:
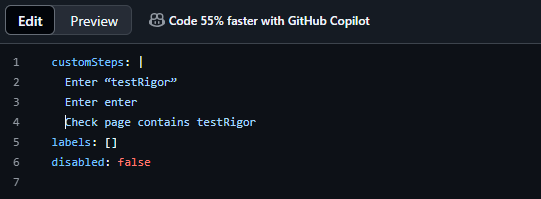
Caption: Test Case in yaml file.
Step 2: Build the workflow and use the prepopulated scripts. We’ll add the prepopulated script in the CICD content step. We’ll make a few modifications, because we’re going to add a job composed of two steps: Checkout and Run a multi-line script.
The Checkout will initialize a simple Bash script, using an empty array, checking the content of our test-cases folder and .yaml files, and then it will fill the array with the content:
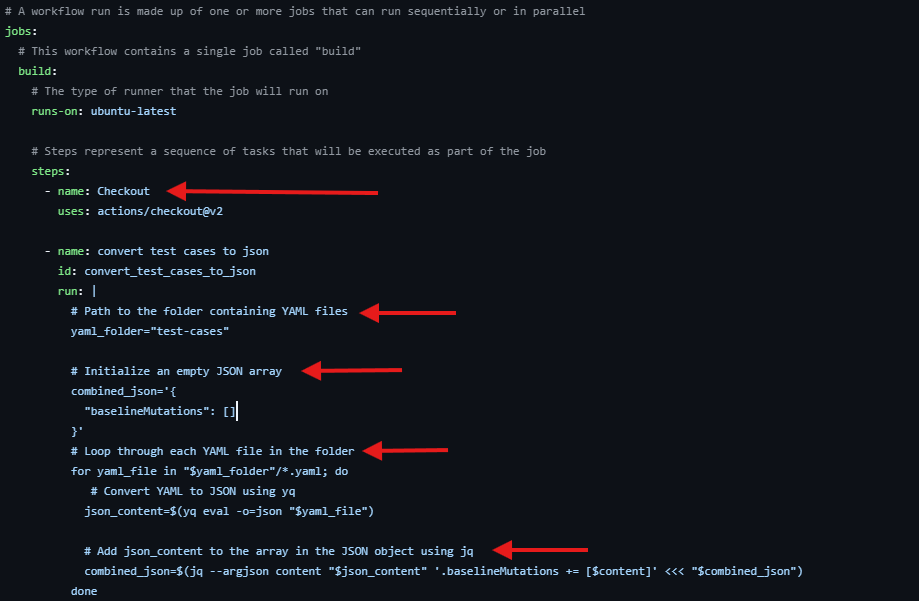
Caption: Checkout script.
Meanwhile, The “Run a multi-line script” step (using the prepopulated CICD testRigor Script) will include the call to our Test Suite and steps to run the workflow, using the auth-token shown by the red arrow in image below:
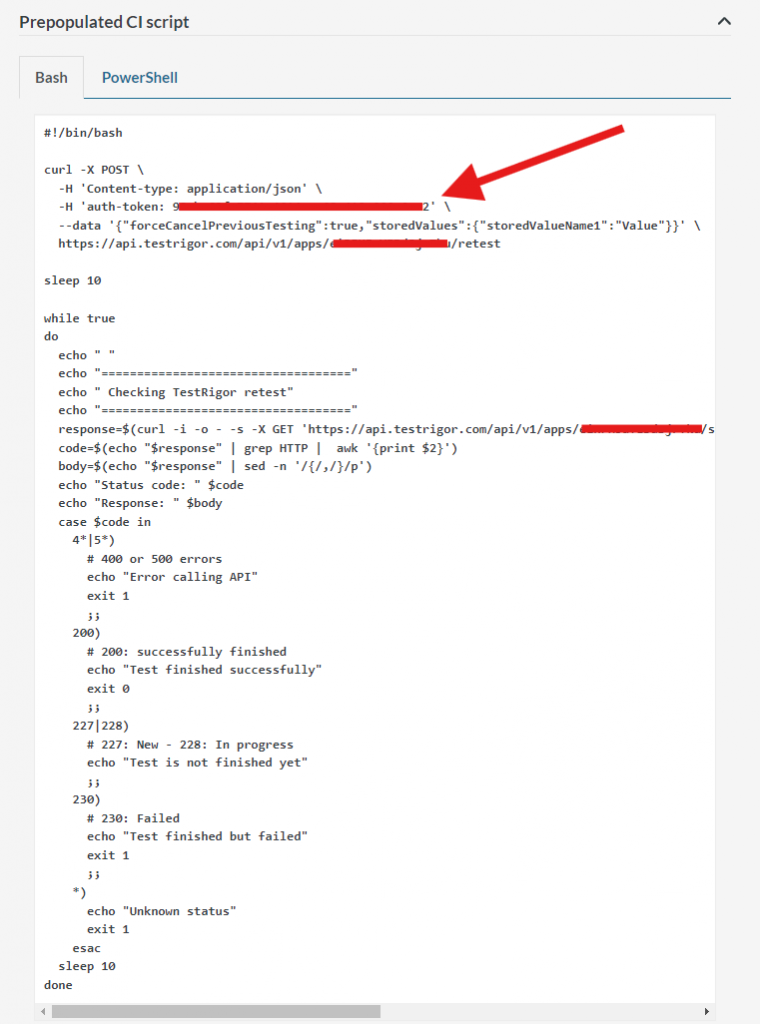
Caption: CI script and auth-token location.
And it will be added as the second part of the script:
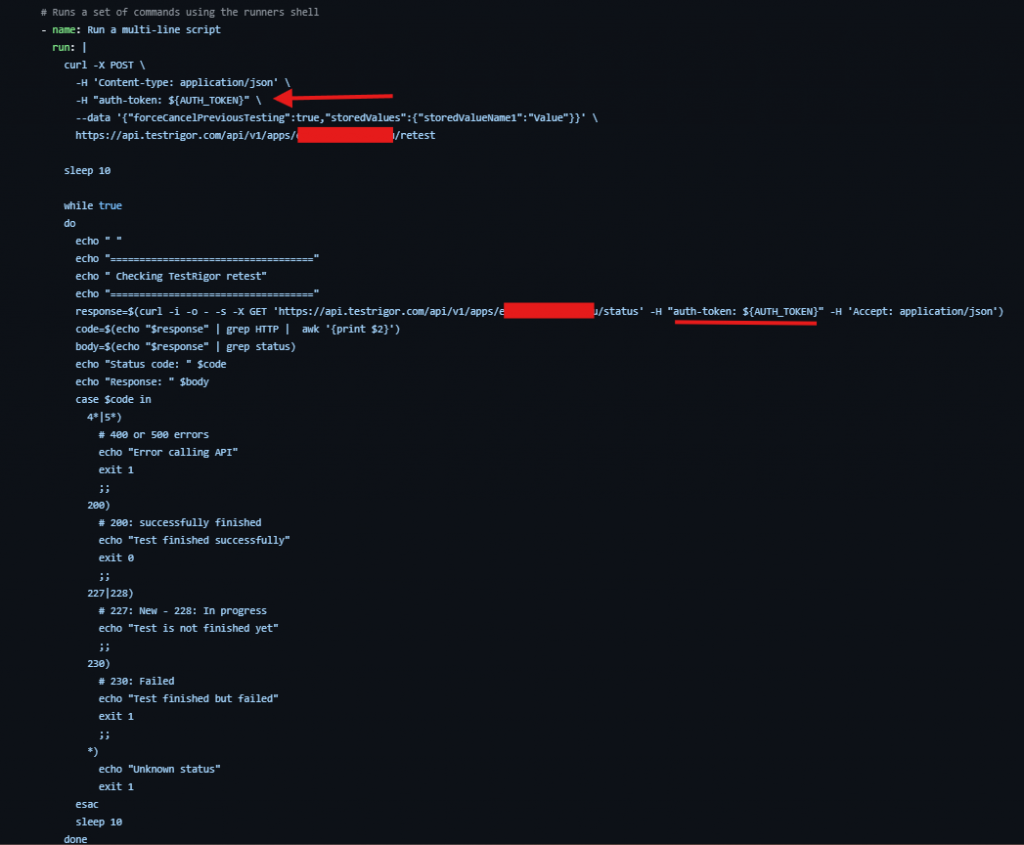
Caption: CI script and auth location in .yml file.
At the end, the result will look like this:
# This is a basic workflow to help you get started with Actions

name: testRigor
# Controls when the workflow will run

on:
  # Triggers the workflow on push or pull request events but only for the "main" branch
  push:
    branches:
      - main

  # Allows you to run this workflow manually from the Actions tab
  workflow_dispatch:

# A workflow run is made up of one or more jobs that can run sequentially or in parallel
jobs:
  api_call_job:
    # The type of runner that the job will run on
    runs-on: ubuntu-latest
    # Steps represent a sequence of tasks that will be executed as part of the job
    steps:
      - name: Checkout
        uses: actions/checkout@v2

      - name: convert test cases to json
        id: convert_test_cases_to_json
        run: |
          # Path to the folder containing YAML files
          yaml_folder="test-cases"


          # Initialize an empty JSON array
          combined_json='{
            "baselineMutations": []
          }'
          # Loop through each YAML file in the folder
          for yaml_file in "$yaml_folder"/*.yaml; do
                  # Convert YAML to JSON using yq
              json_content=$(yq eval -o=json "$yaml_file")
              # Create description name from yml file
              file_name=$(basename "$yaml_file")
              file_name="${file_name%.yaml}"
              # Append description name to test case json object
              json_content=$(jq --arg name "$file_name" '. + {description: $name}' <<<"$json_content")
              # Add json_content to the array in the JSON object using jq
              combined_json=$(jq --argjson content "$json_content" '.baselineMutations += [$content]' <<< "$combined_json")
          done
          echo $combined_json


          curl -X POST \
            -H 'Content-type: application/json' \
            -H 'auth-token: {$auth-token}' \
            --data "${combined_json}" \
            https://api.testrigor.com/api/v1/apps/{$testId}}/retest


          sleep 10


          while true
          do
            echo " "
            echo "==================================="
            echo " Checking TestRigor retest"
            echo "==================================="
            response=$(curl -i -o - -s -X GET 'https://api.testrigor.com/api/v1/apps/{$testId}/status' -H 'auth-token: {$auth-token}}' -H 'Accept: application/json')
            code=$(echo "$response" | grep HTTP |  awk '{print $2}')
            body=$(echo "$response" | grep status)
            echo "Status code: " $code
            echo "Response: " $body
            case $code in
              4*|5*)
                # 400 or 500 errors
                echo "Error calling API"
                exit 1
                ;;
              200)
                # 200: successfully finished
                echo "Test finished successfully"
                exit 0
                ;;
              227|228)
                # 227: New - 228: In progress
                echo "Test is not finished yet"
                ;;
              230)
                # 230: Failed
                echo "Test finished but failed"
                exit 1
                ;;
              *)
                echo "Unknown status"
                exit 1
            esac
            sleep 10
          done
Remember that the current test suite is empty, so once we run the script or add a simple commit, the workflow will run:
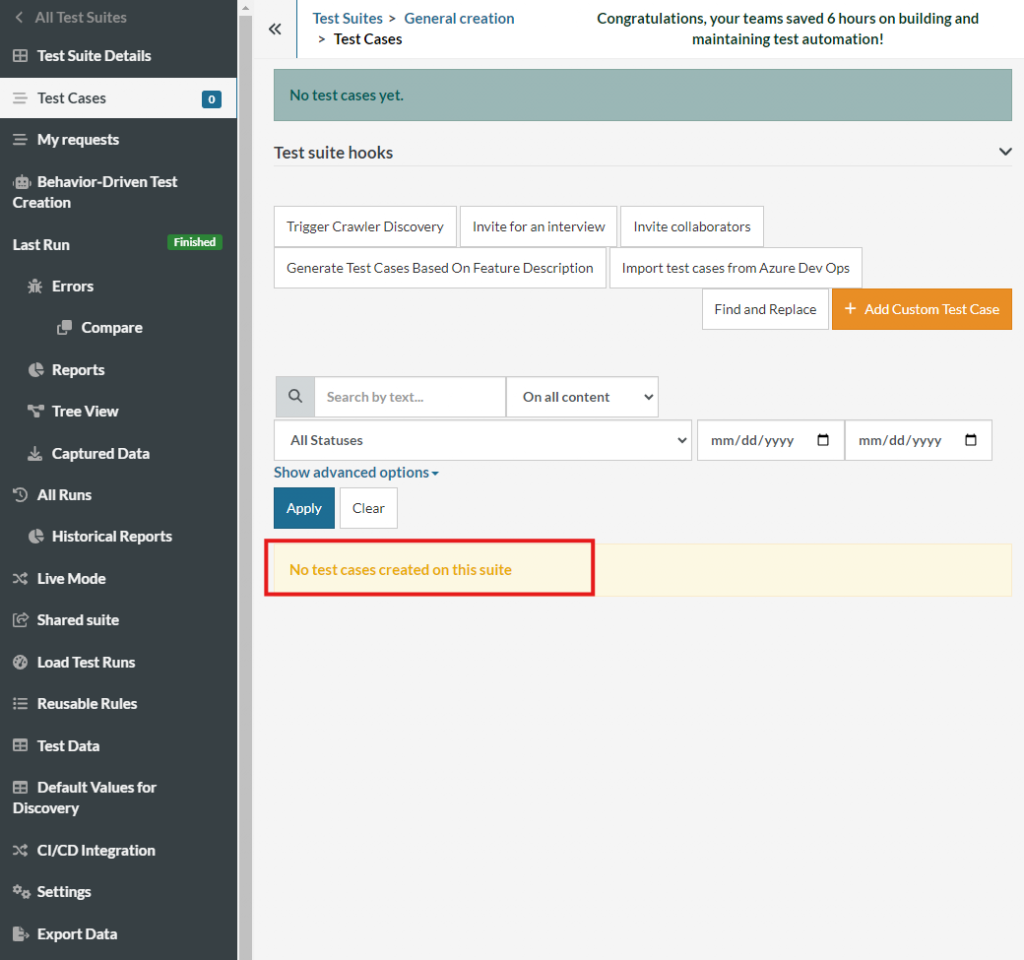
Caption: Empty test suite.
Step 3: once the repo is complete, we just go to Actions -> Workflow and run the workflow to build our CI:

Caption: Workflow run.
Click on the workflow that just ran and check the result from the build for the api_call_job in “Convert test cases to json” section:
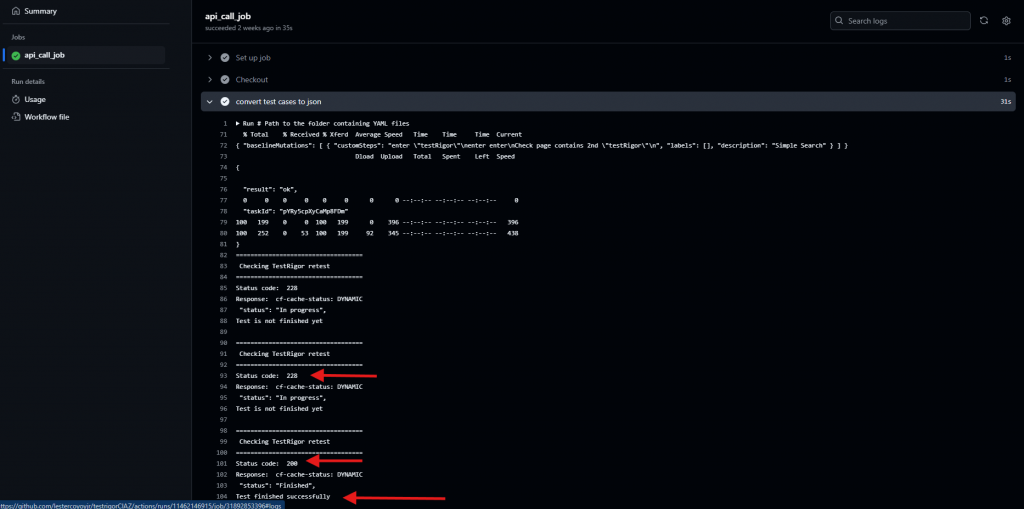
Caption: Build results.
NOTE: In the CICD section of every test suite, there’s a status explanation for API responses:
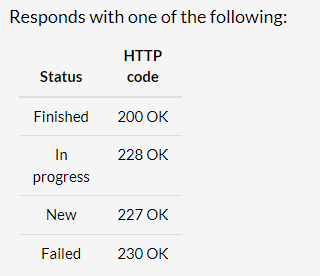
Caption: Status API response.
In this case, the response was 200, which means it was successful, so once we check the result in the test suite, it should appear the new test case:
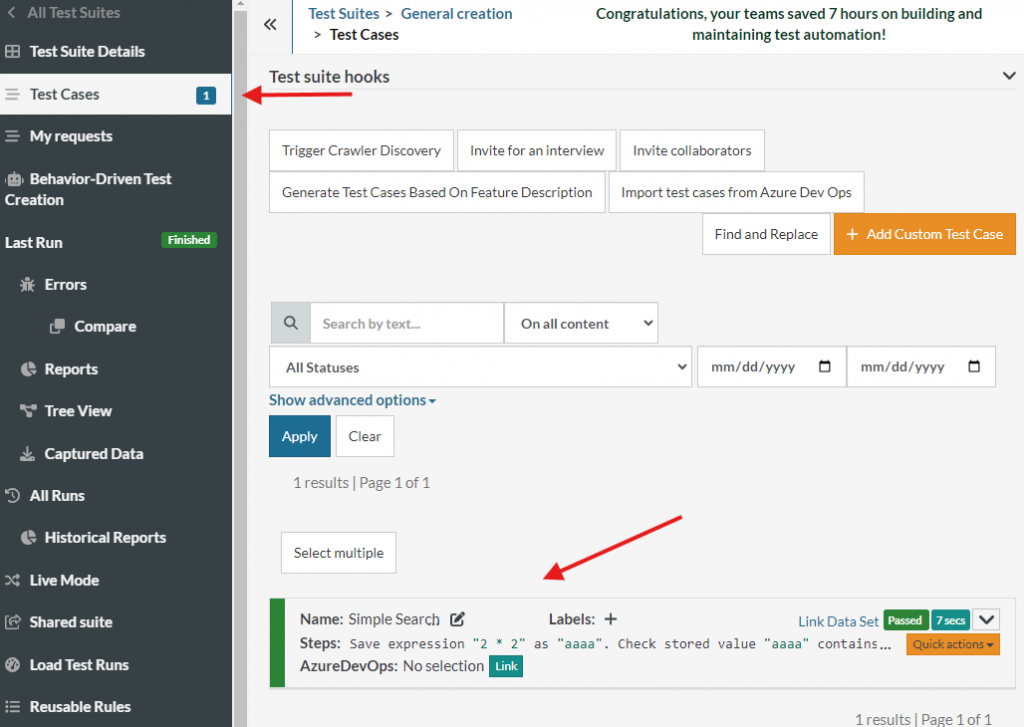
Caption: testRigor Suite result.
Update Test Cases
To update test cases, there are a couple of things to change in our workflow:
Step 1: You must update the test case with the UUID of the test case. This was not created in step before due to it was a new test case, but assuming the test case is already created, we just update the uuid. This can be found opening the test case, below test case name:
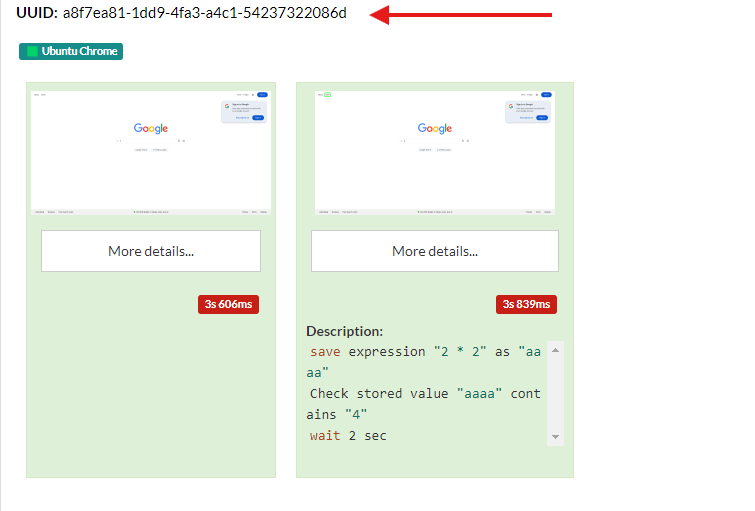
Caption: UUID location and previous steps.

Caption: UUID added to the .yaml file.
Step 2: We’ll just modify test case to search for 2nd result instead of the first one:

Caption: Test case modification.
Step 3: Once it’s done, the workflow will automatically run the workflow and the results will be the test case with the updated test case:
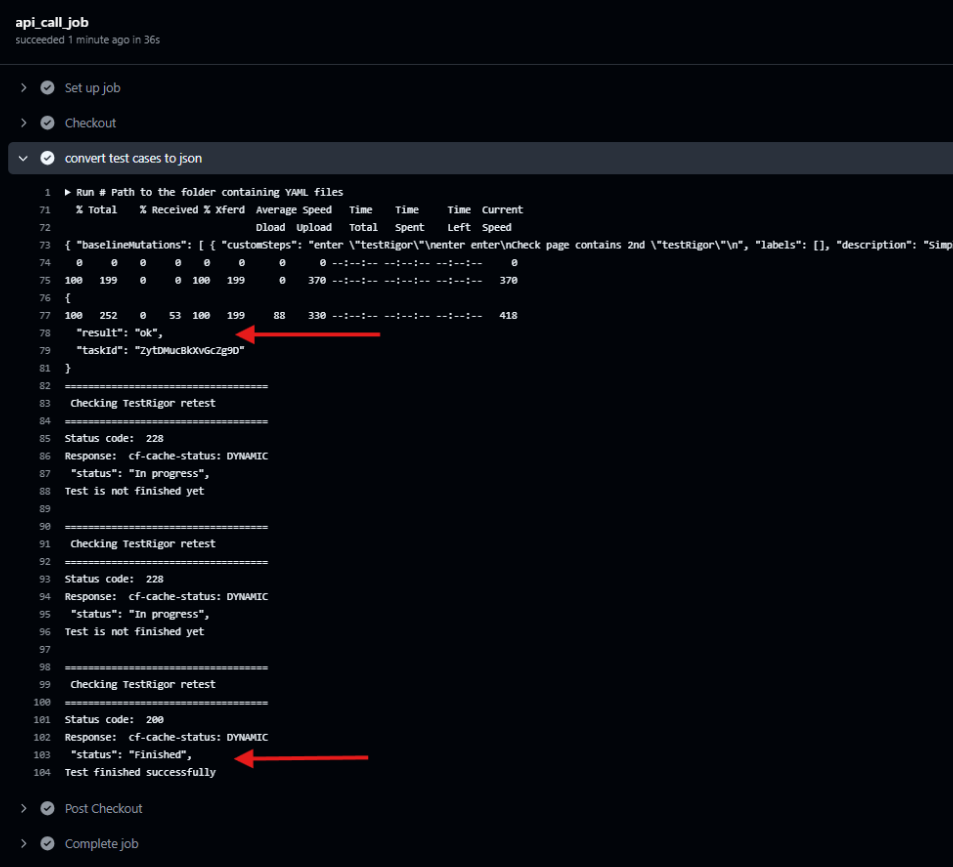
Caption: Workflun run status.
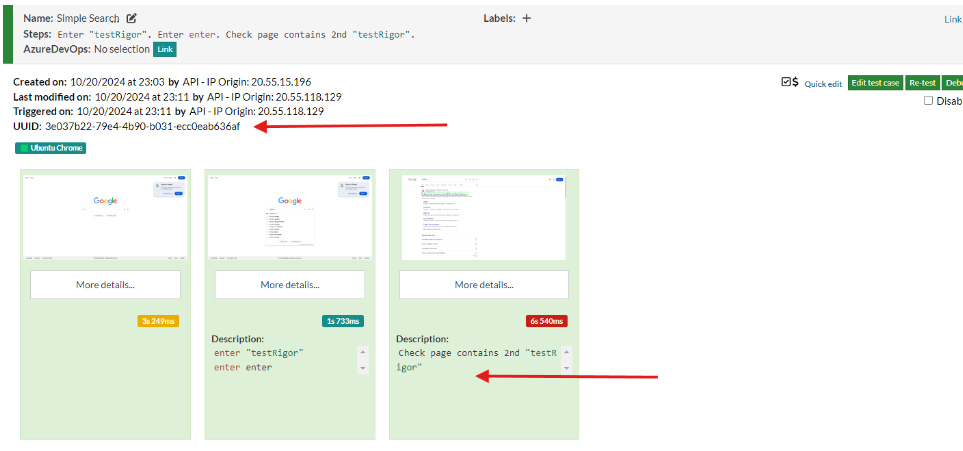
Caption: New run with new steps.


