NetSuite Testing
According to Statista, the global cloud Enterprise Resource Planning (ERP) market is expected to grow 13.6% annually and reach $40.5 billion by 2025. ERP software automates business processes by compiling data from various sources such as accounting, manufacturing, customer relationship management(CRM), supply chain management, inventory, sales, marketing, and human resources (HR). This data is stored in a central repository and provides access to departments and leadership with a single “source of truth”.
NetSuite is a leading cloud-based, integrated business management software suite provided by Oracle, designed to help businesses manage their core processes. It provides real-time visibility into the business's operational and financial performance and data. It is transforming business processes for enterprises of all sizes and is used by more than 36,000 fast-growing organizations across the globe. It can be tailor-made to suit your business needs.
NetSuite's high usage and impact on your business calls for fast and comprehensive testing. Let us learn more about how to test your NetSuite platform.
How to Perform NetSuite Testing?
The section below outlines the testing types required for your business's NetSuite platform.
Unit Testing
The smallest code unit is tested in isolation for correctness, which can be a few lines of code or a function. You can use Jest Test Framework to unit test the NetSuite's functionality. Let us learn more about Jest.
Jest Test Framework
Jest, an open-source and zero-config testing framework, is known for its speed and built-in features such as test runners, assertions, and mocking capabilities. Utilize Jest to write and execute unit tests for SuiteScript 2.x scripts, which are JavaScript-based scripts designed to enhance NetSuite's functionality.
By employing Jest, you can conduct isolated testing of individual units of SuiteScript 2.x code, ensuring their accuracy, comprehensive test coverage, and proper functioning within the application.
Matchers in Jest
When writing a unit test, you should expect a specific outcome for that unit of code. Jest provides built-in methods, known as Matchers, to verify test expectations.
toBe(value) and toBeGreaterThan(number). This test shows that the expected product of 6 and 4 is 24. Additionally, the product of 3 and 9 is expected to be greater than 10. Therefore this test provides multiple expectations to verify the code.it('Should test the product function', () => {
expect(product(6, 4)).toBe(24);
expect(product(3, 9)).toBeGreaterThan(10);
});
Mocking Functions in Jest
Mock functions watch the behavior of your scripts by creating a relationship between the Jest framework and the unit of code you are testing.
mockReturnValue(value).const mockFunction = jest.fn(); //tells Jest to mock function
const mockFunction2 = jest.fn();
mockFunction.mockReturnValue(200); // returns 200
mockFunction2.mockReturnValue('hello world!'); // returns hello world
Steps for Unit Testing in Jest
Step 1: Set up IDE for Unit Testing by installing Visual Studio Code and creating a SuiteCloud project. Then install SuiteCloud Unit Testing for the project and complete the project structure.
Step 2: To set up your unit test file, import the script file being tested and the module-level dependencies used in your SuiteScript file.
Use Jest global methods and objects such as describe() method, which allows you to create a comment about what the group of tests is about. Each test inside the block must be separated with a test()/it() block.
Structure your tests with the Given, When, Then format to keep your code organized and reduce errors.
Step 3: Identify the test cases you want to execute and use mocking functions to create arbitrary values to imitate the behavior of the script.
Step 4: Validate the tests using the Jest code coverage feature to attain at least 80% coverage of your script. Configure the package file (package.json) in your SuiteCloud project to enable code coverage of the script.
Integration Testing
The NetSuite platform is massive due to the unified involvement of all departments and modules. It is essential to verify how different modules and applications within NetSuite integrate and behave. The data transfer between the modules and subsequent processing should be smooth and error-free.
Example: Test the integration between the CRM module with other modules by checking how sales orders of the CRM module are reflected in the order management and inventory modules.
End-to-End Testing
In NetSuite, end-to-end testing is facilitated through the use of a sandbox. They serve as safe and isolated test accounts allowing you to develop and test new applications and their customizations. You can have one or more sandboxes for each production account, where each sandbox account replicates the configuration, data, and customizations of your company's production account to create an accurate environment.
Executing end-to-end testing on sandbox helps to:
- Test platform customization before production deployment
- Resolve and fix existing customization issues in a controlled setting
- Experimenting with and evaluating third-party integration features without impacting live data
- Conduct employee training on business processes using a production-like account, ensuring familiarity with the system's functionalities
Example: Using a sandbox account, you can test scenarios for email campaigns, email notifications, reports, 2-factor authentication (2FA), telephony, CSV imports, etc.
User Acceptance Testing
It involves end-users validating whether the NetSuite application meets their business requirements and expectations. The issues are fixed based on the end-user feedback, and the software is released into the production environment.
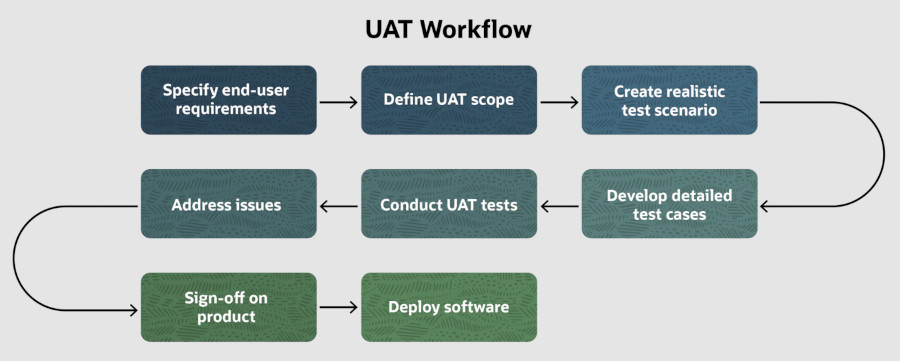
Example: See the UAT test steps below for NetSuite ERP's order management module for an e-commerce business.
- Log in to the NetSuite ERP system: Use valid login credentials to access the NetSuite ERP system and gain access to the Order Management module.
- Navigate to Order Management: Once logged in, navigate to the Order Management module to handle order-related functionalities.
- Create a New Order: Create a new order by entering valid customer details (name, contact information, shipping address) and product details (product name, quantity, price). After creating the order, verify that the order is successfully saved and the order status is updated to "pending" in the system. Also, ensure that the inventory levels are updated accordingly, considering the products sold.
- Cancel the Order: Perform order cancellation by selecting the created order and initiating the cancellation process. Verify that the order status is updated to "canceled" and that the inventory is correctly adjusted to reflect the canceled order.
- Verify Invoice Generation and Delivery: Confirm that the system automatically generates an invoice for the created order. Additionally, ensure the invoice is emailed to the customer per the system configuration. This step is essential to verify the efficiency of the invoicing process.
- Invoice Details Verification: Check the invoice received by the customer via email. Verify that it contains all relevant details, such as the invoice date, invoice number, customer information, address, list of goods sold, payment terms, and applicable taxes or discount codes/amount. Ensure that the invoice accurately reflects the order details.
Load Testing
Measuring the performance of the NetSuite platform under varying load conditions is crucial. It is a vast platform with shared access across departments in an organization or business. Therefore load tests should have a specific and realistic performance and load target which mimics the actual user load.
Example: Bulk web order processing for an e-commerce website at the new year's sale may cause an unexpected load on the order management system and invoicing.
Security Testing
NetSuite deals with sensitive business data, financial information, and customer records, making it a prime target for cyberattacks. Security testing helps ensure the application is adequately protected against potential threats and adheres to industry security standards.
Perform security testing to identify and address potential vulnerabilities in the application, such as vulnerability assessment, penetration testing, regulatory compliance, authentication, authorization, customer data security, 2FA, etc.
Many security companies provide cybersecurity solutions to keep your infrastructure, customer data, and secured information safe.
Example: Verify that NetSuite implements an account lockout mechanism to prevent brute force attacks. Attempt to log in with multiple incorrect passwords for a specific user account and ensure that the account gets locked temporarily.
Tools to Support NetSuite Testing
This section focuses on the different automation tools that can be used for NetSuite testing.
Traditional (Legacy) Automation Testing Tools
With traditional test automation tools, testers often face multiple challenges due to the complex nature of applications and their dynamic user interfaces. The market provides numerous automation tools designed for NetSuite testing. However, most of these tools are based on Selenium, and they encounter similar issues.
Dynamic Element Locators in the NetSuite platform cause finding stable locators for elements challenging. Frequent changes in the DOM structure can lead to test failures and flaky tests.
Slow Loading Times result from NetSuite's complex structures and heavy content. Selenium may encounter timing issues, such as elements not being visible when executing the test script.
iFrames are used in NetSuite's certain components, and switching in and out of iFrames during test execution can be tricky using legacy automation testing tools.
Authentication Challenges may arise because NetSuite may have multiple authentication mechanisms, such as Single Sign-On (SSO).
Large Test Data Sets are standard in NetSuite, especially for end-to-end scenarios. Managing and preparing large test data sets can be time-consuming.
Test Data Synchronization across multiple environments (production, sandbox, etc.) can be challenging.
Dynamic Popups are used in NetSuite for notifications, warnings, and error messages, which can interfere with test execution.
Performance Testing of NetSuite can not be performed using legacy automation testing tools.
Cross-Browser Compatibility issues need thorough cross-browser testing due to variations in browser rendering, which increases test complexity.
New Generation Tools
The issues mentioned above are why organizations are seeking better alternatives that can expedite the test automation process and provide more comprehensive coverage to keep pace with Agile/DevOps methodologies. Organizations cannot afford to spend time on script maintenance due to factors such as dynamic element locators, pop-ups, and frequent NetSuite releases.
testRigor can be the solution to these challenges. This innovative no-code automation tool, enriched with integrated AI, is designed to accelerate test creation and minimize test maintenance.
Below are some advantages that distinguish testRigor from other tools:
Versatile test creation: testRigor enables you to create tests using three straightforward approaches:
- By simply providing the test case title, testRigor's generative AI engine will automatically create test steps for you within seconds.
- testRigor supports writing test scripts in plain English, eliminating the need for any programming language knowledge. The tool's AI converts these English test scripts into actual code using advanced Natural Language Processing (NLP).
- You can use our test recorder to record your actions and easily create the test case. The tests are generated in plain English, meaning there's no need to learn code. The lack of XPath dependency ensures ultra-stable tests that are easy to maintain.
Self-healing tests: The issue of constant updates and test maintenance is expected in NetSuite since it is regularly updated with new versions. testRigor incredibly manages these issues with its automatic self-healing features. Any changes in the element attributes or application are incorporated into the test scripts automatically, saving massive maintenance effort hours.
Automatic wait times: testRigor automatically manages wait times, sparing you from manually inputting them and thus preventing "element not found" errors.
Ultra-stable: As a no-code solution, testRigor eliminates dependencies on specific programming languages. Elements are referenced as they appear on the screen, reducing reliance on implementation details and simplifying test creation, maintenance, and debugging.
Cloud-hosted: Save time, effort, and resources on infrastructure setup. With testRigor, you are ready to start writing test scripts right after signing up, boasting a speed up to 15 times faster compared to other automation tools.
Comprehensive testing coverage: testRigor supports all main types of testing and accommodates cross-browser and cross-platform tests.
Seamless integrations: Built-in integrations with CI/CD, issue and test management tools ensure a seamless and efficient testing process.
Take a look at the testRigor's documentation to get a better understanding of the supported functionality.
login
create new lead
go to leads
check that table at row containing stored value "lastName" and column "Status" contains "Created”
You can see how clean and simple the test script appears. The built-in login command handles the login process automatically. You simply write in plain English what you see on the screen to serve as element locators. There's no need for CSS and XPath element locators that could result in unstable and flaky tests. testRigor caters to all your NetSuite testing needs with such simplicity that even your non-technical staff can write and maintain test cases in plain English.
These features help you to achieve a broader test coverage before the release deadline, and that too in budget. There is no need for separate testing tools and external integrations to perform NetSuite testing. Just use testRigor and relax. Everything will be taken care of by the intelligent tool, you do not even need to write and maintain your test scripts. How can it get better than this?
Get a glimpse of testRigor's incredible features.
How to do End-to-end Testing with testRigor
Let us take the example of an e-commerce website that sells plants and other gardening needs. We will create end-to-end test cases in testRigor using plain English test steps.
Step 1: Log in to your testRigor app with your credentials.
Step 2: Set up the test suite for the website testing by providing the information below:
- Test Suite Name: Provide a relevant and self-explanatory name.
- Type of testing: Select from the following options: Desktop Web Testing, Mobile Web Testing, Native and Hybrid Mobile, based on your test requirements.
- URL to run test on: Provide the application URL that you want to test.
- Testing credentials for your web/mobile app to test functionality which requires user to login: You can provide the app’s user login credentials here and need not write them separately in the test steps then. The login functionality will be taken care of automatically using the keyword
login. - OS and Browser: Choose the OS Browser combination on which you want to run the test cases.
- Number of test cases to generate using AI: If you wish, you can choose to generate test cases based on the App Description text, which works on generative AI.

Step 3: Click Create Test Suite.
On the next screen, you can let AI generate the test case based on the App Description you provided during the Test Suite creation. However, for now, select do not generate any test, since we will write the test steps ourselves.
Step 4: To create a new custom test case yourself, click Add Custom Test Case.
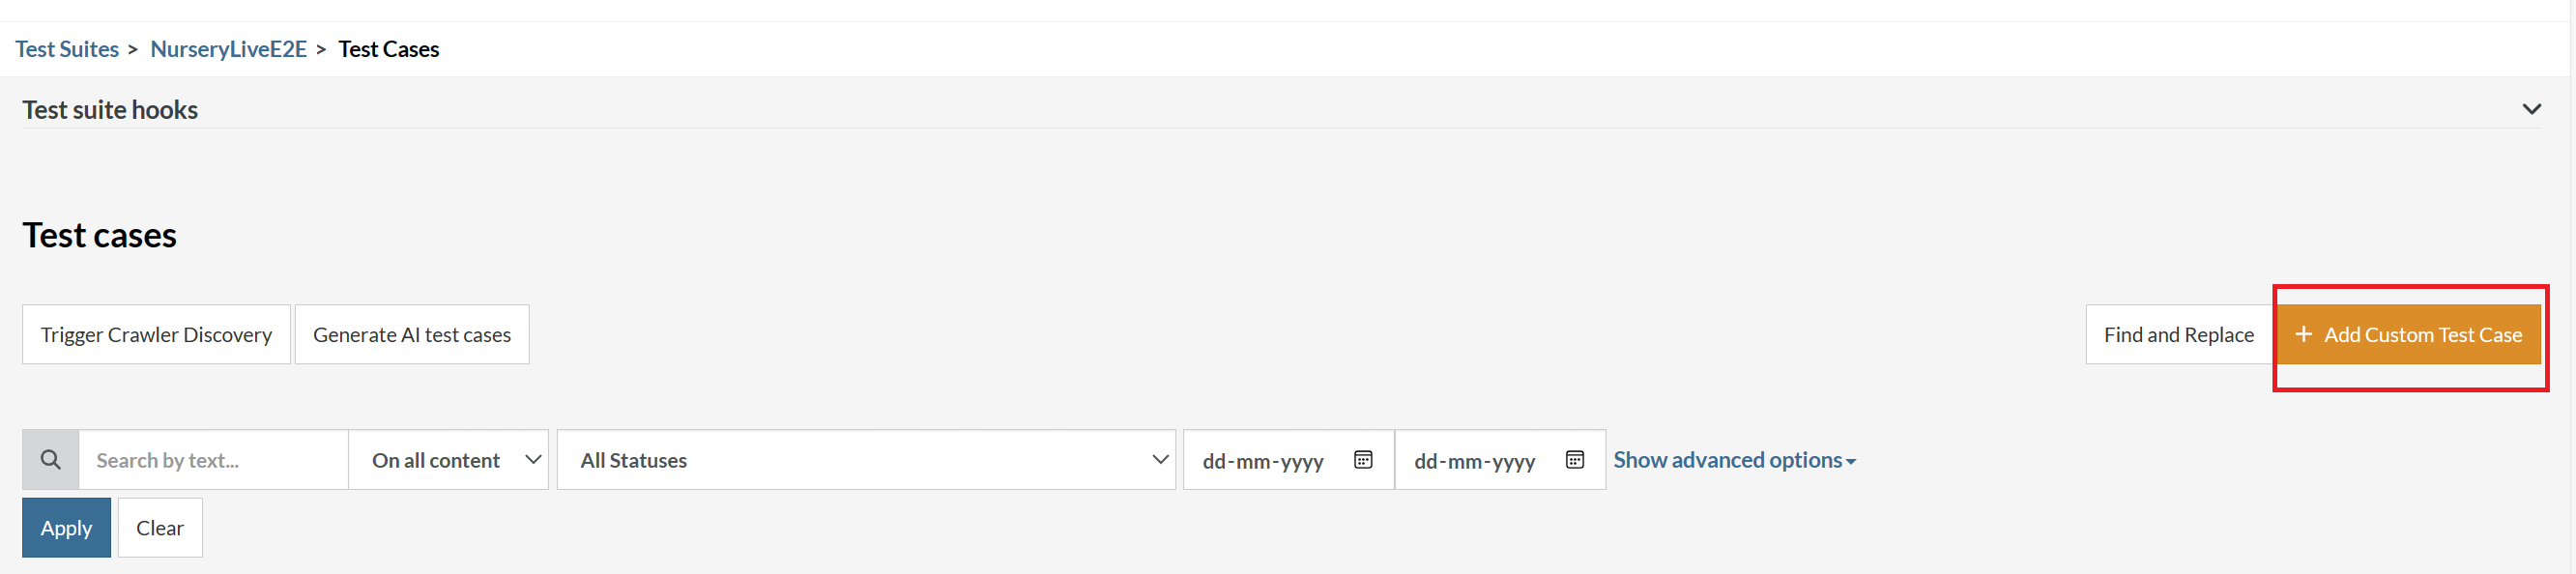
Step 5: Provide the test case Description and start adding the test steps.
For the application under test, i.e., e-commerce website, we will perform below test steps:
- Search for a product
- Add it to the cart
- Verify that the product is present in the cart
Test Case: Search and Add to Cart
Step 1: We will add test steps on the test case editor screen one by one.
testRigor automatically navigates to the website URL you provided during the Test Suite creation. There is no need to use any separate function for it. Here is the website homepage, which we intend to test.

First, we want to search for a product in the search box. Unlike traditional testing tools, you can identify the UI element using the text you see on the screen. You need not use any CSS/XPath identifiers.
click "What are you looking for?"
Step 2: Once the cursor is in the search box, we will type the product name (lily), and press enter to start the search.
type "lily"
enter enter

Search lists all products with the “lily” keyword on the webpage.
Step 3: The lily plant we are searching for needs the screen to be scrolled; for that testRigor provides a command. Scroll down until the product is present on the screen:
scroll down until page contains "Zephyranthes Lily, Rain Lily (Red)"

When the product is found on the screen, testRigor stops scrolling.
Step 4: Click on the product name to view the details:
click "Zephyranthes Lily, Rain Lily (Red)"
After the click, the product details are displayed on the screen as below, with the default Quantity as 1.

Step 5: Lets say, we want to change the Quantity to 3, so here we use the testRigor command to select from a list.
select "3" from "Quantity"
click "Add to cart"
The product is successfully added to the cart, and the “Added to your cart:” message is displayed on webpage.
Step 6: To assert that the message is successfully displayed, use a simple assertion command as below:
check that page contains "Added to your cart:"
Step 7: After this check, we will view the contents of the cart by clicking View cart as below:
click "View cart"

Step 8: Now we will again check that the product is present in the cart, under heading “Your cart” using the below assertion. With testRigor, it is really easy to specify the location of an element on the screen.
check that page contains "Zephyranthes Lily, Rain Lily (Red)" under "Your cart"

Complete Test Case
Here is how the complete test case will look in the testRigor app. The test steps are simple in plain English, enabling everyone in your team to write and execute them.

Click Add and Run.
Execution Results
Once the test is executed, you can view the execution details, such as execution status, time spent in execution, screenshots, error messages, logs, video recordings of the test execution, etc. In case of any failure, there are logs and error text that are available easily in a few clicks.
You can also download the complete execution with steps and screenshots in PDF or Word format through the View Execution option.

testRigor’s Capabilities
Apart from the simplistic test case design and execution, there are some advanced features that help you test your application using simple English commands.
- Reusable Rules (Subroutines): You can easily create functions for the test steps that you use repeatedly. You can use the Reusable Rules to create such functions and call them in test cases by simply writing their names. See the example of Reusable Rules.
- Global Variables and Data Sets: You can import data from external files or create your own global variables and data sets in testRigor to use them in data-driven testing.
- 2FA, QR Code, and Captcha Resolution: testRigor easily manages the 2FA, QR Code, and Captcha resolution through its simple English commands.
- Email, Phone Call, and SMS Testing: Use simple English commands to test the email, phone calls, and SMS. These commands are useful for validating 2FA scenarios, with OTPs and authentication codes being sent to email, phone calls, or via phone text.
- File Upload/ Download Testing: Execute the test steps involving file download or file upload without the requirement of any third-party software. You can also validate the contents of the files using testRigor’s simple English commands.
- Database Testing: Execute database queries and validate the results fetched.
testRigor enables you to test web, mobile (hybrid, native), API, and desktop apps with minimum effort and maintenance.
Additional Resources
- Access testRigor documentation to know about more useful capabilities
- Top testRigor’s features
- How to perform end-to-end testing
Conclusion
NetSuite is a complex application covering a large number of services and modules. However, it doesn't imply that the test automation suite should be complex too. You can use simple and user-friendly AI-powered tools such as testRigor to create a robust test suite with comprehensive test coverage.
The built-in features of testRigor help you test challenging scenarios of NetSuite, such as emails, calls, SMS, PDF testing, login management, cross-browser and cross-platform testing, that too much more quickly.
| Achieve More Than 90% Test Automation | |
| Step by Step Walkthroughs and Help | |
| 14 Day Free Trial, Cancel Anytime |


