Setup for Remote Desktop Protocol (RDP) Tunneling
|
|
This article contains instructions on how to set up RDP tunneling from a Windows VM to testRigor cloud servers.
Before we get started, it’s important to know what this feature is NOT for. This is not for desktop web/ browser based applications, mobile web testing or native/hybrid mobile applications. testRigor executes all these tests on the infrastructure we provide or on the external infrastructure providers (e.g., LambdaTest) you integrate with your suite. Connection issues here can almost always be safely resolve through whitelisting our list of static IPs. If whitelisting is not your preferred option, please contact testRigor support or sales for alternatives.
Now that we cleared this up, what is it for?
So, you have a Windows application that you want to test, you have the virtual machine (VM) or local computer available to you to test it, you’ve set up your Windows Remote Desktop suite in testRigor, but you’re unable to execute any test cases because your VM or local computer is behind a firewall or VPN. You’ve come to the right place! Follow the steps below to set up a secure direct connection with testRigor servers.
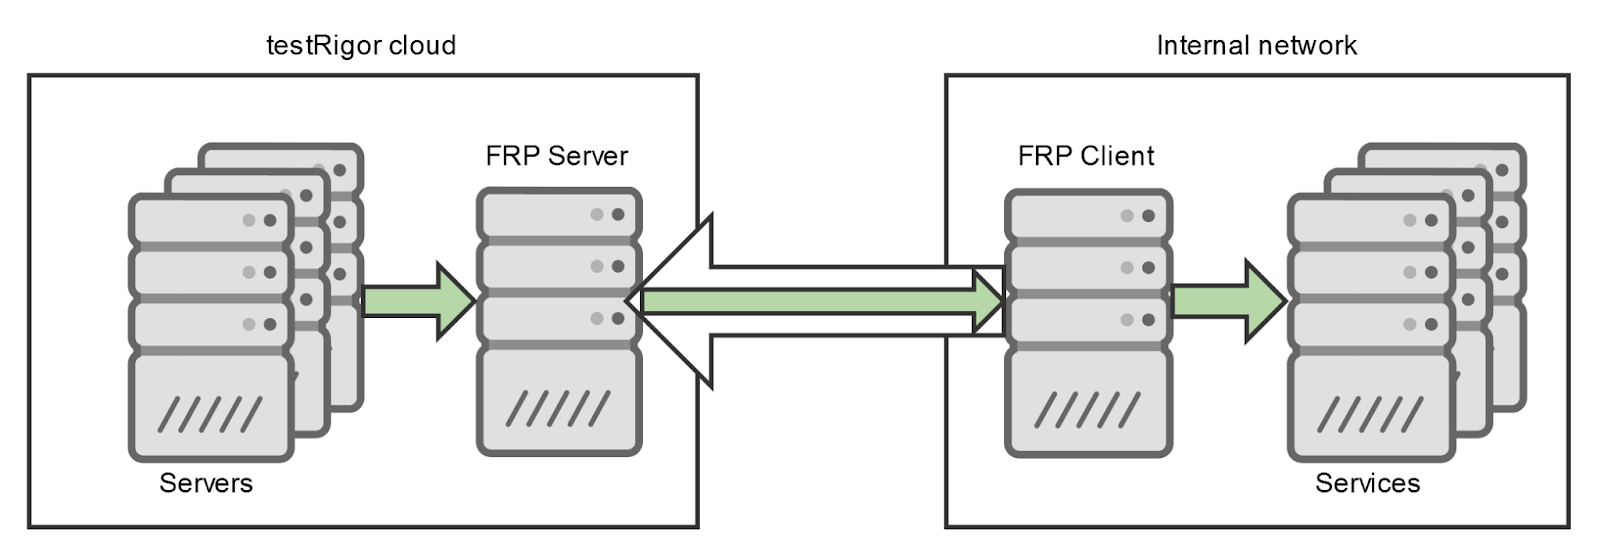
1. Download FRP client
Download and extract the latest frp (fast reverse proxy) version for your Operating System from here:
https://github.com/fatedier/frp/releases
2. Create config.ini file
Create a file named config.ini with the following template using a simple text editing app like Notepad (For best results, save the file in the extracted folder. The file extension must be .ini):
| [common] server_addr = tunnel.testrigor.com server_port = 443 [local_rdp_XXXXX] |
*Substitute XXXX with a port number assigned by a testRigor representative.
3. Run FRP client
To connect to the server which is located on testRigor cloud, open Windows Command Prompt to run the following command:
# ./frpc -c config.ini
You should see messages similar to the following:
| 2021/11/01 19:57:49 [I] [service.go:301] [90cb3f80767c4fbc] login to server success, get run id [90cb3f80767c4fbc], server udp port [0] 2021/11/01 19:57:49 [I] [proxy_manager.go:144] [90cb3f80767c4fbc] proxy added: [http_proxy_XXXXX] 2021/11/01 19:57:49 [I] [control.go:180] [90cb3f80767c4fbc] [http_proxy_XXXX] start proxy success |
4. Setting up your test suite on app.testrigor.com
Navigate to the Remote Desktop tab in Settings. Then type “tunnel.testrigor.com:XXXX” into the Address field, using the assigned port number, which should also be specified in the config.ini file, in the place of XXXX.


