CI/CD Series: testRigor and Azure DevOps
|
|
TestRigor manages different types of CI/CD tools in order to enhance with AI your workflows and pipelines. This time, we’ll explore one of them: Azure DevOps.
Azure DevOps Brief Concept:
Azure DevOps is a cloud-based platform for DevOps lifecycle management, offering CI/CD pipelines, source control (via Git), and project management tools. Compared to GitHub Actions, which integrates deeply with GitHub for automation, Azure DevOps provides a more comprehensive suite for enterprise-scale projects with broader tool integration. GitLab CI/CD offers a similar CI/CD experience but is tightly integrated into GitLab’s platform. Azure DevOps stands out for its flexibility, supporting multiple version control systems (Git and TFVC), and extensive services, making it ideal for large organizations managing complex workflows.
Azure DevOps: Tools and Considerations:
- Migration Tools: There’s no direct, automated tool to migrate workflows from, so manual conversion is needed.
- Documentation: Microsoft and GitHub both provide comprehensive documentation on YAML syntax and how to build workflows in each system, which is helpful during the transition.
Comparison to other Platform Concepts:
- Jobs and Steps: Jobs correspond to Azure Pipelines stages and jobs.
- Triggers: It translates to Azure’s trigger: (for branches, PRs, etc.).
- Marketplace: Azure DevOps has extensions in its own Marketplace for different languages.
Version Control in Azure DevOps
Azure DevOps supports both Git and Team Foundation Version Control (TFVC), but Git is the go-to for modern DevOps pipelines—especially when test automation is a core part of the workflow. By combining Git-based version control with testRigor’s AI-powered testing, teams can build a robust, traceable, and scalable testing strategy.
Here’s how it all fits together:
- Unified source of truth: Store your application code, infrastructure definitions, and testRigor PowerShell scripts in a single Git repository. This ensures every test run is tied to a specific commit, making debugging and auditing seamless.
- Trigger tests from Git events: Azure Pipelines can initiate testRigor test runs automatically on Git pushes, pull requests, or tag creations. This tight coupling between version control and testing helps catch regressions early.
- Branch-aware testing: Use Git branches to isolate features or hotfixes, and configure testRigor to run different test suites or environments per branch. This supports parallel development without compromising quality.
- Import and link test cases: testRigor allows you to import manual test cases from Azure DevOps or link existing ones, so test results sync across both platforms. This bridges the gap between manual QA and automated pipelines.
- Security and scalability: Store your test suite IDs and auth tokens securely (e.g., in
.envfiles), and scale your test execution across environments using testRigor’s cloud infrastructure.
With testRigor embedded into your Git-driven Azure DevOps pipeline, testing becomes a first-class citizen—automated, versioned, and aligned with every code change.
How does testRigor work with Azure DevOps?
Seeing previous differences, testRigor smooths the testing process in the CI cycle when using Azure DevOps by adding a PowerShell Script that you can add in order to automate your Tests. You can find this prepopulated CI Script by going to testRigor workspace -> CI/CD Integration and click on PowerShell variation next to Bash option:
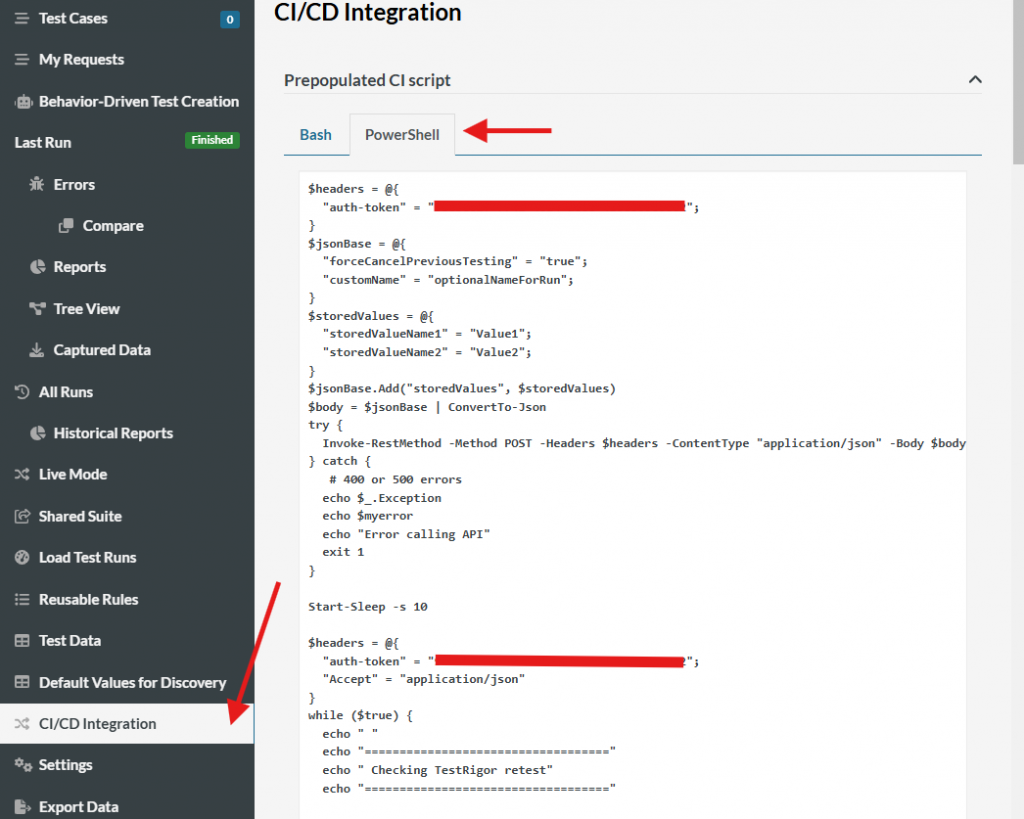
Caption: CICD powershell location
Each one of the current APIs comes with a PowerShell Script for it. Now, here we share the steps to run a single Azure DevOps Pipeline with TestRigor:
Before starting:
- You already have a testRigor Workspace
- You already have an Azure DevOps account and workspace.
- You already performed the Azure DevOps testRigor Integration.
Steps
Step1: Login to Azure DevOps and go to your workspace.
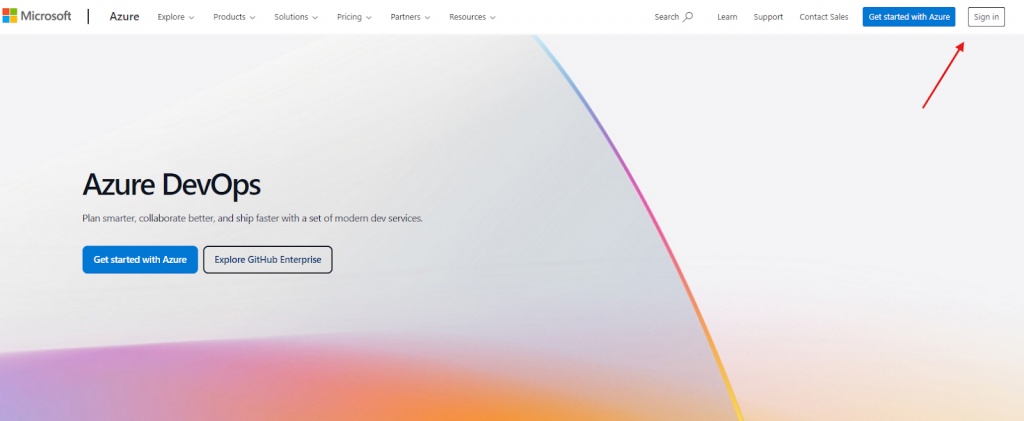

Caption: Azure DevOps organization location
Step 2: You chose your organization or create a new one. For this tutorial, I will focus on an organization that already exists:
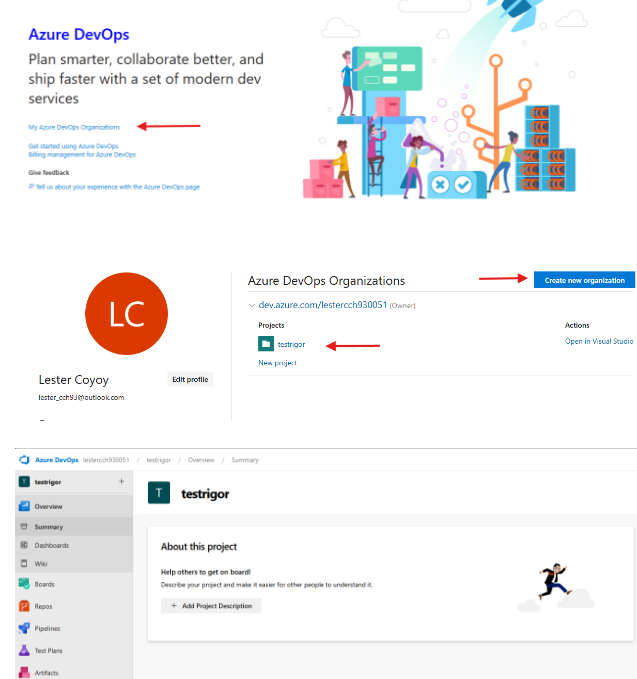
Caption: Organizations in Azure Account
Step 3: In the previous image, click on “Pipelines”. You will see there all your previous and current workflows. We will select a new pipeline for this:

Caption: Pipelines location
Step 4: Once there, and in the case it’s a new repo, you will have the option to:
- Import from Azure Repo
- Import from BitBucket
- Import from GitHub
If you already performed the GitHub Actions and TestRigor CI: How it works article, it’s very easy, cause the only thing you require to perform is to transfer the current code from Github, update the .yml file to be with PowerShell scripts, run it and that’s it.
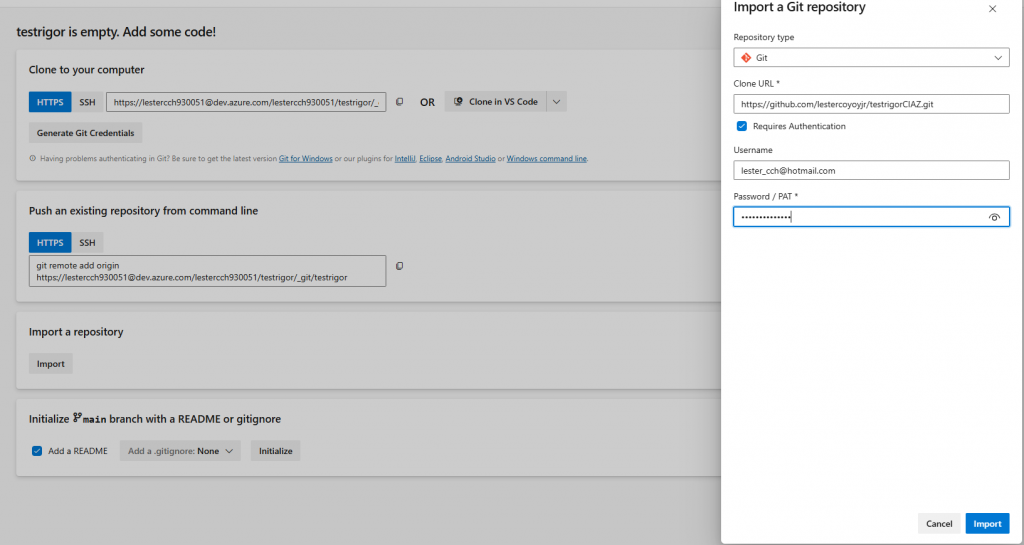

Caption: Import from GitHub to Azure
trigger:
  branches:
    include:
      - main # Trigger on changes to the 'main' branch
pool:
  vmImage: 'windows-latest' # Using a Windows agent
jobs:
- job: PowershellJob
  displayName: "Run PowerShell Commands"
  steps:
    - task: PowerShell@2
      displayName: "Download yq and Run Script"
      inputs:
        targetType: 'inline'
        script: |
          # Download yq binary for Windows
          Invoke-WebRequest -Uri "https://github.com/mikefarah/yq/releases/latest/download/yq_windows_amd64.exe" -OutFile "$env:USERPROFILE\yq.exe"
          Write-Output "yq downloaded successfully"
          # Add yq to PATH for this session
          $env:PATH += ";$env:USERPROFILE"
          # Set headers and initialize JSON base
          $headers = @{
            "auth-token" = @{auth-token};
          }
          $jsonBase = @{
            "baselineMutations" = @();
          }
          # Directory containing YAML test cases
          $yamlFolder = "test-cases"
          # Iterate over each YAML file, converting it to JSON and adding it to the array
          foreach ($yamlFile in Get-ChildItem -Path $yamlFolder -Filter *.yaml) {
              Write-Output "Processing file: $($yamlFile.FullName)"

              # Convert YAML to JSON using yq
              $jsonContent = & "$env:USERPROFILE\yq.exe" eval -o=json $yamlFile.FullName
              Write-Output "Parsed JSON content: $jsonContent"

              # Parse JSON content into an object if it's not empty
              if ($jsonContent) {
                  # Convert JSON content to PSCustomObject
                  $jsonContentObj = $jsonContent | ConvertFrom-Json

                  # Check and add the description property
                  $fileName = [System.IO.Path]::GetFileNameWithoutExtension($yamlFile.Name)
                  $jsonContentObj | Add-Member -MemberType NoteProperty -Name "description" -Value $fileName -Force

                  # Verify that all required fields are present
                  if (-not $jsonContentObj.customSteps) {
                      Write-Output "Warning: 'customSteps' field is missing in $fileName"
                      $jsonContentObj | Add-Member -MemberType NoteProperty -Name "customSteps" -Value "default steps" -Force
                  }
                  if (-not $jsonContentObj.labels) {
                      Write-Output "Warning: 'labels' field is missing in $fileName"
                      $jsonContentObj | Add-Member -MemberType NoteProperty -Name "labels" -Value @() -Force
                  }

                  # Append the JSON object to baselineMutations
                  $jsonBase.baselineMutations += $jsonContentObj
                  Write-Output "Successfully added description to JSON object"
              } else {
                  Write-Output "Error: Failed to parse JSON content from $yamlFile."
                  exit 1
              }
          }
          # Convert final JSON to string
          $body = $jsonBase | ConvertTo-Json -Depth 10
          Write-Output "Print body: $body"

          try {
              # Make API POST request
              Invoke-RestMethod -Method POST -Headers $headers -ContentType "application/json" -Body $body -Uri "https://api.testrigor.com/api/v1/apps/@{your-testSuite}/retest" -ErrorVariable myerror
          } catch {
              # Handle errors
              Write-Output "Error calling API"
              Write-Output $_.Exception
              exit 1
          }
          Start-Sleep -Seconds 10
          # Begin polling to check retest status
          while ($true) {
              Write-Output "==================================="
              Write-Output " Checking TestRigor retest status"
              Write-Output "==================================="
              try {
                  $response = Invoke-WebRequest -Method GET -Headers $headers -Uri "https://api.testrigor.com/api/v1/apps/eiRFH5aYEDdSjrTku/status" -UseBasicParsing -ErrorVariable myerror
              } catch {
                  Write-Output "Error calling API"
                  Write-Output $_.Exception
                  exit 1
              }
              $code = $response.StatusCode
              $body = $response.Content
              Write-Output "Status code: $code"
              Write-Output "Response: $body"
              switch ($code) {
                  200 {
                      Write-Output "Test finished successfully"
                      exit 0
                  }
                  { @(227, 228) -contains $code } {
                      Write-Output "Test is not finished yet"
                  }
                  230 {
                      Write-Output "Test finished but failed"
                      exit 1
                  }
                  default {
                      Write-Output "Unknown status: $code"
                      exit 1
                  }
              }
              Start-Sleep -Seconds 10
          }
IMPORTANT: The @{auth-token} is the token found in the CI/CD section, and the @{your-testSuite} is the test suite Id. We added a .env file to grab them from there due to security reasons, so replace them with your own token and test suite Id in order to make it work properly.
Step 6: Now, we’ll proceed to set up a new build by selecting our pre-existing .yml file:

Caption: Pipelines location
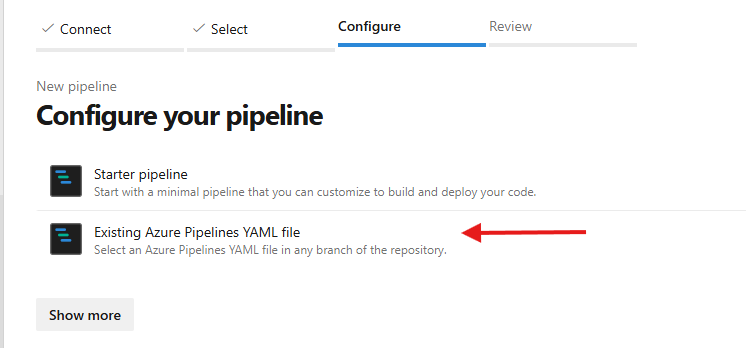
Caption: Existing Azure YAML file selection
Step 7: Select your branch:
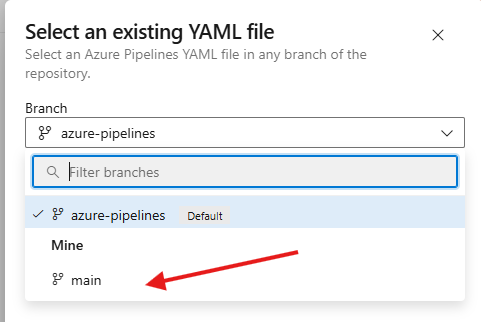
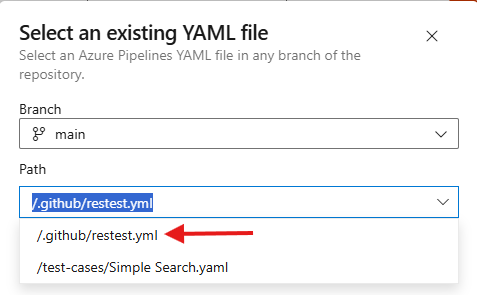
Caption: Select .yml file and branch location
Step 8: We review the pipeline and run it:
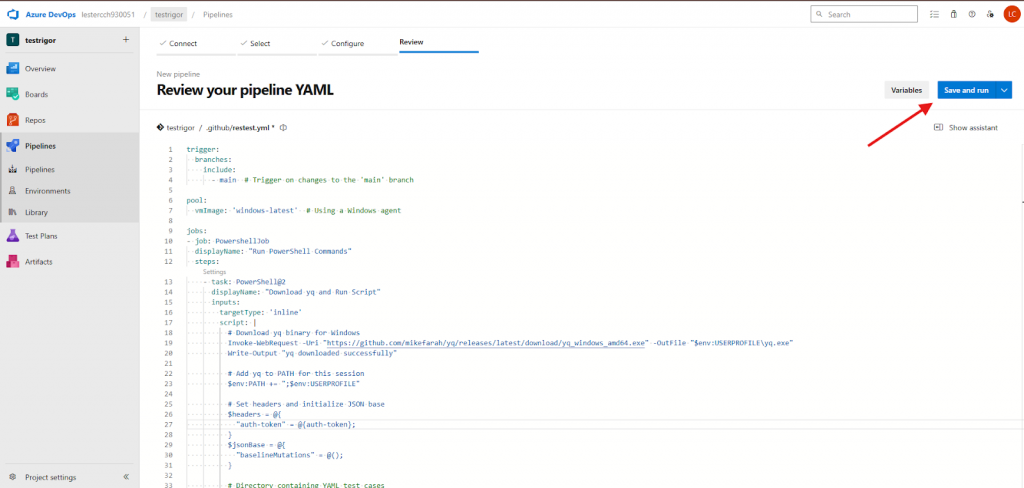
Caption: Save and Run Button
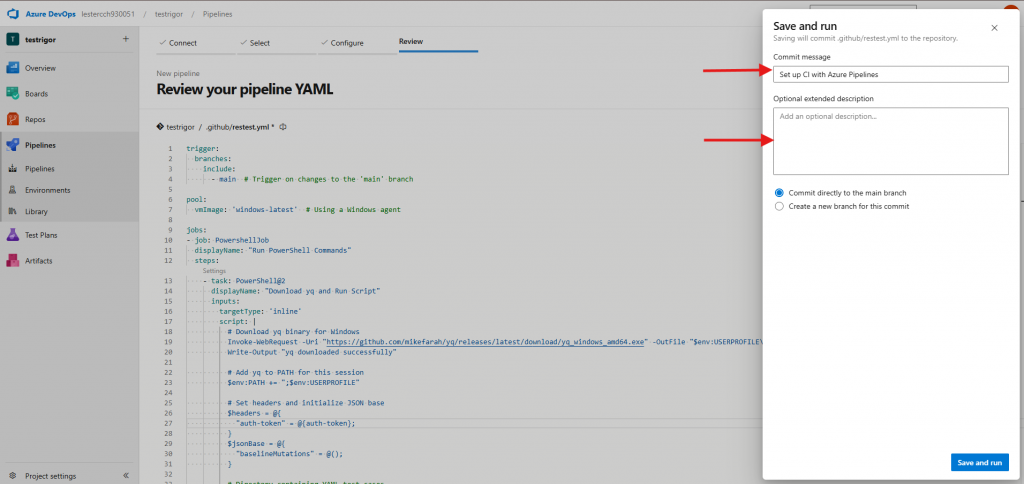
Caption: Commit Message
Step 9: We review the current workload and status and that’s it:

Caption: TestRigor build 1
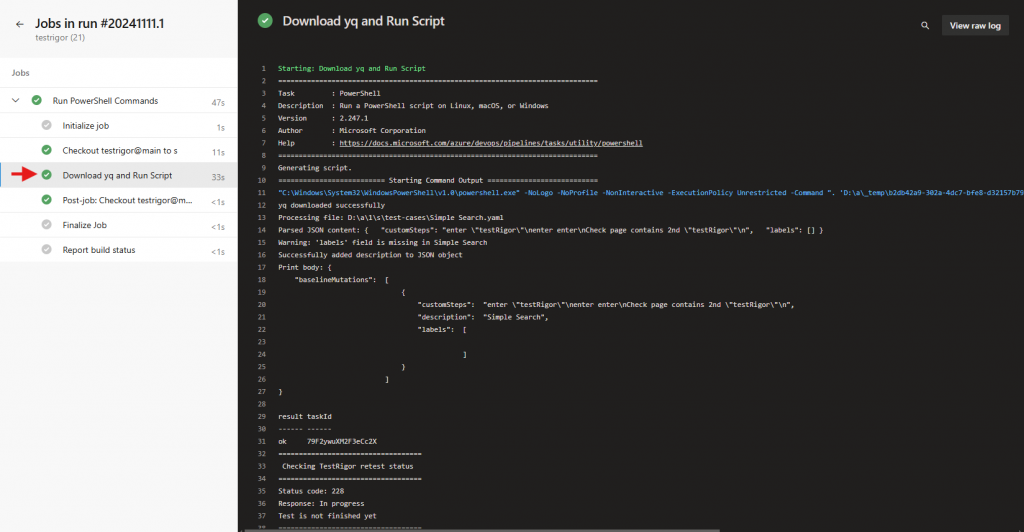
Caption: TestRigor build 2

Caption: TestRigor build 3
And this is how it would look like in TestRigor:
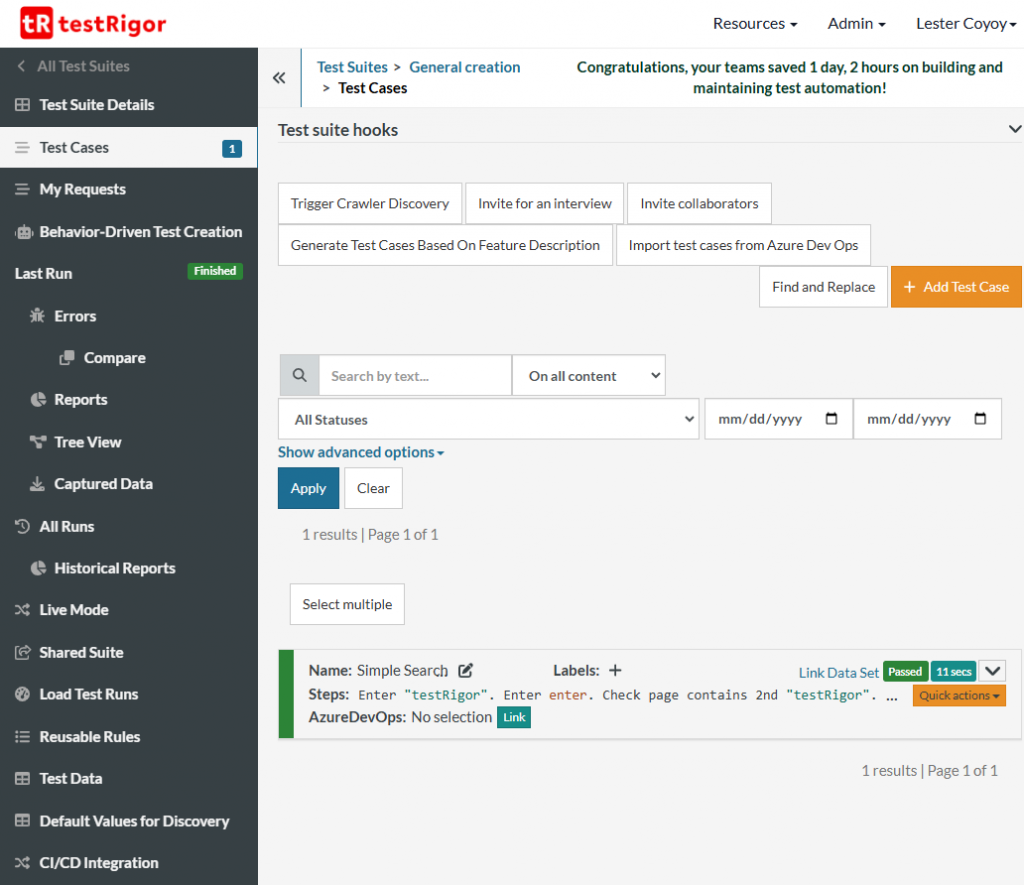
Caption: TestRigor Run from Azure DevOps
| Achieve More Than 90% Test Automation | |
| Step by Step Walkthroughs and Help | |
| 14 Day Free Trial, Cancel Anytime |


