Joomla Testing
|
|
What is Joomla?
Joomla is a popular open-source content management system (CMS) for creating and managing websites and online applications. It is written in PHP and uses MySQL or PostgreSQL as its database management system. Joomla allows users to create and manage websites with little to no technical knowledge, thanks to its user-friendly interface, rich set of features, and extensive library of templates and extensions.
Joomla Unit Testing
Unit tests are designed to check various functions, methods, and classes in isolation. This preliminary testing is crucial in complex Content Management System (CMS) platforms like Joomla. Although the focus is strictly on obtaining the correct output from the code unit, it is an excellent way to determine whether any breaking changes have been introduced into the system. As the emphasis is on isolated and lightweight testing, unit tests often employ mocking to minimize external dependencies.
Joomla uses the PHPUnit framework for unit testing. Here is an example of a test case for a JArrayHelper class in Joomla. The goal of this test is to verify that the getColumn method of the JArrayHelper class returns the correct data. The test case extends the PHPUnit\Framework\TestCase class, which provides methods for setting up and tearing down test fixtures. In this case, the setUp and tearDown methods are left empty.
The test case includes one test method named testGetColumn(). This method creates an array of arrays called $test_array, where each sub-array represents a row of data with values for three columns: ‘sport’, ‘teams’, and ‘country’. The test method then calls the getColumn method of the JArrayHelper class and passes in the $test_array and the name of the column (‘country’) to retrieve. The result is stored in $result_array.
PHPUnit assertion method assertEquals() to compare the $result_array with an expected array of values for the ‘country’ column. If the two arrays are equal, the test passes. If not, the test fails with an error message.require_once JPATH_BASE.'/libraries/joomla/utilities/arrayhelper.php';
class JArrayHelperTest extends PHPUnit\Framework\TestCase {
/**
* Sets up the fixture, for example, opens a network connection.
* This method is called before a test is executed.
*
* @access protected
*/
protected function setUp(): void {
}
/**
* Tears down the fixture, for example, closes a network connection.
* This method is called after a test is executed.
*
* @access protected
*/
protected function tearDown(): void {
}
/**
* Simple Test for getColumn method.
*/
public function testGetColumn(): void
{
$test_array = [
[
'sport' => 'football',
'teams' => '10',
'country' => 'United States'
],
[
'sport' => 'badminton',
'teams' => '8',
'country' => 'Germany'
],
[
'sport' => 'basketball',
'teams' => '12',
'country' => 'Canada'
]
];
$result_array = JArrayHelper::getColumn($test_array, 'country');
$this->assertEquals(
['United States', 'Germany', 'Canada'],
$result_array,
'We did not get the proper column data back'
);
}
}
Joomla is also compatible with Codeception which uses PHPUnit under the hood.The syntax is quite similar to PHPUnit. However, Codeception offers some helpful utilities to make testing more straightforward. You can install Codeception in your project using Composer.
namespace Tests\Unit;

use Tests\Support\UnitTester;
use App\User;

class UserTest extends \Codeception\Test\Unit
{
  /**
   * @var UnitTester
   */
  protected $tester;

  public function testValidation(): void
  {
    $user = new User();

    $user->setName(null);
    $this->assertFalse($user->validate(['username']));

    $user->setName('toolooooongnaaaaaaameeee');
    $this->assertFalse($user->validate(['username']));

    $user->setName('davert');
    $this->assertTrue($user->validate(['username']));
  }
}
The example demonstrates a simple test case for validating a user’s username using the User class. The test case checks if the username is valid in three different scenarios: when it’s null, when it’s too long, and when it’s an acceptable length.
You can find in-depth documentation on how to write and run these test cases here.
Joomla Integration Testing
- When a Joomla site uses third-party extensions like plugins, modules, or components, it’s important to ensure that these extensions work well together and do not conflict with each other.
- Joomla has a powerful access control list system that allows administrators to set granular permissions for different user groups. Integration testing can help ensure that these settings work as intended and that users can access only the content they are authorized to view.
- Joomla sites often use different templates for different pages or sections of the site. Integration testing can help ensure that templates work well with other extensions, and that content is displayed correctly across all templates.
- Joomla has a caching system that can help speed up page load times. Integration testing can ensure that caching works correctly and that cached content is refreshed when necessary.
- Joomla has a multi-language feature that allows sites to be translated into different languages. Integration testing can ensure that all content is correctly translated and that language settings do not conflict with other extensions.
- Some Joomla sites use custom code or scripts to add functionality or integrate with other systems. Integration testing can help ensure that custom code works well with other extensions and does not introduce bugs or conflicts.
- Joomla sites often integrate with third-party services like payment gateways, social media platforms, or analytics tools. Integration testing can ensure that these integrations work as intended and that data is properly transmitted and processed.
Integration testing can be performed using automated testing tools, such as Codeception or PHPUnit, or through manual testing. The choice of testing method depends on the complexity of the application, the level of interaction between components, and the resources available for testing.
Joomla End-to-End Testing
End-to-end testing is a comprehensive approach that evaluates an entire system or application from the user’s perspective to ensure that it functions as expected. In the context of Joomla applications, end-to-end testing involves testing the complete functionality of the website or application, including the frontend, backend, and all the integrated components, to confirm that they work together seamlessly and meet the desired requirements.
The primary goal of end-to-end testing is to simulate real-world user scenarios and validate that the system behaves correctly under various conditions. This testing type can help uncover issues that might not be detected during unit or integration testing, such as problems with user interfaces, workflows, data handling, or system configurations.
- Testing the user interface (UI) and user experience (UX) to ensure that the site is easy to navigate, responsive, and visually appealing across different devices and browsers.
- Verifying that the frontend and backend components of the application interact properly, including forms, user authentication, content management, and data processing.
- Checking the functionality of any custom or third-party extensions, modules, and plugins, and ensuring that they integrate seamlessly with the Joomla application.
- Assessing the performance, security, and reliability of the application, including load times, data protection, and error handling.
- Selenium with PHPUnit
- Codeception
- testRigor
Using Selenium
Joomla offers support for performing system testing using Selenium. When writing these test cases, you need to think from the user’s perspective. Joomla supports using Selenium IDE to record tests which can be converted into PHP code.
PHPUnit also has an extension called Selenium2TestCase which allows QA to write functional tests for web applications using the Selenium WebDriver API. It provides a set of methods for interacting with web pages and simulating user actions. When using PHPUnit_Extensions_Selenium2TestCase, you can define tests that launch a web browser, navigate to a page, and interact with it to test various aspects of the page’s behavior. For example, you can test whether certain elements are present on the page, whether form submissions result in the expected behavior, and whether specific interactions trigger expected changes to the page. Unlike the older versions, the latest versions of PHPUnit do not document this class; it is still widely used for automated testing.
The main downside is that this method is not as versatile and does not cover many common use cases that are likely to occur in CMS websites.
Using Codeception
You can use Codeception to write end-to-end tests for your application. This tool also supports the BDD approach for testing. Codeception’s BDD support is based on the Gherkin language, which is used to describe the behavior of a system in a structured, human-readable way. Gherkin uses a set of keywords, such as Given, When, Then, And, and But, to describe the steps of a scenario.
Codeception’s BDD support allows developers to write Gherkin feature files that describe the system’s behavior, and then generate PHP code based on those feature files that can be executed as tests. Let’s take a look at the below example.
First, a story is defined using the Gherkin language. Here’s an example:
- In order to buy products
- As a customer
- I want to be able to purchase several products at the same time
-
Scenario:
- Given I have a product with a $600 price in my cart
And I have a product with a $1000 price
When I go to checkout process
Then I should see that total number of products is 2
And my order amount is $1600
- Given I have a product with a $600 price in my cart
<?php
namespace Step\Acceptance;

use AcceptanceTester;

class CheckoutProcessSteps extends AcceptanceTester
{
  /**
   * @Given I have a product with a :price price in my cart
   */
  public function iHaveAProductWithAPriceInMyCart($price)
  {
    $I = $this;
    $I->amOnPage('/product_page_url');
    $I->fillField('price', $price);
    $I->click('Add to cart');
  }

  /**
   * @And I have a product with :price price
   */
  public function iHaveAProductWithPrice($price)
  {
    $I = $this;
    $I->amOnPage('/product_page_url');
    $I->fillField('price', $price);
    $I->click('Add to cart');
  }

  /**
   * @When I go to checkout process
   */
  public function iGoToCheckoutProcess()
  {
    $I = $this;
    $I->amOnPage('/checkout');
  }

  /**
   * @Then I should see that total number of products is :numProducts
   */
  public function iShouldSeeThatTotalNumberOfProductsIs($numProducts)
  {
    $I = $this;
    $I->seeNumberOfElements('.product', $numProducts);
  }

  /**
   * @And my order amount is :orderAmount
   */
  public function myOrderAmountIs($orderAmount)
  {
    $I = $this;
    $I->see($orderAmount, '.order-total');
  }
}
This step definition file defines a class called CheckoutProcessSteps that extends the AcceptanceTester class, which provides methods for interacting with the application. The methods in this class correspond to the steps in the Gherkin feature file and use Codeception’s built-in methods to navigate through the application and perform the necessary actions.
<?php
use Step\Acceptance\CheckoutProcessSteps;

class CheckoutProcessCest
{
  public function checkoutProcessTest(CheckoutProcessSteps $I)
  {
    $I->iHaveAProductWithAPriceInMyCart(600);
    $I->iHaveAProductWithPrice(1000);
    $I->iGoToCheckoutProcess();
    $I->iShouldSeeThatTotalNumberOfProductsIs(2);
    $I->myOrderAmountIs(1600);
  }
}
Using testRigor
The primary advantages of testRigor include its simplicity, ease of maintenance, and scalability. Often, the end user’s perspective on interacting with a system, which is crucial for creating end-to-end test cases, comes from non-technical individuals such as product owners, experienced manual testers, business analysts, or client-facing teams. However, if test cases must be coded, this perspective may not be accurately translated due to limited engagement from a diverse audience. testRigor addresses this issue by enabling test cases to be written in plain English, facilitating easy collaboration, review, and editing of test scenarios. Additionally, testRigor supports Behavior-Driven Development (BDD) right out of the box – also without the need for coding.
With its stability, low test maintenance, and straightforward test case creation, testRigor is well-equipped to ensure the quality of your website. Content Management Systems (CMSs) often require testing use cases that involve sending emails or SMS alerts, which testRigor can accommodate. As a cloud-based application, testRigor allows users to begin automating without the need to install and configure software, unlike many other automation tools. The tool supports cross-platform testing across web, mobile, and desktop environments, covering a wide range of testing needs. You can explore more benefits of using testRigor here.
login
click on "Cart"
grab value from "Item 1 price" and save it as "Price 1"
grab value from "Item 2 price" and save it as "Price 2"
click on "Check Out"
check that page contains "2" to the right of "Total number of items"
check that page contains expression "$(Price 1) + $(Price 2)" below "Total Amount"
How to do End-to-end Testing with testRigor
- Step 1: Log in to your testRigor app with your credentials.
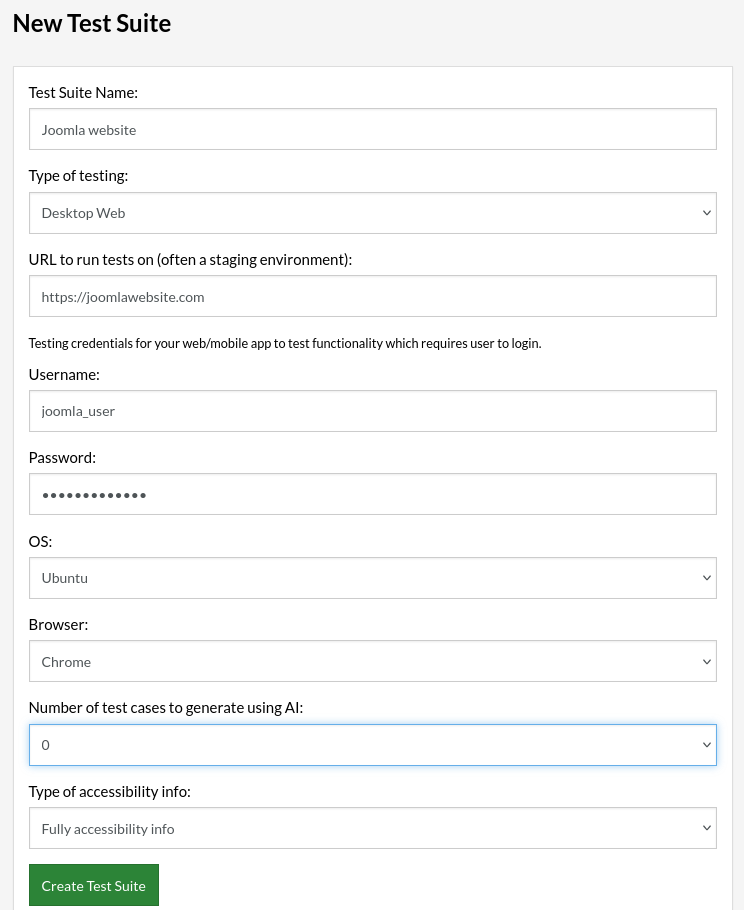
- Step 2: Set up the test suite for the website testing by providing the information below:
- Test Suite Name: Provide a relevant and self-explanatory name.
- Type of testing: Select from the following options: Desktop Web Testing, Mobile Web Testing, Native and Hybrid Mobile.
- URL to run test on: Input the application URL that you want to test.
- Testing credentials for your web/mobile app to test functionality which requires user to login: You can provide the app’s user login credentials here and need not write them separately in the test steps then. The login functionality will be taken care of automatically using the keyword
login. - OS and Browser: Choose the OS Browser combination on which you want to run the test cases.
- Number of test cases to generate using AI: If you wish, you can choose to generate test cases based on the App Description text, which works on generative AI.
-
Step 3: Click “Create Test Suite”.On the next screen, you can let AI generate the test case based on the App Description you provided during the Test Suite creation. However, for now, select do not generate any test, since we will write the test steps ourselves.
-
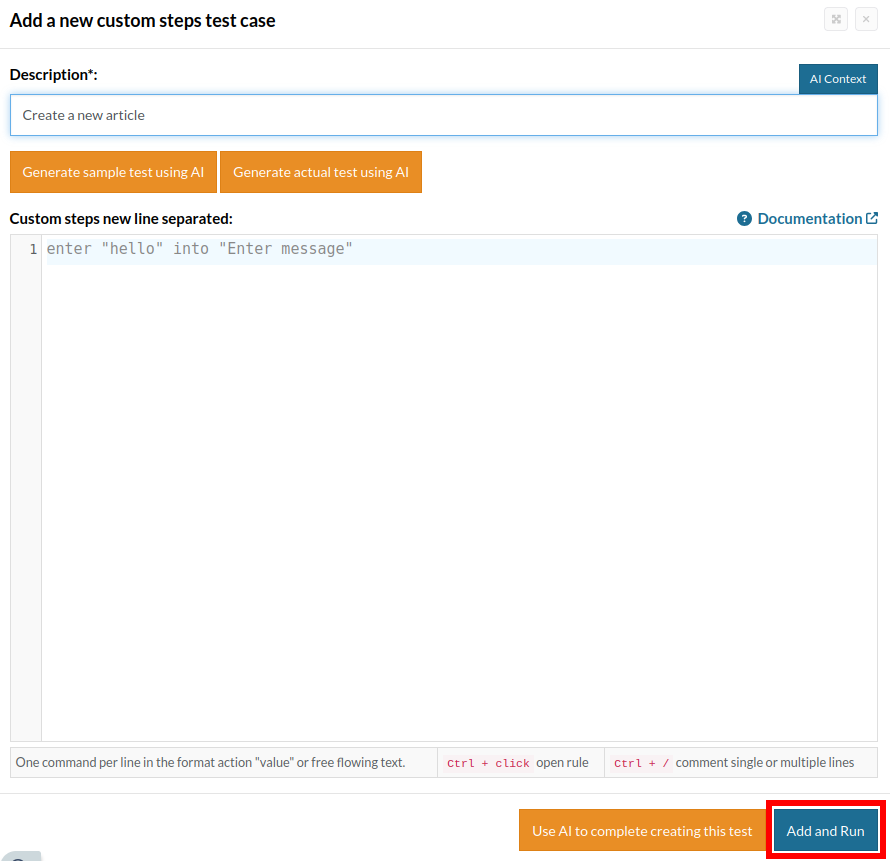
Step 4: To create a new custom test case yourself, click Add Test Case.

-
Step 5: Provide the test case Description and start adding the test steps, once finished, click “Add and Run”.
Test case: Create an article then validate it’s being saved
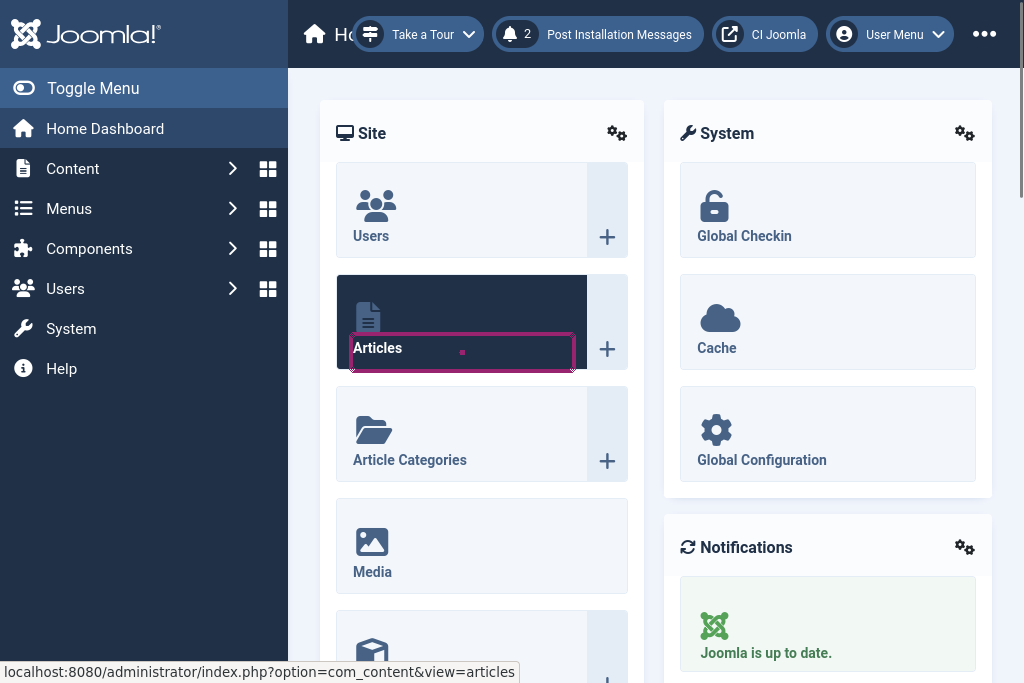
We will add test steps on the test case editor screen one by one. testRigor automatically navigates to the website URL you provided during the Test Suite creation. There is no need to use any separate function for it.
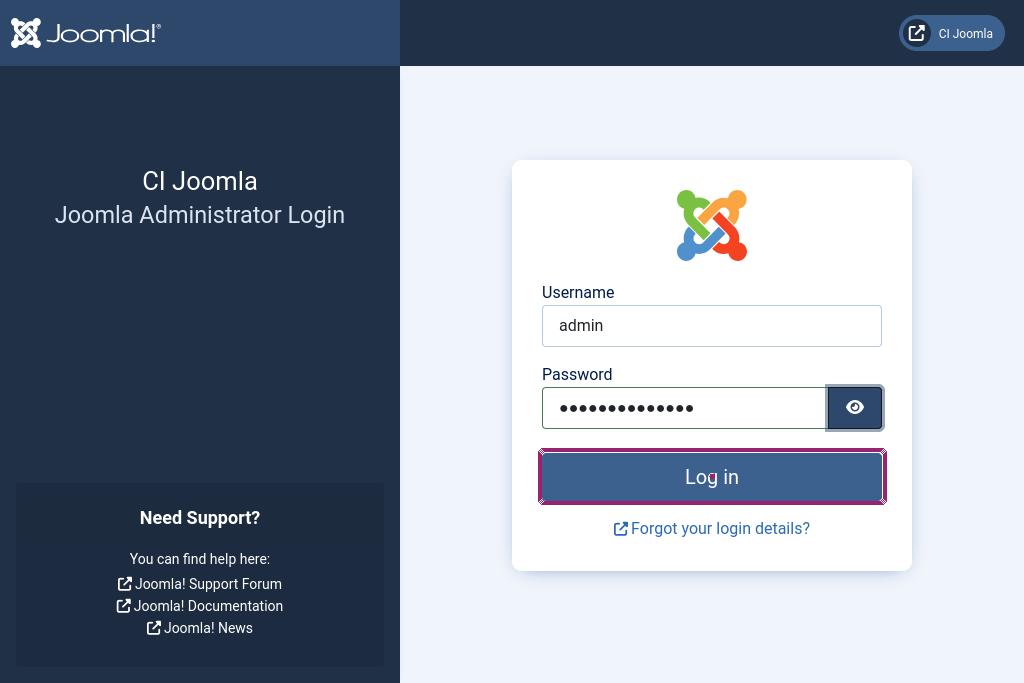
login reusable rule, which will automatically input the credentials that were provided when the test suite was created.login
click "Articles"
click "Add your first article"

enter saved value "articleName" into input "Title"
enter "Hello this is article" into "Rich Text Area."
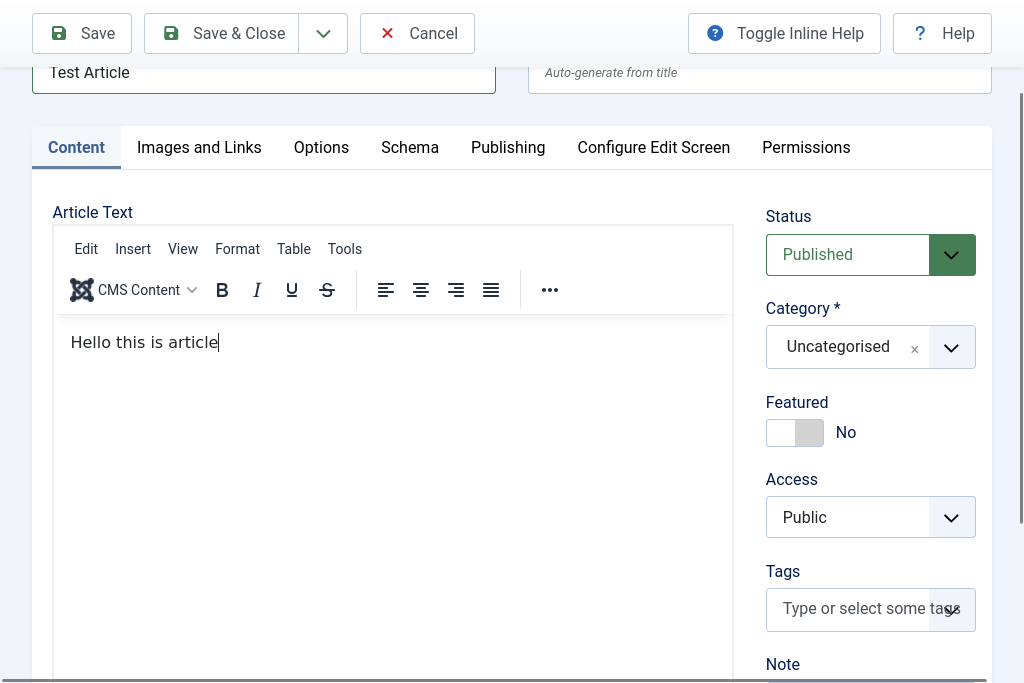
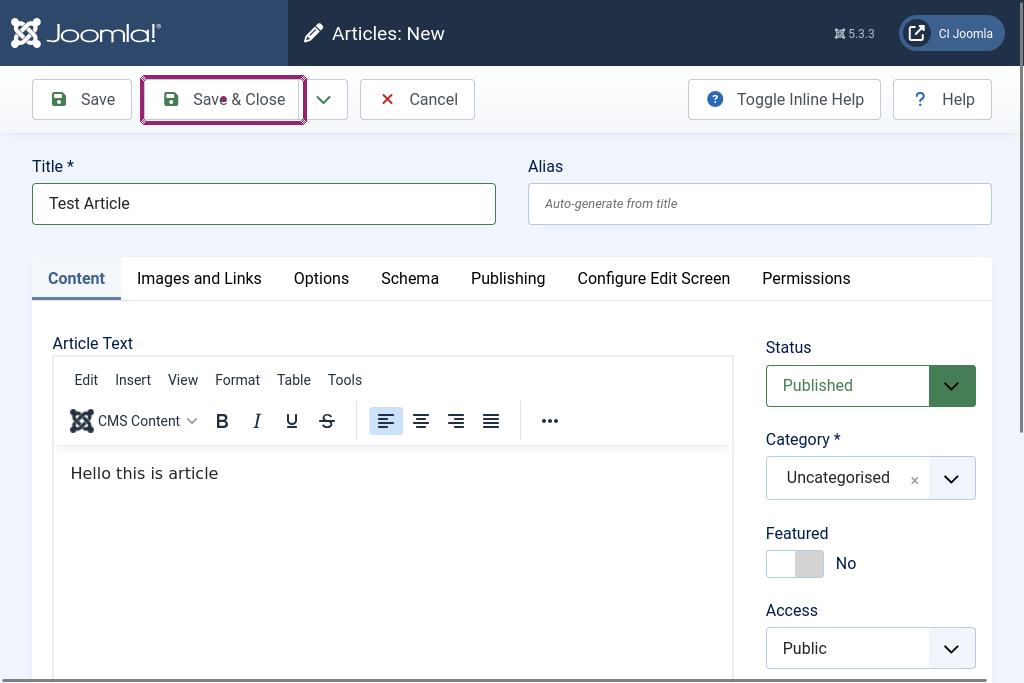
click button "Save & Close"
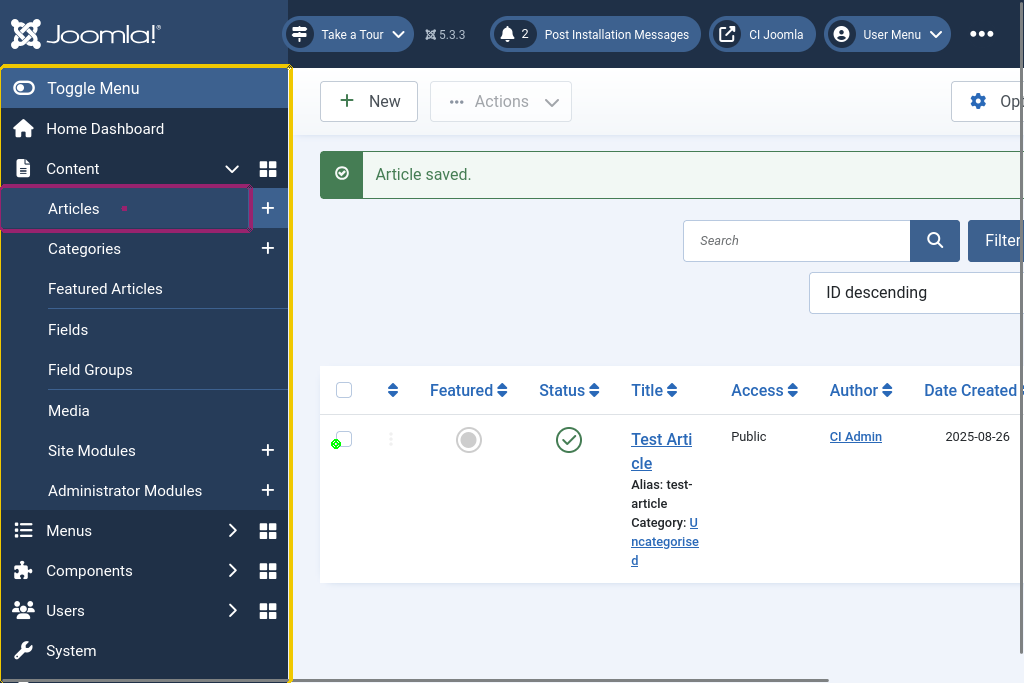
check that page contains saved value "articleName"
Complete test case
login
save "Test Article" as "articleName"
click "Articles"
click button "Add your first article"
enter saved value "articleName" into input "Title"
enter "Hello this is article" into "Rich Text Area."
click button "Save & Close"
check that page contains saved value "articleName"
Test cases to get you started with end-to-end testing
-
Check that deleted categories prevent the creation of new ones with the same name. This test case checks that deleted categories get trashed first, preventing the creation of new categories with equal name. Test case execution.
login
click "Hide forever" if exists
click exactly "No" if exists
save "Test category" as "categoryName"
create_category_saved value "categoryName"
delete_category_saved value "categoryName"
click "New"
enter saved value "categoryName" into "Title"
click "Save"
check that page contains "Save failed with the following error: A trashed category with the same parent category has the same alias."
click "cancel"
empty_category_trash
click "Content" within the context of "sidebar"
create_category_saved value "categoryName"
check that page contains saved value "categoryName"
delete_category_saved value "categoryName"
empty_category_trash
-
Create a new post and category, assign newly created category to post. In this test case we create a new post then assign it a category then validate said post has that category Test case execution.
save "Test Article" as "articleTitle"
save "Assign Category" as "newCategory"
login
click "Hide forever" if exists
click exactly "No" if exists
create_category_saved value "newCategory"
create_article_with_title_saved value "articleTitle"
click "Articles" within the context of "sidebar"
click saved value "articleTitle"
click "Uncategorised"
click saved value "newCategory"
click "Save & Close"
delete_article_saved value "articleTitle"
delete_category_saved value "newCategory"
empty_article_trash
empty_category_trash
-
Create a new user then log in with their credentials. This test case checks that new users are able to be created, then use their credentials to log into the website. Test case execution.
login
click "Hide forever" if exists
click exactly "No" if exists
click "Users"
click "Manage"
save value "test123" as "username"
save value "1234567890ad" as "password"
click button "New"
enter saved value "username" into "Name"
enter saved value "username" into "Login Name (Username)"
enter saved value "password" into 4th input
enter saved value "password" into "Confirm Password"
enter "[email protected]" into "Email"
click button "Save & Close"
click "Open frontend of"
enter saved value "username" into "Username"
enter saved value "password" into "Password"
click button "Log in"
check that page contains string with parameters "Hi ${username},"
switch to tab 1
click "Manage"
enter "1" into checkbox on the left of saved value "username"
click "Actions"
click "Delete"
click button "Yes"
-
Create an article. In this test case we log in as admin then create a new article and validate it’s being properly saved Test case execution.
login
click "Hide forever" if exists
click exactly "No" if exists
save "Test Article" as "articleName"
click "Articles"
click button "Add your first article"
enter saved value "articleName" into input "Title"
enter "Hello this is article" into "Rich Text Area."
click button "Save & Close"
check that page contains saved value "articleName"
delete_article_saved value "articleName"
empty_article_trash
-
Create new article with restricted category, validate that normal users cant see it. Similar to the previous test case but with the difference that this article gets classified with a special category, that prevents normal users to see it. Test case execution.
login
save "Hidden Category" as "newCategory"
click button exactly "No" if exists
click "Article Categories"
click "New"
enter saved value "newCategory" into "Title"
select "Super Users" from "Access"
click "Save & Close"
save "user1" as "newUsername"
save "twelvecharacterpassword" as "newPassword"
click "Users" within the context of "sidebar"
click "Manage"
click "New"
enter saved value "newUsername" into "Name"
enter saved value "newPassword" into "Login Name"
enter "[email protected]" into "Email"
click "Save & Close"
save "hidden article" as "articleName"
click "Content" within the context of "sidebar"
click "Articles"
click "New"
enter saved value "articleName" into "Title"
click "Uncategorised"
click saved value "newCategory"
click "Save & Close"
enter "1" into checkbox on the left of saved value "articleName"
click "Actions"
click "Feature"
click "Open frontend of"
login
check that page contains saved value "articleName"
click button "Log Out"
enter saved value "newUsername"
enter saved value "newPassword"
click "Log in"
check that page does not contains saved value "articleName"
switch to tab 1
delete_article_saved value "articleName"
empty_article_trash
delete_category_saved value "newCategory"
empty_category_trash
click "Users" within the context of "sidebar"
click "Manage"
enter "1" into checkbox on the left of saved value "newUsername"
click "Actions"
click "Delete"
click "Yes"
-
Install a language, change site language then uninstall it. This checks that the language packages are properly working for Joomla!, we install a language package (in this case Spanish) then validate that the changes are being applied. Test case execution.
login
click "Hide forever" if exists
click exactly "No" if exists
click "System"
click "Languages"
enter "Spanish" into "Search"
click button on the left of "Clear"
click button "Install"
wait 40 sec up to 2 times until page contains "Installation of the language pack was successful."
click "Manage Languages"
select "Administrator" from "Site"
click radiobutton on the left of "Spanish"
click button "Switch Language"
check that page contains "Idiomas: Instalados"
click radiobutton on the left of "English"
click button "Intercambiar idioma"
click "System"
click "Extensions"
click "Manage Extensions"
type "Spanish" into input on the left of "Filter options"
type enter
enter "1" into checkbox on the left of "Status"
click "Actions"
click "Uninstall"
click "Yes"
check that page contains "Uninstalling the package was successful."
-
Set the website offline and display a custom message. For this test case, we shut down the test website with a custom message then validate that normal users aren’t able to log in. Test case execution.
login
click "Hide forever" if exists
click exactly "No" if exists
click "Global Configuration"
click "switcher"
save "Site offline, go away" as "customMessage"
enter saved value "customMessage" into input "Custom Message"
click "Save & Close"
click "Open frontend of"
check that page contains saved value "customMessage"
switch to tab 1
click "Global Configuration"
enter "Default message" into input "Custom Message"
click "switcher"
click "Save & Close"
-
Validate project page login error messages. In this scenario, we try to enter wrong credentials on the login screen then validate that proper error messages are being displayed. Test case execution.
go to url string with parameters "${homePrefix}" click "log in" check that page contains "Empty password not allowed." enter "randomUser" into first input roughly on the left of "login form" enter "randomPassword" into second input roughly on the left of "login form" enter "1" into checkbox "Remember me" click "log in" roughly below "Remember me" check that page contains "Username and password do not match or you do not have an account yet." -
Verify successful login to Joomla! Admin Dashboard and accurate display of all default dashboard widgets. For this test case, we log into Joomla! admin dashboard then validate that all of the UI elements are present. Test case execution.
login
click "Hide forever" if exists
click exactly "No" if exists
check that page contains "Home Dashboard"
check that page contains "Content"
check that page contains "Menus"
check that page contains "Components"
check that page contains "Users"
check that page contains "System"
check that page contains "Help"
-
View in project page and log in with credentials. In this instance we log in with admin credentials onto the dashboard then view the website itself and validate that the homepage is properly loading. Test case execution.
login
click exactly "No" if exists
click "Hide forever" if exists
click button "Open frontend of"
check that page contains "CASSIOPEIA"
login
check that page contains string "Hi"
check that page contains button "Log out"
Reusable rules
The test cases above are using custom reusable rules, below you’ll find the code for every single one of them. For more info about reusable rules and how to use them, check this link.
-
empty article trash
click "Articles" within the context of "sidebar"
click "Filter Options"
select "Trashed" from "Select Status"
enter "1" into checkbox on the left of "Status"
click "Delete"
click "Yes"
click button "Clear" if exists
-
empty category trash
click "Categories" within the context of "sidebar"
click "Filter Options"
select "Trashed" from exactly "- Select Status -"
enter "1" into checkbox on the left of button exactly "Status"
click "Delete"
click "Yes"
click button "Clear"
-
delete category “categoryName”
click "Categories" within the context of "sidebar"
check that page contains saved value "categoryName"
enter "1" into checkbox on the left of saved value "categoryName"
click "Actions"
click "Trash"
check that page does not contain saved value "categoryName"
-
create category “categoryName”
click "Content" within the context of "sidebar"
click "Categories" within the context of "sidebar"
click "New"
enter saved value "categoryName" into "Title"
click "Save & Close"
-
delete article “articleName”
click "Articles" within the context of "sidebar"
check that page contains saved value "articleName"
enter "1" into checkbox on the left of saved value "articleName"
click "Actions"
click "Trash"
check that page does not contain saved value "articleName"
-
create article with title “articleTitle”
click "Articles" within the context of "sidebar"
click button "New"
enter saved value "articleTitle" into "Title"
click button "Save & Close"
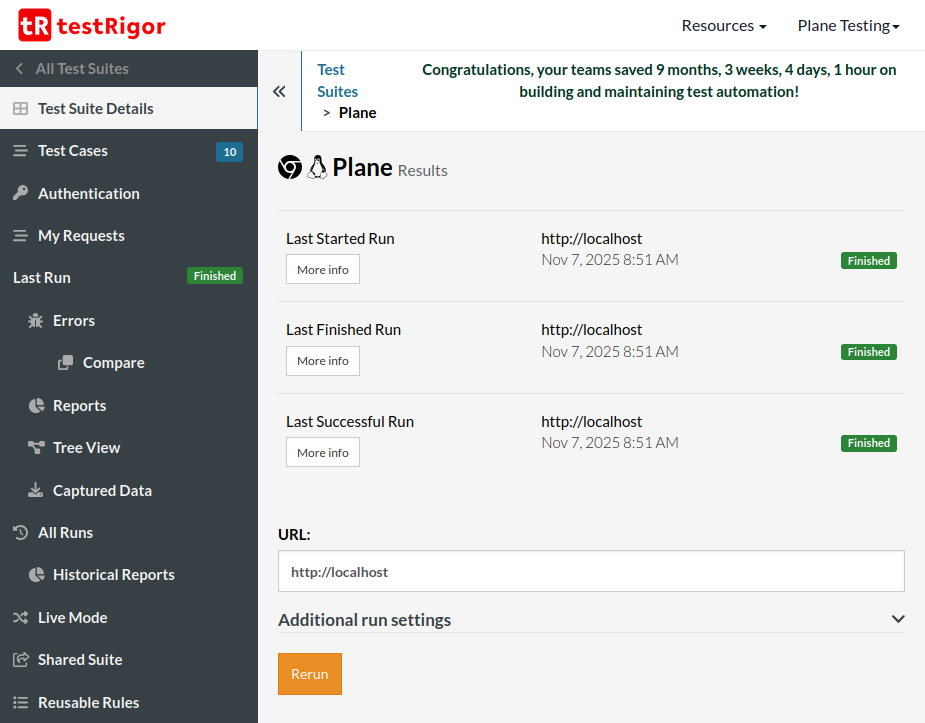
Running Plane Tests with testRigor
To trigger test suite runs we can simply navigate to the “Test Suite Details” page located inside our test suite, then click the button “Rerun”.
If you set up your testing environment locally, then you will have to use testRigor’s CLI tool in order to run the test suite.
Setting up GitHub CI/CD integration
For automated testing in your GitHub repository, you’ll need to configure your testRigor credentials as GitHub secrets. This approach differs from local testing by using GitHub’s secure environment variables.
Step 1: Add GitHub Secrets
- Go to your GitHub repository
- Click on “Settings” → “Secrets and variables” → “Actions”
- Add the following:
- As a secret:
PLANE_AUTH_TOKEN: Your testRigor auth token (keep this private)
- As variables:
PLANE_TEST_SUITE_ID: Your testRigor Test Suite IDPLANE_BASE_URL: Your Plane website URL
- As a secret:
For further information on creating secrets and variables in GitHub Actions, you can check the official GitHub documentation on secrets and variables.
Step 2: Use in GitHub Actions
After setting up the secrets and variables, you could use them in a workflow file as follows:
- name: Run testRigor Tests
  run: testrigor test-suite run PLANE_TEST_SUITE_ID --token PLANE_AUTH_TOKEN --localhost --url PLANE_BASE_URL
  env:
    PLANE_AUTH_TOKEN: ${{ secrets.PLANE_AUTH_TOKEN }}
    PLANE_TEST_SUITE_ID: ${{ vars.PLANE_TEST_SUITE_ID }}
    PLANE_BASE_URL: ${{ vars.PLANE_BASE_URL }}
| Achieve More Than 90% Test Automation | |
| Step by Step Walkthroughs and Help | |
| 14 Day Free Trial, Cancel Anytime |


