Kotlin Testing

Stated as Google’s preferred language for Android app development, Kotlin is a versatile programming language renowned for its conciseness and expressiveness, designed with type and null-safety in mind. This language was developed by JetBrains and supports app development across several platforms, such as:
- JVM-supported platforms: Kotlin is tailored to run on the Java Virtual Machine (JVM). It's suitable for developing applications executable on any platform that supports the JVM, including servers, desktops, and various other devices.
- Android: As an officially endorsed language for Android app development, Kotlin facilitates the creation of Android applications, leveraging its contemporary features and ensuring interoperability with extant Java code.
- JavaScript: Kotlin empowers developers to author code capable of running in web browsers and other JavaScript environments, promoting code sharing between server-side and client-side applications.
- Wasm: WebAssembly (Wasm) serves as a binary instruction format optimized for efficient web operation. Kotlin can be transpiled into WebAssembly, allowing developers to craft high-performance web applications using Kotlin.
- Native: Kotlin supports the compilation of code into native executables. This facilitates the creation of independent applications that operate without the necessity of a virtual machine, rendering it apt for systems programming and environments with limited resources. Notably, Kotlin/Native caters to platforms such as macOS, iOS, tvOS, watchOS, Android NDK, Windows (MinGW), and Linux.
Given its compatibility with Java, transitioning to Kotlin is straightforward, and it's feasible to integrate both languages within a single project. Beyond Android development, Kotlin finds its application in server-side development, with frameworks like Spring, Ktor, Quarkus, Micronaut, Javelin, and many others offering support.
For a programming language as versatile as Kotlin, an equally adaptable testing tool is imperative to uphold the quality of its applications. You have the liberty to select distinct tools for various testing levels, such as:
Unit Testing
Writing unit tests for your Kotlin code is the first step to getting the testing process started. Unit tests are meant to target small units of code like functions, and classes. Just like the area they cover, these tests are small and crisp in terms of the objective of the test and the expected output. So if you are writing a unit test for a method responsible for adding two numbers, you will have to write separate tests to check different types of outputs.
Let's take a look at some of the tools that can be used to test Kotlin code. You can use IDEs like IntelliJ IDEA or Android Studio since they have built-in Kotlin support.
JUnit
JUnit is a widely used testing framework for Java, but also for Kotlin. It provides annotations and APIs for writing and executing unit tests. JUnit is commonly used for testing Kotlin code on various platforms, including JVM-based applications, Android, and Kotlin/Native.
kotlin.test
kotlin.test is a testing library specifically designed for Kotlin. It provides a set of annotations and utility functions that include assertions that are independent of the testing framework in use. kotlin.test integrates well with JUnit and can be used for both unit testing and integration testing. It covers packages catering to code that is common, and even specific to JVM run, native or JavaScript based.
import kotlin.test.Test
import kotlin.test.assertEquals

internal class SampleTest {

  private val testSample: Sample = Sample()

  @Test fun testSum() {
    val expected = 30
    assertEquals(expected, testSample.sum(10, 20))
  }
}
MockK
MockK is a mocking library for Kotlin. It allows you to create mock objects and define their behavior during tests. MockK simplifies the process of mocking dependencies and verifying interactions with them during testing. Mocking comes in handy during unit testing since these test cases are supposed to be isolated in nature and not depend on other portions of the code for successful execution.
Spek
Spek is also a testing framework for Kotlin that focuses on providing a flexible and expressive syntax for behavior-driven development (BDD) style tests. It allows you to write tests that describe the expected behavior of your code in a more natural language style for both Android and JVM-based applications. It integrates well with other testing frameworks like JUnit and kotlin.test.
Scenario("getting the first item") {

  val item = "foo"

  Given("a non-empty set")  {
    set.add(item)
  }

  lateinit var result: String

  When("getting the first item") {
    result = set.first()
  }

  Then("it should return the first item") {
    assertEquals(item, result)
  }
}
Kotest
This is another testing framework meant for Kotlin testing. It is as flexible as Kotlin itself, suitable for multi-platform testing. This framework can be considered as three stand-alone entities, namely the testing framework, assertion library, and property-based testing. Kotest lets you pick from these options, meaning that it does not force you to use all three together, thus giving you the freedom to mix and match frameworks and libraries.
Mockito
A very popular choice for executing mocks during testing, Mockito is widely used for testing Java code. However, it is still a good choice for using it in your Kotlin code testing. Mockito allows you to create mock objects and define their behavior during tests, enabling you to isolate and test specific components of your code without relying on real dependencies. There is a small helper library Mockito-Kotlin that offers some useful tools to further make testing effective.
Integration Testing
Once you've ascertained that the individual units of code are working as expected, the next step would be to check if they are able to function properly together. Integration testing helps with achieving this through exercising these different units at crucial junctions. For example, if an API is expected to perform read-write operations in the database, integration tests should cover these interactions. The thing with integration tests is that though they exercise multiple units of code, they still won't boot the whole system for testing. Hence mocking is still required. However, these tests are slower and bulkier in comparison to unit tests.
You can use the above-mentioned testing tools and libraries like JUnit, kotlin.test, Kotest, Spek, MockK, and Mockito to write integration tests as well. You can also use UI automation tools like Espresso or AndroidX Test for automating integration tests that involve the user interface of an Android application written in Kotlin. Depending on whether you use Kotlin for Android development or server-side coding, the development framework that you choose will also have certain libraries that can come in handy for writing test cases. For example, if you are using the Ktor framework that is also developed by JetBrains for your server-side Kotlin application, there are testing utilities and APIs specifically tailored for testing Ktor applications. It allows you to write tests for your Ktor routes, handlers, and middleware, enabling comprehensive testing of your server-side code.
End-to-end Testing
This level of testing is the one that tends to exercise the entire application code. The focus now shifts to the user's perspective, that is, how would a user interact with the application and whether the application is able to perform satisfactorily under real-world conditions. The automation testing tools that you need to use will depend on what kind of application Kotlin has been used to create. For mobile testing, there are special testing tools available. However, we will also look at a one-stop solution for multiplatform testing below.
Espresso
Espresso is an open-source, Android automation testing framework developed by Google. It is known to offer high-performance, concise and reliable tests. It also comes integrated with Google's Android Studio. The prime components of Espresso are ViewMatchers to locate elements in a view, ViewActions to interact with these elements, and ViewAssertions to validate various aspects of elements.
Some great features of Espresso are that it automatically syncs with user-interface elements and test actions, has simple and lightweight APIs that offer support for unit testing, and also tests native applications. However, Espresso has some limitations like it is meant only for Android meaning that you cannot test iOS apps with it, and works with only Java and Kotlin languages. For using Espresso, you will need access to the source code which may not be possible always. To use this testing tool, you need to be well acquainted with the fundamentals of Android testing. Another important thing to note here is that Espresso is meant for developers and though it can be used for black-box testing, it is more effective when used by those familiar with the code base.
Appium
Appium is an open-source, automation testing tool for testing mobile applications. It supports the testing of native, hybrid, and mobile web applications built for iOS and Android. It uses the WebDriver interface for running test cases. You can write your test scripts in different programming languages like Kotlin, Java, JavaScript, PHP, Ruby, Python, and C#. Appium is cross-platform, that is, it allows you to write tests for multiple platforms (iOS, Android, Windows), using the same API. This enables code reuse between iOS, Android, and Windows test suites.
import io.appium.java_client.MobileElement
import io.appium.java_client.android.AndroidDriver
import io.appium.java_client.android.AndroidElement
import io.appium.java_client.remote.MobileCapabilityType
import org.junit.Assert
import org.junit.Test
import org.openqa.selenium.By
import org.openqa.selenium.remote.DesiredCapabilities
import java.net.URL

class ProductCheckout {

  @Test

  fun tesCheckout() {
    val capabilities = DesiredCapabilities()
    capabilities.setCapability(MobileCapabilityType.PLATFORM_NAME, "Android")
    capabilities.setCapability(MobileCapabilityType.DEVICE_NAME, "device name")
    capabilities.setCapability(MobileCapabilityType.APP, "path/to/your/app.apk")

    val driver = AndroidDriver<MobileElement>(URL("http://localhost:4723/wd/hub"), capabilities)
    val searchInput = driver.findElementById("searchInput")
    searchInput.sendKeys("Samsung earphones (Black)")

    val searchButton = driver.findElementById("searchButton")
    searchButton.click()

    val searchResult = driver.findElement(By.xpath("//android.widget.ListView/android.view.ViewGroup[4]"))
    searchResult.click()

    val addToCartButton = driver.findElementById("addToCartButton")
    addToCartButton.click()

    val cartButton = driver.findElementById("cartButton")
    cartButton.click()

    val itemCount = driver.findElementById("itemCount")
    Assert.assertEquals("1", itemCount.text)

    val checkoutButton = driver.findElementById("checkoutButton")
    checkoutButton.click()

    val defaultAddressRadioButton = driver.findElementById("defaultAddressRadioButton")
    defaultAddressRadioButton.click()

    val proceedAddressButton = driver.findElementById("proceedAddressButton")
    proceedAddressButton.click()

    val codRadioButton = driver.findElementById("codRadioButton")
    codRadioButton.click()

    val proceedPaymentButton = driver.findElementById("proceedPaymentButton")
    proceedPaymentButton.click()

    val placeOrderButton = driver.findElementById("placeOrderButton")
    placeOrderButton.click()

    val successMessage = driver.findElementById("successMessage")
    Assert.assertTrue(successMessage.isDisplayed)

    driver.quit()
  }
}
testRigor
Out of the many testing tools available in the market, testRigor is one of the few AI-driven tools that make automation testing everyone's cup of tea. Most automation testing tools suffer from test maintenance overhead due to their reliance on the implementation details of UI elements. Since testRigor does not require such implementation details during the time of test creation, it is able to combat test maintenance effort and bring it down to a bare minimum. The use of AI does not stop there for testRigor. It uses AI to make test creation easier, categorize common images and icons like shopping cart or downward arrow for easy usage in test scripts, and also supports using generative AI to create test cases with just a description.
Having to create and maintain test cases in a programming language can be time-consuming even for experienced developers. Another challenge with using such a setup for end-to-end testing is that it sidelines manual testers and even the business stakeholders who are likely to know more about these user-centric workflows than developers and automation engineers. testRigor offers a great solution for this. It lets test creation happen in plain English language.
login //pre-defined rule
enter "Samsung earphone (Black)" in "search"
click on "Search"
click on the 4th element by image from stored value "item" with less than "10" % discrepancy
scroll down until page contains "Add to cart"
click on "cart"
check that page contains "item count : 1"
click on "Checkout"
click radiobutton "default address"
click on "proceed to checkout"
click radiobutton "COD"
click on "place order"
check that page contains stored value "success message"
In this example, we are visiting an e-commerce application and then placing an order. The test steps are very close to the regular English language, similar to how a human would dictate them. Telling testRigor which UI element to interact with is also super easy because you just need to mention how it appears to you on the screen. In the same breadth of ease of use, testRigor offers many assertions and actions to work with tables, log in via 2FA, email, or text messages, email content, file upload, and much more.
testRigor can test applications across various platforms like the web, mobile, and even native desktop applications. Thanks to testRigor's smooth integration with various tools like BrowserStack and LambdaTest, you can scale your automation testing across over 2000 combinations of devices and device-browser configurations.
How to do End-to-end Testing with testRigor
Let us take the example of an e-commerce website that sells plants and other gardening needs. We will create end-to-end test cases in testRigor using plain English test steps.
Step 1: Log in to your testRigor app with your credentials.
Step 2: Set up the test suite for the website testing by providing the information below:
- Test Suite Name: Provide a relevant and self-explanatory name.
- Type of testing: Select from the following options: Desktop Web Testing, Mobile Web Testing, Native and Hybrid Mobile, based on your test requirements.
- URL to run test on: Provide the application URL that you want to test.
- Testing credentials for your web/mobile app to test functionality which requires user to login: You can provide the app’s user login credentials here and need not write them separately in the test steps then. The login functionality will be taken care of automatically using the keyword
login. - OS and Browser: Choose the OS Browser combination on which you want to run the test cases.
- Number of test cases to generate using AI: If you wish, you can choose to generate test cases based on the App Description text, which works on generative AI.
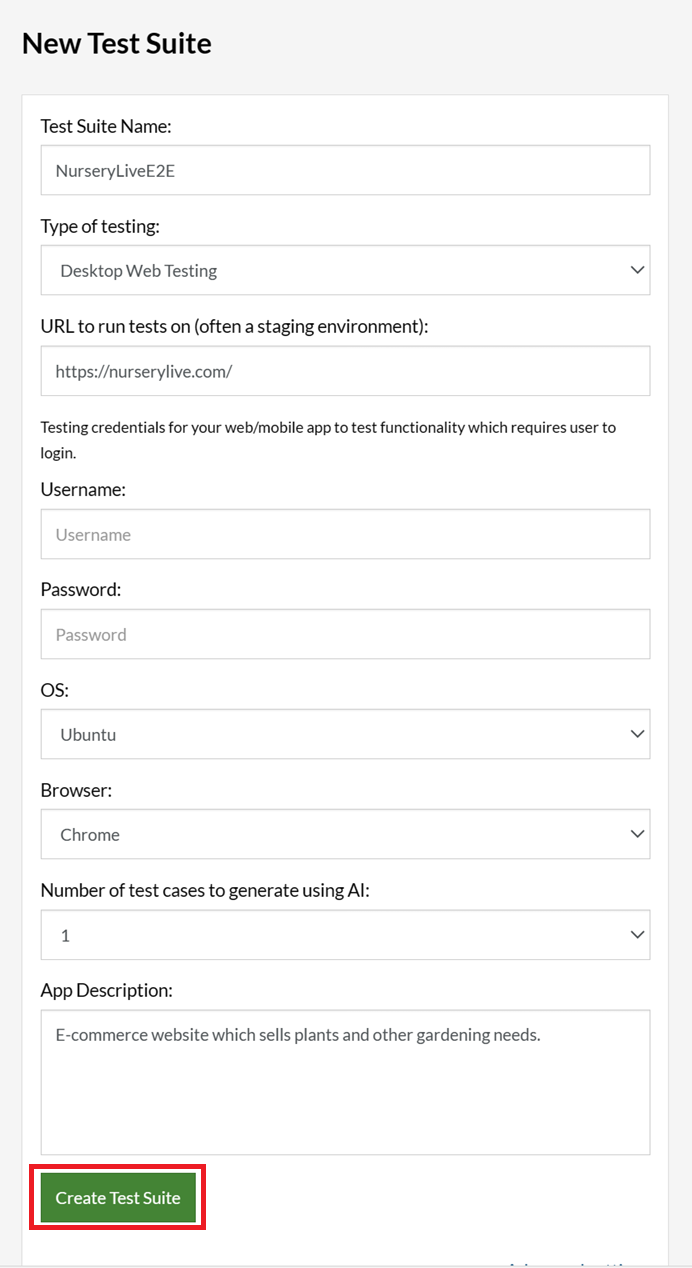
Step 3: Click Create Test Suite.
On the next screen, you can let AI generate the test case based on the App Description you provided during the Test Suite creation. However, for now, select do not generate any test, since we will write the test steps ourselves.
Step 4: To create a new custom test case yourself, click Add Custom Test Case.

Step 5: Provide the test case Description and start adding the test steps.
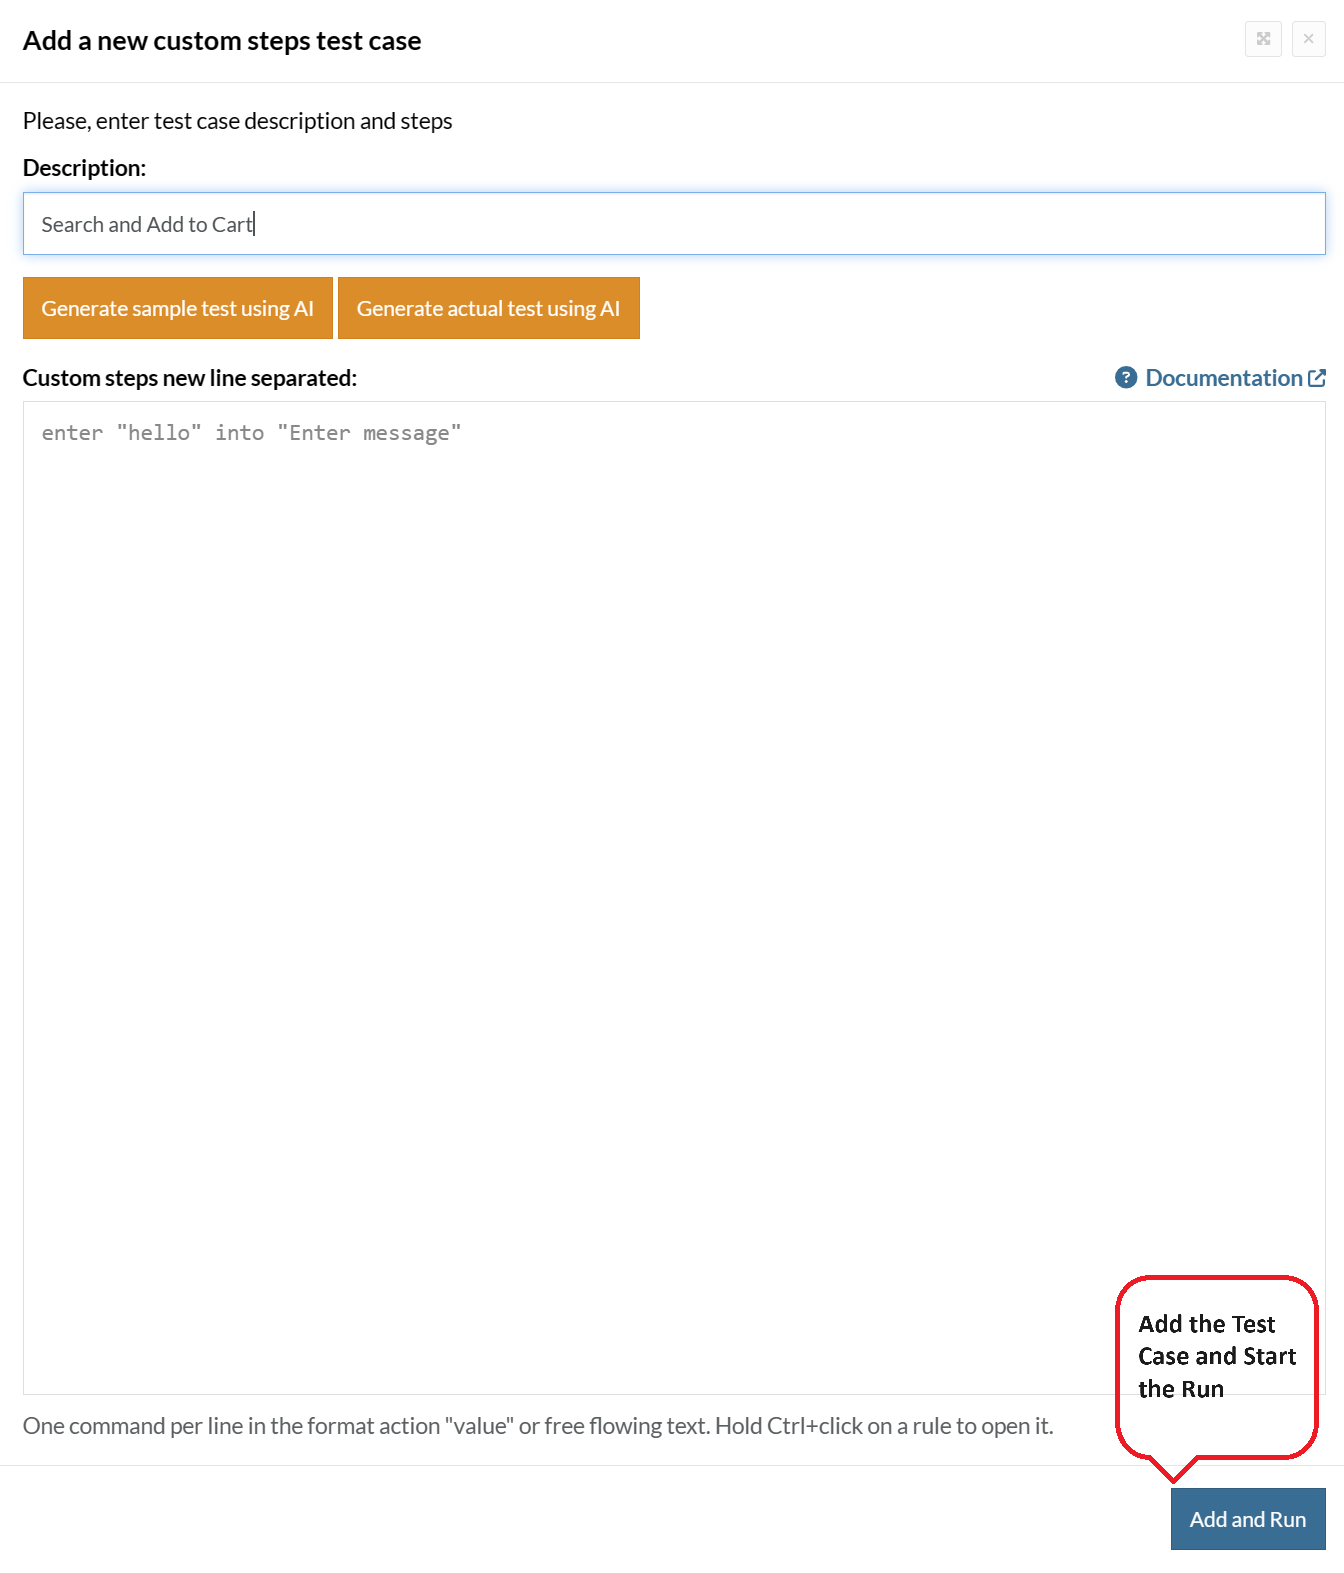
For the application under test, i.e., e-commerce website, we will perform below test steps:
- Search for a product
- Add it to the cart
- Verify that the product is present in the cart
Test Case: Search and Add to Cart
Step 1: We will add test steps on the test case editor screen one by one.
testRigor automatically navigates to the website URL you provided during the Test Suite creation. There is no need to use any separate function for it. Here is the website homepage, which we intend to test.

First, we want to search for a product in the search box. Unlike traditional testing tools, you can identify the UI element using the text you see on the screen. You need not use any CSS/XPath identifiers.
click "What are you looking for?"
Step 2: Once the cursor is in the search box, we will type the product name (lily), and press enter to start the search.
type "lily"
enter enter
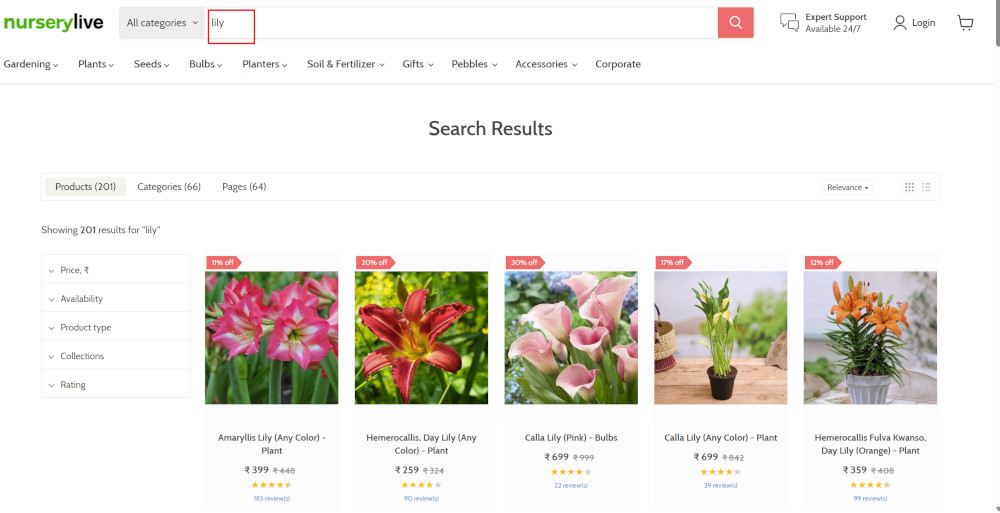
Search lists all products with the “lily” keyword on the webpage.
Step 3: The lily plant we are searching for needs the screen to be scrolled; for that testRigor provides a command. Scroll down until the product is present on the screen:
scroll down until page contains "Zephyranthes Lily, Rain Lily (Red)"
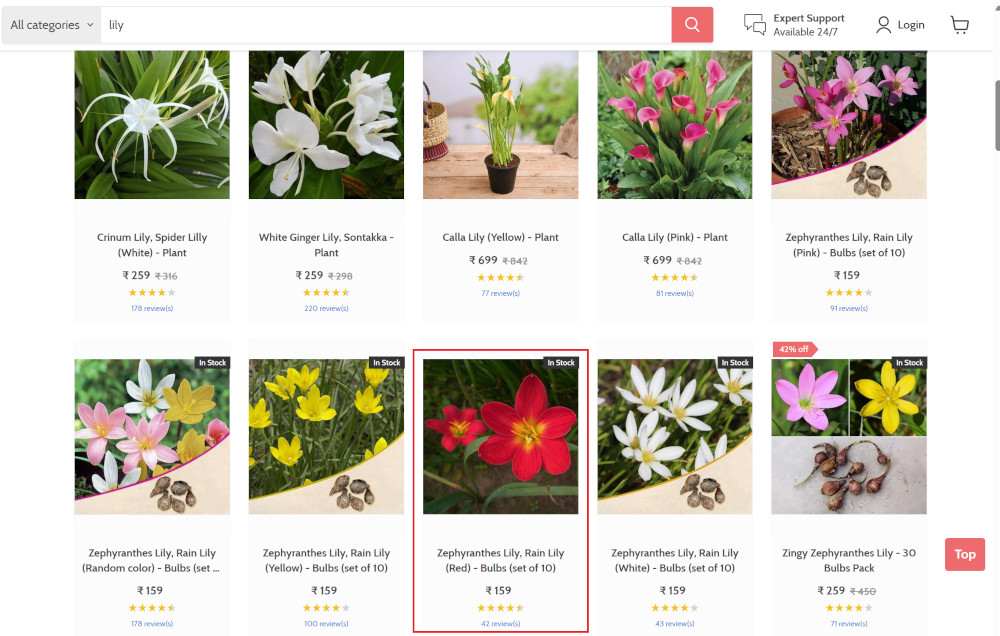
When the product is found on the screen, testRigor stops scrolling.
Step 4: Click on the product name to view the details:
click "Zephyranthes Lily, Rain Lily (Red)"
After the click, the product details are displayed on the screen as below, with the default Quantity as 1.
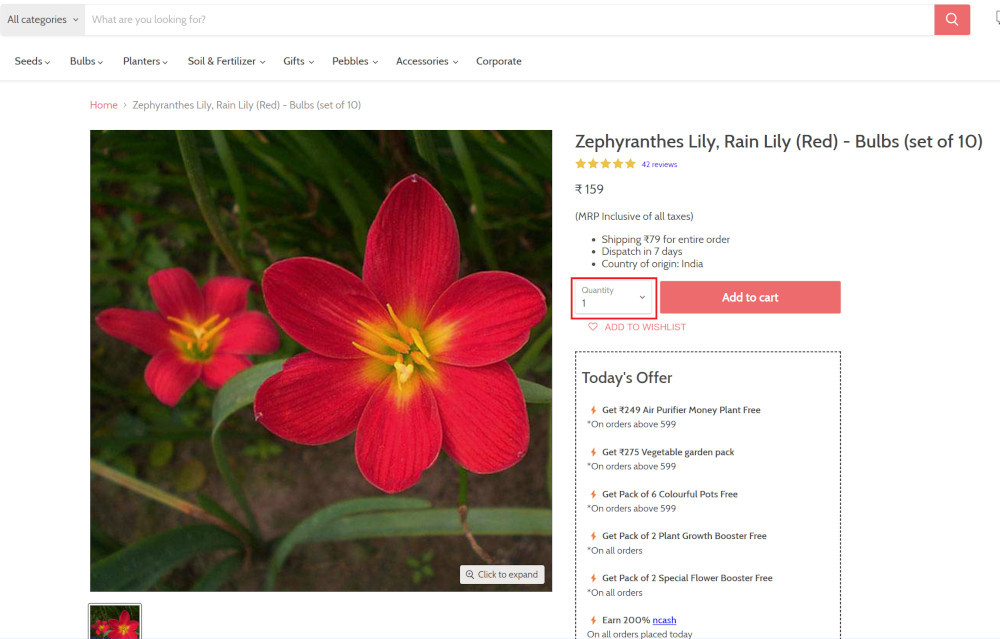
Step 5: Lets say, we want to change the Quantity to 3, so here we use the testRigor command to select from a list.
select "3" from "Quantity"
click "Add to cart"
The product is successfully added to the cart, and the “Added to your cart:” message is displayed on webpage.
Step 6: To assert that the message is successfully displayed, use a simple assertion command as below:
check that page contains "Added to your cart:"
Step 7: After this check, we will view the contents of the cart by clicking View cart as below:
click "View cart"

Step 8: Now we will again check that the product is present in the cart, under heading “Your cart” using the below assertion. With testRigor, it is really easy to specify the location of an element on the screen.
check that page contains "Zephyranthes Lily, Rain Lily (Red)" under "Your cart"

Complete Test Case
Here is how the complete test case will look in the testRigor app. The test steps are simple in plain English, enabling everyone in your team to write and execute them.
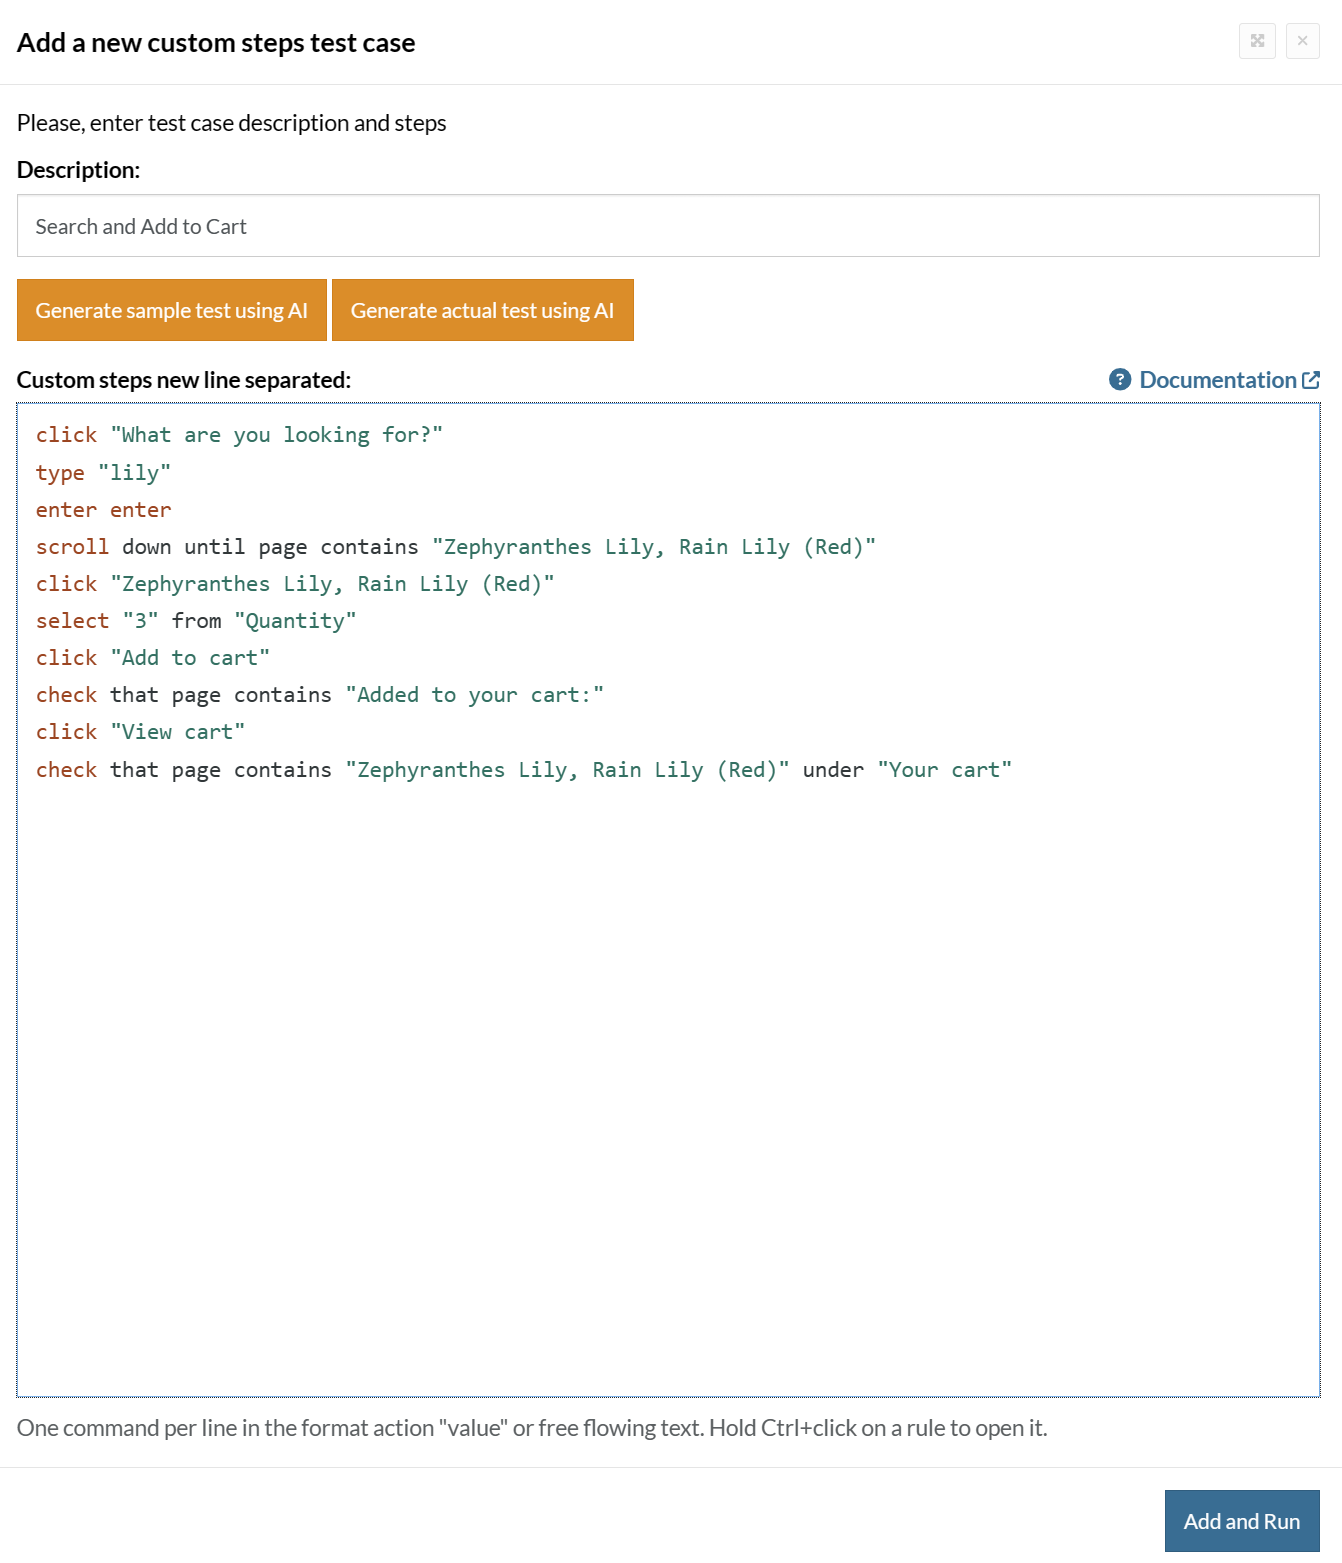
Click Add and Run.
Execution Results
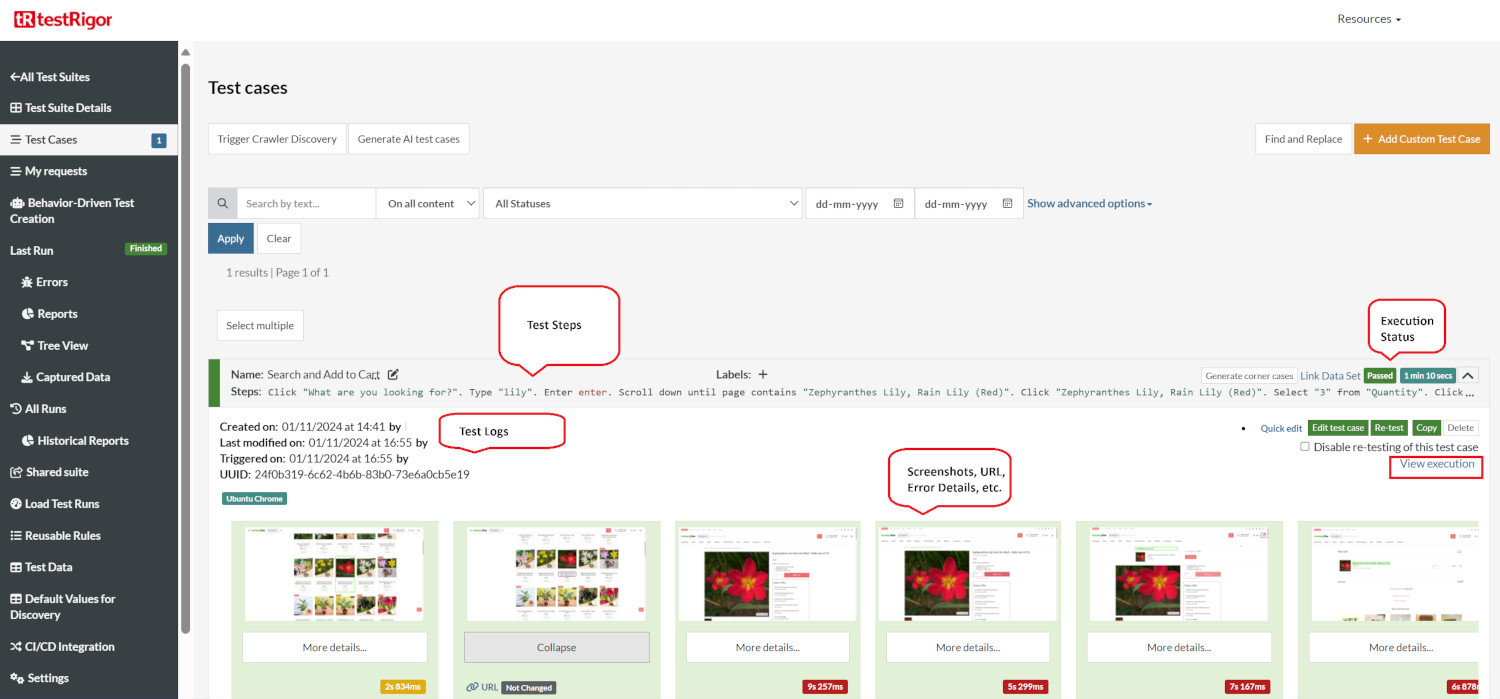
Once the test is executed, you can view the execution details, such as execution status, time spent in execution, screenshots, error messages, logs, video recordings of the test execution, etc. In case of any failure, there are logs and error text that are available easily in a few clicks.
You can also download the complete execution with steps and screenshots in PDF or Word format through the View Execution option.
testRigor’s Capabilities
Apart from the simplistic test case design and execution, there are some advanced features that help you test your application using simple English commands.
- Reusable Rules (Subroutines): You can easily create functions for the test steps that you use repeatedly. You can use the Reusable Rules to create such functions and call them in test cases by simply writing their names. See the example of Reusable Rules.
- Global Variables and Data Sets: You can import data from external files or create your own global variables and data sets in testRigor to use them in data-driven testing.
- 2FA, QR Code, and Captcha Resolution: testRigor easily manages the 2FA, QR Code, and Captcha resolution through its simple English commands.
- Email, Phone Call, and SMS Testing: Use simple English commands to test the email, phone calls, and SMS. These commands are useful for validating 2FA scenarios, with OTPs and authentication codes being sent to email, phone calls, or via phone text.
- File Upload/ Download Testing: Execute the test steps involving file download or file upload without the requirement of any third-party software. You can also validate the contents of the files using testRigor’s simple English commands.
- Database Testing: Execute database queries and validate the results fetched.
testRigor enables you to test web, mobile (hybrid, native), API, and desktop apps with minimum effort and maintenance.
Additional Resources
- Access testRigor documentation to know about more useful capabilities
- Top testRigor’s features
- How to perform end-to-end testing
Conclusion
Quality assurance is a key step in ensuring the health of your application. Using a lightweight and versatile language like Kotlin will enable you to create multi-platform applications with ease. Pair it with a powerful AI-driven testing tool like testRigor to reap the benefits of automation testing.
| Achieve More Than 90% Test Automation | |
| Step by Step Walkthroughs and Help | |
| 14 Day Free Trial, Cancel Anytime |


