Open HRMS Testing

Open HRMS is an open-source Human Resource Management System (HRMS) software solution from Cybrosys Technologies that helps organizations manage various aspects of their HR functions, such as employee data management, recruitment, performance management, payroll management, leave management, and more. Open HRMS is built using the Python programming language and is based on the Odoo framework, which is an open-source ERP software.
Open HRMS is designed to be customizable and can be adapted to suit the specific needs of an organization. It provides various features and modules that can be configured and integrated into the existing HR processes of an organization. The software is available for free, and its source code can be accessed and modified by developers, making it a popular choice for small and medium-sized enterprises that require a cost-effective HRMS solution.
Unit testing
Unit testing involves testing individual units or components of a software application in isolation from the rest of the system. A unit can be a function, method, or class that performs a specific task within the application. Unit testing is a critical step in the software development process and is often automated using testing frameworks or libraries.
The primary goal of unit testing is to ensure that each unit of code performs as intended and to identify and isolate any defects or bugs. By testing individual units, developers can detect and fix issues early in the development process, reducing the overall cost and time required to develop and maintain the software application.
During unit testing, developers write test cases that include a set of inputs, expected outputs, and preconditions. The test cases are executed against the individual units of code, and the actual results are compared to the expected results. If the actual results match the expected results, the unit passes the test, and if not, the developer can identify and fix the issue.
- Python unit tests
- JS unit tests
Python unit testing
Odoo provides support for testing modules using Python’s unittest library. Test modules should have a name starting with test_ and should be imported from tests/__init__.py
Below is a basic example for validating strings
import unittest

class TestStringMethods(unittest.TestCase):

  def test_upper(self):
    self.assertEqual('foo'.upper(), 'FOO')

  def test_isupper(self):
    self.assertTrue('FOO'.isupper())
    self.assertFalse('Foo'.isupper())

  def test_split(self):
    s = 'hello world'
    self.assertEqual(s.split(), ['hello', 'world'])
    # check that s.split fails when the separator is not a string
    with self.assertRaises(TypeError):
      s.split(2)

if __name__ == '__main__':
  unittest.main()
Odoo provides a number of utilities and helpers related to testing Odoo content. You can read more about it over here.
JS unit testing
The Odoo framework uses the QUnit library testing framework for JS testing. QUnit defines the concepts of tests and modules and gives us a web-based interface to execute the tests.
For example, here is how a unit test can look like:
QUnit.module('py_utils');

QUnit.test('simple arithmetic', function (assert) {
  assert.expect(2);

  var result = pyUtils.py_eval("1 + 2");
  assert.strictEqual(result, 3, "should properly evaluate sum");
  result = pyUtils.py_eval("42 % 5");
  assert.strictEqual(result, 2, "should properly evaluate modulo operator");
});
You can read more about the infrastructure and recommended test practices here.
Integration testing
Integration testing is used to determine if the functions or services of a software application are working together as intended to produce the desired output. The test cases in integration testing are designed to target scenarios involving the software application’s integration with various components such as databases, file systems, and network infrastructure.
In the case of complex systems like Open HRMS, where multiple modules are involved, each module may function correctly when tested independently. However, issues may arise when the modules are combined and work together as part of the larger system. Integration testing helps to identify and resolve such issues, ensuring that the system performs as expected and meets the required specifications. By detecting and addressing integration problems early on, integration testing can help reduce the overall cost and time required to develop and maintain the software application.
- Testing crucial read-write operations into databases.
- Testing services by mocking HTTP calls.
- Checking GET and POST routes, controllers, and pipelines.
Below is an example of an integration test for employee registration:
import unittest
import requests

class OpenHRMIntegrationTest(unittest.TestCase):
  def setUp(self):
    # Create a test employee record
    self.employee = {
      "name": "John Doe",
      "email": "[email protected]"
    }

  def test_employee_registration(self):
    # Send a POST request to the employee registration endpoint with the test employee data
    response = requests.post("http://openhrm.com/api/employee", json=self.employee)

    # Verify that the response is successful (HTTP status code 200)
    self.assertEqual(response.status_code, 200)

    # Verify that the response contains the expected employee data
    user = response.json()
    self.assertEqual(user["name"], self.employee["name"])
    self.assertEqual(user["email"], self.employee["email"])

  def tearDown(self):
    # Clean up the test environment, such as removing test data or restoring configuration values
    pass

if __name__ == '__main__':
  unittest.main()
In Odoo, you have something called test tours that can be used for integration tests. It ensures that the JS(web client side) and Python(server side) are properly connected to each other and work together. Mentioned below is an example of what a test tour can look like:
# test_tour.py

from odoo.tests import common

class TestTour(common.SavepointCase):
  @classmethod
  def setUpClass(cls):
    super(TestTour, cls).setUpClass()

    # Create a tour
    cls.tour = cls.env['web_tour.tour'].create({
      'name': 'Test Tour',
      'sequence': '''
        tour:
          step
            name: Start the tour
            script: self.click('.o_menu_toggle')
            trigger: .o_menu_toggle
            help: This opens the main menu
          step
            name: Open the Configuration menu
            script: self.click('.o_menu_sections a:contains("Configuration")')
            trigger: .o_menu_sections a:contains("Configuration")
            help: This opens the Configuration menu
          step
            name: Open the Users menu
            script: self.click('.o_menu_sections a:contains("Users")')
            trigger: .o_menu_sections a:contains("Users")
            help: This opens the Users menu
      '''
    })

  def test_tour(self):
    # Start the tour
    self.tour.ready()

    # Verify that the tour steps have been executed correctly
    ...
In this example, a tour is created using the web_tour.tour model and stored in the tour variable. The sequence field of the tour contains the steps of the tour, which simulate user actions such as clicking the main menu, the configuration menu, and the user’s menu.
The test_tour method is used to start the tour and verify that the tour steps have been executed correctly. This code is part of a test case that can be run using the Odoo test runner to verify that the tour works as expected.
You can read more about it here.
End-to-end testing
End-to-end testing involves testing an application’s entire workflow from start to finish to ensure that it performs as intended and meets the requirements. End-to-end testing is also known as system testing or acceptance testing.
In end-to-end testing, testers simulate real-world scenarios, including multiple modules or components, to validate the application’s functionality, reliability, and performance. This testing method verifies that all the modules or components of the application work together as intended and that the application as a whole meets the desired quality standards.
- Selenium-based tools
- TestCafe
- testRigor
Selenium-based tools
Selenium is a legacy open-source tool that is still widely used for system testing. Most tools out there that are based on Selenium tend to offer features that might benefit your project. However, each of these tools does inherit some of the drawbacks that Selenium has, though they try to overcome them.
TestCafe
TestCafe is an open-source end-to-end testing tool for web applications. It is designed to simplify the process of creating and running automated tests for web applications across different browsers and platforms.
TestCafe can be used on Windows, macOS, and Linux operating systems, and it supports various web browsers such as Google Chrome, Mozilla Firefox, and Microsoft Edge. The tool is built on top of Node.js and uses JavaScript as the scripting language, which makes it easy for developers to write and maintain test scripts.
TestCafe provides several features and tools to simplify the testing process, including automatic waiting for page loads and element visibility, automatic parallel testing across multiple browsers, and built-in support for continuous integration.
testRigor
testRigor is a unique tool here since it is the only one that allows manual QA testers to build lengthy end-to-end tests. Even more so, they can do it much faster than QA engineers can write Selenium code, while spending a lot less time on test maintenance. This is possible due to testRigor’s AI engine and a handful of smart features.
You can easily test APIs, emails, SMS alerts, database records, file uploads, and identify elements on the screen and interact with them without thinking about XPaths or other element locators. testRigor also supports visual testing wherein you can directly compare screens and identify potential changes.
Let’s take a look at an example of a test case where the administrator logs in and creates a feedback record for an employee’s appraisal.
Login
Click on "Search Menu"
Enter "Appraisal"
Click on "Appraisal"
Click on "Create" on the top left
Select "Lily Adams" from "Employee's Name"
Click on "Appraisal Deadline"
save expression "${todayDayOfMonth}" as "date"
If the stored value "date" is greater than 20 then click on "Next Month"
Save expression "(${date}-20)" as "newDate"
click stored value "newDate"
Select "Manager"
Select "Ronald Smith" from "Appraisal Reviewer"
Select "Feedback Form" from "Appraisal Form"
Click on "Start appraisal and send form"
Check that page contains "Ronald Smith" roughly below "To Start"
Besides these capabilities, testRigor also integrates with most CI/CD tools, bug tracking, and test management systems. You can read more about the capabilities of this tool here.
How to do End-to-end Testing with testRigor
Let us take the example of an e-commerce website that sells plants and other gardening needs. We will create end-to-end test cases in testRigor using plain English test steps.
Step 1: Log in to your testRigor app with your credentials.
Step 2: Set up the test suite for the website testing by providing the information below:
- Test Suite Name: Provide a relevant and self-explanatory name.
- Type of testing: Select from the following options: Desktop Web Testing, Mobile Web Testing, Native and Hybrid Mobile, based on your test requirements.
- URL to run test on: Provide the application URL that you want to test.
- Testing credentials for your web/mobile app to test functionality which requires user to login: You can provide the app’s user login credentials here and need not write them separately in the test steps then. The login functionality will be taken care of automatically using the keyword
login. - OS and Browser: Choose the OS Browser combination on which you want to run the test cases.
- Number of test cases to generate using AI: If you wish, you can choose to generate test cases based on the App Description text, which works on generative AI.
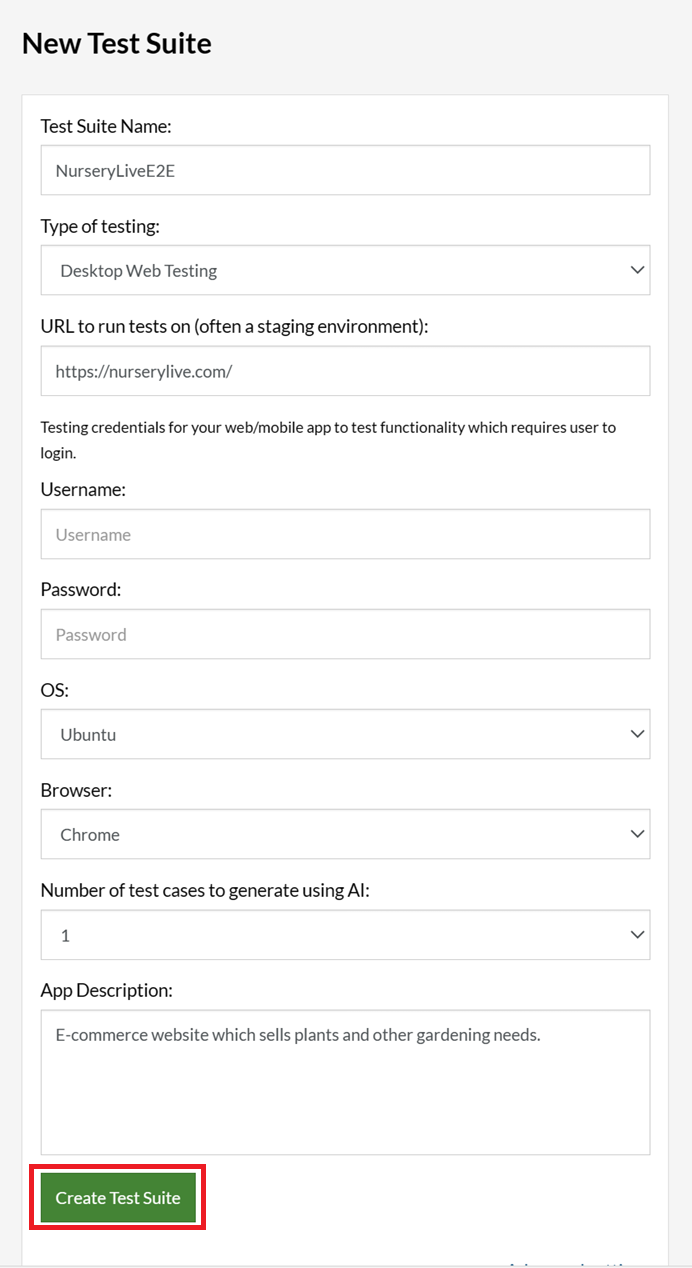
Step 3: Click Create Test Suite.
On the next screen, you can let AI generate the test case based on the App Description you provided during the Test Suite creation. However, for now, select do not generate any test, since we will write the test steps ourselves.
Step 4: To create a new custom test case yourself, click Add Custom Test Case.

Step 5: Provide the test case Description and start adding the test steps.
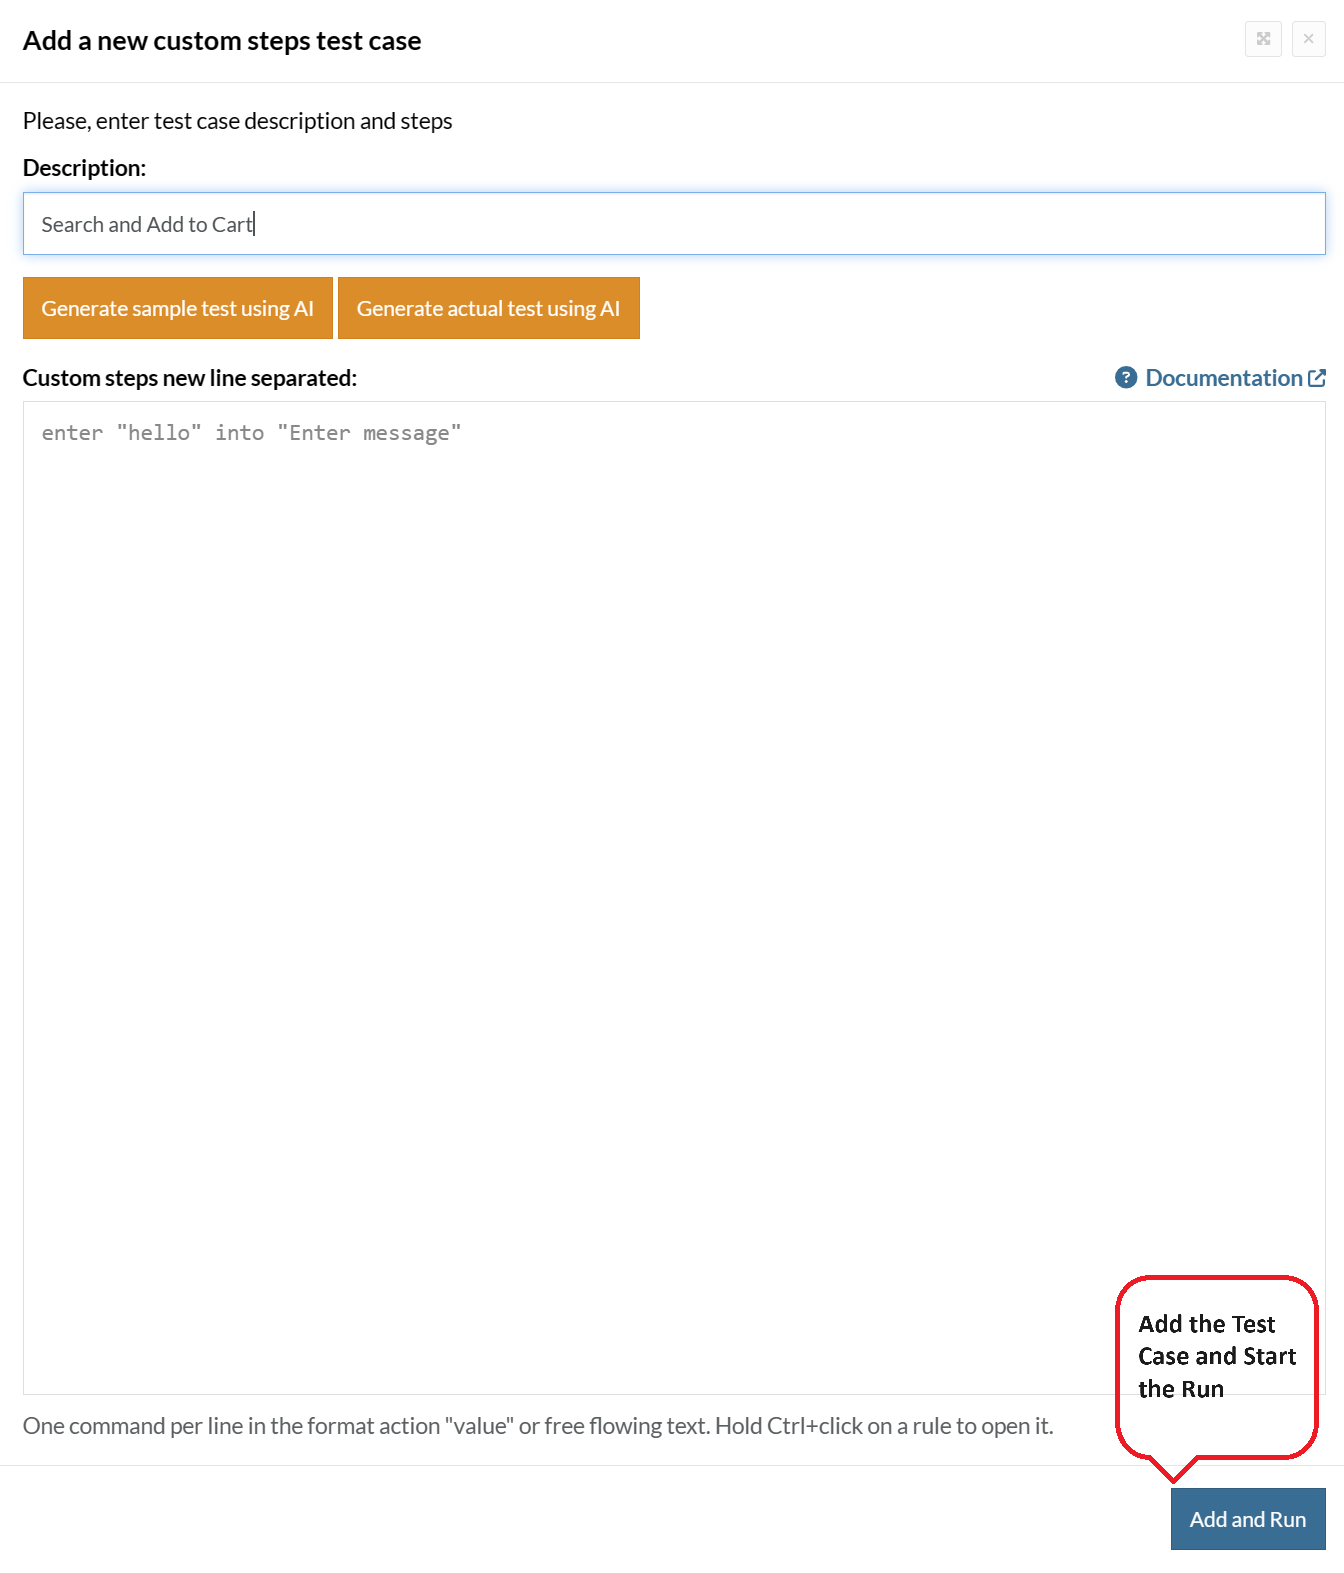
For the application under test, i.e., e-commerce website, we will perform below test steps:
- Search for a product
- Add it to the cart
- Verify that the product is present in the cart
Test Case: Search and Add to Cart
Step 1: We will add test steps on the test case editor screen one by one.
testRigor automatically navigates to the website URL you provided during the Test Suite creation. There is no need to use any separate function for it. Here is the website homepage, which we intend to test.

First, we want to search for a product in the search box. Unlike traditional testing tools, you can identify the UI element using the text you see on the screen. You need not use any CSS/XPath identifiers.
click "What are you looking for?"
Step 2: Once the cursor is in the search box, we will type the product name (lily), and press enter to start the search.
type "lily"
enter enter
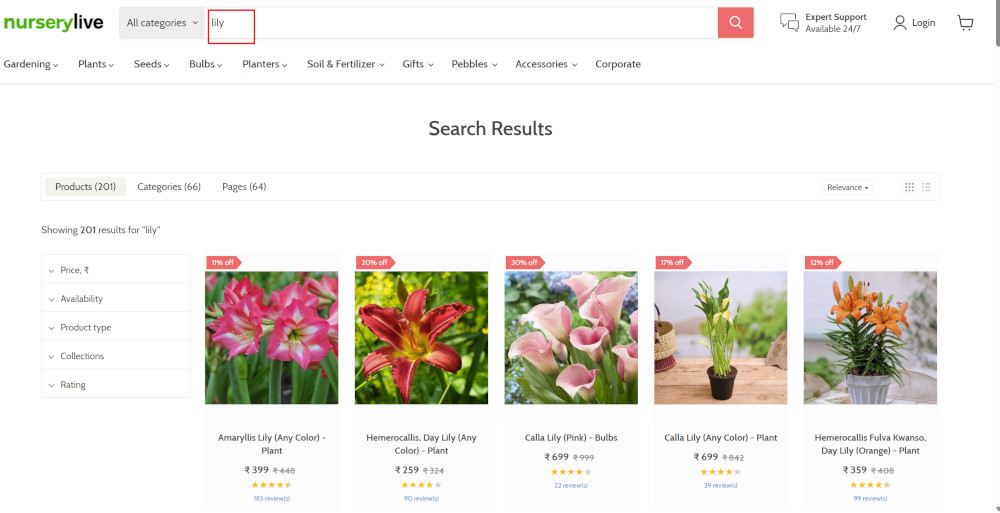
Search lists all products with the “lily” keyword on the webpage.
Step 3: The lily plant we are searching for needs the screen to be scrolled; for that testRigor provides a command. Scroll down until the product is present on the screen:
scroll down until page contains "Zephyranthes Lily, Rain Lily (Red)"
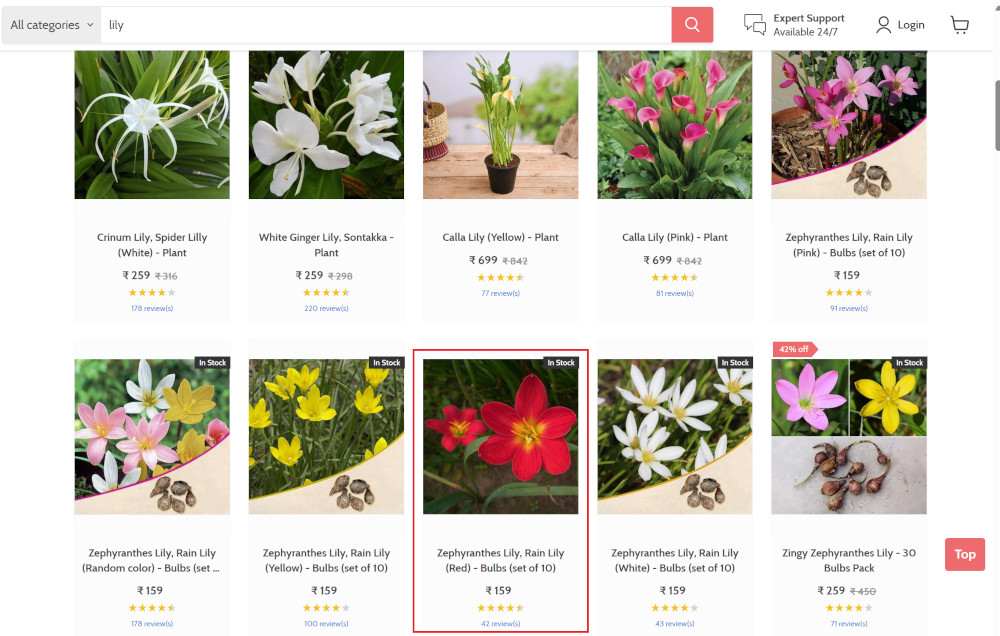
When the product is found on the screen, testRigor stops scrolling.
Step 4: Click on the product name to view the details:
click "Zephyranthes Lily, Rain Lily (Red)"
After the click, the product details are displayed on the screen as below, with the default Quantity as 1.
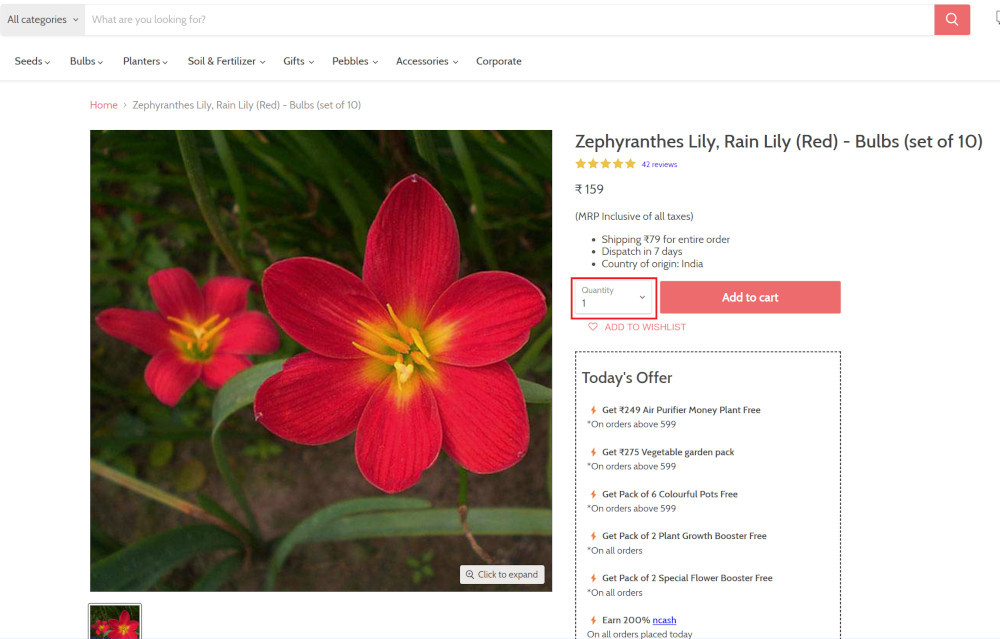
Step 5: Lets say, we want to change the Quantity to 3, so here we use the testRigor command to select from a list.
select "3" from "Quantity"
click "Add to cart"
The product is successfully added to the cart, and the “Added to your cart:” message is displayed on webpage.
Step 6: To assert that the message is successfully displayed, use a simple assertion command as below:
check that page contains "Added to your cart:"
Step 7: After this check, we will view the contents of the cart by clicking View cart as below:
click "View cart"

Step 8: Now we will again check that the product is present in the cart, under heading “Your cart” using the below assertion. With testRigor, it is really easy to specify the location of an element on the screen.
check that page contains "Zephyranthes Lily, Rain Lily (Red)" under "Your cart"

Complete Test Case
Here is how the complete test case will look in the testRigor app. The test steps are simple in plain English, enabling everyone in your team to write and execute them.
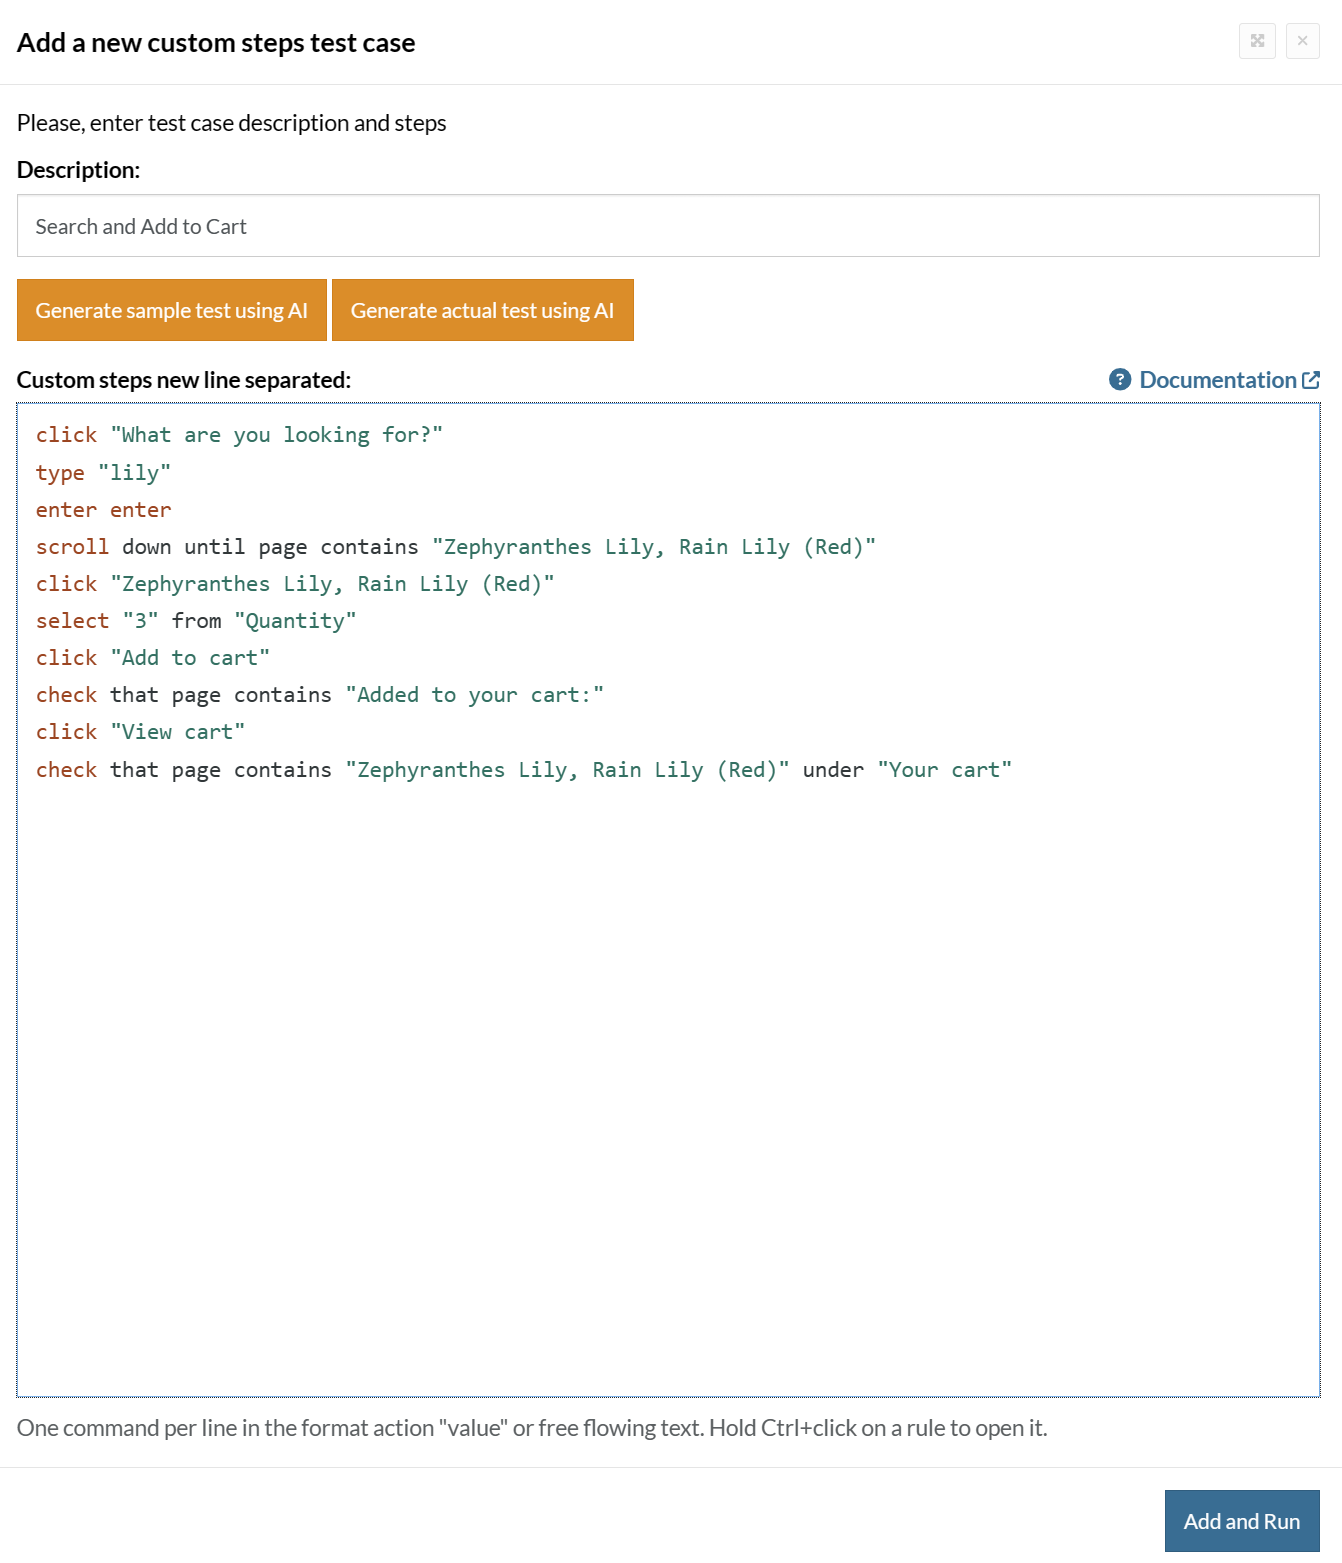
Click Add and Run.
Execution Results
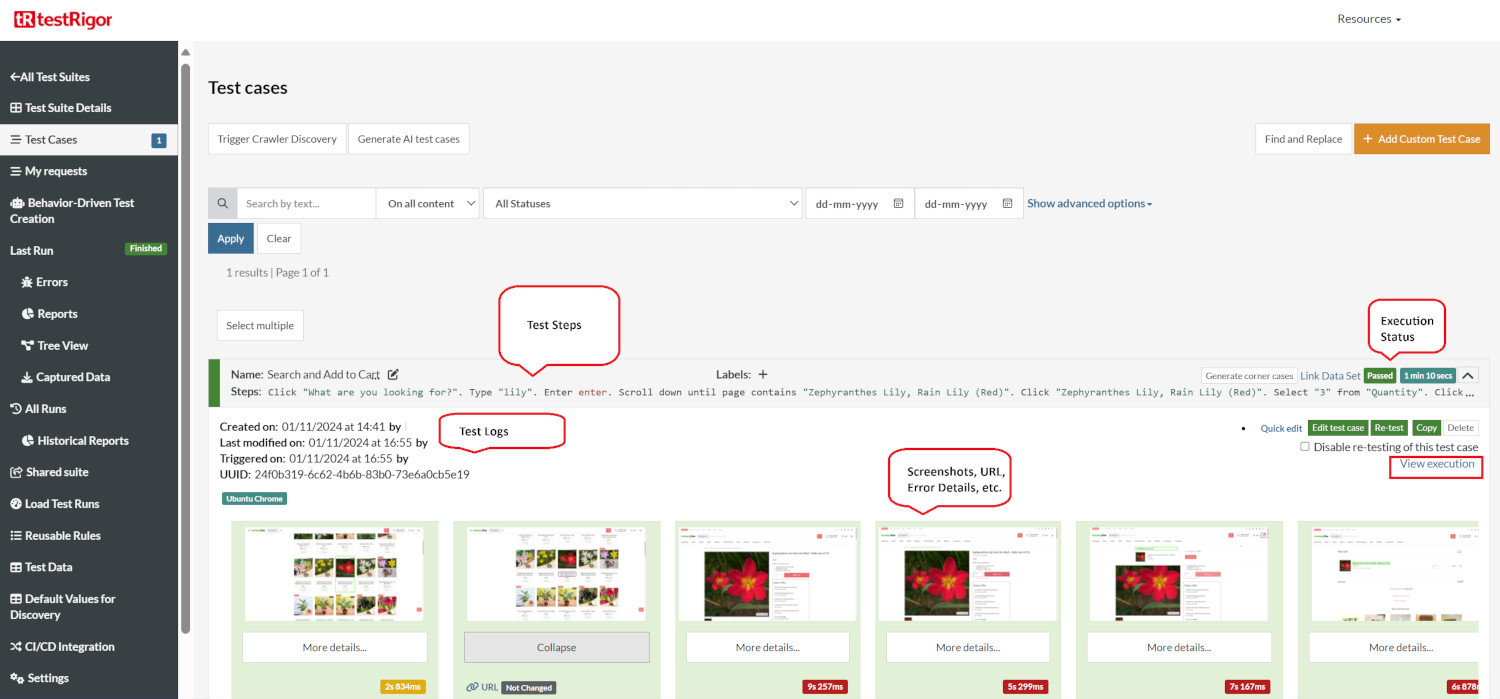
Once the test is executed, you can view the execution details, such as execution status, time spent in execution, screenshots, error messages, logs, video recordings of the test execution, etc. In case of any failure, there are logs and error text that are available easily in a few clicks.
You can also download the complete execution with steps and screenshots in PDF or Word format through the View Execution option.
testRigor’s Capabilities
Apart from the simplistic test case design and execution, there are some advanced features that help you test your application using simple English commands.
- Reusable Rules (Subroutines): You can easily create functions for the test steps that you use repeatedly. You can use the Reusable Rules to create such functions and call them in test cases by simply writing their names. See the example of Reusable Rules.
- Global Variables and Data Sets: You can import data from external files or create your own global variables and data sets in testRigor to use them in data-driven testing.
- 2FA, QR Code, and Captcha Resolution: testRigor easily manages the 2FA, QR Code, and Captcha resolution through its simple English commands.
- Email, Phone Call, and SMS Testing: Use simple English commands to test the email, phone calls, and SMS. These commands are useful for validating 2FA scenarios, with OTPs and authentication codes being sent to email, phone calls, or via phone text.
- File Upload/ Download Testing: Execute the test steps involving file download or file upload without the requirement of any third-party software. You can also validate the contents of the files using testRigor’s simple English commands.
- Database Testing: Execute database queries and validate the results fetched.
testRigor enables you to test web, mobile (hybrid, native), API, and desktop apps with minimum effort and maintenance.
Additional Resources
- Access testRigor documentation to know about more useful capabilities
- Top testRigor’s features
- How to perform end-to-end testing
Conclusion
Open HRMS makes it convenient for organizations to utilize a single software for multiple tasks. You can customize the software modules as per your requirements. However, when doing so, it is necessary to have all checks and balances in place from a testing standpoint to ensure high-quality software.
| Achieve More Than 90% Test Automation | |
| Step by Step Walkthroughs and Help | |
| 14 Day Free Trial, Cancel Anytime |


