OpenMRS Testing

What is OpenMRS?
OpenMRS is the world’s leading open-source electronic medical records platform. Initially designed to support HIV care, it later expanded to cover the needs of HIV patients suffering from other health conditions, such as malaria, tuberculosis, maternal health, and primary care needs, among other medical issues. For more details about the system, refer here.
OpenMRS technical aspects
OpenMRS is a Java-based software and a web-based electronic medical record. It features a robust and flexible data model with an API layer, enabling developers to understand Java objects and read, update, or save them. This layer itself can be used as a standalone application.
- Apache Maven and Tomcat
- Bamboo
- Concept dictionary
- Core (OpenMRS API and core modules)
- Eclipse/IntelliJ
- GitHub
- Hibernate
- Spring framework
OpenMRS testing
Unit testing
Unit testing is performed to validate that individual code units - such as a single class, function, or method - are working as expected.
- Each test should validate a single piece of logical code.
- The names of methods should be self-explanatory.
- Methods should have assertions to validate the expected outcome.
package org.openmrs.module.sampletest;

import org.junit.Assert;
import org.junit.Test;
import org.openmrs.module.samplemodule.SampleModuleObject;

public class SampleModuleObjectTest {

  @Test
  public void shouldExamineFeatureXofSampleObject() throws Exception {
    // Create a new instance of SampleModuleObject
    SampleModuleObject sampleObject = new SampleModuleObject("SampleValue");

    // Get the value of the object
    String objectValue = sampleObject.getValue();

    // Assert that the value is as expected
    Assert.assertEquals("SampleValue", objectValue);
  }
}
In this example, the test is checking if the SampleModuleObject is storing and returning the correct value. The test creates an instance of SampleModuleObject with a sample value, retrieves the value, and asserts that it is equal to the expected value.
Integration testing
Integration testing is a type of software testing that focuses on evaluating the combined functionality of individual modules or components within an application. Its main objective is to identify defects and issues that may arise when different modules interact, ensuring that data flows correctly between them and their combined functionality performs as expected. This testing level helps confirm that the application's various parts work together seamlessly, improving the overall system's reliability and stability.
- Integration testing can be performed at the database layer
- Integration testing can be performed at the user interface level (which can also be part of E2E testing)
package org.openmrs.module.sampletest;

import org.junit.Assert;
import org.junit.Before;
import org.junit.Test;
import org.openmrs.api.context.Context;
import org.openmrs.module.samplemodule.api.SampleModuleService;
import org.openmrs.module.samplemodule.SampleModuleObject;
import org.openmrs.test.BaseModuleContextSensitiveTest;

public class SampleModuleObjectDatabaseIntegrationTest extends BaseModuleContextSensitiveTest {

  private SampleModuleService sampleModuleService;

  @Before
  public void setup() {
    sampleModuleService = Context.getService(SampleModuleService.class);
  }

  @Test
  public void shouldSaveAndRetrieveSampleModuleObject() throws Exception {
    // Create a new instance of SampleModuleObject
    SampleModuleObject sampleObject = new SampleModuleObject("SampleValue");

    // Save the object to the database
    SampleModuleObject savedObject = sampleModuleService.saveSampleModuleObject(sampleObject);

    // Retrieve the object from the database using its ID
    SampleModuleObject retrievedObject = sampleModuleService.getSampleModuleObject(savedObject.getId());

    // Assert that the saved and retrieved objects are the same
    Assert.assertEquals(savedObject, retrievedObject);
  }
}
In this example, the test extends BaseModuleContextSensitiveTest, which provides the necessary setup for integration testing with the OpenMRS database. The test checks whether the SampleModuleObject can be saved and retrieved from the database using the SampleModuleService. It creates a new instance of SampleModuleObject, saves it to the database, retrieves it using its ID, and asserts that the saved and retrieved objects are the same.
End-to-end testing
End-to-end (E2E) or system testing is a comprehensive testing approach that evaluates the entire application, including its integrated modules, components, dependencies, and interfaces, to ensure seamless functionality and interaction from start to finish. The primary objective of E2E testing is to validate that the application performs as expected from the user's perspective, considering various real-world scenarios and conditions. This type of testing helps identify any issues that may arise during user interaction, ensuring that the application meets its requirements, delivers a positive user experience, and functions reliably in a production environment.
You can create automated end-to-end tests using the following ways:
Cypress
Cypress is a NodeJS-based front-end Test Automation Framework for automating modern web applications. Unlike other automation tools, the Cypress engine directly interacts with the browser, and there is no proxy server between the code and the client. Basically, in Cypress, the browser itself executes the code, and there is a direct interaction between Cypress and the DOM where the browser behavior can be modified at runtime. Refer here.
Selenium
To conduct end-to-end testing for OpenMRS, a Behavior-Driven Development (BDD) framework called QAFramework is employed, which is accessible on GitHub. This framework incorporates Cucumber, which utilizes Gherkin for BDD implementation. For a comprehensive overview of Cucumber and BDD, you can refer to the provided resources.
To access the source code and contribute to automating features, it is necessary to first clone the QAFramework repository to your local machine using Git Bash.
After successful cloning, we can perform test automation of end-to-end features. We will take an example: "Login to OpenMRS web application and validate login successfully by checking all modules available in the location page Inpatient Ward".
Feature: User Login
Background:
  Given user visits openMRS login page
Scenario: validate successful login
  When user enters "admin" username
  And user enters "Admin123" Password
  And user selects "Inpatient ward" Login location
  And user logs in
  And user verifies modules available on home page after login as Admin
  And user verifies modules available on home page after login as Clerk
  And user verifies modules available on home page after login as Doctor
  And user verifies modules available on home page after login as Nurse
  And user Closes browser
public class loginandvalidate extends Steps {
  @When("user enters {string} username")
  public void userEntersUsername(String username) {
    driver.findElement(By.id("username")).sendKeys(username);
  }
  @And("user enters {string} Password")
  public void userEntersPassword(String passwd) {
    driver.findElement(By.id("passwd")).sendKeys(passwd);
  }
  @And("user selects {string} Login location")
  public void userSelectsLoginLocation(String location) {
    driver.findElement(By.cssSelector("#sessionloaction li")).click();
  }
  @And("user logs in")
  public void userLogsIn() {
    driver.findElement(By.id("loginButton")).click();
  }
  @And("user verifies modules available on home page after login as Admin")
  public void userVerifiesModulesAvailableOnHomePageAfterLoginAsAdmin() {
    assertTrue(homePage.isFindAPatientAppPresent());
    assertTrue(homePage.isActiveVisitAppPresent());
    assertTrue(homePage.isAppointmentSchedulingAppPresent());
    assertTrue(homePage.isCaptureVitalAppsPresent());
    assertTrue(homePage.isRegisterPatientCustomizedForRefAppPresent());
    assertTrue(homePage.isDataManagementAppPresent());
    assertTrue(homePage.isConfigureMetadataAppPresent());
    assertTrue(homePage.isSytemAdministrationAppPresent());
  }
}
And there would be a sample test runner Java file that helps to run the test case. The above is a basic sample example of an end-to-end test that uses Selenium.
testRigor
An innovative no-code tool that is extremely easy to implement, writing tests takes about 15x faster than with Selenium, and the test maintenance issue is virtually eliminated. Yes, that is testRigor - an AI-driven tool that makes end-to-end testing a breeze.
Unlike other tools on the market, there are no step definition files or other underlying code in testRigor. The tests you write in plain English commands are the tests that get executed by the system. This makes it extremely straightforward for the entire team to comprehend and collaborate.
Below is the sample test of testRigor with the same example "Login to OpenMRS web application and validate login is successful by checking all modules available in the location page Inpatient Ward".
//login into location-Inpatient Ward
enter "admin" into "Enter your username"
enter "******" into "Enter your password"
click on "Inpatient ward"
press "Log In"
check that page contains "Logged in as super user (admin) at Inpatient Ward."

//check modules
check that page contains "Find Patient Record"
check that page contains "Active Visits"
check that page contains "Register a patient"
check that page contains "Capture vitals"
check that page contains "Appointment scheduling"
check that page contains "Reports"
check that page contains "Data management"
check that page contains "Configure Metadata"
check that page contains "System Administration"
Impressive, right? This is just a sneak peek into what testRigor is capable of. We encourage you to look into the documentation page to get a better idea of all the features that your team can test. And the best part is that tests are so stable that some companies use testRigor for monitoring!
How to do End-to-end Testing with testRigor
Let us take the example of an e-commerce website that sells plants and other gardening needs. We will create end-to-end test cases in testRigor using plain English test steps.
Step 1: Log in to your testRigor app with your credentials.
Step 2: Set up the test suite for the website testing by providing the information below:
- Test Suite Name: Provide a relevant and self-explanatory name.
- Type of testing: Select from the following options: Desktop Web Testing, Mobile Web Testing, Native and Hybrid Mobile, based on your test requirements.
- URL to run test on: Provide the application URL that you want to test.
- Testing credentials for your web/mobile app to test functionality which requires user to login: You can provide the app’s user login credentials here and need not write them separately in the test steps then. The login functionality will be taken care of automatically using the keyword
login. - OS and Browser: Choose the OS Browser combination on which you want to run the test cases.
- Number of test cases to generate using AI: If you wish, you can choose to generate test cases based on the App Description text, which works on generative AI.
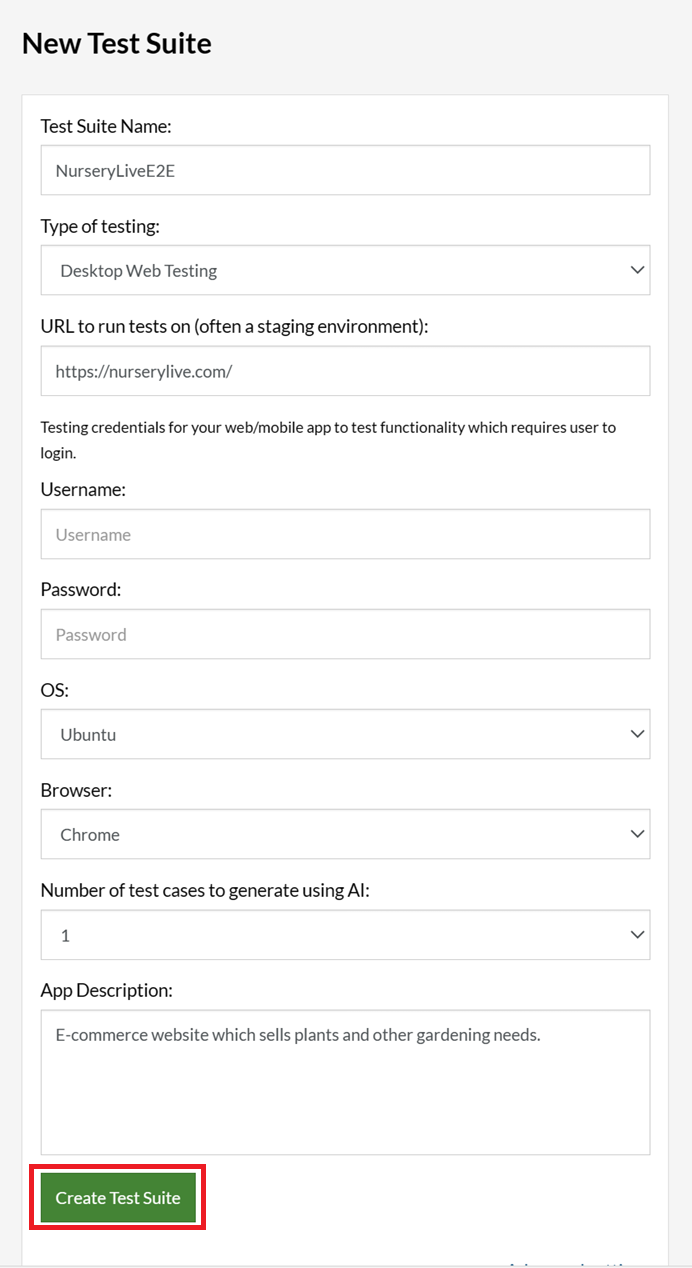
Step 3: Click Create Test Suite.
On the next screen, you can let AI generate the test case based on the App Description you provided during the Test Suite creation. However, for now, select do not generate any test, since we will write the test steps ourselves.
Step 4: To create a new custom test case yourself, click Add Custom Test Case.

Step 5: Provide the test case Description and start adding the test steps.
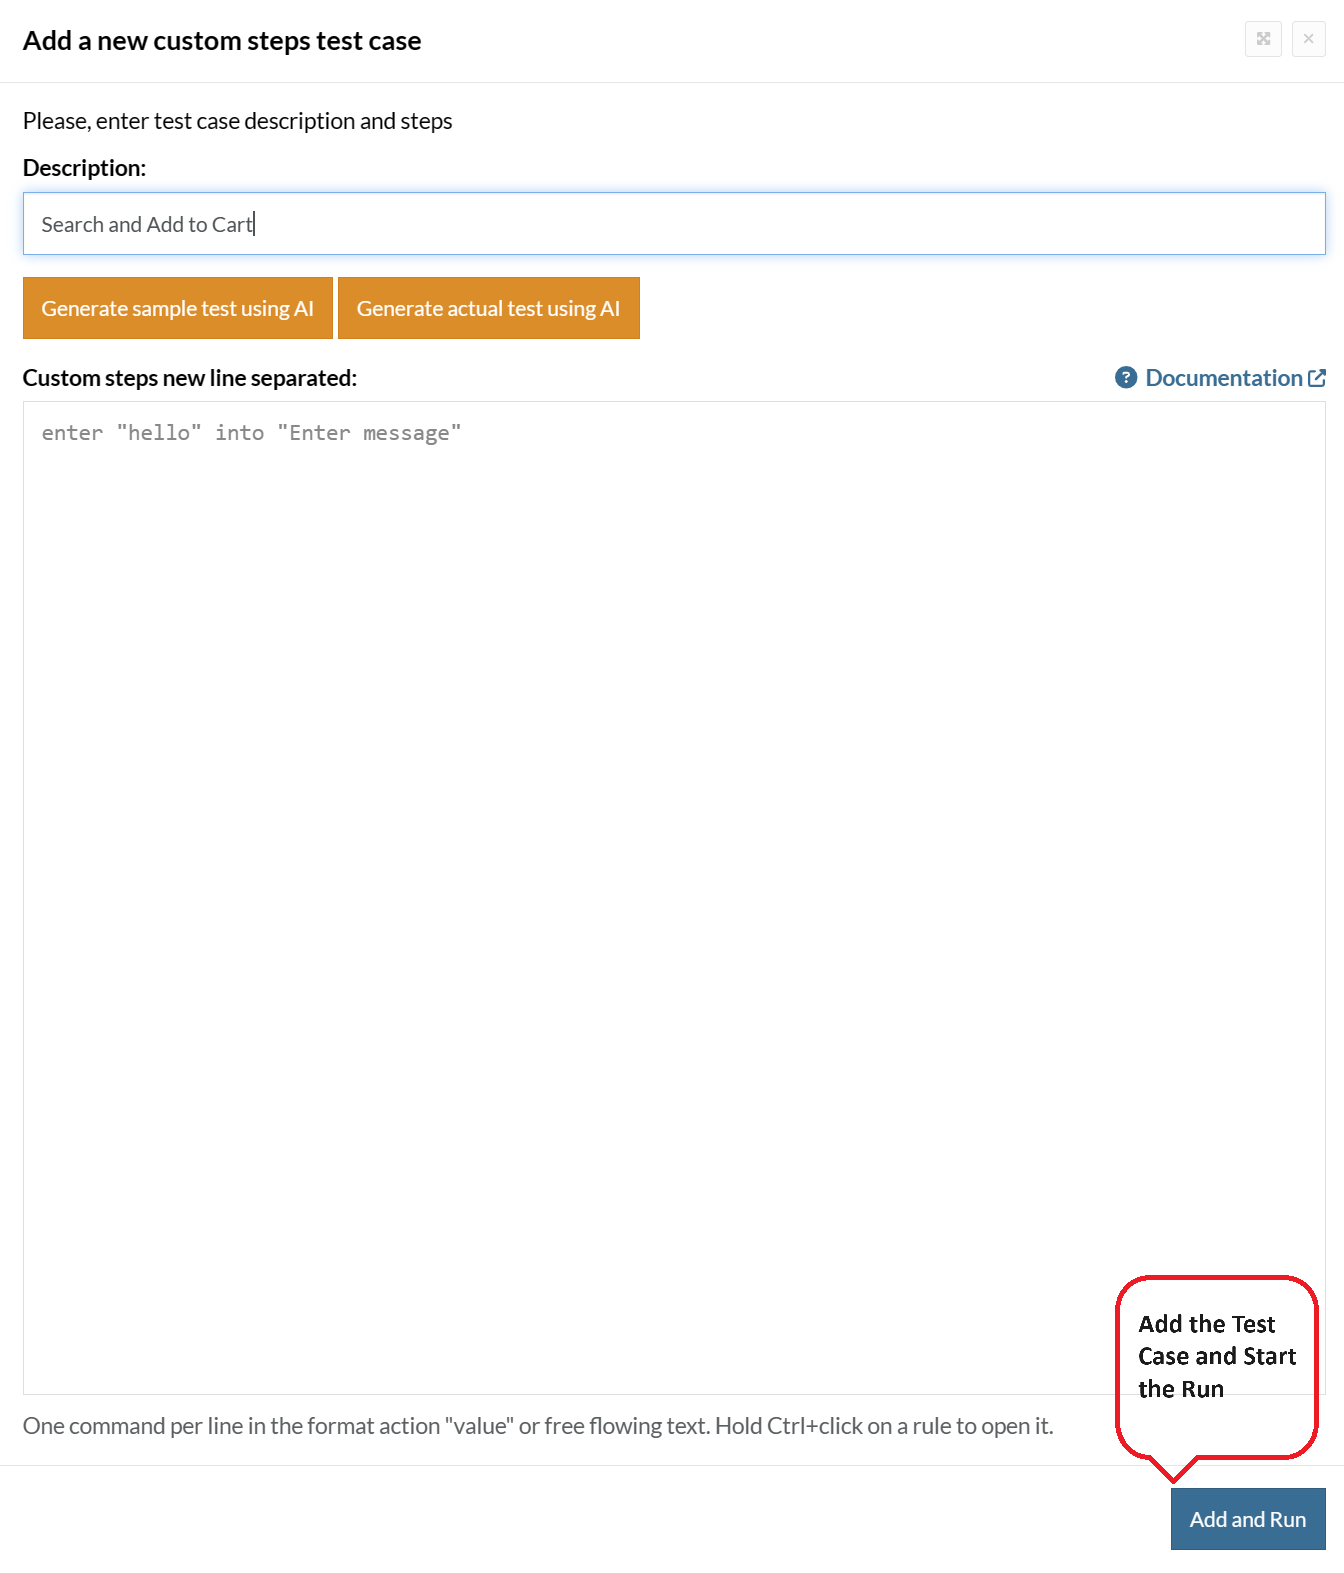
For the application under test, i.e., e-commerce website, we will perform below test steps:
- Search for a product
- Add it to the cart
- Verify that the product is present in the cart
Test Case: Search and Add to Cart
Step 1: We will add test steps on the test case editor screen one by one.
testRigor automatically navigates to the website URL you provided during the Test Suite creation. There is no need to use any separate function for it. Here is the website homepage, which we intend to test.

First, we want to search for a product in the search box. Unlike traditional testing tools, you can identify the UI element using the text you see on the screen. You need not use any CSS/XPath identifiers.
click "What are you looking for?"
Step 2: Once the cursor is in the search box, we will type the product name (lily), and press enter to start the search.
type "lily"
enter enter
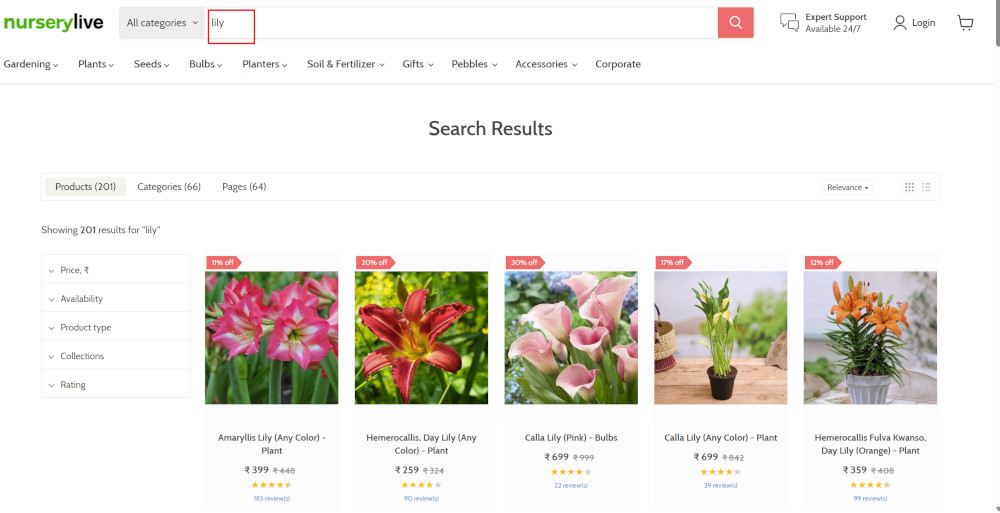
Search lists all products with the “lily” keyword on the webpage.
Step 3: The lily plant we are searching for needs the screen to be scrolled; for that testRigor provides a command. Scroll down until the product is present on the screen:
scroll down until page contains "Zephyranthes Lily, Rain Lily (Red)"
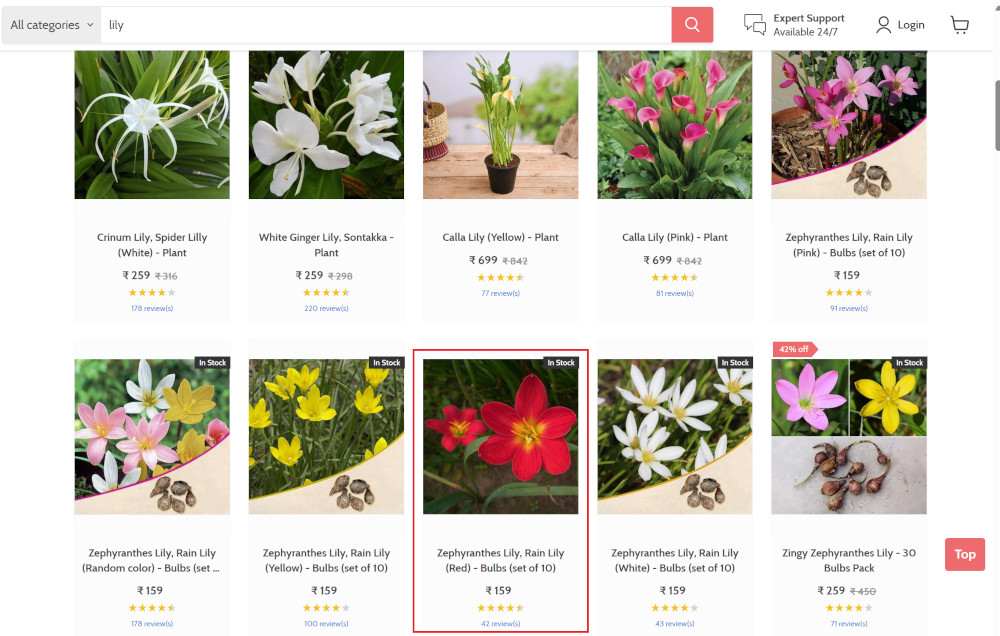
When the product is found on the screen, testRigor stops scrolling.
Step 4: Click on the product name to view the details:
click "Zephyranthes Lily, Rain Lily (Red)"
After the click, the product details are displayed on the screen as below, with the default Quantity as 1.
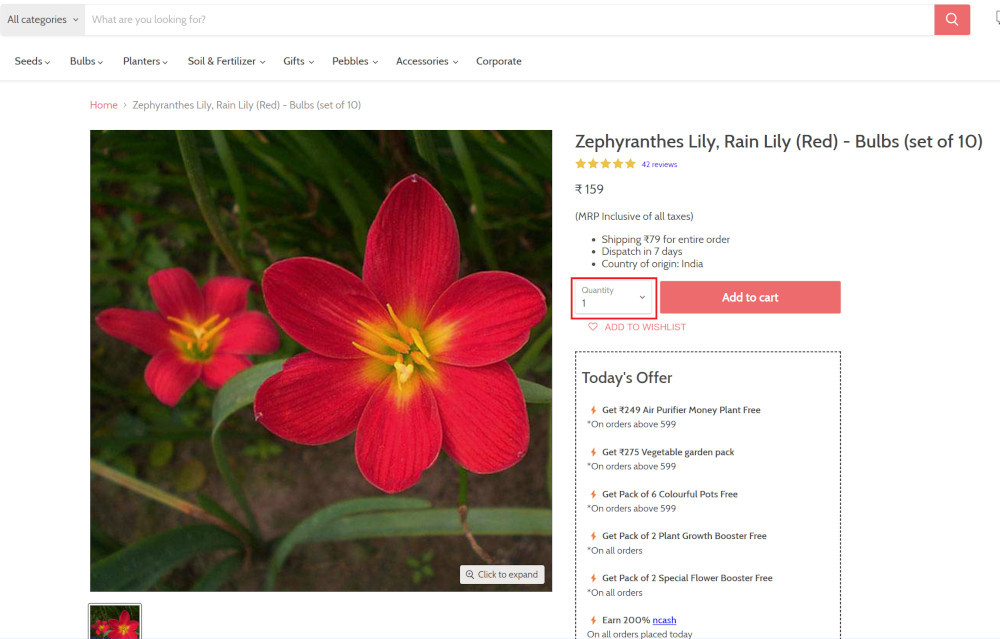
Step 5: Lets say, we want to change the Quantity to 3, so here we use the testRigor command to select from a list.
select "3" from "Quantity"
click "Add to cart"
The product is successfully added to the cart, and the “Added to your cart:” message is displayed on webpage.
Step 6: To assert that the message is successfully displayed, use a simple assertion command as below:
check that page contains "Added to your cart:"
Step 7: After this check, we will view the contents of the cart by clicking View cart as below:
click "View cart"

Step 8: Now we will again check that the product is present in the cart, under heading “Your cart” using the below assertion. With testRigor, it is really easy to specify the location of an element on the screen.
check that page contains "Zephyranthes Lily, Rain Lily (Red)" under "Your cart"

Complete Test Case
Here is how the complete test case will look in the testRigor app. The test steps are simple in plain English, enabling everyone in your team to write and execute them.
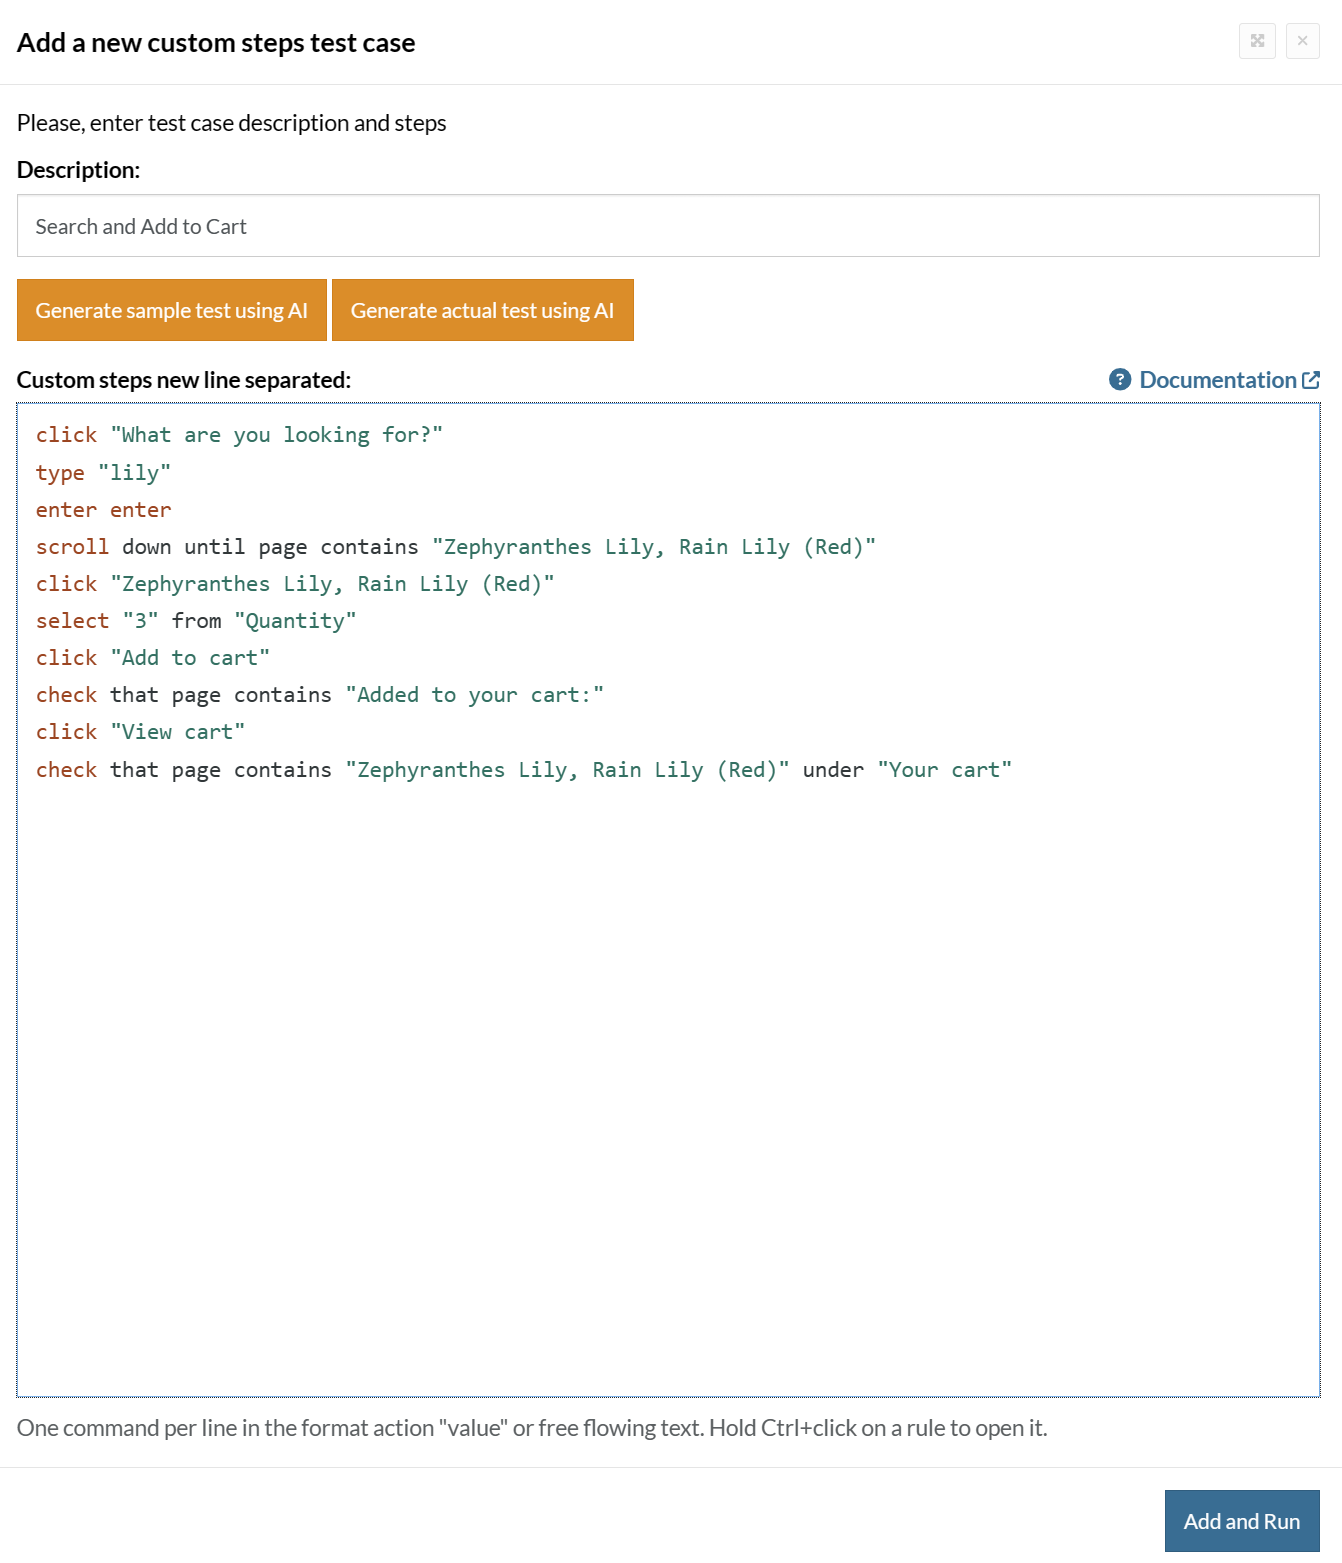
Click Add and Run.
Execution Results
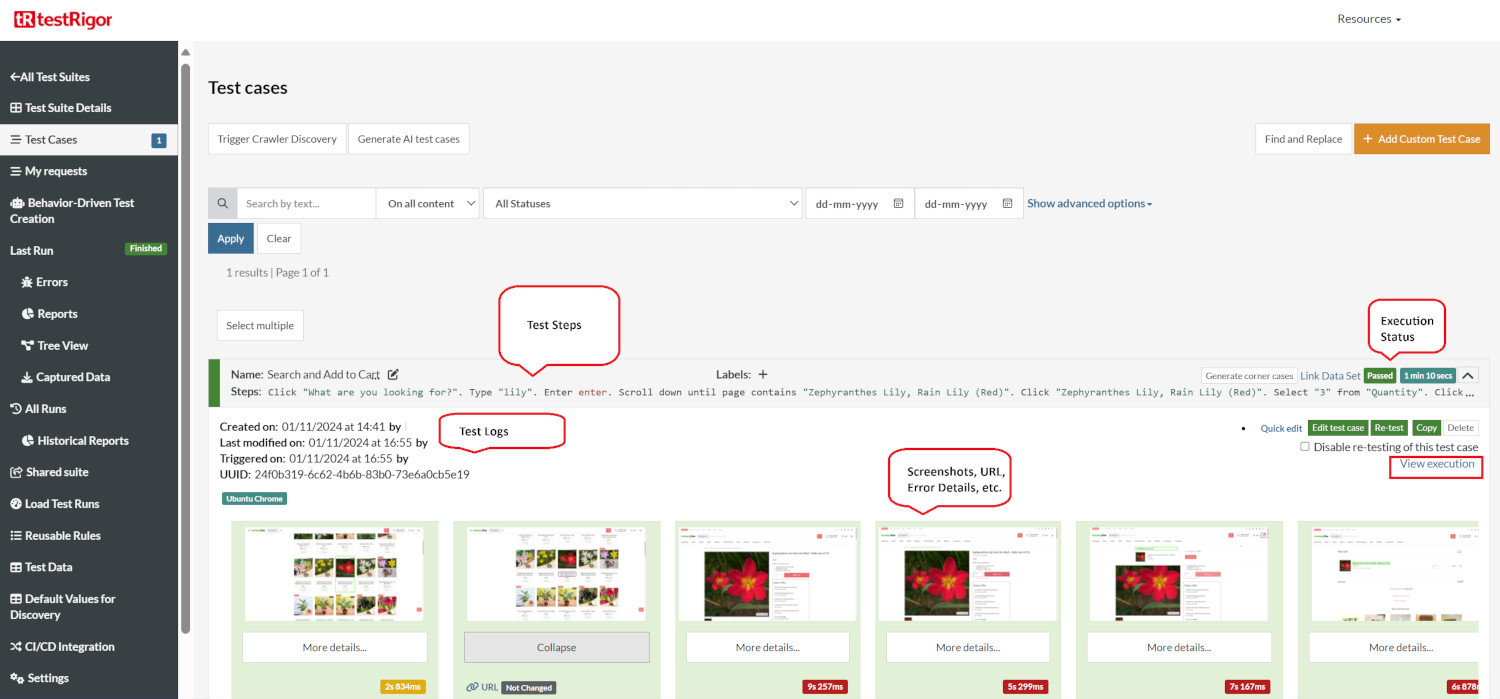
Once the test is executed, you can view the execution details, such as execution status, time spent in execution, screenshots, error messages, logs, video recordings of the test execution, etc. In case of any failure, there are logs and error text that are available easily in a few clicks.
You can also download the complete execution with steps and screenshots in PDF or Word format through the View Execution option.
testRigor’s Capabilities
Apart from the simplistic test case design and execution, there are some advanced features that help you test your application using simple English commands.
- Reusable Rules (Subroutines): You can easily create functions for the test steps that you use repeatedly. You can use the Reusable Rules to create such functions and call them in test cases by simply writing their names. See the example of Reusable Rules.
- Global Variables and Data Sets: You can import data from external files or create your own global variables and data sets in testRigor to use them in data-driven testing.
- 2FA, QR Code, and Captcha Resolution: testRigor easily manages the 2FA, QR Code, and Captcha resolution through its simple English commands.
- Email, Phone Call, and SMS Testing: Use simple English commands to test the email, phone calls, and SMS. These commands are useful for validating 2FA scenarios, with OTPs and authentication codes being sent to email, phone calls, or via phone text.
- File Upload/ Download Testing: Execute the test steps involving file download or file upload without the requirement of any third-party software. You can also validate the contents of the files using testRigor’s simple English commands.
- Database Testing: Execute database queries and validate the results fetched.
testRigor enables you to test web, mobile (hybrid, native), API, and desktop apps with minimum effort and maintenance.
Additional Resources
- Access testRigor documentation to know about more useful capabilities
- Top testRigor’s features
- How to perform end-to-end testing
Conclusion
In conclusion, OpenMRS testing is crucial to ensure the platform's reliability, stability, and overall quality. By employing different testing levels - unit, integration, and end-to-end testing - developers can identify and address issues at various stages of the application's development. Utilizing the right tools enables efficient and effective testing, ultimately resulting in a robust and user-friendly electronic medical records system that caters to the diverse needs of healthcare providers and patients worldwide.
| Achieve More Than 90% Test Automation | |
| Step by Step Walkthroughs and Help | |
| 14 Day Free Trial, Cancel Anytime |


