Play Framework Testing

Play framework or Play is an open-source web application framework that is lightweight and stateless. It’s written in Scala and built on Akka and provides predictable and minimal resource consumption for highly scalable web applications. Guillaume Bort created Play, and the initial release happened in 2007. Play framework is a direct competitor of the Spring framework in Java. Play can be usable from other programming languages compiled to JVM bytecode. Also, the Play framework uses RESTful by default and supports big data and NoSQL. The Play follows a model-view-controller architectural pattern. EA, Verizon, Linkedin, Walmart, Samsung, etc., use the Play framework.
- Unit testing
- Integration testing
- End to End or System testing
Unit Testing
Unit testing implies testing small pieces of code to ensure the tested function works without fail. In Play, we can do unit testing for the models, controllers, view templates, and essential actions. Unit testing differs for Java as well as Scala.
Java Unit Testing
The default framework used for unit testing is JUnit. Play provides helpers and application stubs for testing. The unit test cases are written and stored in the "test" folder and executed via the Scala build tool console. Users can run all tests in parallel or in the selective mode. A new process gets forked whenever unit testing is triggered. Users can provide custom settings via "build.sbt".
import static org.junit.Assert.*;
import org.junit.Test;
public class SimpleTest {
  @Test
  public void testSum() {
    int a = 1 + 1;
    assertEquals(2, a);
  }

  @Test
  public void testString() {
    String str = "Hello world";
    assertFalse(str.isEmpty());
  }
}
Many popular libraries are used to write assertions for unit testing, such as Hamcrest. If the test class depends on an external data access class, we may have to mock it for controlled data. Mockito library is used for mocking external data. An external library Ebean is used for the unit testing of Models. Ebean helps in adding data logically to the unit test scenarios. Play's test helpers are mainly used for the unit testing of Controllers.
Scala Unit Testing
import org.scalatestplus.play._
import scala.collection.mutable
class StackSpec extends PlaySpec {
  "A Stack" must {
    "pop values in last-in-first-out order" in {
      val stack = new mutable.Stack[Int]
      stack.push(1)
      stack.push(2)
      stack.pop() mustBe 2
      stack.pop() mustBe 1
    }
    "throw NoSuchElementException if an empty stack is popped" in {
      val emptyStack = new mutable.Stack[Int]
      a[NoSuchElementException] must be thrownBy {
        emptyStack.pop()
      }
    }
  }
}
Internal libraries like Anorm or Slick are used for the unit testing of Models. They help in adding data logically to the unit test scenarios.
Integration Testing
Integration testing is responsible for connecting different modules, functions, or components in a system. For both Java and Scala applications, users can perform integration testing on the server or in the browser. Play provides many custom methods and classes to support integration testing, which can be found in "play.api.test" package or "play.test" package.
Testing With a Server
public class ServerFunctionalTest extends WithServer {
  @Test
  public void testInServer() throws Exception {
     OptionalInt optHttpsPort = testServer.getRunningHttpsPort();
     String url;
     int port;
     if (optHttpsPort.isPresent()) {
        port = optHttpsPort.getAsInt();
        url = "https://localhost:" + port;
     } else {
        port = testServer.getRunningHttpPort().getAsInt();
        url = "http://localhost:" + port;
     }
     try (WSClient ws = play.test.WSTestClient.newClient(port)) {
       CompletionStage stage = ws.url(url).get();
       WSResponse response = stage.toCompletableFuture().get();
       assertEquals(NOT_FOUND, response.getStatus());
    } catch (InterruptedException e) {
      e.printStackTrace();
    }
  }
}
If multiple tests are running on the same server, the performance of the test will be high. Users can change server configurations in the "ConfiguredServer" file.
Testing In a Browser
For integration testing in the browser, the Play framework depends on the Selenium Webdriver. Let's look at Selenium integration with Play in the system testing section.
End to End / System Testing
This type of testing sits on top of the testing pyramid and ensures that the whole application works per requirements. With system testing, the user can confirm not just the controller part, but that the controller UI code also works well. In other words, it is about testing the UI layer.
- Testing the controller with JUnit
- Selenium Webdriver
- testRigor
Testing The Controller With JUnit
Users can do system testing on the controller part using the JUnit framework. Functional tests call the "ActionInvoker" class simulating an HTTP response. The play framework routes the request, invokes the corresponding action, and sends the response. Based on the assertions the user provides, the test case gets verified.
import org.junit.*;
import play.test.*;
import play.mvc.*;
import play.mvc.Http.*;
import models.*;
public class ApplicationTest extends FunctionalTest {
  @Test
  public void testThatIndexPageWorks() {
      Response response = GET("/");
      assertIsOk(response);
      assertContentType("text/html", response);
      assertCharset("utf-8", response);
  }
}
Though the user can test the entire application via this method, this won't provide an accurate result as the users interact with the View, and there can be issues. Since it's not ideal for end-to-end testing, let's move to other options.
Selenium Webdriver
Selenium is a legacy open-source web automation tool for web application automation. We won't go into too many details in this article. You can learn more about Selenium here and also the limitations of Selenium here.
testRigor
testRigor is one of the most advanced AI-integrated automated tools built explicitly for end-to-end testing. It's known for being completely no-code, as well as extremely stable tests and low maintenance.
click "Sign In"
enter email into "Email"
enter password into "Password"
click "Submit"
enter "Keyboard with Lights" into "Search" input
click "GO"
click "first" item
click "add to cart"
click "cart"
check that page contains "Keyboard with Lights"
The above example may look like a test case, but it's a test script. As you can see, there are no details of implementation, allowing for a test built truly in the UI layer. This approach allows for tests that represent an actual user's perspective, from start to finish of a flow.
Another benefit is the minimal learning curve of starting with testRigor. It's cloud-hosted, and the initial setup of a new test suite only takes a few minutes. From there, anyone on the team can build cross-browser and cross-platform functional UI tests, edit and maintain them.
- tesRigor is a cloud application, so there is no extra device setup or maintenance cost
- testRigor supports cross-platform tests across desktop applications, desktop and mobile browsers, and native mobile apps. There are many other testing types, such as API testing, performance testing, etc.
- testRigor provides integrations with multiple issue management and test management tools like Jira, Zephyr, and X-ray.
- Detailed test reports are available in formats like HTML, pdf, and video recordings.
How to do End-to-end Testing with testRigor
Let us take the example of an e-commerce website that sells plants and other gardening needs. We will create end-to-end test cases in testRigor using plain English test steps.
Step 1: Log in to your testRigor app with your credentials.
Step 2: Set up the test suite for the website testing by providing the information below:
- Test Suite Name: Provide a relevant and self-explanatory name.
- Type of testing: Select from the following options: Desktop Web Testing, Mobile Web Testing, Native and Hybrid Mobile, based on your test requirements.
- URL to run test on: Provide the application URL that you want to test.
- Testing credentials for your web/mobile app to test functionality which requires user to login: You can provide the app’s user login credentials here and need not write them separately in the test steps then. The login functionality will be taken care of automatically using the keyword
login. - OS and Browser: Choose the OS Browser combination on which you want to run the test cases.
- Number of test cases to generate using AI: If you wish, you can choose to generate test cases based on the App Description text, which works on generative AI.
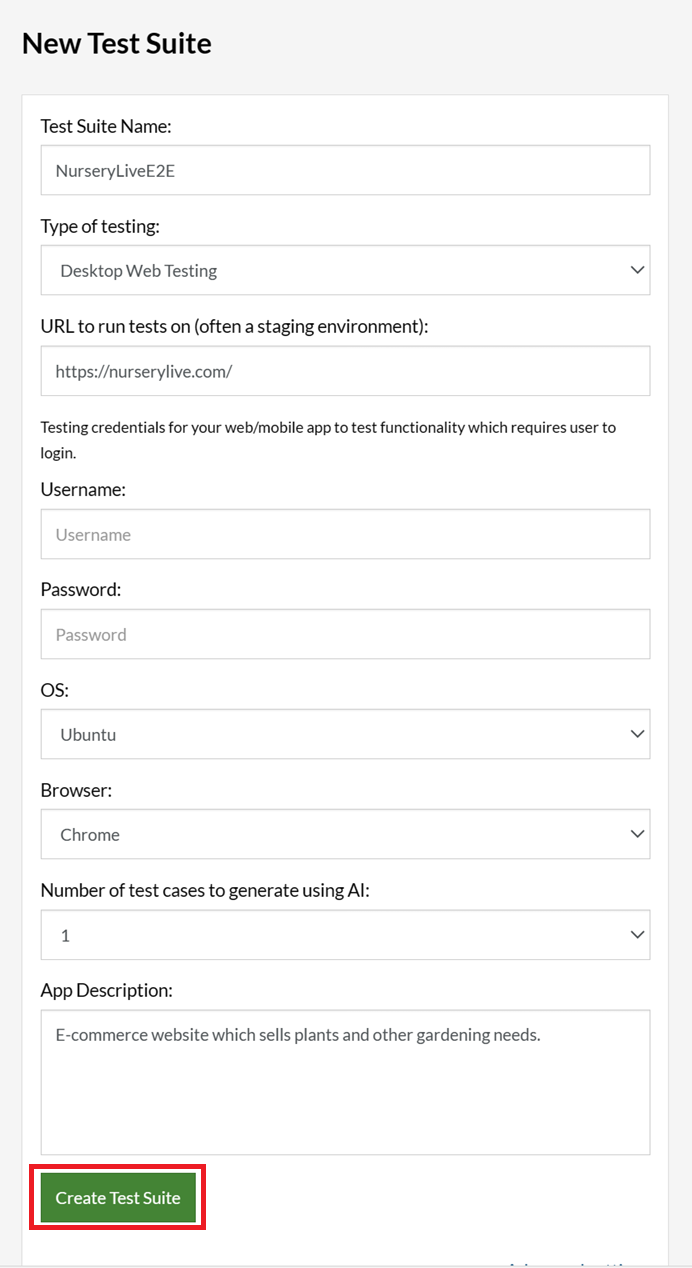
Step 3: Click Create Test Suite.
On the next screen, you can let AI generate the test case based on the App Description you provided during the Test Suite creation. However, for now, select do not generate any test, since we will write the test steps ourselves.
Step 4: To create a new custom test case yourself, click Add Custom Test Case.

Step 5: Provide the test case Description and start adding the test steps.
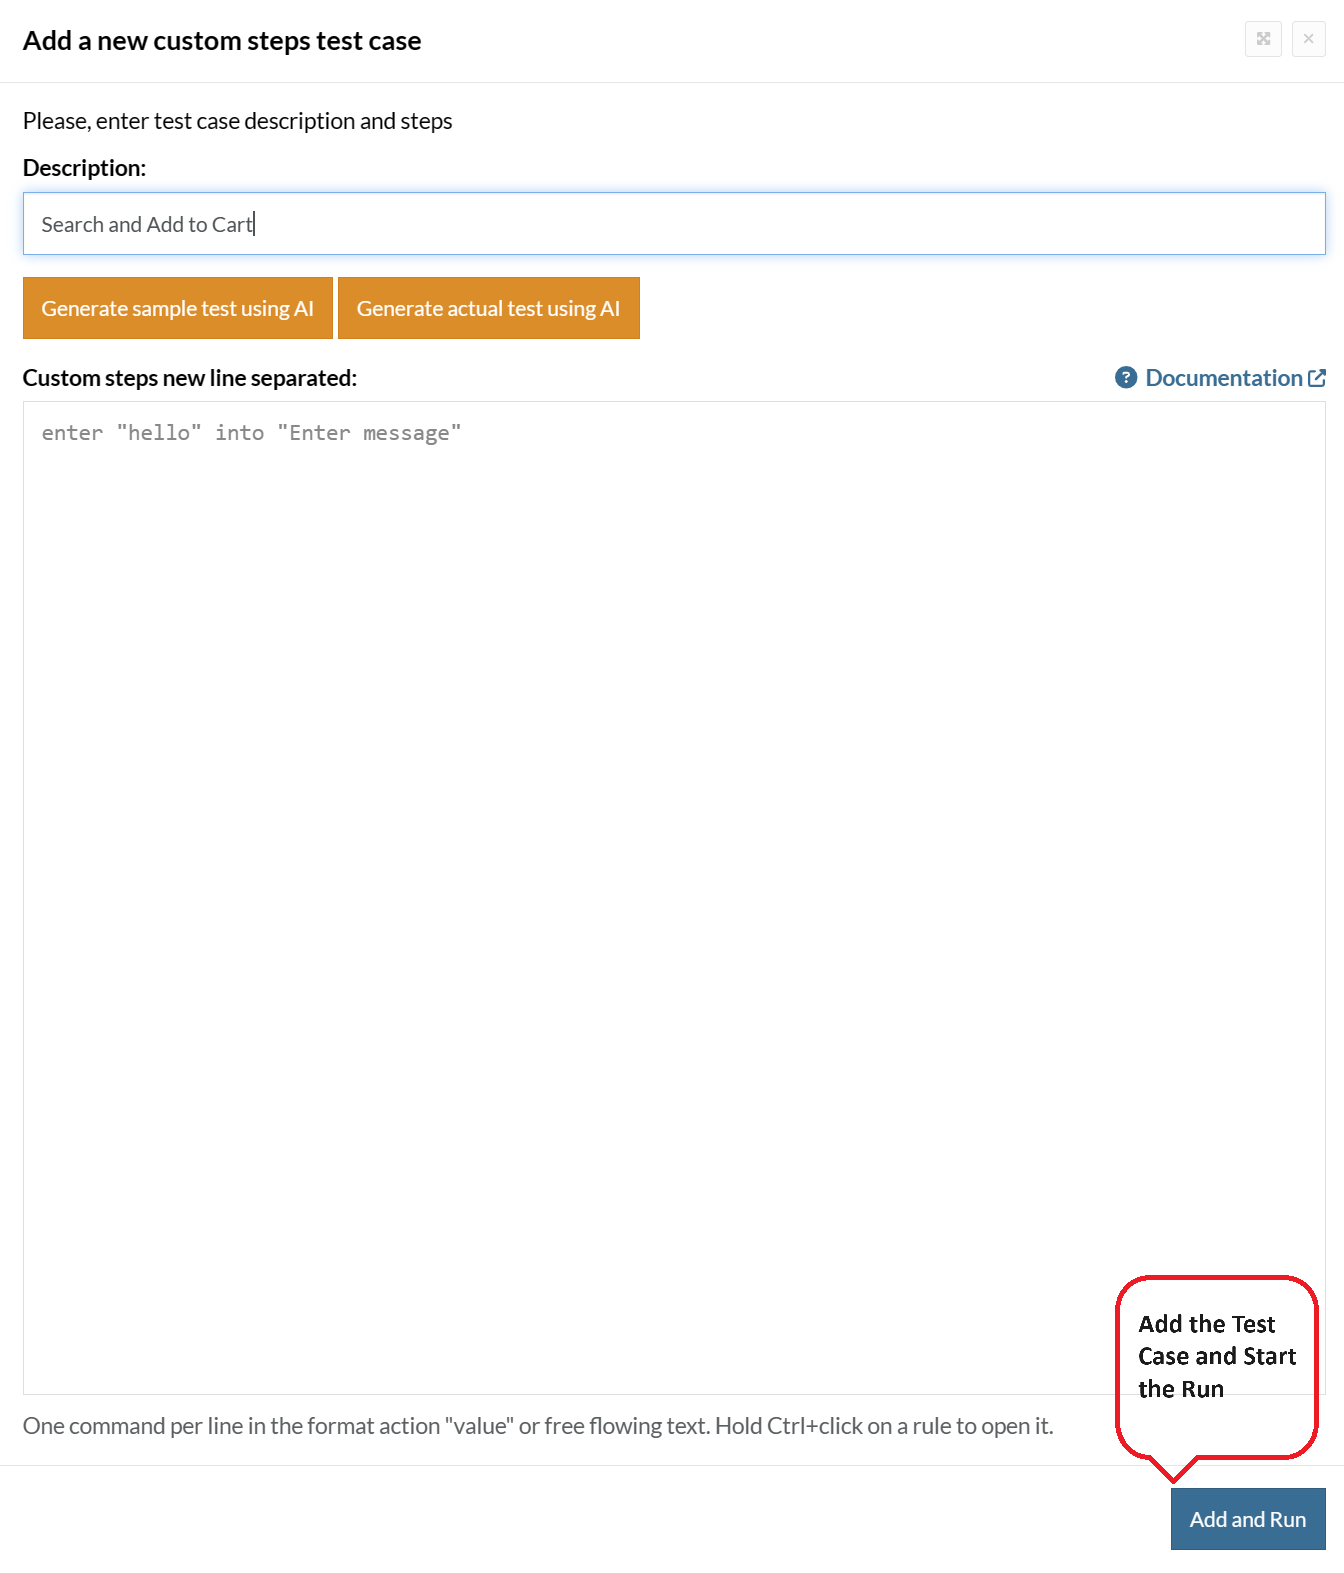
For the application under test, i.e., e-commerce website, we will perform below test steps:
- Search for a product
- Add it to the cart
- Verify that the product is present in the cart
Test Case: Search and Add to Cart
Step 1: We will add test steps on the test case editor screen one by one.
testRigor automatically navigates to the website URL you provided during the Test Suite creation. There is no need to use any separate function for it. Here is the website homepage, which we intend to test.

First, we want to search for a product in the search box. Unlike traditional testing tools, you can identify the UI element using the text you see on the screen. You need not use any CSS/XPath identifiers.
click "What are you looking for?"
Step 2: Once the cursor is in the search box, we will type the product name (lily), and press enter to start the search.
type "lily"
enter enter
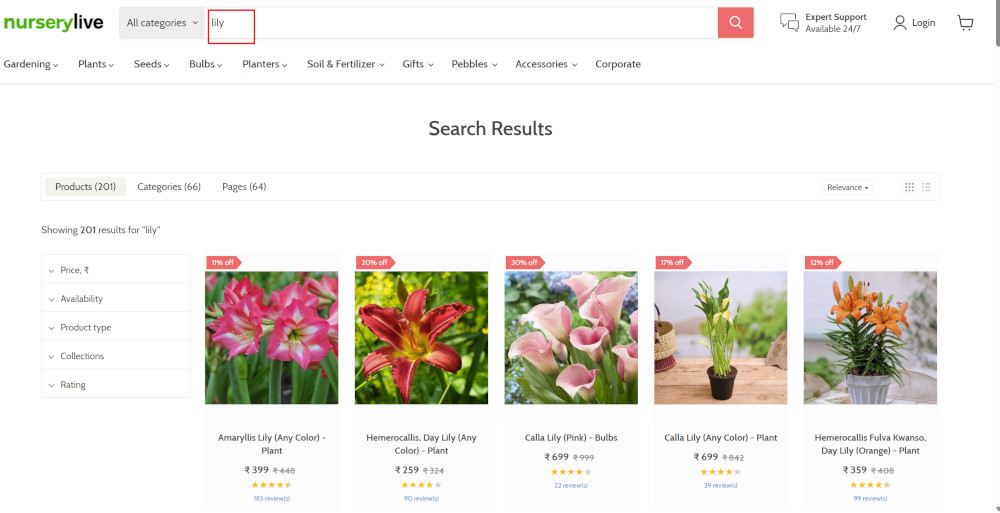
Search lists all products with the “lily” keyword on the webpage.
Step 3: The lily plant we are searching for needs the screen to be scrolled; for that testRigor provides a command. Scroll down until the product is present on the screen:
scroll down until page contains "Zephyranthes Lily, Rain Lily (Red)"
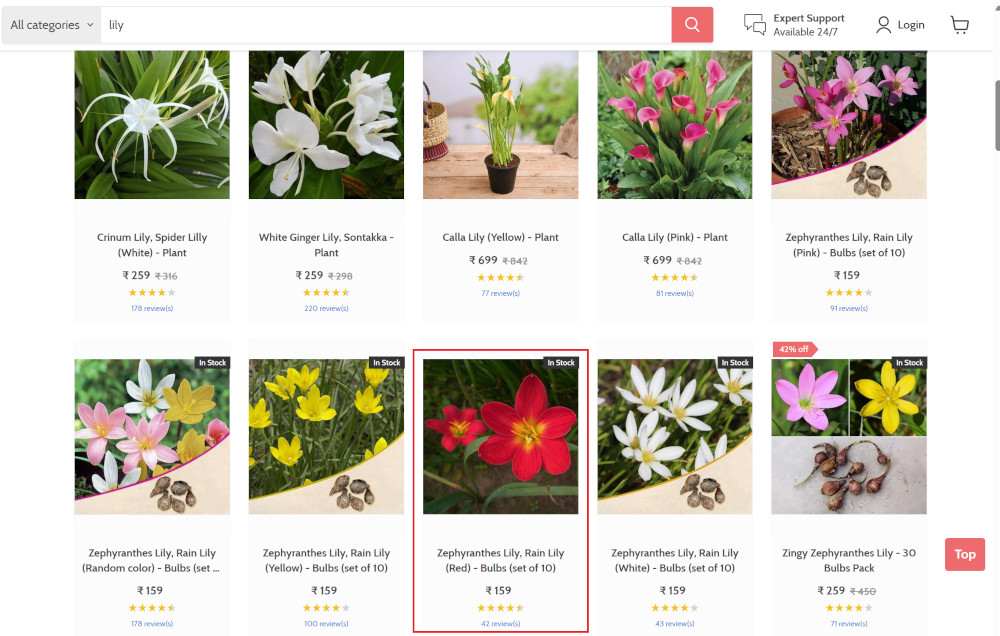
When the product is found on the screen, testRigor stops scrolling.
Step 4: Click on the product name to view the details:
click "Zephyranthes Lily, Rain Lily (Red)"
After the click, the product details are displayed on the screen as below, with the default Quantity as 1.
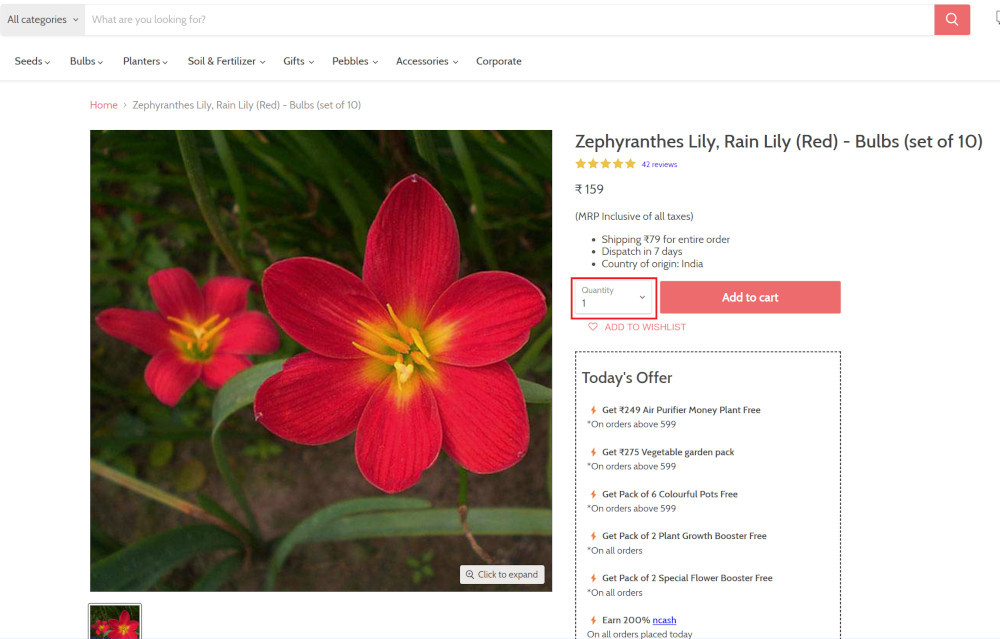
Step 5: Lets say, we want to change the Quantity to 3, so here we use the testRigor command to select from a list.
select "3" from "Quantity"
click "Add to cart"
The product is successfully added to the cart, and the “Added to your cart:” message is displayed on webpage.
Step 6: To assert that the message is successfully displayed, use a simple assertion command as below:
check that page contains "Added to your cart:"
Step 7: After this check, we will view the contents of the cart by clicking View cart as below:
click "View cart"

Step 8: Now we will again check that the product is present in the cart, under heading “Your cart” using the below assertion. With testRigor, it is really easy to specify the location of an element on the screen.
check that page contains "Zephyranthes Lily, Rain Lily (Red)" under "Your cart"

Complete Test Case
Here is how the complete test case will look in the testRigor app. The test steps are simple in plain English, enabling everyone in your team to write and execute them.
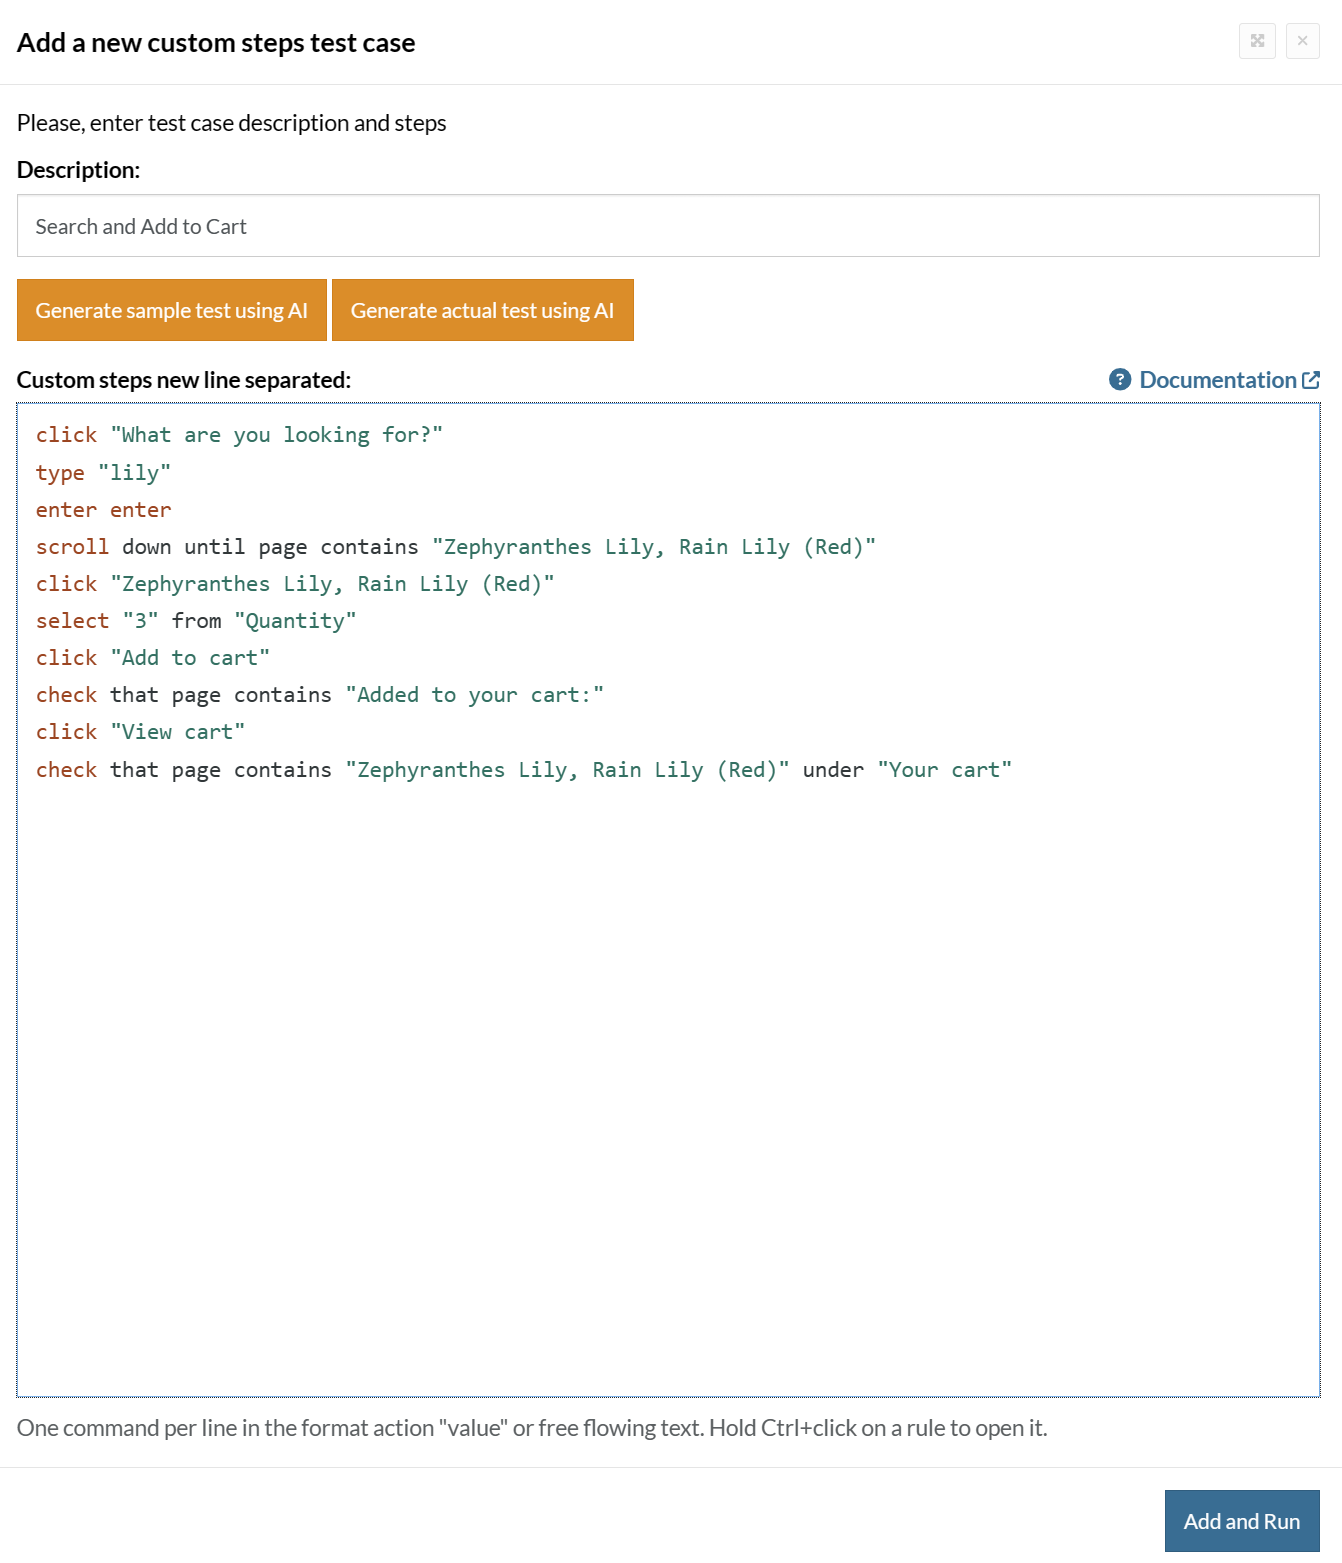
Click Add and Run.
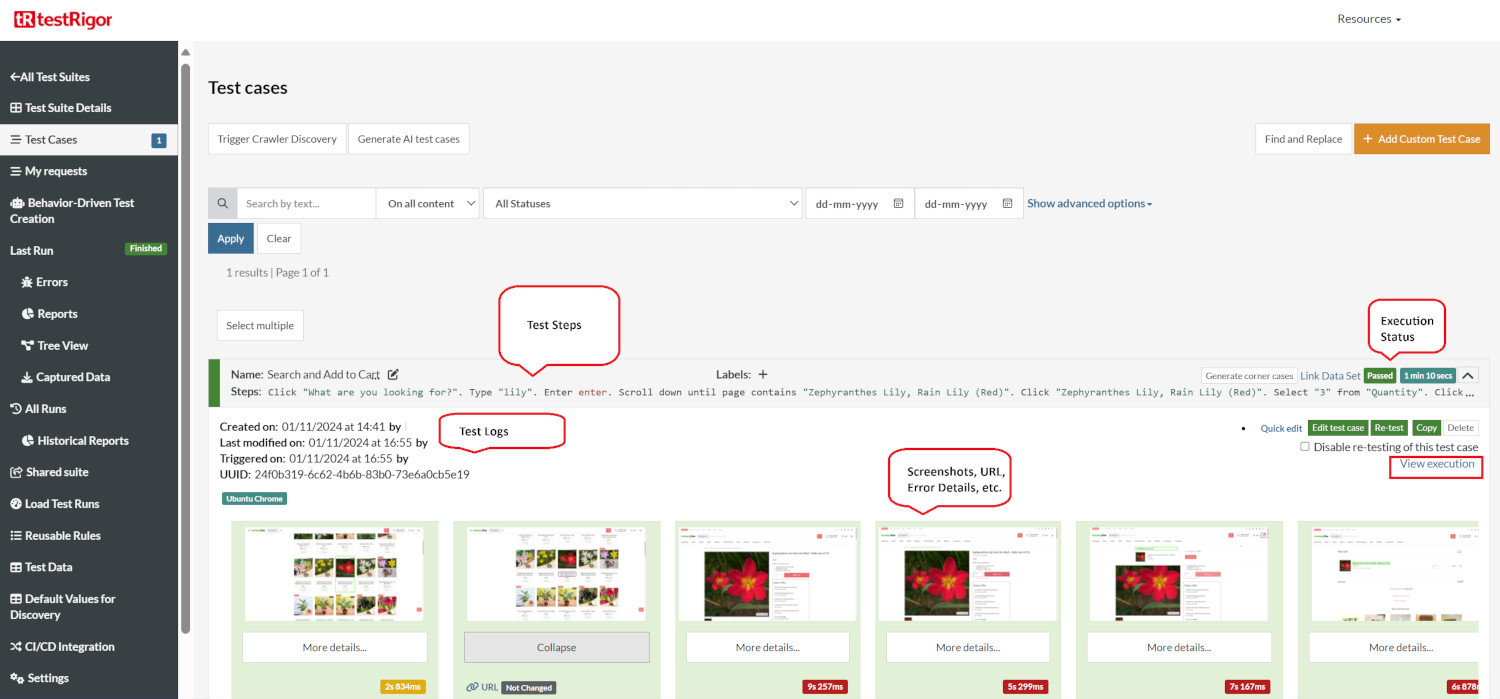
Execution Results
Once the test is executed, you can view the execution details, such as execution status, time spent in execution, screenshots, error messages, logs, video recordings of the test execution, etc. In case of any failure, there are logs and error text that are available easily in a few clicks.
You can also download the complete execution with steps and screenshots in PDF or Word format through the View Execution option.
testRigor’s Capabilities
Apart from the simplistic test case design and execution, there are some advanced features that help you test your application using simple English commands.
- Reusable Rules (Subroutines): You can easily create functions for the test steps that you use repeatedly. You can use the Reusable Rules to create such functions and call them in test cases by simply writing their names. See the example of Reusable Rules.
- Global Variables and Data Sets: You can import data from external files or create your own global variables and data sets in testRigor to use them in data-driven testing.
- 2FA, QR Code, and Captcha Resolution: testRigor easily manages the 2FA, QR Code, and Captcha resolution through its simple English commands.
- Email, Phone Call, and SMS Testing: Use simple English commands to test the email, phone calls, and SMS. These commands are useful for validating 2FA scenarios, with OTPs and authentication codes being sent to email, phone calls, or via phone text.
- File Upload/ Download Testing: Execute the test steps involving file download or file upload without the requirement of any third-party software. You can also validate the contents of the files using testRigor’s simple English commands.
- Database Testing: Execute database queries and validate the results fetched.
testRigor enables you to test web, mobile (hybrid, native), API, and desktop apps with minimum effort and maintenance.
Additional Resources
- Access testRigor documentation to know about more useful capabilities
- Top testRigor’s features
- How to perform end-to-end testing
Conclusion
Having a solid testing strategy is crucial, with tests on each layer allowing for optimal performance. You now have all the main tools for testing the Play application at your fingertips and can build an optimal plan of action to ensure high quality for your end users.
| Achieve More Than 90% Test Automation | |
| Step by Step Walkthroughs and Help | |
| 14 Day Free Trial, Cancel Anytime |


