Sinatra Testing

Sinatra is a lightweight, open-source web application framework written in Ruby. It is designed to provide a simple and flexible way to create web applications and APIs. Sinatra is often referred to as a “microframework” because of its minimalist approach. It is popular among developers for its ease of use, fast development cycle, and ability to integrate well with other Ruby libraries and tools.
Sinatra provides a routing DSL (domain-specific language) that allows developers to define the routes for their web applications, as well as a simple template engine for rendering views. It also supports middleware, allowing developers to easily add application functionality such as authentication or caching.
Unit Testing
Unit testing forms the base of the testing pyramid, meaning that the majority of your tests ought to be unit tests. The main purpose of writing these tests is to verify that individual units of code, like functions, classes, etc. are giving the expected output. Since these tests are run very often, they need to be lightweight and independent of other modules. Thus you will need to mock other functions or services and provide test data.
Sinatra, being a Ruby-based framework, supports most of the testing tools and frameworks used for testing Ruby code. You can install different gems into your project and get started with creating test suites using them. Let's take a look at the ones that are popularly used.
Using Minitest
Minitest is a popular unit testing framework for Ruby. It provides a variety of testing tools and libraries for writing and running tests, including assertions, test runners, mocks/stubs, and benchmarking tools. It has a simple and flexible syntax for defining tests and assertions, making it easy to write and understand test code.
Minitest is designed to be lightweight and fast, with a minimal overhead that makes it well-suited for testing small to medium-sized Ruby applications. It is also highly extensible, with a plugin system that allows developers to add custom assertions, reporters, and other features to the framework.
Using Rack::Test
Rack::Test is a testing library that provides a simple API for testing Rack-based applications, including Sinatra. It allows you to send HTTP requests to your application and make assertions about the response, making it a great choice for testing the behavior of your application's routes and controllers.
require 'my_sinatra_app'
require 'minitest/autorun'
require 'rack/test'

class MyAppTest < Minitest::Test
  include Rack::Test::Methods

  def app
    Sinatra::Application
  end

  def test_my_default
    get '/'
    assert_equal 'Hello World!', last_response.body
  end

  def test_with_params
    get '/meet', :name => 'John'
    assert_equal 'Hello, John!', last_response.body
  end

  def test_with_user_agent
    get '/', {}, 'HTTP_USER_AGENT' => 'Hybrid'
    assert_equal "You're using Hybrid!", last_response.body
  end
end
Using RSpec
RSpec is a behavior-driven development (BDD) testing framework for Ruby. It provides a flexible and expressive syntax for defining and running tests. RSpec uses a DSL (domain-specific language) to define tests and expectations. Tests are organized into "describe" and "context" blocks, which define the behavior being tested, and "it" blocks, which define specific test cases or examples. Assertions are defined using "expect" statements, which allow developers to test for specific outcomes or behaviors.
RSpec also includes a variety of built-in matchers for testing common scenarios, as well as support for custom matchers and extensions. It can be run from the command line or integrated into an automated testing suite using tools like Guard or Travis CI.
Mentioned below is a unit test for a Sinatra web application using RSpec and Rack::Test. Setting the APP_ENV environment variable to 'test' is a common practice in Ruby web development to indicate that the application is running in a testing environment. This ensures that any configuration or settings specific to the test environment are being used, rather than those for the production environment.
The required statements load the necessary libraries and dependencies for the test, including the Sinatra application being tested (hello_world.rb), RSpec, and Rack::Test. The RSpec.describe block defines a group of tests or examples for the HelloWorld app. Within this block, the include Rack::Test::Methods statement includes the necessary methods for making HTTP requests and testing the response. The app method is defined to return the instance of the Sinatra application being tested (Sinatra::Application).
ENV['APP_ENV'] = 'test'

require 'hello_world' # <-- your sinatra app
require 'rspec'
require 'rack/test'

RSpec.describe 'The HelloWorld App' do
  include Rack::Test::Methods

  def app
    Sinatra::Application
  end

  it "says hello" do
    get '/'
    expect(last_response).to be_ok
    expect(last_response.body).to eq('Hello World')
  end
end
Using Test::Spec
Test::Spec is a testing framework for Ruby that provides a more expressive and readable syntax for defining tests than the built-in Test::Unit framework. It is designed to make testing code easier and more natural by allowing developers to describe the behavior of their code in a more human-like way. It can be a good choice for developers who prefer a more minimalistic approach to testing or who want to stick closer to the built-in Test::Unit framework.
ENV['APP_ENV'] = 'test'

require 'hello_world' # <-- your sinatra app
require 'test/spec'
require 'rack/test'

describe 'The HelloWorld App' do
  include Rack::Test::Methods

  def app
    Sinatra::Application
  end

  it "says hello" do
    get '/'
    last_response.should.be.ok
    last_response.body.should.equal 'Hello World'
  end
end
Integration Testing
The middle tier of the testing pyramid comprises integration tests. These tests should be for those scenarios where different integrations are being made between modules. For example, if a function calls an API to write into the database, you need to check if this integration is working as expected. Some common areas of focus are integrations between different modules, UI components, network systems, databases, classes, functions, helpers, and APIs. You can use the same tools and frameworks used for unit testing, like Minitest, Test::Unit, Rack::Test, or RSpec.
Here is an example of a test meant to check a simple implementation of HTTP authentication. The three test methods in the suite are named test_without_authentication, test_with_bad_credentials, and test_with_proper_credentials. Each of these methods tests a different scenario related to authentication in the Sinatra application.
In the test_without_authentication method, the test makes a GET request to a route that requires authentication and checks that the response status is 401 Unauthorized.
In the test_with_bad_credentials method, the test makes a GET request to the same route but with incorrect credentials and checks that the response status is 401 Unauthorized.
ENV['APP_ENV'] = 'test'
require 'test/unit'
require 'rack/test'
require 'application'

class ApplicationTest < Test::Unit::TestCase
  include Rack::Test::Methods

  def app
    Sinatra::Application
  end

  def test_without_authentication
    get '/protected'
    assert_equal 401, last_response.status
  end

  def test_with_bad_credentials
    authorize 'bad', 'user'
    get '/protected'
    assert_equal 401, last_response.status
  end

  def test_with_proper_credentials
    authorize 'admin', 'admin'
    get '/protected'
    assert_equal 200, last_response.status
    assert_equal "You're welcome", last_response.body
  end
end
Using Capybara
Capybara is a Ruby library used for testing. It provides a high-level DSL (Domain-Specific Language) for interacting with web pages in a way that simulates a user's interaction with a web browser. Capybara can be used to simulate user actions such as clicking on links, filling out forms, and submitting data. It also provides a powerful set of matchers for asserting the content of web pages, allowing developers to write tests for the expected behavior of their web applications. Capybara is often used in conjunction with other testing frameworks and supports a variety of drivers for running tests in different web browsers and headless environments. We will dive into its ability to support functional testing in the next section.
ENV['APP_ENV'] = 'test'

require 'hello_world' # <-- your sinatra app
require 'capybara'
require 'capybara/dsl'
require 'test/unit'

class HelloWorldTest < Test::Unit::TestCase
  include Capybara::DSL

  def setup
    Capybara.app = Sinatra::Application.new
  end

  def test_it_works
    visit '/'
    assert page.has_content?('Hello World')
  end
end
End-to-End Testing
End-to-end testing involves simulating a user's interaction with an application, examining the various components and modules that are required to complete specific use cases. In the context of booking airline tickets, for instance, a user would navigate through multiple modules to accomplish this task. Therefore, it is crucial to have a solid grasp of the use cases that users typically engage with when utilizing the application. Such information is typically held by QA testers and business analysts.
Involving these team members in the process of developing end-to-end test cases can contribute to better test coverage. End-to-end testing emphasizes the user's perspective, and as a result, the tools employed often interact with the web browser and user interface components.
- Capybara with Selenium
- testRigor
Using Capybara with Selenium
You can write end-to-end tests using Capybara and Selenium. Selenium is a popular choice for web automation as it gives the capability to manipulate UI elements using commands that can be written in different languages, including Ruby. By combining Capybara and Selenium, developers can write tests that not only simulate user interactions but also run in a real web browser. This allows for more accurate and comprehensive testing of web applications.
require_relative '../test_helper'
require 'selenium-webdriver'

class UserCreatesSkillTest < Minitest::Test
  include Capybara::DSL
  include TestHelpers

  Capybara.default_driver = :selenium

  def setup
    Capybara.app = Sinatra::Application.new
  end

  def test_creates_a_skill_with_valid_attributes
    visit '/'
    click_link('New Skill')
    fill_in("skill[name]", with: "Skill name")
    fill_in("skill[description]", with: "Skill description")
    select "School", from: "category_id"
    click_button("Submit")
    assert_equal '/skills', current_path
    within("#skill") do
      assert page.has_content?("Skill name")
      assert page.has_content?("school")
    end
    refute page.has_content?("work")
  end
end
Using testRigor
As mentioned earlier, involving team members closely connected to the business in end-to-end testing can provide valuable insights and enhance test coverage. Utilizing a tool that enables users to effortlessly collaborate on and write end-to-end test cases will streamline the test creation process and reduce excessive back-and-forth communication. No-code testRigor system can significantly improve the quality of your testing. Let's examine how this is achieved.
testRigor is an end-to-end test automation tool powered by artificial intelligence, which simplifies many traditional tasks associated with automation testing. Users write test cases in plain English, eliminating the need for programming knowledge - and thus empowering even manual testers to contribute to test automation.
Unlike most other automation testing tools, testRigor does not require specifying element locators such as XPaths. Decoupling from details of implementation brings extra stability (your test won't fail if a locator was accidentally changed), and allows for proper UI-level tests from an end user's perspective. For example, you can simply write "click 'Home' at the top of the page," and testRigor will identify and click on the "Home" element.
As a cloud-based tool, testRigor is scalable and accessible from anywhere, though on-premise setup options are also available. The tool supports cross-platform testing for web, mobile, and desktop. It offers numerous integrations with infrastructure providers such as SauceLabs and BrowserStack for accessing device farms, as well as CI/CD-providing frameworks like Travis and Jenkins to execute test suites efficiently after each deployment.
In testRigor, test suites offer various configurations for HTTP authorization, proxy settings, integrations with other tools or frameworks, screen resolution, and platform testing, among others. Test cases can cover visual testing, audio testing, table data testing, and email and text message testing. Additionally, testRigor allows for API testing and database interaction within test cases. The tool also supports test data generation and importing.
open url "https://learningisfun.org"
login
compare screen to stored value "Home page"
select "New Skill" from "More"
enter stored value "skillName" into "Skill name"
click on "upload description" to the right of "Skill Description"
enter stored value "skillDescription" into input file "upload-file"
check that page contains "Your skill description was uploaded successfully!" in the middle of the screen
select "School" from "Category"
click "Submit"
compare screen to stored value "Home page"
select "Skill Listings" from "More"
check that table "Skills" at row "80" and column "Skill Name" contains stored value "skillName"
Overall, testRigor is the easiest way to build robust and efficient functional test cases fast, while spending minimal time on test maintenance.
How to do End-to-end Testing with testRigor
Let us take the example of an e-commerce website that sells plants and other gardening needs. We will create end-to-end test cases in testRigor using plain English test steps.
Step 1: Log in to your testRigor app with your credentials.
Step 2: Set up the test suite for the website testing by providing the information below:
- Test Suite Name: Provide a relevant and self-explanatory name.
- Type of testing: Select from the following options: Desktop Web Testing, Mobile Web Testing, Native and Hybrid Mobile, based on your test requirements.
- URL to run test on: Provide the application URL that you want to test.
- Testing credentials for your web/mobile app to test functionality which requires user to login: You can provide the app’s user login credentials here and need not write them separately in the test steps then. The login functionality will be taken care of automatically using the keyword
login. - OS and Browser: Choose the OS Browser combination on which you want to run the test cases.
- Number of test cases to generate using AI: If you wish, you can choose to generate test cases based on the App Description text, which works on generative AI.
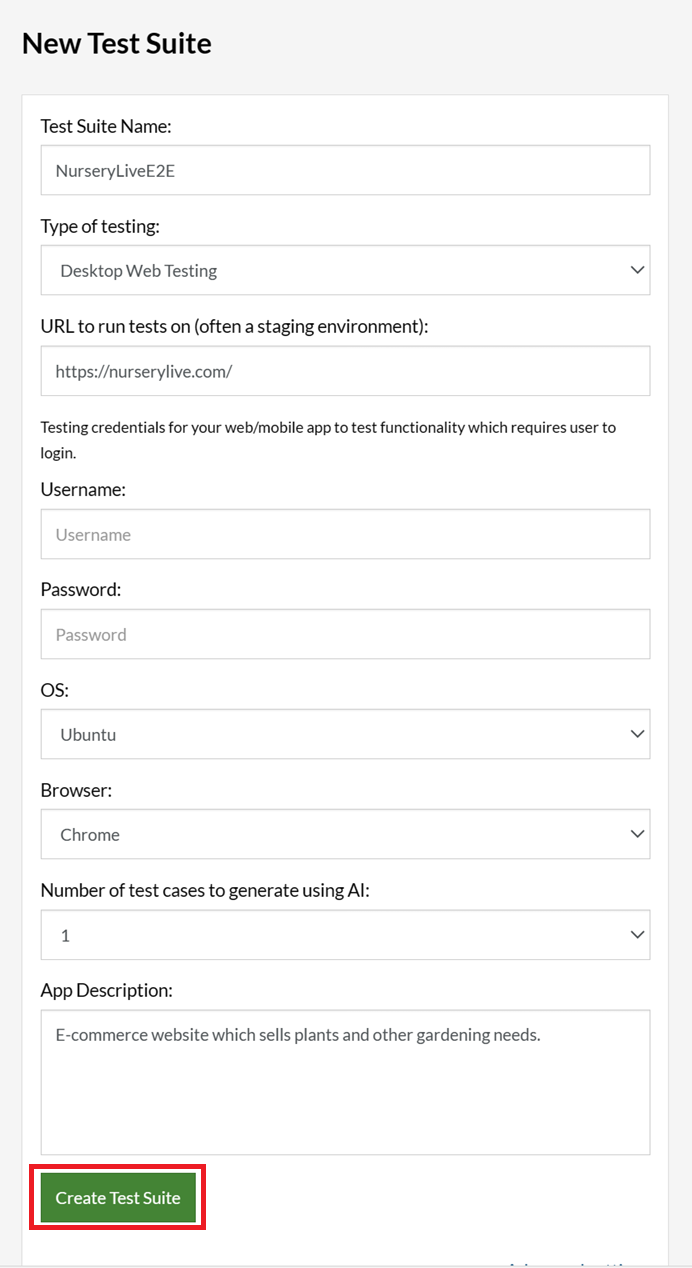
Step 3: Click Create Test Suite.
On the next screen, you can let AI generate the test case based on the App Description you provided during the Test Suite creation. However, for now, select do not generate any test, since we will write the test steps ourselves.
Step 4: To create a new custom test case yourself, click Add Custom Test Case.

Step 5: Provide the test case Description and start adding the test steps.
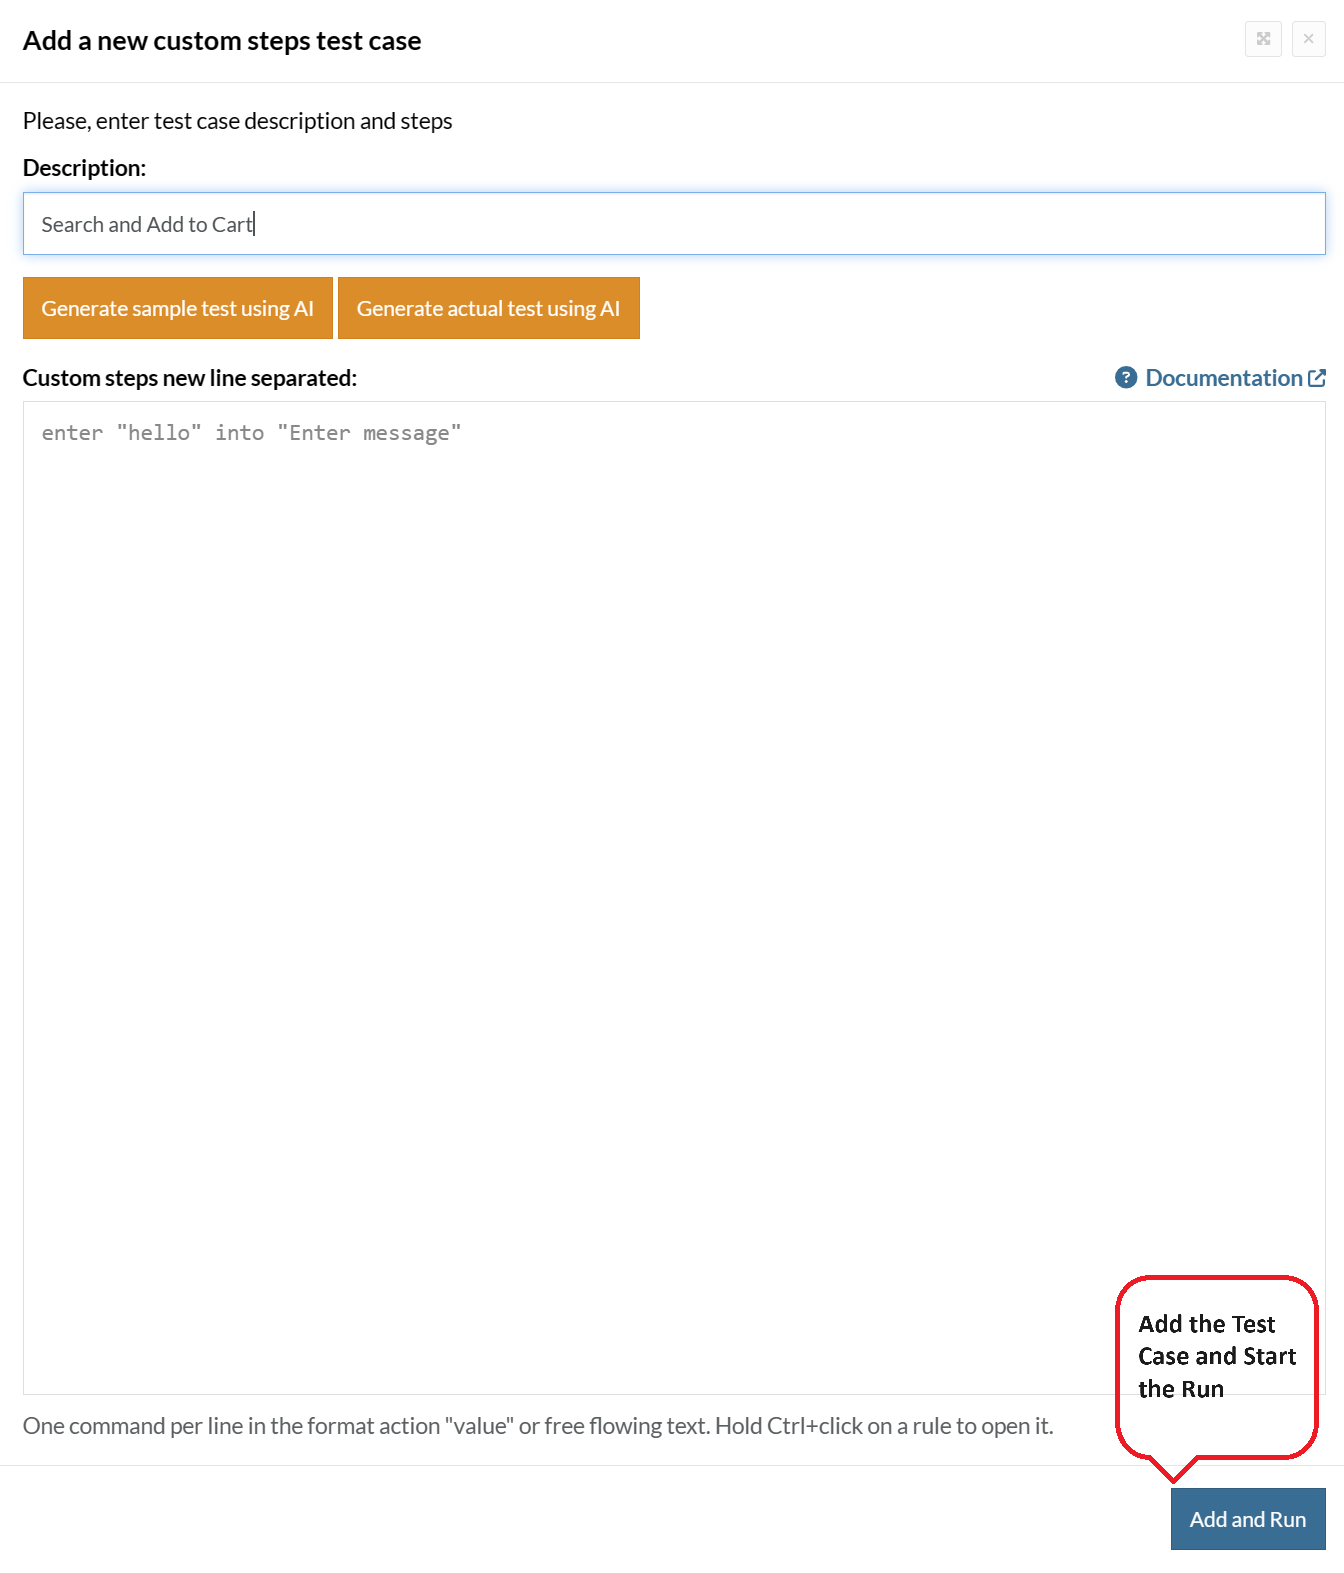
For the application under test, i.e., e-commerce website, we will perform below test steps:
- Search for a product
- Add it to the cart
- Verify that the product is present in the cart
Test Case: Search and Add to Cart
Step 1: We will add test steps on the test case editor screen one by one.
testRigor automatically navigates to the website URL you provided during the Test Suite creation. There is no need to use any separate function for it. Here is the website homepage, which we intend to test.

First, we want to search for a product in the search box. Unlike traditional testing tools, you can identify the UI element using the text you see on the screen. You need not use any CSS/XPath identifiers.
click "What are you looking for?"
Step 2: Once the cursor is in the search box, we will type the product name (lily), and press enter to start the search.
type "lily"
enter enter
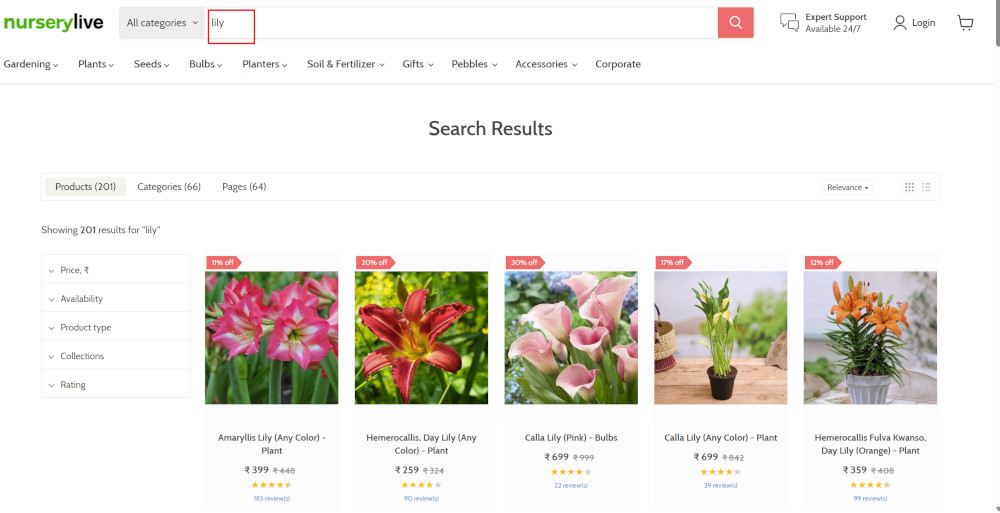
Search lists all products with the “lily” keyword on the webpage.
Step 3: The lily plant we are searching for needs the screen to be scrolled; for that testRigor provides a command. Scroll down until the product is present on the screen:
scroll down until page contains "Zephyranthes Lily, Rain Lily (Red)"
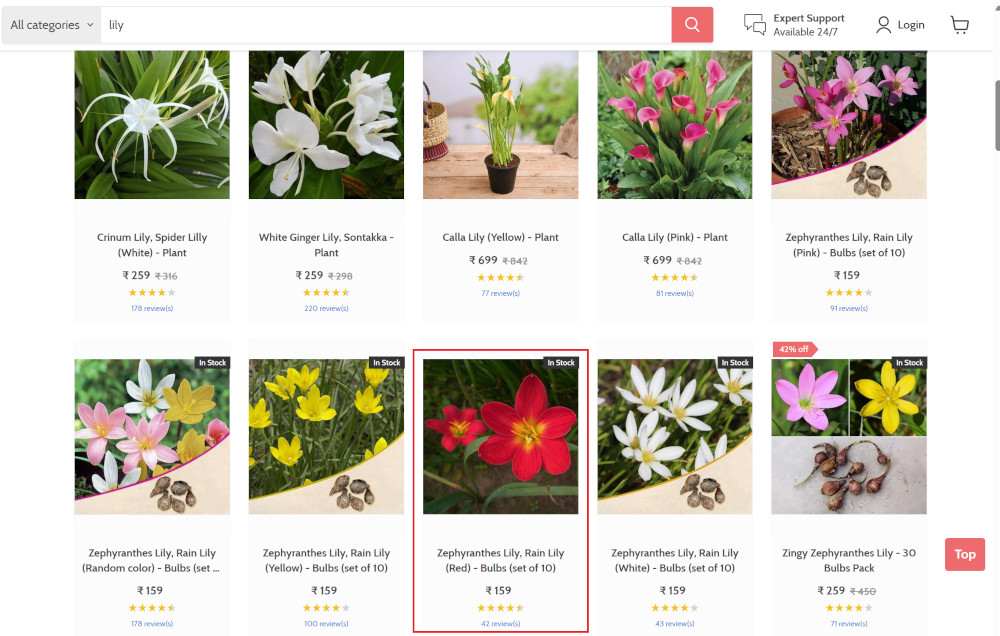
When the product is found on the screen, testRigor stops scrolling.
Step 4: Click on the product name to view the details:
click "Zephyranthes Lily, Rain Lily (Red)"
After the click, the product details are displayed on the screen as below, with the default Quantity as 1.
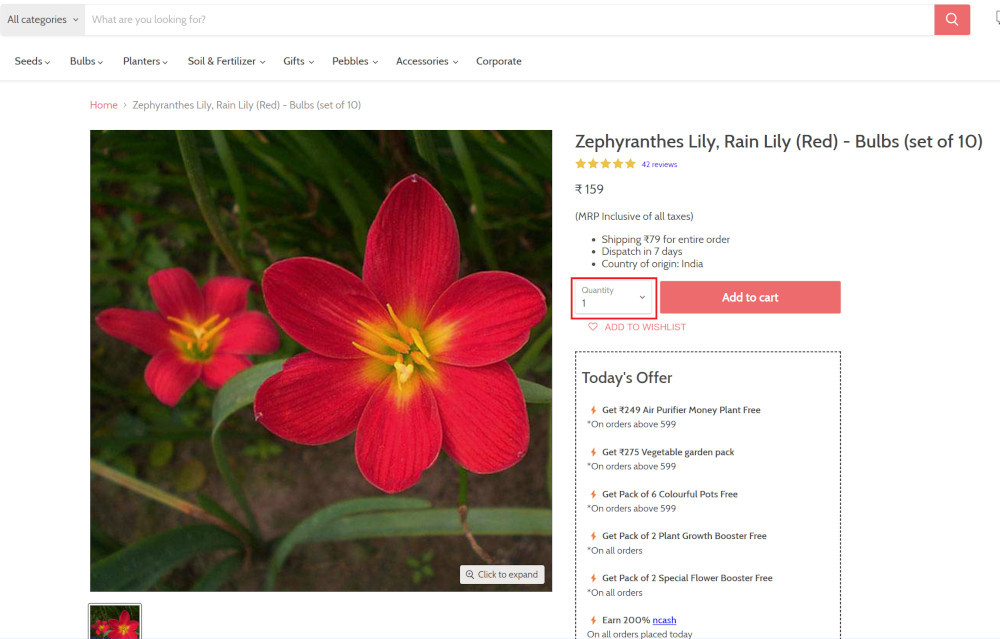
Step 5: Lets say, we want to change the Quantity to 3, so here we use the testRigor command to select from a list.
select "3" from "Quantity"
click "Add to cart"
The product is successfully added to the cart, and the “Added to your cart:” message is displayed on webpage.
Step 6: To assert that the message is successfully displayed, use a simple assertion command as below:
check that page contains "Added to your cart:"
Step 7: After this check, we will view the contents of the cart by clicking View cart as below:
click "View cart"

Step 8: Now we will again check that the product is present in the cart, under heading “Your cart” using the below assertion. With testRigor, it is really easy to specify the location of an element on the screen.
check that page contains "Zephyranthes Lily, Rain Lily (Red)" under "Your cart"

Complete Test Case
Here is how the complete test case will look in the testRigor app. The test steps are simple in plain English, enabling everyone in your team to write and execute them.
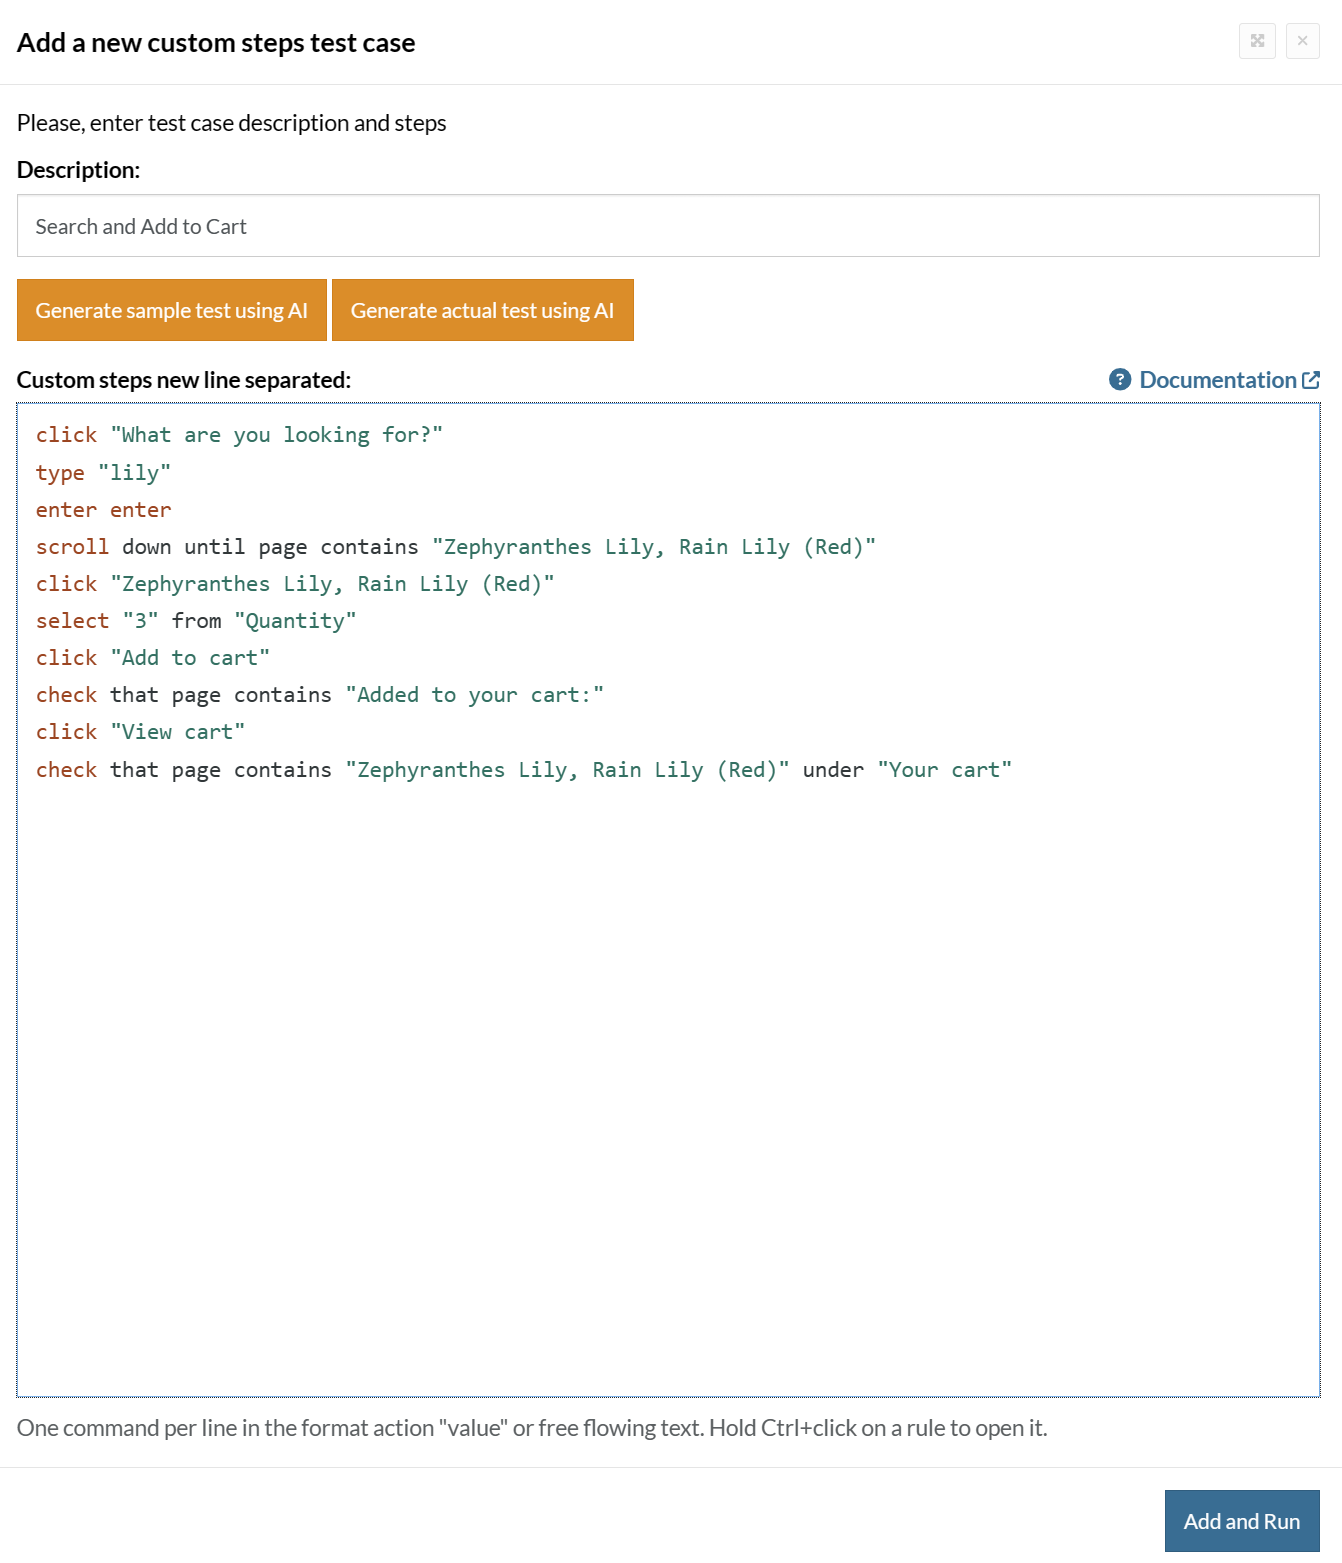
Click Add and Run.
Execution Results
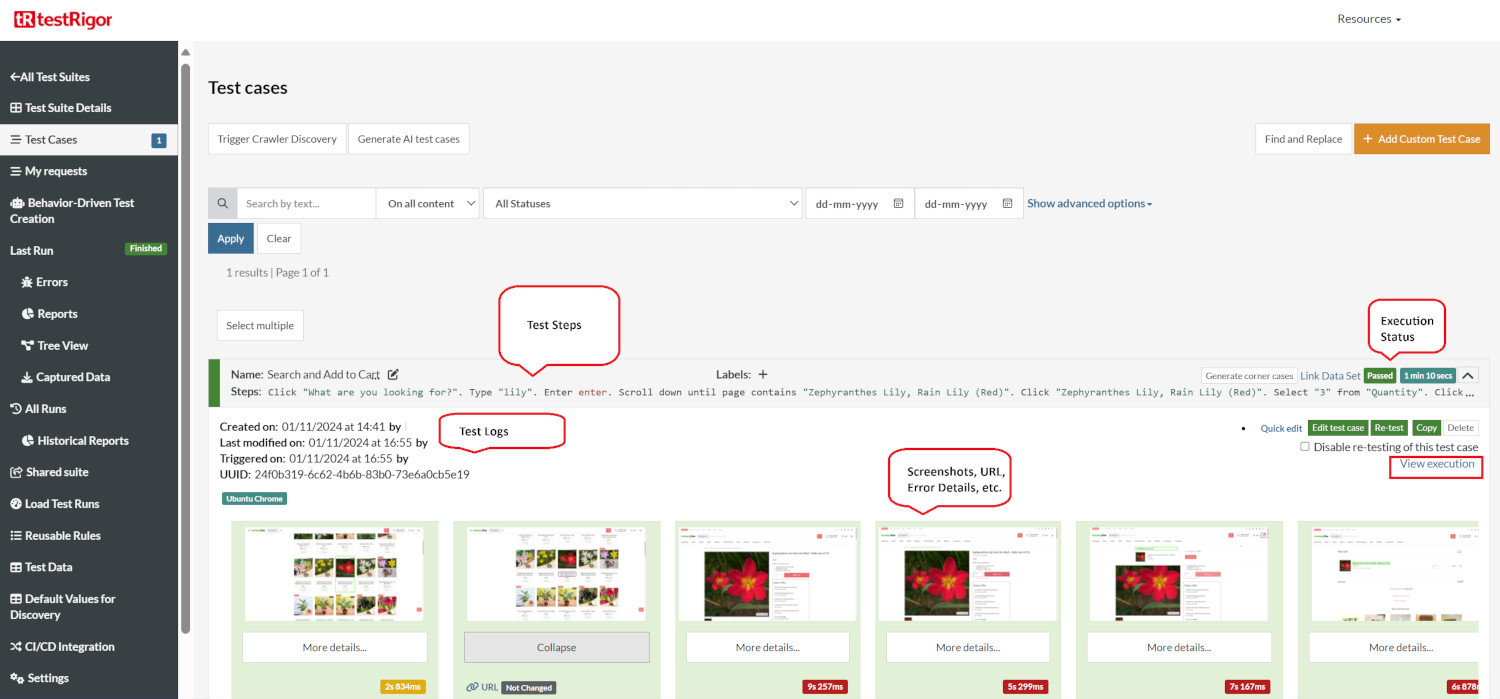
Once the test is executed, you can view the execution details, such as execution status, time spent in execution, screenshots, error messages, logs, video recordings of the test execution, etc. In case of any failure, there are logs and error text that are available easily in a few clicks.
You can also download the complete execution with steps and screenshots in PDF or Word format through the View Execution option.
testRigor’s Capabilities
Apart from the simplistic test case design and execution, there are some advanced features that help you test your application using simple English commands.
- Reusable Rules (Subroutines): You can easily create functions for the test steps that you use repeatedly. You can use the Reusable Rules to create such functions and call them in test cases by simply writing their names. See the example of Reusable Rules.
- Global Variables and Data Sets: You can import data from external files or create your own global variables and data sets in testRigor to use them in data-driven testing.
- 2FA, QR Code, and Captcha Resolution: testRigor easily manages the 2FA, QR Code, and Captcha resolution through its simple English commands.
- Email, Phone Call, and SMS Testing: Use simple English commands to test the email, phone calls, and SMS. These commands are useful for validating 2FA scenarios, with OTPs and authentication codes being sent to email, phone calls, or via phone text.
- File Upload/ Download Testing: Execute the test steps involving file download or file upload without the requirement of any third-party software. You can also validate the contents of the files using testRigor’s simple English commands.
- Database Testing: Execute database queries and validate the results fetched.
testRigor enables you to test web, mobile (hybrid, native), API, and desktop apps with minimum effort and maintenance.
Additional Resources
- Access testRigor documentation to know about more useful capabilities
- Top testRigor’s features
- How to perform end-to-end testing
Conclusion
When it comes to testing, choosing a good testing process along with testing tools is essential. Out of the many available options, the above tools are some of the most popular ones to choose from. However, the final call depends on your project's requirements, and any tool that is put to the test should be able to meet them.
| Achieve More Than 90% Test Automation | |
| Step by Step Walkthroughs and Help | |
| 14 Day Free Trial, Cancel Anytime |


