Saleor Commerce Testing

Saleor is a widely used open-sourced e-commerce platform. It offers a high-performance, customizable framework for building online stores and e-commerce platforms. It gives greater flexibility in designing the user interface. Saleor includes GrapgQL, a flexible data query language, and a headless architecture separating the back and front end.
It is created in Python with the Django web framework. In addition, as discussed earlier, Saleor uses GraphQL for its API. GraphQL is more efficient, robust, and flexible than traditional REST API. The front end is developed using JavaScript frameworks like React.
When it comes to testing the Saleor application, we can follow through the Testing Pyramid.
Unit Testing
The preliminary level of testing done in an application is unit testing. Here, we test the application in the early development stages to capture the bugs at very early stages. We isolate and test the individual units of the code, helping us test the exact functionality. The individual unit can be a function, class, or method.
We can use two tools to perform unit testing for Saleor applications.
- Django’s Built-in Test Framework
- Pytest
Let’s go through each one by one.
Django’s Built-in Test Framework
Django has the built-in testing framework that extends Python’s standard unittest library. This test framework is designed to test models, forms, and templates. Suppose any database update is involved in the application code that needs to be unit tested; creating a temporary database is better. This ensures the production or development database won’t be affected.
Once we install all the dependencies, we can start writing test scripts. The test files are kept in a separate tests directory, or we can also create a separate tests.py for every application file. It’s always recommended to extend django.test.TestCase, as this class provides many helper methods and classes for testing purposes. Once the scripts are created, we can execute them using the manage.py command.
from django.test import TestCase
from .models import Product

class ProductTestCase(TestCase):
  def setUp(self):
    Product.objects.create(name="Test Product 1", price=50, description="A simple product")
    Product.objects.create(name="Test Product 2", price=200, description="An expensive product")

  def test_product_creation(self):
    """Test the product creation."""
    product1 = Product.objects.get(name="Test Product 1")
    product2 = Product.objects.get(name="Test Product 2")
    self.assertEqual(product1.description, "A simple product")
    self.assertEqual(product2.price, 200)

  def test_product_string_representation(self):
    """Test the string representation of the product."""
    product = Product.objects.get(name="Test Product 1")
    self.assertEqual(str(product), "Test Product 1")

  def test_is_expensive(self):
    """Test the is_expensive method of the product."""
    cheap_product = Product.objects.get(name="Test Product 1")
    expensive_product = Product.objects.get(name="Test Product 2")
    self.assertFalse(cheap_product.is_expensive())
    self.assertTrue(expensive_product.is_expensive())
pytest
pytest is a standard Python testing framework. pytest is famous for its simplicity, flexibility, and powerful features. To test Saleor applications, we first need to install pytest and its Django integration package. Once that is complete, we must create pytest.ini for the tool configuration. Once we have done with the setup, we can start creating unit tests.
Here, the tests are saved in the tests folder, and all the test files will start with the name “test_”.
import pytest
from products.models import Product

@pytest.fixture
def product(db):
  return Product.objects.create(name="Test Product", price=100, available=True)

def test_product_creation(product):
  assert product.name == "Test Product"
  assert product.price == 100

def test_product_availability(product):
  assert product.is_available() is True
  # Change availability and test again
  product.available = False
  assert product.is_available() is False
Integration testing
The next level of testing is integration testing. Here, we combine the units to check how they perform when integrated. So here, more than the individual component functionality, we are testing the functionality when the system gets integrated; if the system can work flawlessly when integrated, that’s tested.
We can use the below-mentioned tools for performing integration testing:
- Django Test Client
- pytest-django
- Postman
Let’s go through each of the tools.
Django Test Client
from django.test import TestCase
from django.urls import reverse
from .models import Product

class ProductListViewTest(TestCase):

  @classmethod
  def setUpTestData(cls):
    # Set up data for the whole TestCase
    Product.objects.create(name="Test Product 1", price=100)

  def test_view_url_exists_at_desired_location(self):
    response = self.client.get('/products/')
    self.assertEqual(response.status_code, 200)

  def test_view_url_accessible_by_name(self):
    response = self.client.get(reverse('products:list'))
    self.assertEqual(response.status_code, 200)

  def test_view_uses_correct_template(self):
    response = self.client.get(reverse('products:list'))
    self.assertEqual(response.status_code, 200)
    self.assertTemplateUsed(response, 'products/product_list.html')

  def test_pagination_is_ten(self):
    response = self.client.get(reverse('products:list'))
    self.assertTrue('is_paginated' in response.context)
    self.assertTrue(response.context['is_paginated'] == True)
    self.assertTrue(len(response.context['product_list']) == 10)
pytest-django
First, we need to install pytest-django. Once installed, we must configure it by creating a configuration file, pytest.ini. pytest-django has a dependency on pytest, so in our script, we need to extend pytest so that the fixtures, markers, and assertions can be used. The setting and configuration of pytest-django are similar to that of pytest.
Postman
Using Postman, we can test the API integration between different layers. Since Saleor uses GraphQL, we can use Postman to conduct API integration tests. Postman is a popular tool used for API testing. Using it, we can create a collection of API requests that mocks the production or development usage of the application. We can test not only the responses but also the structure, data integrity, and performance.
End-to-end testing
E2E testing is performed when the application is fully developed and ready to test the use cases. So, more than testing the functionality, E2E testing focuses on testing from an end-user perspective. It ensures the application use case conditions meet the requirements. Since Saleor is into e-commerce platforms, E2E testing is critical to satisfy customers’ expectations. So, let’s see which tools we can use for E2E testing.
Selenium
As we all know, end-to-end testing won’t be complete without mentioning the Selenium tool. Selenium is the legacy tool in web automation testing, which supports most programming languages. It has significantly fewer integrations as an open source, but we can integrate many different applications and reports.
But as the market got more aggressive, software development moved to Agile and Extreme Programming, where automation needs to be on par with development. This was not possible for Selenium to achieve. The major drawback was the code complexity. As the code repository gets bigger and the test case increases, the code debugging and maintenance become a nightmare.
Also, the dependency on flaky element locators lost the trust of execution results as there were many false positive bugs. There were many limitations to using Selenium, paving the way for companies to make Selenium not a preferred E2E tool.
Anyway, there are a lot of tutorials for Selenium available on the internet. Here is one posted in our blogs: Selenium Test Example.
testRigor
testRigor can be defined as a generative AI-driven, intelligent, and codeless automation tool that allows you to write test cases in plain English. Let’s just go through a few capabilities of testRigor:
- Generative AI: testRigor can generate test cases or test data based on the test description we provide. It makes the testers’ lives extremely easy by saving a lot of time and effort for them.
- Free from programming languages: Yes, that’s correct. Using testRigor, we can create or edit the test scripts in parsed plain English, eliminating the dependency on programming languages. This feature supports both QA and anyone from the development, management, BA, marketing, or any other stakeholder to create, edit, or execute test scripts.
- Say goodbye to Flaky XPaths: testRigor doesn’t rely on flaky XPaths; it has its way of defining the elements called testRigor locators. Just mention the text as you see on the screen to identify the element; AI takes care of the rest.
We can mention these as AI features, but tetsRigor features continue further. testRigor can be cited as the test powerhouse, as it supports different types of tests like:
- Web and mobile browser testing
- Mobile App Testing
- Desktop App Testing
- API Testing
- Visual Testing
- Accessibility Testing
- Load Testing
Also, testRigor supports inbuilt integration with different tools.
open url "https://yoursaleorcommercesite.com"
enter stored value "UserName" into "User Name"
enter stored value "password" into "Password"
click "Sign in"
click “Purchase Orders”
click “Create New Purchase Order”
enter "John" into "Vendor Name"
enter "Vending Machine" into "Items to be Ordered"
enter "5" into "Items to be Ordered"
click "Submit"
Reviewing the above script, we can easily understand how simple and easily readable it is from others. That’s the advantage that testRigor puts forth. Have a look at the powerful features of testRigor.
How to do End-to-end Testing with testRigor
Let us take the example of an e-commerce website that sells plants and other gardening needs. We will create end-to-end test cases in testRigor using plain English test steps.
Step 1: Log in to your testRigor app with your credentials.
Step 2: Set up the test suite for the website testing by providing the information below:
- Test Suite Name: Provide a relevant and self-explanatory name.
- Type of testing: Select from the following options: Desktop Web Testing, Mobile Web Testing, Native and Hybrid Mobile, based on your test requirements.
- URL to run test on: Provide the application URL that you want to test.
- Testing credentials for your web/mobile app to test functionality which requires user to login: You can provide the app’s user login credentials here and need not write them separately in the test steps then. The login functionality will be taken care of automatically using the keyword
login. - OS and Browser: Choose the OS Browser combination on which you want to run the test cases.
- Number of test cases to generate using AI: If you wish, you can choose to generate test cases based on the App Description text, which works on generative AI.
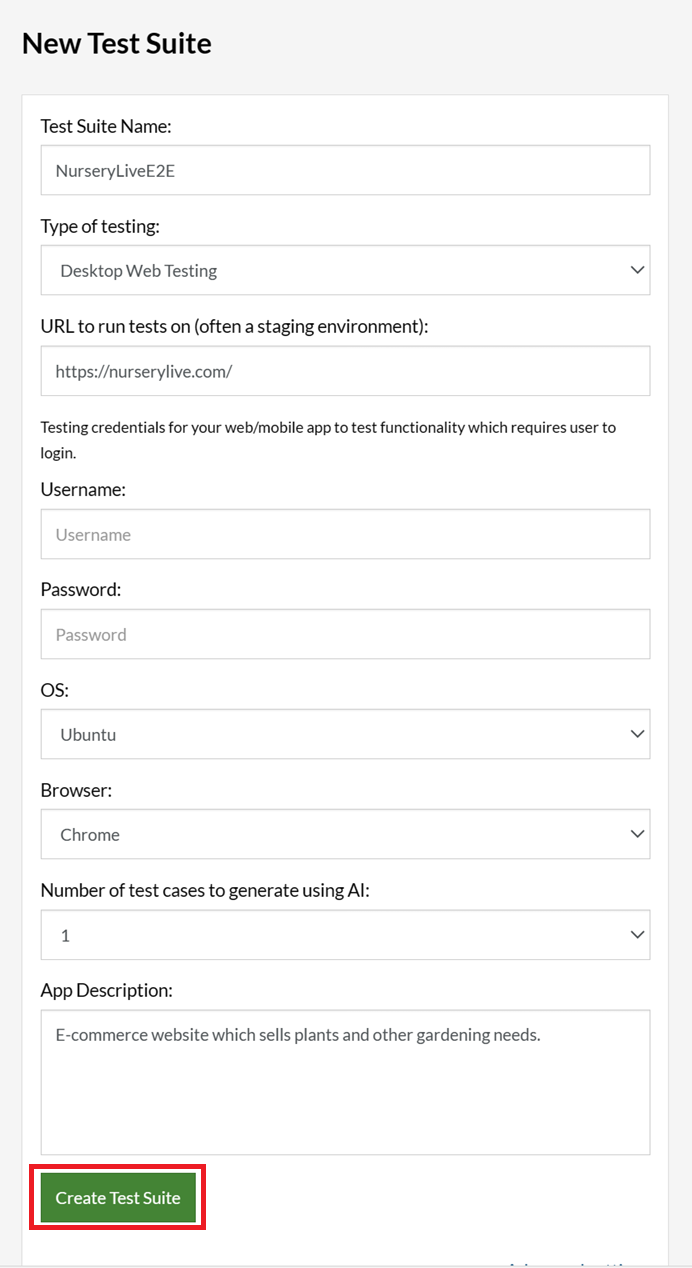
Step 3: Click Create Test Suite.
On the next screen, you can let AI generate the test case based on the App Description you provided during the Test Suite creation. However, for now, select do not generate any test, since we will write the test steps ourselves.
Step 4: To create a new custom test case yourself, click Add Custom Test Case.

Step 5: Provide the test case Description and start adding the test steps.
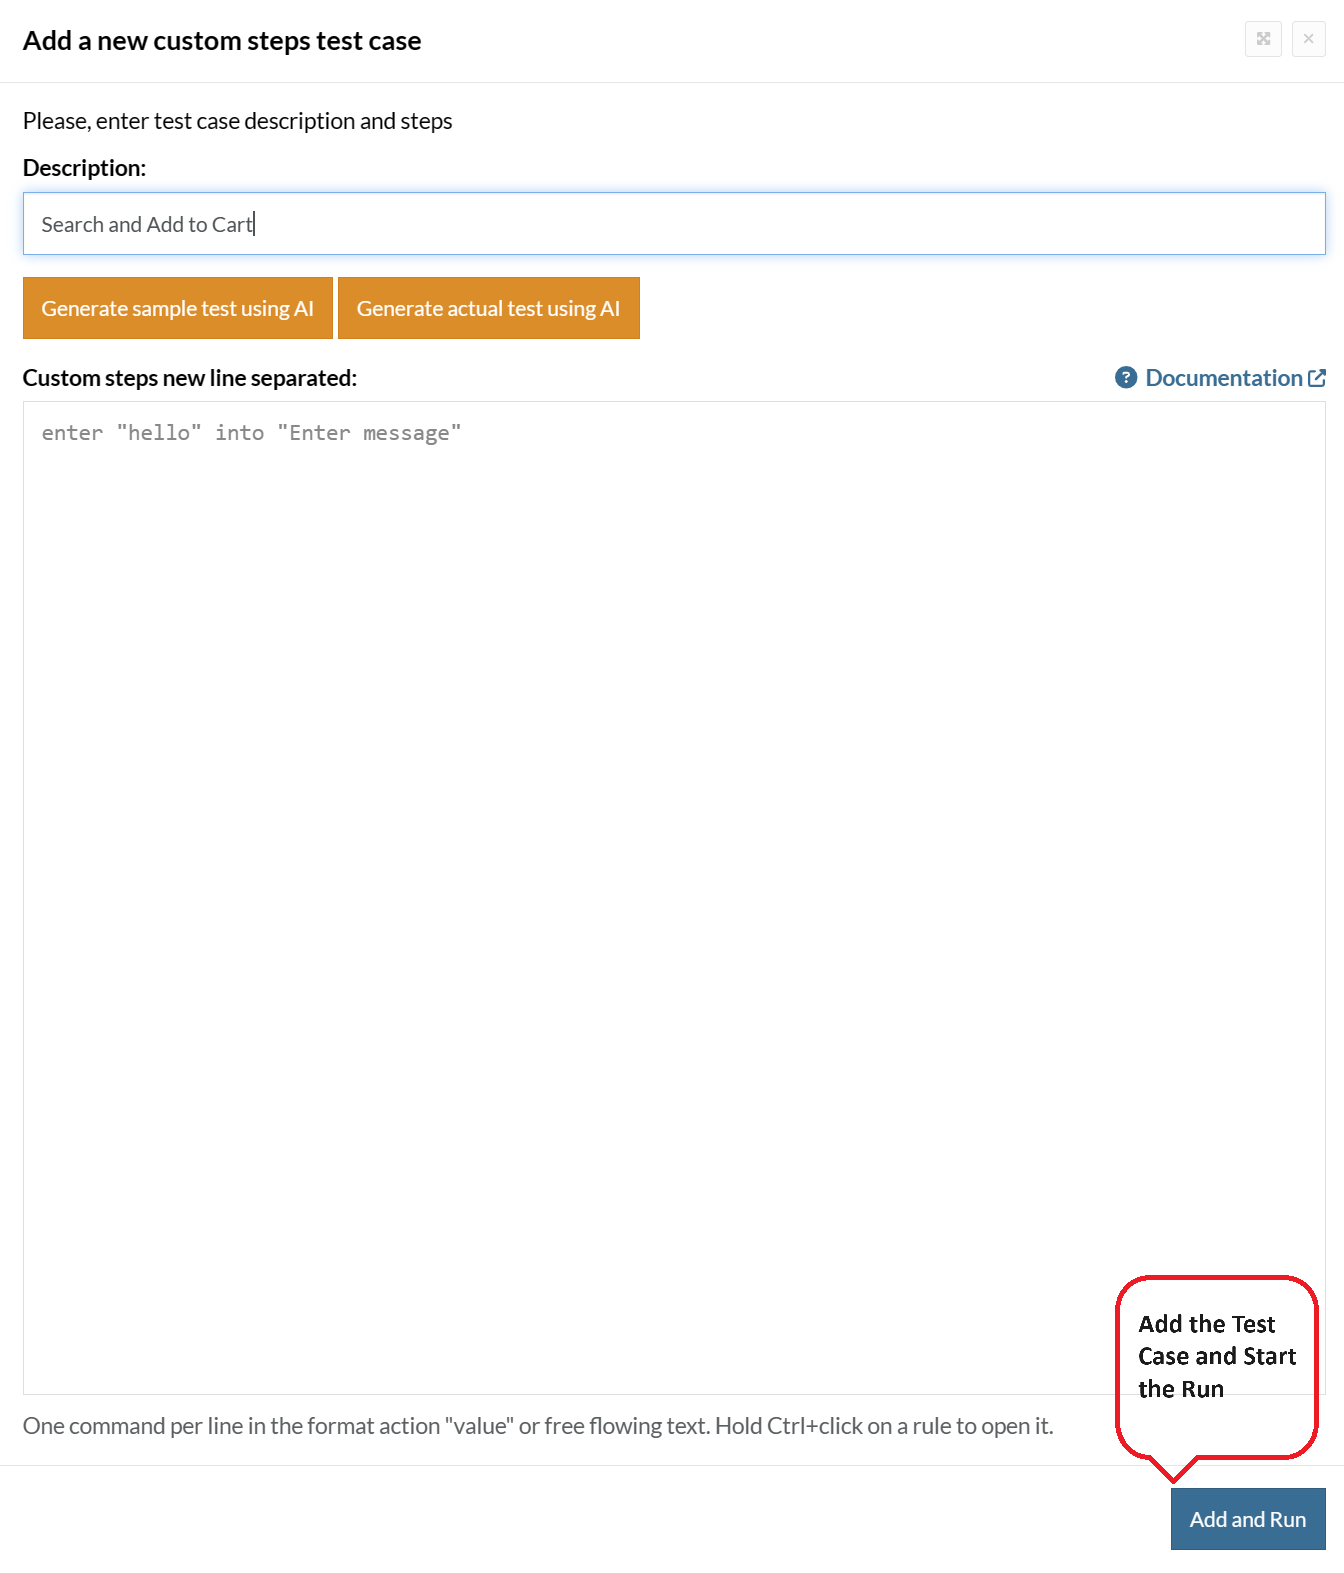
For the application under test, i.e., e-commerce website, we will perform below test steps:
- Search for a product
- Add it to the cart
- Verify that the product is present in the cart
Test Case: Search and Add to Cart
Step 1: We will add test steps on the test case editor screen one by one.
testRigor automatically navigates to the website URL you provided during the Test Suite creation. There is no need to use any separate function for it. Here is the website homepage, which we intend to test.

First, we want to search for a product in the search box. Unlike traditional testing tools, you can identify the UI element using the text you see on the screen. You need not use any CSS/XPath identifiers.
click "What are you looking for?"
Step 2: Once the cursor is in the search box, we will type the product name (lily), and press enter to start the search.
type "lily"
enter enter
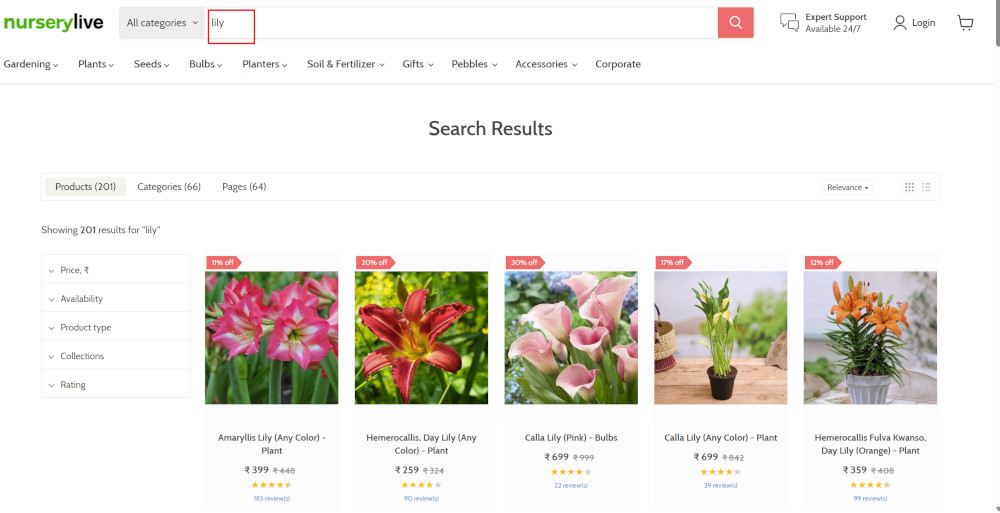
Search lists all products with the “lily” keyword on the webpage.
Step 3: The lily plant we are searching for needs the screen to be scrolled; for that testRigor provides a command. Scroll down until the product is present on the screen:
scroll down until page contains "Zephyranthes Lily, Rain Lily (Red)"
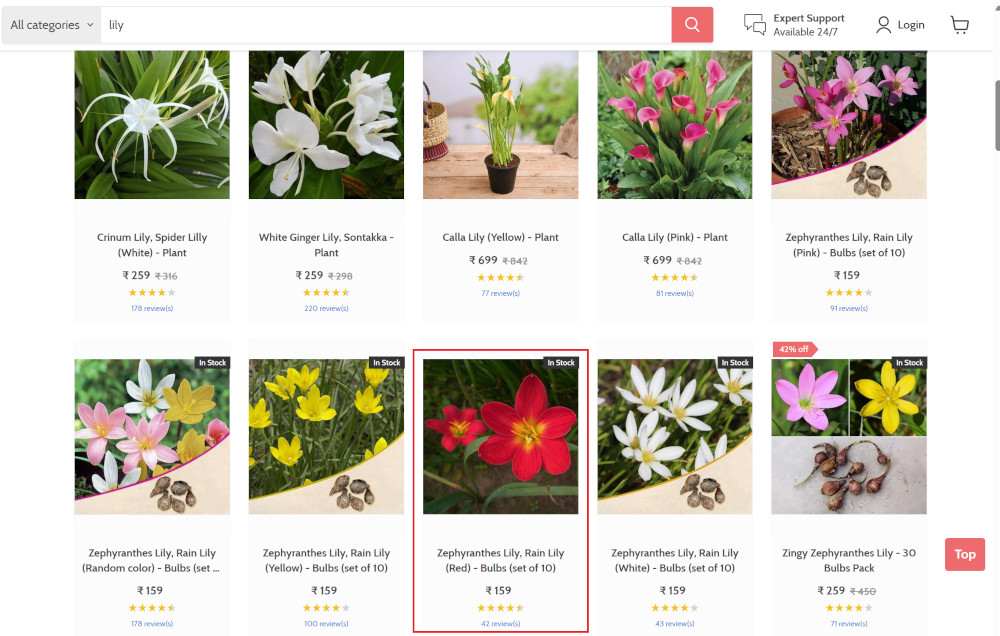
When the product is found on the screen, testRigor stops scrolling.
Step 4: Click on the product name to view the details:
click "Zephyranthes Lily, Rain Lily (Red)"
After the click, the product details are displayed on the screen as below, with the default Quantity as 1.
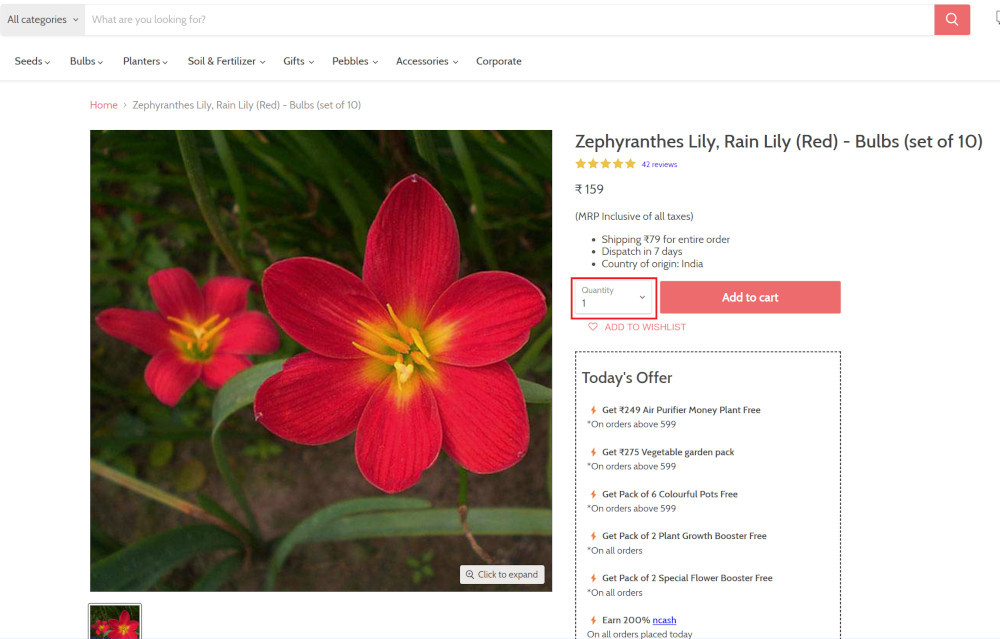
Step 5: Lets say, we want to change the Quantity to 3, so here we use the testRigor command to select from a list.
select "3" from "Quantity"
click "Add to cart"
The product is successfully added to the cart, and the “Added to your cart:” message is displayed on webpage.
Step 6: To assert that the message is successfully displayed, use a simple assertion command as below:
check that page contains "Added to your cart:"
Step 7: After this check, we will view the contents of the cart by clicking View cart as below:
click "View cart"

Step 8: Now we will again check that the product is present in the cart, under heading “Your cart” using the below assertion. With testRigor, it is really easy to specify the location of an element on the screen.
check that page contains "Zephyranthes Lily, Rain Lily (Red)" under "Your cart"

Complete Test Case
Here is how the complete test case will look in the testRigor app. The test steps are simple in plain English, enabling everyone in your team to write and execute them.
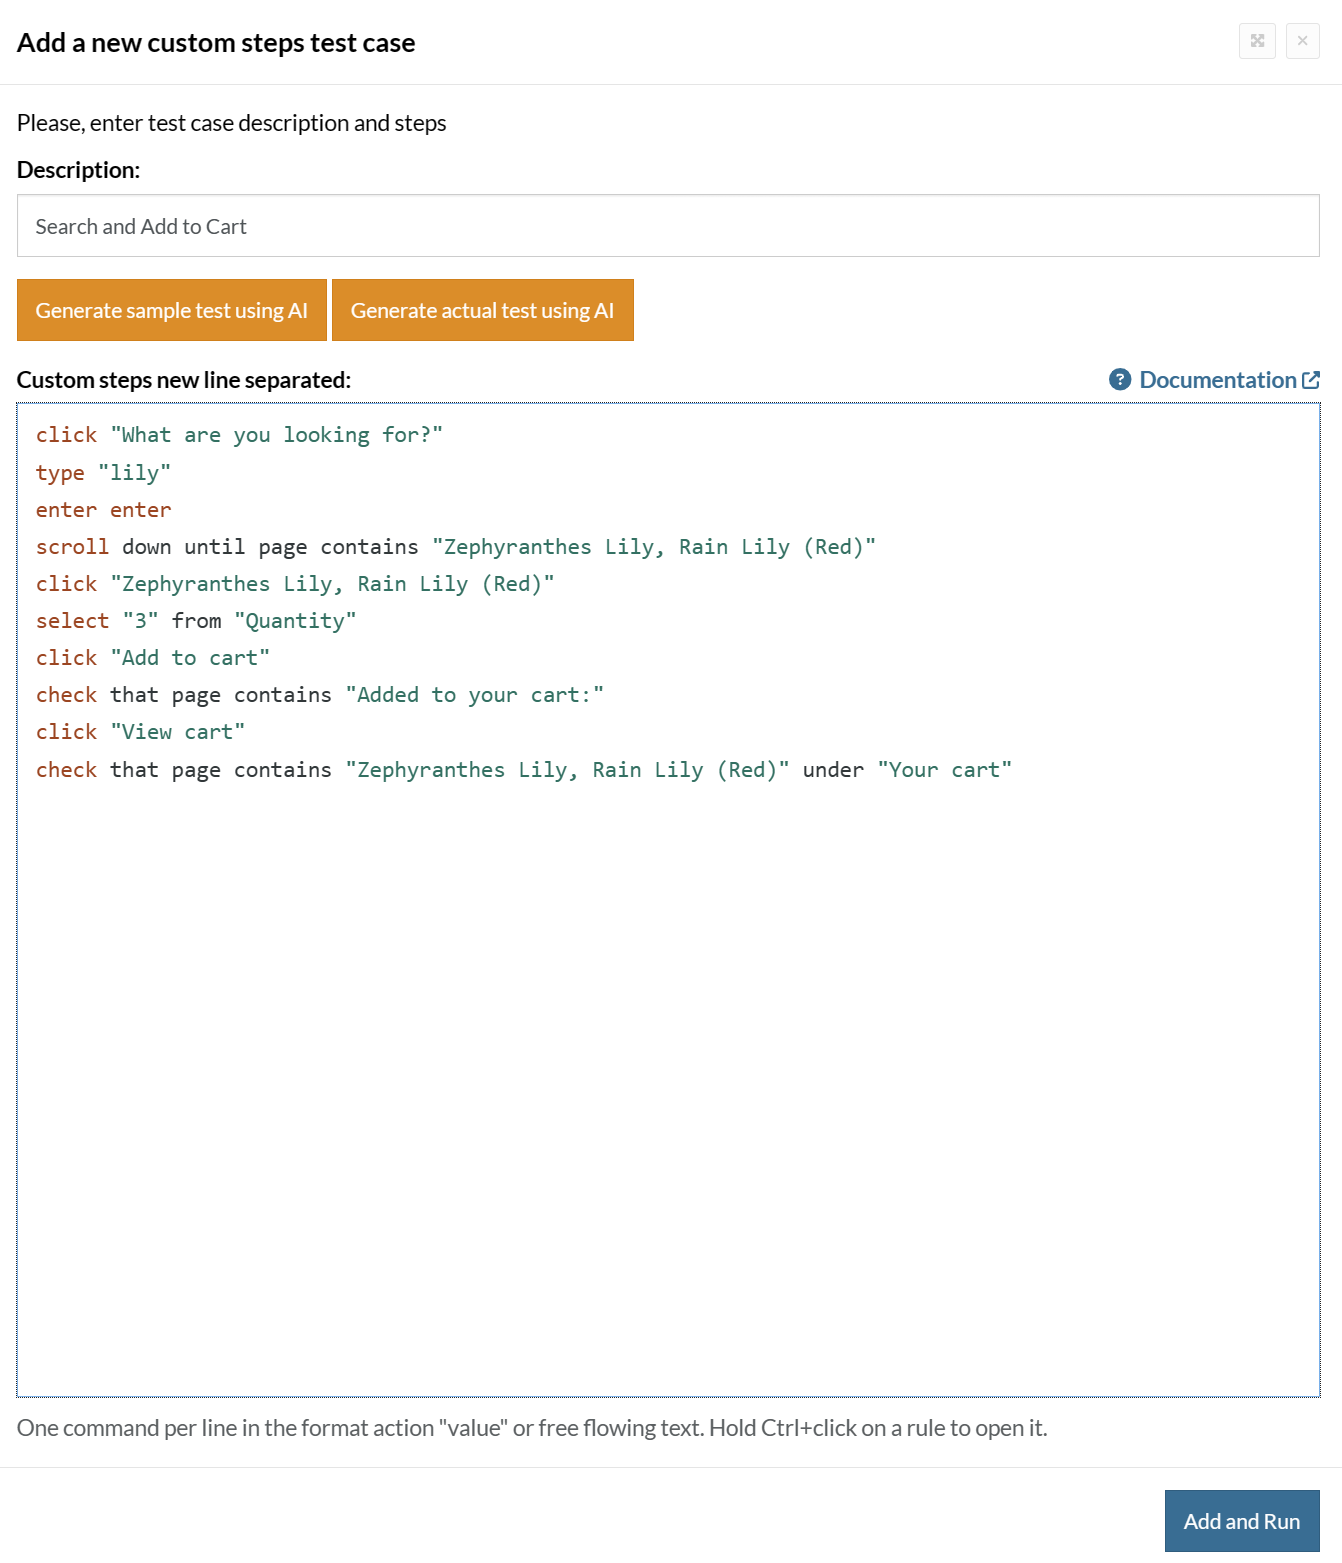
Click Add and Run.
Execution Results
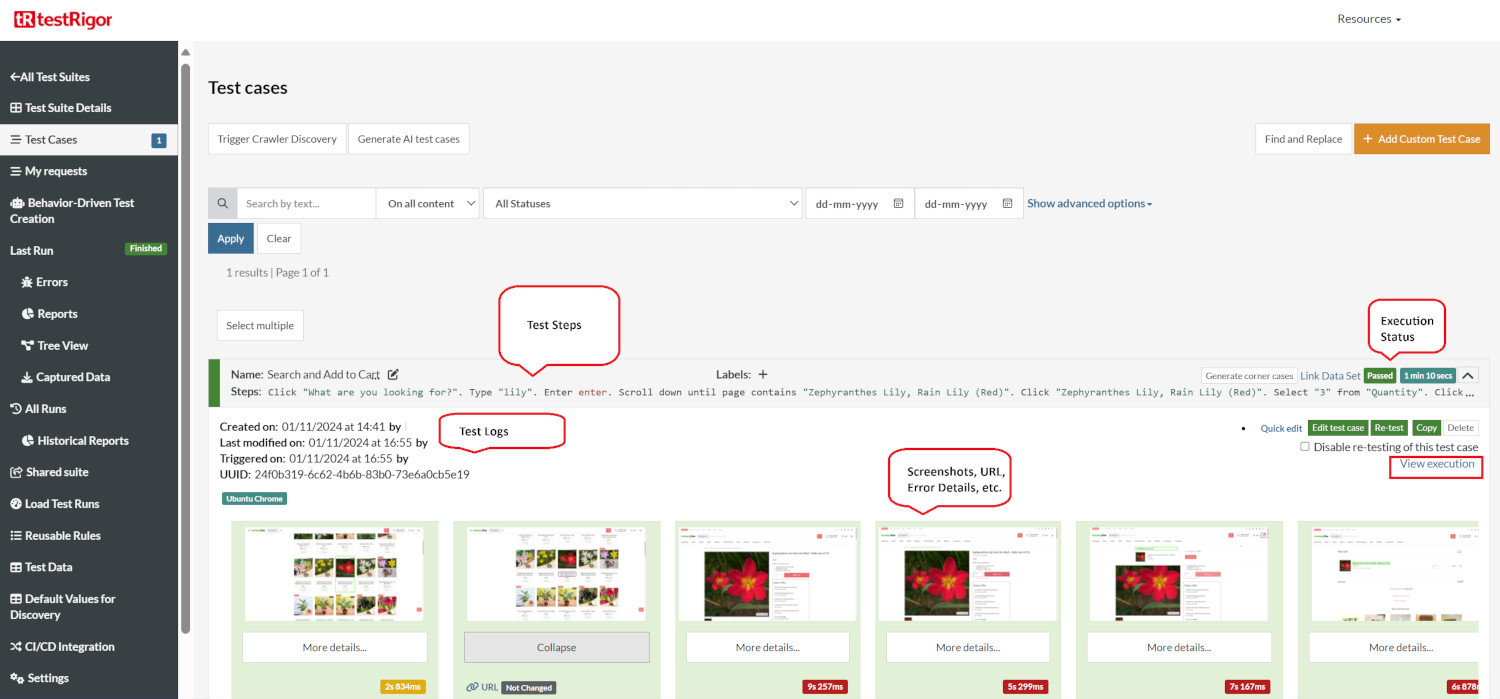
Once the test is executed, you can view the execution details, such as execution status, time spent in execution, screenshots, error messages, logs, video recordings of the test execution, etc. In case of any failure, there are logs and error text that are available easily in a few clicks.
You can also download the complete execution with steps and screenshots in PDF or Word format through the View Execution option.
testRigor’s Capabilities
Apart from the simplistic test case design and execution, there are some advanced features that help you test your application using simple English commands.
- Reusable Rules (Subroutines): You can easily create functions for the test steps that you use repeatedly. You can use the Reusable Rules to create such functions and call them in test cases by simply writing their names. See the example of Reusable Rules.
- Global Variables and Data Sets: You can import data from external files or create your own global variables and data sets in testRigor to use them in data-driven testing.
- 2FA, QR Code, and Captcha Resolution: testRigor easily manages the 2FA, QR Code, and Captcha resolution through its simple English commands.
- Email, Phone Call, and SMS Testing: Use simple English commands to test the email, phone calls, and SMS. These commands are useful for validating 2FA scenarios, with OTPs and authentication codes being sent to email, phone calls, or via phone text.
- File Upload/ Download Testing: Execute the test steps involving file download or file upload without the requirement of any third-party software. You can also validate the contents of the files using testRigor’s simple English commands.
- Database Testing: Execute database queries and validate the results fetched.
testRigor enables you to test web, mobile (hybrid, native), API, and desktop apps with minimum effort and maintenance.
Additional Resources
- Access testRigor documentation to know about more useful capabilities
- Top testRigor’s features
- How to perform end-to-end testing
EndNotes
E-commerce sites are mostly exposed to a massive spectrum of people, so the scenarios or use cases that need to be tested are countless. It is not just the use cases; the functionalities must also be robust, making every testing phase very critical.
Here, we have analyzed a few tools commonly used for each testing phase. Understanding your requirements and selecting the most suitable tool that saves overall testing time, effort, and cost will always be better.
| Achieve More Than 90% Test Automation | |
| Step by Step Walkthroughs and Help | |
| 14 Day Free Trial, Cancel Anytime |


