BigCommerce Testing

BigCommerce is a leading e-commerce platform that provides Software as a Service (SaaS) to business owners and retailers. BigCommerce helps retailers set up and operate online stores with little time and efficiency. A few features BigCommerce offers are customizable templates, robust product management, integrated payment processing, search engine optimization (SEO), and marketing tools. Established in Sydney in 2009 by Eddie Machaalani and Mitchell Harper, BigCommerce has grown exponentially, serving different enterprises across the globe. SkullCandy, Toyota, and Travelpro are a few companies that use the BigCommerce e-commerce platform.
BigCommerce uses PHP for server-side scripting, JavaScript for front-end development, and HTML for CSS for UI design. Like any other e-commerce platform, BigCommerce platforms also need thorough testing.
This article discusses the different testing types and related tools to test BigCommerce platform.
Unit Testing
It’s always good to test the application at a low level. We know the cost of the bug increases exponentially as the application grows. That’s why the developers and testers give much importance to unit testing. Unit testing is the starting phase of testing, where we test the individual unit of the application, which can be a function, module, or code snippet separately.
In BigCommerce applications, as the server-side scripting is done in JavaScript, the commonly used unit testing framework tool is Jest.
Jest
Jest is a widely used unit testing framework for JavaScript and React applications. Jest is built on top of Jasime, a popular BDD tool. We are not going in-depth about Jest here, read an informative article about Jest Testing.
For unit testing BigCommerce applications, we can write test scripts once we install and configure the Jest framework. The test files will be kept at the exact location along with the application files. The difference is that the test files will have the extension “.test.js” or “.spec.js”.
// priceCalculation.test.js

const calculateTotalPrice = require('./priceCalculation');

describe('calculateTotalPrice', () => {
  test('calculates the correct total price with a discount', () => {
    const price = 100;
    const discount = 20; // 20%
    const expectedTotal = 80; // 20% off of 100

    expect(calculateTotalPrice(price, discount)).toBe(expectedTotal);
  });

  test('throws an error for invalid discount values', () => {
    const price = 100;
    const discount = -10; // Invalid discount

    expect(() => calculateTotalPrice(price, discount)).toThrow("Invalid discount value");
  });
});
Along with Jest, we can use Chai mainly for creating assertions, Sinon.js for creating spies, stubs, and mocks, and Karma, which is used as a test runner for the scripts.
Integration Testing
As we pass unit testing, the next testing phase is integration testing. Here, the unit-tested modules or components are integrated and tested to ensure the integration doesn’t break any functionality, or in other words, after the integration, the components work harmoniously.
For BigCommerce applications, we can do integration testing in two ways –
- UI Integration Testing
- API Integration Testing
For UI integration testing, we can use tools like Cypress or Selenium; for API, we use tools like Postman or Supertest.
Cypress
Cypress is a JavaScript-based web automation tool for integration and end-to-end testing. Cypress uses Mocha’s BDD syntax and JavaScript for scripting. Cypress has a futuristic Dashboard that provides a detailed report of the test execution with detailed logs and screenshots.
Cypress supports integration testing for BigCommerce applications. So, to start with, we need to install and configure Cypress. This is pretty easy using node commands. Once the configuration is done, we can start creating test scripts. So, the test files are to be kept in the path cypress/integration folder.
describe('BigCommerce Storefront Test', () => {

  it('should allow a user to search for a product, add it to the cart, and proceed to checkout', () => {

    // Visit the homepage
    cy.visit('https://yourbigcommercestore.com');

    // Search for a product
    cy.get('input[name="search_query"]').type('product name{enter}');

    // Assert that search results are displayed
    cy.contains('Search Results').should('be.visible');

    // Click on the first product in the search results
    cy.get('.productGrid').find('.card').first().click();

    // Add the product to the cart
    cy.get('button#form-action-addToCart').click();

    // Go to the cart page
    cy.visit('https://yourbigcommercestore.com/cart.php');

    // Assert the cart contains the product
    cy.get('.cart-item').should('contain', 'product name');

    // Assert that we are on the checkout page
    cy.url().should('include', '/checkout');
  });
});
We have seen how UI integration tests work with Cypress. Let’s move on to API integration tests. Here, one of the fast-growing test automation tools is Supertest.
Supertest
We selected Supertest because it is one of the most popular Node.js libraries for testing HTTP servers. Supertest also uses BDD syntax with the support of Mocha or Cucumber. Installing Supertest is the same as installing Cypress using node commands. Along with Supertest, we must install Mocha or Cucumber as supporting libraries.
// api.test.js
const supertest = require('supertest');
const app = require('../app'); // Import your Express app
const request = supertest(app);

describe('BigCommerce API Integration', () => {
  it('should fetch products from BigCommerce', async () => {

  const response = await request.get('/your-custom-route-that-calls-bigcommerce-api');

    expect(response.statusCode).toBe(200);
    expect(response.body).toHaveProperty('data');
    // Add more assertions based on your API response
  });

});
End-to-End Testing
End-to-end testing is customer-centric, where we test the application from an end-user perspective. How a customer approaches the website, navigates, checks out the item, and finally places the order. So, the whole flow is tested not as a tester but from the customer’s point of view. Here, more than test cases, use cases will be evaluated.
BigCommerce applications are more into e-commerce; this testing plays a crucial role. So, let us evaluate what tools can be used for E2E testing.
Selenium
As we know, Selenium is a legendary tool in web automation that has achieved great glory. Selenium is an open-source tool where anyone can take the code and modify the framework according to their requirement. Selenium supports integration with different third-party plugins and tools. Also, it supports test script secretion in most of the available scripting languages.
Even though Selenium has many limitations, one of them is the maintenance effort, as the Selenium test repository gets more complex as the number of automation test scripts increases. Another reason is the non-trustworthy execution results. If there is any change in DOM elements, the test case will fail, leading to a false positive bug.
So, it’s challenging to understand whether all the failures are bugs or script issues. We can say as per the current market trend, Selenium is not a preferred E2E tool. We are not mentioning any examples for Selenium, but you can refer here.
testRigor
Currently, there are a lot of web automation tools claiming the codeless automation slogan. But if we check that, we can understand they are not doing justice to what they claim. But one tool that stands out from others is testRigor. It is an innovative codeless automation tool with integrated generative AI. Let’s check what makes testRigor different.
One of the most commonly heard words is generative AI. It can generate test cases or data per the requirements in plain English. A huge difference compared to Selenium is that testRigor is independent of programming languages. Anyone without programming skills can also create or modify test scripts and execute them. testRigor supports creating test steps in parsed plain English.
open url "https://yourbigcommercestore.com"
enter stored value "UserName" into "User Name"
enter stored value "password" into "Password"
click "Sign in"
click “Purchase Orders”
click “Create New Purchase Order”
enter "John" into "Vendor Name"
enter "Vending Machine" into "Items to be Ordered"
enter "5" into "Items to be Ordered"
click "Submit"
If you see here, the elements are mentioned by the text seen or relative positions on the UI, making them more stable.
We have mentioned very few features of testRigor here, but you can check testRigor’s top features.
How to do End-to-end Testing with testRigor
Let us take the example of an e-commerce website that sells plants and other gardening needs. We will create end-to-end test cases in testRigor using plain English test steps.
Step 1: Log in to your testRigor app with your credentials.
Step 2: Set up the test suite for the website testing by providing the information below:
- Test Suite Name: Provide a relevant and self-explanatory name.
- Type of testing: Select from the following options: Desktop Web Testing, Mobile Web Testing, Native and Hybrid Mobile, based on your test requirements.
- URL to run test on: Provide the application URL that you want to test.
- Testing credentials for your web/mobile app to test functionality which requires user to login: You can provide the app’s user login credentials here and need not write them separately in the test steps then. The login functionality will be taken care of automatically using the keyword
login. - OS and Browser: Choose the OS Browser combination on which you want to run the test cases.
- Number of test cases to generate using AI: If you wish, you can choose to generate test cases based on the App Description text, which works on generative AI.
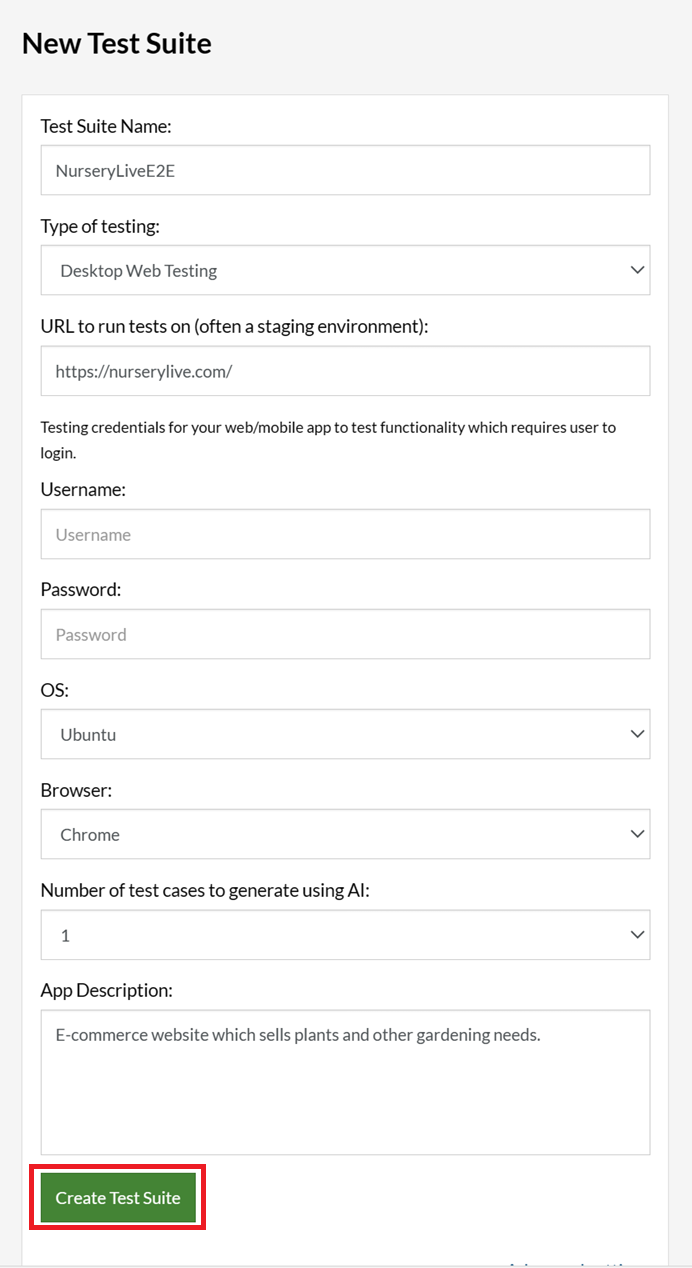
Step 3: Click Create Test Suite.
On the next screen, you can let AI generate the test case based on the App Description you provided during the Test Suite creation. However, for now, select do not generate any test, since we will write the test steps ourselves.
Step 4: To create a new custom test case yourself, click Add Custom Test Case.

Step 5: Provide the test case Description and start adding the test steps.
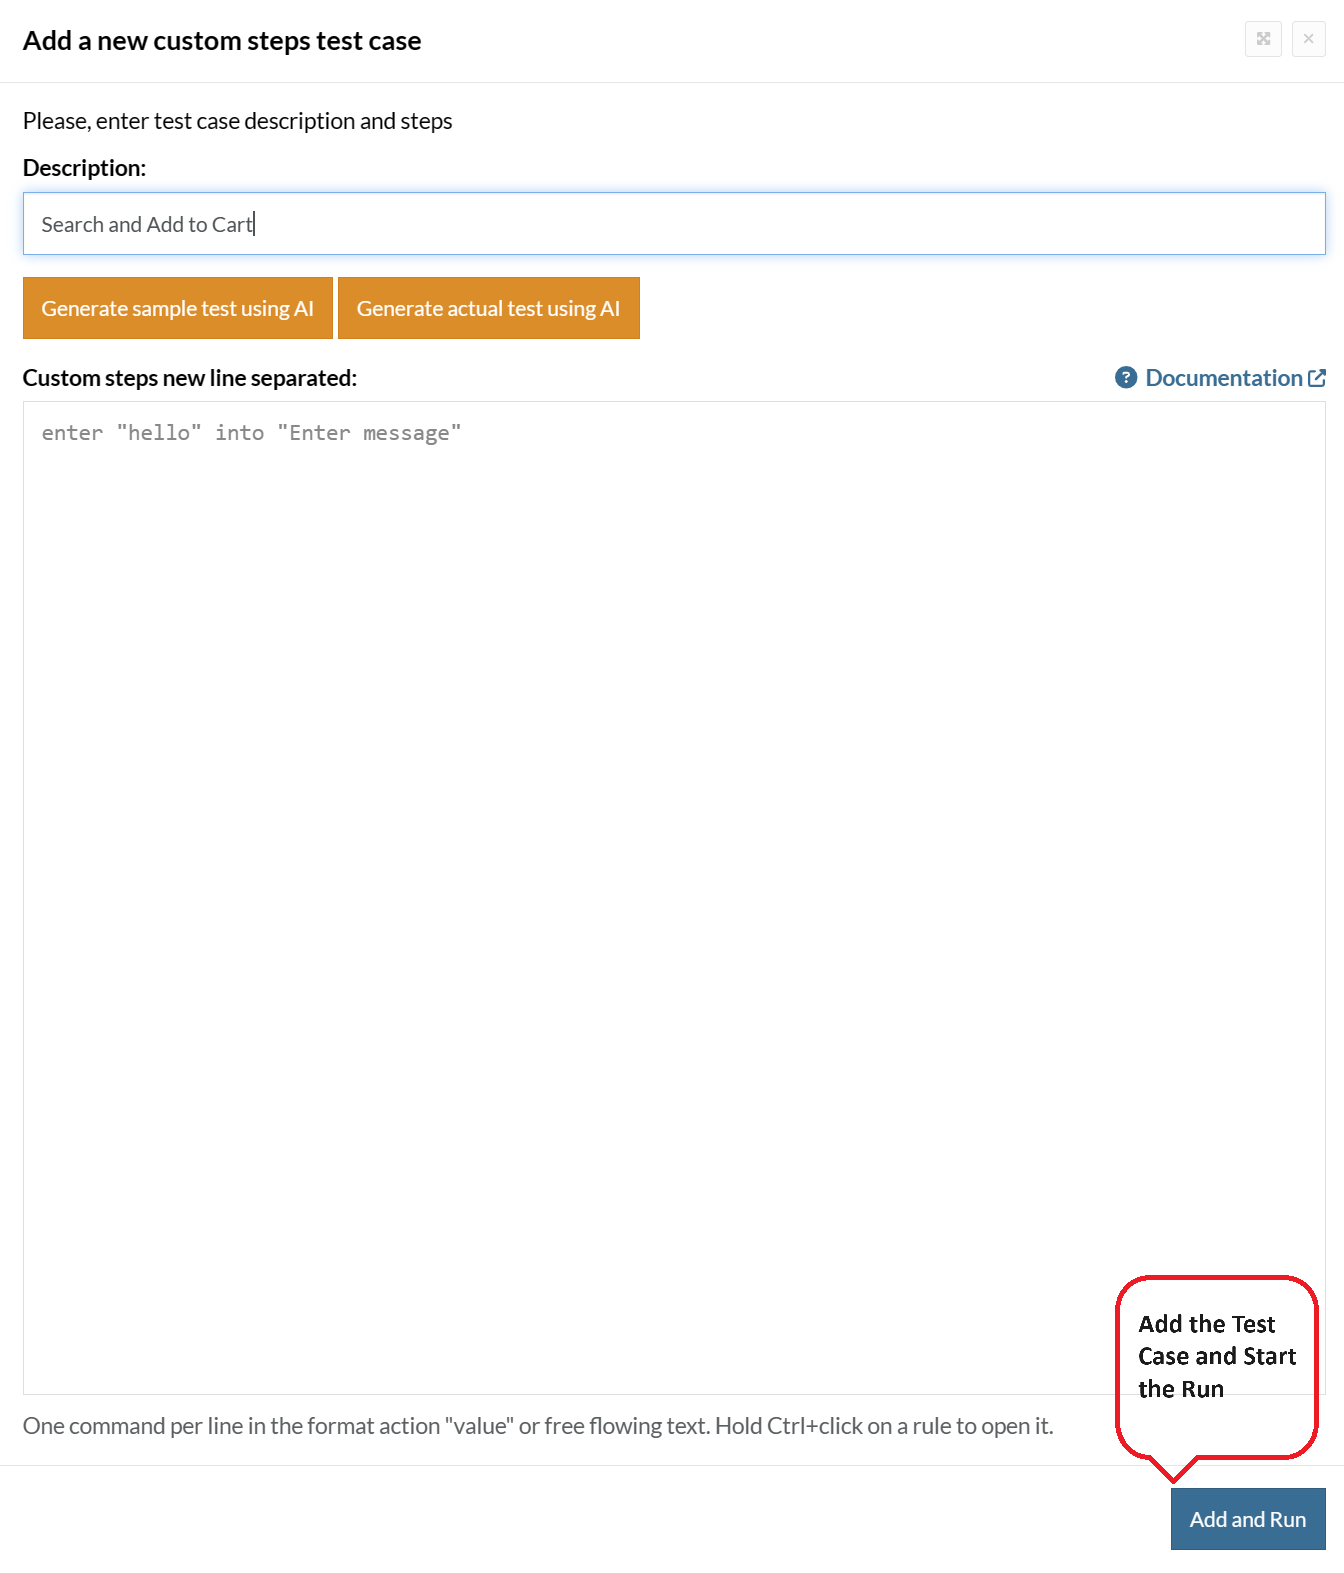
For the application under test, i.e., e-commerce website, we will perform below test steps:
- Search for a product
- Add it to the cart
- Verify that the product is present in the cart
Test Case: Search and Add to Cart
Step 1: We will add test steps on the test case editor screen one by one.
testRigor automatically navigates to the website URL you provided during the Test Suite creation. There is no need to use any separate function for it. Here is the website homepage, which we intend to test.

First, we want to search for a product in the search box. Unlike traditional testing tools, you can identify the UI element using the text you see on the screen. You need not use any CSS/XPath identifiers.
click "What are you looking for?"
Step 2: Once the cursor is in the search box, we will type the product name (lily), and press enter to start the search.
type "lily"
enter enter
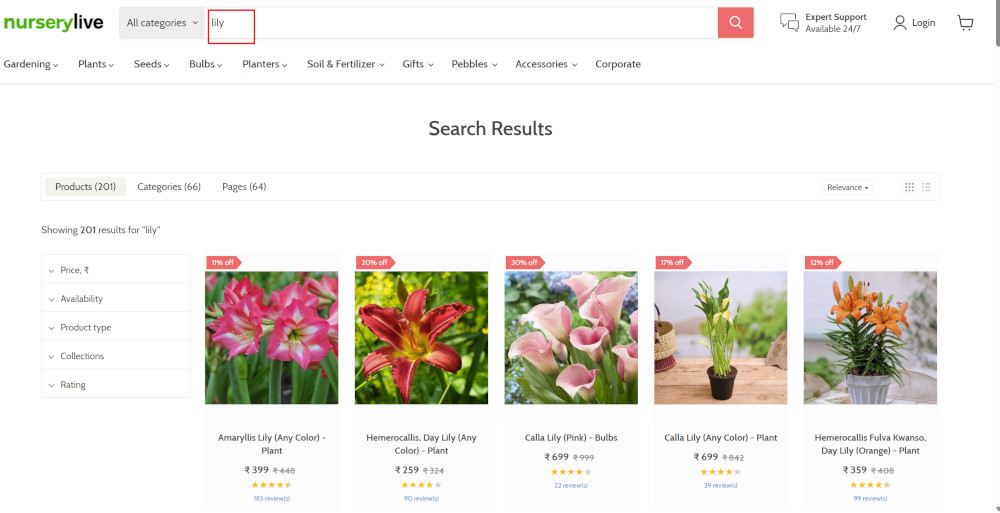
Search lists all products with the “lily” keyword on the webpage.
Step 3: The lily plant we are searching for needs the screen to be scrolled; for that testRigor provides a command. Scroll down until the product is present on the screen:
scroll down until page contains "Zephyranthes Lily, Rain Lily (Red)"
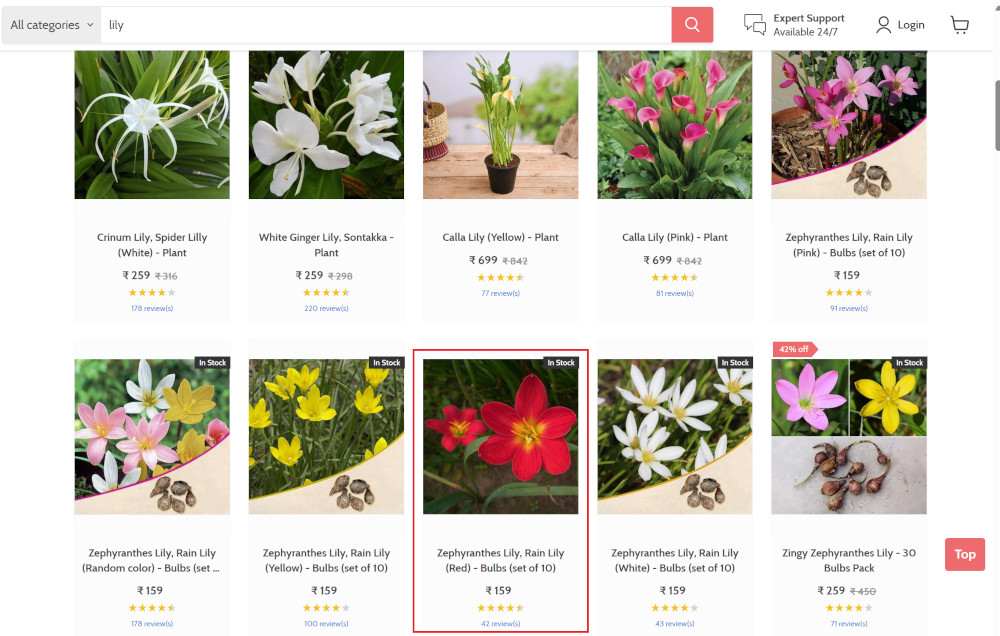
When the product is found on the screen, testRigor stops scrolling.
Step 4: Click on the product name to view the details:
click "Zephyranthes Lily, Rain Lily (Red)"
After the click, the product details are displayed on the screen as below, with the default Quantity as 1.
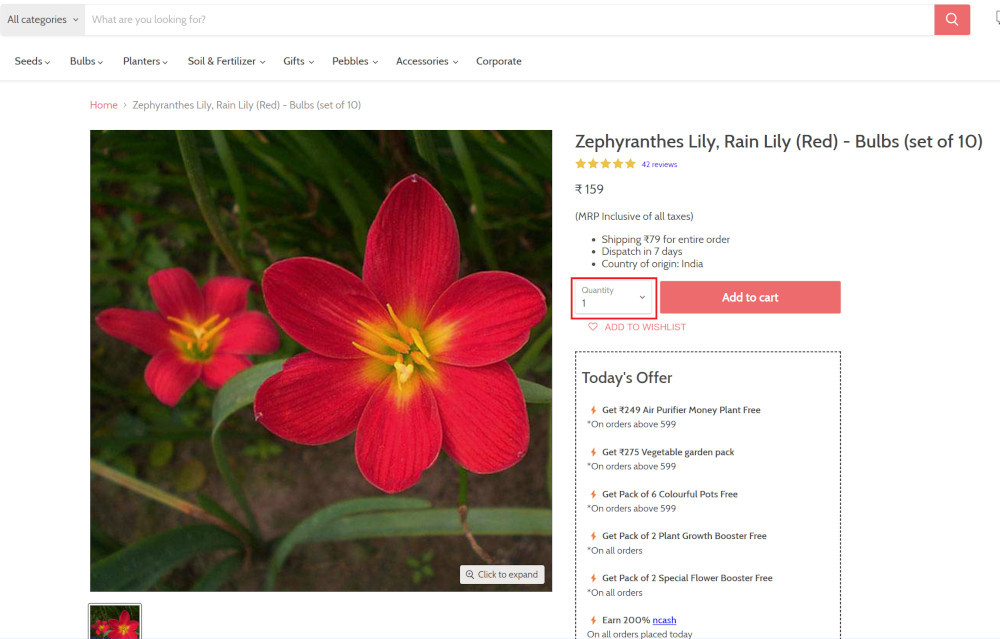
Step 5: Lets say, we want to change the Quantity to 3, so here we use the testRigor command to select from a list.
select "3" from "Quantity"
click "Add to cart"
The product is successfully added to the cart, and the “Added to your cart:” message is displayed on webpage.
Step 6: To assert that the message is successfully displayed, use a simple assertion command as below:
check that page contains "Added to your cart:"
Step 7: After this check, we will view the contents of the cart by clicking View cart as below:
click "View cart"

Step 8: Now we will again check that the product is present in the cart, under heading “Your cart” using the below assertion. With testRigor, it is really easy to specify the location of an element on the screen.
check that page contains "Zephyranthes Lily, Rain Lily (Red)" under "Your cart"

Complete Test Case
Here is how the complete test case will look in the testRigor app. The test steps are simple in plain English, enabling everyone in your team to write and execute them.
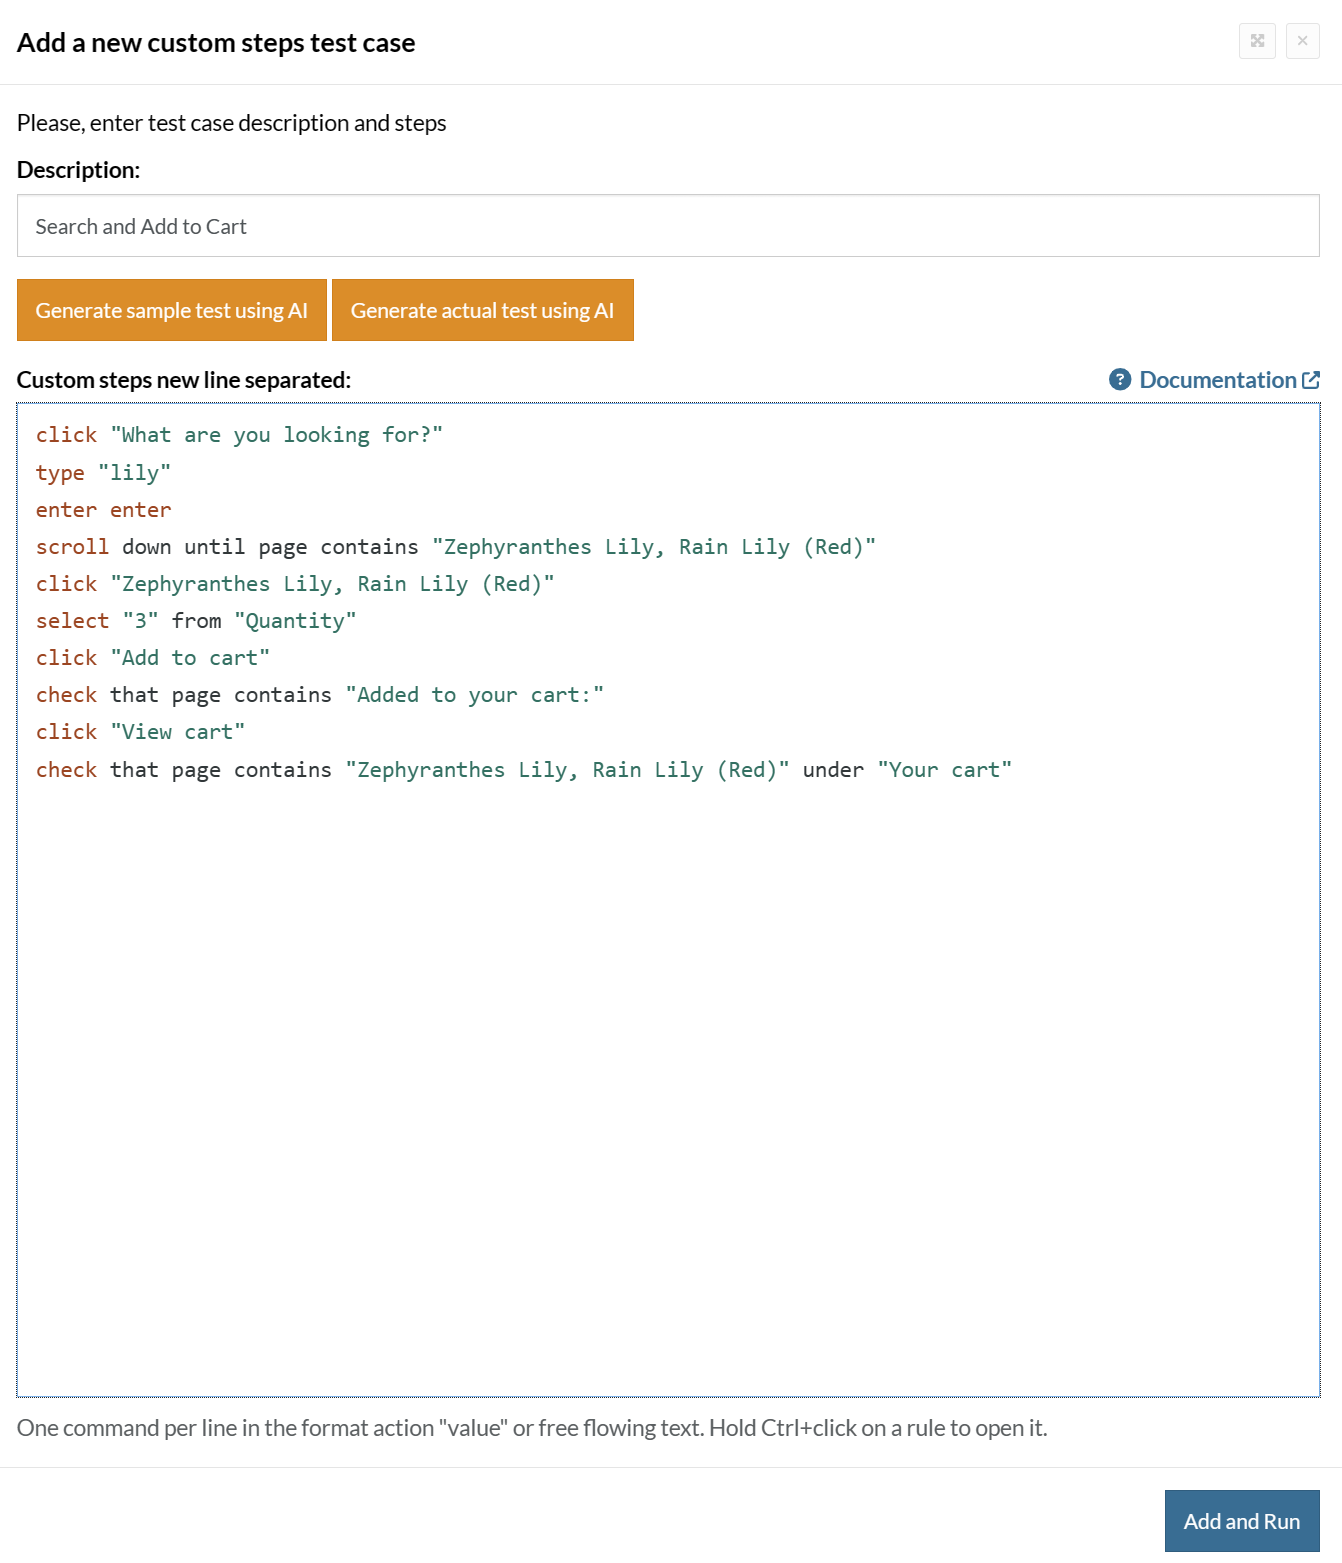
Click Add and Run.
Execution Results
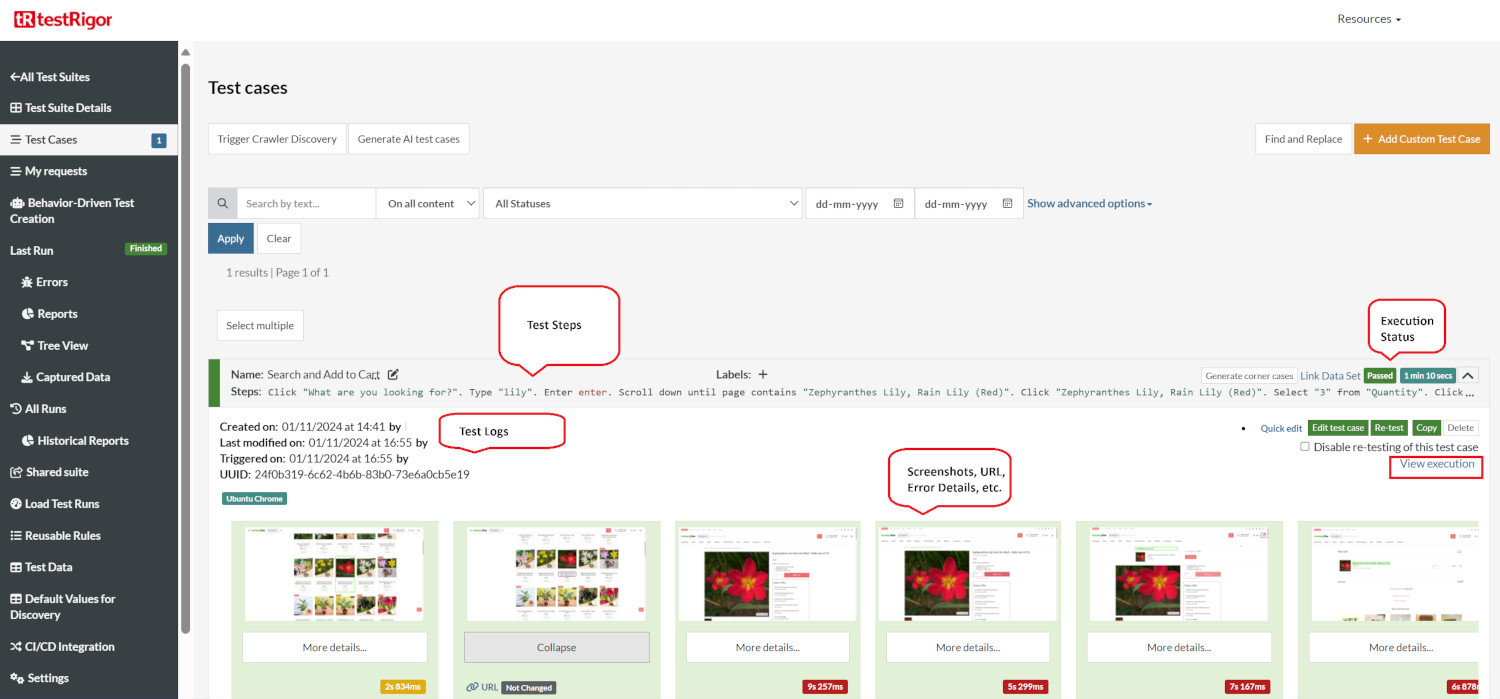
Once the test is executed, you can view the execution details, such as execution status, time spent in execution, screenshots, error messages, logs, video recordings of the test execution, etc. In case of any failure, there are logs and error text that are available easily in a few clicks.
You can also download the complete execution with steps and screenshots in PDF or Word format through the View Execution option.
testRigor’s Capabilities
Apart from the simplistic test case design and execution, there are some advanced features that help you test your application using simple English commands.
- Reusable Rules (Subroutines): You can easily create functions for the test steps that you use repeatedly. You can use the Reusable Rules to create such functions and call them in test cases by simply writing their names. See the example of Reusable Rules.
- Global Variables and Data Sets: You can import data from external files or create your own global variables and data sets in testRigor to use them in data-driven testing.
- 2FA, QR Code, and Captcha Resolution: testRigor easily manages the 2FA, QR Code, and Captcha resolution through its simple English commands.
- Email, Phone Call, and SMS Testing: Use simple English commands to test the email, phone calls, and SMS. These commands are useful for validating 2FA scenarios, with OTPs and authentication codes being sent to email, phone calls, or via phone text.
- File Upload/ Download Testing: Execute the test steps involving file download or file upload without the requirement of any third-party software. You can also validate the contents of the files using testRigor’s simple English commands.
- Database Testing: Execute database queries and validate the results fetched.
testRigor enables you to test web, mobile (hybrid, native), API, and desktop apps with minimum effort and maintenance.
Additional Resources
- Access testRigor documentation to know about more useful capabilities
- Top testRigor’s features
- How to perform end-to-end testing
EndNotes
BigCommerce is used by both startups and huge enterprises. So, the application must be appropriately tested before releasing it to customers. This article covers all types of testing we can perform in BigCommerce applications and the tools that can be used for every kind of testing. Check your requirements and select a tool that meets them with minimum effort and results in productive output.
| Achieve More Than 90% Test Automation | |
| Step by Step Walkthroughs and Help | |
| 14 Day Free Trial, Cancel Anytime |


