Selenium with Ruby Cheat Sheet
|
|


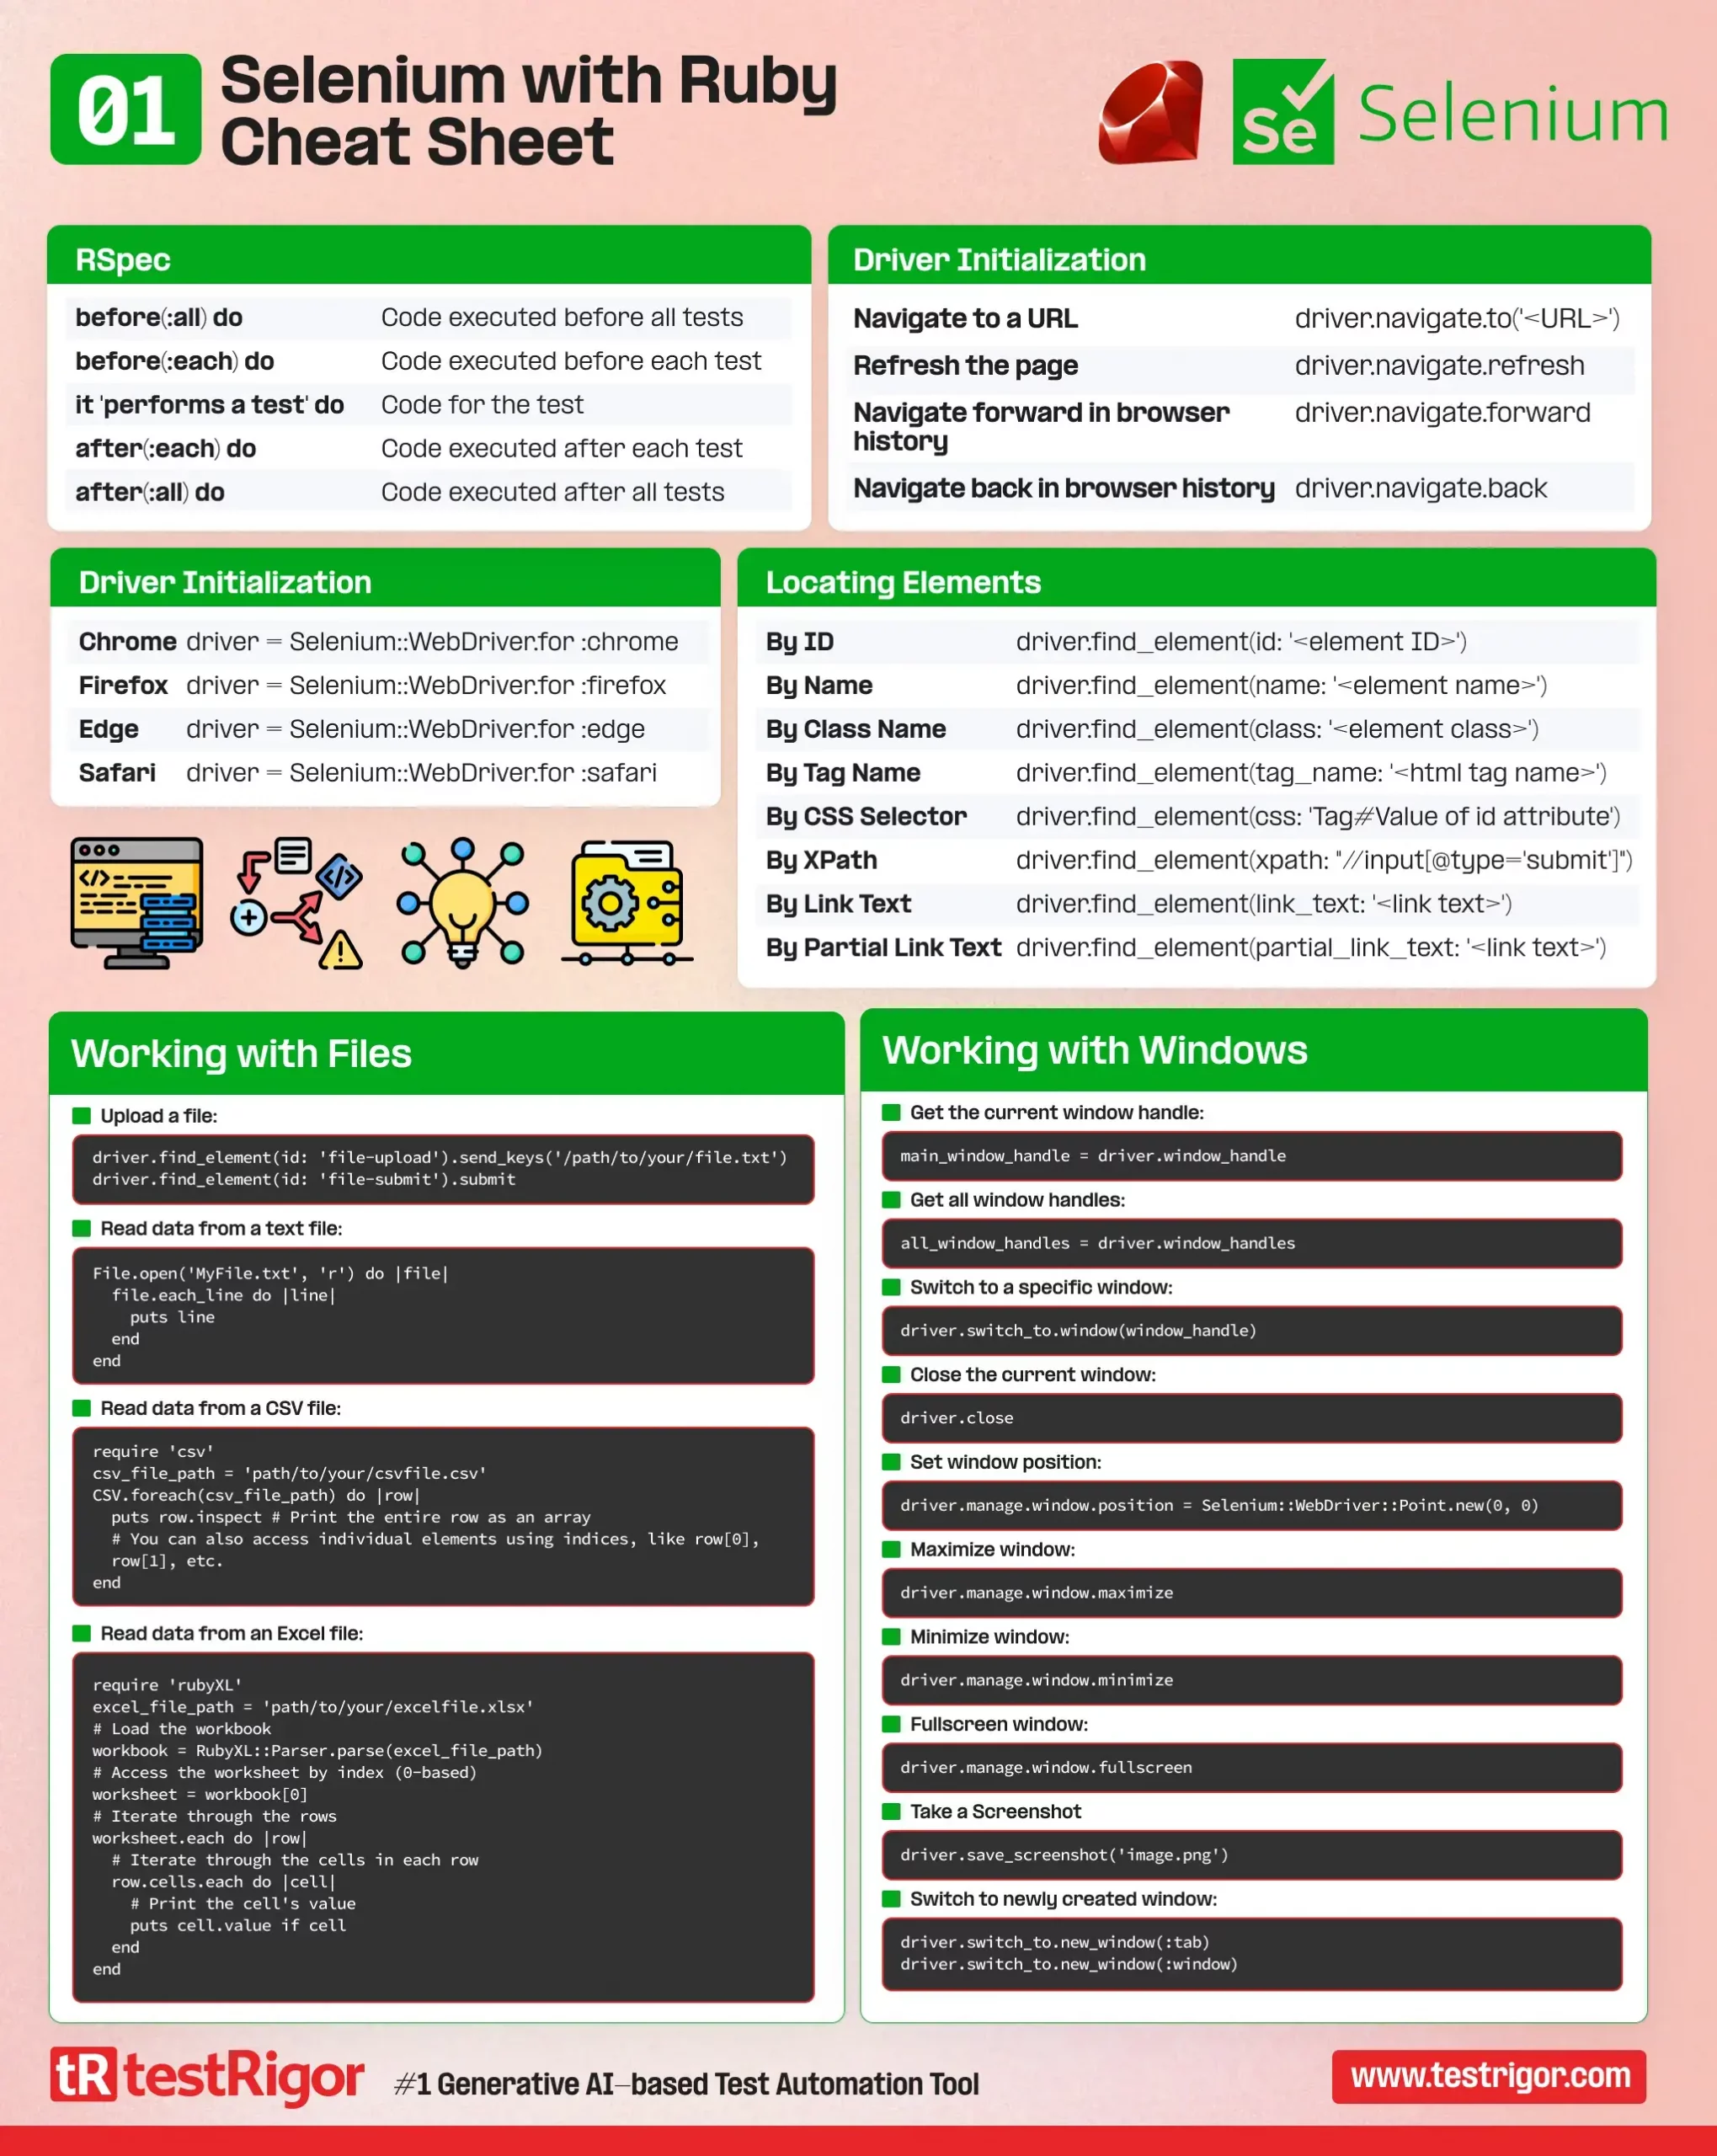
Driver Initialization |
|
| Chrome | driver = Selenium::WebDriver.for :chrome |
|---|---|
| Firefox | driver = Selenium::WebDriver.for :firefox |
| Edge | driver = Selenium::WebDriver.for :edge |
| Safari | driver = Selenium::WebDriver.for :safari |
Locating Elements |
|
| By ID: | driver.find_element(id: '<element ID>') |
| By Name: | driver.find_element(name: '<element name>') |
| By Class Name: | driver.find_element(class: '<element class>') |
| By Tag Name: | driver.find_element(tag_name: '<html tag name>') |
| By CSS Selector: | driver.find_element(css: 'Tag#Value of id attribute') |
| By XPath: | driver.find_element(xpath: "//input[@type='submit']") |
| By Link Text: | driver.find_element(link_text: '<link text>') |
| By Partial Link Text: | driver.find_element(partial_link_text: '<link text>') |
RSpec |
|
| before(:all) do | Code executed before all tests |
| before(:each) do | Code executed before each test |
| it ‘performs a test’ do | Code for the test |
| after(:each) do | Code executed after each test |
| after(:all) do | Code executed after all tests |
Working with Files |
|
|
Upload a file:
driver.find_element(id: 'file-upload').send_keys('/path/to/your/file.txt')
driver.find_element(id: 'file-submit').submit
Read data from a text file:
File.open('MyFile.txt', 'r') do |file|
  file.each_line do |line|
    puts line
  end
end
Read data from a CSV file:
require 'csv' csv_file_path = 'path/to/your/csvfile.csv' CSV.foreach(csv_file_path) do |row|

  puts row.inspect # Print the entire row as an array

  # You can also access individual elements using indices, like row[0], row[1], etc.

end
Read data from an Excel file:
require 'rubyXL'

excel_file_path = 'path/to/your/excelfile.xlsx'

# Load the workbook

workbook = RubyXL::Parser.parse(excel_file_path)

# Access the worksheet by index (0-based)

worksheet = workbook[0]

# Iterate through the rows

worksheet.each do |row|

  # Iterate through the cells in each row

  row.cells.each do |cell|

    # Print the cell's value

    puts cell.value if cell

  end

end
|
|
Selenium Navigators |
|
| Navigate to a URL | driver.navigate.to('<URL>') |
| Refresh the page | driver.navigate.refresh |
| Navigate forward in browser history | driver.navigate.forward |
| Navigate back in browser history | driver.navigate.back |
Working with Windows |
|
|
Get the current window handle:
main_window_handle = driver.window_handle Get all window handles:
all_window_handles = driver.window_handles Switch to a specific window:
driver.switch_to.window(window_handle) Switch to newly created window:
driver.switch_to.new_window(:tab)
driver.switch_to.new_window(:window)
Close the current window:
driver.close Set window position:
driver.manage.window.position = Selenium::WebDriver::Point.new(0, 0) Maximize window:
driver.manage.window.maximize Minimize window:
driver.manage.window.minimize Fullscreen window:
driver.manage.window.fullscreen Take a Screenshot
driver.save_screenshot('image.png')
|
|
Working with Frames |
|
|
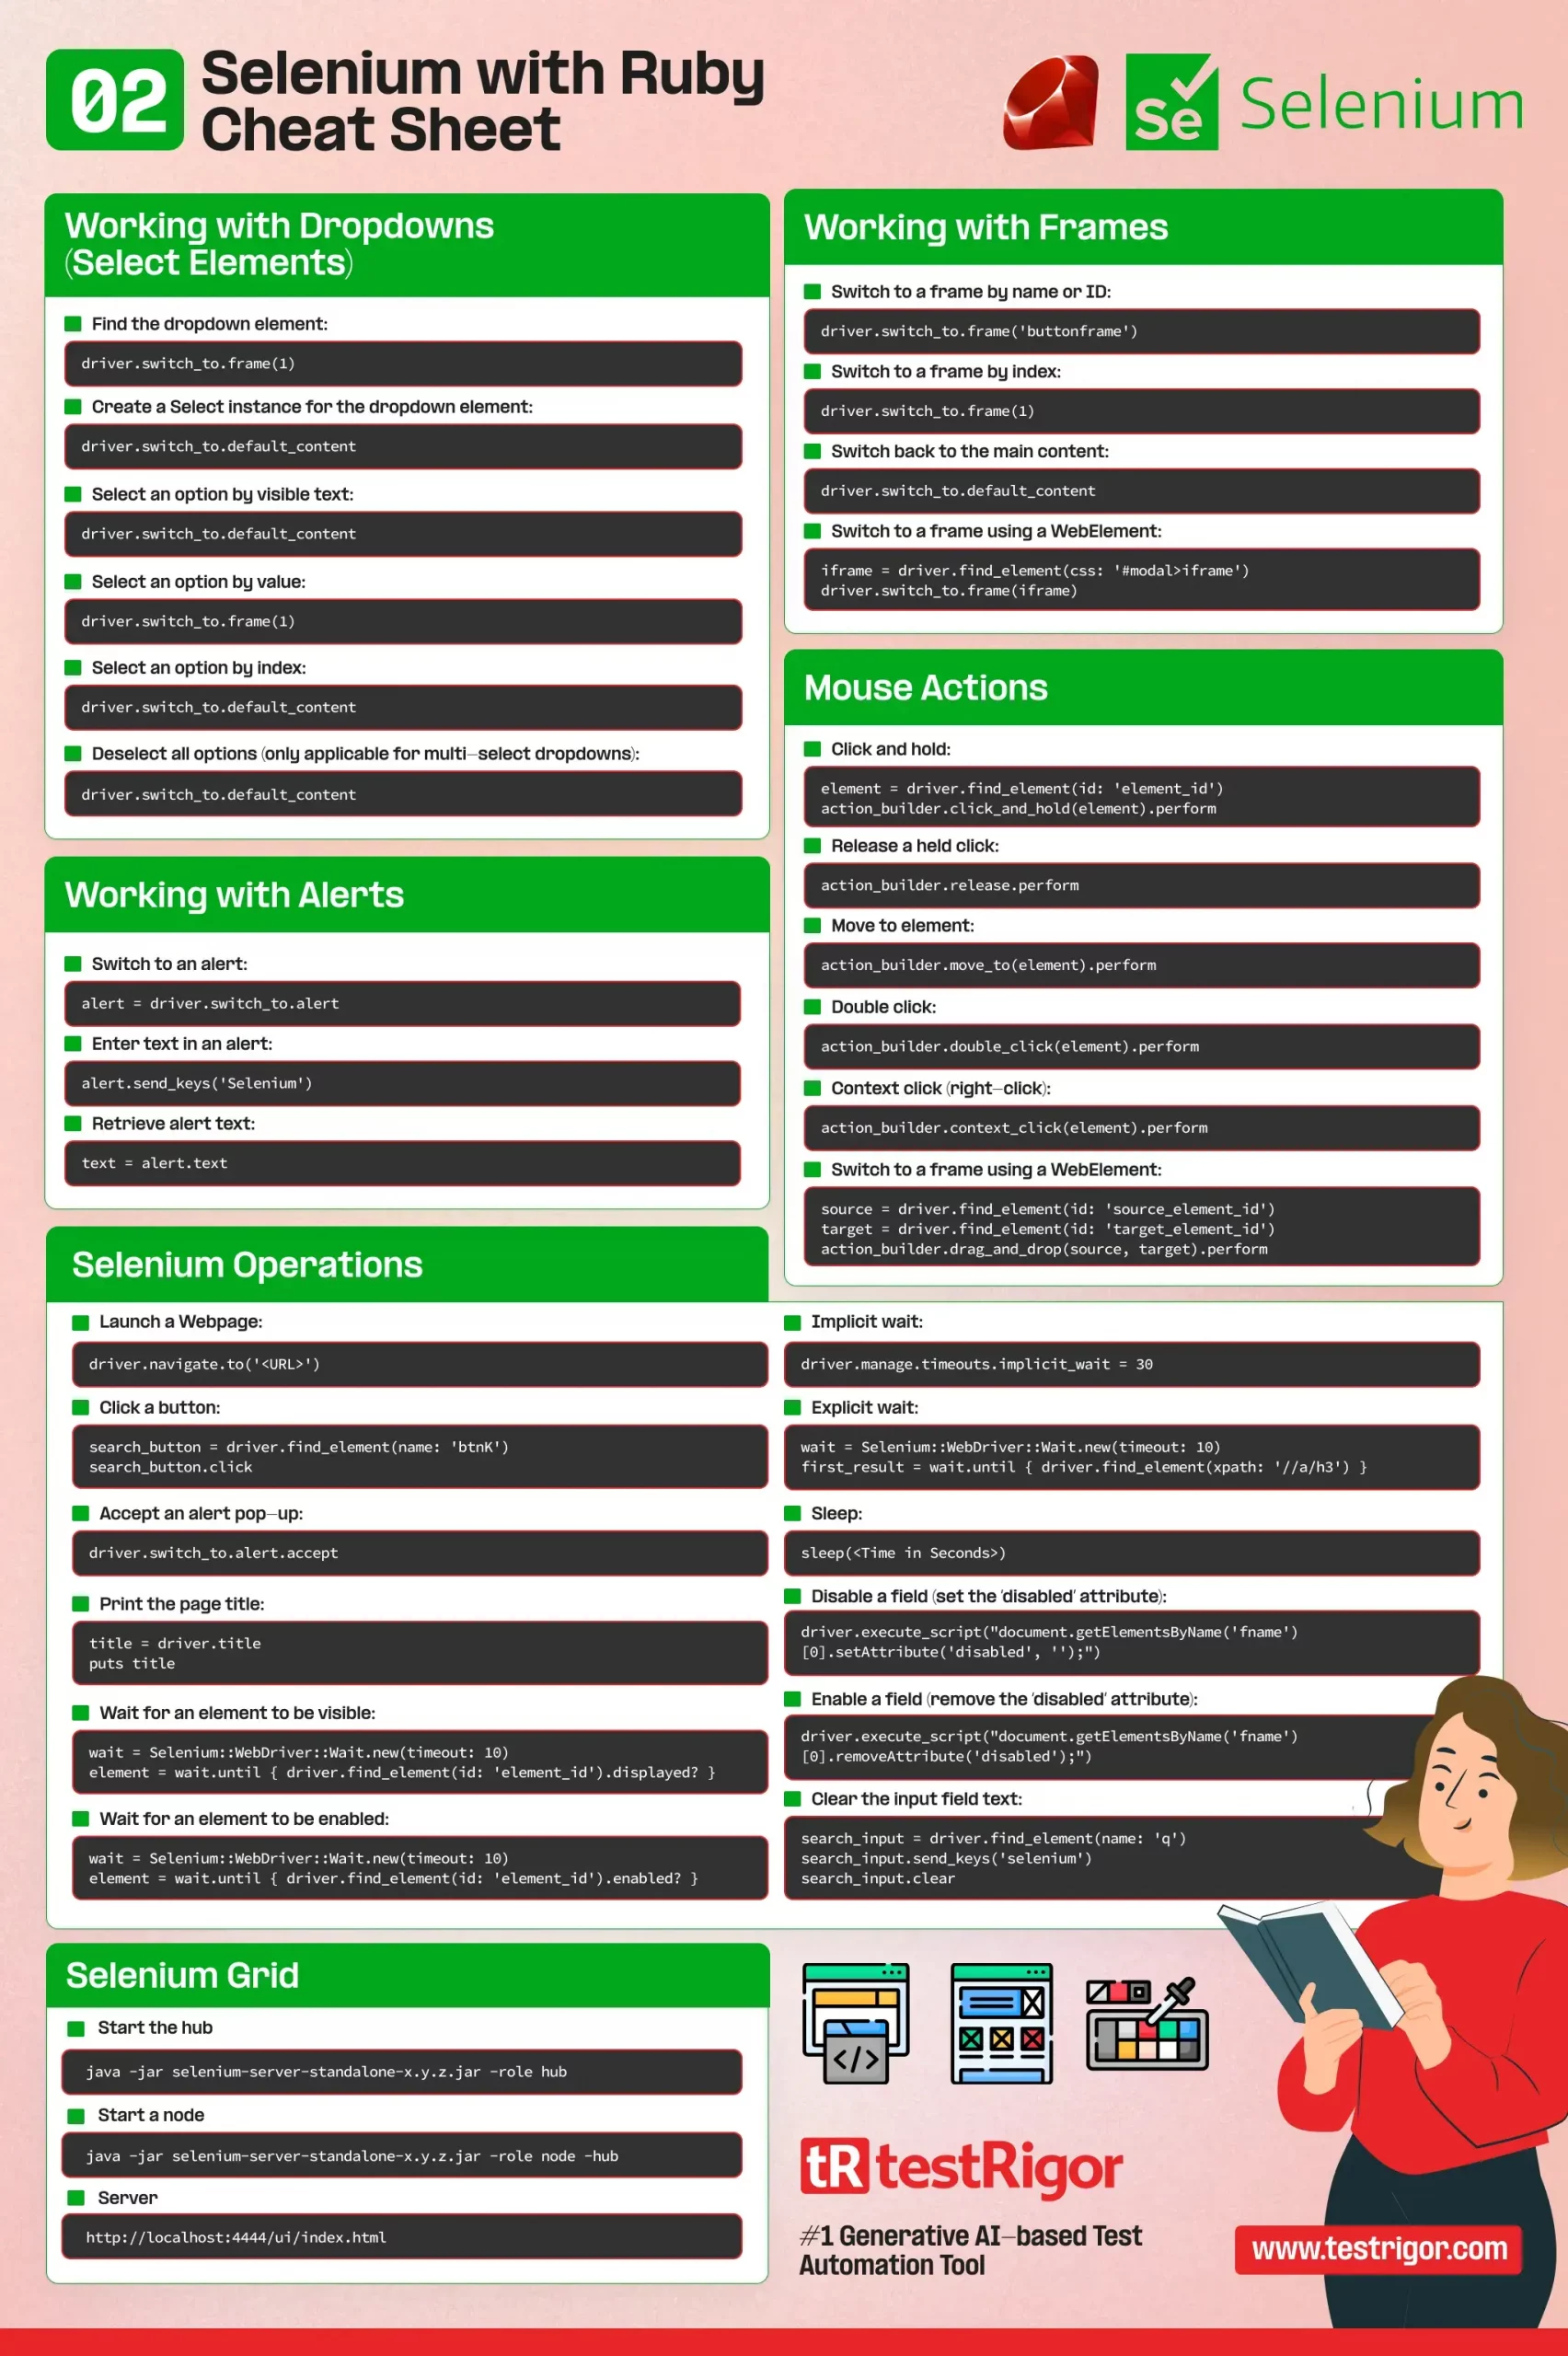
Switch to a frame by name or ID:
driver.switch_to.frame('buttonframe')
Switch to a frame by index:
driver.switch_to.frame(1) Switch to a frame using a WebElement:
iframe = driver.find_element(css: '#modal>iframe')
driver.switch_to.frame(iframe)
Switch back to the main content:
driver.switch_to.default_content |
|
Working with Dropdowns (Select Elements) |
|
|
Find the dropdown element:
dropdown = driver.find_element(id: 'dropdown_id') Create a Select instance for the dropdown element:
select = Selenium::WebDriver::Support::Select.new(dropdown) Select an option by visible text:
select.select_by(:text, 'Option Text') Select an option by value:
select.select_by(:value, 'option_value') Select an option by index:
select.select_by(:index, 1) Deselect all options (only applicable for multi-select dropdowns):
select.deselect_all |
|
Mouse Actions |
|
|
Click and hold:
element = driver.find_element(id: 'element_id')
action_builder.click_and_hold(element).perform
Release a held click:
action_builder.release.perform Drag and drop:
source = driver.find_element(id: 'source_element_id')
target = driver.find_element(id: 'target_element_id')
action_builder.drag_and_drop(source, target).perform
Move to element:
action_builder.move_to(element).perform Double click:
action_builder.double_click(element).perform Context click (right-click):
action_builder.context_click(element).perform |
|
Working with Alerts |
|
|
Switch to an alert:
alert = driver.switch_to.alert Enter text in an alert:
alert.send_keys('Selenium')
Retrieve alert text:
text = alert.text |
|
Selenium Operations |
|
|
Launch a Webpage:
driver.navigate.to('<URL>')
Click a button:
search_button = driver.find_element(name: 'btnK')
search_button.click
Accept an alert pop-up:
driver.switch_to.alert.accept Print the page title:
title = driver.title
puts title
Wait for an element to be visible:
wait = Selenium::WebDriver::Wait.new(timeout: 10)
element = wait.until { driver.find_element(id: 'element_id').displayed? }
Wait for an element to be enabled:
wait = Selenium::WebDriver::Wait.new(timeout: 10)
element = wait.until { driver.find_element(id: 'element_id').enabled? }
Implicit wait:
driver.manage.timeouts.implicit_wait = 30 Explicit wait:
wait = Selenium::WebDriver::Wait.new(timeout: 10)
first_result = wait.until { driver.find_element(xpath: '//a/h3') }
Sleep:
sleep(<Time in Seconds>) Clear the input field text:
search_input = driver.find_element(name: 'q')
search_input.send_keys('selenium')
search_input.clear
Disable a field (set the ‘disabled’ attribute):
driver.execute_script("document.getElementsByName('fname')[0].setAttribute('disabled', '');")
Enable a field (remove the ‘disabled’ attribute):
driver.execute_script("document.getElementsByName('fname')[0].removeAttribute('disabled');")
|
|
Selenium Grid |
|
|
Start the hub
java -jar selenium-server-standalone-x.y.z.jar -role hub Start a node
java -jar selenium-server-standalone-x.y.z.jar -role node -hub http://localhost:4444/grid/register Server
http://localhost:4444/ui/index.html Note: Replace "x.y.z" with the version number of your Selenium Server Standalone JAR file. |
|
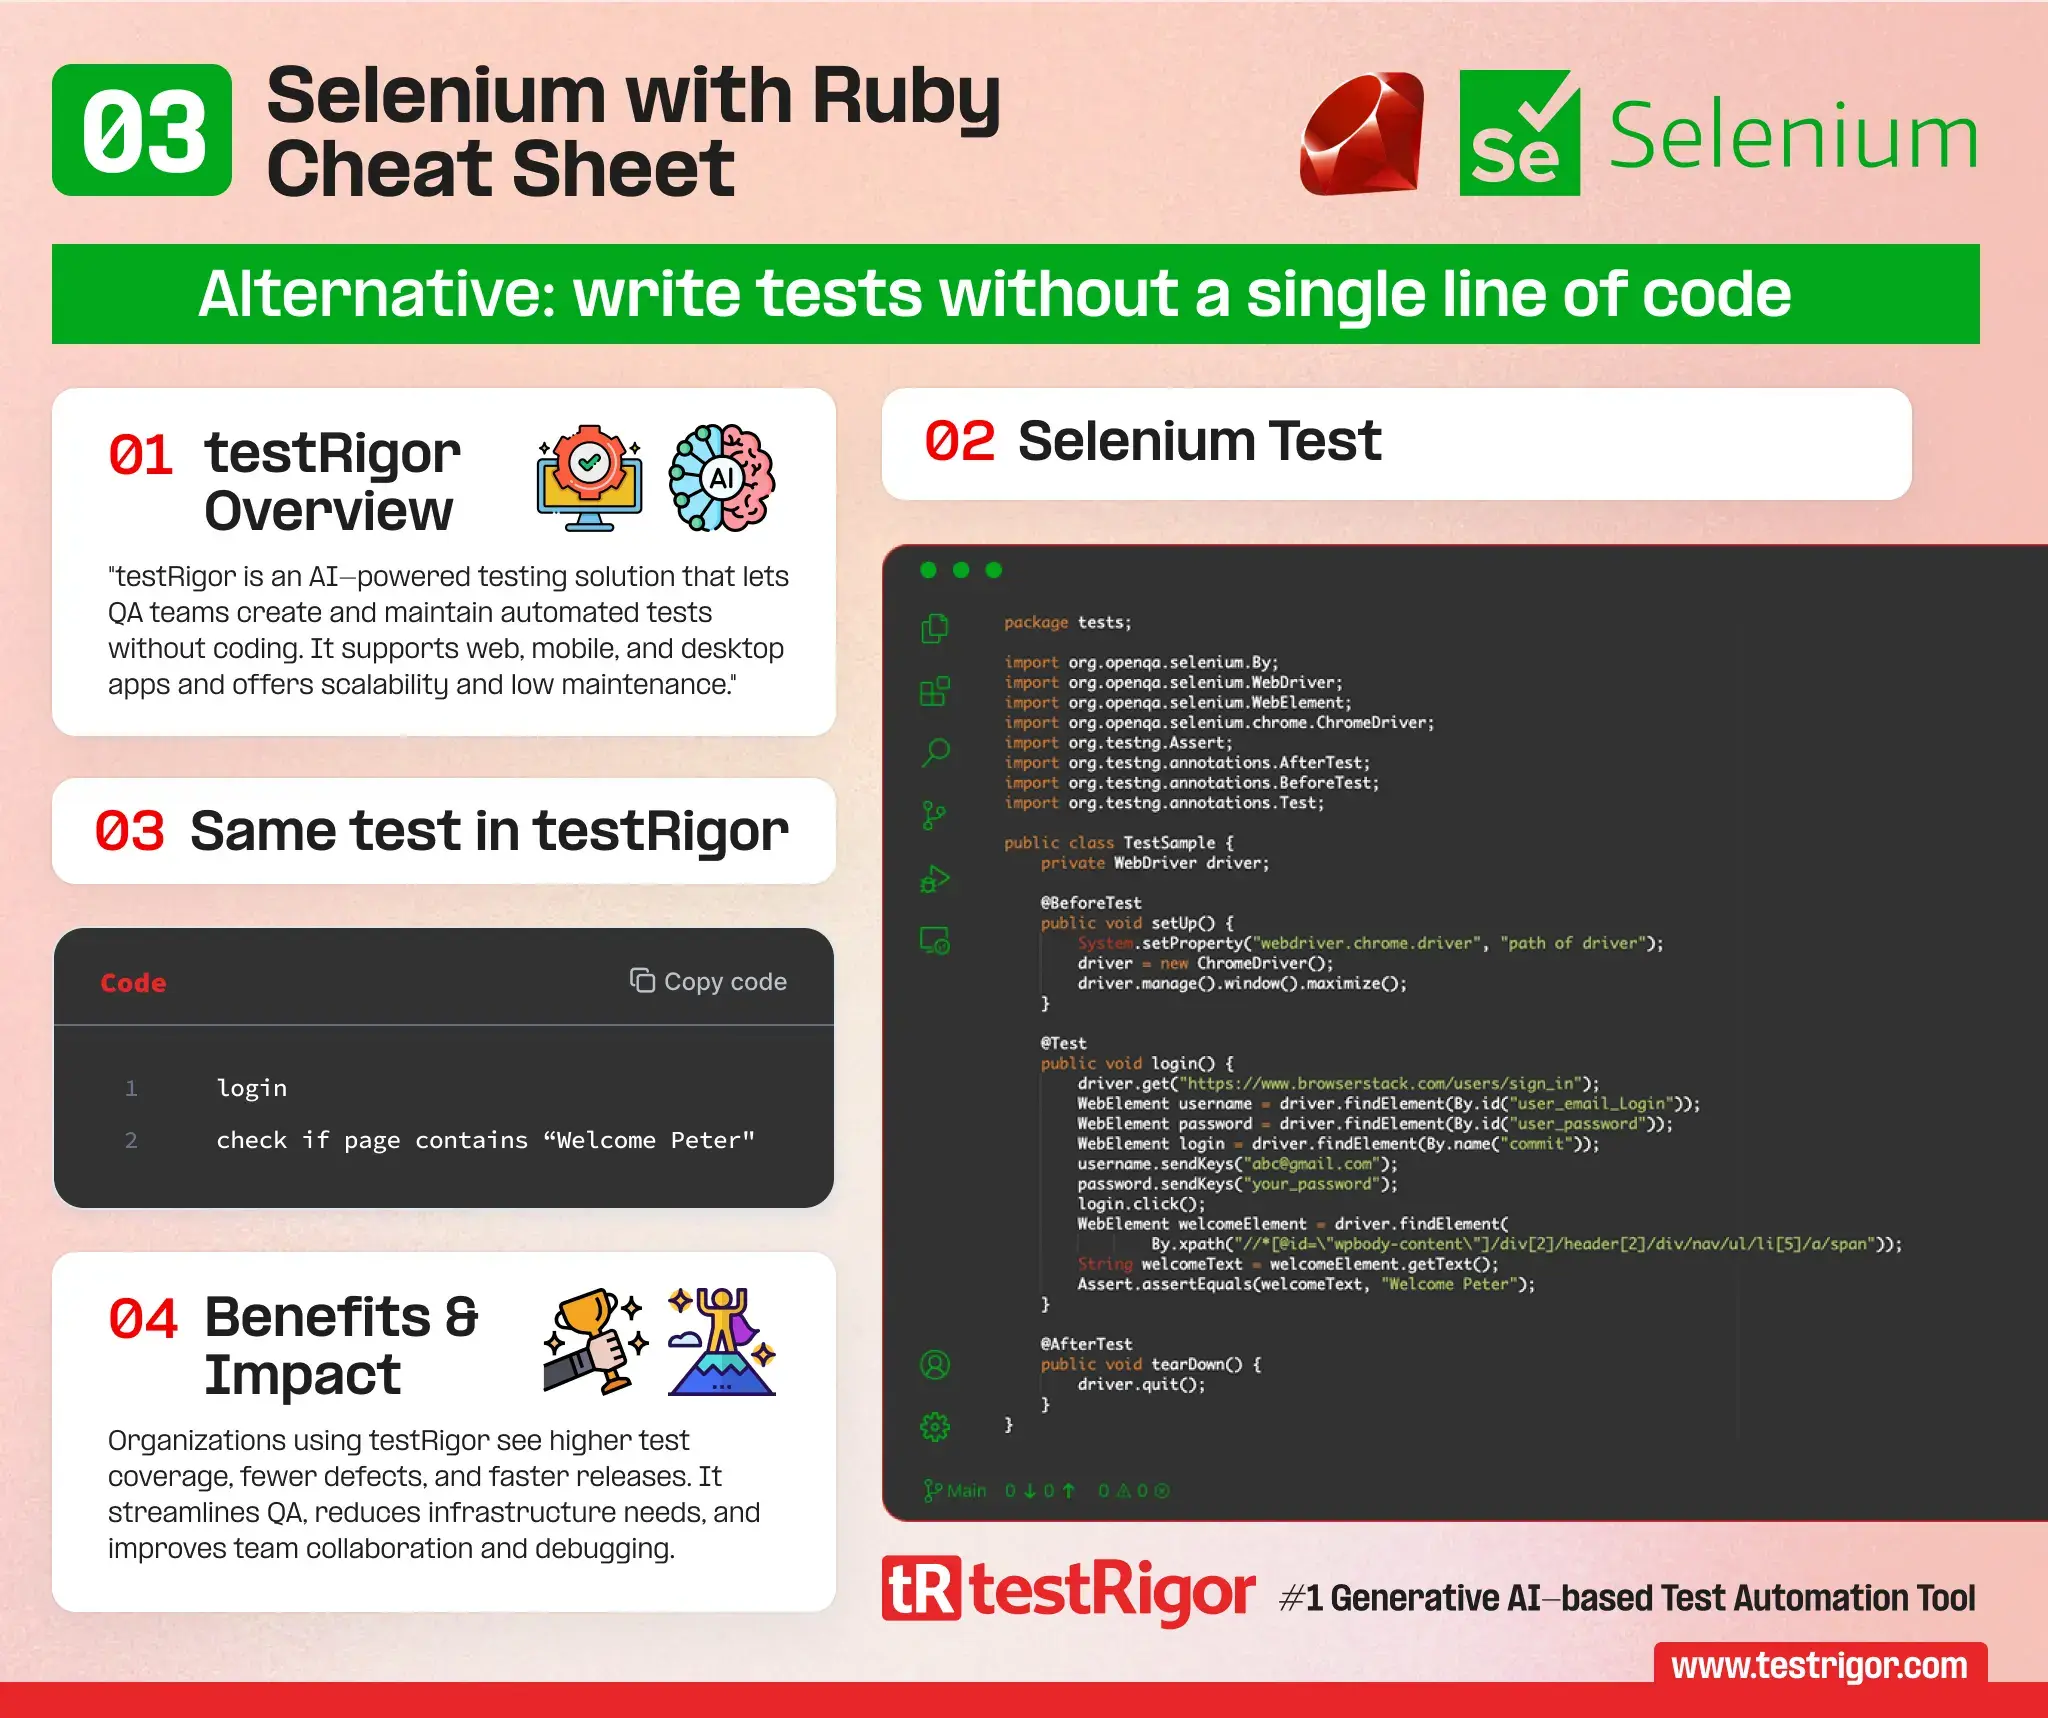
Alternative: write tests without a single line of code
testRigor is an AI-driven, end-to-end testing solution that empowers QA professionals to create and maintain complex automated tests without requiring coding skills. This comprehensive system supports testing of various platforms, including web, mobile, and desktop applications, and is suitable for functional regression, accessibility, load, and performance testing. By leveraging plain English statements and an advanced AI engine, testRigor provides excellent scalability, minimal maintenance, and faster test execution, setting itself apart from coded automation tools such as Selenium.
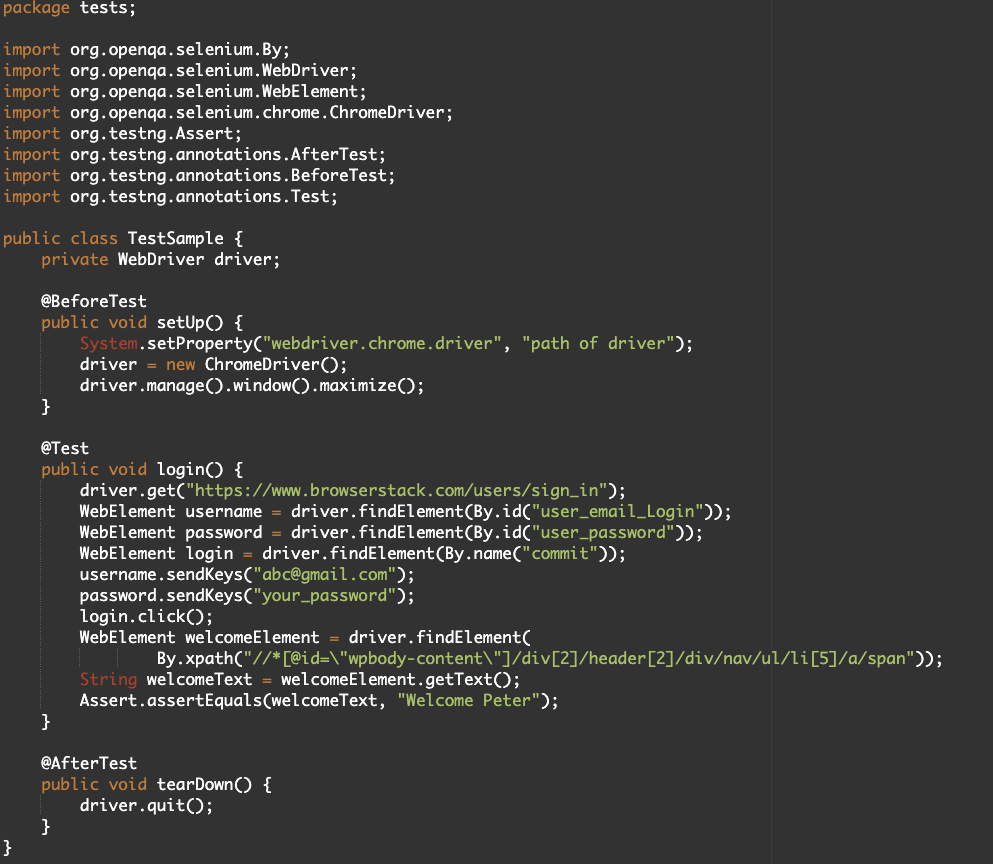
Selenium test:

Same test in testRigor:
login
check if page contains "Welcome Peter"
Organizations that have adopted testRigor have experienced significant improvements in their software testing processes, with increased test coverage, reduced defect escape rates, and accelerated release cycles. The platform not only enhances QA teams and delivery processes but also eliminates the need for maintaining testing infrastructure. The unique approach of testRigor allows for seamless collaboration among team members and ensures tests remain valid even after underlying framework changes or refactoring. This superior choice in test automation provides numerous key benefits, including cost savings, improved communication, and detailed test results for seamless debugging.
| Achieve More Than 90% Test Automation | |
| Step by Step Walkthroughs and Help | |
| 14 Day Free Trial, Cancel Anytime |


