Understanding Mutation Testing: A Comprehensive Guide
|
|
In software testing, achieving high code coverage seems to be a common goal. However, it can often provide a false sense of security. Code coverage tells you what code was executed, but not how well your tests can actually detect problems. This is where Mutation Testing comes in. It’s an advanced technique designed to rigorously assess the quality and effectiveness of your existing test suite, giving you confidence that your tests are truly robust enough to protect your application.
Let’s take a deeper look at this type of testing.
| Key Takeaways: |
|---|
|

What is Mutation Testing?
Mutation Testing (MT) has a rich history dating back to the 1970s when it was initially conceived as a school project. Initially dismissed due to its resource-intensive nature, MT experienced a resurgence with the advent of increasingly powerful computers. Today, it is one of the most widely adopted and popular testing techniques.
Mutation testing, also referred to as code mutation testing, is a type of white-box testing where specific components of an application’s source code are modified by testers. The purpose of this is to verify whether a software test suite is capable of detecting these deliberately introduced alterations, which are designed to induce errors in the program. It’s important to note that mutation testing focuses on assessing the effectiveness of a software testing tool rather than evaluating the applications it analyzes, thus ensuring the quality of the testing process itself.
Mutation testing is an invaluable tool for ensuring the robustness and reliability of software testing endeavors. By subjecting the software to intentional code alterations, testers gain insights into the capability of the test suite to detect and accurately handle unexpected errors or faults. This technique acts as a safety net, capturing inadequacies in the testing process and identifying areas that require further attention, ultimately improving software quality and resilience.
Mutation Testing Concepts: Mutants
- Live Mutants: Mutants that remain ‘alive’ after running the tests. These must be ‘killed’.
- Killed Mutants: Mutants that become ‘invalid’ after running the tests. These mutants are considered invalid when the results differ after running the tests on the original and mutated source code.
- Equivalent Mutants: These are mutated versions of the source code with different syntax or implementation but produce the same output or behavior as the original code.
The fundamental goal of Mutation Testing is to strengthen the software testing process by uncovering code segments that need to be adequately tested or by detecting hidden defects that may escape other conventional testing methods. These modifications, known as mutations, can be implemented by manipulating existing lines of code. For instance, a statement may be deleted or duplicated, true or false expressions can be swapped, or variables can be modified. Following the introduction of these mutations, the code, with its newly incorporated changes, undergoes rigorous testing and is then compared against the original code to evaluate the efficacy of the test suite.
Mutation Score
The mutation score is calculated as follows:
Mutation score = (number of killed mutants/total number of mutants, killed or surviving) x 100
If tests using mutants detect the same number of issues as the original program test, it indicates either a code failure or the testing suite’s failure to detect mutations. In such cases, efforts should be made to improve the effectiveness of the software testing. A successful mutation test produces different test results from the mutant code, and the mutants are subsequently discarded. A mutation score of 100% signifies that the test was comprehensive.
How to Perform Mutation Testing
// Original Function
function checkCredentials(username, password) {
  if (username === "admin" && password === "password") {
    return true;
  } else {
    return false;
  }
}
// Mutant code (Always returns true)
function checkCredentialsMutant(username, password) {
  return true;
}
- With the correct username and password – both original and mutant program results pass.
- With the wrong username and password – the original program fails, and the mutant program passes.
This indicates that the mutant has been ‘killed’, and the test suite is successful.
A Practical Step-By-Step Guide
To put it in simpler terms, teams can leverage the below clearer and more actionable workflow:
Identify Critical Code Areas
Select modules that contain core logic, security conditions, or business rules.
Generate Mutants Automatically
- Operator replacements
- Condition negations
- Value mutations
- Statement removals
Run Your Existing Test Suite
Every mutant is executed against the existing test suite.
Analyze Survivors
- Killed mutants = strong test assertions.
- Surviving mutants = test gaps or equivalent mutants.
Refine and Add Tests
Build or improve tests with the sole purpose of removing the mutants that are still alive.
Re-run Mutation Testing
Continue iterating until the quality threshold is achieved by the mutation score.
Integrate into CI/CD
Execute incremental mutation testing on every PR and full mutation testing on a regular basis (e.g., nightly).
This step-by-step guide offers clarity and adaptability for real teams.
When conducting mutation testing, it’s crucial to ensure that the changes introduced in the mutant program are kept minimal to avoid disrupting the overall objective of the original program. The rationale behind keeping the mutations small is to maintain the integrity of the program’s logic and behavior while isolating specific aspects that could potentially introduce errors. The essence of mutation testing lies in its ability to simulate faults or defects within the codebase. Consequently, this testing strategy is often referred to as a fault-based testing approach. This approach allows for a targeted analysis and verification of the test suite’s ability to appropriately identify and handle these faults.
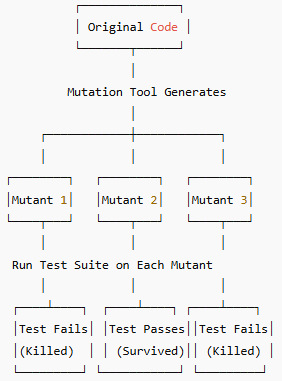
Visual Diagram: How Mutation Testing Works
Types of Mutation Testing
There are three main types of mutation testing:
1. Statement Mutation
In statement mutation, a code block is subjected to deliberate alterations by removing or duplicating specific statements. Additionally, statements within the code block can be rearranged to create different ordering sequences.
function checkCredentials(username, password) {
  if (username === "admin" && password === "password") {
    return true;
  }
}
2. Value Mutation
- Small Value to Higher Value: We replace a small value with a higher value to test the code’s behavior when confronted with larger inputs. This helps verify if the code can handle and process higher values accurately and efficiently.
- Higher Value to Small Value: Conversely, we replace a higher value with a smaller value to evaluate how the code handles lower inputs. This ensures the code doesn’t encounter unexpected issues or errors when dealing with smaller values.
// Original code
function multiplyByTwo(value) {
  return value * 2;
}

// Value mutation: Small value to higher value
function multiplyByTwoMutation1(value) {
  return value * 10;
}

// Value mutation: Higher value to small value
function multiplyByTwoMutation2(value) {
  return value / 10;
}
3. Decision Mutation
In Decision mutation testing, the focus is on detecting design errors within the code. Specifically, this technique involves modifying arithmetic and logical operators to uncover potential flaws or weaknesses in the program’s decision-making logic.
// Original code
function isPositive(number) {
  return number > 0;
}

// Decision mutation: Changing the comparison operator
function isPositiveMutation1(number) {
  return number >= 0;
}

// Decision mutation: Negating the result
function isPositiveMutation2(number) {
  return !(number > 0);
}
Consideration and Challenges in Mutation Testing
- Performance and Execution Time: Hundreds or thousands of mutated versions of your code can be generated by mutation testing. As each one should be tested individually, the CI runtime may be significantly increased. Techniques such as incremental mutation testing, operator sampling, and selective mutation can be beneficial.
- Equivalent Mutants: The fact that some mutants do not change program behavior at all poses a critical hurdle. These “equivalent mutants” require manual inspection and artificially decrease your mutation score.
- False Sense of Security from High Coverage: Even with high code coverage, some test suites fail to eliminate mutants. This is a clear sign that the tests are running code but not asserting behavior sufficiently.
- Mutations in Hard-to-Test Layers: Code that is highly integrate, asynchronous, or UI-intensive may generate mutants that are hard to select. These require carefully designed assertions or integration tests.
- Mutant Explosions: An extensive number of mutants may be generated by larger codebases. Using tools that support selective operators or incremental analysis is important.
Commonly Used Mutation Testing Tools
Based on your development stack, several high-quality tools are available:
| Programming Language | Tools Available |
|---|---|
| Java | PIT (Pitest) – most popular for JVM projects, fast and mature. |
| JavaScript/TypeScript | Stryker – full-featured, supports mutation score thresholds and dashboards. |
| Python | MutPy, mutmut |
| .NET | Stryker.NET |
| Ruby | Mutant |
Each tool automatically produces mutants and offers detailed reports to help developers detect weak test cases.
How testRigor Enhances Mutation Testing
While unit tests have always been the main focus of mutation testing, modern applications need verification at multiple levels, including user interface and end-to-end flows.
The below are some ways that testRigor enhances the mutation testing workflow:
Human-readable, Behavior-driven Tests
enter "john" into "username"
enter "password123" into "password"
click "Log In"
check that page contains "Welcome, John"
These tests are more resilient to UI or logic changes, boosting the chance of identifying mutants that modify behavior.
Generative AI-based Functional Test Creation
testRigor can generate a large number of tests using its generative AI engine. These tests often end up detecting changes at the logic level that unit tests ignore.
Running Tests Against Mutants
- PIT mutates backend logic.
- testRigor executes full end-to-end tests.
- Any behavioral change propagates to the UI level.
- Wrong business logic
- Changed validation rules
- Flow inconsistencies
- Hidden coupling issues
How testRigor Detects Mutants
if (customer.isPremium) applyDiscount(20%)
if (customer.isPremium) applyDiscount(5%)
A typical unit test may not catch the exact percentage change.
But testRigor will.
If the discount changes from 20% to 5%, the total is wrong → test fails → mutant is killed.
This illustrates how testRigor identifies more than just code coverage gaps, it also catches business-level mutant behavior.
Traditional code-level tests validate the internal accuracy of specific functions, often checking isolated logic, mocked dependencies, or return values. This means that if the test does not assert every potential behavioral impact of the changed logic, a mutation can slip through.
In comparison, testRigor validates the system’s real end-to-end functionality from the POV of the user. It examines the final result that a real user would see rather than looking at internal code paths. testRigor automatically detects these deviations, even when code-based tests fail to, because any drastic mutation eventually modifies the system’s output or behavior.
Best Practices for Effective Mutation Testing
- Start with High-Impact Areas: Pay close attention to modules that include essential workflows, security checks, or business logic. These areas benefit maximum from stronger test validation.
- Use Selective Mutation to Control Cost: To avoid “mutant explosion” and reduce execution time, target specific mutation operators or particular components rather than changing every line of code.
- Combine Unit and End-to-End Tests: While tools like testRigor catch behavioral changes, unit tests detect low-level mutants. The highest detection coverage is achieved by utilizing both layers.
- Prioritize Surviving Mutants: A surviving mutant is a clear indication of a weak or missing test.
- Integrate Mutation Testing into CI/CD: To provide assured continuous feedback, use incremental mutation testing for PRs and run full mutation tests on a regular basis (e.g., nightly).
- Set Realistic Mutation Score Targets: While it is rarely needed, a 100% mutation score is perfect.
- Set thresholds as per the criticality and risk of the components.
- Iterate and Optimize Continuously: Mutation testing is most efficient when treated as a continuous process.
Every cycle boosts your confidence in the robustness of your test suite.
Conclusion
Mutation testing is a powerful technique for verifying the depth and quality of your test suite. It becomes even more useful and efficient when combined with PIT and more advanced automated testing platforms such as testRigor. Mutation testing helps make sure that your application continues to work correctly as business logic alters by consistently identifying assertion and test coverage gaps.
| Achieve More Than 90% Test Automation | |
| Step by Step Walkthroughs and Help | |
| 14 Day Free Trial, Cancel Anytime |


