Magento Testing
|
|
Magento (both a free, open-source version and a commerce version called Adobe Commerce) is a popular choice for building e-commerce websites. It is a powerful platform with its own testing frameworks to help you test your website. However, there are certain limitations when it comes to testing that you ought to know.
- Unit Testing
- Integration Testing
- Magento Functional Testing Framework (MFTF)
- End-to-End Testing
Magento Unit Testing
As the testing pyramid suggests, unit tests should be at the very beginning, encompassing the base of all tests. Magento supports unit testing of all algorithms and methods. It utilizes the PHPUnit framework. It supports PHP as well as JavaScript unit testing. Since Magento has some predefined features, it also comes with some predefined unit test cases. These unit tests are written by following the Test Data Driven (TDD) approach.
Ways to Execute Magento PHP Unit Tests
-
Command Line Interface (CLI)It is possible to run all or a select few tests using the CLI. Their specific directory paths need to be mentioned for the respective cases to be executed. For further reading, refer to this link.
-
PhpStorm IDEIt is also possible to run unit tests through IDEs like PhpStorm. Just like the CLI execution, the IDE execution also supports running either all or a select group of unit tests. However, the IDE needs to be configured to run the correct set of cases. Further details on the configuration and commands can be found here.
Ways to Execute Magento JavaScript Unit Tests
Magento provides sophisticated frontend capabilities for frontend unit testing. The Commerce version of Magento supports testing JavaScript code using Jasmine and a custom version of Grunt CLI task runner. Further details on the configuration and commands can be found here.
Magento Integration Testing
The next layer after unit tests is typically integration. As you know, the goal of these tests is to make sure various components interact with each other as expected. Some examples include integration with a third-party system or an API. Keep in mind that integration tests in Magento require a runtime environment.
- HTTP tests to test APIs
- Third party integration tests
- Browser tests (although you might want them to be a part of end-to-end tests)
All of the details on setting up the integration testing with Magento can be found here.
<?php

namespace IntegerNet\Categorydisplay\Test\Integration\Controller;

class NewProductTest extends \Magento\TestFramework\TestCase\AbstractController
{
    public static function loadFixture()
    {
        include __DIR__ . '/../_files/categories.php';
        include __DIR__ . '/../_files/products.php';
    }

    /**
     * @magentoDbIsolation enabled
     * @magentoAppIsolation enabled
     * @magentoDataFixture loadFixture
     */
    public function testDisplaysCorrectProduct()
    {
        $this->dispatch('catalog/category/view/id/xyz');

        $this->assertContains('OurProduct 1', $this->getResponse()->getBody());
        $this->assertNotContains('Our Product 2', $this->getResponse()->getBody());
    }
}
Magento End-to-end Testing
End-to-end tests sit on top of the testing pyramid. They are typically the slowest (compared to other types of tests) but also the most representative. Since E2E tests represent the entire user flow, having a tight coverage is the only way to ensure a great user experience.
We won’t get into Selenium-based testing here since it might not be the most optimal way to use for end-to-end testing due to its limitations.
Magento Functional Testing Framework (MFTF)
MFTF aims to simplify the testing of complex use cases that are likely to be encountered in e-commerce websites. It tends to target the pages that the end users and admins of the system will interact with. As your website grows, it becomes essential to have automation testing strategies in place to validate the integrity of the ever-growing e-commerce website constantly. This framework is quite stable as it is based on technologies like Selenium, Allure, and Codeception. Since it is meant for Magento websites, it is highly customizable and scalable. It is open source which makes it a popular choice for Magento applications testing. As Magento provides some common functionalities that are used in e-commerce websites, it also has a directory where functional test cases for these features are stored.
It is necessary to set up the environment for functional testing by downloading the required versions of PHP, Java, Composer, and web driver. A detailed overview of this setup can be found here.
All test cases are written in XML. The XML files are built to generate PHP class files which are then executed. It is possible to add assertions, data sets, and club repetitive actions into action groups using MFTF. Details on how to convert manual test cases into MFTF cases can be found here.
Reports of these functional test cases are generated using Allure.
Enhanced MFTF with testRigor Integration
- Seamless integration between MFTF and testRigor testing frameworks
- Pre-configured CI/CD workflows for GitHub Actions
- Ready-to-use testRigor scripts for automated testing
- Simplified setup process for testRigor integration
To use it, simply set the required GitHub secret and variable as described in the following steps, and then run the tests directly from the included GitHub Actions workflow.
You can further integrate this workflow with your own instance of (Magento) to make your e-commerce platform completely set up for CI/CD.
This enhanced version is available as a fork of the official MFTF repository. You can fork it to get started with the integrated testing approach immediately.
testRigor End-to-end Testing
testRigor specializes in end-to-end testing. Among the key features are ease of test creation, unrivaled test stability, and low maintenance – a rare combination for E2E tests.
- Support email testing, as well as testing for attachments as part of the tests
- Support visual testing if needed (ex: you can compare an entire screen to a previous version)
- Test two-factor authentication logins on Gmail, SMS, etc
End-to-end tests in testRigor represent how a real user would interact with the application. What this means is that you don’t need to use CSS Selectors or dig into the DOM structure to define an element. Commands are in simple English terms, such as click “Add to Cart”, or check that checkbox “Remember me” is checked.
As we’ll see on the next section, it’s very straightforward to create end-to-end tests covering the entire user flows while keeping abstraction from the details of implementation.
How to create End-to-end tests with testRigor
Let us take the example of an e-commerce website that sells plants and other gardening needs. We will create end-to-end test cases in testRigor using plain English test steps.
Step 1: Log in to your testRigor app with your credentials.
Step 2: Set up the test suite for the website testing by providing the information below:
- Test Suite Name: Provide a relevant and self-explanatory name.
- Type of testing: Select from the following options: Desktop Web Testing, Mobile Web Testing, Native and Hybrid Mobile, based on your test requirements.
- URL to run test on: Provide the application URL that you want to test.
- Testing credentials for your web/mobile app to test functionality which requires user to login: You can provide the app’s user login credentials here and need not write them separately in the test steps then. The login functionality will be taken care of automatically using the keyword
login. - OS and Browser: Choose the OS Browser combination on which you want to run the test cases.
- Number of test cases to generate using AI: If you wish, you can choose to generate test cases based on the App Description text, which works on generative AI.
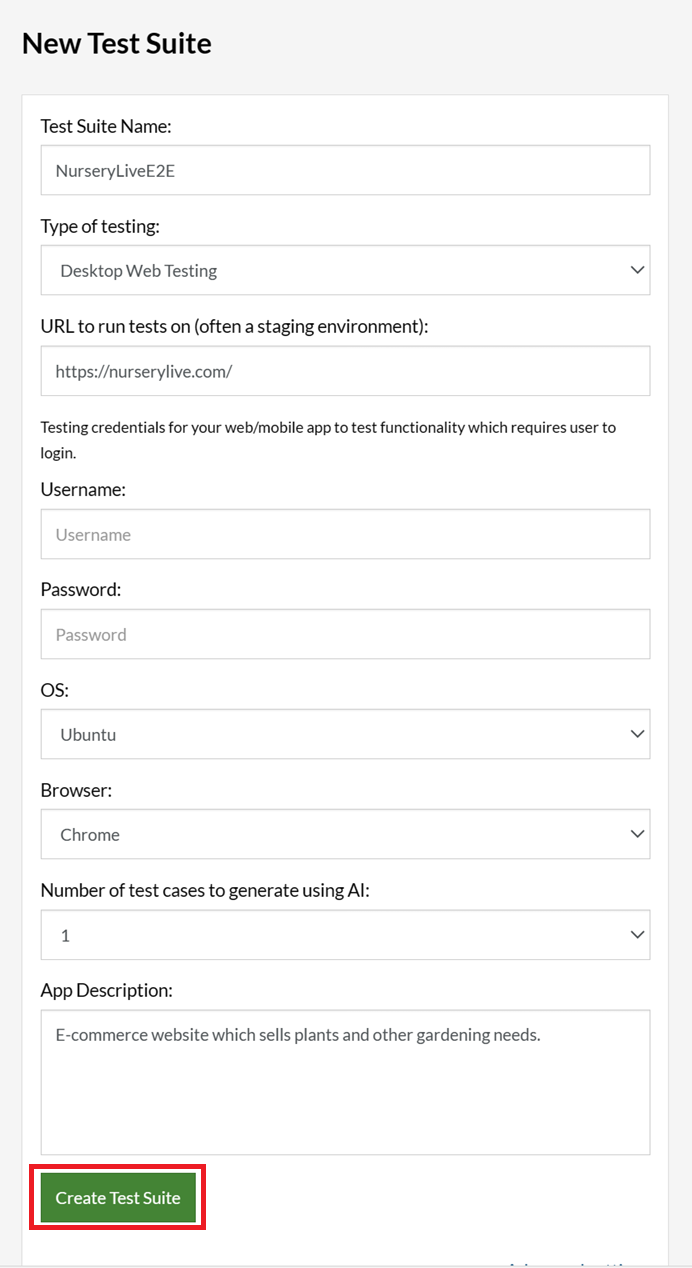
Step 3: Click Create Test Suite.
On the next screen, you can let AI generate the test case based on the App Description you provided during the Test Suite creation. However, for now, select do not generate any test, since we will write the test steps ourselves.
Step 4: To create a new custom test case yourself, click Add Custom Test Case.

Step 5: Provide the test case Description and start adding the test steps.
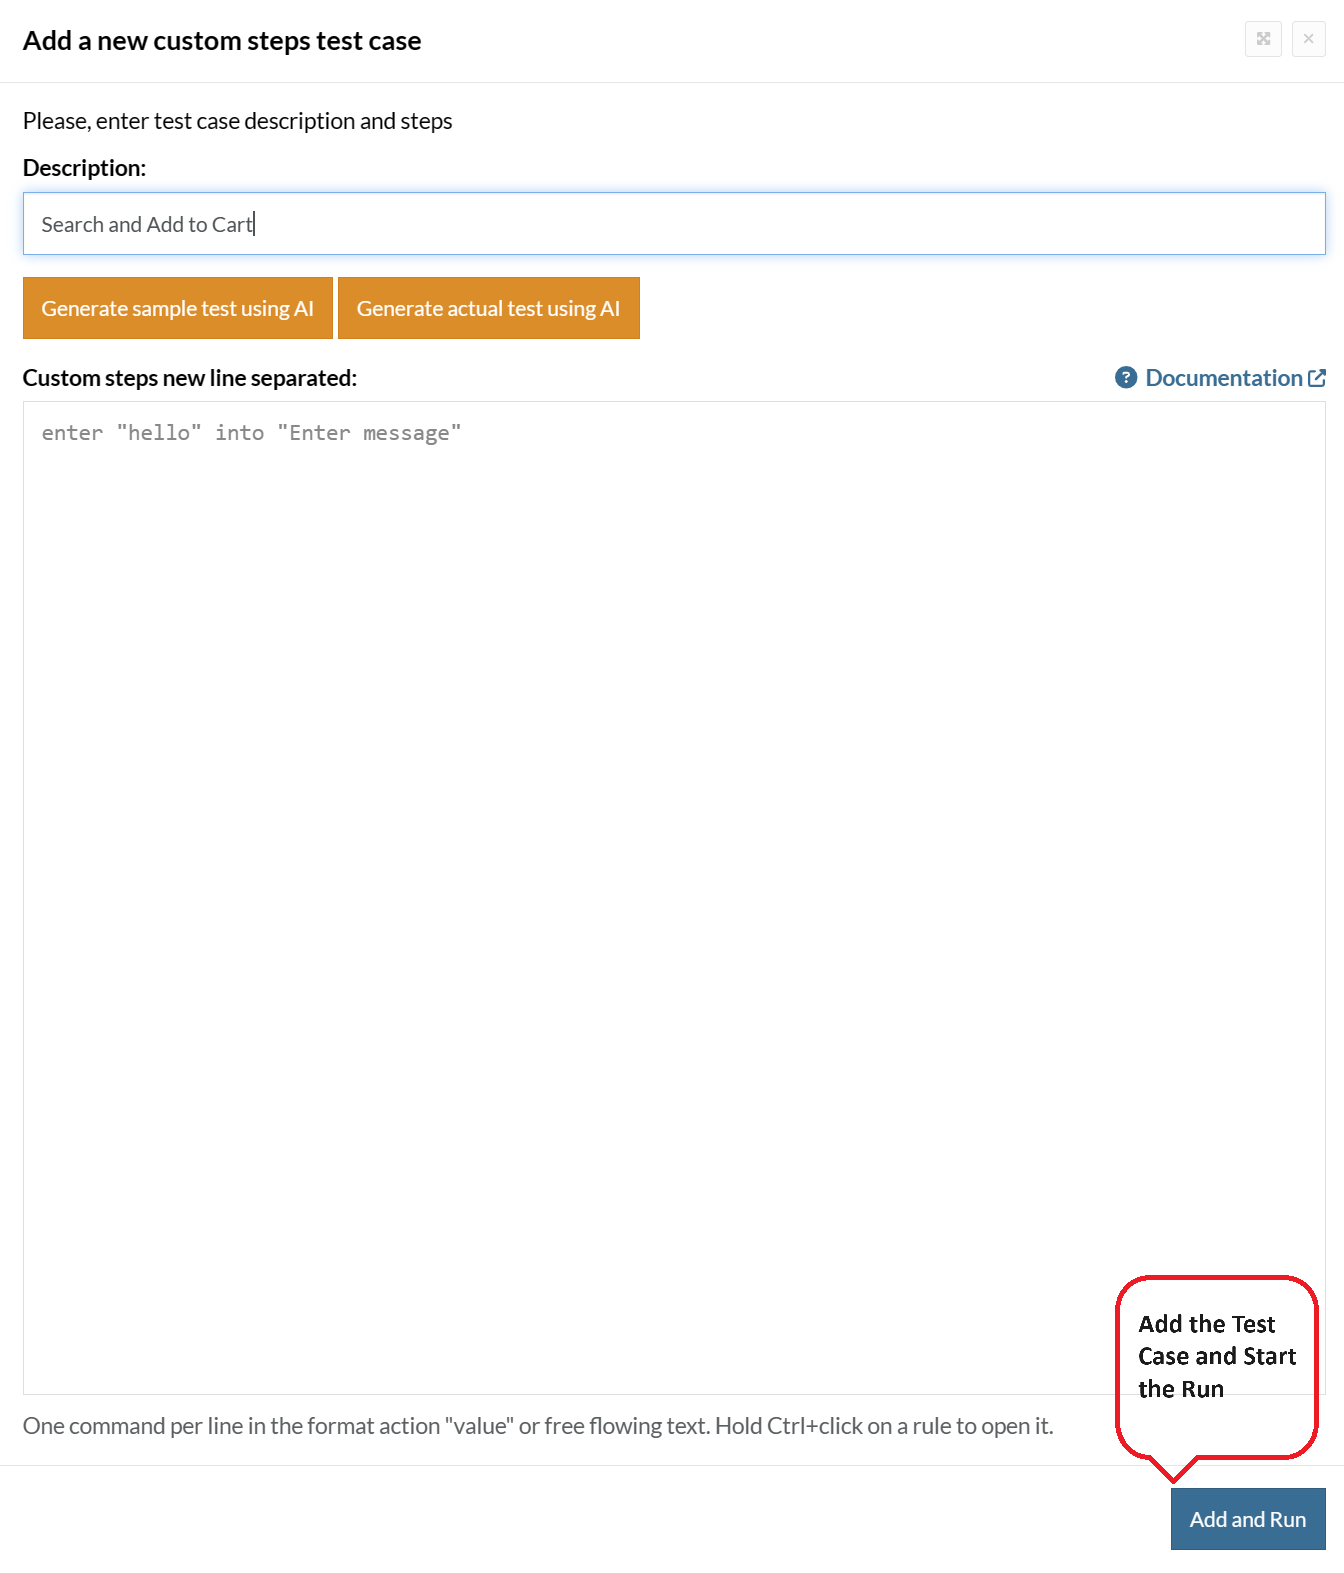
For the application under test, i.e., e-commerce website, we will perform below test steps:
- Search for a product
- Add it to the cart
- Verify that the product is present in the cart
Test Case: Search and Add to Cart
Step 1: We will add test steps on the test case editor screen one by one.
testRigor automatically navigates to the website URL you provided during the Test Suite creation. There is no need to use any separate function for it. Here is the website homepage, which we intend to test.

First, we want to search for a product in the search box. Unlike traditional testing tools, you can identify the UI element using the text you see on the screen. You need not use any CSS/XPath identifiers.
click "What are you looking for?"
Step 2: Once the cursor is in the search box, we will type the product name (lily), and press enter to start the search.
type "lily"
enter enter
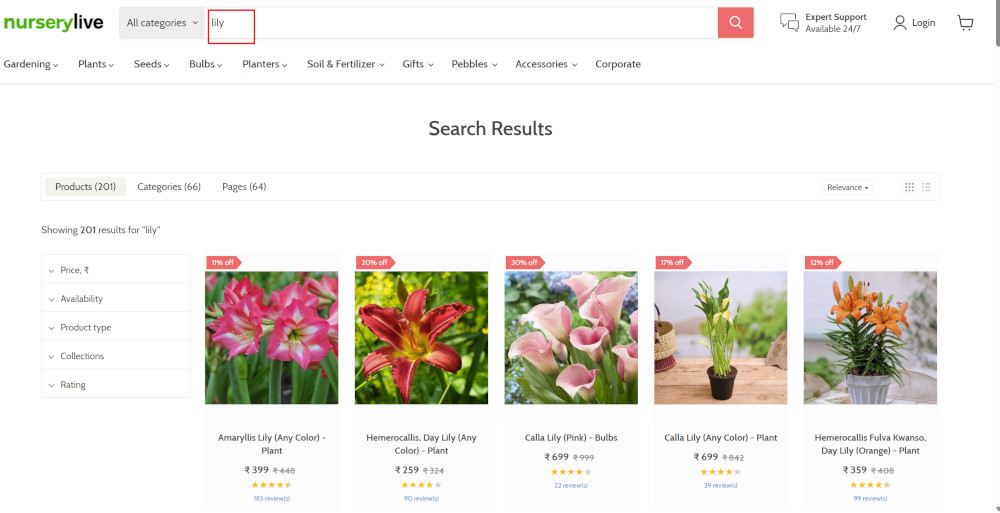
Search lists all products with the “lily” keyword on the webpage.
Step 3: The lily plant we are searching for needs the screen to be scrolled; for that testRigor provides a command. Scroll down until the product is present on the screen:
scroll down until page contains "Zephyranthes Lily, Rain Lily (Red)"
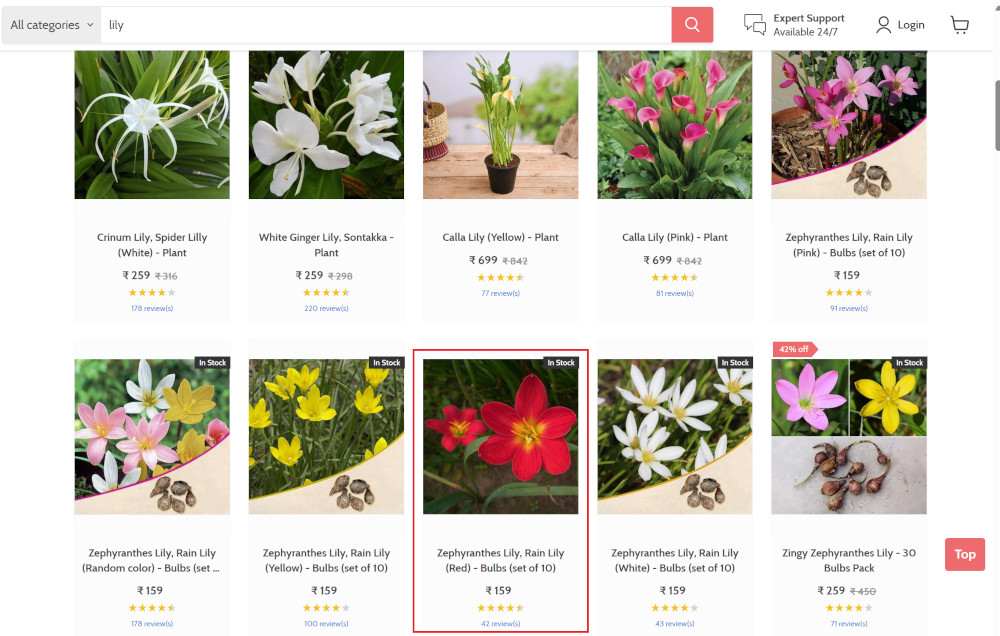
When the product is found on the screen, testRigor stops scrolling.
Step 4: Click on the product name to view the details:
click "Zephyranthes Lily, Rain Lily (Red)"
After the click, the product details are displayed on the screen as below, with the default Quantity as 1.
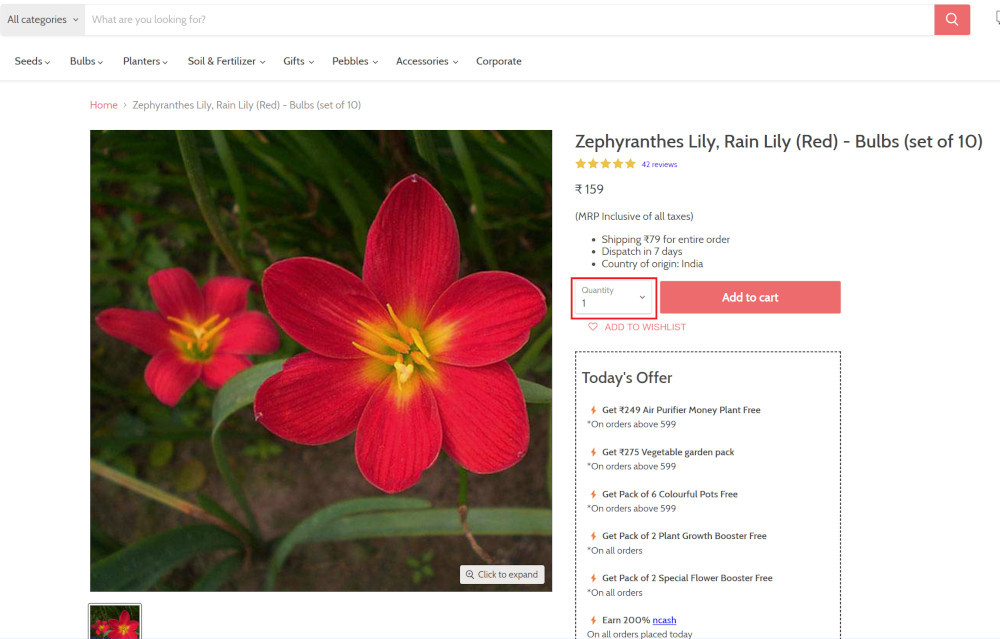
Step 5: Lets say, we want to change the Quantity to 3, so here we use the testRigor command to select from a list.
select "3" from "Quantity"
click "Add to cart"
The product is successfully added to the cart, and the “Added to your cart:” message is displayed on webpage.
Step 6: To assert that the message is successfully displayed, use a simple assertion command as below:
check that page contains "Added to your cart:"
Step 7: After this check, we will view the contents of the cart by clicking View cart as below:
click "View cart"

Step 8: Now we will again check that the product is present in the cart, under heading “Your cart” using the below assertion. With testRigor, it is really easy to specify the location of an element on the screen.
check that page contains "Zephyranthes Lily, Rain Lily (Red)" under "Your cart"

Complete Test Case
Here is how the complete test case will look in the testRigor app. The test steps are simple in plain English, enabling everyone in your team to write and execute them.
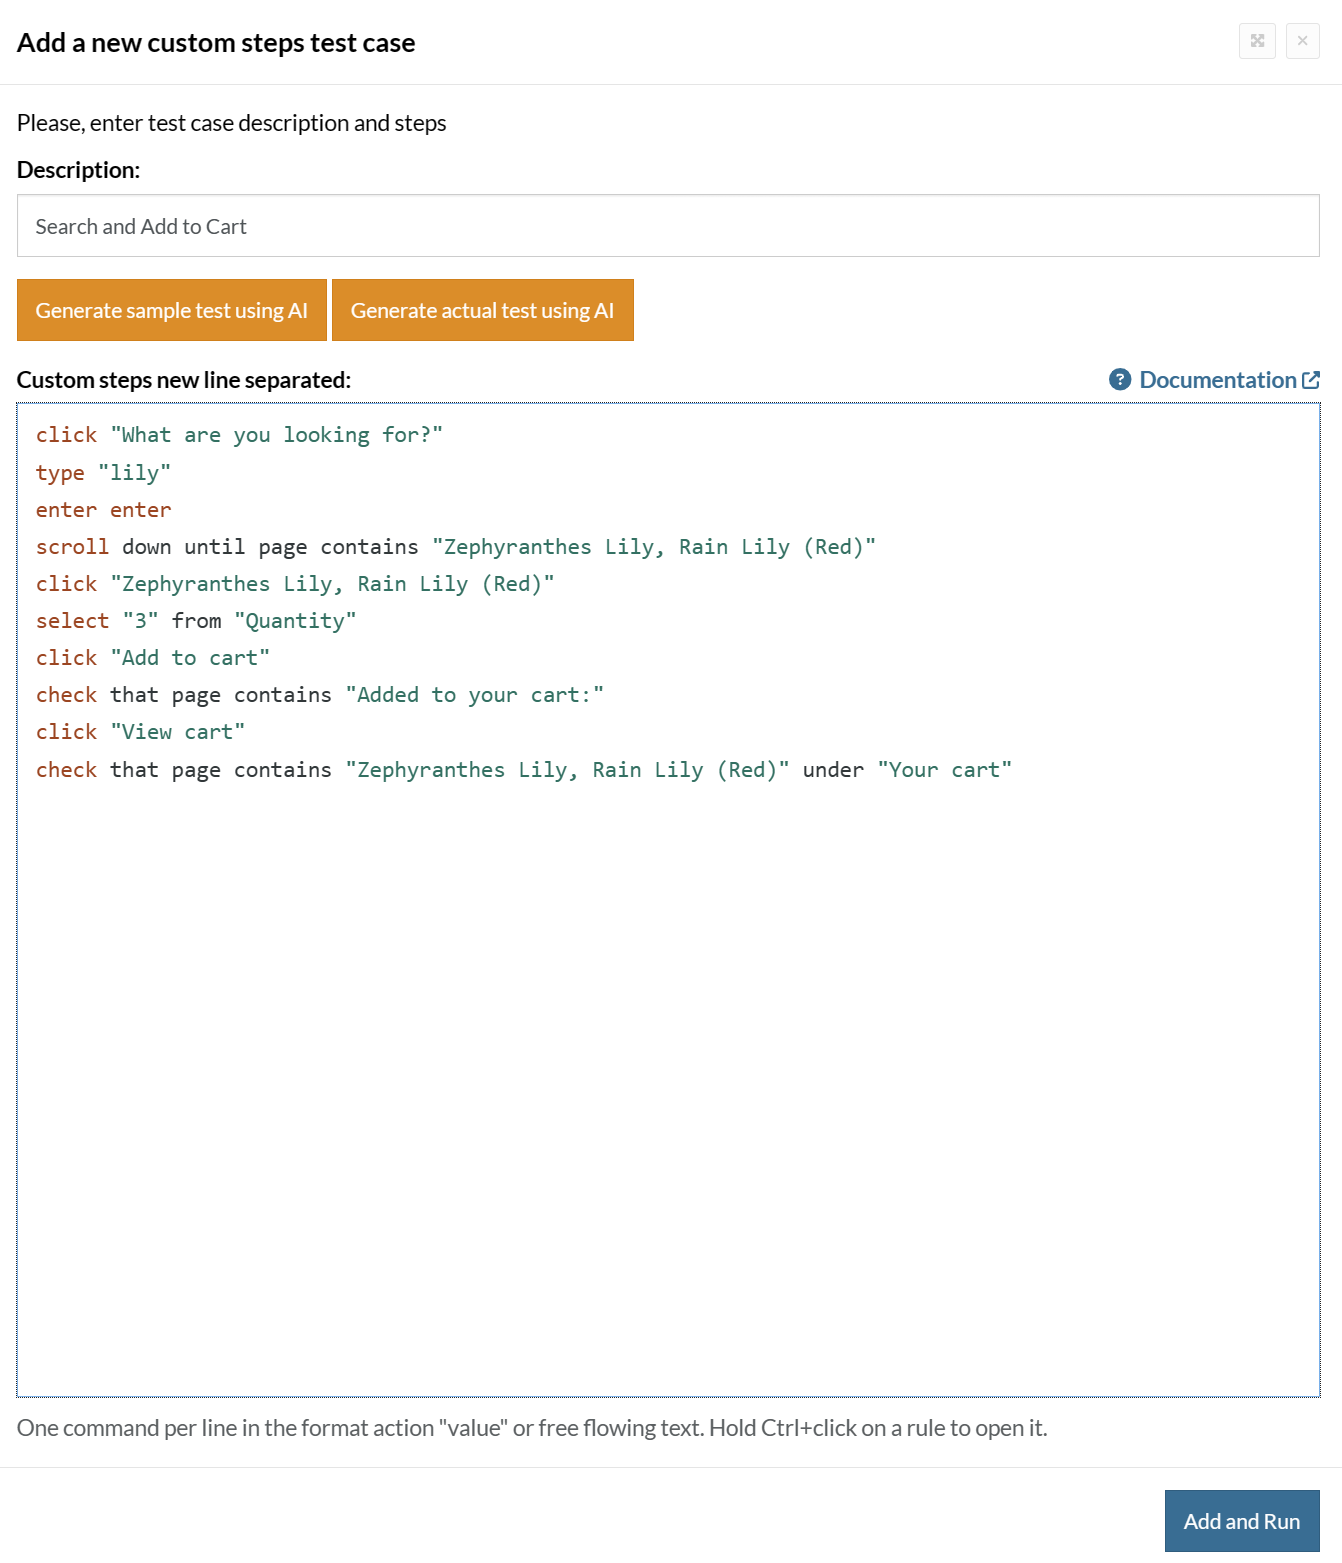
Click Add and Run.
Execution Results
Once the test is executed, you can view the execution details, such as execution status, time spent in execution, screenshots, error messages, logs, video recordings of the test execution, etc. In case of any failure, there are logs and error text that are available easily in a few clicks.
You can also download the complete execution with steps and screenshots in PDF or Word format through the View Execution option.
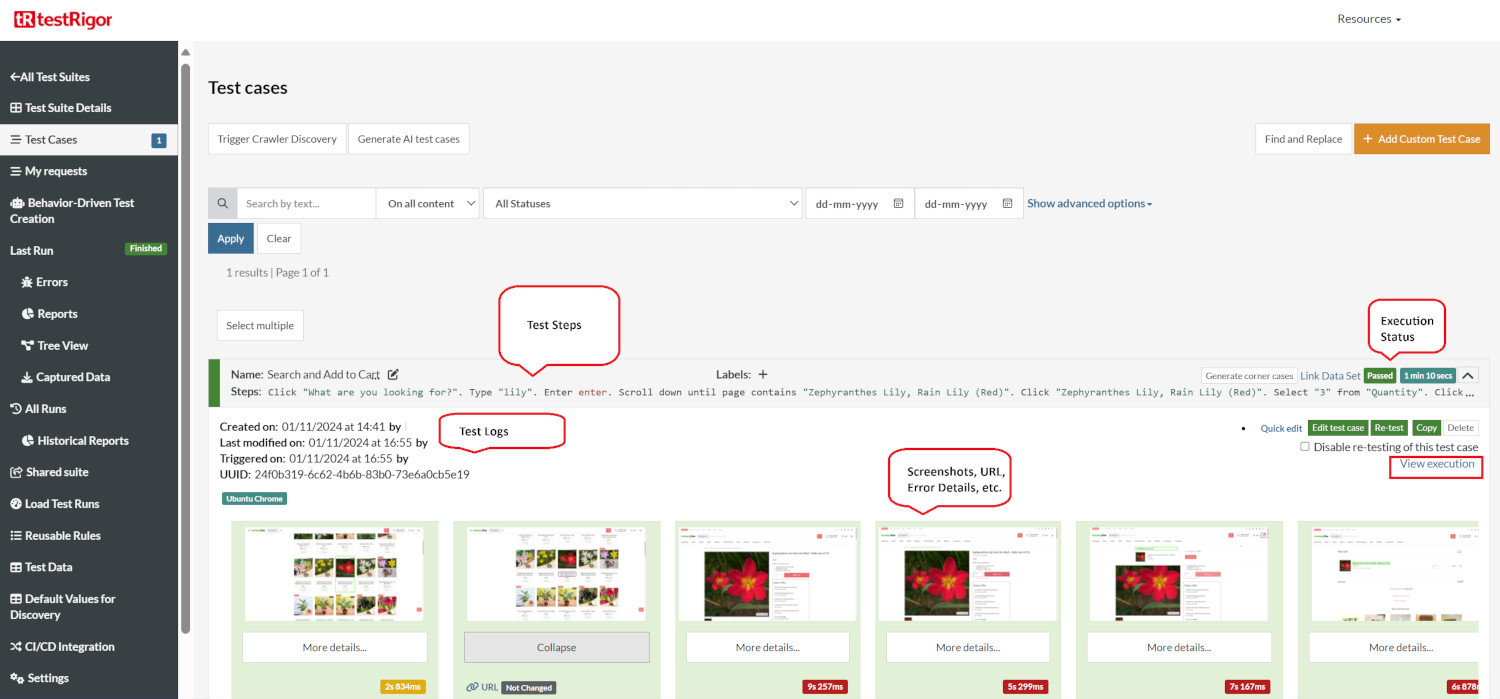
testRigor’s Capabilities
Apart from the simplistic test case design and execution, there are some advanced features that help you test your application using simple English commands.
- Reusable Rules (Subroutines): You can easily create functions for the test steps that you use repeatedly. You can use the Reusable Rules to create such functions and call them in test cases by simply writing their names. See the example of Reusable Rules.
- Global Variables and Data Sets: You can import data from external files or create your own global variables and data sets in testRigor to use them in data-driven testing.
- 2FA, QR Code, and Captcha Resolution: testRigor easily manages the 2FA, QR Code, and Captcha resolution through its simple English commands.
- Email, Phone Call, and SMS Testing: Use simple English commands to test the email, phone calls, and SMS. These commands are useful for validating 2FA scenarios, with OTPs and authentication codes being sent to email, phone calls, or via phone text.
- File Upload/ Download Testing: Execute the test steps involving file download or file upload without the requirement of any third-party software. You can also validate the contents of the files using testRigor’s simple English commands.
- Database Testing: Execute database queries and validate the results fetched.
testRigor enables you to test web, mobile (hybrid, native), API, and desktop apps with minimum effort and maintenance.
Additional Resources
- Access testRigor documentation to know about more useful capabilities
- Top testRigor’s features
- How to perform end-to-end testing
Running Magento Tests with testRigor
To make it even easier to get started with Magento testing, we’ve created a set of pre-built test cases that you can run immediately. These tests cover common Magento workflows and are available as individual public execution links below, where you can view and copy each test case to your own account.
Quick Setup Guide
Follow these simple steps to run the pre-built Magento tests locally:
Step 1: Create Your testRigor Account
- Go to testRigor.com
- Click “Sign Up” and select “Public Open Source” version
- Complete registration and verify your email
- Log in to your account
Step 2: Access and Copy Individual Test Cases
Each test case has its own public execution link where you can view and copy it to your account. Click on each test case below to access it:
Critical Test Cases Included
The pre-built test suite includes these essential Magento workflows that every e-commerce site must have working perfectly:
1. Customer Account Management
Test: Create customer account and validate registration process
Why it’s critical: Customer registration is the foundation of any e-commerce site. If users can’t create accounts, they can’t save preferences, track orders, or access personalized features. This test ensures the registration form works correctly and validates user input properly.
2. Product Search Functionality
Test: Search for products and validate search results display correctly
Why it’s critical: Search is how most customers find products. A broken search means lost sales. This test verifies that search queries return relevant results and that the search interface displays properly.
3. Complete Purchase Flow
Test: Log in, search for item, add to cart, and complete checkout with payment
Why it’s critical: This is the money-making flow. If checkout fails, you lose revenue. This comprehensive test validates the entire customer journey from login to order confirmation, ensuring payment processing and order management work correctly.
4. Category Navigation and Filtering
Test: Navigate product categories and validate filtering works accurately
Why it’s critical: Category browsing is essential for product discovery. Customers need to filter by size, color, price, and other attributes. This test ensures category pages load correctly and filters return accurate results.
5. Product Configuration (Size/Color Selection)
Test: Select product variations (size, color) and add to cart without logging in
Why it’s critical: Many products have variations (sizes, colors, materials). This test ensures customers can configure products correctly and that the cart handles product variations properly, even for guest users.
6. Product Detail Page Functionality
Test: View product details including prices, sizes, colors, and image zoom
Why it’s critical: Product detail pages are where customers make purchase decisions. This test validates that all product information displays correctly, including pricing, availability, and interactive features like image zoom.
7. Wishlist Management
Test: Add products to wishlist and verify they’re saved correctly
Why it’s critical: Wishlists increase conversion rates by allowing customers to save items for later. This test ensures the wishlist feature works properly and integrates correctly with user accounts.
8. Product Comparison
Test: Compare multiple products and validate comparison table displays correctly
Why it’s critical: Product comparison helps customers make informed decisions. This test ensures the comparison feature works for multiple products and displays all relevant information in a clear format.
9. Product Reviews and Ratings
Test: Submit product reviews with ratings and verify they display correctly
Why it’s critical: Reviews build trust and influence purchasing decisions. This test ensures the review submission process works and that reviews appear correctly on product pages, helping build customer confidence.
- Click one of the test case links above to open it
- Copy the test steps from the displayed test case
- Log in to your testRigor account and create a new test case
- Paste the copied steps into your new local test case
- Save the test case in your test suite
- Repeat this process for any additional test cases you want to run locally
Step 4: Set Up Your Local Environment
Create a file named .env in your Magento project folder with these three lines:
MAGENTO_TEST_SUITE_ID=your_test_suite_id_here
MAGENTO_AUTH_TOKEN=your_auth_token_here
MAGENTO_BASE_URL=http://localhost:8080
your_test_suite_id_herewith the Test Suite ID you copied in Step 2your_auth_token_herewith the auth token you copied in Step 3http://localhost:8080with your actual Magento website URL (e.g.,http://mystore.localorhttps://mystore.com)
Step 5: Run the Tests
bin/mftf run:testrigor
- Download and install all required tools (Node.js, testRigor CLI)
- Connect to your testRigor account
- Run all the pre-built Magento tests against your website
- Show you the results in your terminal
Step 6: View Detailed Results
- See which tests passed or failed
- View screenshots of each test step
- Download detailed reports
- Re-run individual tests if needed
Setting Up GitHub CI/CD Integration
For automated testing in your GitHub repository, you’ll need to configure your testRigor credentials as GitHub secrets. This approach differs from local testing by using GitHub’s secure environment variables instead of a local .env file.
Step 1: Add GitHub Secrets
- Go to your GitHub repository
- Click on “Settings” → “Secrets and variables” → “Actions”
- Add the following:
- As a secret:
MAGENTO_AUTH_TOKEN: Your testRigor auth token (keep this private)
- As variables:
MAGENTO_TEST_SUITE_ID: Your testRigor Test Suite IDMAGENTO_BASE_URL: Your Magento website URL
- As a secret:
For further information on creating secrets and variables in GitHub Actions, you can check the official GitHub documentation on secrets and variables.
Required GitHub Secrets and Variables:
- MAGENTO_TEST_SUITE_ID: Your testRigor Test Suite ID (e.g., 12345)
- MAGENTO_AUTH_TOKEN: Your testRigor auth token (format: ########-####-####-####-############)
- MAGENTO_BASE_URL: Your Magento website URL (e.g., https://yourstore.com)
Step 2: Use in GitHub Actions
- name: Run testRigor Tests
  run: bin/mftf run:testrigor
  env:
    MAGENTO_AUTH_TOKEN: ${{ secrets.MAGENTO_AUTH_TOKEN }}
    MAGENTO_TEST_SUITE_ID: ${{ vars.MAGENTO_TEST_SUITE_ID }}
    MAGENTO_BASE_URL: ${{ vars.MAGENTO_BASE_URL }}
Key Difference: While local testing uses a .env file, CI/CD uses GitHub’s secure secret management system, ensuring your credentials are encrypted and only accessible to authorized workflows.
Troubleshooting Tips
- Make sure your Magento site is running and accessible at the URL you specified
- Check your .env file – ensure all three values are correct and there are no extra spaces
- Verify your testRigor account – make sure you can log in and see the test suite
- Check your internet connection – testRigor needs to download some tools on first run
If you need to start over, simply delete the .mftf-tools folder and run the command again.
| Achieve More Than 90% Test Automation | |
| Step by Step Walkthroughs and Help | |
| 14 Day Free Trial, Cancel Anytime |


