Odoo Testing

Odoo is an open-source suite of business applications including, among others, CRM (Customer Relationship Management), sales, project management, manufacturing, inventory management, accounting, and human resources. It’s designed to help businesses manage various aspects of their operations in an integrated and comprehensive manner.
You might have added customizations to the Odoo offerings to make it the right fit for your business process. Or you may have just integrated with existing systems in your organization. Whatever the case, you need to perform testing.
You can achieve holistic test coverage by performing testing at different levels. Odoo primarily uses Python and JavaScript, so you must pick tools and frameworks compatible with these programming languages.
Unit testing
The first level of testing is at the very base, which is closest to the code. Through unit testing, you look for the basic functioning of the various units of code, like methods, classes, or APIs. The concern is strictly to check the code at its most granular level.
Let’s look at the frameworks that are popularly used for testing Odoo.
Python unit testing
You can test your Odoo Python code using Unittest libraries. There are many classes that support unit testing, like
- odoo.tests.TransactionCase
- odoo.tests.SingleTransactionCase
- odoo.tests.HttpCase
- odoo.tests.tagged
- odoo.tests.Form
- odoo.tests.M2MProxy
- odoo.tests.O2MProxy
class TestModelAB(TransactionCase):
  def test_some_action(self):
    record = self.env['model.a'].create({'field': 'value'})
    record.some_action()
    self.assertEqual(
      record.field,
      expected_field_value)

  # other tests...
JavaScript unit testing
JavaScript code can be tested using QUnit. Considering the complexity of Odoo applications, you are better off having unit tests for your JavaScript code as well.
QUnit.test('simple group rendering', function (assert) {
  assert.expect(1);

  var form = testUtils.createView({
    View: FormView,
    model: 'partner',
    data: this.data,
    arch: '<form string="Partners">' +
      '<group>' +
        '<field name="foo"/>' +
      '</group>' +
    '</form>',
    res_id: 1,
  });

  assert.containsOnce(form, 'table.o_inner_group');
  form.destroy();
});
Integration testing
Checking the Python and JavaScript code by themselves is helpful, yet it doesn’t confirm that the web client and server are functioning as a unit. To check this, we could create different tests called tours.
A tour is a small representation of a business process. It describes the steps in order that one must take. Next, the test runner sets up a PhantomJs browser, directs it to the correct URL, and imitates clicking and typing as outlined in the scenario.
/** @odoo-module **/
import tour from 'web_tour.tour';

tour.register('rental_product_configurator_tour', {
  url: '/web', // Here, you can specify any other starting url
  test: true,
}, [
  // Your sequence of steps
]);
Likewise, to start a tour from a Python test, make the class inherit from HTTPCase and call start_tour.
End-to-end testing
Along with unit and integration tests, you need to write end-to-end tests to make sure that all major workflows in your application work as expected. These tests are usually UI-based, spanning across modules.
Testing the whole system from start to finish can be good for finding problems that might not be seen with just unit or integration testing because these problems are about how the system acts or what the user thinks should happen.
You can find many tools in the market that help with this.
Here are a few examples.
Cypress
Cypress is a JavaScript-based testing tool that enables you to write tests that interact with a web application like a real user would. It runs tests in a real browser, providing a more accurate testing environment for user interactions, network requests, and application behavior.
However, you can find better alternatives to Cypress in the test automation market.
testRigor
You can choose testRigor instead of using tools that need coding to create tests or those record-and-playback ones that often result in unreliable tests. This tool allows you to create test steps in simple English for apps that run on different browsers and devices. Or you can use the test recorder to record your actions, and testRigor creates ultra-stable test cases in plain English from those UI actions. You can test web, mobile, API, and desktop using testRigor.
login
click on "Appraisal"
click on "Create" on the top left
select "Jake Jones" from "Employee's Name"
click on "Appraisal Deadline"
save expression "${todayDayOfMonth}" as "date"
if the stored value "date" is greater than 20 then click on "Next Month"
save expression "(${date}-20)" as "newDate"
click stored value "newDate"
testRigor has a lot to offer in terms of features and capabilities. Even if you do find something lacking, you can easily integrate it with other tools and platforms. You need not worry about test maintenance, as testRigor does a great job at managing this woe as well by leveraging AI algorithms and self-healing. Thus, you can focus on creating impactful test cases peacefully.
How to do End-to-end Testing with testRigor
Let us take the example of an e-commerce website that sells plants and other gardening needs. We will create end-to-end test cases in testRigor using plain English test steps.
Step 1: Log in to your testRigor app with your credentials.
Step 2: Set up the test suite for the website testing by providing the information below:
- Test Suite Name: Provide a relevant and self-explanatory name.
- Type of testing: Select from the following options: Desktop Web Testing, Mobile Web Testing, Native and Hybrid Mobile, based on your test requirements.
- URL to run test on: Provide the application URL that you want to test.
- Testing credentials for your web/mobile app to test functionality which requires user to login: You can provide the app’s user login credentials here and need not write them separately in the test steps then. The login functionality will be taken care of automatically using the keyword
login. - OS and Browser: Choose the OS Browser combination on which you want to run the test cases.
- Number of test cases to generate using AI: If you wish, you can choose to generate test cases based on the App Description text, which works on generative AI.
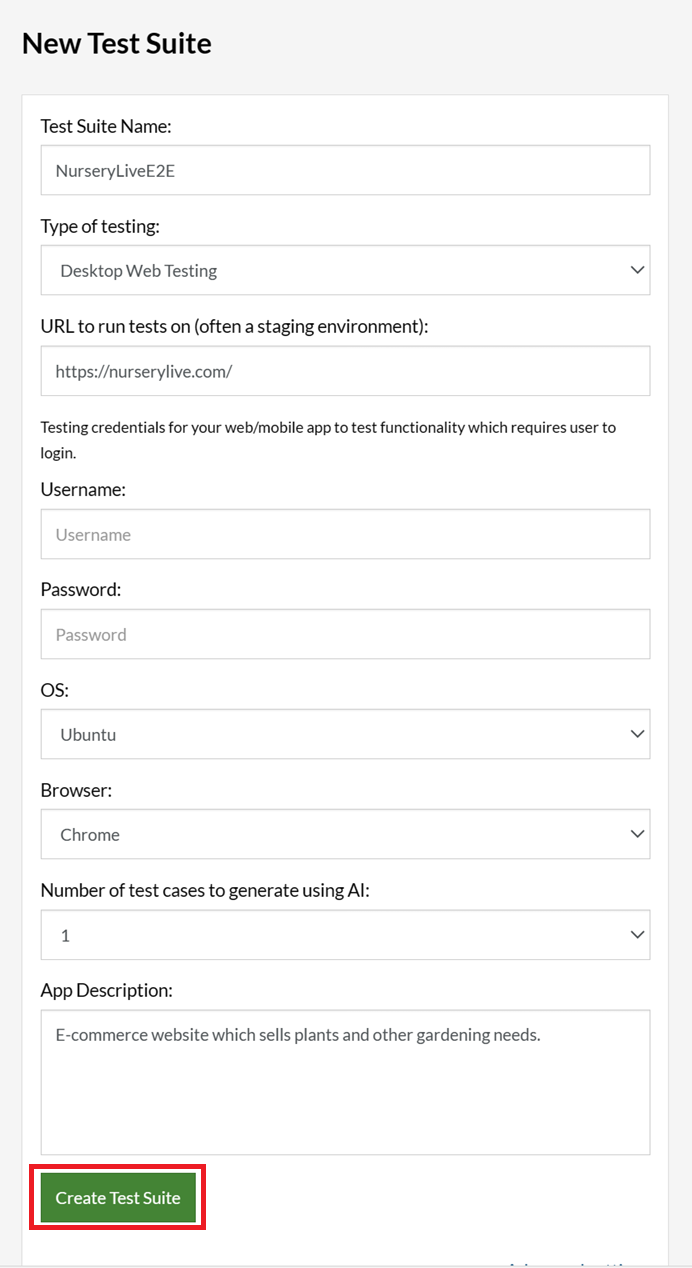
Step 3: Click Create Test Suite.
On the next screen, you can let AI generate the test case based on the App Description you provided during the Test Suite creation. However, for now, select do not generate any test, since we will write the test steps ourselves.
Step 4: To create a new custom test case yourself, click Add Custom Test Case.

Step 5: Provide the test case Description and start adding the test steps.
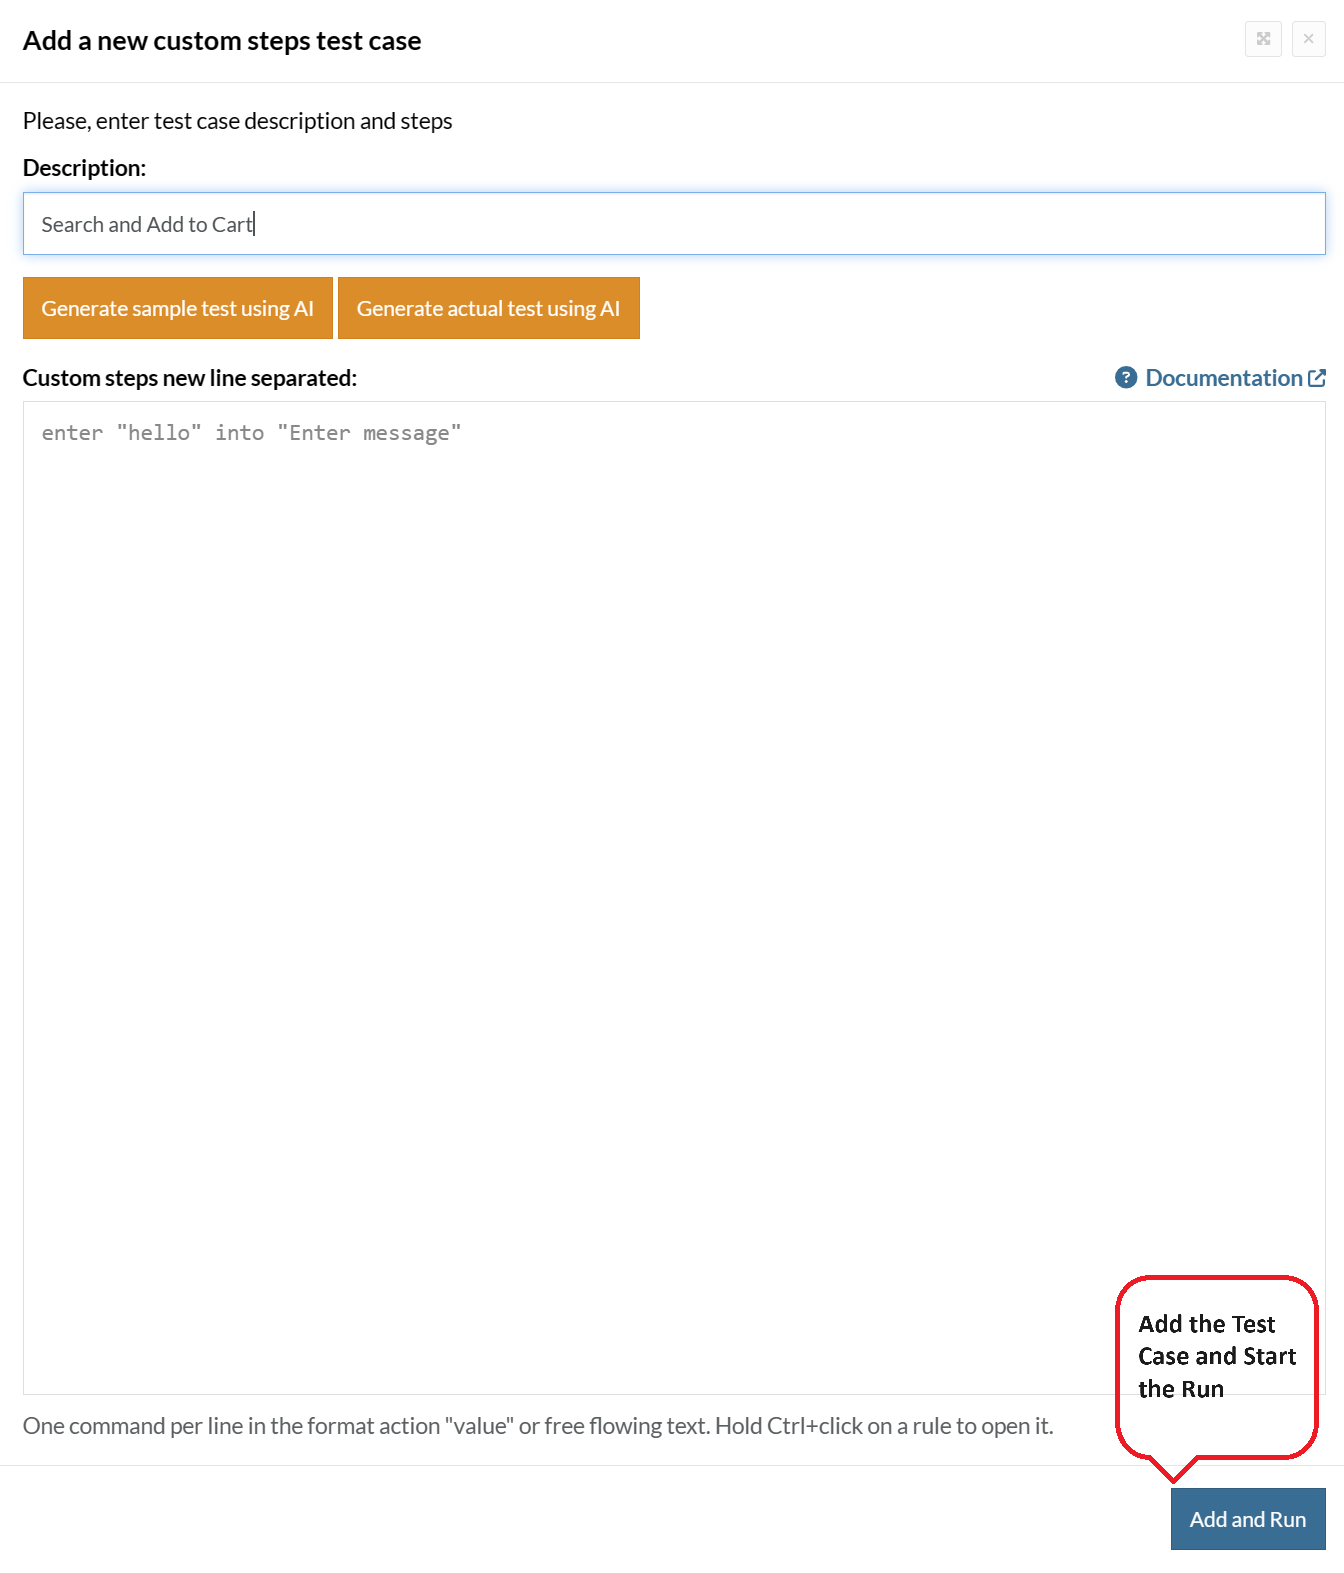
For the application under test, i.e., e-commerce website, we will perform below test steps:
- Search for a product
- Add it to the cart
- Verify that the product is present in the cart
Test Case: Search and Add to Cart
Step 1: We will add test steps on the test case editor screen one by one.
testRigor automatically navigates to the website URL you provided during the Test Suite creation. There is no need to use any separate function for it. Here is the website homepage, which we intend to test.

First, we want to search for a product in the search box. Unlike traditional testing tools, you can identify the UI element using the text you see on the screen. You need not use any CSS/XPath identifiers.
click "What are you looking for?"
Step 2: Once the cursor is in the search box, we will type the product name (lily), and press enter to start the search.
type "lily"
enter enter
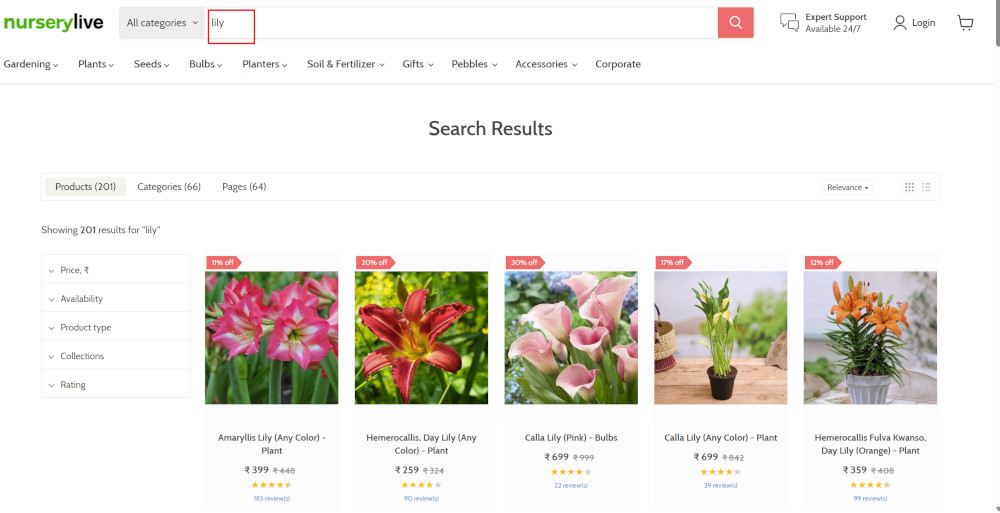
Search lists all products with the “lily” keyword on the webpage.
Step 3: The lily plant we are searching for needs the screen to be scrolled; for that testRigor provides a command. Scroll down until the product is present on the screen:
scroll down until page contains "Zephyranthes Lily, Rain Lily (Red)"
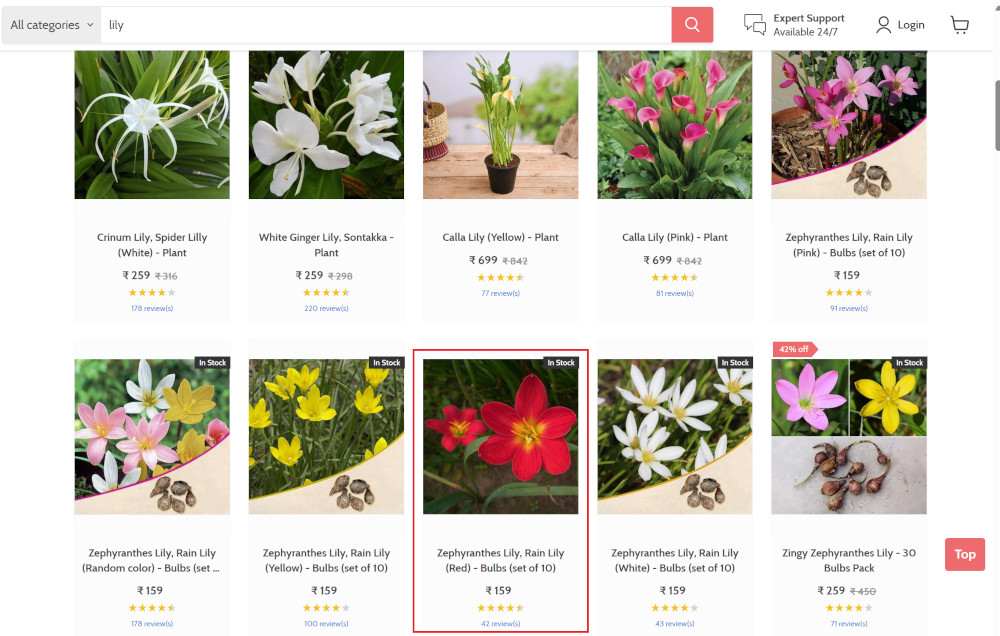
When the product is found on the screen, testRigor stops scrolling.
Step 4: Click on the product name to view the details:
click "Zephyranthes Lily, Rain Lily (Red)"
After the click, the product details are displayed on the screen as below, with the default Quantity as 1.
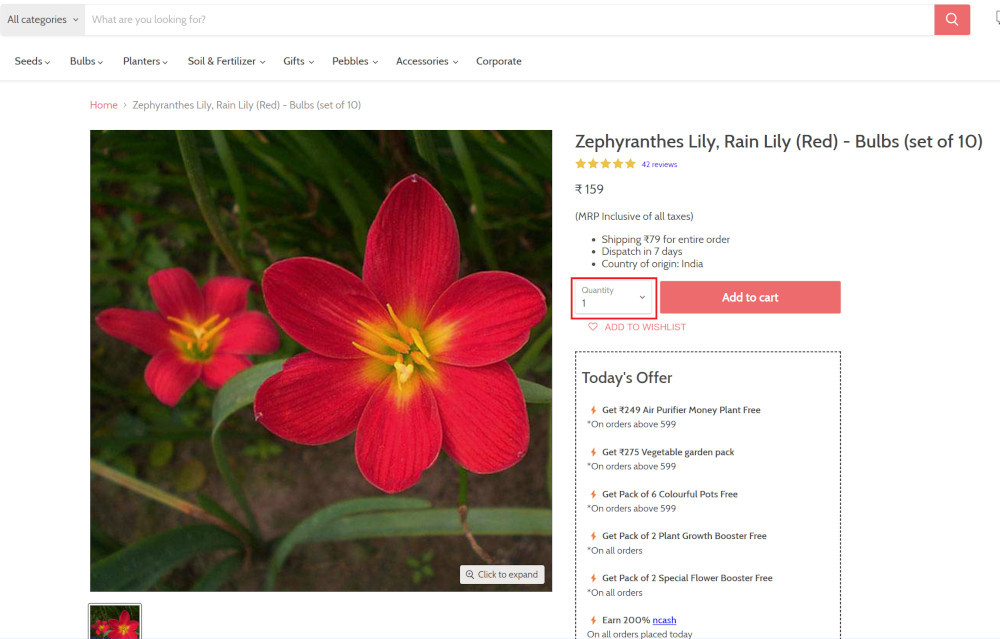
Step 5: Lets say, we want to change the Quantity to 3, so here we use the testRigor command to select from a list.
select "3" from "Quantity"
click "Add to cart"
The product is successfully added to the cart, and the “Added to your cart:” message is displayed on webpage.
Step 6: To assert that the message is successfully displayed, use a simple assertion command as below:
check that page contains "Added to your cart:"
Step 7: After this check, we will view the contents of the cart by clicking View cart as below:
click "View cart"

Step 8: Now we will again check that the product is present in the cart, under heading “Your cart” using the below assertion. With testRigor, it is really easy to specify the location of an element on the screen.
check that page contains "Zephyranthes Lily, Rain Lily (Red)" under "Your cart"

Complete Test Case
Here is how the complete test case will look in the testRigor app. The test steps are simple in plain English, enabling everyone in your team to write and execute them.
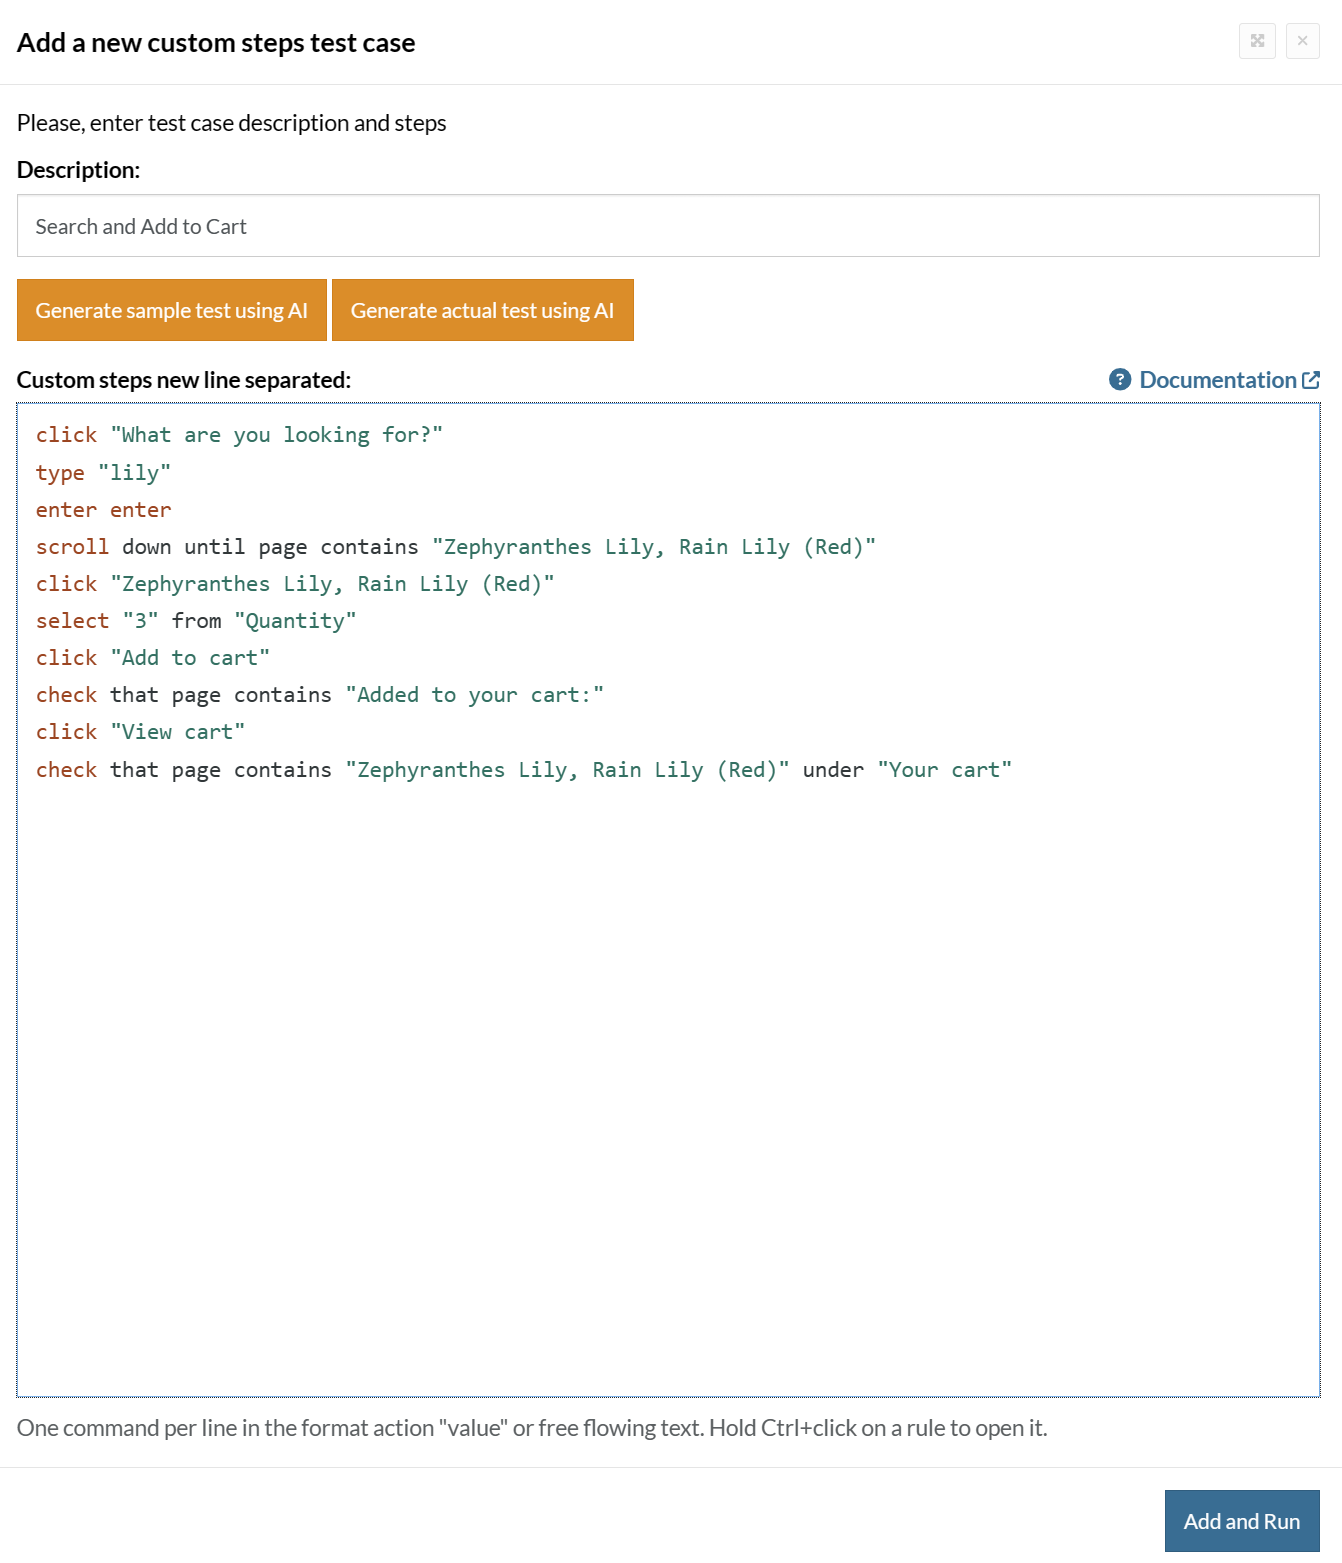
Click Add and Run.
Execution Results
Once the test is executed, you can view the execution details, such as execution status, time spent in execution, screenshots, error messages, logs, video recordings of the test execution, etc. In case of any failure, there are logs and error text that are available easily in a few clicks.
You can also download the complete execution with steps and screenshots in PDF or Word format through the View Execution option.
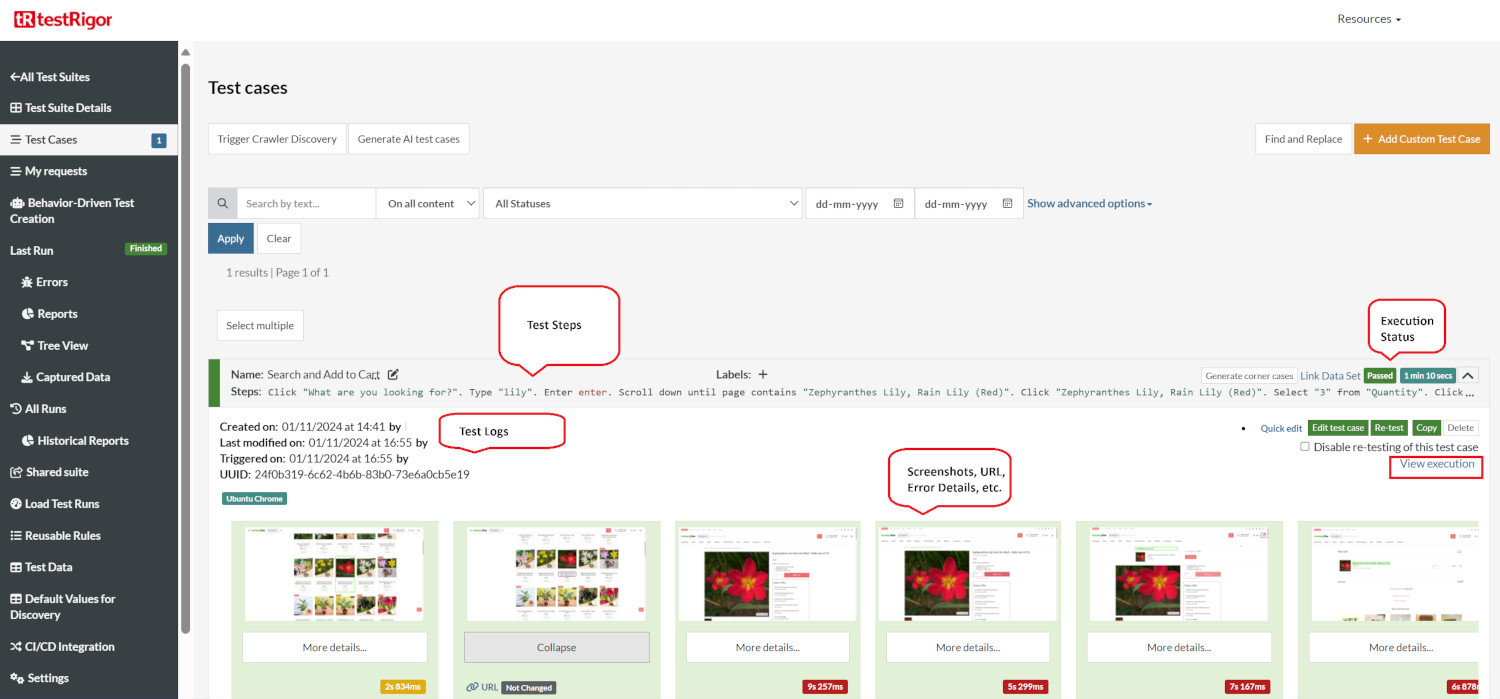
testRigor’s Capabilities
Apart from the simplistic test case design and execution, there are some advanced features that help you test your application using simple English commands.
- Reusable Rules (Subroutines): You can easily create functions for the test steps that you use repeatedly. You can use the Reusable Rules to create such functions and call them in test cases by simply writing their names. See the example of Reusable Rules.
- Global Variables and Data Sets: You can import data from external files or create your own global variables and data sets in testRigor to use them in data-driven testing.
- 2FA, QR Code, and Captcha Resolution: testRigor easily manages the 2FA, QR Code, and Captcha resolution through its simple English commands.
- Email, Phone Call, and SMS Testing: Use simple English commands to test the email, phone calls, and SMS. These commands are useful for validating 2FA scenarios, with OTPs and authentication codes being sent to email, phone calls, or via phone text.
- File Upload/ Download Testing: Execute the test steps involving file download or file upload without the requirement of any third-party software. You can also validate the contents of the files using testRigor’s simple English commands.
- Database Testing: Execute database queries and validate the results fetched.
testRigor enables you to test web, mobile (hybrid, native), API, and desktop apps with minimum effort and maintenance.
Additional Resources
- Access testRigor documentation to know about more useful capabilities
- Top testRigor’s features
- How to perform end-to-end testing
Conclusion
Odoo is a great framework to use to manage business operations. You can make these modules operate without problems alongside your current processes by making more adjustments. Just make sure to choose intelligent testing tools that lower the amount of work you have and not add more to it.
| Achieve More Than 90% Test Automation | |
| Step by Step Walkthroughs and Help | |
| 14 Day Free Trial, Cancel Anytime |


