WordPress Testing

WordPress (WP), an open-source content management system (CMS), is a powerful and flexible tool for creating websites and blogs. Initially used for personal blogging, it has become a popular choice for many websites, including social media platforms, professional publications, e-commerce sites, business portfolios, and more.
WP has a significant impact on the internet today, and several well-known companies, such as LinkedIn, Sony Music, BBC America, and The Walt Disney Company, have utilized it in their websites.
WordPress is built using PHP and relies on either MySQL or MariaDB with HTTPS support. It features a plugin architecture and template system, known as “Themes,” and provides both front-end and back-end support. The back end is the interface where users log in to make changes or add new content, while the front end is the visible part of the UI that visitors see on the internet. Additionally, WordPress is designed to be responsive and can handle mobile internet traffic effectively.
WordPress plugins
Plugins are a great way to extend the core functionality without investing in coding the feature. The official WordPress plugin store has a plethora of plugins that serve various needs, such as social media marketing, theme adjustments, and much more.
However, a situation may arise where you might not find what you need in the existing plugins. This could be due to requirements for custom functionalities or further customizations of existing plugins. In these situations, you can write your own custom plugins. WordPress plugins also use the same programming languages as WordPress does. So, you need a sound knowledge of PHP to develop your own WordPress plugin.
As a bonus, you can even register the plugin on WordPress’s plugin store once you’ve checked all the boxes in their guidelines. Besides the official WordPress plugin store, you can also find plugins on other sites across the internet. Many plugin creators, in fact, offer a simple or lite version of the plugin on the official website and then ask you to update it to a more advanced version on their own site.
What is WordPress testing, and what do we need to test?
Let’s examine the importance of testing for WordPress websites. Given the numerous devices with varying screen sizes, resolutions, and browser platforms available, it’s possible to encounter issues such as
- Inconsistent behavior between different browsers.
- Poor display on specific screen sizes, resolutions, or devices.
- Responsive design issues on specific mobile devices or versions.
- Slow loading times and performance problems on specific browsers.
In the same breadth, you need to test your custom plugins to ensure that they offer what they claim, integrate with what they set out to (WordPress websites), and abide by WordPress’s guidelines.
Given the many potential scenarios that can arise, it’s crucial to thoroughly test WordPress websites to ensure they deliver value to both businesses and customers. This testing is necessary to meet customer needs and expectations, improve the quality of the website, and provide an excellent user experience. By thoroughly testing your WordPress website, you can increase traffic, attract potential customers, boost sales, build trust, and establish credibility. In short, testing is essential to the success and growth of your website.
Testing types for WordPress
The following are the key types of testing that can be carried out to test WordPress:
Other important testing types to be considered as a part of the comprehensive testing strategy are:
- Visual testing
- Responsiveness testing
- Cross-browser compatibility testing
- Security testing
- Performance testing
Unit Testing
Unit testing involves testing individual components of the application in isolation. As a rule of thumb, make sure to write small unit tests. This also means that your methods should be compact and focus on a single functionality so that its corresponding unit test is also straightforward. For unit testing, if your method depends on other methods, data sources, or APIs, then you will have to mock the response values in your unit test cases.
WordPress supports PHPUnit for testing PHP code. You can use other tools like WP-CLI, which is the official command line interface for WordPress.
<?php
  class SomeTest extends WP_UnitTestCase {
    public function setUp() {
      parent::setUp();
      set_current_screen('edit.php');

      //this will cause is_admin to return true
      $this->assertTrue( is_admin() );
    }

  //rest of the code ...
}
Remember to prefix your test case’s method with ‘test’ to ensure it gets considered a test case. Another good practice would be to consider scenarios where dynamic inputs are expected. For example, if the method expects a post to decide on further functionalities, you can use the Factory methods to generate such data.
You can also use Codeception for unit testing your WordPress integrations or plugins. For JavaScript, WordPress relies on QUnit.
Integration Testing
Integration tests are meant to check if two or more components are working together correctly. The test cases often target scenarios where integrations with databases, file systems, network infrastructure, or other components are expected.
With integration testing, you can selectively mock data to see if the method at hand is giving the expected results. For example, suppose you want to test whether the method responsible for saving edited post content works appropriately or not. In that case, you can mock the post content that will get passed to this method and check if the method saves the updated content in the database. So this will help you verify the integration between the database and the saving changes method.
You can use the tools and frameworks you used for unit testing to write integration tests. When it comes to custom plugins, you want to make sure that they work seamlessly with the desired WordPress component. You can use a staging environment to do this testing to avoid disrupting real-time users.
End-to-End Testing
In End-to-end testing, you need to check complete workflows. These tests require the entire system to be booted. You can do that using the following ways.
- Selenium-based tools
- testRigor
Selenium-based tools
Selenium is synonymous with testing and is widely used. There are many tools available that simplify the adoption of Selenium for testing. However, each of these tools does inherit some of the drawbacks of Selenium, though they try to overcome most of them.
testRigor
With tools like testRigor, you can achieve maximum test coverage with ease. It is a powerful, no-code automation tool that allows you to write your commands in plain English, thus making it very easy to form automation test cases. The tool provides good reporting capabilities that can help you review and understand issues in your test cases, if any.
Some salient features of this tool are as follows.
- You need not provide unstable XPath/CSS locators to identify elements. Its generative AI-powered engine can interpret the element’s relative position from the mentioned command. It also allows testing by comparing images to find the element.
- Supports cross-platform and cross-browser testing without significant configuration steps.
- It has a provision to support 2FA testing for Gmail, text messages, and Google authenticator. Test phone calls, SMS, geolocation, video, and audio quickly through its English commands.
- Perform file testing and handle tables on your website easily through simple English.
- Easy integration with most CI/CD tools. You can deploy your unit tests using these tools, too.
- Facilitates easy mocking of API calls and accessing databases if needed.
- It lets you work and access cookies, local storage, and session storage.
- Perform accessibility testing of your website using testRigor.
call api post "http://dummy.restapiexample.com/api/v1/create" with headers "Content-Type:application/json" and "Accept:application/json" and body "{\"name\":\"James\",\"salary\":\"123\",\"age\":\"32\"}" and get "$.data.name" and save it as "createdName" and then check that http code is 200
check image in header is stored value "logo" and click on "About" and select "the Author"
You can simplify testing of your website or plugin using testRigor. You can read more about its offerings over here.
How to do End-to-end Testing with testRigor
Let us take the example of an e-commerce website that sells plants and other gardening needs. We will create end-to-end test cases in testRigor using plain English test steps.
Step 1: Log in to your testRigor app with your credentials.
Step 2: Set up the test suite for the website testing by providing the information below:
- Test Suite Name: Provide a relevant and self-explanatory name.
- Type of testing: Select from the following options: Desktop Web Testing, Mobile Web Testing, Native and Hybrid Mobile, based on your test requirements.
- URL to run test on: Provide the application URL that you want to test.
- Testing credentials for your web/mobile app to test functionality which requires user to login: You can provide the app’s user login credentials here and need not write them separately in the test steps then. The login functionality will be taken care of automatically using the keyword
login. - OS and Browser: Choose the OS Browser combination on which you want to run the test cases.
- Number of test cases to generate using AI: If you wish, you can choose to generate test cases based on the App Description text, which works on generative AI.
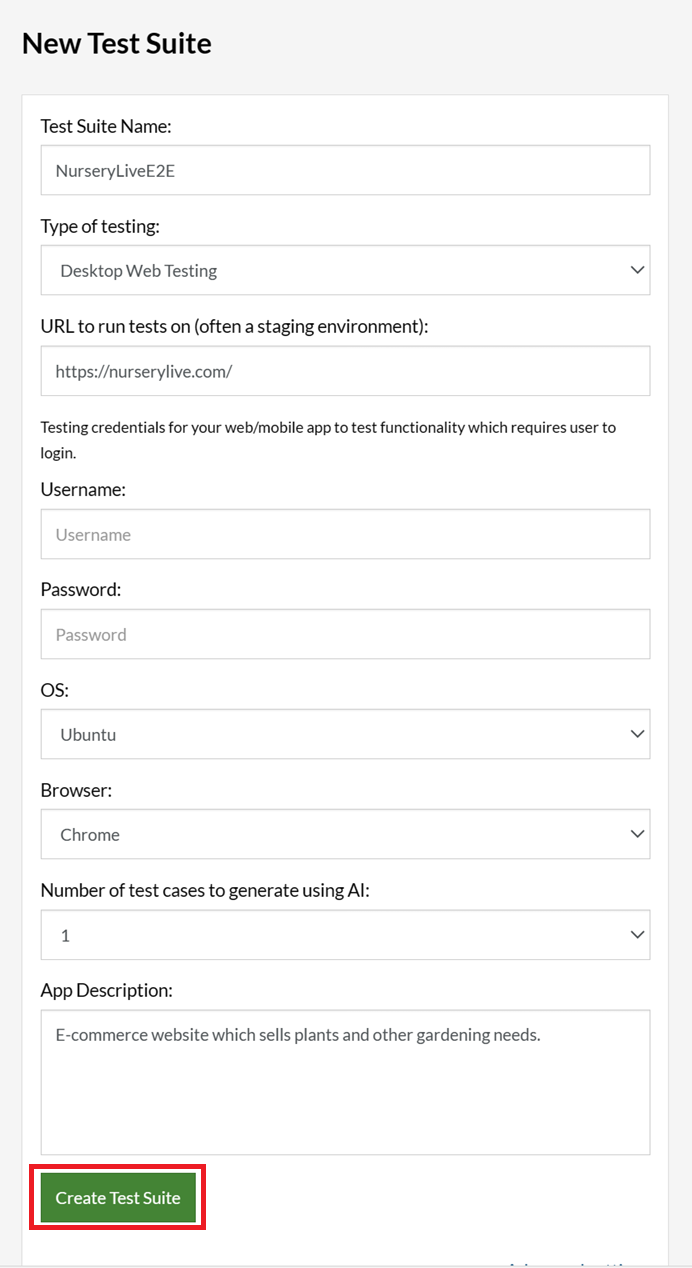
Step 3: Click Create Test Suite.
On the next screen, you can let AI generate the test case based on the App Description you provided during the Test Suite creation. However, for now, select do not generate any test, since we will write the test steps ourselves.
Step 4: To create a new custom test case yourself, click Add Custom Test Case.

Step 5: Provide the test case Description and start adding the test steps.
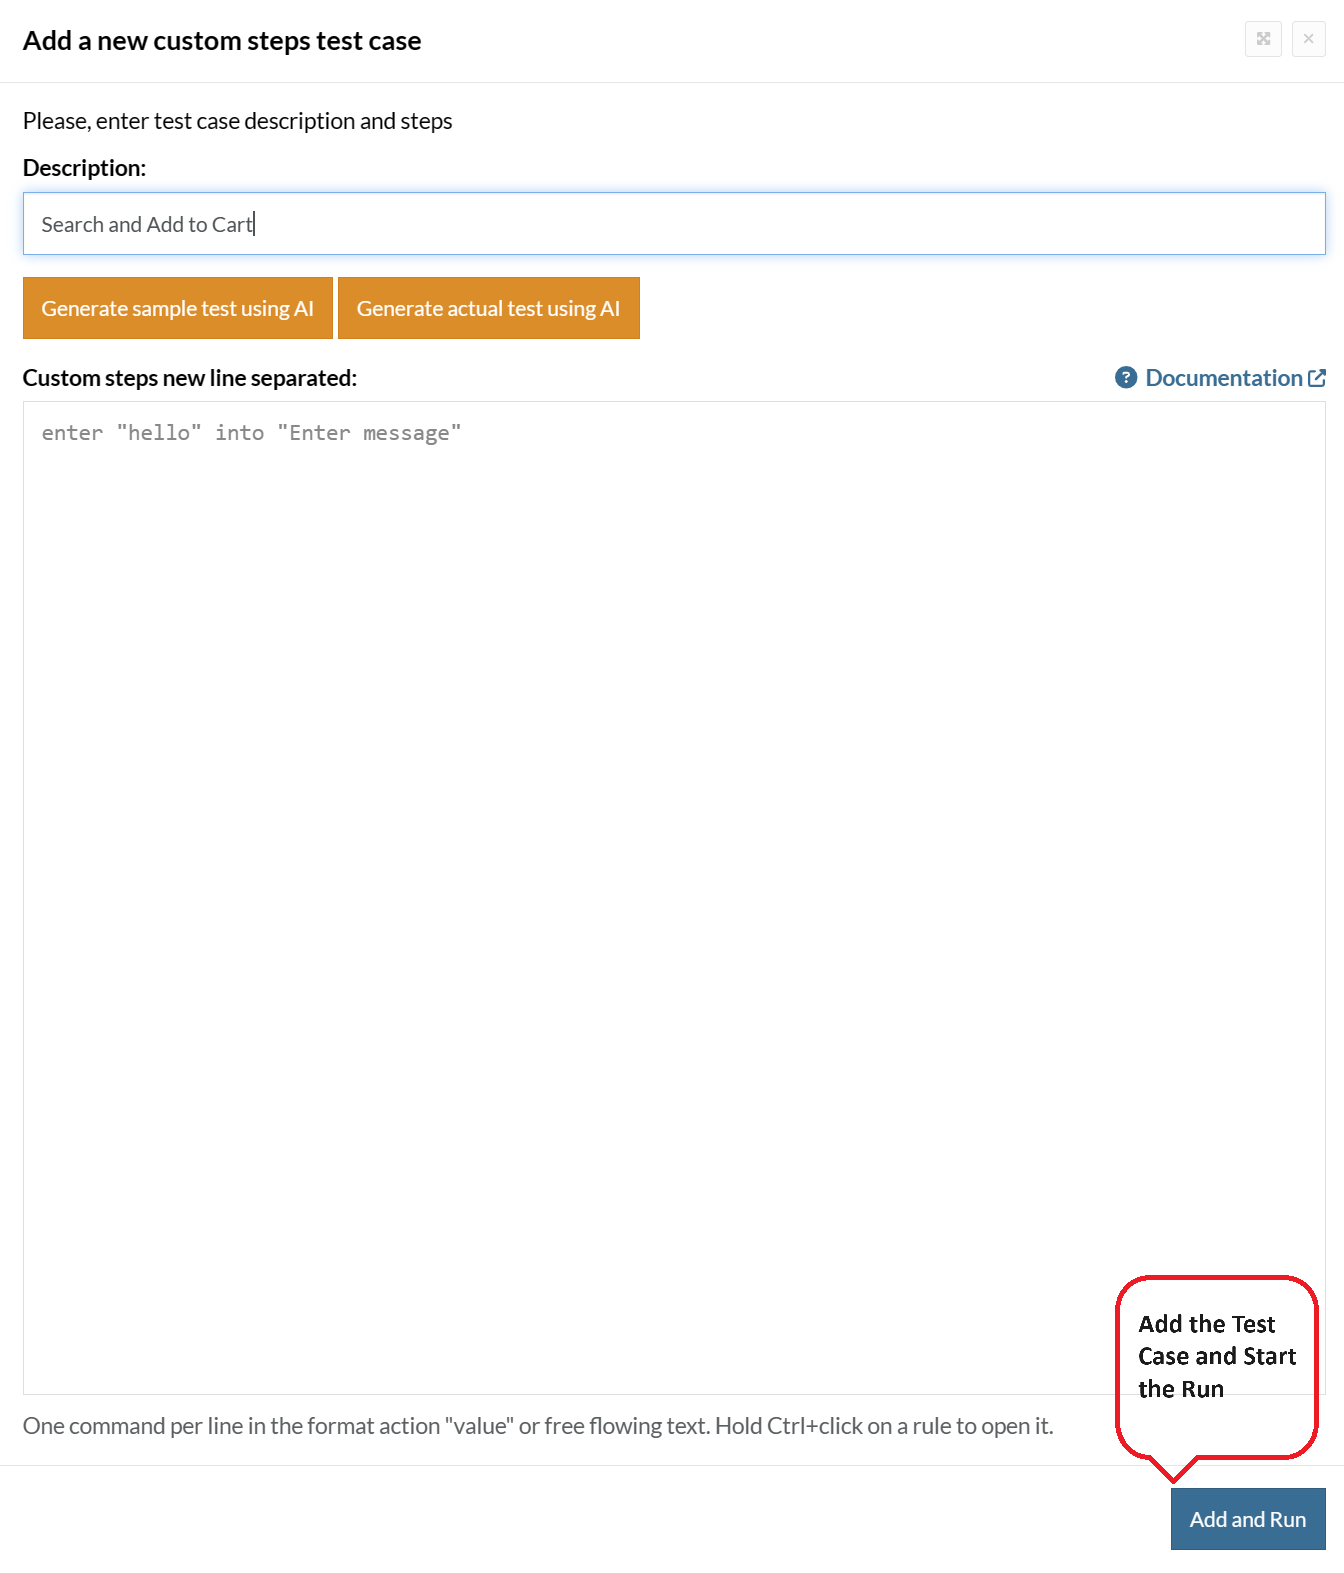
For the application under test, i.e., e-commerce website, we will perform below test steps:
- Search for a product
- Add it to the cart
- Verify that the product is present in the cart
Test Case: Search and Add to Cart
Step 1: We will add test steps on the test case editor screen one by one.
testRigor automatically navigates to the website URL you provided during the Test Suite creation. There is no need to use any separate function for it. Here is the website homepage, which we intend to test.

First, we want to search for a product in the search box. Unlike traditional testing tools, you can identify the UI element using the text you see on the screen. You need not use any CSS/XPath identifiers.
click "What are you looking for?"
Step 2: Once the cursor is in the search box, we will type the product name (lily), and press enter to start the search.
type "lily"
enter enter
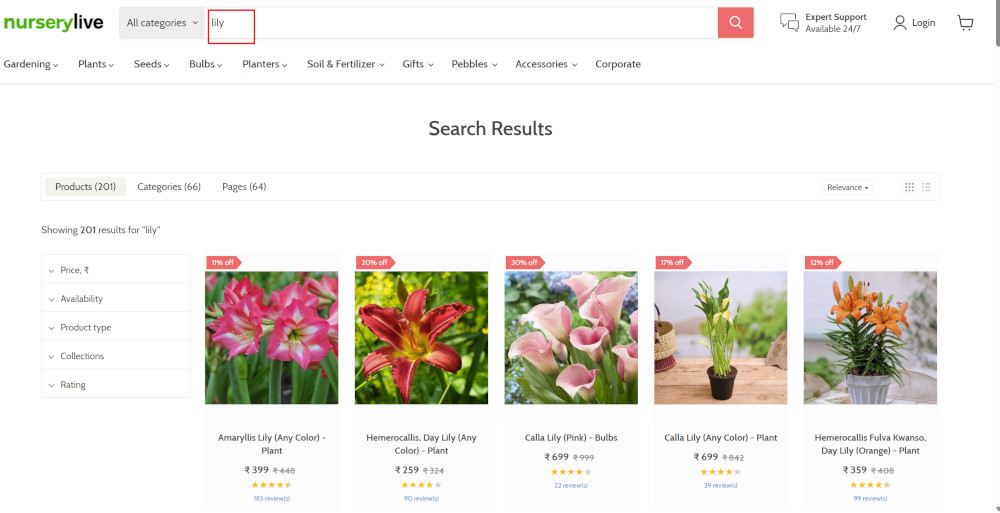
Search lists all products with the “lily” keyword on the webpage.
Step 3: The lily plant we are searching for needs the screen to be scrolled; for that testRigor provides a command. Scroll down until the product is present on the screen:
scroll down until page contains "Zephyranthes Lily, Rain Lily (Red)"
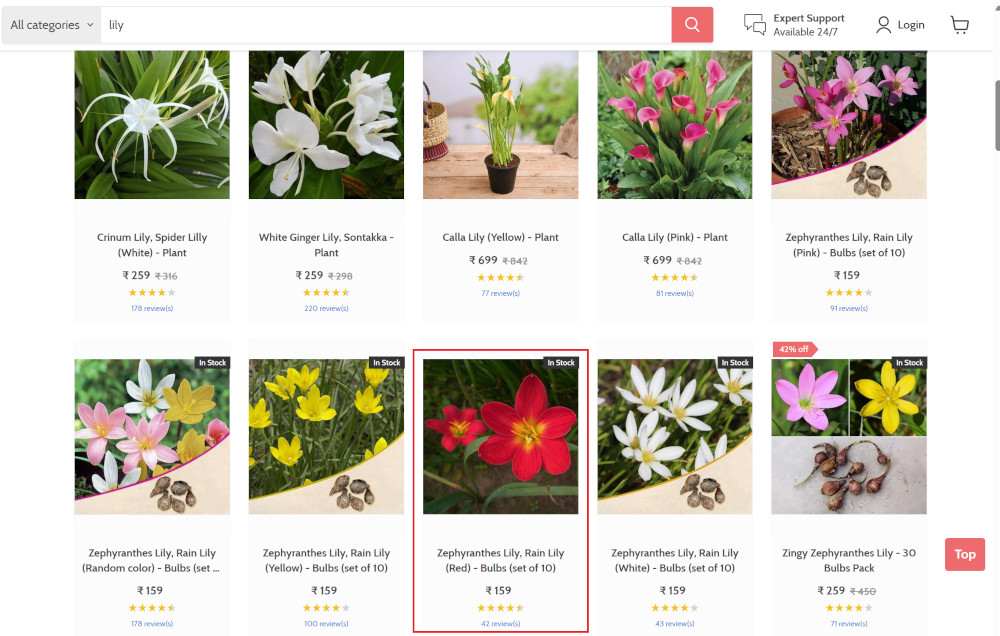
When the product is found on the screen, testRigor stops scrolling.
Step 4: Click on the product name to view the details:
click "Zephyranthes Lily, Rain Lily (Red)"
After the click, the product details are displayed on the screen as below, with the default Quantity as 1.
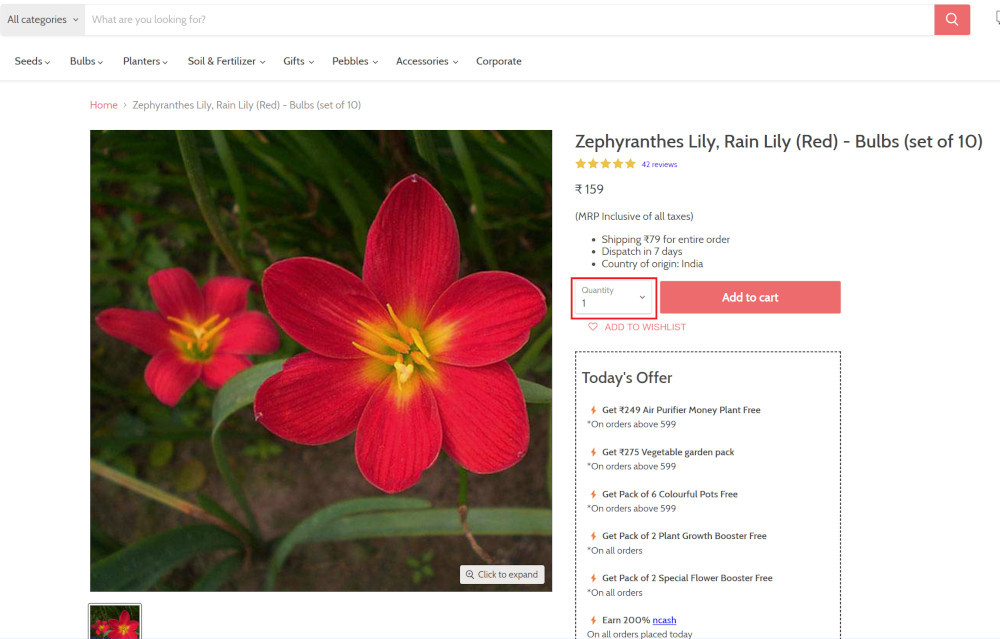
Step 5: Lets say, we want to change the Quantity to 3, so here we use the testRigor command to select from a list.
select "3" from "Quantity"
click "Add to cart"
The product is successfully added to the cart, and the “Added to your cart:” message is displayed on webpage.
Step 6: To assert that the message is successfully displayed, use a simple assertion command as below:
check that page contains "Added to your cart:"
Step 7: After this check, we will view the contents of the cart by clicking View cart as below:
click "View cart"

Step 8: Now we will again check that the product is present in the cart, under heading “Your cart” using the below assertion. With testRigor, it is really easy to specify the location of an element on the screen.
check that page contains "Zephyranthes Lily, Rain Lily (Red)" under "Your cart"

Complete Test Case
Here is how the complete test case will look in the testRigor app. The test steps are simple in plain English, enabling everyone in your team to write and execute them.
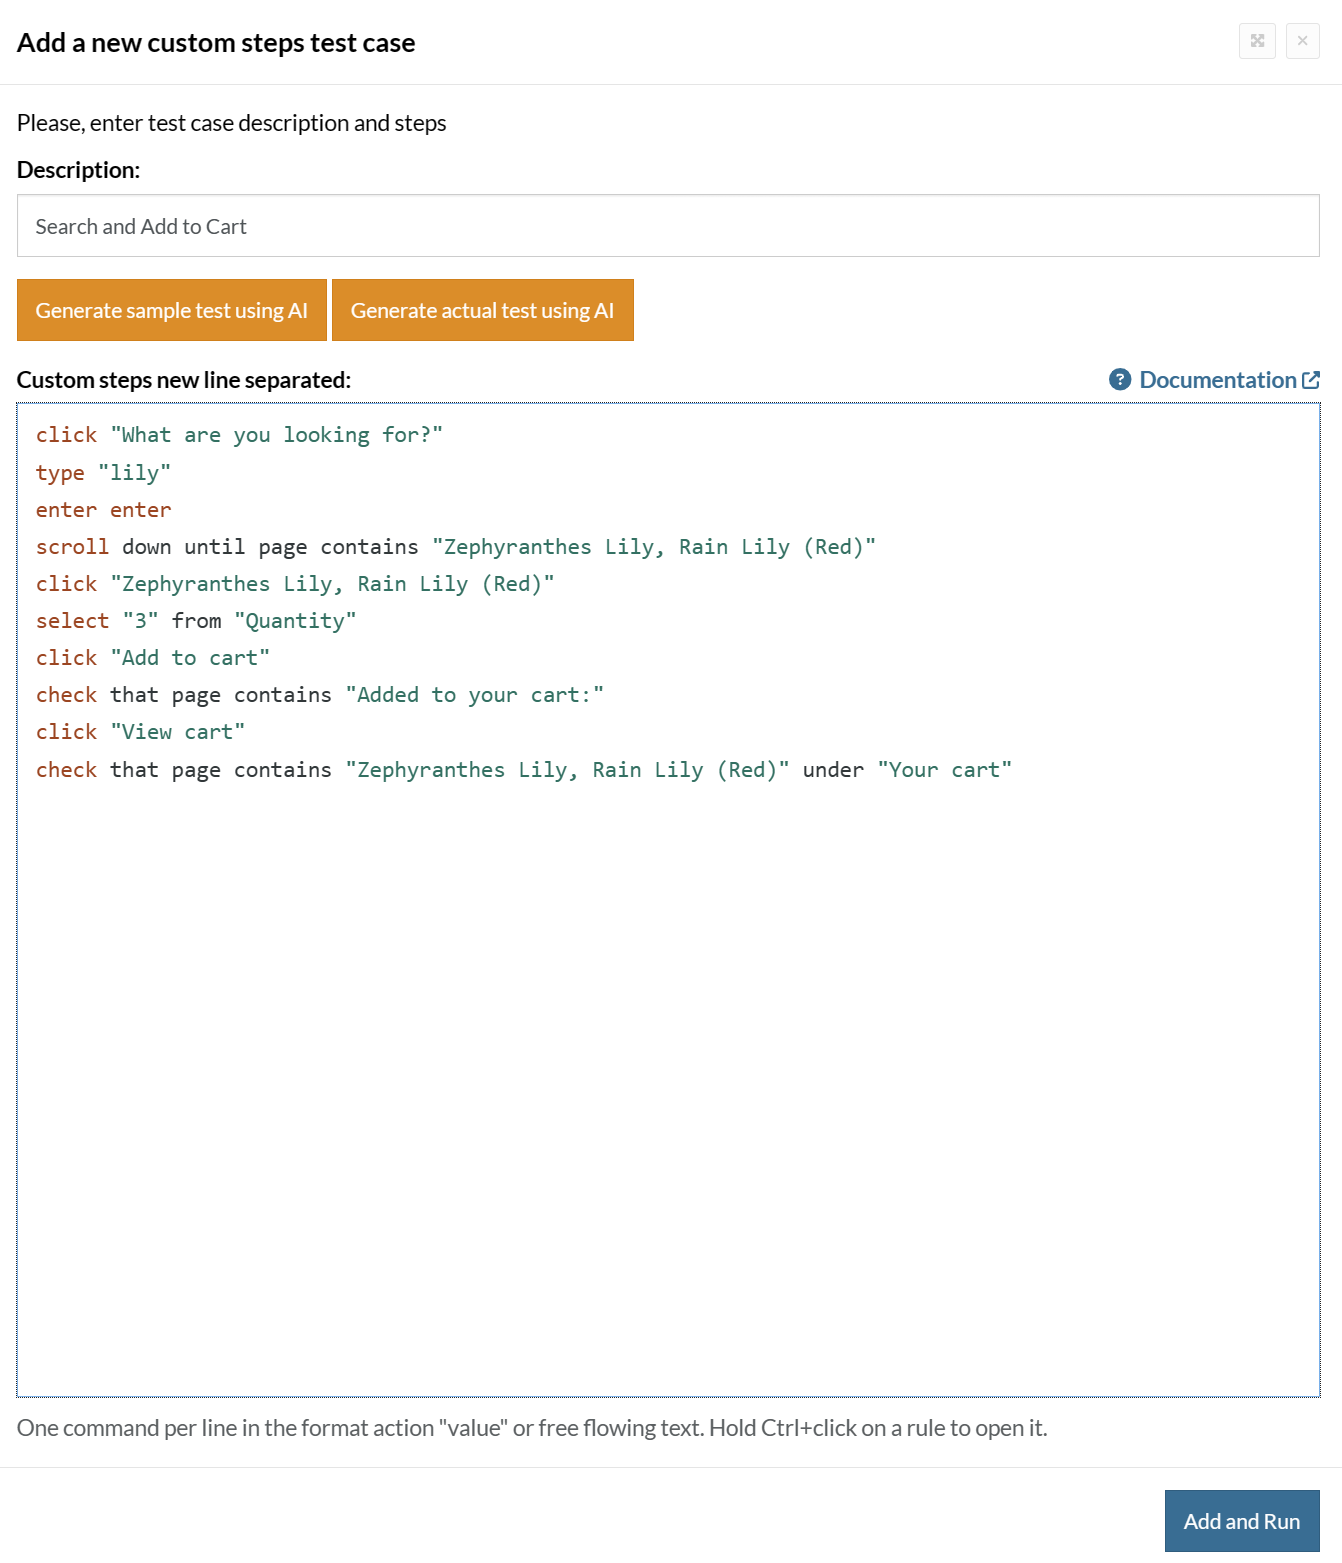
Click Add and Run.
Execution Results
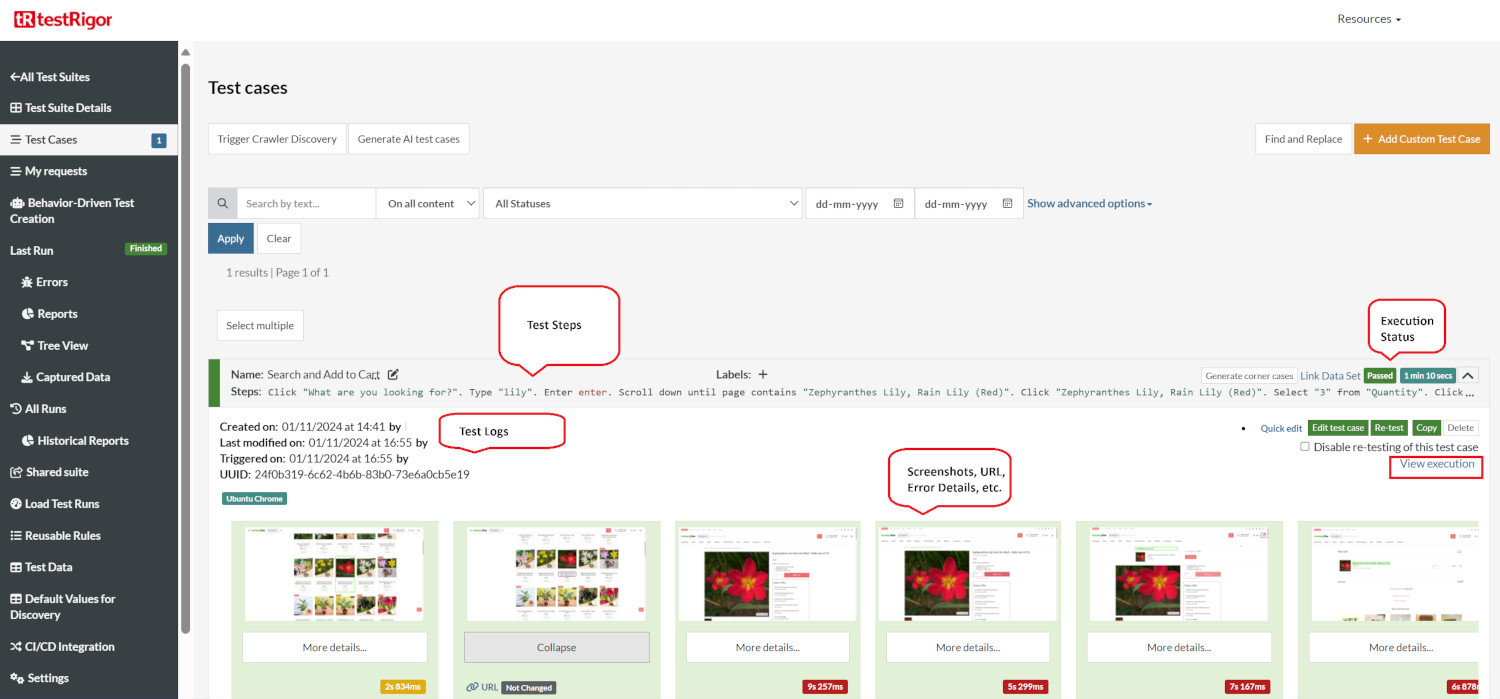
Once the test is executed, you can view the execution details, such as execution status, time spent in execution, screenshots, error messages, logs, video recordings of the test execution, etc. In case of any failure, there are logs and error text that are available easily in a few clicks.
You can also download the complete execution with steps and screenshots in PDF or Word format through the View Execution option.
testRigor’s Capabilities
Apart from the simplistic test case design and execution, there are some advanced features that help you test your application using simple English commands.
- Reusable Rules (Subroutines): You can easily create functions for the test steps that you use repeatedly. You can use the Reusable Rules to create such functions and call them in test cases by simply writing their names. See the example of Reusable Rules.
- Global Variables and Data Sets: You can import data from external files or create your own global variables and data sets in testRigor to use them in data-driven testing.
- 2FA, QR Code, and Captcha Resolution: testRigor easily manages the 2FA, QR Code, and Captcha resolution through its simple English commands.
- Email, Phone Call, and SMS Testing: Use simple English commands to test the email, phone calls, and SMS. These commands are useful for validating 2FA scenarios, with OTPs and authentication codes being sent to email, phone calls, or via phone text.
- File Upload/ Download Testing: Execute the test steps involving file download or file upload without the requirement of any third-party software. You can also validate the contents of the files using testRigor’s simple English commands.
- Database Testing: Execute database queries and validate the results fetched.
testRigor enables you to test web, mobile (hybrid, native), API, and desktop apps with minimum effort and maintenance.
Additional Resources
- Access testRigor documentation to know about more useful capabilities
- Top testRigor’s features
- How to perform end-to-end testing
Conclusion
We see that WordPress is an excellent framework for building your own website. With its plugins and themes, you get a versatile palette to work with, even if you are not well-versed in coding. You can also create your own components for further customization.
When choosing tools for testing your WordPress plugin or website, consider the scope, the specific functionalities you need to test, and your familiarity with the testing frameworks. Combining these tools can provide a comprehensive testing strategy, covering unit tests for individual functions, integration tests for interactions within the WordPress environment, and end-to-end tests for user interface and usability.
| Achieve More Than 90% Test Automation | |
| Step by Step Walkthroughs and Help | |
| 14 Day Free Trial, Cancel Anytime |


