Why Appium sucks for end-to-end tests in 2026?
|
|
Mobile automation has become an essential factor of modern software development, driven by the rapid growth and adoption of mobile applications across various industries. However, with the increasing complexity of mobile platforms, devices, and operating systems, ensuring high-quality app performance, functionality, and user experience has become a significant challenge. This is where mobile automation plays a pivotal role.
| Key Takeaways: |
|---|
|
By automating repetitive and time-consuming tasks, mobile automation allows teams to focus on innovation and adaptability. It ensures that mobile applications can meet modern users’ high expectations.
Mobile automation tools streamline testing, enabling faster release cycles, ensuring higher app quality, and providing thorough testing coverage.
Let’s learn more about Appium and why it is not a great choice today.
About Appium
Appium is a widely adopted open-source mobile automation tool that enables the automation of native, hybrid, and mobile web applications across Android and iOS platforms. It operates on the WebDriver protocol and supports multiple programming languages, such as Java, Python, Ruby, and JavaScript. Its architecture also supports the automation of real devices as well as emulators and simulators.
Creating Test Scripts using Appium
Appium follows a client-server architecture, where the client is the test script or code written by the user using Appium’s client libraries. It interacts with the Appium server by sending HTTP requests following the WebDriver JSON Wire Protocol. The server acts as a bridge between the client and mobile devices/emulators. It listens to the requests from the client and executes commands on the mobile device or emulator. The server is built using Node.js and can be started manually or via Appium Desktop.
{
  "platformName": "Android",
  "deviceName": "emulator-5554",
  "app": "/path/to/app.apk",
  "automationName": "UiAutomator2"
}
Appium uses different native testing frameworks to automate mobile applications on Android and iOS platforms. It uses UiAutomator2 for Android and XCUITest for iOS. Both are critical components for driving the user interface (UI) of mobile apps, and they interact with Appium to allow automation of native, hybrid, and mobile web applications on their respective platforms.
Appium provides a GUI tool called the Appium Inspector that allows testers to inspect the UI elements of the app under test interactively. The inspector helps locate the properties of UI elements like id, XPath, name, or accessibility id, which are essential for writing test scripts. Element locators vary for Android and iOS, which is a considerable issue because it makes using the same test scripts for iOS and Android impossible.
Let’s look at the common and unique ones.
-
Common locator Using Accessibility ID: The accessibilityId is a universal locator that works for both Android and iOS. It maps to contentDescription in Android and accessibilityLabel in iOS.
MobileElement element = driver.findElementByAccessibilityId("login_button");
Android Specific Locators
-
By ID (resource-id): This is the unique identifier assigned to elements within an Android app. It’s one of the most reliable ways to locate elements.
MobileElement element = driver.findElementById("com.example:id/login_button"); -
By Class Name: Every element in an Android app has a class name based on the type of the UI component.
MobileElement element = driver.findElementByClassName("android.widget.Button"); -
By XPath: It can be used to navigate through the app’s UI hierarchy and find elements based on attributes, positions, or relationships.
MobileElement element = driver.findElementByXPath("//android.widget.Button[@text='Login']"); -
By UI Automator: Allows more complex queries using a selector string that can chain together conditions like class, text, resource-id, etc.
MobileElement element = driver.findElementByAndroidUIAutomator("new UiSelector().text(\"Login\")");
iOS Specific Locators
-
By Name: In iOS, the name is often synonymous with label or accessibilityLabel, and you can use it to locate elements that display specific text.
MobileElement element = driver.findElementByName("login_button"); -
By Class Name: Elements in iOS apps are classified into XCUIElementTypeButton, XCUIElementTypeTextField, etc. Class names can be used to locate elements based on their type.
MobileElement element = driver.findElementByClassName("XCUIElementTypeButton"); -
By XPath: XPath is used similarly in iOS to navigate the UI hierarchy and locate elements based on their attributes or positions.
MobileElement element = driver.findElementByXPath("//XCUIElementTypeButton[@label='Login']"); -
By Predicate String (XCUITest): Predicate strings provide a powerful way to search for elements using a query language. This is particularly useful for locating elements based on multiple attributes.
MobileElement element = driver.findElementByIosNsPredicate("label == 'Login' AND value == '1'");
Seeing the different element locators for iOS and Android Studio, getting and updating them in the test script is cumbersome and requires too much effort. This process will consume more time than can be used effectively for performing other types of testing and creating more useful tests.
Appium Limitations
Let’s see a sample script written in Appium for Android and iOS. We can see how the script is different for both.
import io.appium.java_client.MobileElement;
import io.appium.java_client.android.AndroidDriver;
import org.openqa.selenium.remote.DesiredCapabilities;
import java.net.URL;

public class AndroidAppiumTest {
  public static void main(String[] args) throws Exception {

    // Set up desired capabilities for Android
    DesiredCapabilities capabilities = new DesiredCapabilities();
    capabilities.setCapability("platformName", "Android");
    capabilities.setCapability("deviceName", "Android Emulator");
    capabilities.setCapability("app", "/path/to/android_app.apk"); /
    capabilities.setCapability("automationName", "UiAutomator2");

    AndroidDriver<MobileElement> driver = new AndroidDriver<>(new URL("http://127.0.0.1:4723/wd/hub"), capabilities);

    MobileElement usernameField = driver.findElementById("com.example.android:id/username");
    usernameField.sendKeys("testuser");

    MobileElement passwordField = driver.findElementById("com.example.android:id/password");
    passwordField.sendKeys("password123");

    MobileElement loginButton = driver.findElementById("com.example.android:id/login_button");
    loginButton.click();

    driver.quit();
  }
}
import io.appium.java_client.MobileElement;
import io.appium.java_client.ios.IOSDriver;
import org.openqa.selenium.remote.DesiredCapabilities;
import java.net.URL;

public class IOSAppiumTest {
  public static void main(String[] args) throws Exception {

    // Set up desired capabilities for iOS
    DesiredCapabilities capabilities = new DesiredCapabilities();
    capabilities.setCapability("platformName", "iOS");
    capabilities.setCapability("deviceName", "iPhone Simulator");
    capabilities.setCapability("platformVersion", "14.0");
    capabilities.setCapability("app", "/path/to/ios_app.app");
    capabilities.setCapability("automationName", "XCUITest");

    IOSDriver<MobileElement> driver = new IOSDriver<>(new URL("http://127.0.0.1:4723/wd/hub"), capabilities);

    MobileElement usernameField = driver.findElementByClassName("XCUIElementTypeTextField");
    usernameField.sendKeys("testuser");

    MobileElement passwordField = driver.findElementByClassName("XCUIElementTypeSecureTextField");
    passwordField.sendKeys("password123");

    MobileElement loginButton = driver.findElementByClassName("XCUIElementTypeButton");
    loginButton.click();

    driver.quit();
  }
}
If you compare both scripts, you can notice that all the element locators are different, and the desired capabilities also need to be changed based on the mobile device or emulator that we select. So, script maintenance is a challenging task. Though Appium claims that we can keep one script that can work for both platforms, the reality is different.
In many projects, the development for Android and iOS is done by different teams, so the element locator IDs they use may be different. Regarding automation, one script for both platforms mostly remains a far-fetched dream. As a result, the team needs to create and maintain both scripts. This doubles the maintenance and debugging effort and affects the test coverage. This time could have been utilized to write robust and useful tests to validate the application more effectively.
Without self-healing capabilities in the test automation tool, if any element property changes, the test case fails because of a script error. A tester needs to ensure the locators are correct before running the script. This maintenance eats up the time, effort, and cost of the team working on it. Also, it adversely affects the creation of new scripts due to unwanted test script maintenance.
Not the above one alone; there are many other limitations in using Appium.
Sluggish Performance
Test execution is very slow using Appium. There are many factors that make the execution slow, like:
- Heavy Reliance on WebDriver: Appium relies on a webdriver-based architecture, which has unnecessary overheads, making the tests slower when compared to other tools.
- Network Latency Issues: Appium works on a client-server model for communicating with all the connected devices. This introduces more delay.
- Multiple Layers of Abstraction: Instead of interacting directly with device elements, Appium relies on intermediate layers, making it inefficient.
- UI Elements Detection Slowness: Interacting with UI elements requires querying the UI tree, which can be painfully slow, especially in complex apps.
The Flakiness Problem
Appium flakiness acts up more once you switch from simulators to real device testing. Network delays mess things up, so does whatever state the phone’s in – sometimes it’s just slow to respond. Animations running on the OS add confusion, making clicks or swipes fail unexpectedly. Device farms pile on complexity, since timing gets out of sync across machines.
So teams usually spend time fixing setup problems instead of app performance. It highlights how the tool’s actually slowing them down. There are many factors that cause this:
- Element Locator Failure: While using dynamic element locators in automation, the tests fail frequently because the property of the element changes.
- Synchronization Issues: While executing on different devices, there are high chances of failure while waiting for an element to appear, leading to timeout errors.
- Device Dependency: When considering different devices, especially Android devices. Some tests may work fine on certain devices while failing on other devices, making Appium inconsistent in how it interacts with device-specific behaviors.
Appium executes tests slowly – this really matters in continuous integration pipelines. Its client-server setup drags things out, especially when it keeps fetching the UI structure over and over.
Poor Parallel Execution
Appium struggles with parallel execution on multiple real iOS devices or simulators due to the limitations of the XCUITest framework. While Android allows more straightforward parallel execution using UiAutomator2, iOS requires separate WebDriverAgent instances for each device, which can be complicated to configure.
Limited Gesture and Multi-Touch Support
Appium has built-in support for basic gestures like tap, swipe, and scroll, but handling complex gestures or multi-touch events can be challenging, especially in cross-platform scenarios. This limitation becomes evident when testing apps that require complex gestures (e.g., drag-and-drop or pinch-zoom). For complex interactions, you might need to implement custom code or integrate other libraries, increasing the complexity of your test scripts.
Dependency on External Frameworks
Appium relies heavily on external frameworks like UiAutomator2 for Android and XCUITest for iOS, meaning its functionality is constrained by the limitations of these underlying tools. Changes, updates, or bugs in these frameworks can break test execution in Appium, forcing users to wait for updates or bug fixes in the respective frameworks.
Lack of Intelligent Test Automation
Today, test automation has become smarter and is powered by AI and ML models. Appium has failed to incorporate these features into its frameworks:
- Visual Testing with AI: Tools like testRigor use AI for visual regression testing, eliminating the need for hardcoded locators.
- Self-Healing Test Automation: AI-driven frameworks can automatically update locators when elements change, a feature Appium lacks.
Appium E2E limitations are architectural, not accidental.
Appium struggles mostly because it wasn’t built for large-scale, full-cycle testing from start to finish. Instead of solid foundations, its structure depends heavily on unstable interface layouts. Its WebDriver-based architecture forces tests to rely on fragile UI trees and platform-specific attributes. Communication happens through shaky middle layers, making everything slower or unpredictable.
With true end-to-end testing, when groups want dependable results, quick responses, or minimal upkeep, these design choices turn into ongoing headaches instead of short-term hiccups.
How Should End-to-End Testing Work?
What is the purpose of end-to-end tests? They are meant to validate that your app’s functionality works as intended from an end-user’s perspective, following the actual user activity flow in real-world scenarios.
This means you should reference elements in the way the user experiences them, not how a developer views the application. For users, the only thing that matters is identifying the proper input fields or finding the correct button to click. Therefore, it’s essential to have a simple, reliable way to interact with forms, tables, files, etc., that mimics how a user would interact with a browser or device.
Example: Form Interaction
Let us take an example of a website form to help you understand.
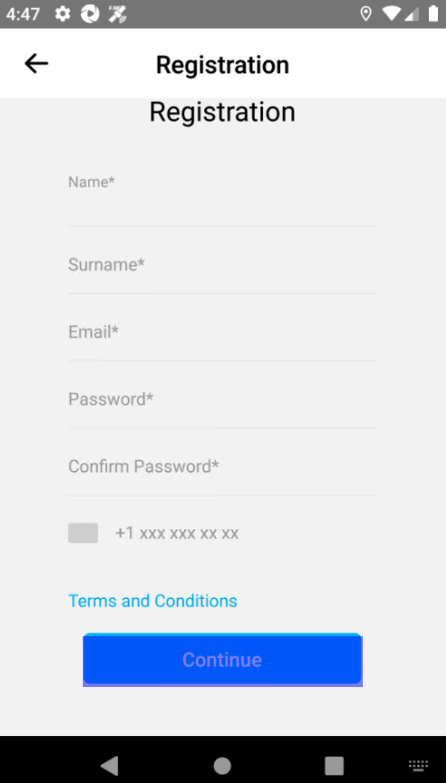
As an end user, you will navigate to each field, fill in the data, and click the ‘Continue’ button. You are not concerned about the resource-id/ClassName/XPath, etc., of the button. Now, let’s see the locator hierarchy.
The developer has not provided an ‘accessibility id‘, so we need to use XPath. As we know, this locator won’t be the same for iOS. We need to add different element locators for iOS. Also, when there is an update in native frameworks, or if the application changes to any new code base, these locators won’t work, and you might be forced to change these element names as well.
Ironically, this is precisely when you need your end-to-end tests to work, i.e., right after migrating to a new framework. You need E2E tests to rely on and ensure everything functions as expected.
And therefore, your end-to-end testing tool shouldn’t depend on the internal code of your application. Instead, it should clearly mimic the perspective and actions of the end user. Take the “Continue” button in the screenshot, for example. Its internal structure could change, but there will likely always be a placeholder or label that the user identifies as “Continue.” What’s really needed is a way to identify and describe elements from the end user’s point of view based on what they see, such as a label or placeholder.
click “Continue”
enter “James Bond” in “Name”
testRigor: Simplifying End-to-End Testing
Today, test automation tools powered by Artificial intelligence and Machine Learning algorithms are available. These tools are simple to use and, therefore, help you achieve greater test coverage quickly. If you are looking for an intelligent test automation tool, the better option will be testRigor. It has advanced capabilities, including Natural Language Processing, Generative AI, AI-features testing, LLM testing, and more.
The English commands you have seen above are actual testRigor commands. There are many reasons why Appium is not suitable for E2E testing today. The tool you use for E2E testing should be as simple as possible and help minimize the number of bugs in production.
It is possible with the available advanced AI technologies and intelligent AI agents. testRigor is a codeless automation tool powered by generative AI and ML technologies that help generate/create easy and automatic test scripts and data in plain English. With testRigor, test script maintenance requires almost zero effort. Read here how you can decrease 99.5% of your test maintenance time.
Let’s take a look at its capabilities and see how easy it is to use.
You have the following advantages with testRigor:
-
No programming required: It is a codeless tool, meaning tests are written/generated using plain English commands. This opens the ability for the entire team to author tests (including manual testers) and significantly increases the speed of creating tests.Its record-and-playback feature can further speed up test creation. Since the recorded tests will be in the same plain English format, it becomes viable for anyone to edit and maintain when desired.
- Stable locators: There is no hassle in mentioning CSS or any technical parameters for locating elements on the screen. All you need to do is mention relative positions or how you see an element on screen. You can click on a button below the title by simply writing ‘click “button” below “Title”’.
- AI-based self-healing: Using Vision AI and adaptation with specification changes for rules and single commands, testRigor can look at the screen for an alternative way of doing what was intended instead of failing. This will allow the test script to adapt quickly to new changes in your application. Read more about AI-based self-healing.
- Cross-browser and cross-platform support: The tool allows you to perform cross-browser and cross-platform tests; the parallel execution feature allows you to get the test results in minutes.
- No installation needed: Being a cloud-based tool, you just need to register and get started with test automation in no time.
- Supported integrations: This can be easily integrated with most CI/CD tools, test management tools, and issue-tracking tools.
- Advanced reporting and logging: It offers good reporting capabilities and captures screenshots at every step. It provides clear error messages in English. You can also view the video recordings or error logs of the execution for clarity.
- A single tool for all testing needs: You can write test cases across platforms: web, mobile (hybrid, native), API, desktop apps, and browsers using the same tool in plain English statements.
- Test AI features: This is an era of LLMs, and using testRigor, you can even test LLMs such as chatbots, user sentiment (positive/negative), true or false statements, etc. Read: AI Features Testing and Security Testing LLMs.
Writing Tests with testRigor
Writing tests with testRigor is as simple as describing the steps to access the application to a friend in English. The testRigor documentation has all the commands in detail, and you can even define your own preferred commands (subroutines) in plain English.
click “Sign in”
login //Reusable rule
check the page contains “Your Account”
enter "laptop" in "Search Amazon"
click the first "hp laptop"
click “add to cart"
click “go to cart"
click “checkout"
click the first checkbox below “address"
You can easily create functions (Reusable Rules) for the test steps you use repeatedly and call them in test cases by simply writing their names. Read How to do End-to-end Testing with testRigor for more details. Know more about the exciting features of testRigor.
The myth of “write once, run everywhere”
Appium’s said to work on both platforms – yet real-world use shows Android and iOS tests drifting apart fast. Locators aren’t the same; neither are gestures or OS behaviors, so teams end up running different code bits. Each side needs its own setup just to keep things working.
By now, Appium isn’t really a true cross-platform mobile option anymore. Instead, it’s just two shaky testing setups using one shared system.
Conclusion
Appium isn’t broken due to misuse by teams. The real issue? It expects mobile squads to tolerate ongoing hassle without question. If your goal is solid, full-cycle testing, this compromise just doesn’t hold up anymore. Many reasons, like slow execution speed, flaky tests, and a lack of AI-driven capabilities, make it a less preferred tool currently. As the industry moves towards intelligent test automation, Appium is being left behind in favor of faster, more reliable alternatives.
If you are still using Appium for mobile automation, now is the time to explore better options. The future of testing is AI-driven, and Appium simply cannot keep up.
| Achieve More Than 90% Test Automation | |
| Step by Step Walkthroughs and Help | |
| 14 Day Free Trial, Cancel Anytime |


