Anomaly Reports: How to use AI for Defect Detection?
|
|
“The pace of progress in artificial intelligence is incredibly fast unless you have direct exposure to groups like DeepMind; you have no idea how fast it is growing at a pace close to exponential” — Elon Musk.
Software applications are getting really complicated. With microservices, daily deployments, and users who expect even more, it’s getting harder and harder to catch bugs before they become a real mess in production. By the time something hits production, if you’re in QA, you can feel like you’re always just playing catch-up.
That’s where AI steps in. No, it’s not some sci-fi robot that’s coming to take your job; it’s more like a supercharged assistant that never sleeps, doesn’t overlook details, and can catch predictive anomalies in your software before your users do, to the detriment of your business.
So, let’s learn more about anomaly reports, how they work, and how we can use AI to improve them in the defect detection toolbox.
Anomalies in Software Testing
When we talk about an anomaly in software testing, it means any behavior that is not expected. This can be:
- An unexpected UI change
- A sudden spike in API response time
- A crash occurs when performing a particular sequence of actions
- A mismatch between actual and expected output
- Unusual memory consumption
These anomalies can be indicative of defects. But not every anomaly is a bug; some may be expected due to configuration changes or external factors. The challenge is to identify the anomalies that are real defects from those that are false positives, which is a task well-suited for AI. Read: The Strategy to Handle Defects in the Agile Development Methodology.
Traditional Defect Detection vs AI-Powered Anomaly Detection
| Traditional Defect Detection | AI-Powered Anomaly Detection |
|---|---|
| Relies heavily on test scripts and manual test cases. | Uses machine learning to find deviations without explicit test cases. |
| Issues are typically found only when they’re explicitly tested for. | Capable of identifying patterns humans might miss. |
| Manual analysis of logs and test results is time-consuming. | Continuously learns from historical data to improve accuracy. |
| Often, reactive bugs are found after failure. | It is proactive, detecting potential issues before they escalate. |
What are Anomaly Reports in Software Testing?
The anomaly report is a summary pointing out unexpected or abnormal behavior during the execution of the application. It’s kind of like the system saying, “Hey, something strange just happened, maybe you should investigate this.”
Anomaly reports are like digital watchdogs. Their job is to make sure your application isn’t silently breaking under the hood. Instead of waiting for users to run into a bug in production or a tester to randomly stumble upon it, these reports alert you as soon as something weird starts bubbling. And the best part? As your AI learns over time, it becomes more adept at distinguishing false alarms from real issues. That means less noise and more actionable insights, which is exactly what every QA and DevOps team needs.
These reports are typically the result of AI models constantly monitoring things like:
- Logs: These are the diary entries of your application, a detailed record of what’s happening behind the scenes. AI combs through these logs, recognizing patterns and identifying anomalous entries that a human being would either miss or pass by. Read: Test Log Tutorial.
- Performance Metrics: These include CPU usage, memory consumption, server response times, etc. If your app suddenly begins consuming twice as much memory or takes three times longer to load a page, AI will register it and raise the alarm.
- UI Changes: Computer vision-based visual testing tools can catch when a UI element disappears, a layout moves, or fonts change sizes arbitrarily. It’s like having a robot that keeps checking if your app still looks correct.
- System Events: AI looks for unusual system-level activities, such as random service crashes, unexpected restarts, or network anomalies. It’s learned from data what a healthy system should look like, and raises flags on anything that seems suspect.
- Test Case Execution: Even if all your tests are passing, AI might realize something is off, like an abnormally rapid execution (could mean something was bypassed) or suddenly dropping patterns in test coverage.
What’s Inside a Good Anomaly Report?
A good anomaly report is not a vague “something is wrong” message. It contains detailed, structured information and is designed to allow your team to act and move rapidly. Here’s what you’ll generally see:
- Timestamp of the Event: This tells you the exact time when the anomaly occurred, so you can match it with other events or deployments.
- Component or Module Affected: Indicates which part of the application/system experienced the unusual behavior.
- Observed Behavior vs. Expected Behavior: Describes what actually occurred vs what was expected to happen.
- Severity Level: The level of the anomaly, whether a harmless glitch or a major failure that requires immediate attention.
- Confidence Score: How confident is the AI that this is a real red flag and not a harmless blip?
- Suggested Root Cause: Provides an AI-based estimated root cause of the anomaly based on historical data and patterns.
- Recommended Fixes or Actions: Practical next steps you can take to fix or further investigate the problem.
How AI Detects Anomalies
AI doesn’t know what’s “weird”; it has to be trained. It works in much the same way humans learn patterns. If you take the same path to work every day, you notice when something is amiss, when construction is blocking your way, or a street is unusually quiet. AI does essentially the same with data: It learns what “normal” is, and flags anything that feels off. Let’s see the step-by-step process of AI learning anomalies.
- Data Collection: First, AI requires information. It gathers historical data from all sorts of sources, including log files, user behavior analytics, test results, performance metrics, etc. The more data it has, the better the system becomes at learning what’s normal.
- Preprocessing: Raw data can be messy, so the next step is to clean things up. This involves stripping away the noise, standardizing all the values (so everything has the same time unit and the same temperature scale), and identifying the issues that are known to have occurred in the past, so the AI has some context of what an anomaly looks like.
- Training the Model: The AI then gets to work learning the patterns. In this phase, the clean dataset is used to train machine learning models. The models learn to distinguish between average behavior and outliers, which allows them to identify similar patterns on their own later.
- Real-Time Monitoring: Upon training, the model gets deployed. It starts tracking new data, in real-time, whether that means system performance metrics, application logs, or the results from running test cases.
- Anomaly Scoring: Every new event or data point that arrives is compared against what the AI learned. If something goes wrong, like a bump up in memory usage or a test that runs ten times faster than usual, it gets an anomaly score based on how far from normal it varies.
- Alert Generation: When the anomaly score reaches a sufficiently high level, the system doesn’t just let it sit; it acts. This triggers an alert, and the event is logged in an anomaly report with information such as a timestamp, severity, and suggested actions.
Types of AI Used in Anomaly Detection
When it comes to anomaly detection, four main types of AI are commonly used: supervised, unsupervised, semi-supervised, and reinforcement learning. Let’s discuss in detail.
- Supervised Learning: This is the well-known “teach-by-example” method. You train the model with labelled data that says clearly, “this is a defect” and “this is normal.” And, over time, the AI learns these patterns and can make predictions on new data.
- Unsupervised Learning: This one is more of a detective. You don’t label it at all, just a bunch of data, and the model learns the patterns by itself.” Once it knows what “normal” looks like, anything outside the box gets flagged.
- Semi-Supervised Learning: In this case, you’re prompting the AI a bit. It begins with a limited amount of labeled data and subsequently gets trained on a more extensive dataset that lacks labels. It is like giving a baby step and then letting a junior tester explore, of course, with some supervision.
- Reinforcement Learning: This one’s a little different; it learns via trial and error, recovering feedback from the environment based on actions. It’s like training a dog; reinforce the good and correct the bad.
Implementing AI-Based Anomaly Detection in the QA Process
So, you’re all set to have AI work for you in your QA process to make sure bugs don’t reach production? Awesome move. However, as with any powerful tool, AI needs to be configured the right way to function well. Let’s have a step-by-step process for implementing AI-based anomaly detection to work for your team.
Define Your Goals
Before getting into tools and data, be clear about what you want to accomplish. Do you want to minimize the flare of false positives from automation results? Do you want to spot subtle bugs that slip through standard test cases? Or perhaps you want to automatically highlight performance problems? The right goals help dictate all other decisions you make.
Choose a Tool or Framework
There are a variety of open-source and commercial solutions out there. If you’re looking for a low-maintenance, intelligent platform, testRigor is worth exploring. It’s designed to minimize test flakiness and maintenance by using AI to understand test intent and spot anomalies in behavior even when the UI or workflows change. Read: Decrease Test Maintenance Time by 99.5% with testRigor.
Collect Quality Data
AI is only as good as the data it’s trained on. Start collecting useful data like:
- System logs
- Application performance metrics
- Test execution results
- User interaction data
The better the quality and variety of your data, the better your anomaly detection model will be.
Label Historical Data (If Using Supervised Learning)
If you’re going the supervised route, you’ll need to label past data. Mark which events were actual bugs and which were harmless. This helps the AI understand what real issues look like. No historical labels? You might want to start with unsupervised learning instead.
Train the Model
Now comes the fun part: training the model. Depending on your tool, you might do this using a built-in training pipeline or by coding it yourself using Python libraries like SciKit, TensorFlow, or PyTorch. The model learns from your historical data to spot future anomalies. Or use commercial tools such as testRigor to bypass all this hassle of coding and creating scripting logic. We will see how to use that in the next section.
Integrate with CI/CD
To really benefit from AI anomaly detection, it needs to be part of your CI/CD pipeline. That means every code commit, build, or test run should feed into the anomaly detection system. This lets it flag issues in near real-time and keeps your QA loop tight and fast.
Analyze Reports
Once the system starts generating anomaly reports, make sure your QA team knows how to read them. Train them to understand things like:
- What does the anomaly score mean
- How to read confidence levels
- Which issues need immediate action vs. which are low priority
AI doesn’t replace human judgment; it helps amplify it.
Create a Feedback Loop
The final step is to keep the AI learning. Feed back any new bugs, user-reported issues, or false alarms into the system. Over time, your model gets smarter, more accurate, and more aligned with the actual behavior of your application and users.
AI-Driven Anomaly Reporting in testRigor
testRigor, with its integrated Artificial Intelligence, takes automation to the next level. testRigor incorporates Natural Language Processing (NLP) that helps testers to perform commands in plain English instead of scripts. The AI knows the semantics, knows what kinds of things or actions are involved, and adjusts its movement accordingly. This is the first step for non-technical users to adopt test automation. To know more about testRigor NLP-based scripting, read Natural Language Processing for Software Testing.
Another feature of testRigor is AI-based self-healing. testRigor tracks UI changes from many test runs to learn to adapt on their own. If the selector or position of an element changes, the tool has to fall back to historical data and make the fix accordingly. This can be seen in the testRigor reports by clicking “Show extra info” button.
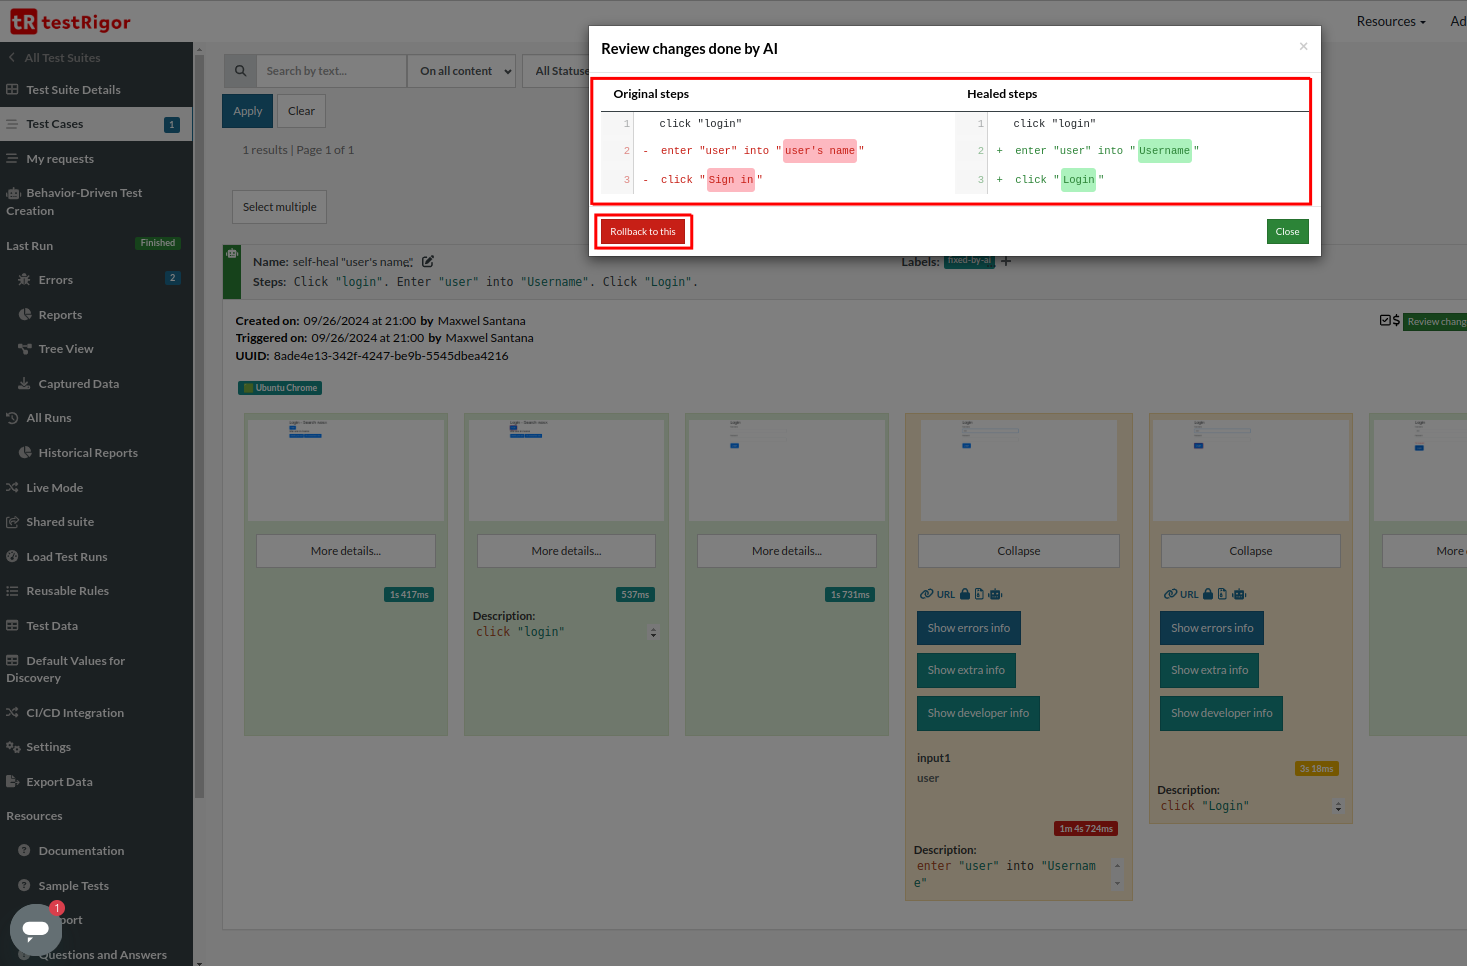
To learn more about this, read AI-Based Self-Healing for Test Automation.
enter "mention Newton's third law" into "Chat with AI...".
type enter.
check that page "contains Newton's third law" using ai.

testRigor validates the chatbot response and confirms whether it is correct or not. You can review the test output by clicking the “Show extra info” button.

This creates a conversational type verification of chatbots. Read more: Top 10 OWASP for LLMs: How to Test?
You can do a lot more with testRigor. Check out the complete list of features.
Summing Up
AI-based anomaly detection isn’t a trend—it’s evolving into an essential component of modern QA. Teams can go from reactive bug fixing to proactive quality assurance by leveraging anomaly reports. It is a blend of the right tools, trained models, clean data, and a QA strategy that seeks to harness AI.
If you want better defect capture, then you must implement AI-based anomaly detection into your QA pipelines or use modern automation tools like testRigor, and this is the time for it. This not only increases product quality, but also gain insight into how your software behaves in the wild.
| Achieve More Than 90% Test Automation | |
| Step by Step Walkthroughs and Help | |
| 14 Day Free Trial, Cancel Anytime |


