Azure DevOps Overview
|
|
Continuous Integration and Continuous Delivery (CI/CD) is being increasingly adopted for software development to keep up with the fast-paced demands of business. It aims to bridge the gap between development (Dev) and operations (Ops) teams, fostering a collaborative DevOps culture. CI/CD helps automate the process of building, testing, and releasing software applications.
With the help of the right tools, you can ensure that this process works for your organization, too. Of the many DevOps platforms available in the market, one such platform that acts as a multipurpose tool is Azure DevOps.
What is Azure DevOps?
Azure DevOps is a cloud-based platform from Microsoft that provides a suite of tools to support the DevOps lifecycle for software development. It allows development teams to manage their entire application lifecycle, from planning and version control to testing and deployment. Azure DevOps provides a central platform to automate builds, tests, and deployments, leading to faster releases and improved software quality.
Features of Azure DevOps
Azure DevOps is loaded with features like:
- Version control: Azure Repos provides Git repositories or Team Foundation Version Control (TFVC) for managing your codebase. This allows developers to track changes, collaborate effectively, and revert to previous versions if needed.
- Build and release management: Azure Pipelines helps automate the build, testing, and deployment processes. You can define pipelines to trigger builds and tests upon code changes and configure deployments to various environments (testing, staging, production). It supports multiple languages and platforms, including Windows, Linux, and macOS.
- Agile planning and work management: Azure Boards provides tools for planning sprints, tracking work items (user stories, bugs, tasks), and visualizing progress using Kanban boards or Scrum methodologies. These dashboards are customizable with widgets for tracking progress and metrics.
- Test management: Azure Test Plans allows you to create and manage manual and automated test cases, track test execution results, and generate reports to gain insights into software quality. It can integrate with automated test frameworks and run automated tests as part of CI/CD pipelines.
- Collaboration features: Azure DevOps offers features like workspaces, wikis, and team chats to facilitate communication and collaboration between developers, testers, and other stakeholders.
- Extensibility and integrations: The platform provides a rich marketplace with extensions to integrate with various third-party tools and services used in the development lifecycle.
Benefits of using Azure DevOps
With a valuable platform like Azure DevOps, you can adopt a DevOps approach to software development. Here are some benefits of working with this tool:
- Comprehensive set of tools: Azure DevOps provides a complete set of integrated tools that cover the entire software development lifecycle, including planning, development, testing, delivery, and monitoring. This eliminates the need for multiple disparate tools and ensures seamless collaboration and workflow.
- Enhanced software quality: Integrated testing tools and features promote a focus on quality throughout the development lifecycle.
- Scalable and flexible: Being highly scalable, organizations of all sizes can use it effectively. It supports a wide range of programming languages, frameworks, and platforms.
- Enhanced collaboration: This platform facilitates collaboration among team members through features like Azure Boards for work tracking, Azure Repos for version control, and Azure Pipelines for CI/CD. It integrates well with other collaboration tools like Microsoft Teams, Slack, and GitHub.
- Automation through pipelines: Azure DevOps enables automated CI/CD pipelines, allowing for faster and more reliable software delivery.
- Possibility for customizations: It offers extensive customization options, allowing teams to tailor the tools to their specific workflows and processes. The Azure DevOps Marketplace provides a wide range of extensions and integrations to further enhance functionality.
- Secure platform: Azure DevOps provides robust security features, including role-based access control (RBAC), auditing, and compliance with industry standards and regulations. This ensures that your development processes and data are secure.
- Better analytics and reporting: Built-in analytics and reporting tools provide insights into your development and delivery processes. Teams can monitor key metrics, track progress, and identify areas for improvement using customizable dashboards and reports.
- Cost-effective: Azure DevOps offers flexible pricing options, including free tier options for small teams and projects. The pay-as-you-go model allows organizations to scale their usage and costs based on their needs.
Overview of testing features in Azure DevOps
Azure DevOps gives you the ability to test your code as you go by allowing you to create test plans and test cases. With test plans, you can track manual as well as automated test cases and their results.
Here’s how you can do it.
Create test cases
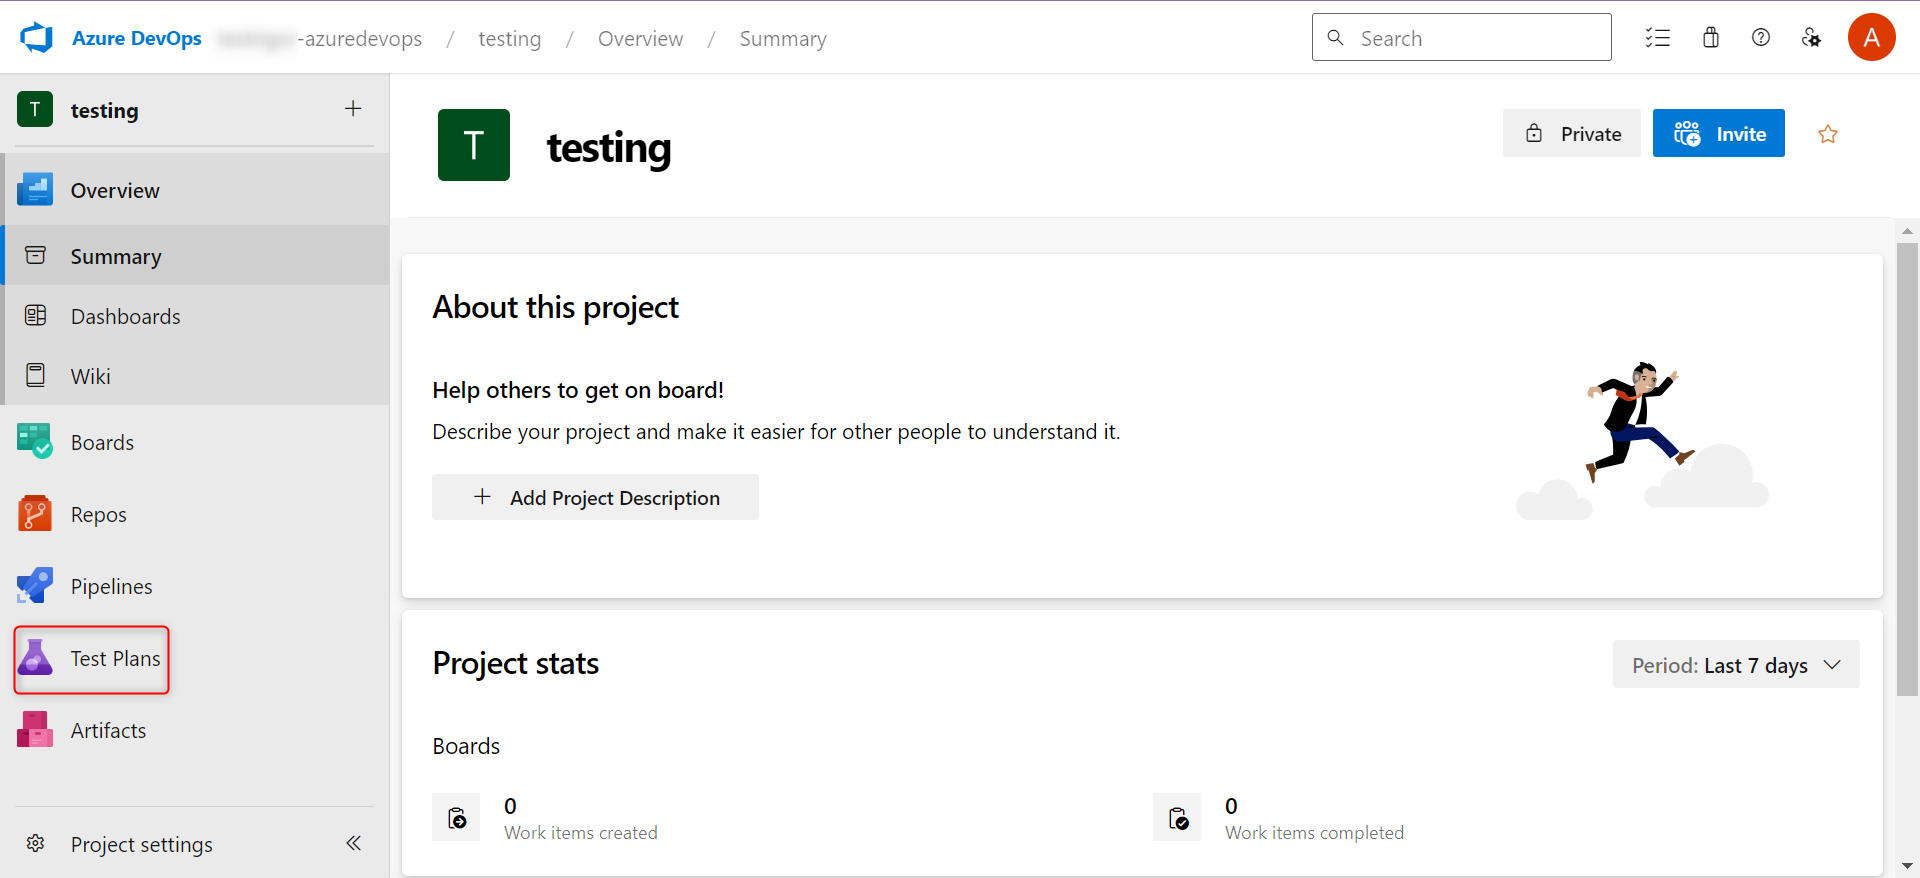
Step 1: Log into your Azure DevOps account and go to the project for which you want to create test cases. From the left panel, open the Test Plan section.
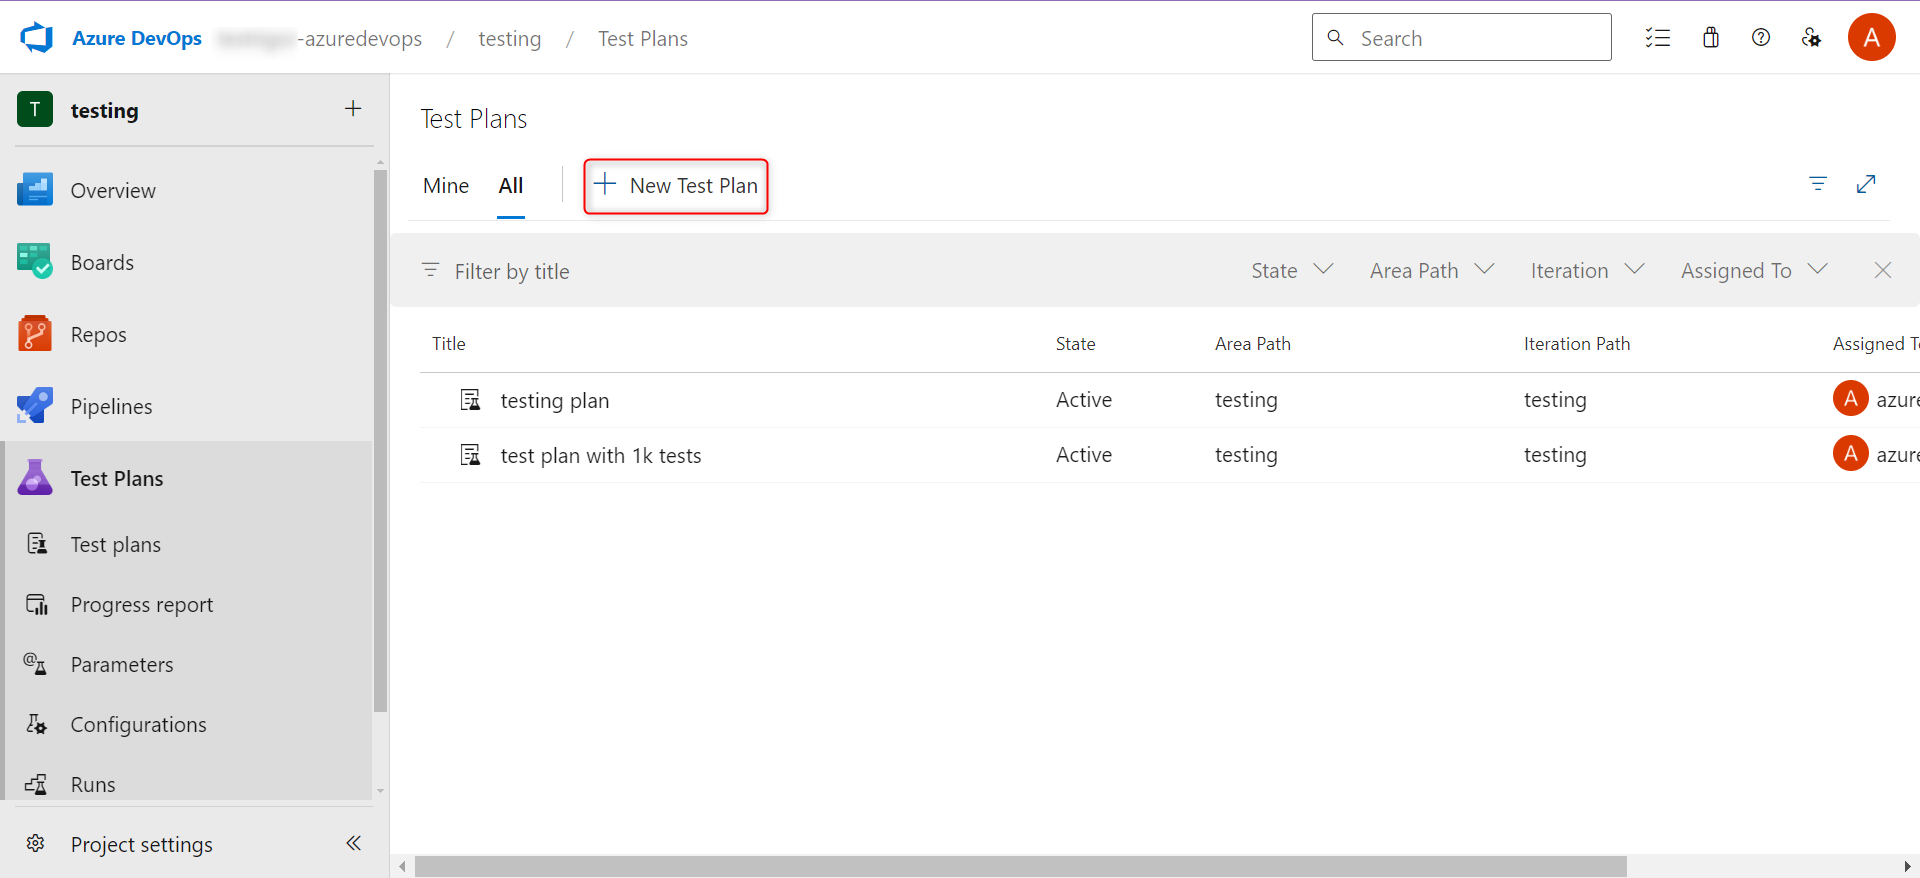
Step 2: In the Test Plans section, create a new plan by clicking + New Test Plan.
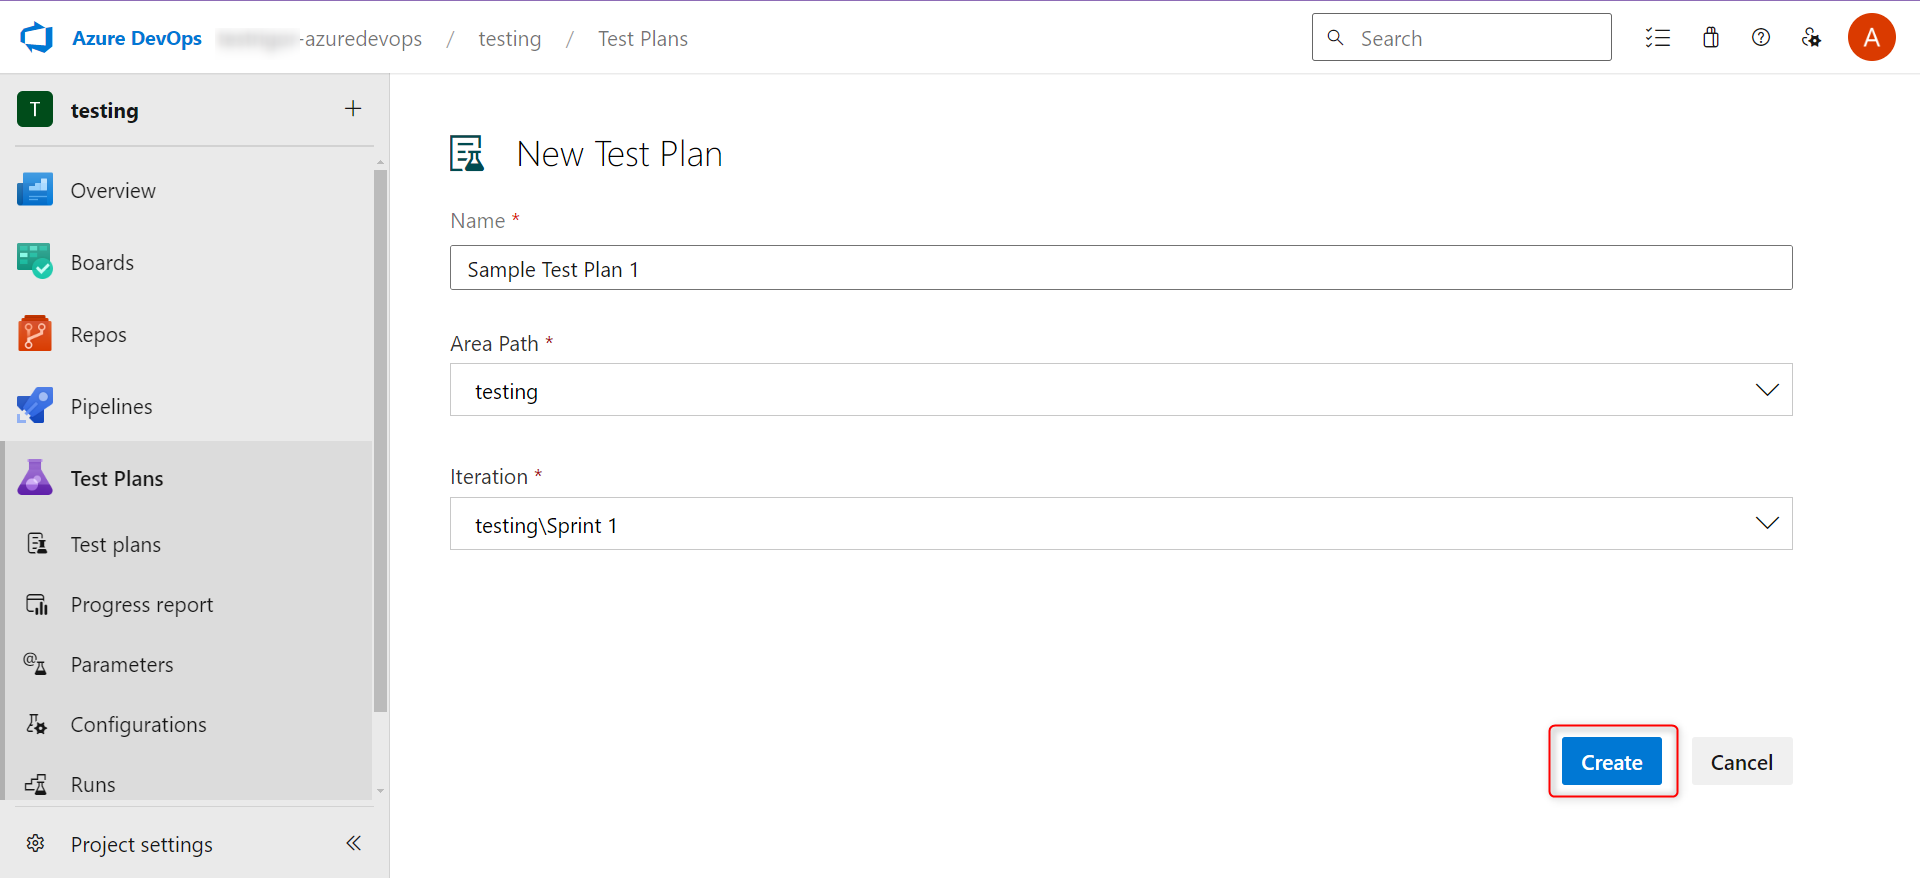
Step 3: Provide the required details and create the test plan, click Create.
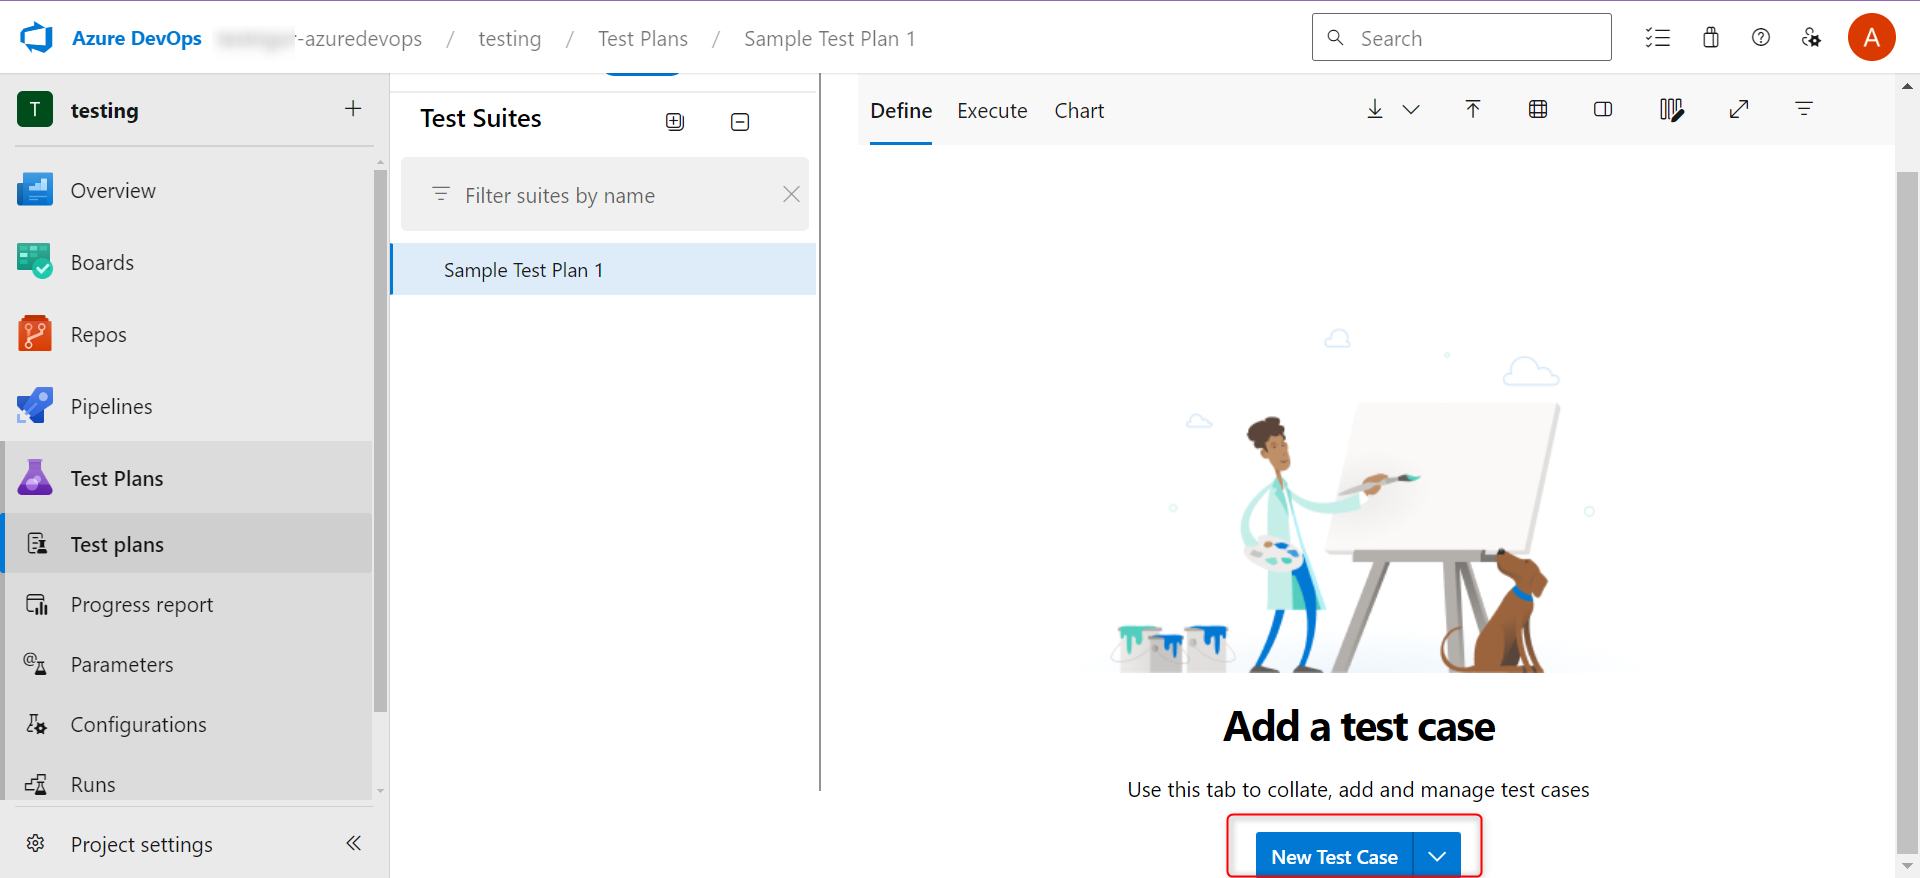
Step 4: Once created, the test plan will look like this. Now you can start adding test cases to this plan by clicking on New Test Case.
Step 5: You have three ways to add test cases to this test plan.
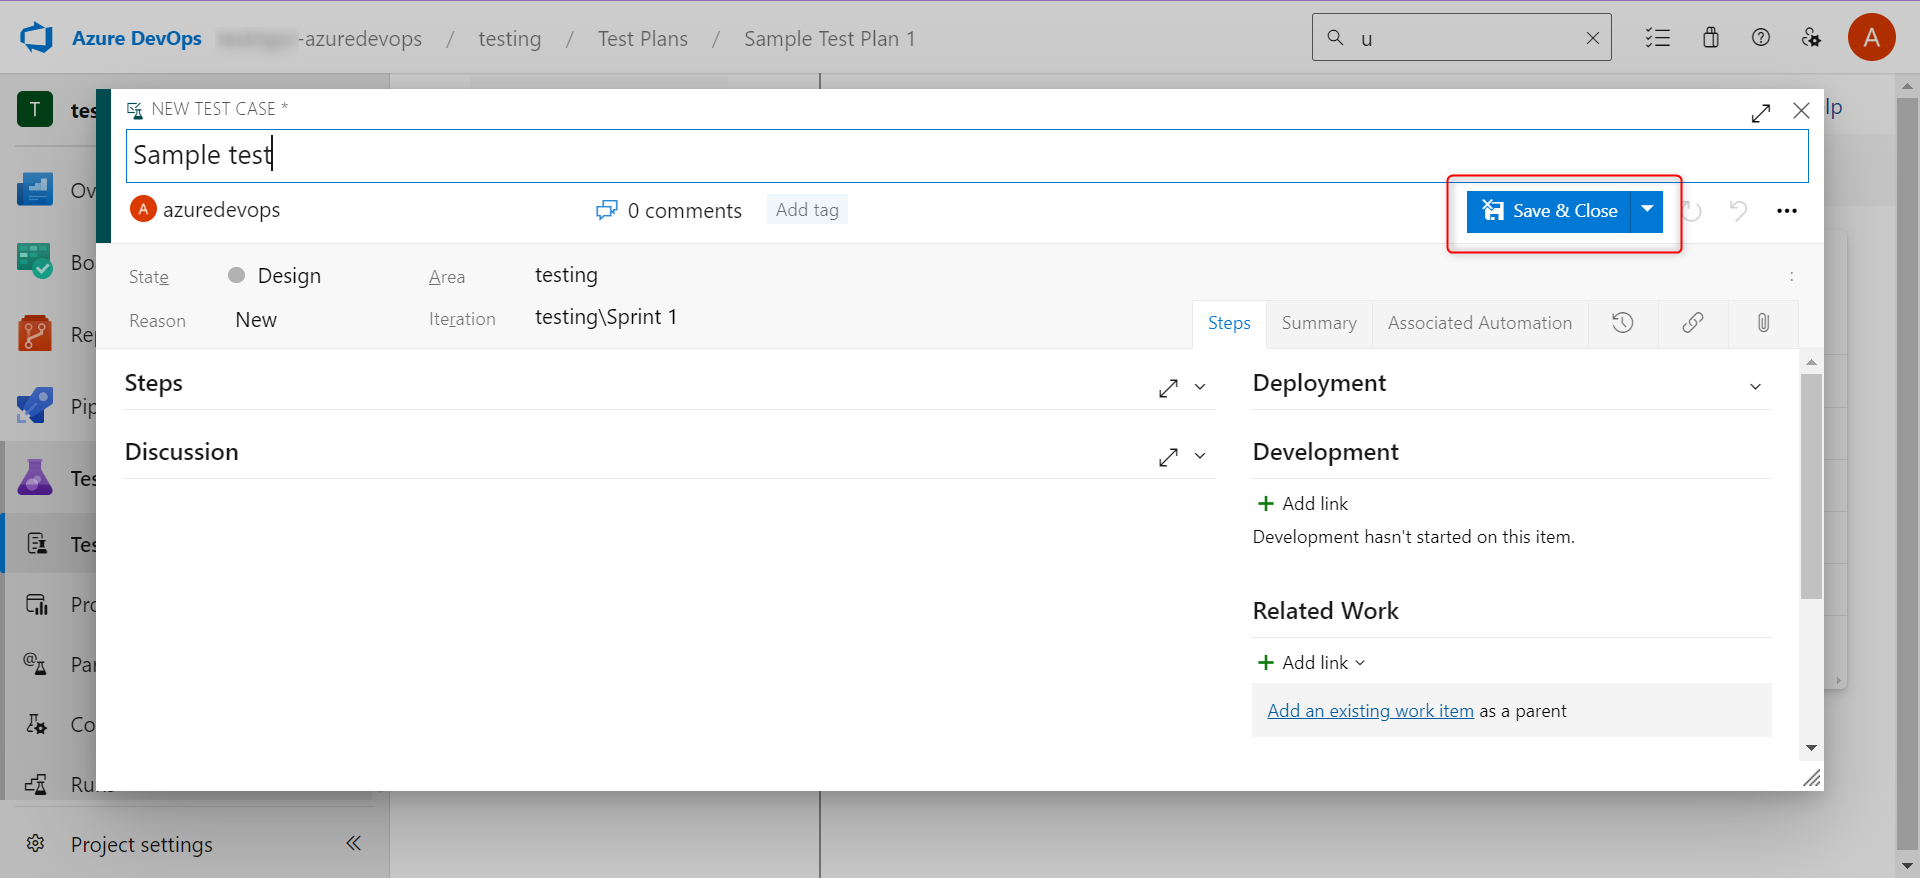
Step 5.1: The Create using form option.
This happens when you click on the New Test Case button. A form opens for you to create a single new test case. Fill in the details and then save the test case.
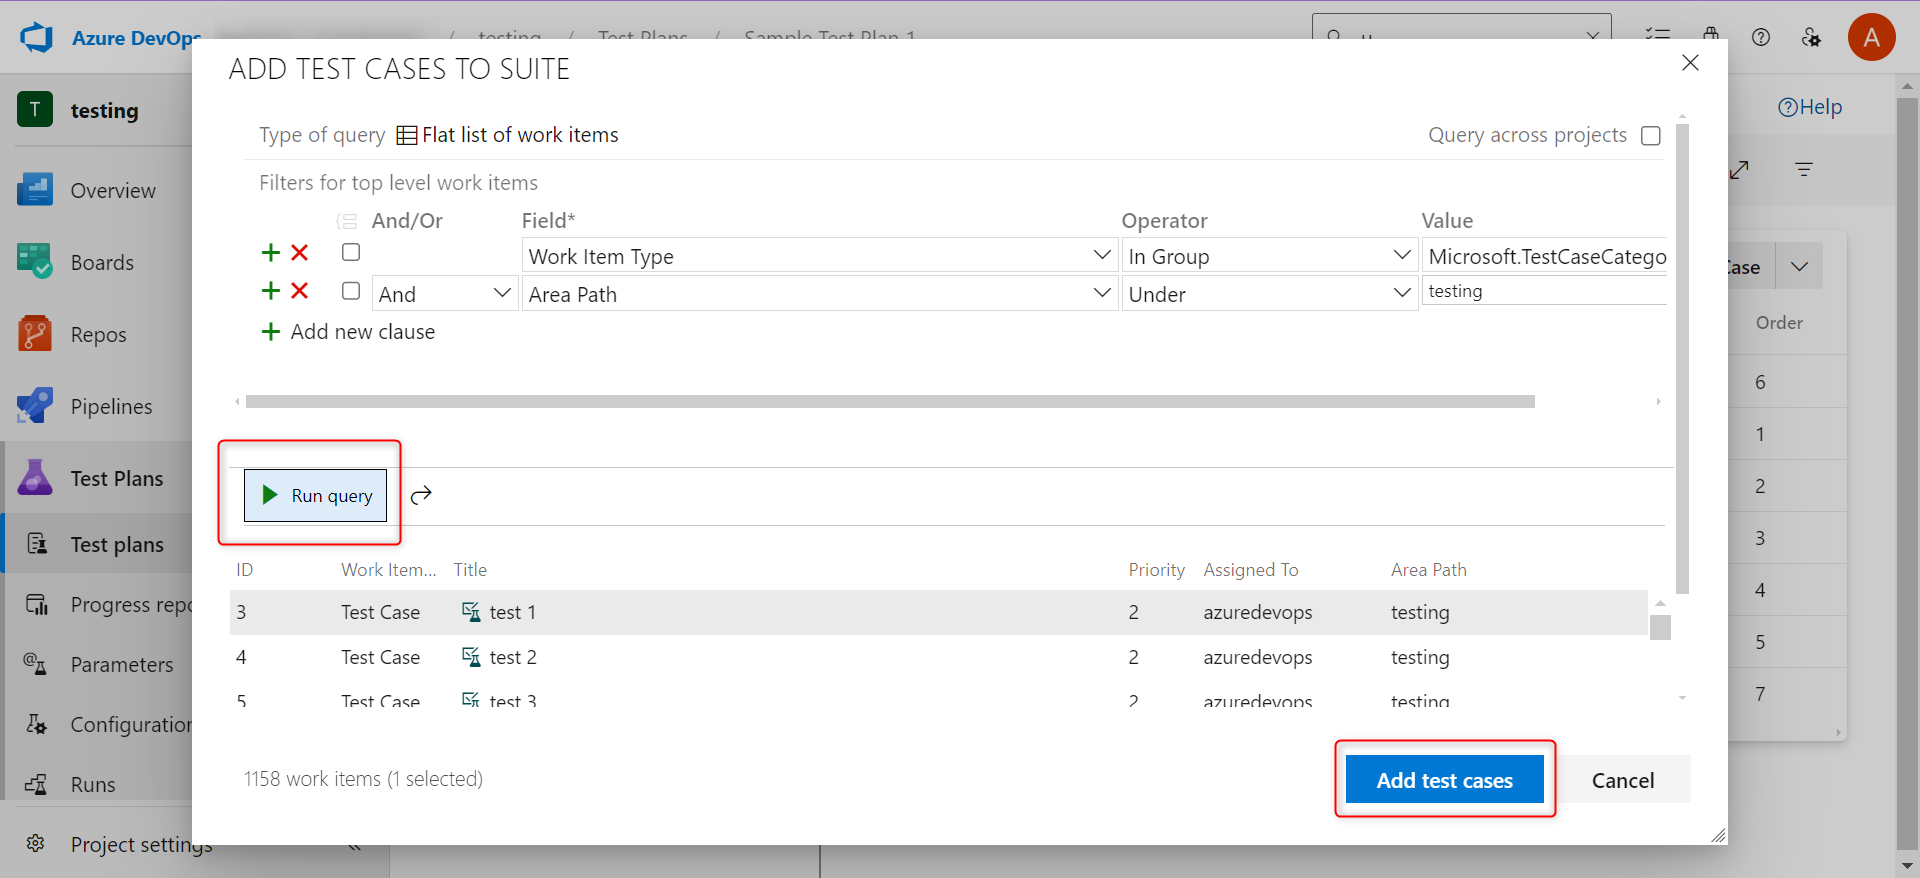
Step 5.2: The Add existing test cases option.
You will get this option in the menu next to New Test Case. This will open a popup with an interactive query, which you can configure to get a list of test cases. Choose from this list to add multiple test cases at once.
Remember to click Run Query to see all the eligible test cases.
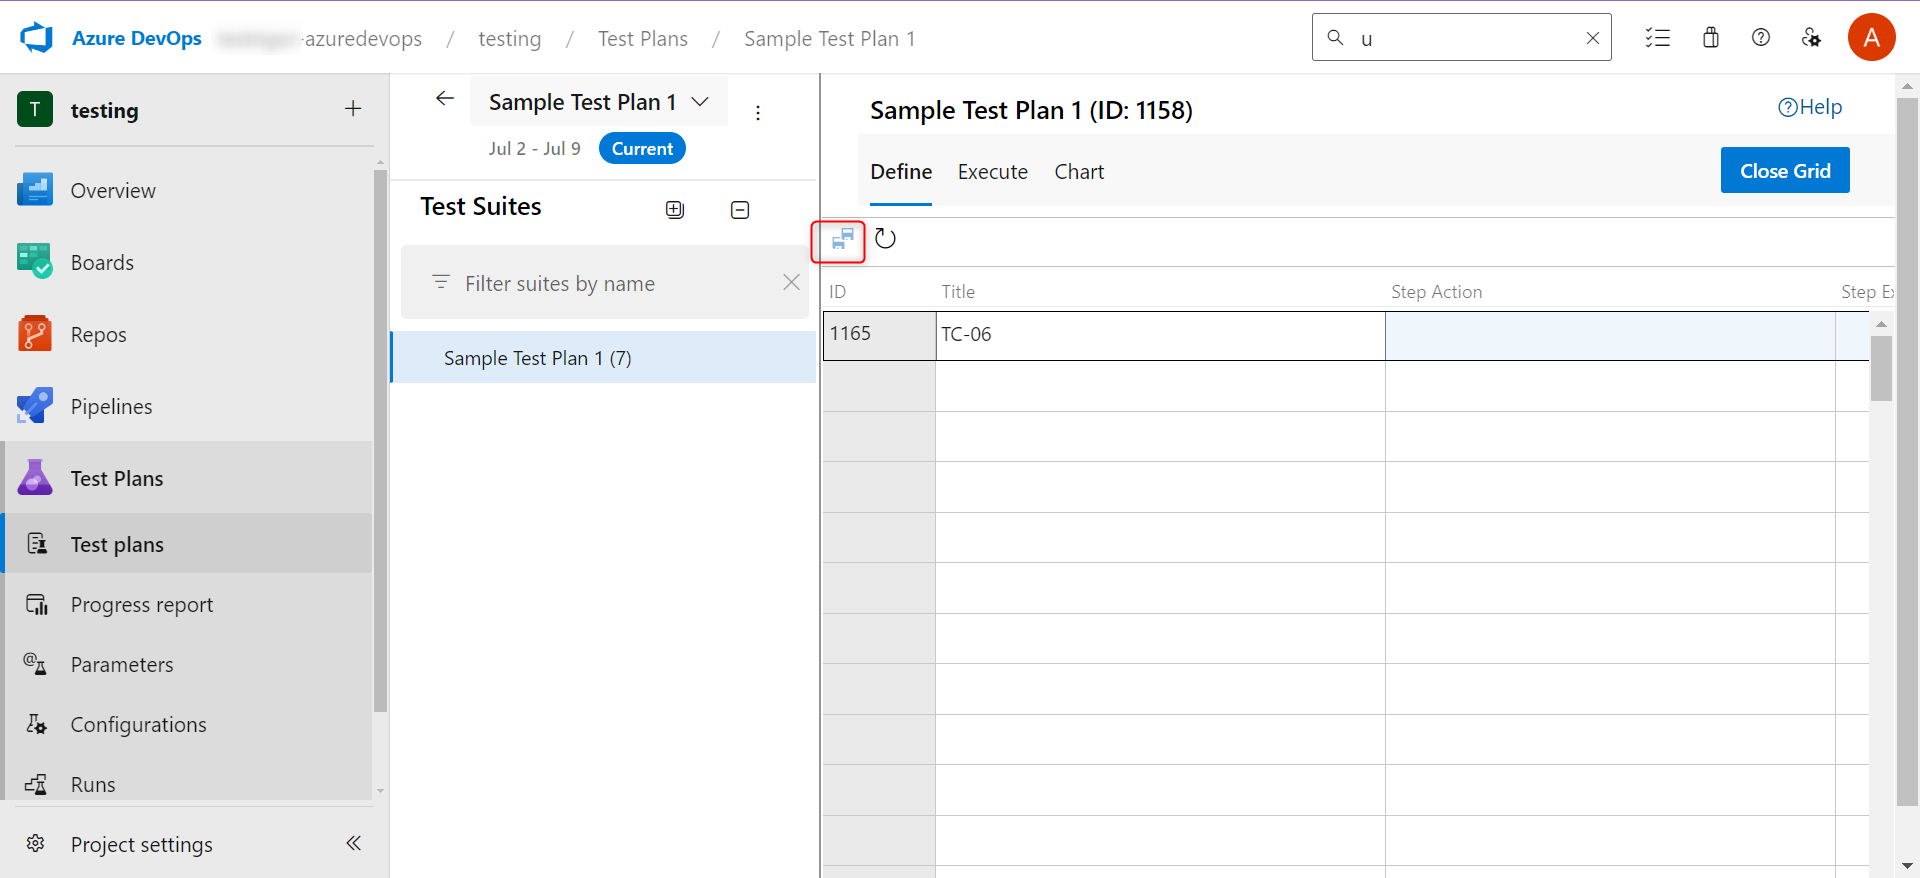
Step 5.3: The Add test cases using grid option.
Under the same menu is another option to add test cases in bulk. This option will open a grid, quite like an Excel sheet, where you need to provide test case details. Each row is a new test case that gets created.
Remember to click on the Save icon (highlighted below) once you’ve filled the grid.
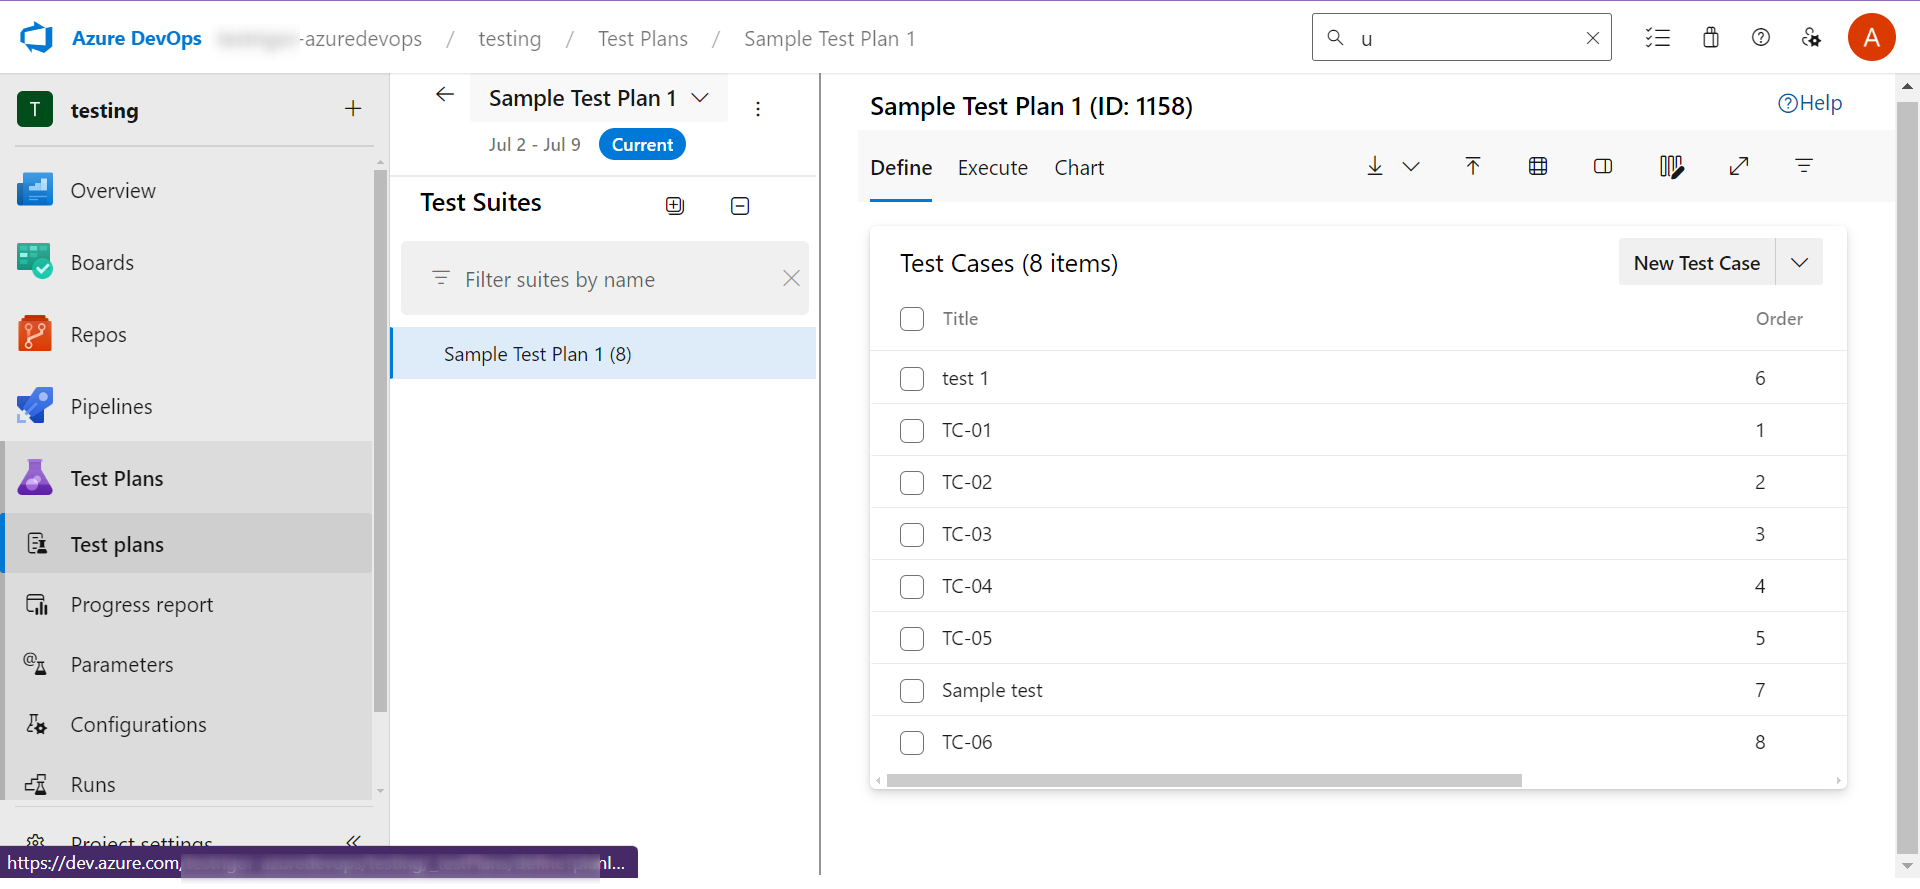
Step 6: This is how your populated test plan will look like:
Note: For automated test cases, you can link your test scripts written in IDEs (Visual Studio) to the ones you just created within test plans in Azure DevOps. With the help of a build pipeline you can run these automated tests and check their results.
Manage test cases
Azure DevOps allows you to manage changes in the test case, update their execution statuses, and also prepare reports.
Within the test plan, go to the Define tab. Each of the visible test cases has an action menu (seen on hover). Using this menu, you can export test cases, edit them, and remove them from the plan.
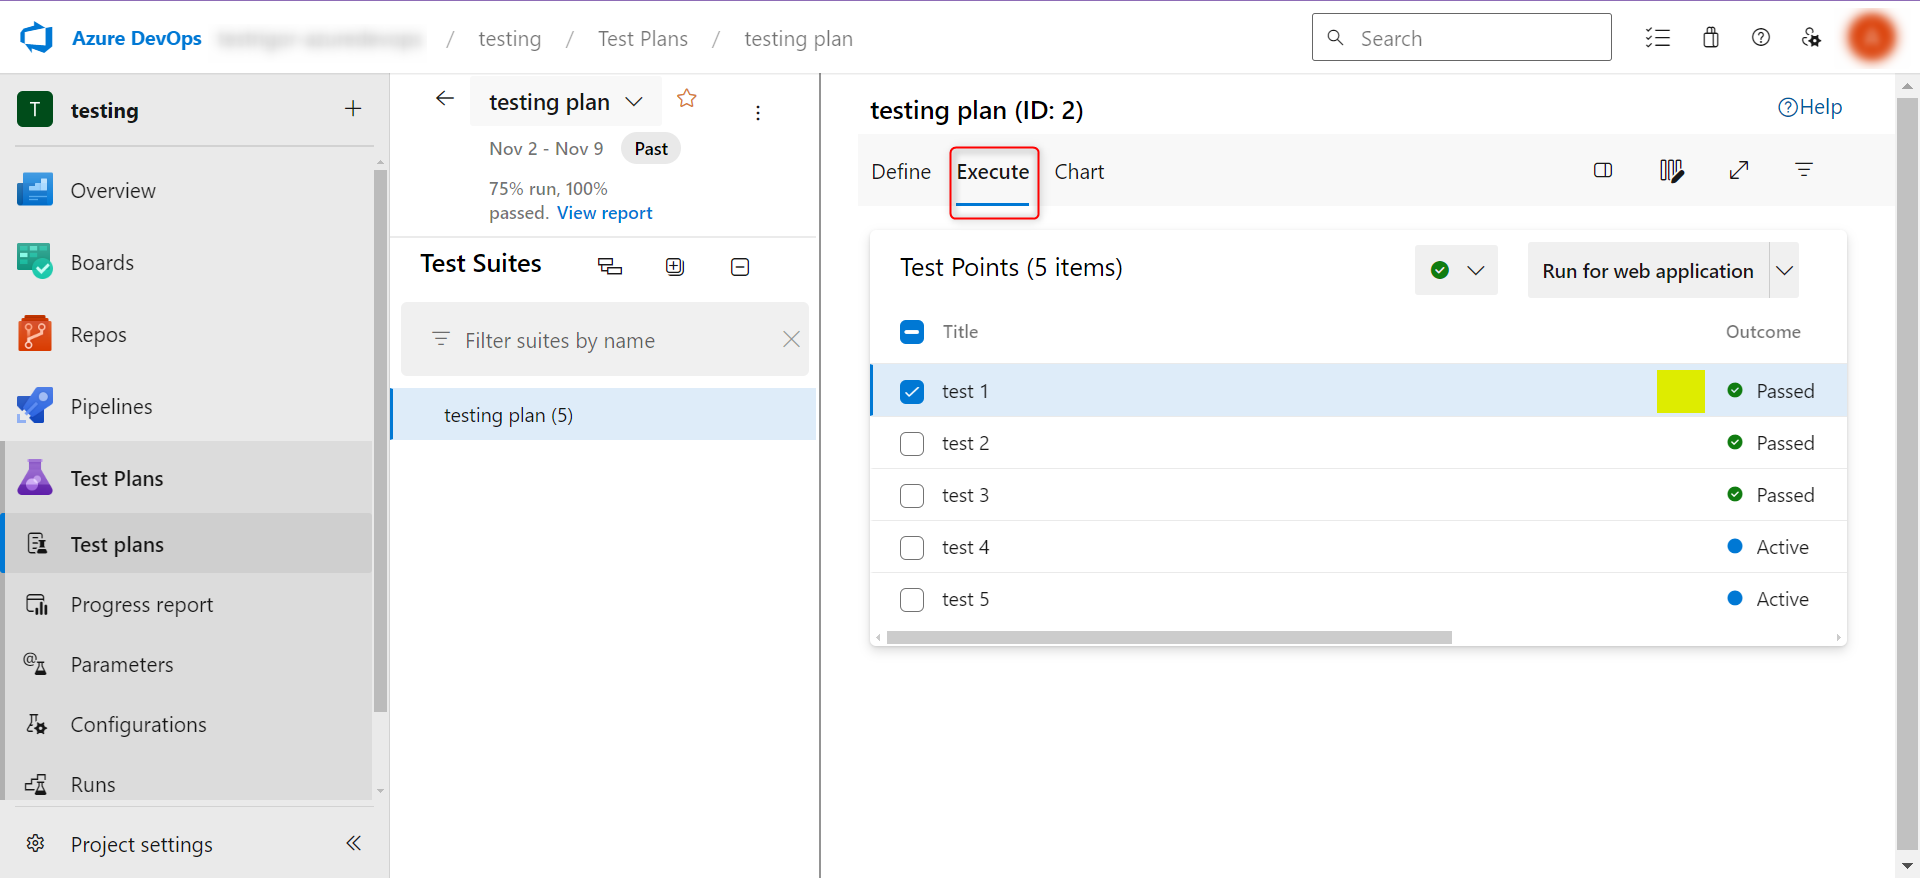
Similarly, the Execute tab will comprise a menu for each of the test cases, similar to the Define tab. However, this menu will have options related to test execution, such as view execution history, change assignee, run test, and change test case status.
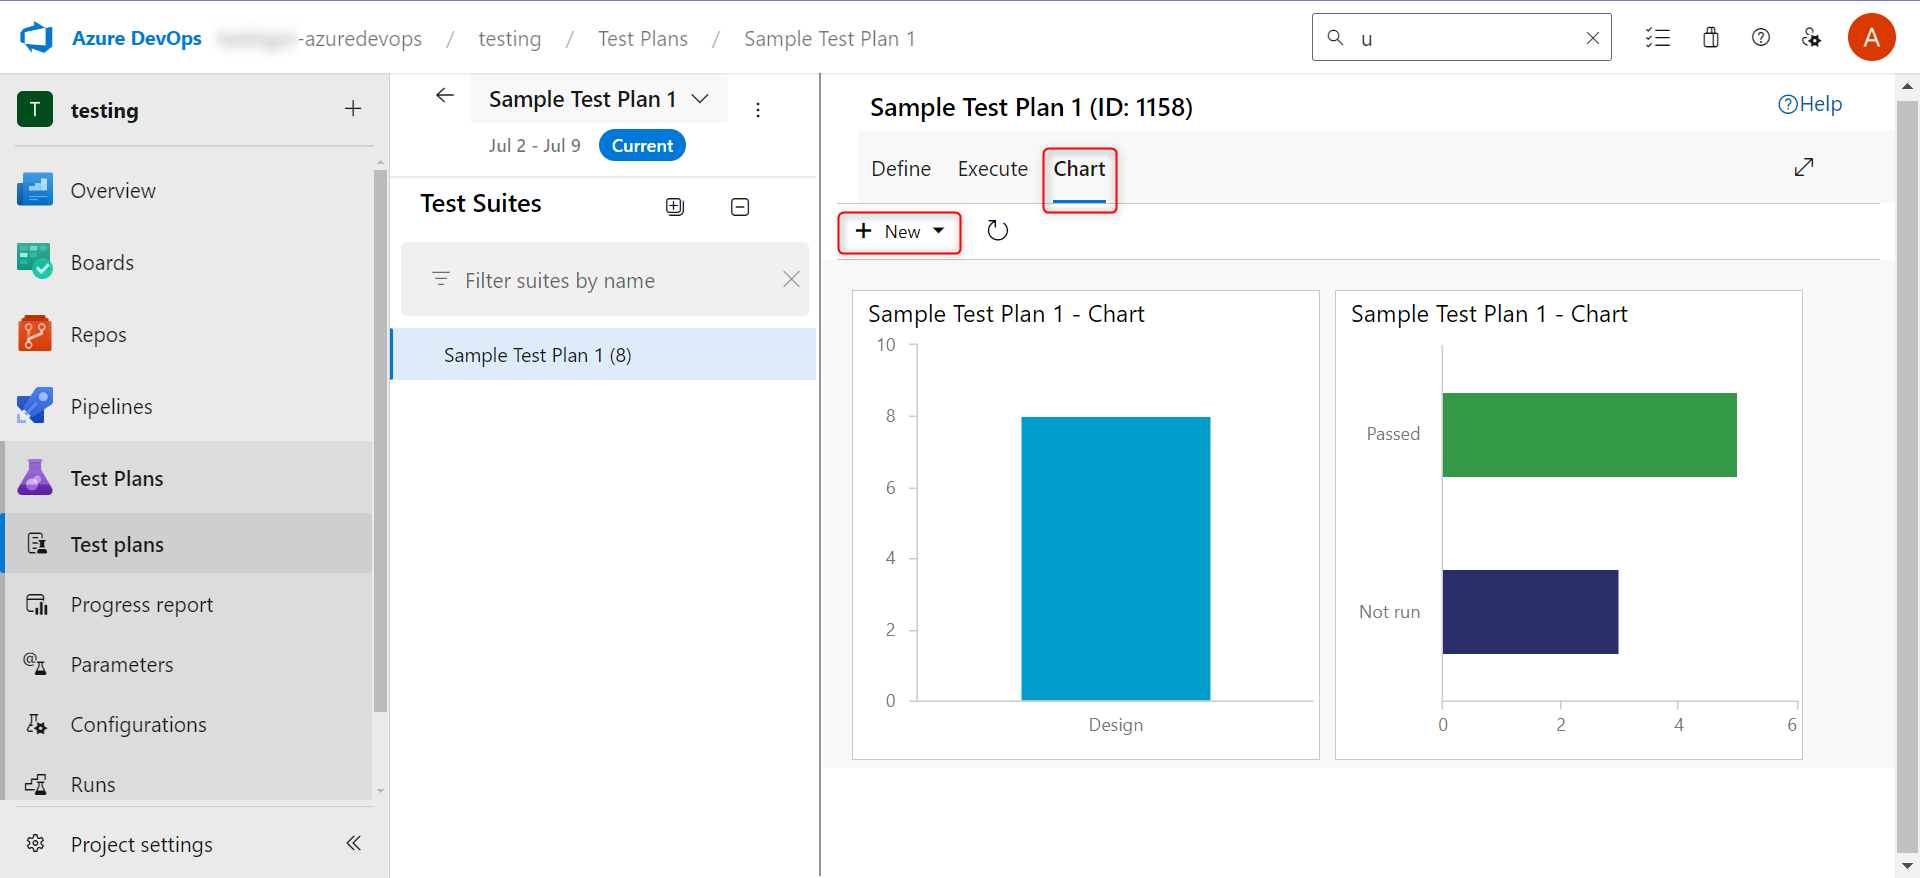
Finally, the Chart tab gives options to create pictorial representations of the test execution and results.
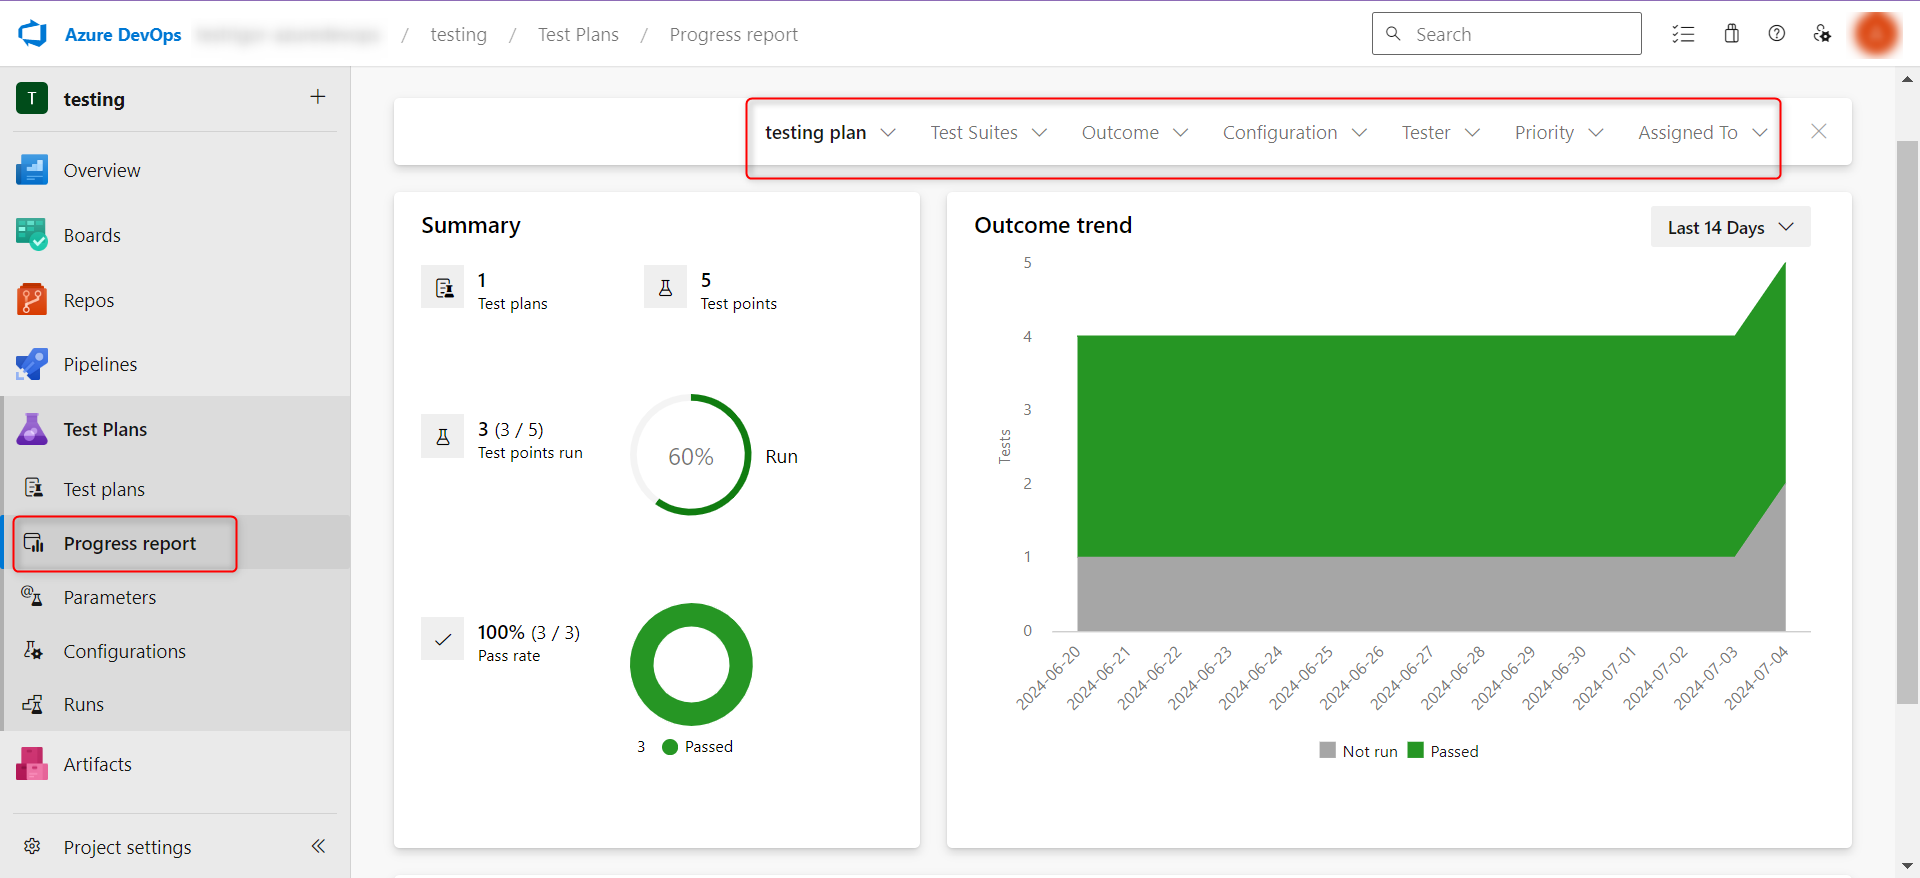
You can see detailed progress reports under the Progress report section. The page offers filters and pictorial representations of the data associated with different test plans and test suites.
Similarly, the Runs tab in the left panel will also give you a view of all the test runs and related details in an overview format.
Better automated testing with AI-based tools
There are some challenges when you try to use tools like Azure DevOps for functional or end-to-end testing.
- You need to be proficient in coding so that you can write test scripts in the expected programming language. This is not a skill that can be expected of those who are responsible for coming up with functional testing scenarios, such as manual testers and business stakeholders. Read about an Test Automation Tool For Manual Testers.
- You need a common platform for various team members like developers, all types of testers, product managers, business analysts to collaborate on, especially for end-to-end test cases. Everyone should be able to use this platform, not just those who can read and write code.
- Training different teams to understand the nitty-gritty of Azure may prove challenging, especially for those who do not work with code on a day-to-day basis.
- Modern websites require verifying scenarios beyond clicks and element visibility. The scripting framework that you use for writing test cases needs to be able to handle these things in an easy way. Most likely Selenium is put to use in conjunction with Azure but that isn’t enough. Here is an intelligent Selenium Alternative.
You need tools that make the process of writing and maintaining automated test cases easy. Luckily, there’s one such tool that can help you achieve this – testRigor.
testRigor for automated testing
testRigor is one of the best test automation tool out there if you are looking for effortless automated testing. This tool uses generative AI to make test case writing, executing, and maintaining easy for all. It allows you to create various types of tests for different types of apps and platforms in plain English (or any other natural language) without requiring any kind of coding. This means that your entire team, both those skilled at coding and those who are not, can participate in automated testing, including test case writing.
testRigor supports seamless integration with Azure DevOps.
Here’s how you can do it:
Integrating Azure DevOps with testRigor
Step 1: Log into your testRigor account and create a test suite where you want to import your Azure DevOps test cases.
Step 2: Within the test suite, navigate to the Settings -> Integrations -> Azure DevOps section. Use this guide to fill in the required details.
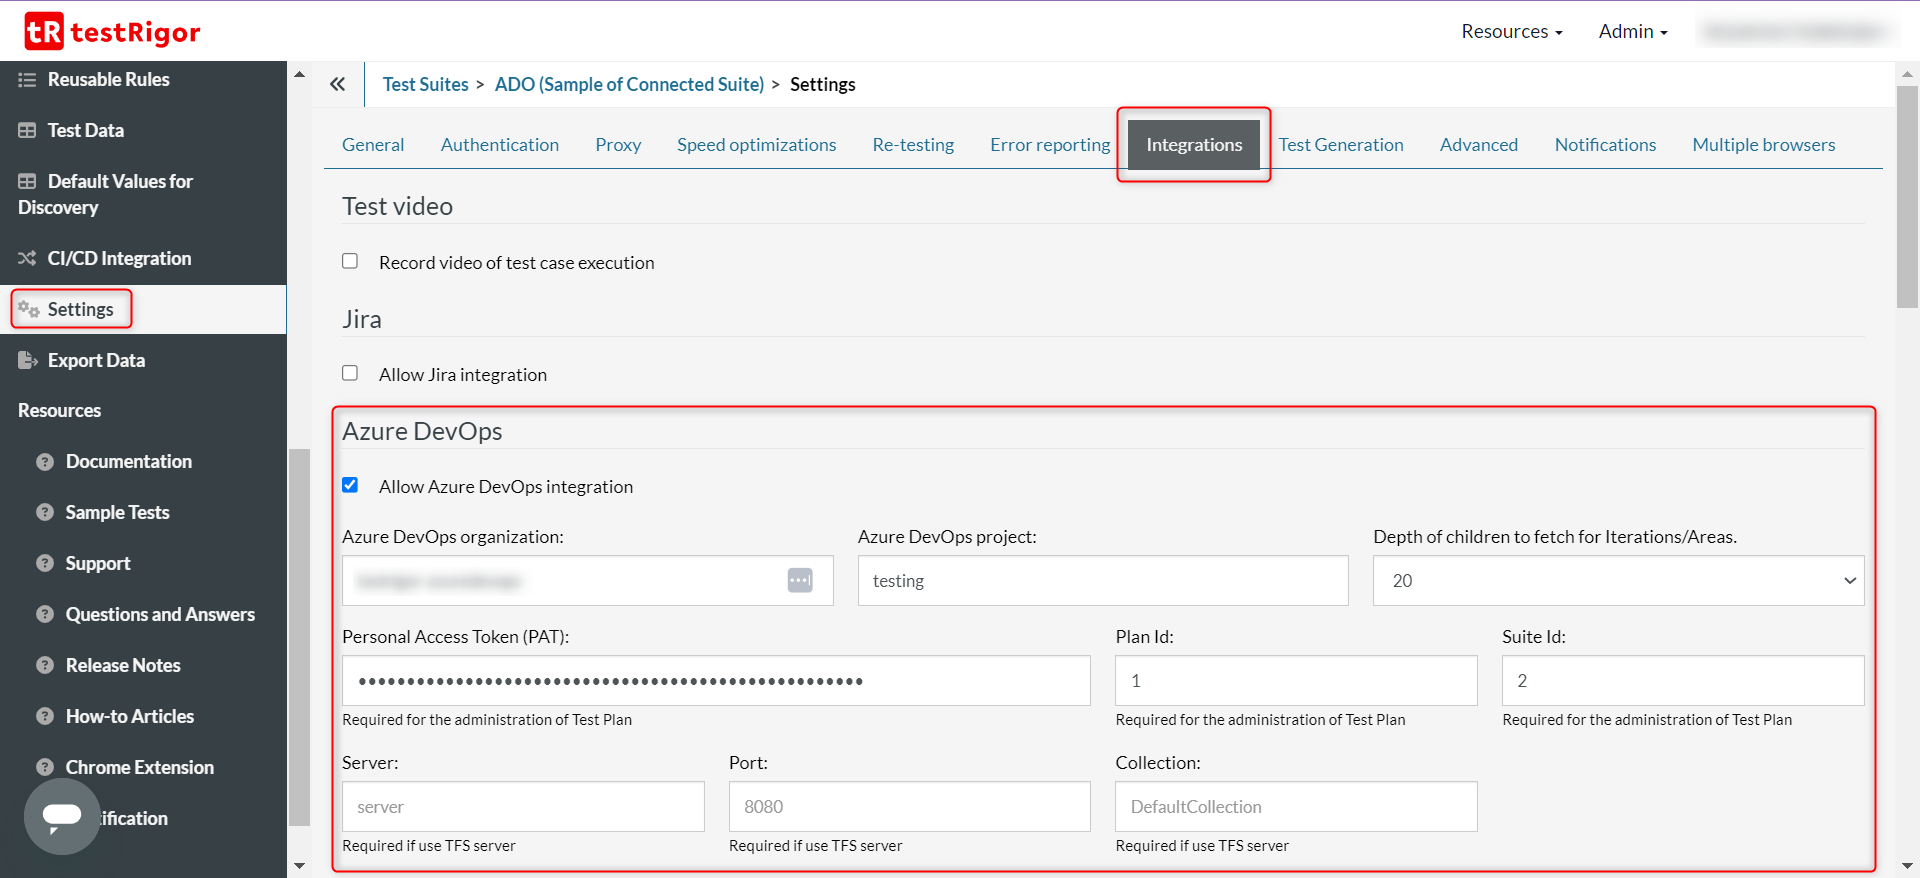
Linking testRigor test cases to Azure DevOps test cases
testRigor lets you automate all kinds of functional and end-to-end test cases with the help of its rich command library. The test cases in Azure DevOps can be mapped to these testRigor test cases.
Step 1: Come back to the Test Cases section in testRigor. You can now start adding test cases in testRigor and then link them to the ones you’ve created in Azure DevOps. Here’s how to do it.
Step 1.1: You will see a new section associated with each testRigor test case, as shown below, called Azure Test Case. To link a testRigor test case to one of the Azure test cases, click Link.
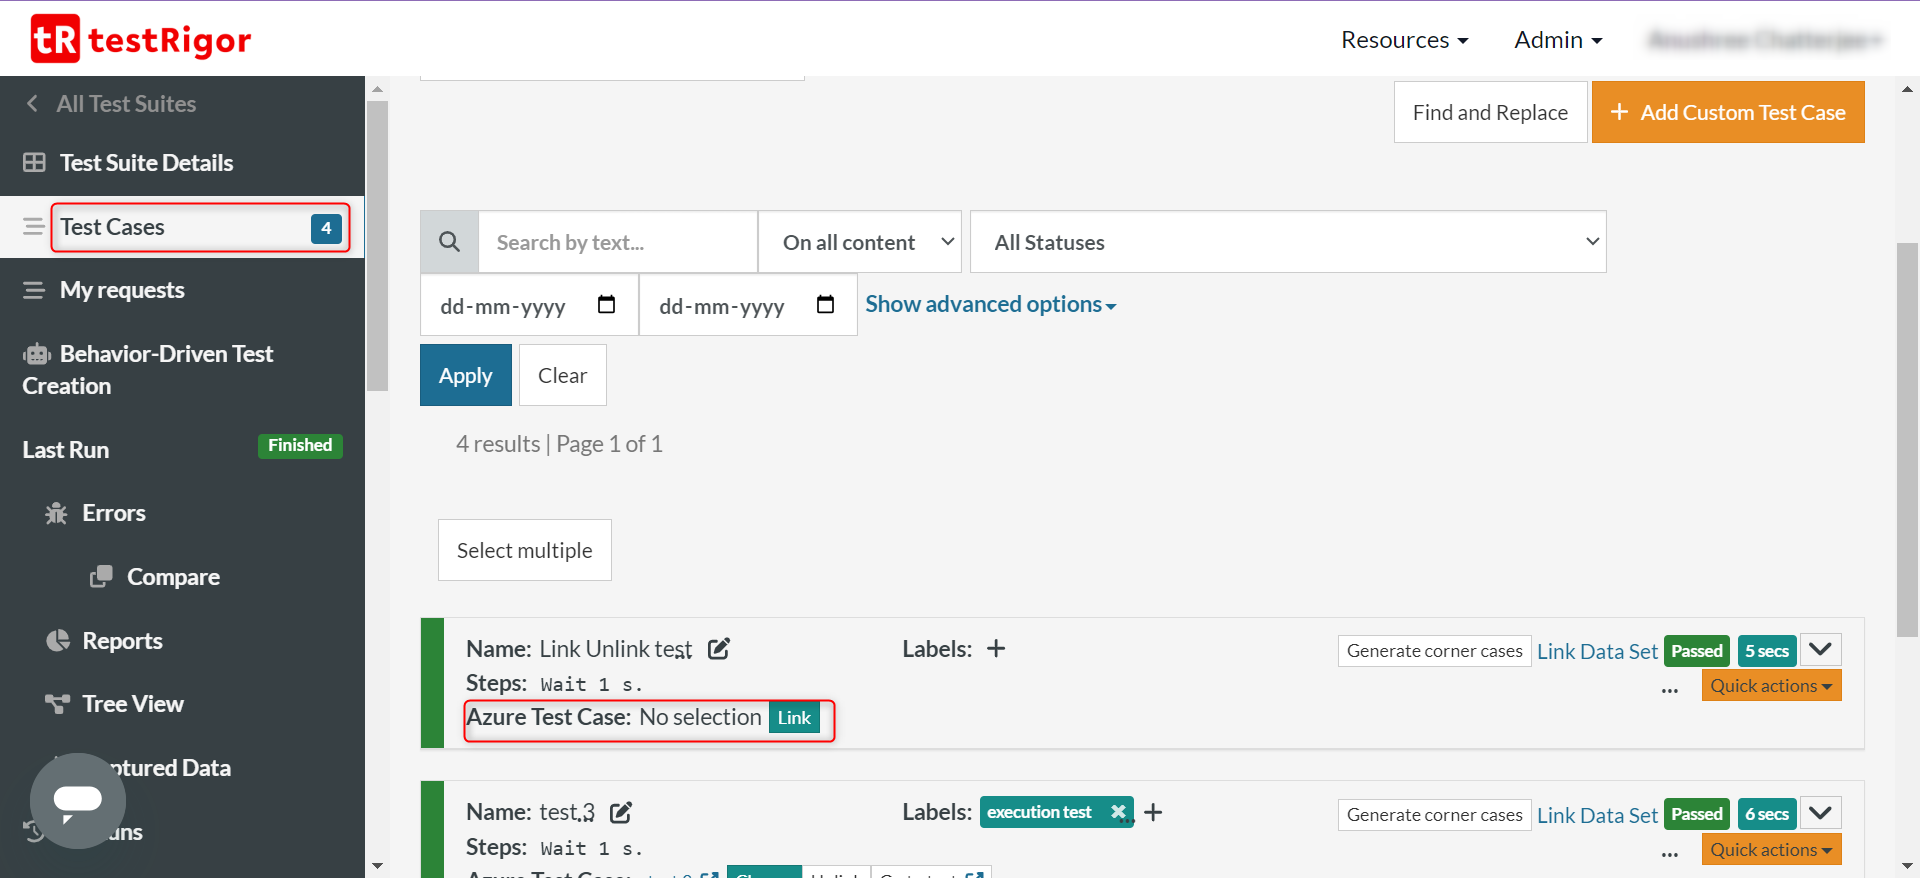
Step 1.2: Select the Azure test case from the list.
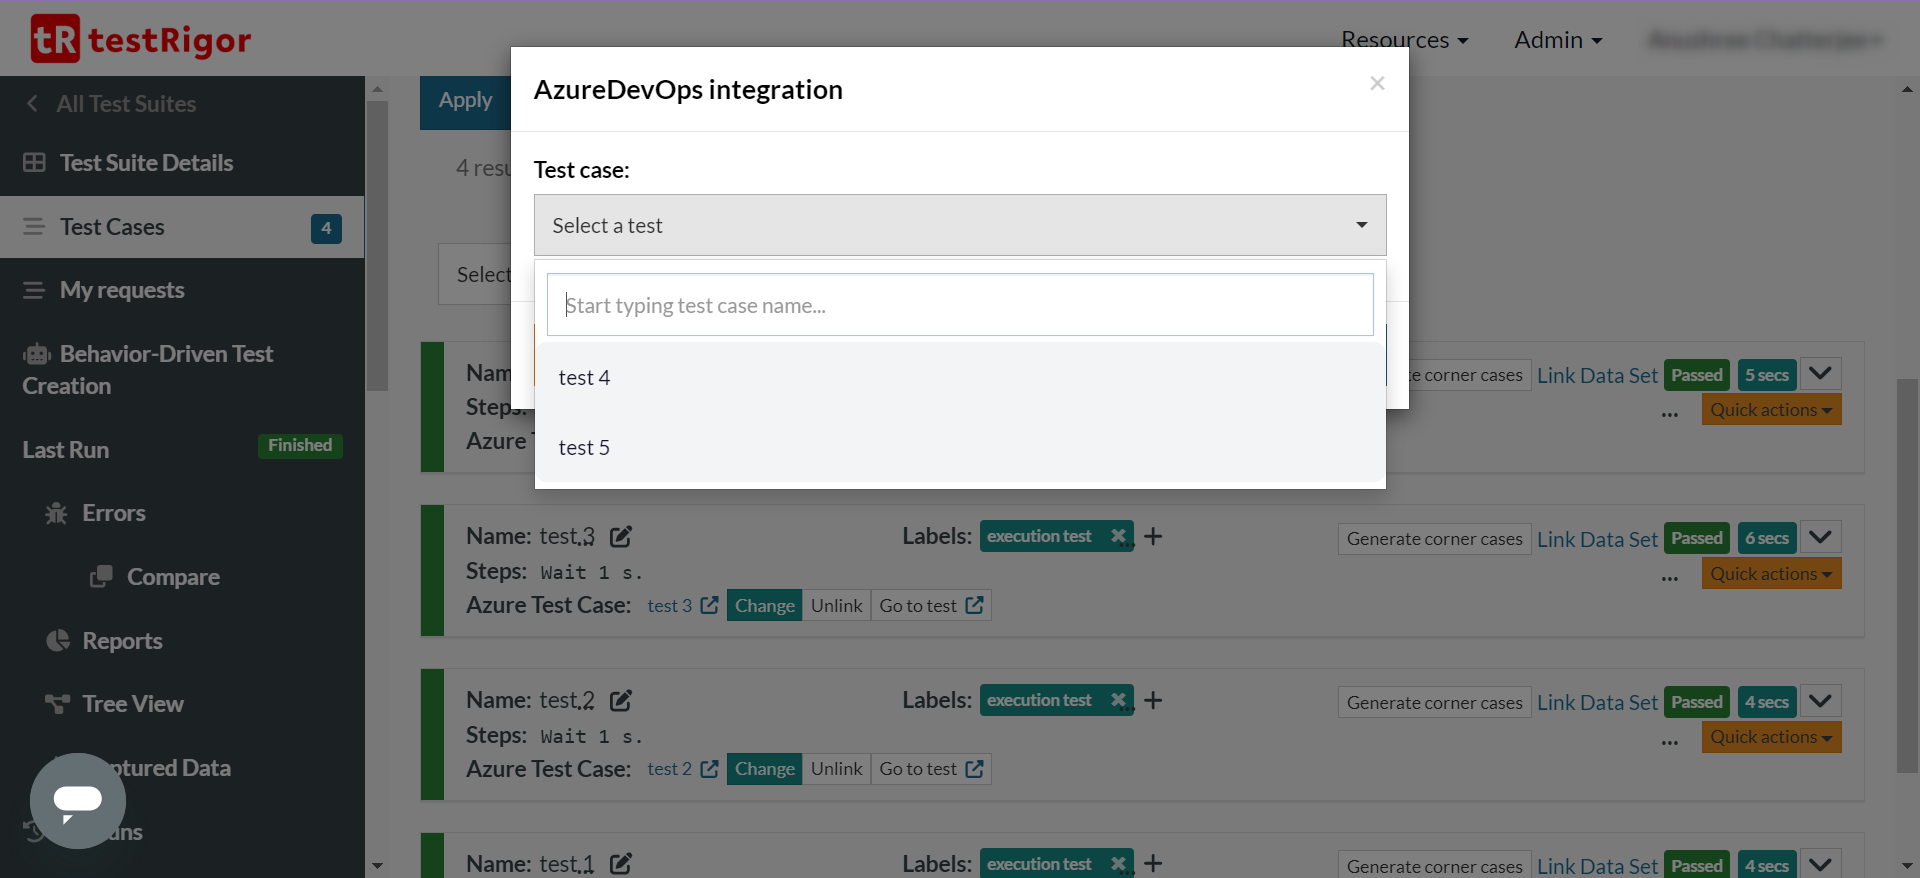
Step 1.3: Save changes.
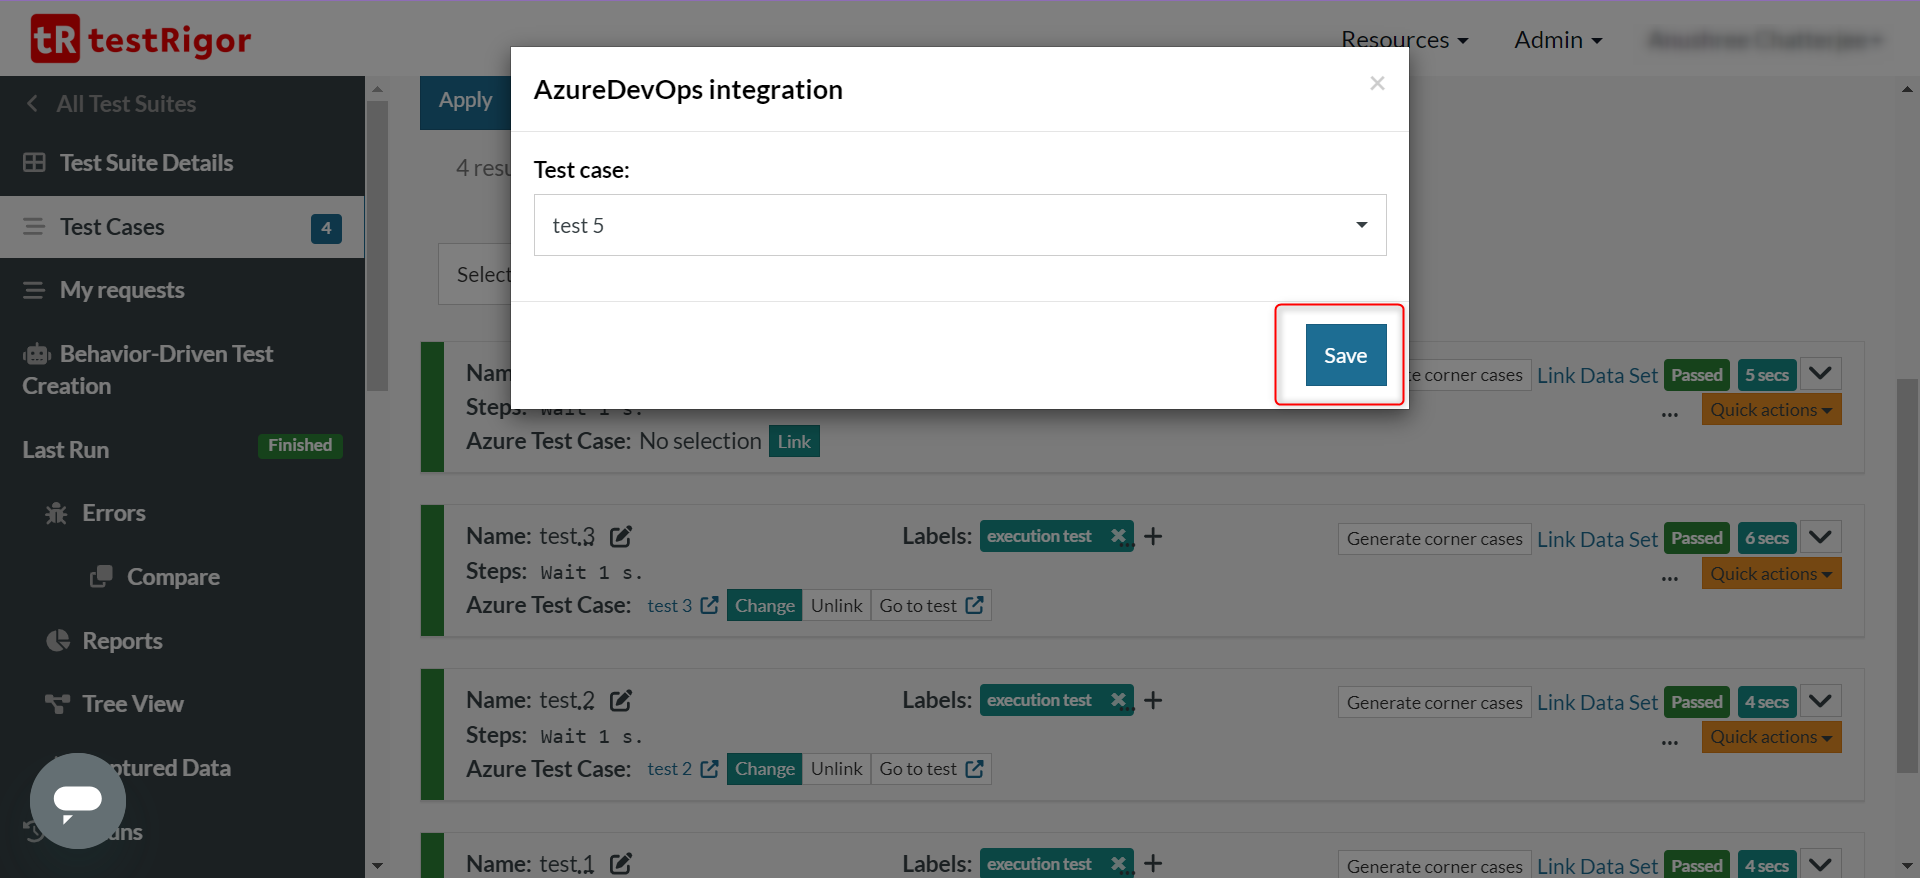
Step 1.4: You’ll see that the link is updated for that test case. Now the execution details will be updated not just in testRigor, but also in Azure.
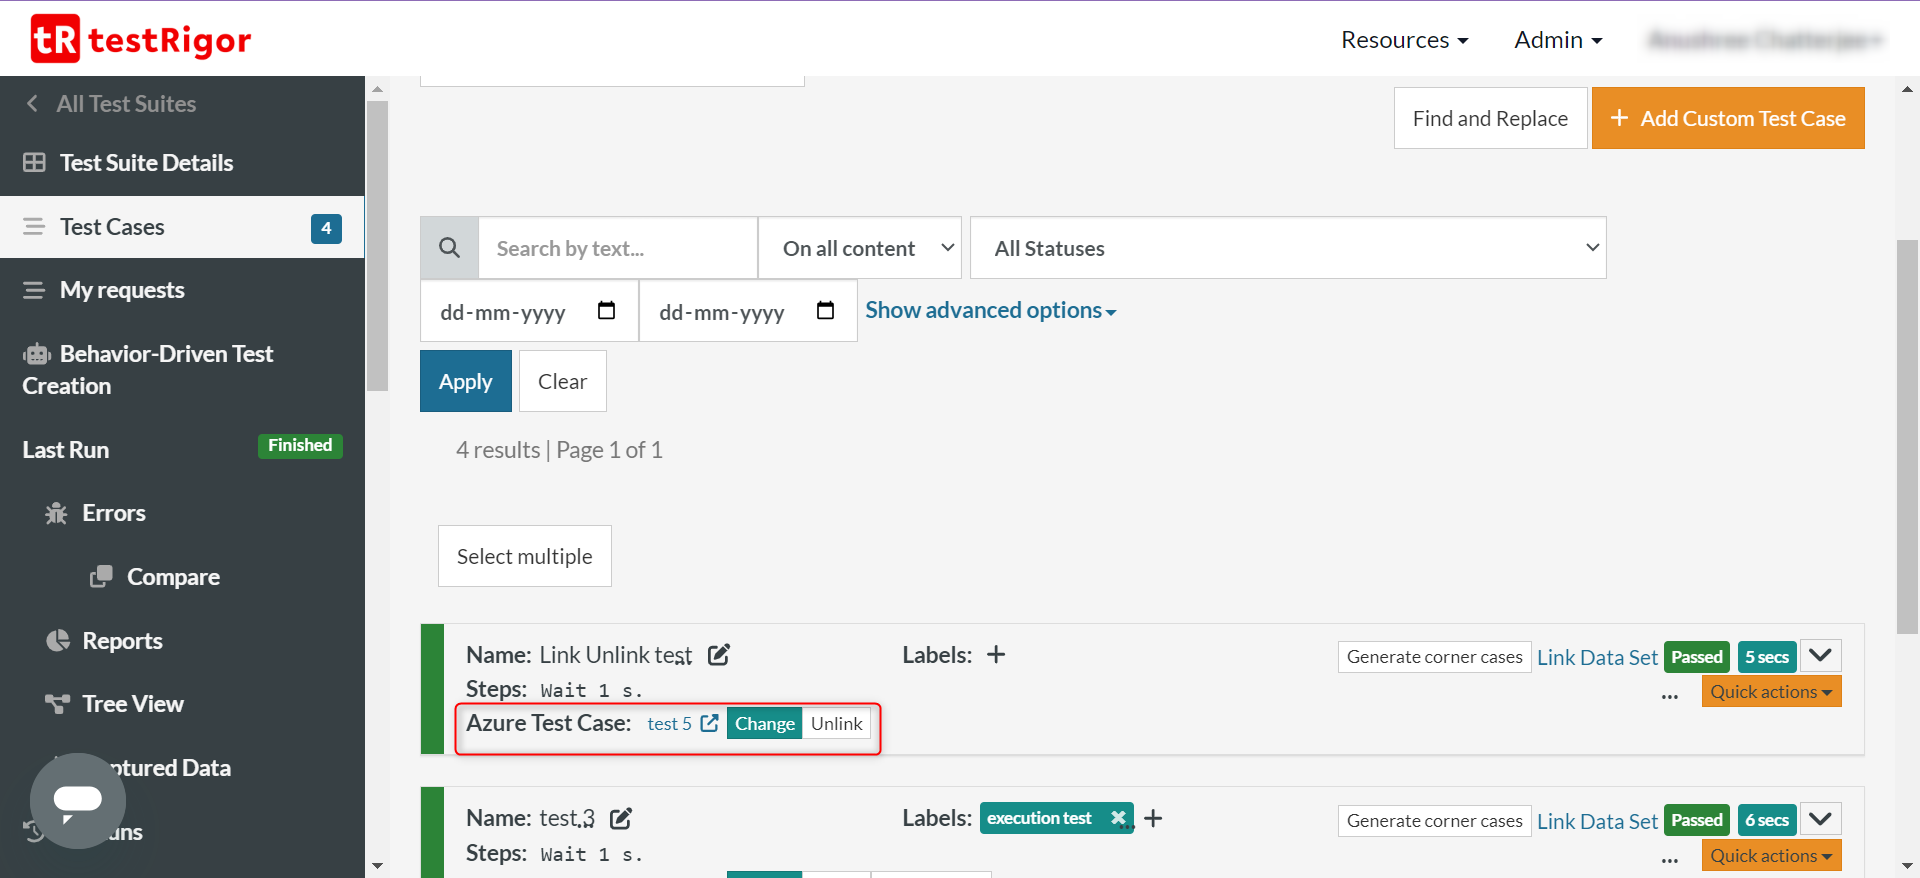
Importing Azure DevOps test cases into testRigor
You can import the test cases you’ve written in Azure by following these steps:
Step 1: Make sure that your testRigor test suite is linked to the correct Azure Test Plan and Azure Test Suite. You’ll see an import button in testRigor.
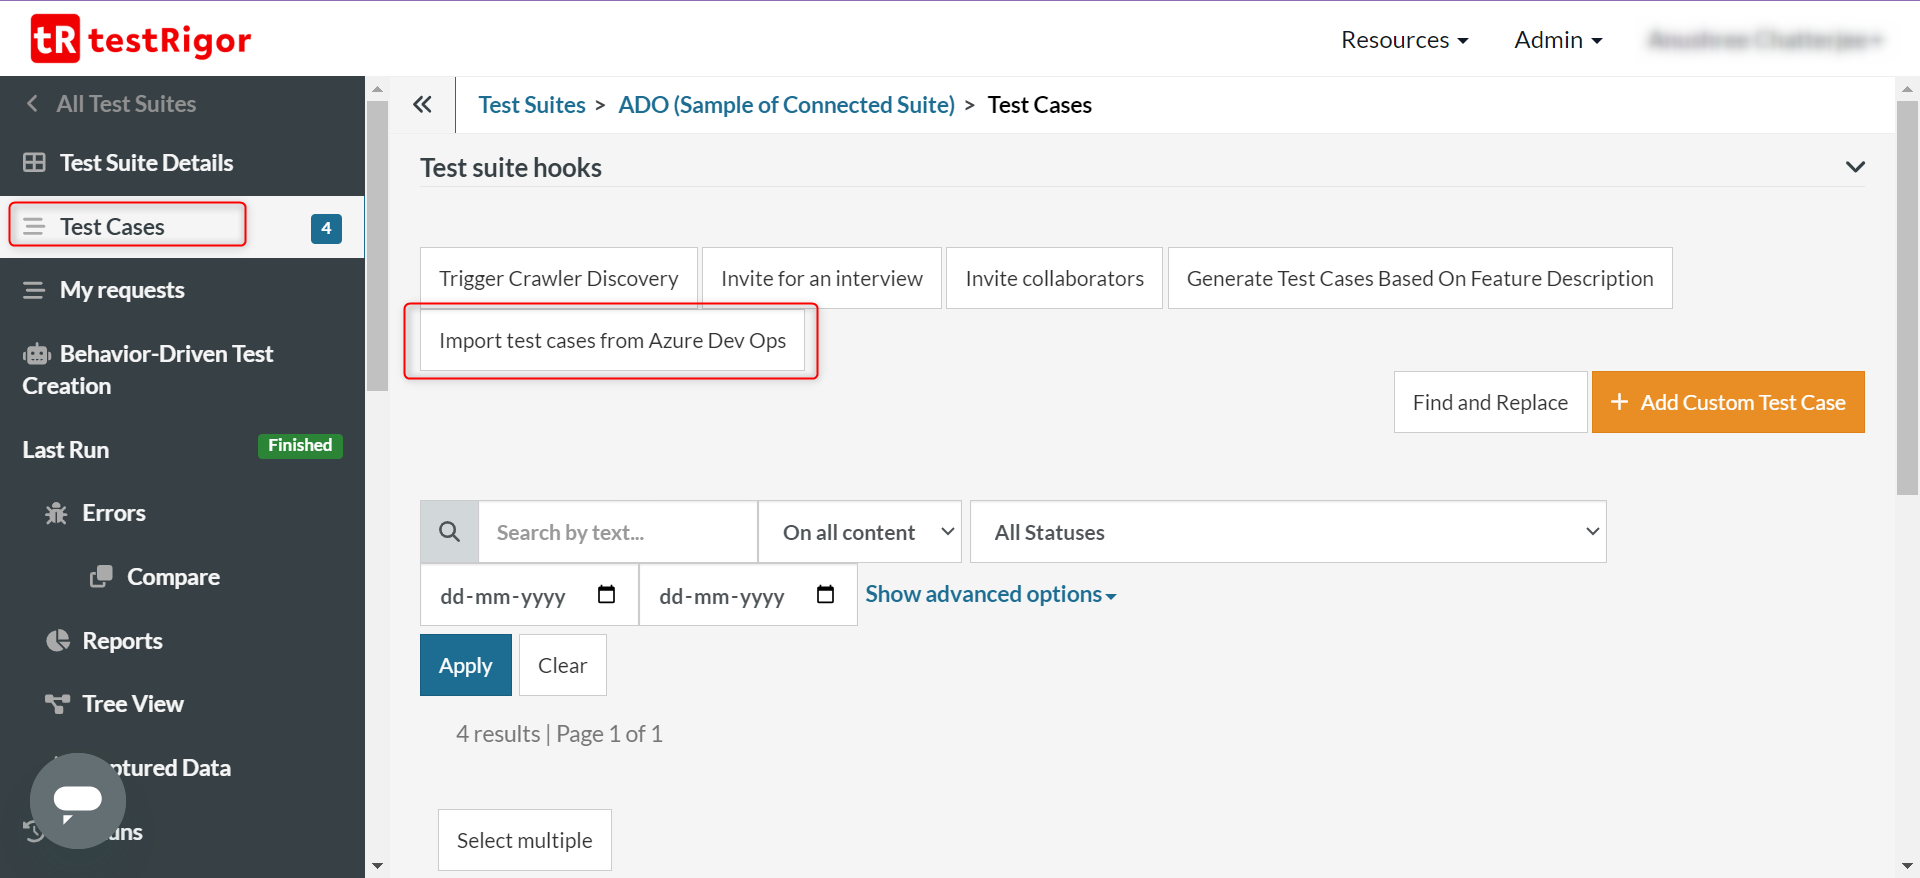
Step 2: Click Import test cases from Azure DevOps and choose the test cases (that have test steps) you want to import through the popup.
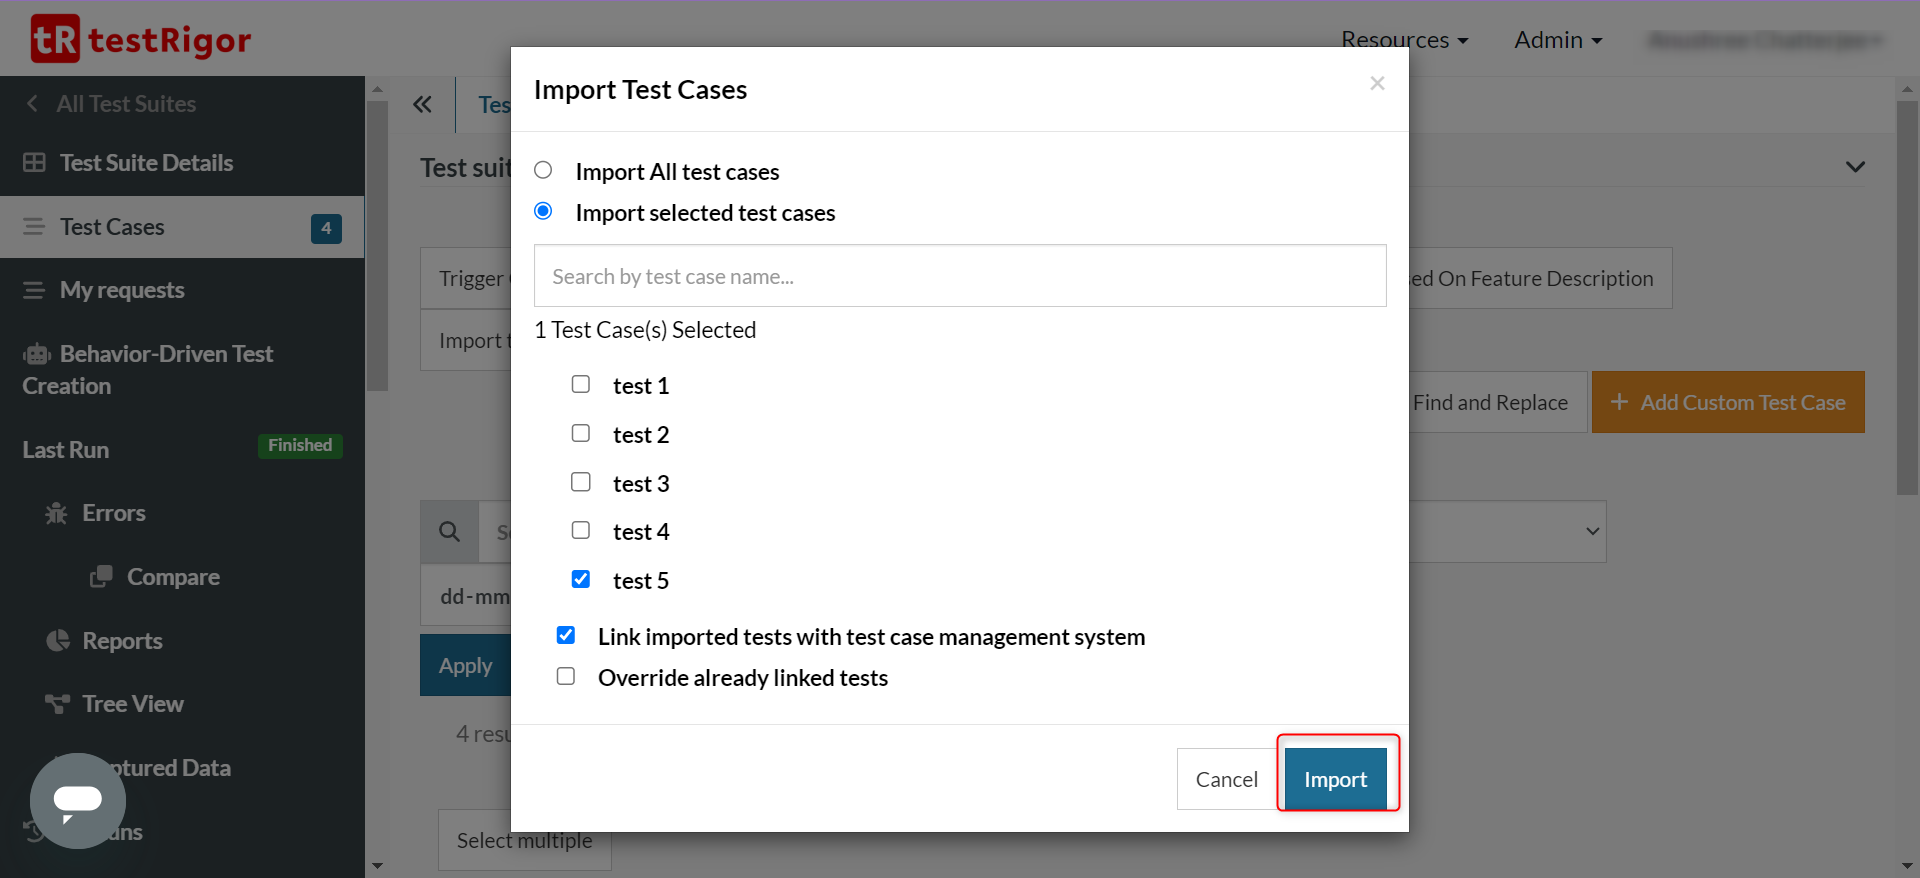
Click Import.
Step 3: You’ll see a Confirm Import popup. Once you consent to that, the new test cases will appear in your testRigor test suite.
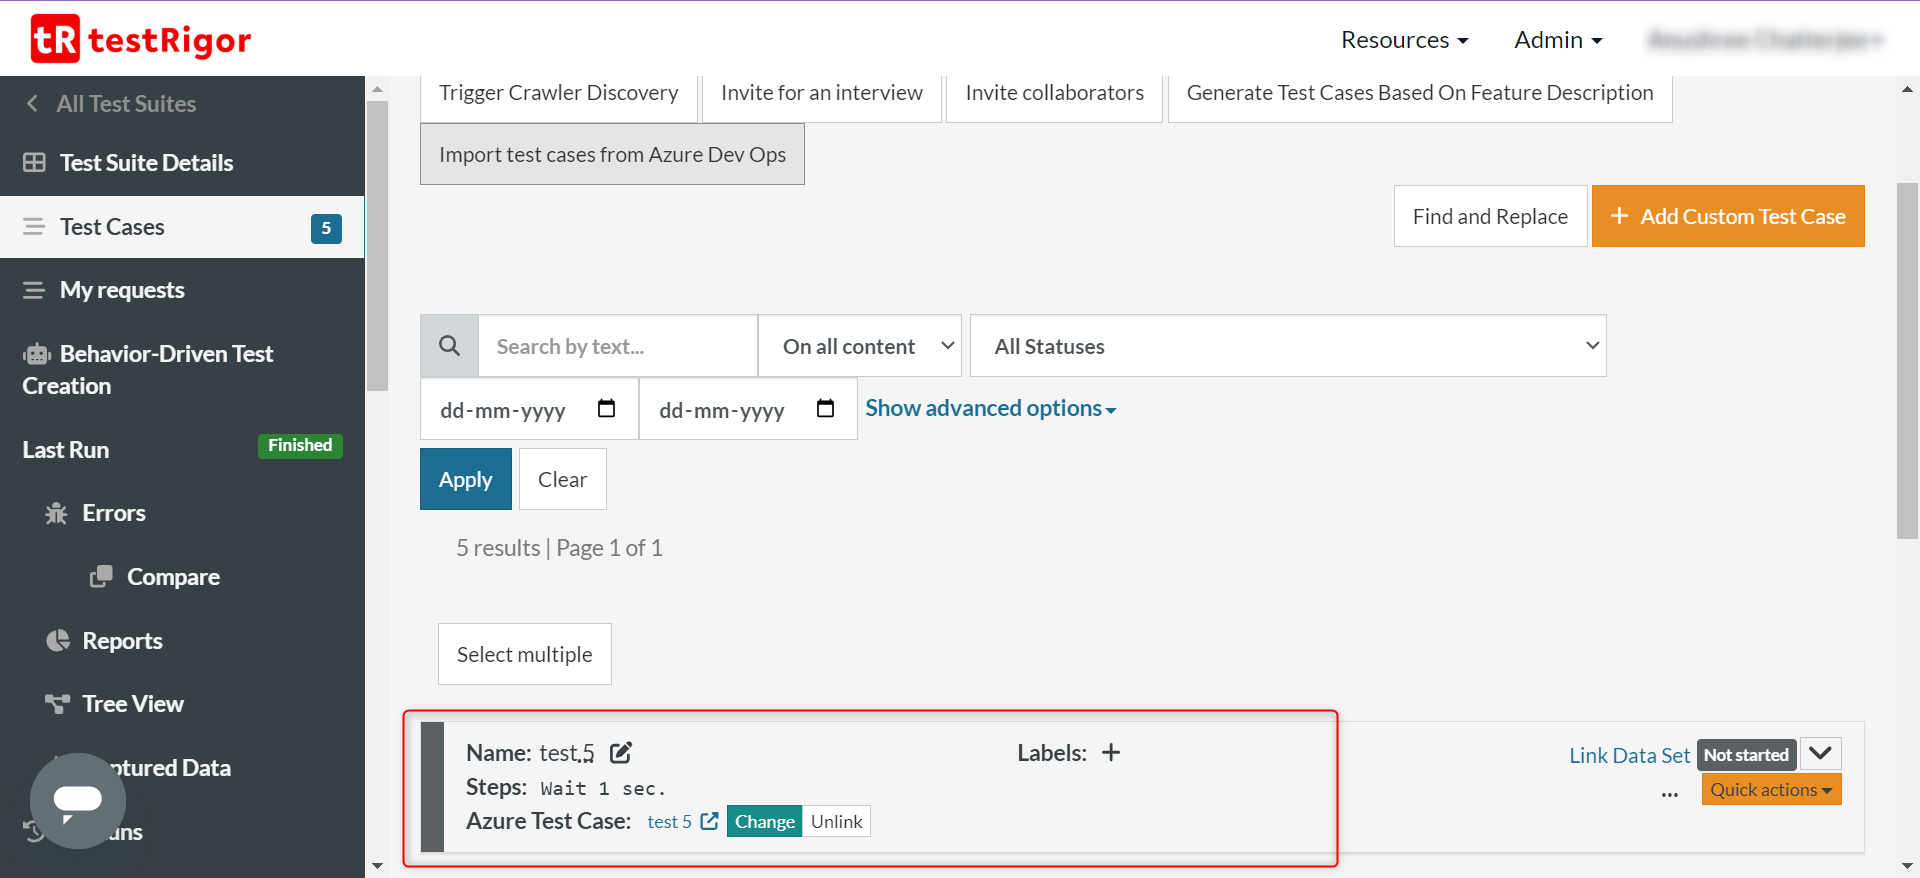
In case testRigor cannot identify any of the plain English lines written in the Azure manual test cases, it will convert them into an AI-based reusable rule. This means that the statement in question is now being looked at as a series of statements that are also written in plain English and can be reused across test cases. You can edit such reusable rules to your liking, too.
Update Azure DevOps test cases with execution statuses of linked testRigor test cases
Once you’ve linked test cases following the above-mentioned steps, your job becomes simple. Run the tests in testRigor and the results will be displayed in both testRigor as well as Azure DevOps.
Here’s how you can check this:
Step 1: Run the entire test suite from the Test Suite Details section within testRigor. Here, you’ll get an additional configuration to decide whether to update Azure with the test execution results or not.
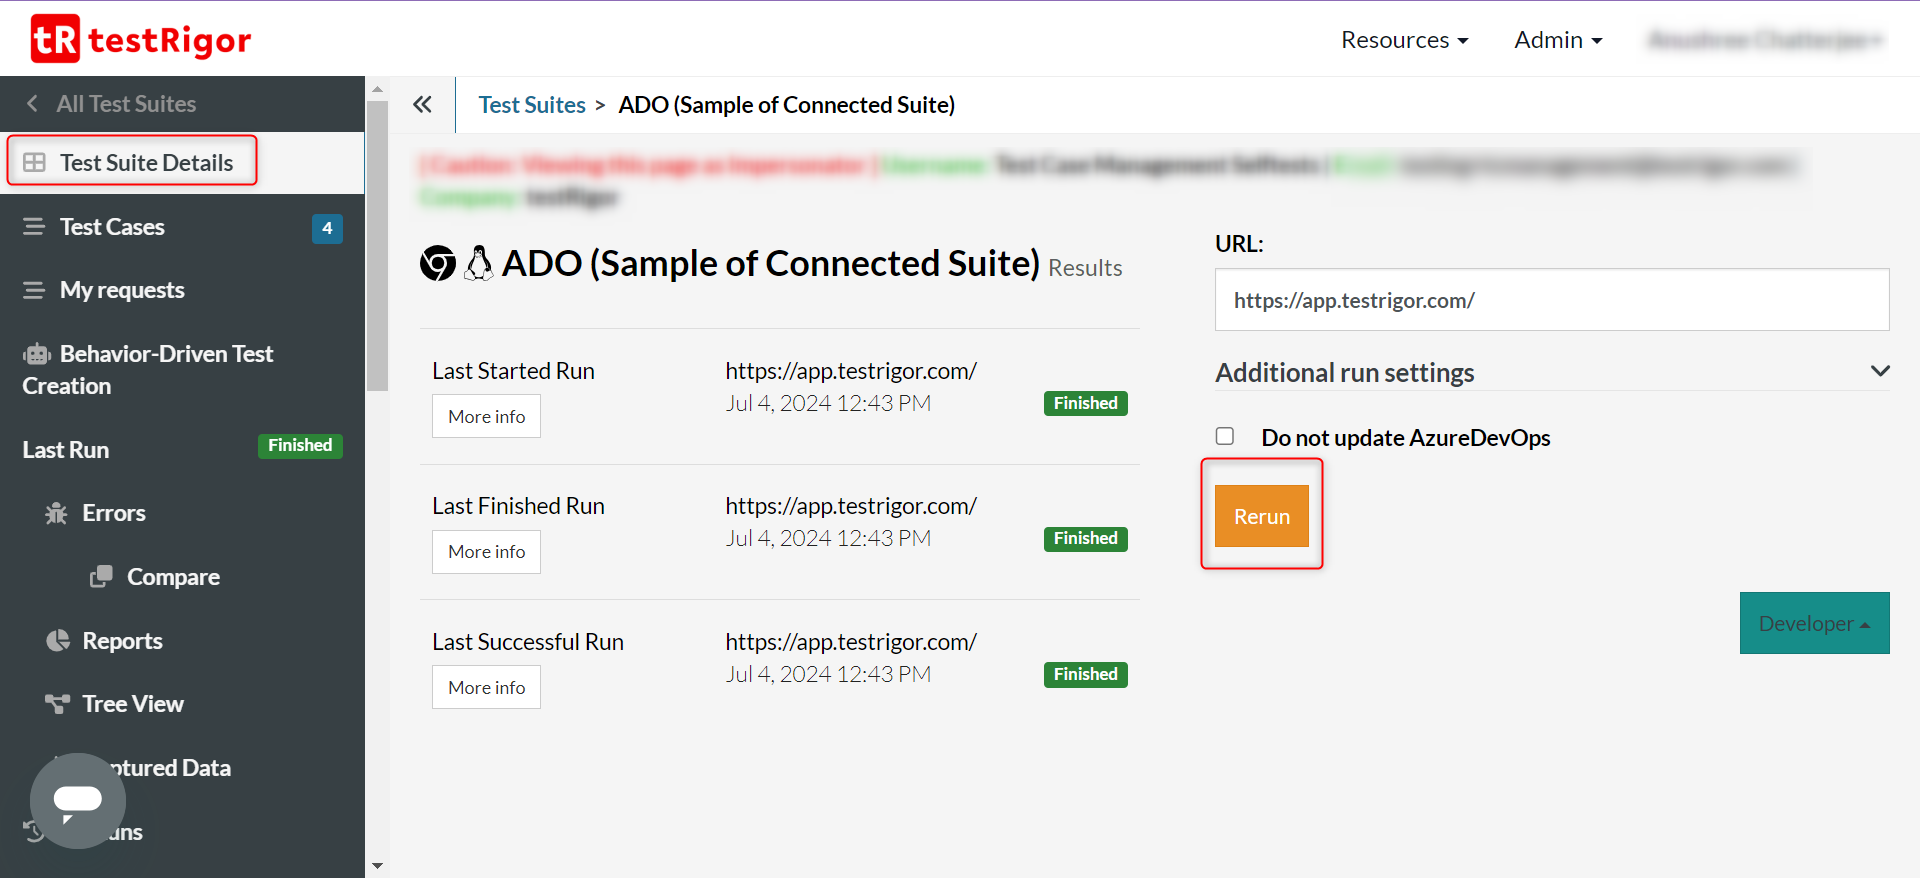
Step 2: Once the test cases in testRigor have run, you can view the execution updates within Azure. Here’s how:
Step 2.1: Go to your Azure project and open the test plan with the test suite you’ve linked to testRigor.
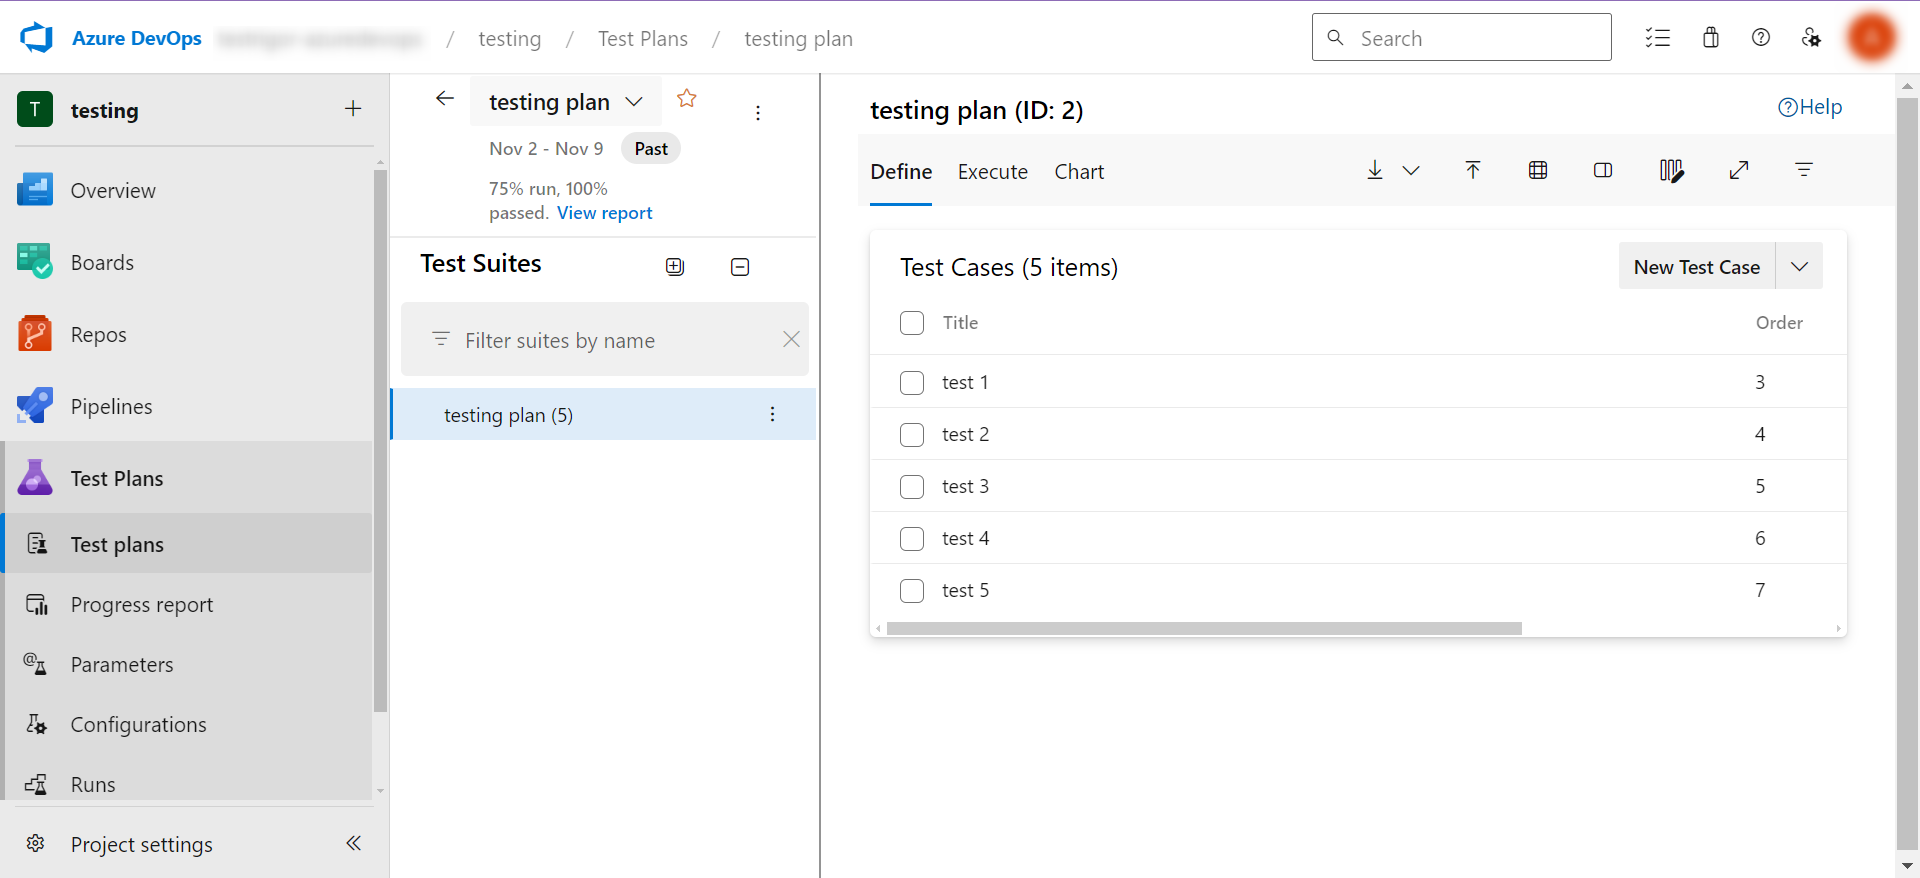
Step 2.2: Come to the Execute view and choose the test case whose execution history you want to see. When you hover over the test case, you will see a More menu (in the place highlighted in the below image). Choose the View execution history option.
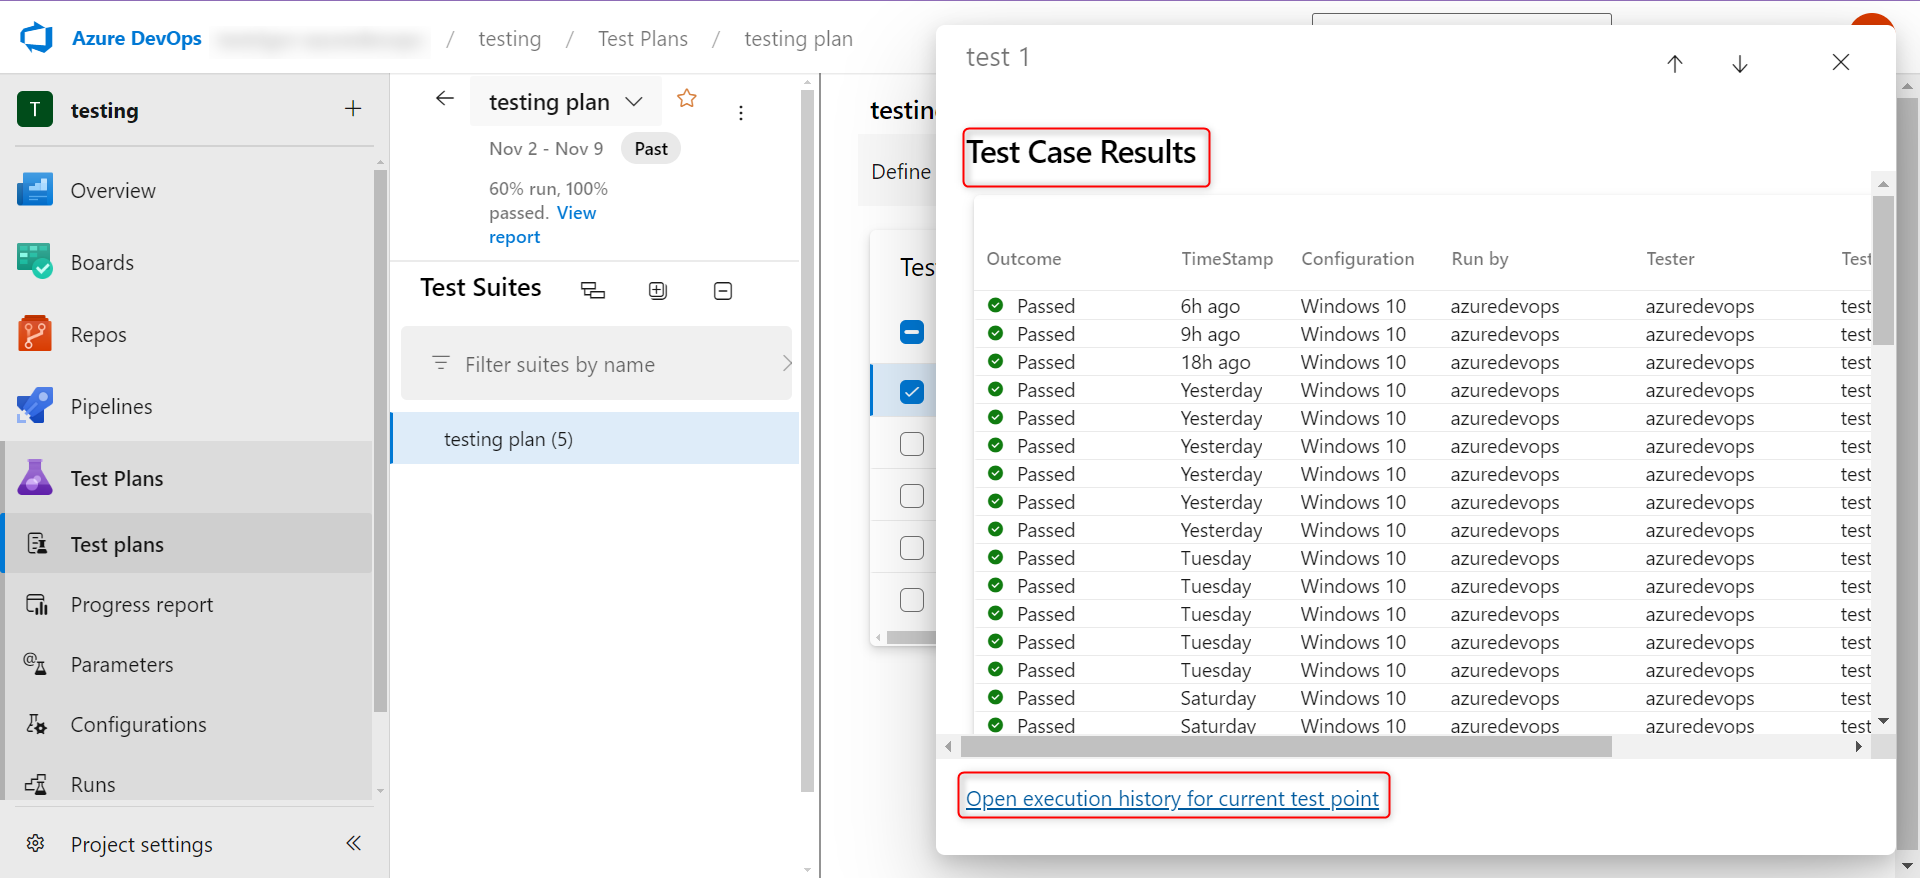
Step 2.3: Here you can see all the runs for that test case. You can even expand the view.
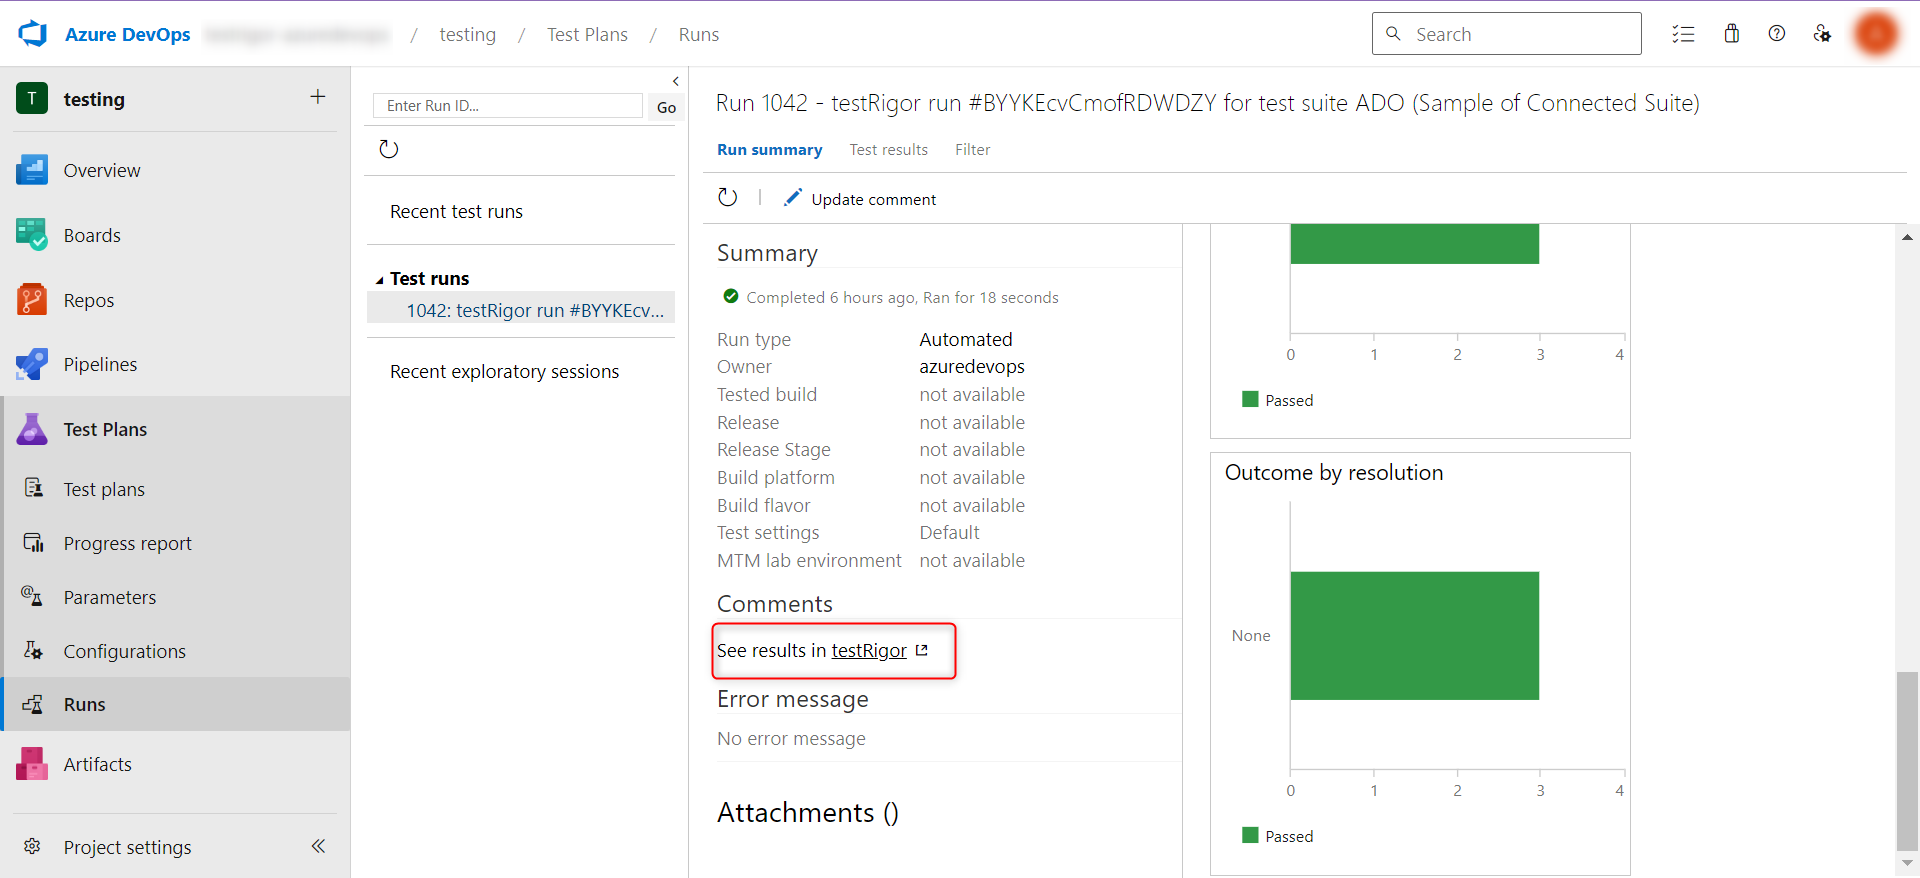
Step 3: In the Runs section in the left panel, you will get an overview of all the test runs that took place with links to viewing test execution details in testRigor.
Creating work items in Azure through testRigor
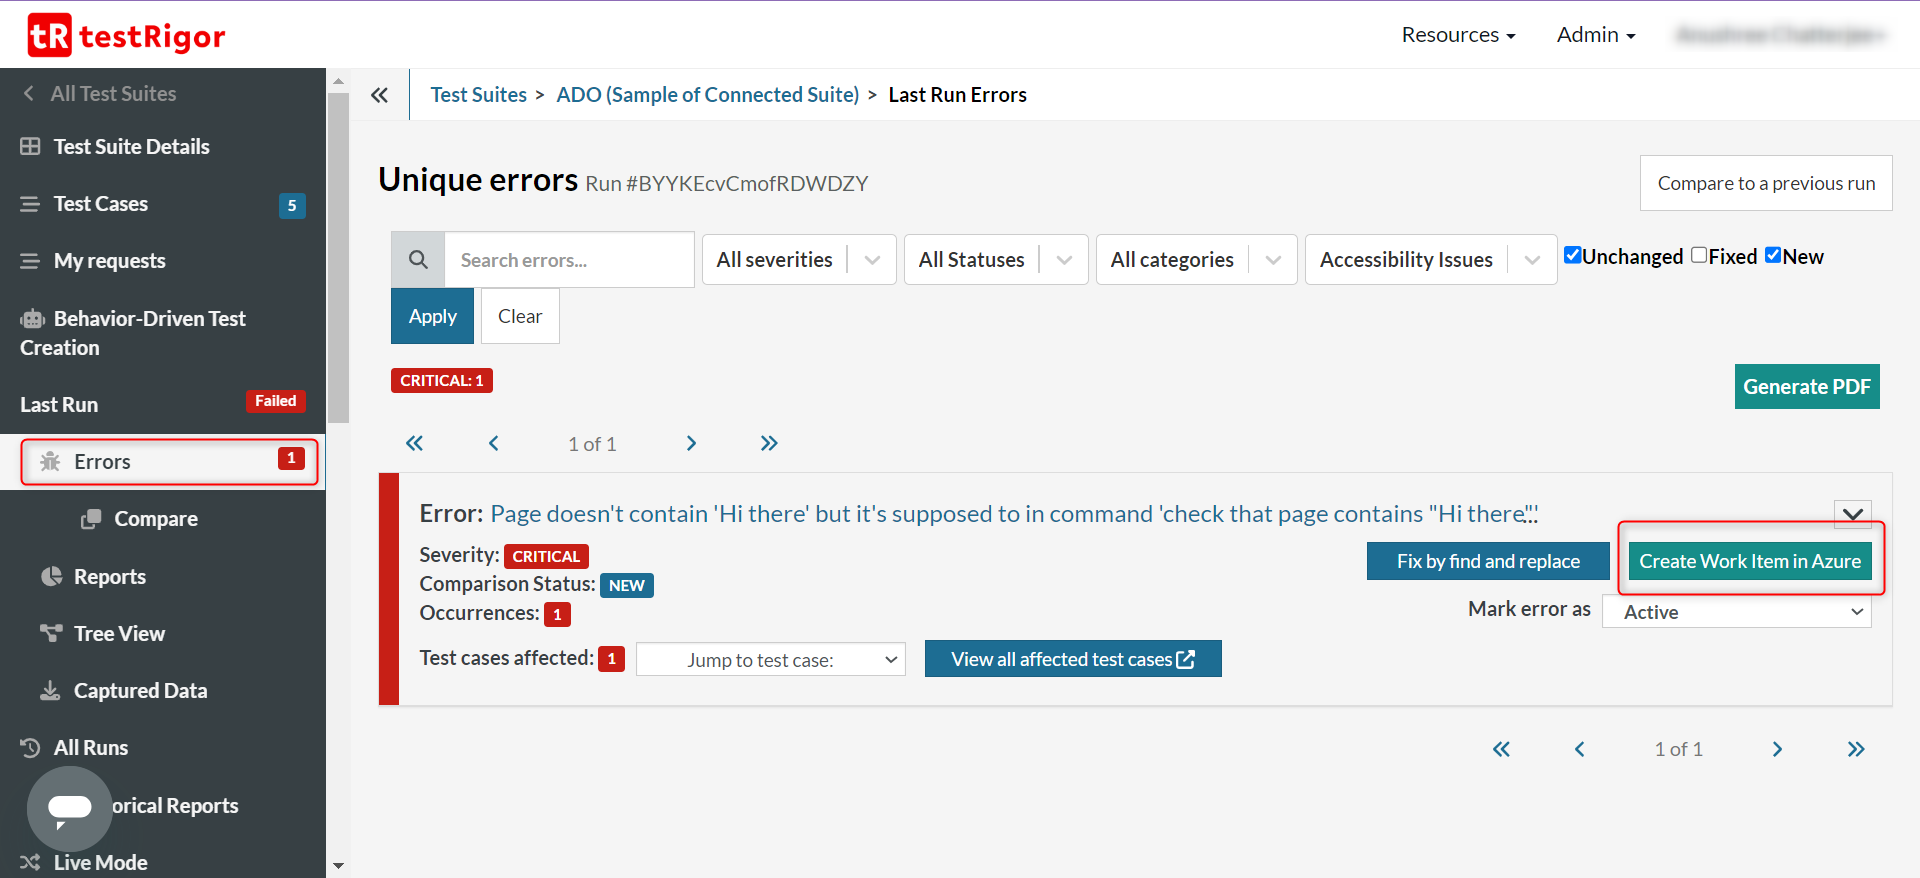
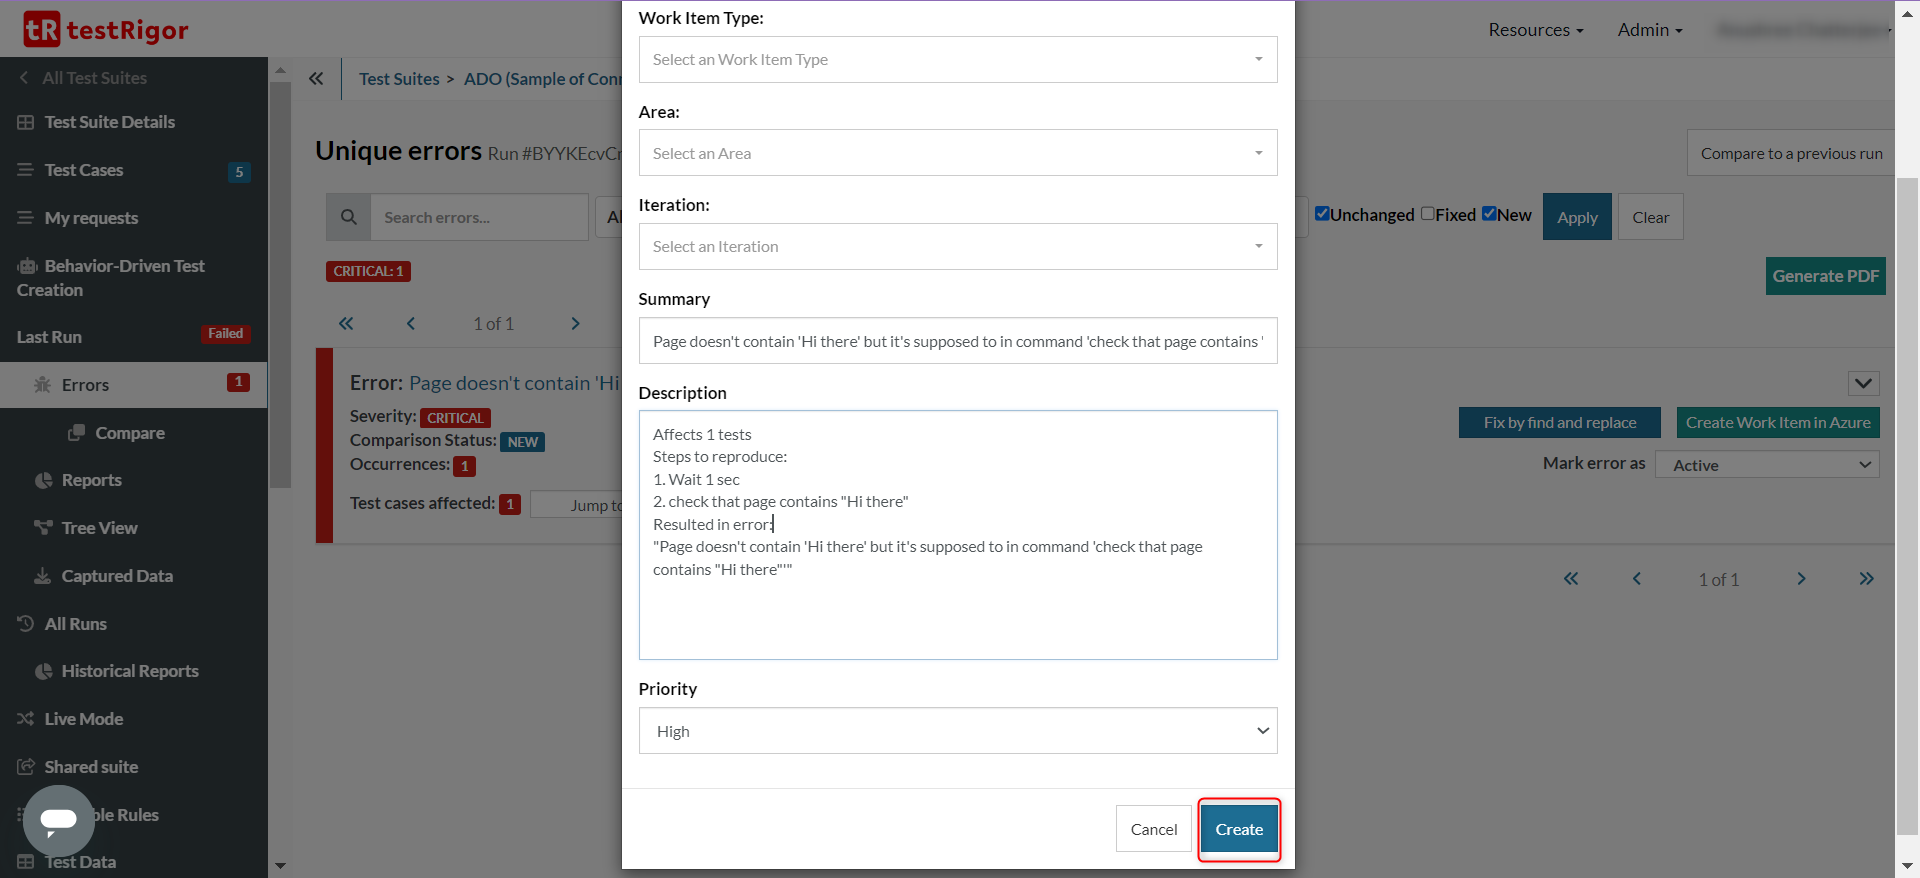
Test runs might bring up issues that will get logged as ‘errors’ within testRigor. You can directly create work items (tickets) in Azure for these errors seen through testRigor.
Step 1: Go to the Errors section. For the error you want to create a work item, click Create Work Item in Azure in that row.
Step 2: A form will appear which you need to fill. Select the relevant Work Item Type and then click Create at the bottom.
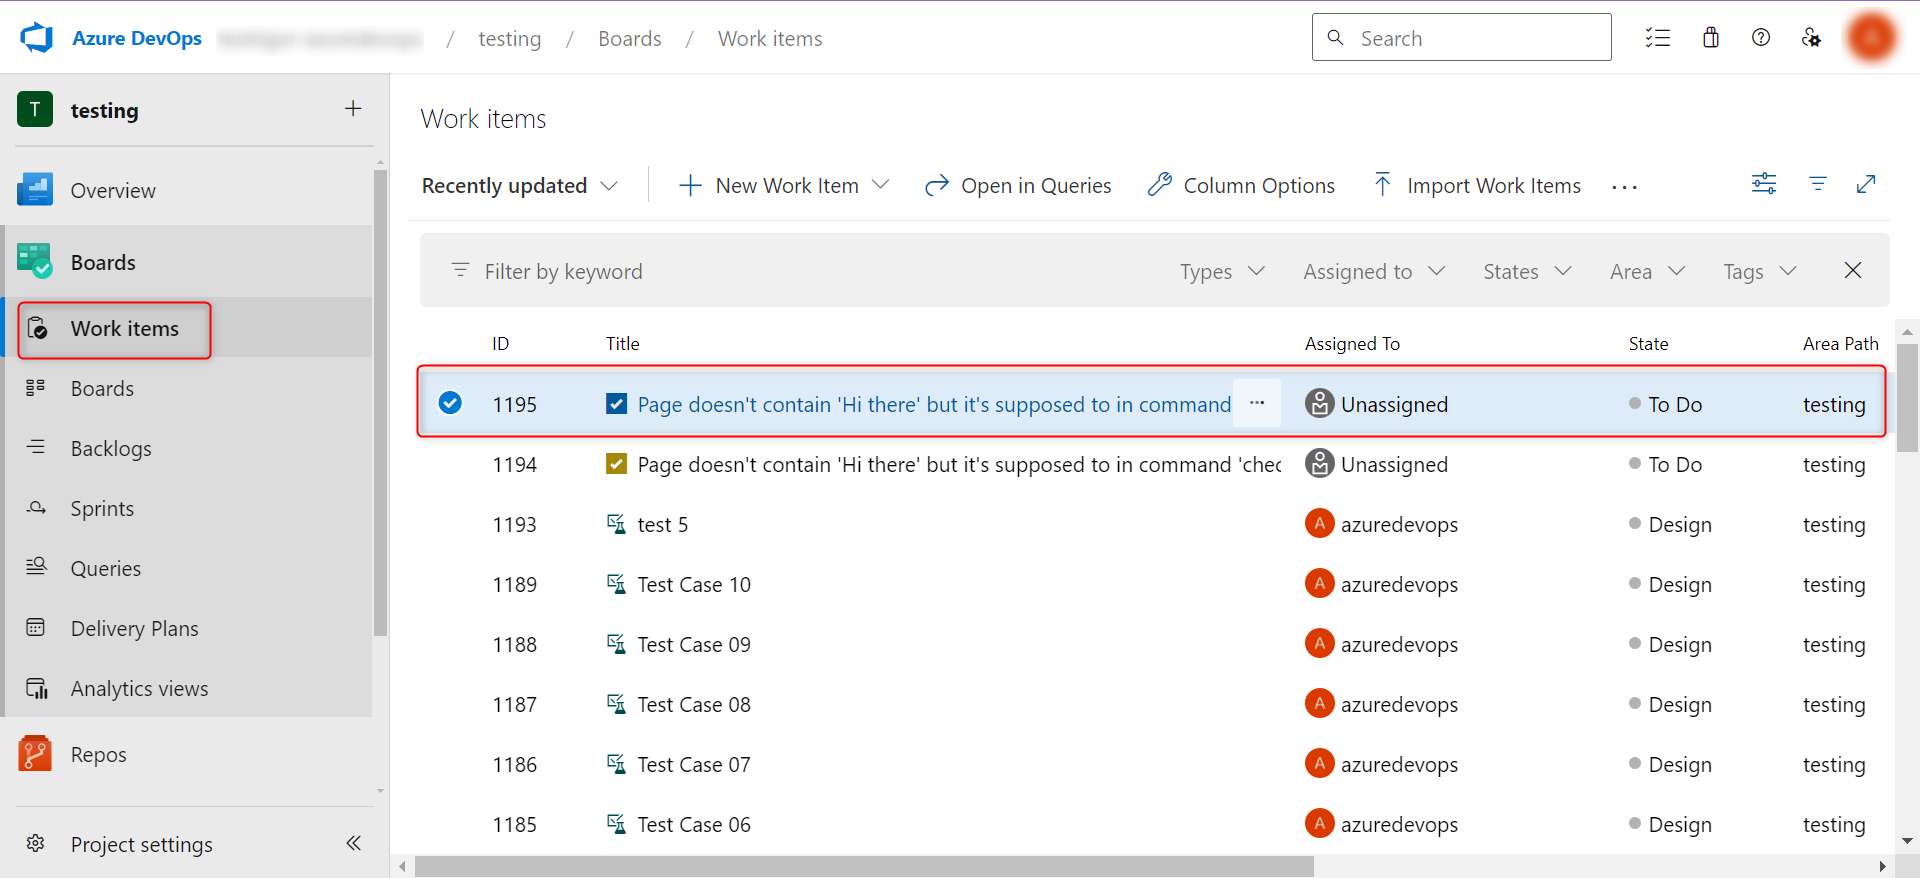
Step 3: Now switch to your Azure DevOps account, in the correct project, and go to Dashboards -> Work Items. You’ll see this newly created work item at the top of the list.
This is just the tip of the iceberg. You can do a lot more with this powerful tool.
Here’s a full list of testRigor’s intelligent capabilities and documentation.
| Achieve More Than 90% Test Automation | |
| Step by Step Walkthroughs and Help | |
| 14 Day Free Trial, Cancel Anytime |


