ALM Overview
|
|
Building an application is no cakewalk. It involves a series of processes, each with its to-do list. The general life cycle of software applications moves from initial requirement gathering and planning to development through deployment and regular maintenance. These processes require coordination among different team members, such as testers, developers, product owners, project managers, and business analysts.
Imagine managing all these activities and cross-team coordination without a common tool. Sounds like a guaranteed recipe for disaster!
Hence, it is essential to have an ‘Application Lifecycle Management‘ tool that provides a central platform for everyone to work on.
The ALM tool
ALM has had a long journey of enhancements and rebranding. ALM was developed and marketed by Hewlett-Packard (HP) as HP ALM. However, the software and its associated products were acquired by Micro Focus as part of a spin-off and merger with HP’s Enterprise Software division. Recently, OpenText acquired Micro Focus, and as a result, ALM is now branded under the OpenText umbrella as OpenText ALM.
Despite the changes in ownership and branding, the core functionalities and purpose of the product remain consistent: providing comprehensive tools for managing the application development lifecycle, including requirements management, test management, and defect tracking.
Features of ALM
ALM allows you to manage all the processes involved in an application’s lifecycle. Here’s a list of all that ALM lets you do:
Requirements management:
- Capture and manage requirements in a centralized repository.
- Trace requirements throughout the software development lifecycle.
- Link requirements to tests and defects to ensure test coverage and test traceability.
Test management:
- Create, organize, and manage test plans and test cases.
- Execute manual and automated tests. Here is a Manual Testing Cheat Sheet.
- Track test execution progress and results.
- Integrate with various test automation tools.
Defect management:
- Log, track, and manage defects.
- Prioritize and assign defects to team members.
- Monitor defect status and progress.
- Integrate with defect tracking tools. Know about Severity vs. Priority in the Life Cycle.
Release management:
- Plan and track releases and sprints.
- Manage release schedules and milestones.
- Coordinate development and testing activities.
Project planning and tracking:
- Define project scope, objectives, and deliverables.
- Create project timelines and work breakdown structures.
- Monitor project progress and resource allocation.
- Generate project status reports and dashboards.
Collaboration and communication:
- Provide a centralized platform for team collaboration.
- Facilitate communication through discussion threads, notifications, and email integration.
- Share documents, reports, and project artifacts.
Traceability and reporting:
- Maintain end-to-end traceability from requirements to deployment.
- Generate customizable reports and dashboards.
- Visualize project metrics and key performance indicators (KPIs).
Integrations and extensibility:
- Integrate with various development, testing, and deployment tools.
- Support for REST and SOAP APIs for custom integrations.
- Plugin support for CI/CD tools.
Version control:
- Manage different versions of requirements, tests, and other project artifacts. Read:How to Do Version Controlling in Test Automation.
- Track changes and maintain a history of modifications.
Security and access control:
- Define user roles and permissions.
- Ensure secure access to project data and artifacts.
- Comply with industry standards and regulations.
Customization and configuration:
- Customize workflows, fields, and templates to fit specific project needs.
- Configure user interfaces and dashboards to match team preferences.
Deployment options:
- Available as an on-premises solution or a cloud-based service.
- Flexible deployment options to suit different organizational needs.
ALM editions
ALM is available in different flavors. You can opt for the one that works best for your needs.
- ALM: This is the core product offering comprehensive features for application lifecycle management, including requirements, test, defect, and project management.
- Quality Center (QC) Enterprise edition: Primarily focused on quality management, this edition offers a robust set of features for testing, defect management, and test automation.
- Quality Center (QC) Express edition: Designed for smaller teams, this edition provides a subset of the Enterprise Edition’s features, focusing on test and defect management.
- Quality Center (QC) Community edition: A free version with limited functionality for learning and evaluation purposes.
- ALM Octane: While not a direct edition of ALM, it’s a complementary platform that offers agile and DevOps capabilities, often used in conjunction with ALM.
- SaaS offerings: ALM has been made available as a Software-as-a-Service (SaaS) solution, offering different pricing and deployment models.
ALM Overview
ALM lets you manage tests along with other aspects of an application’s lifecycle. You can create test plans, manage various test resources, control test versions, schedule test executions, track and manage defects, and more.
A site administrator (could be you) needs to associate your account with the projects you need to access. This will lead to you being able to choose which project you want to work on during the login time itself.
In this overview, we have the on-premise version of the HP ALM. ALM has changed hands multiple times, resulting in different versions and brandings. It is important to remember that the versions will differ in their user interfaces and enhancements, but the core functionalities remain the same. Thus, if you understand the basics, you will be able to work with different versions of ALM.
Create test cases
Step 1: Log into your account. Go to Testing -> Test Plan through the left panel menu. Test plan allows you to create, manage, and organize your test cases. Create a new folder to house your test cases.
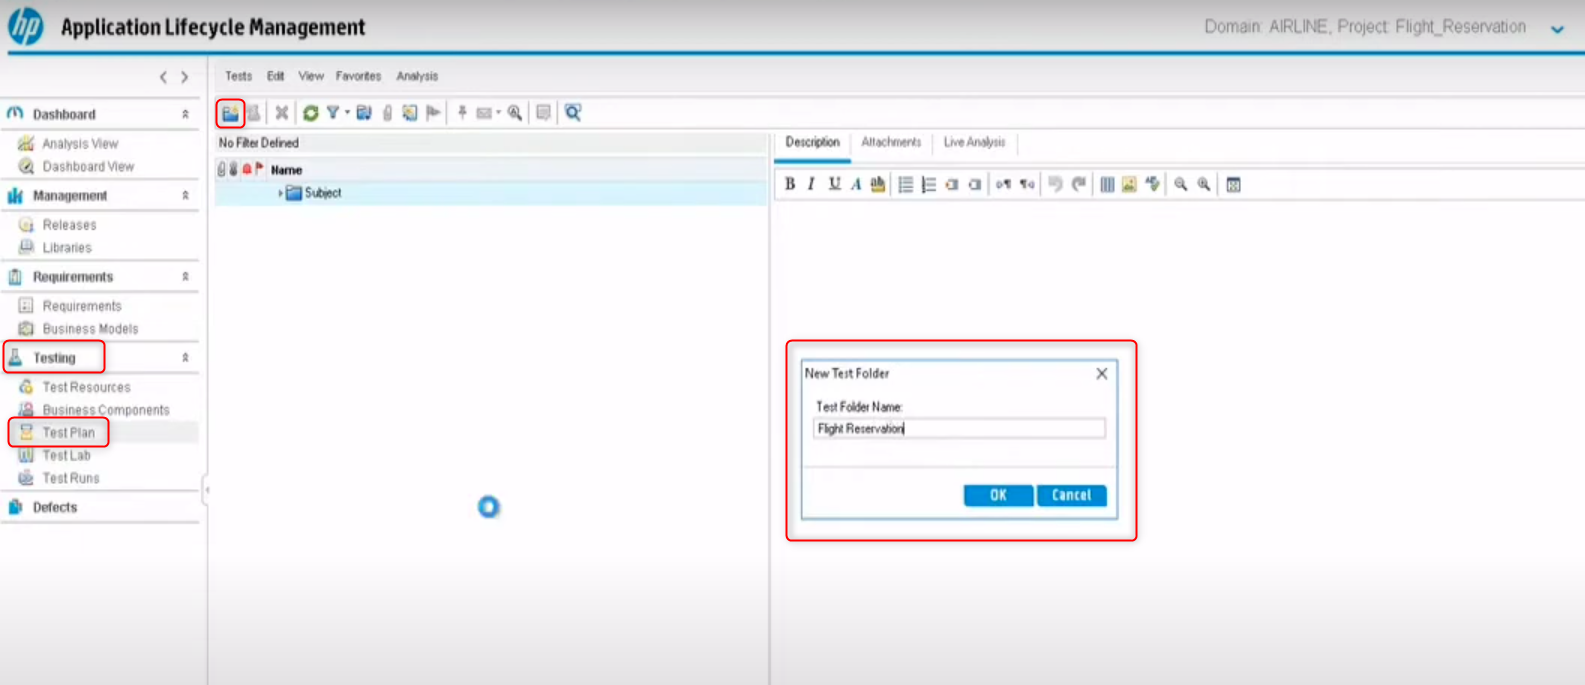
This new folder will appear under the root folder.
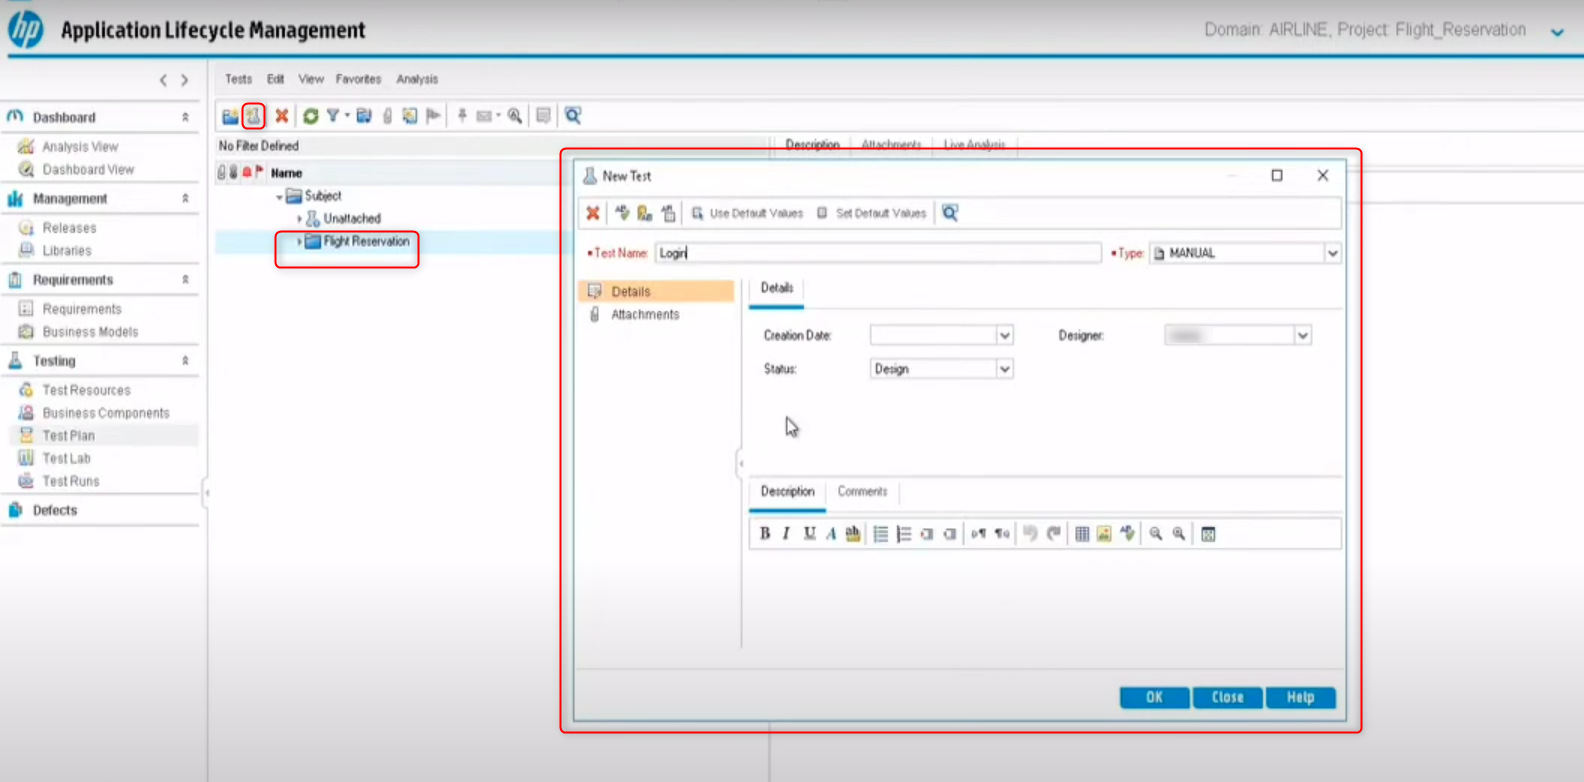
Step 2: Start adding test cases to this folder. The New Test window gives many configuration options, such as the status and type of test case.
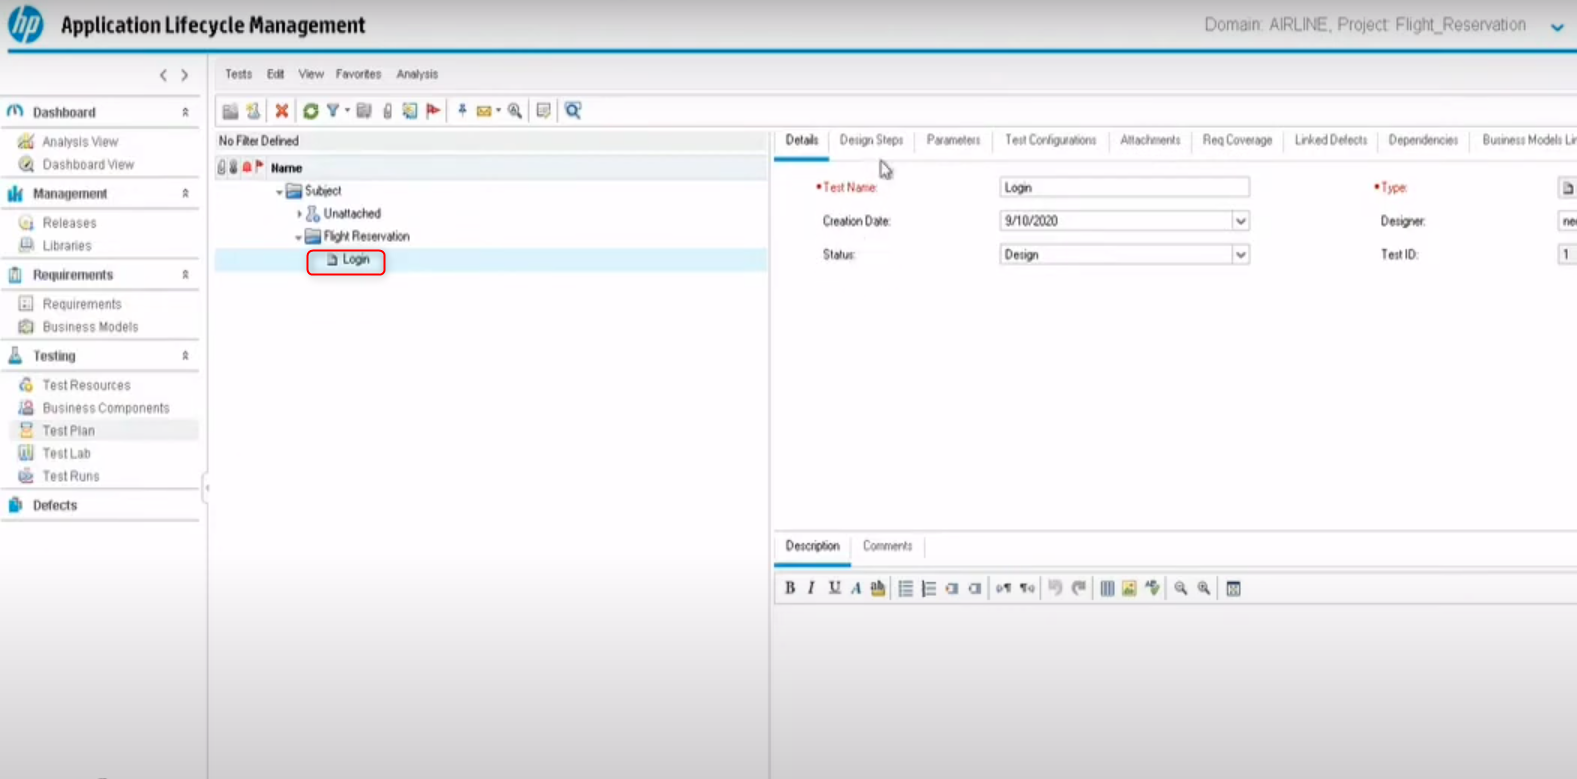
Step 3: When you click on a test case, you will see various details about it in the right window. You can design test steps, define parameters, and configure global variables. Additionally, you can link requirements or defects to a test.
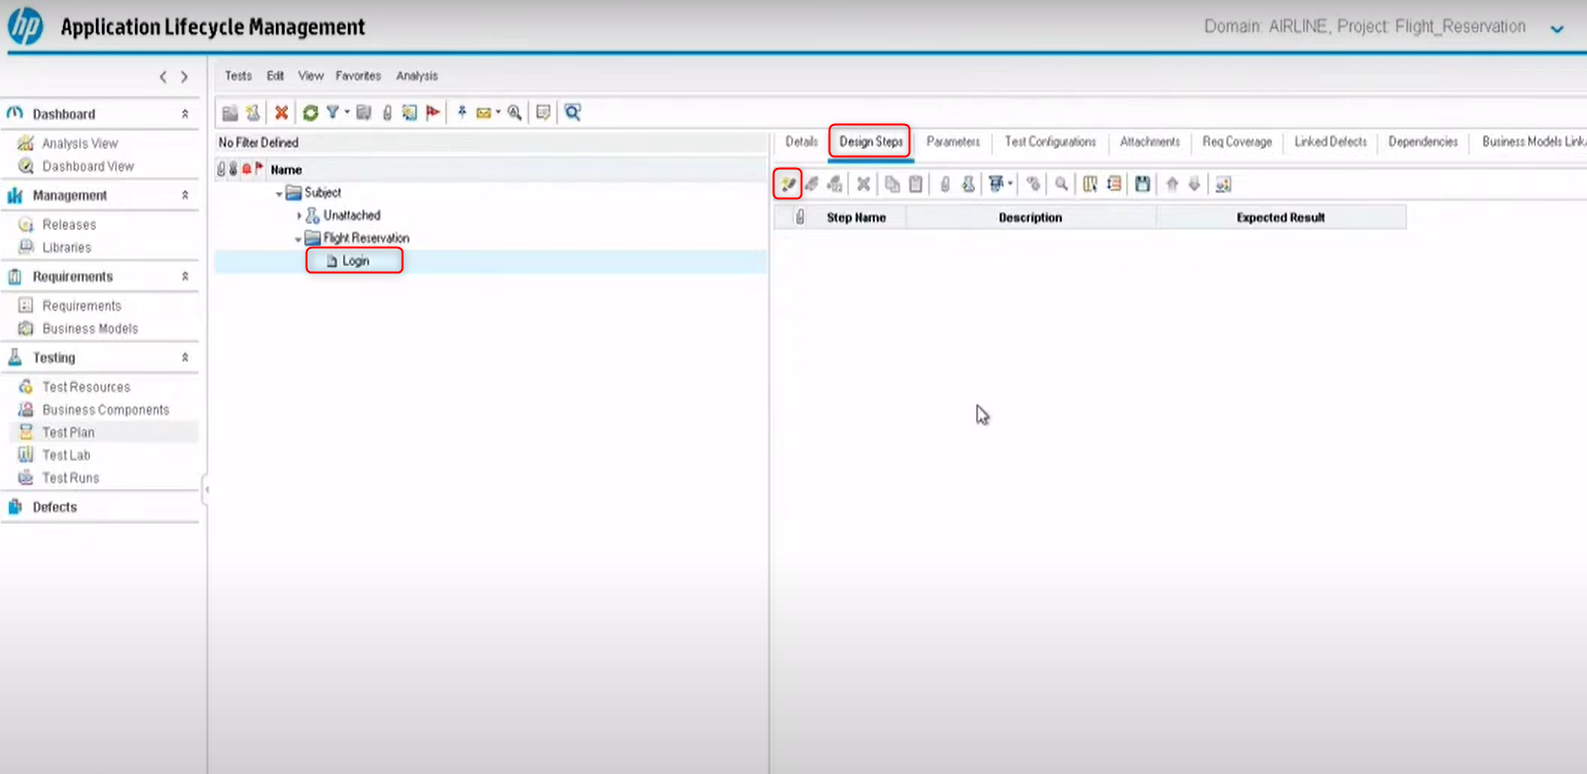
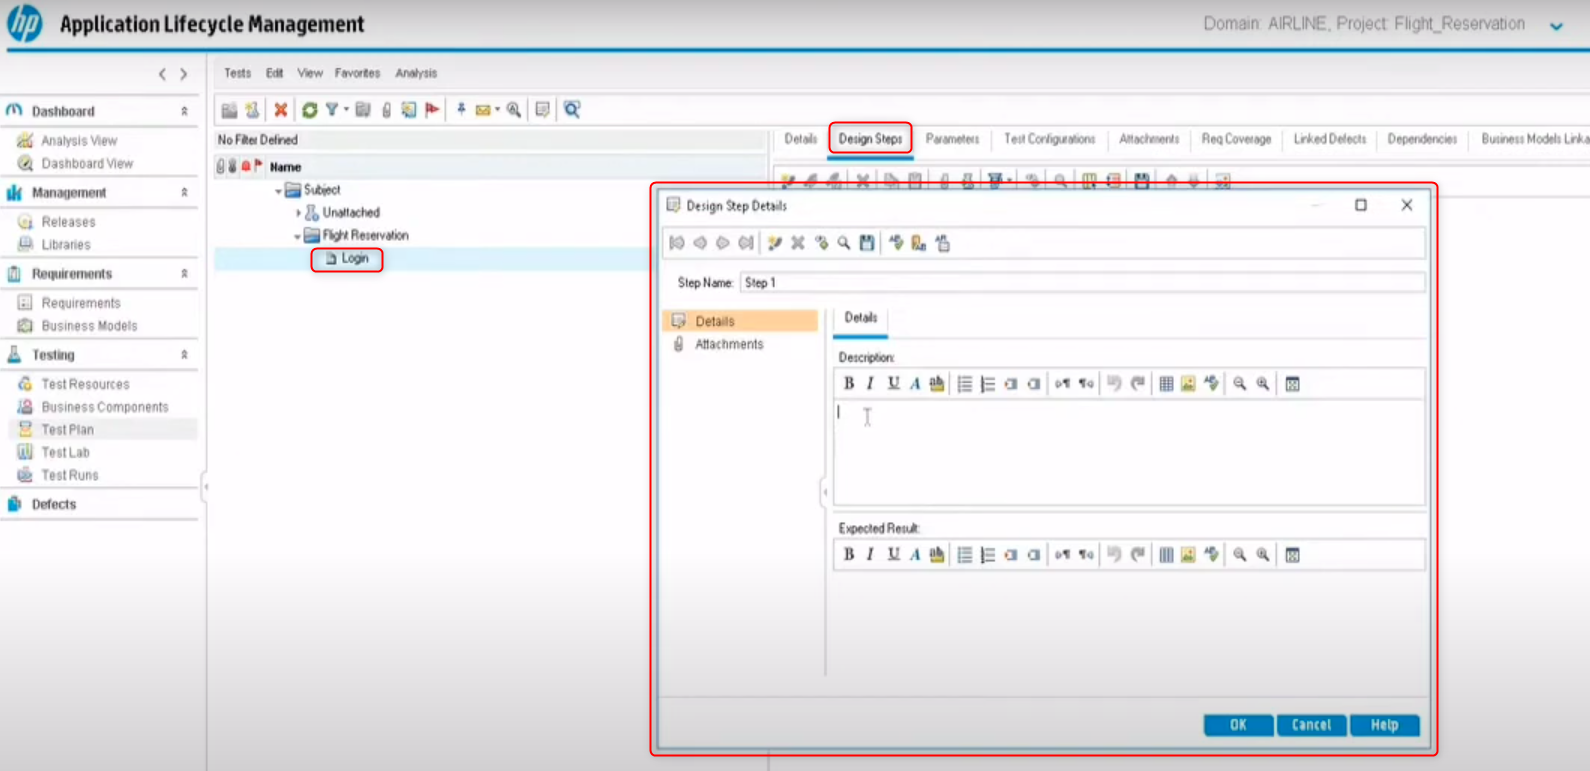
Step 4: To add test steps to a test case, click on Design Steps and then New Step.
Step 5: A window will open to allow you to create a new step for the test case. Fill in the step Description and Expected Result.
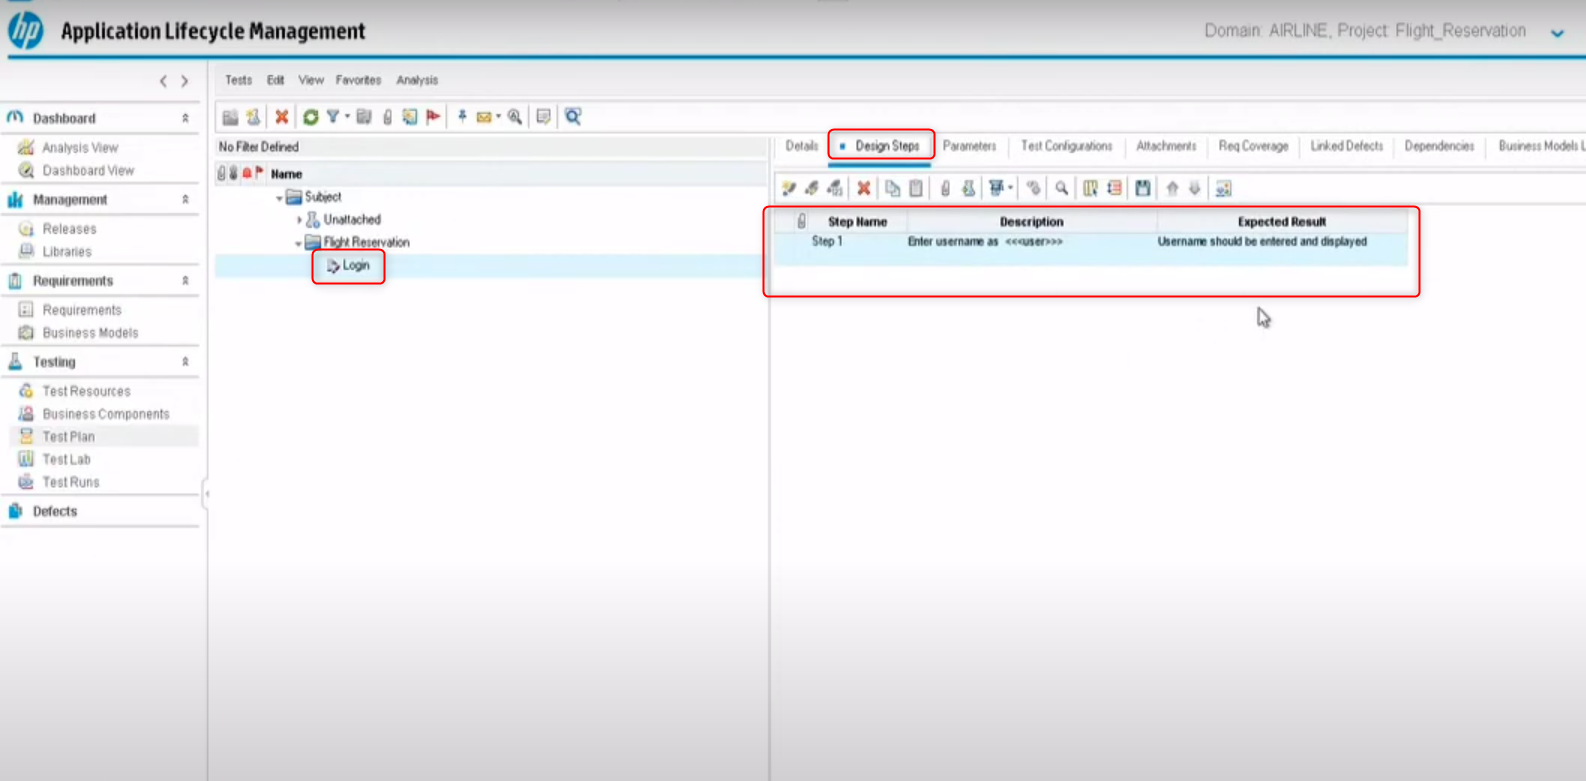
This is what the test steps will look like.
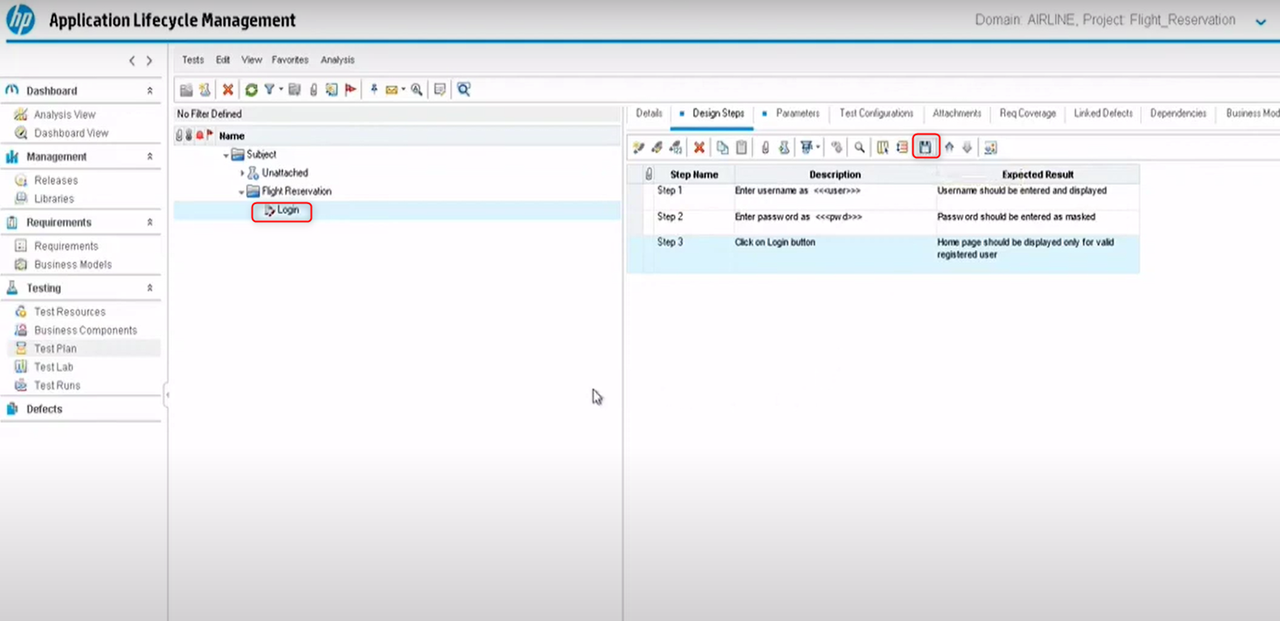
Step 6: You can save and export your test cases in different formats, such as Excel.
Execute test cases
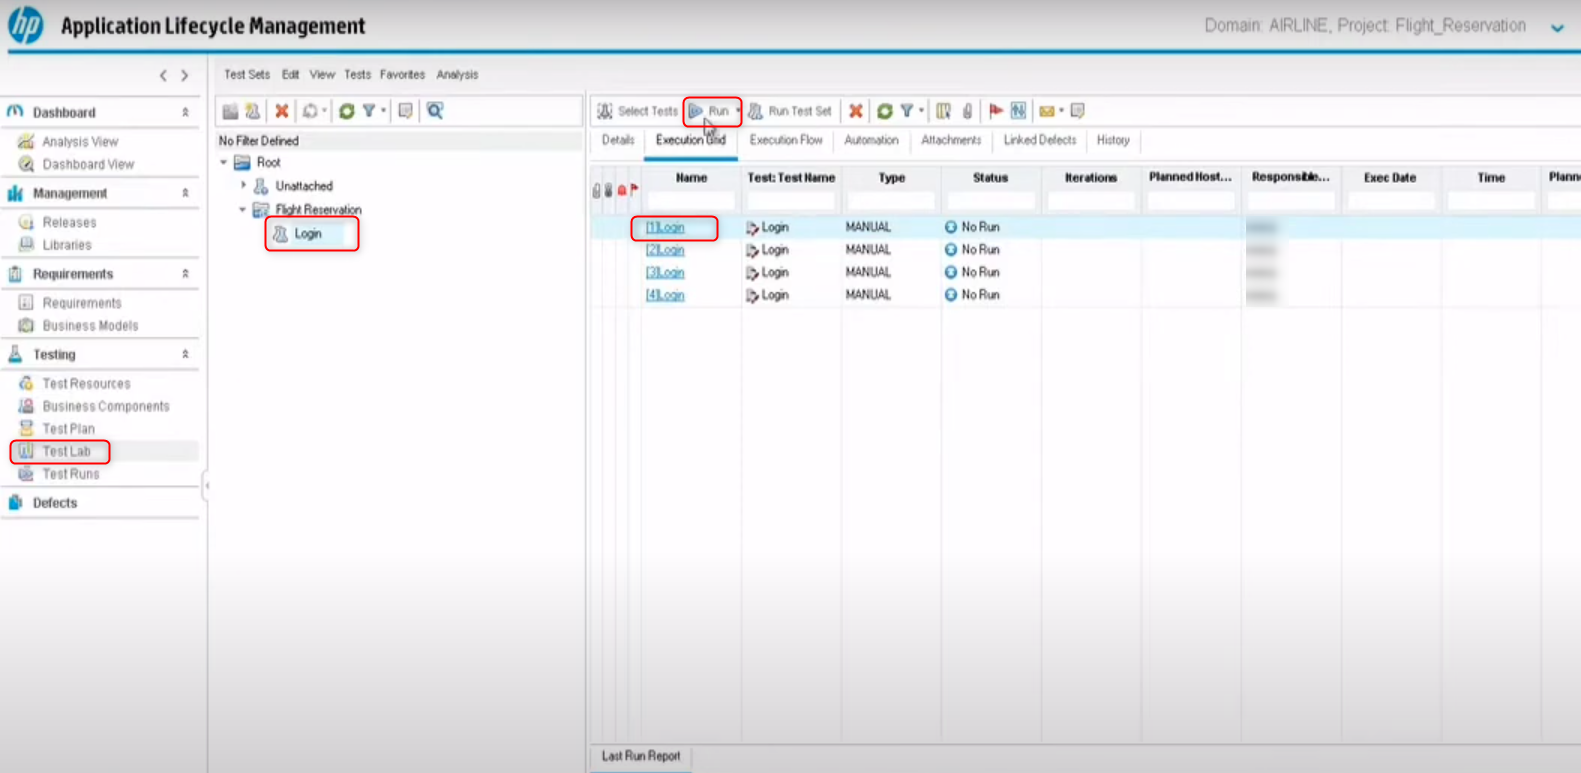
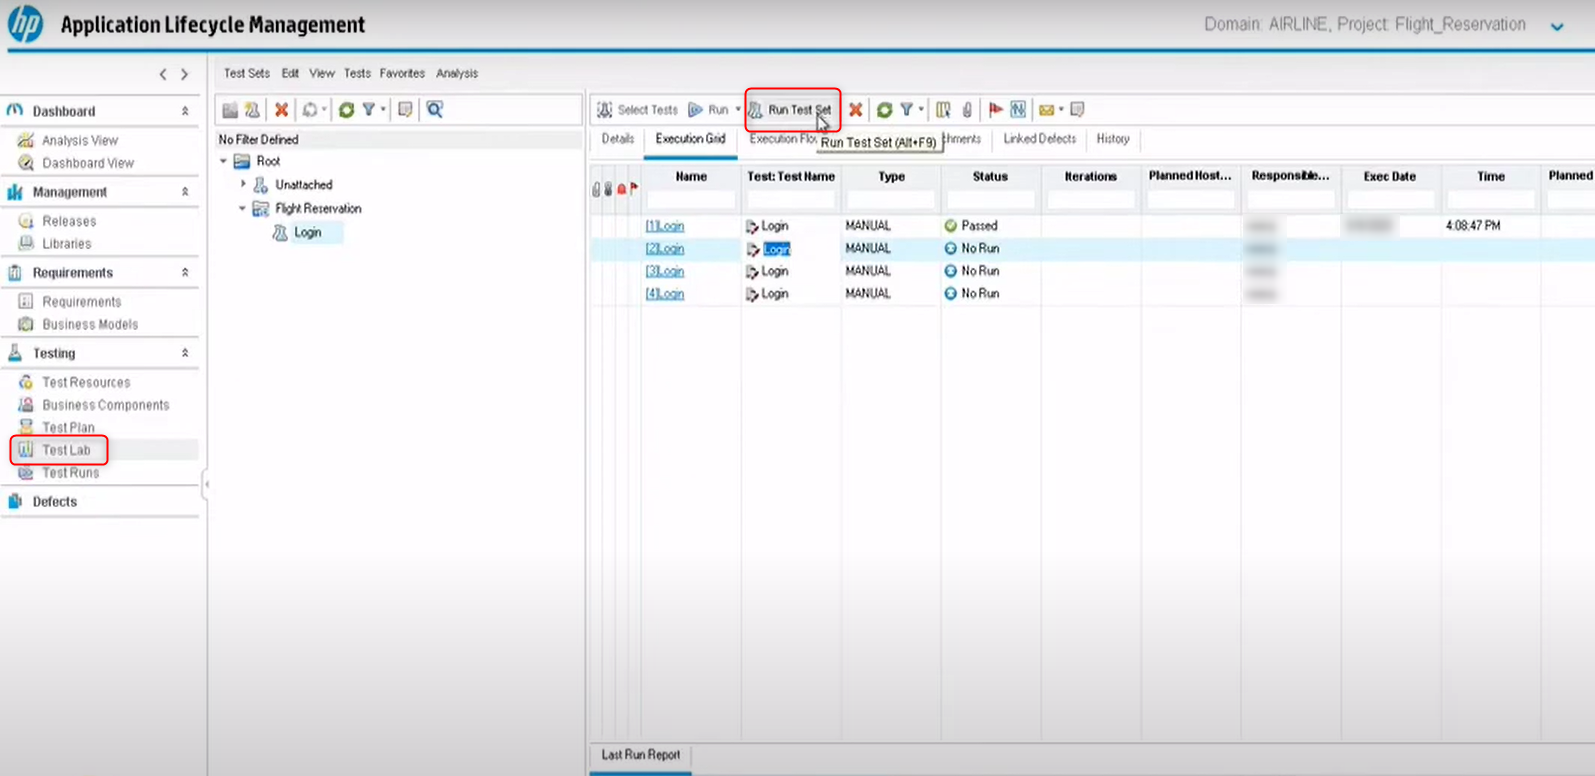
Step 1: In ALM, you can use Test Lab to import tests from test plans, prioritize the run order, and choose how the tests will be executed. Choose the test case you want to execute and click on the Run button.
Step 2: As soon as you click on the Run button, the ALM application will minimize and give you a small window, the Manual Test Runner. This window will accompany you through the application. The expectation is that you read the test steps and log the actual outcome in this test runner window while executing the test case.
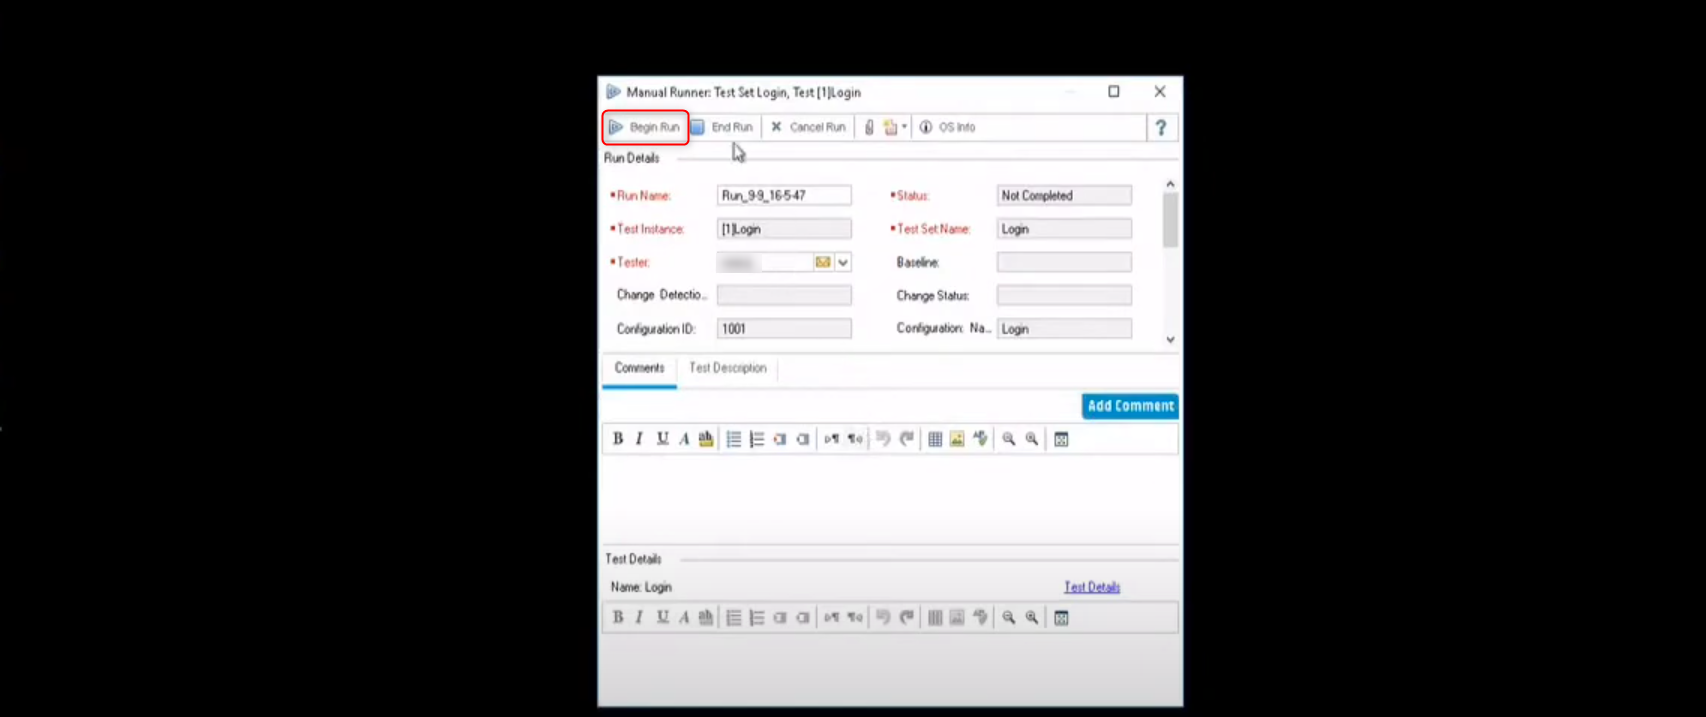
At all times, you will see that this window has the expected outcome that you wrote when creating the test step. Also, if you’ve used parameters, the values are displayed here instead of the variables to help whoever is running the test to do so themselves.
The window also has buttons to allow you to pass a step and move on to the next.
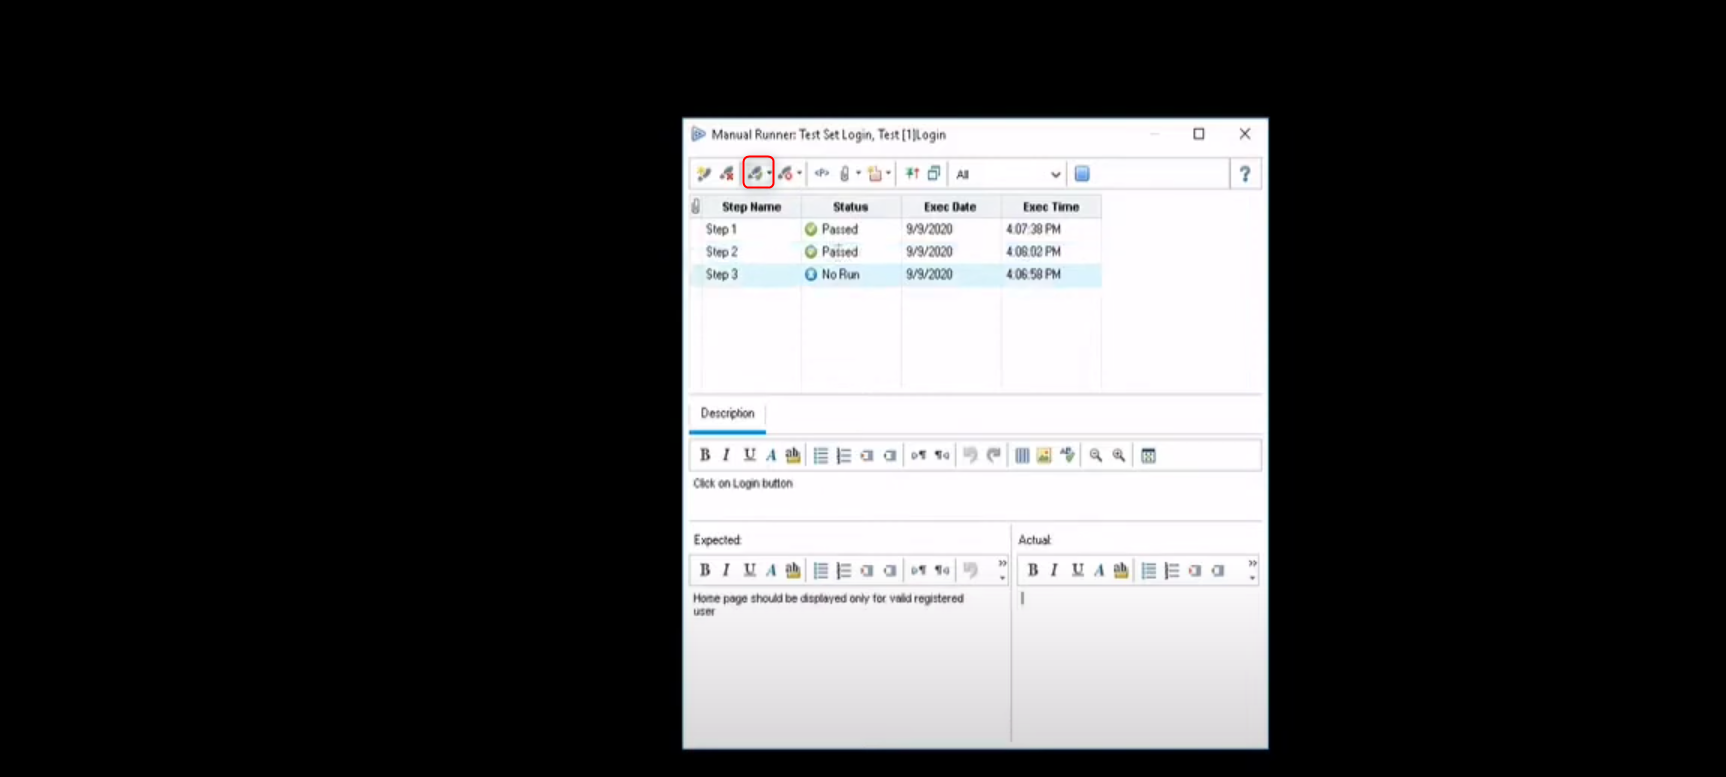
Step 3: At any point during the test run, if you encounter a defect, you can raise it by using the button in the test runner window. Fail the test step where you found the defect. This will also log the test case as failed. Once you are done with the complete test execution, click on End Run button.

If you want to run all the test cases in the set at once, then click on the Run Test Set button in your ALM application.
Reports and analysis
ALM offers a Dashboard module with two options – Analysis View and Dashboard View.
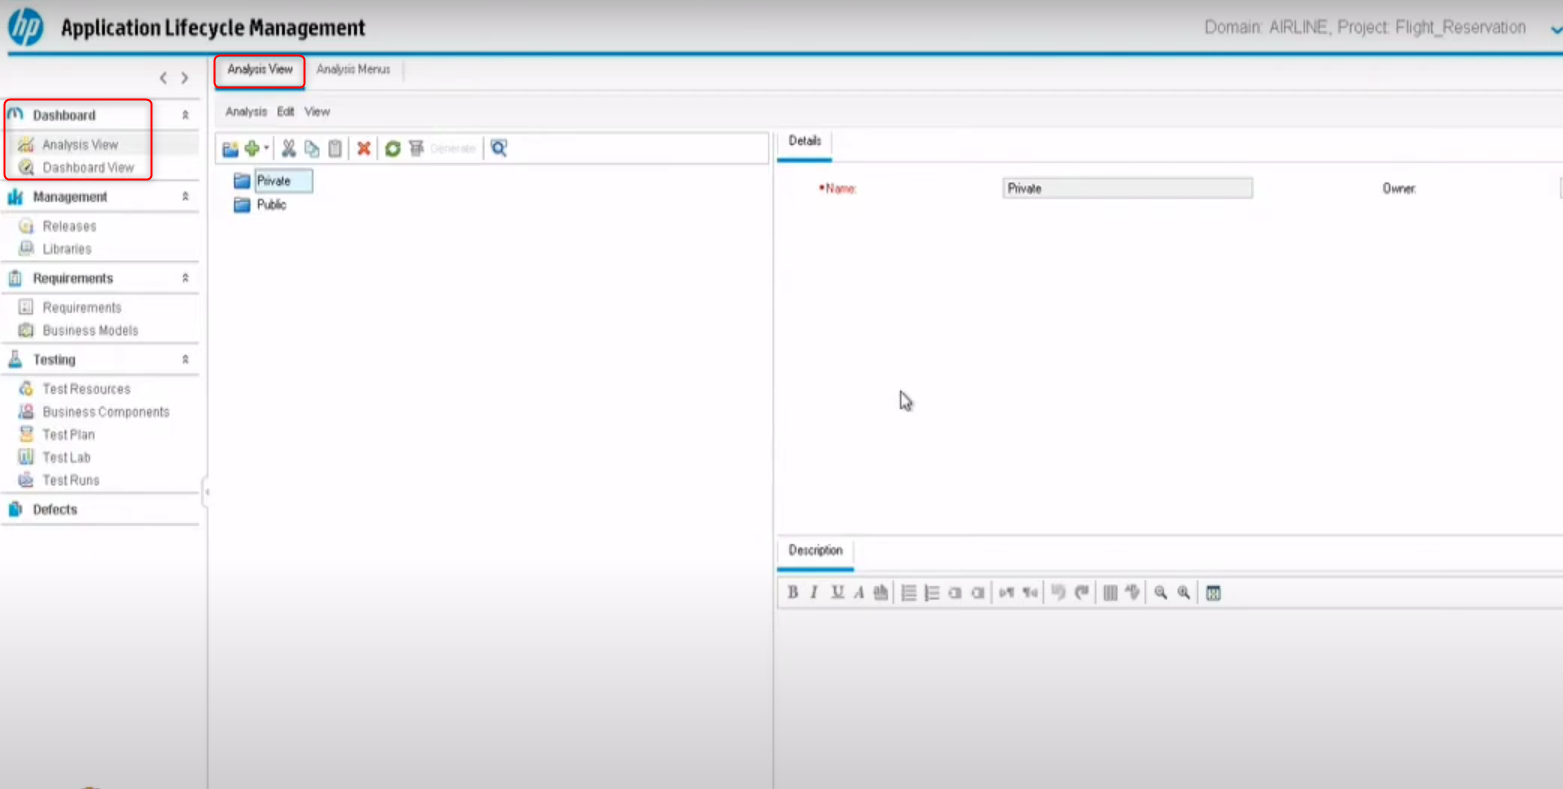
You can create graphs and reports through the Analysis View. The Graph Wizard, accessible through the New Item button, lets you create new graphs and charts.
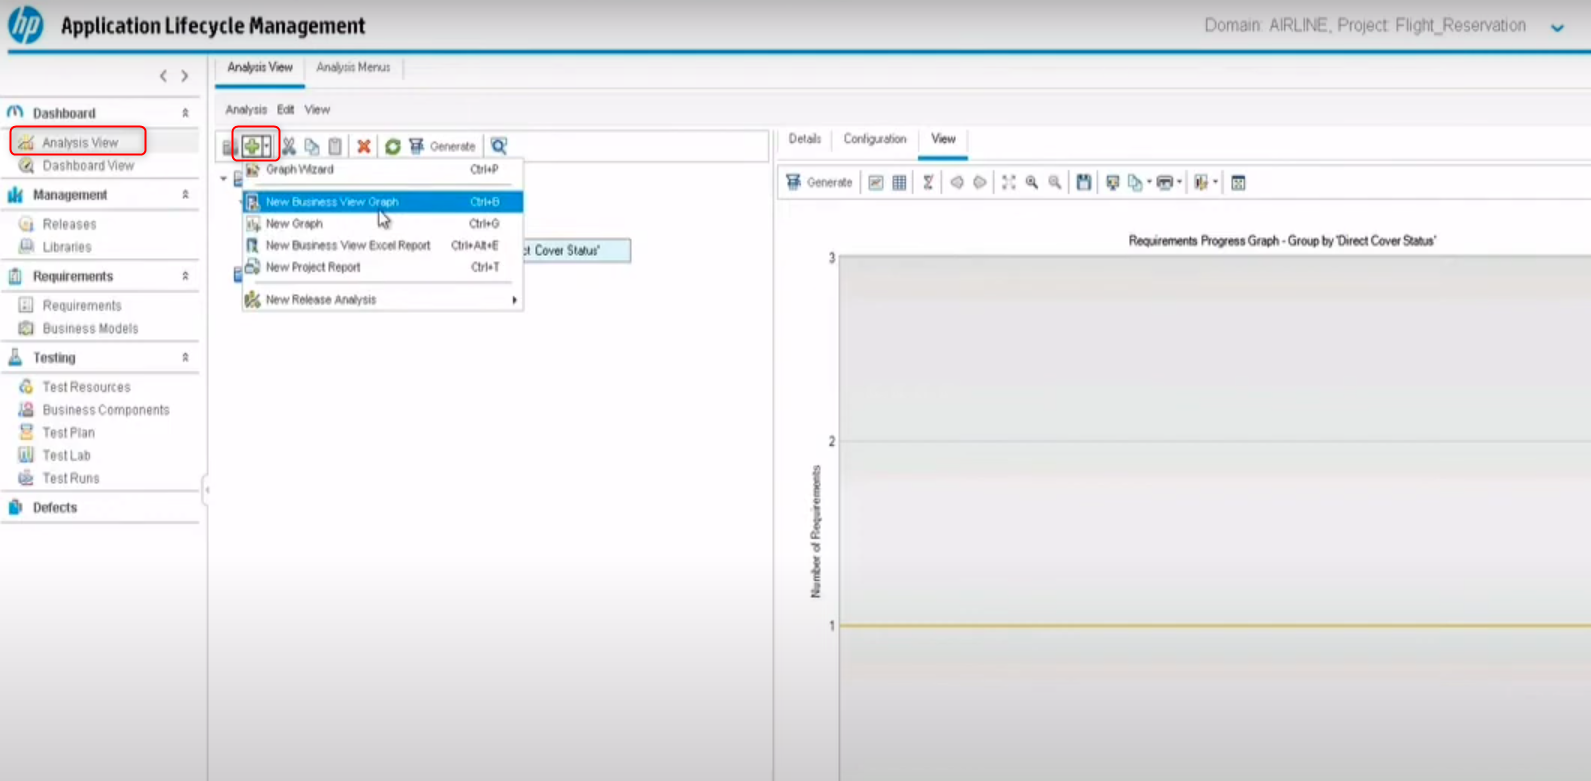
With the Graph Wizard’s simple GUI, you can choose what parameters you want to include in your report for the project you wish to create a report on. These reports can then be added to the analysis tree, that is, they can be organized into different files for future reference.
You can further compare these different reports simultaneously through the Dashboard View.
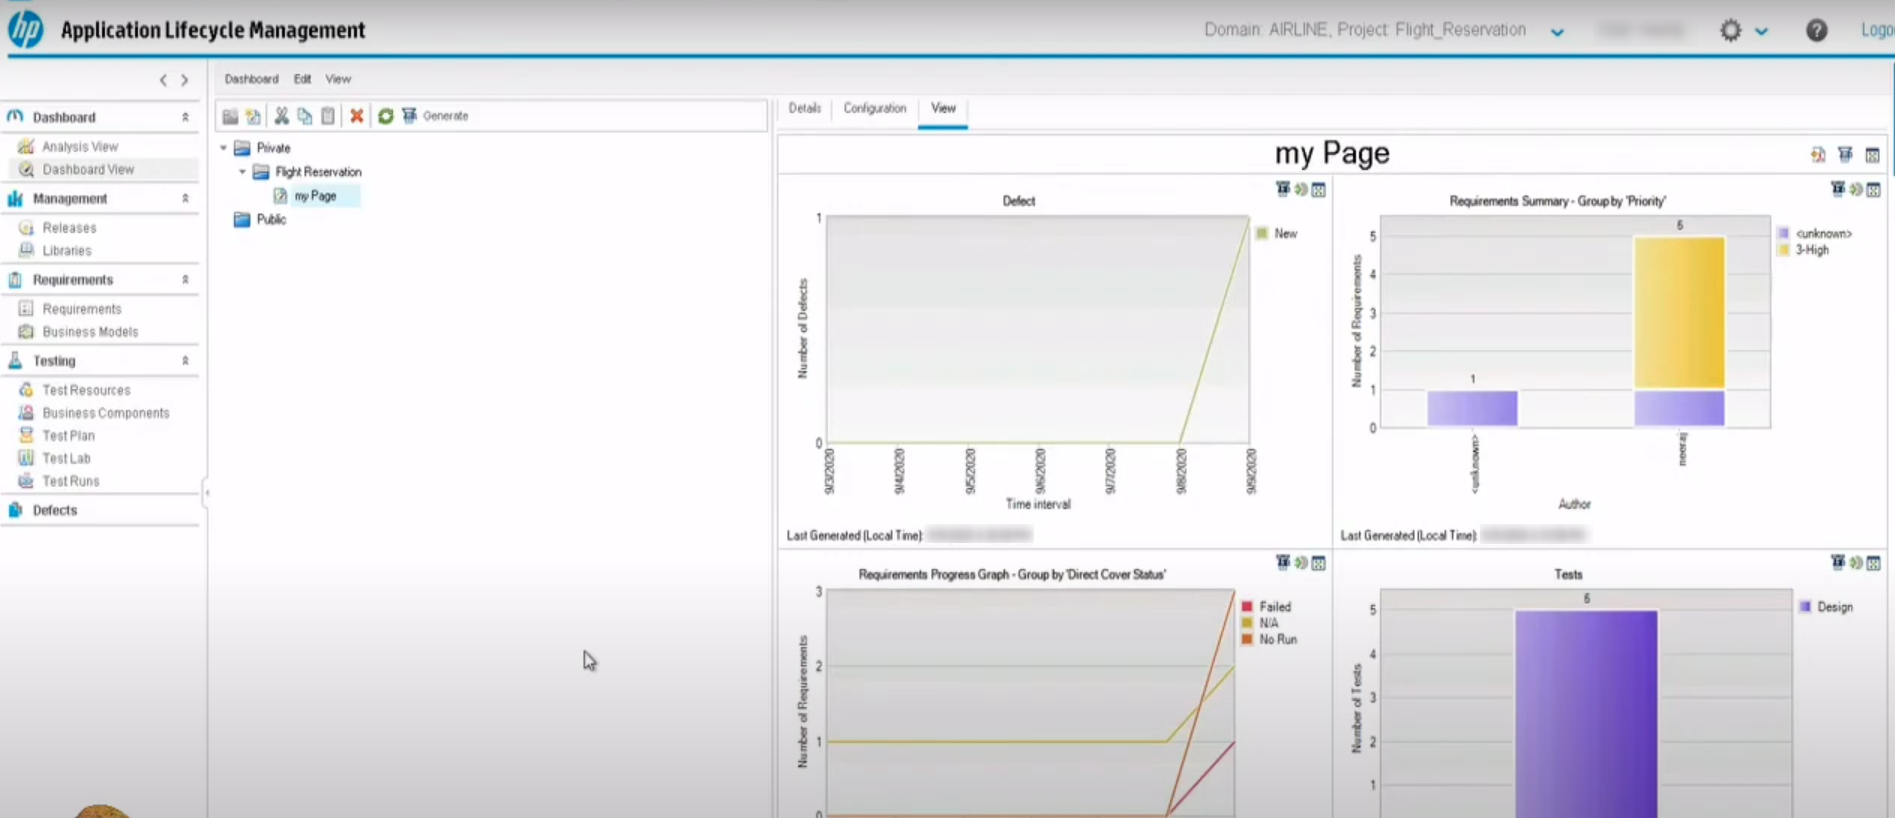
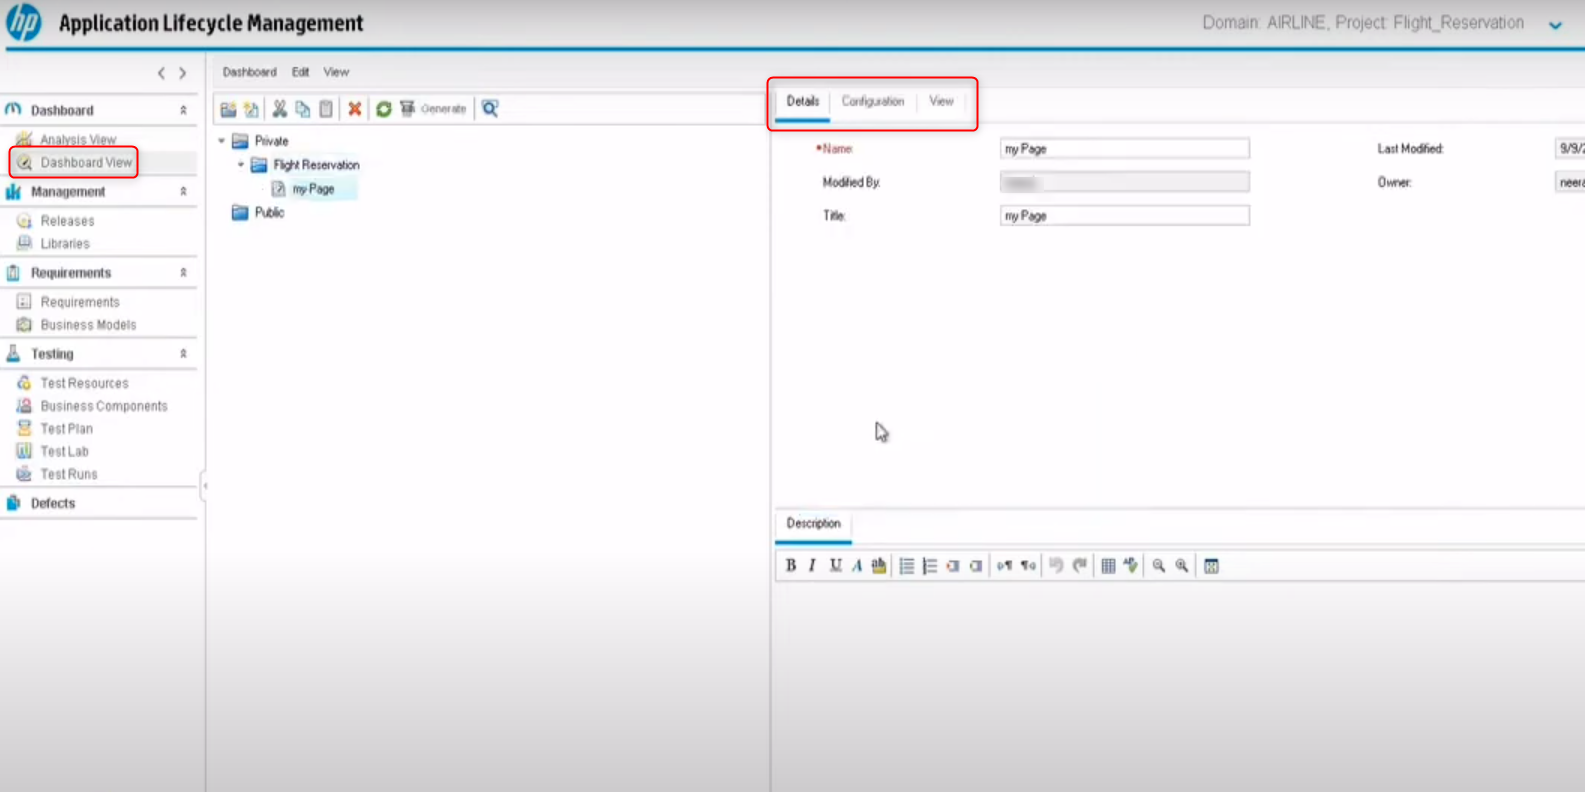
Create a new Dashboard page. Then go ahead to configure these dashboard pages to add graphs that you want to compare.
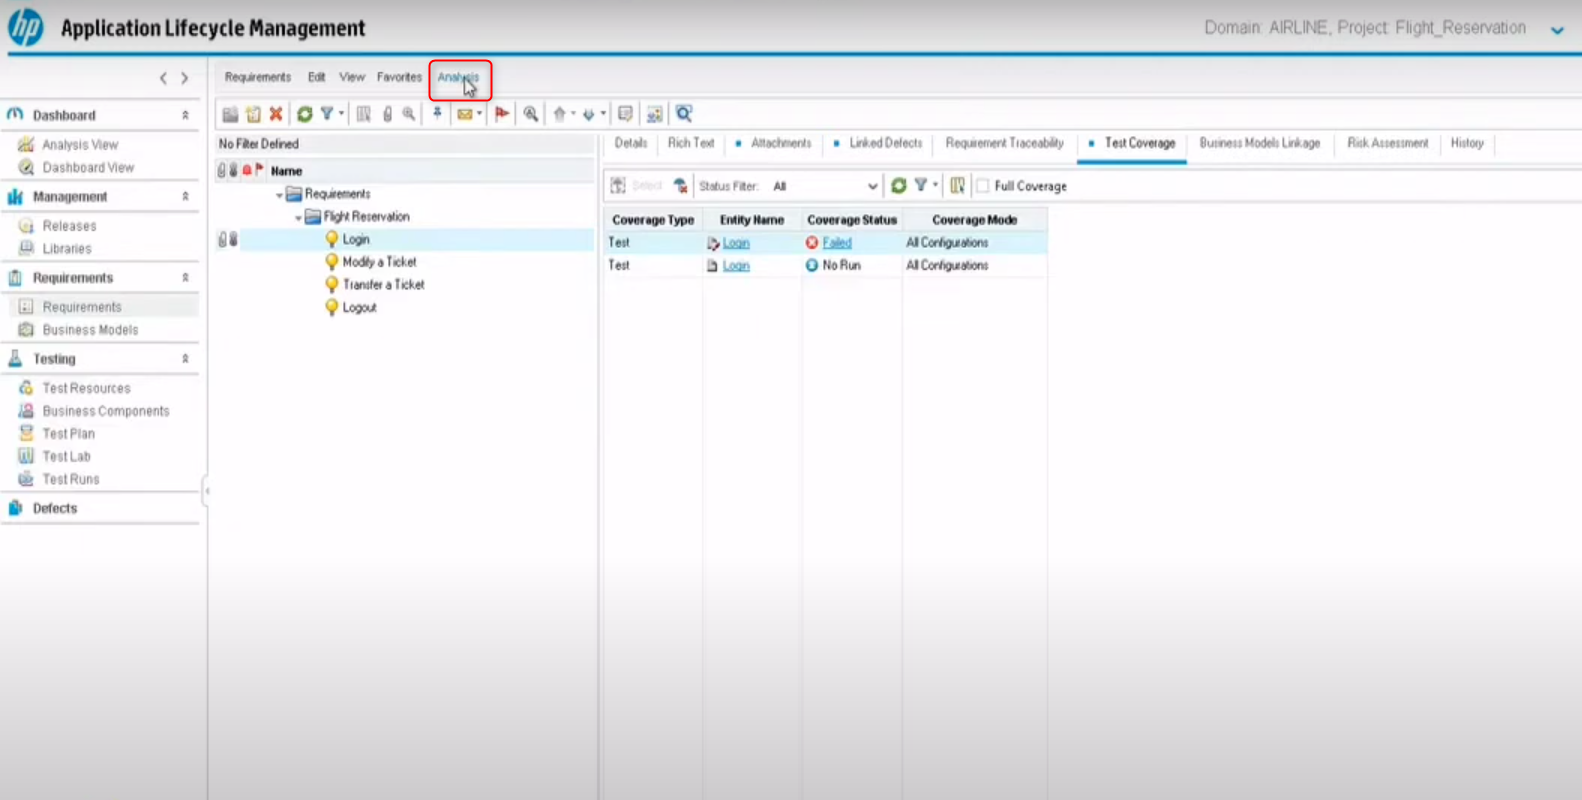
Additionally, within each module like Requirements, Testing, or Defects, you will see the option for Analysis in the header menu. If you do check this Analysis option, you will see standard reports and graphs for that particular module. You can choose from those options and add them to the analysis tree. It will be grouped under Analysis View. The benefit of this is you get quick options to create reports as opposed to selecting the parameters manually.
Improving test automation with AI-based tools
ALM is a wholesome platform to manage all aspects of an application’s lifecycle. However, if you wish to automate the test cases in it, you need to use tools that can execute your test cases as well. Of the many test automation tools available in the market, the one that stands out the most is testRigor.
Test automation using testRigor
testRigor is a one-of-a-kind test automation tool that makes test case writing, executing, and maintaining super easy. With this tool, you can easily create test cases in plain English language statements. This is because testRigor leverages generative AI to take it upon itself to decipher what the user intends, making it like a human emulator or AI agent.
You can write various types of functional, end-to-end, regression, sanity, API, UI, and system tests with this intelligent tool. These tests can verify different kinds of apps/platforms/scenarios, including the web, mobile (hybrid, native), desktop, API, database, file handling, QR code, Captcha resolution, email, phone, SMS, 2FA, and many more in just plain English.
That’s not all, testRigor uses advanced AI to reduce test maintenance overhead, thus allowing you to focus on creating test cases.
Migrating ALM test cases into testRigor
If your test suites are in ALM and wish to automate these test cases, then you can simply copy them into testRigor’s test editor and convert them to automation tests directly. As testRigor leverages generative AI, it will convert statements that it cannot comprehend into reusable rules. These rules are in plain English and are a group of simple steps that lead to a more extensive action. You can further let testRigor build the rule for you. All this happens in plain English language. Here’s an example.
Let’s say that your manual ALM test case has a statement like ‘Checkout from cart‘. When testRigor’s engine tries to comprehend this, it will classify it as a reusable rule. Now, you can choose to either define this rule by yourself in plain English or let testRigor do it for you using generative AI.
click on “cart”
scroll down until page contains "Checkout"
click on “Checkout”
click on “Continue”
That’s it! Now, wherever you have the statement ‘Checkout from cart’, testRigor will execute this set of steps. At any point, you can modify these steps, and the change will be reflected in all test cases.
That’s not all. This tool can do a lot more. Here’s a full list of testRigor’s powerful capabilities and its benefits to help you understand better. Have a look at this tutorial to see how simple it is to perform end-to-end testing using testRigor.
| Achieve More Than 90% Test Automation | |
| Step by Step Walkthroughs and Help | |
| 14 Day Free Trial, Cancel Anytime |


