How to Build a Testable React Native App?
|
|
React Native, the brainchild of Facebook has revolutionized the mobile app development landscape. It is an open-source mobile app framework that leverages JavaScript and React, enabling developers to craft natively rendered applications for both iOS and Android. However, like with any application, ensuring its reliability and functionality through testing is paramount.
But how do you ensure that your React Native app is built with testability in mind? This article will discuss the steps and practices to ensure your React Native application is testable.
Challenges of Testing React Native Apps
Cross-Platform Variability: React Native’s primary goal is to allow developers to “write once, run anywhere”. While the framework supports both iOS and Android, this also leads to the most common disadvantage, as inconsistencies are often present in test case specifications due to platform-specific behaviors. This can lead to bugs and minor differences in flows that appear on one platform but not on the other, requiring additional testing effort.
Native Modules: React Native apps can include native modules written in platform-specific code for functionalities not supported by the framework. Testing these modules might require different approaches or tools than the ones used for JavaScript components.
Asynchronous Operations: React Native uses a lot of asynchronous operations, especially when interfacing with native modules. These operations can lead to tricky race conditions to reproduce and test.
Note: Race conditions occur when multiple asynchronous tasks or threads try to access and modify shared data or resources concurrently. This leads to unpredictable and potentially erroneous behavior of the app.
Hot and Live Reloading: While features like hot and live reloading are beneficial during development, they can introduce state inconsistencies if not managed well and further complicate testing scenarios.
UI Challenges: React Native uses a flexbox model for layout, which, while powerful, can behave differently across different devices and resolutions. Ensuring a consistent UI across a multitude of devices is challenging.
Note: The Flexbox (short for Flexible Box) layout model is a CSS layout model adapted for use in React Native to simplify the creation of complex layouts for mobile applications.
Limited Testing Libraries: Earlier in its development, React Native lacked mature testing libraries. While the situation has improved with libraries like Detox and React Native Testing Library, it’s still not as comprehensive as what’s available for web or native mobile app testing.
Continuous Integration (CI) Complexity: Setting up a CI environment for React Native can be complex because it must support both iOS and Android platforms, each with its own requirements.
Upgrades and Dependencies: React Native is continuously evolving. Frequent updates might introduce breaking changes or alter behavior, necessitating regular and thorough regression testing. Additionally, managing and testing third-party dependencies can be challenging.
Performance Testing: Due to its architecture, where the JavaScript thread communicates with native threads, it’s crucial (and challenging) to ensure that React Native apps perform well without dropping frames or consuming excessive resources.
Gesture Handling: Complex gestures, animations, and interactions, especially when done concurrently, can be hard to simulate and test reliably.
UI Automation Testing for React Native Apps
Given that the framework generates cross-platform apps, manual testing for each one will quickly become highly time-consuming. In this regard, test automation can save time and money in the long run. Since the framework creates multiple apps that must undergo the same set of tests numerous times, automating the process using automation testing tools becomes highly beneficial.
There are two ways of doing this:
Using Emulators or Simulators
Testing on emulators and simulators entails replicating the behavior of various real mobile devices on a computer. However, this method is notably more resource-intensive and time-consuming than other testing approaches. The primary reason is that quality assurance (QA) teams must meticulously determine the complete range of devices their app needs to be tested on, as specified in the device matrix. Subsequently, they must download and configure emulators or simulators for these distinct devices.
This process has several steps:
Device Matrix Analysis: QA professionals must comprehensively analyze the device matrix to identify the devices and configurations they need to test. This includes different device models, operating system versions, screen sizes, and resolutions.
Emulator and Simulator Setup: Once the specific devices are identified, the next step involves setting up emulators or simulators for each device. This includes downloading and configuring the appropriate virtual environments to mimic the target devices accurately.
App Installation and Deployment: After the emulators or simulators are set up, the React Native app must be installed and deployed on each virtual device. This process needs to be repeated for every device in the matrix.
Test Execution: With the emulators or simulators ready and the app installed, QA teams can execute their automated test scripts on each virtual device. This includes running a comprehensive suite of tests to ensure the app functions correctly and is visually appealing across all configurations.
Result Analysis: After test execution, QA professionals analyze the test results to identify any issues, inconsistencies, or deviations from the expected behavior on different emulated devices.
Maintenance and Updates: As the app evolves or new device configurations emerge, QA teams must regularly update and maintain the emulator and simulator environments to keep their testing up to date.
Using Real Devices
Comprehensive automation testing on real devices for React Native apps should cater to both Android and iOS platforms. It is considered a best practice to replicate real-world user conditions during testing to ensure a seamless and consistently superior end-user experience.
Testing on real Android and iOS devices offers several compelling advantages:
Authentic User Experience: Testing on actual devices closely mimics the real-world user experience. This authenticity is crucial for identifying and addressing potential issues affecting users’ interaction with the React Native app.
Diverse Device Environments: Real devices come in various models, screen sizes, resolutions, and hardware configurations. Testing on this array of devices ensures that the app functions optimally across a broad spectrum of user scenarios using cross-platform and cross-browser testing.
Platform-Specific Variations: Testing on real devices helps uncover issues that are specific to each platform. This makes sure that your app behaves consistently on both Android and iOS.
Performance Assessment: Real devices provide an accurate environment for assessing the app’s performance, including responsiveness, load times, and resource utilization. Performance issues that might not manifest on emulators or simulators can be detected and rectified during real device testing.
Identifying Device-Specific Bugs: Some bugs are device-specific and cannot be replicated on emulators or simulators. You can uncover and address these elusive bugs by conducting tests on real devices before they impact the user experience.
Network Conditions: Real devices allow testing under various network conditions, including different speeds and connectivity levels. This is essential to ensure that the app performs reliably in real-world scenarios, whether users have a strong Wi-Fi connection or are on a slower mobile data network.
Hardware Features: Testing on real devices allows for evaluating hardware-specific features, such as device orientation, camera functionality, GPS, and sensors.
Battery Consumption: Assessing the app’s impact on device battery life is crucial, as excessive battery drain can lead to negative user reviews and uninstallations. Real device testing provides accurate insights into battery consumption.
testRigor integrates seamlessly with all major infrastructure providers, such as LambdaTest, BrowserStack, SauceLabs, etc., to help you test on thousands of real devices. Quickly identify bugs that cannot be traced on emulators or simulators and eventually might hamper the user experience.
testRigor is ultra-stable and provides AI-driven capabilities such as generative AI and NLP-based test creation, self-healing tests, test steps in plain English, and many more.
Through testRigor’s shared test suites, you can inherit the test cases, shared rules, and saved values (test data) from one test suite when you need to share code between iOS and Android tests. Additionally, testRigor helps you easily manage synchronization issues through its automatic waits; where you need not specify explicit waits, the tool takes care of it automatically.
Tips to Build a Testable React Native Hybrid App
React Native applications are not entirely native to their operating systems. Some aspects are native, and others run on a web view. The automation testing tool that you are using should know the difference. testRigor is an AI-powered intelligent tool that understands which parts are native and which aren’t and allows you to interact with them seamlessly.
You can follow the below tips to keep your React Native app testable through testRigor:
- To ensure consistent testing for both Android and iOS versions of the application, it is a good practice to add a
testIDand anAccessibiltyLabelattribute to every critical component to be tested. -
React Native framework is capable of performing a lot of customizations to suit a particular OS. This may lead to situations where the
testIDmight not remain a component’s attribute anymore. Thus, having both attributes set for a component ensures that when the tester searches for a component using Appium’s UI component search, it works without any errors.Here is an example of setting up both thetestIDandAccessibilityLabelto UI components.<TouchableOpacity accessible={true} testID={“ReactNative Appium”} accessibilityLabel="Browser Stack" onPress={onPress}> <View style={styles.button}> <Text style={styles.buttonText}>Start Test Automation </View> </TouchableOpacity> -
Like the above example, you can also set the
accessibleattribute to'true'in the parent components. This helps testRigor know not to exclude them in the component hierarchy.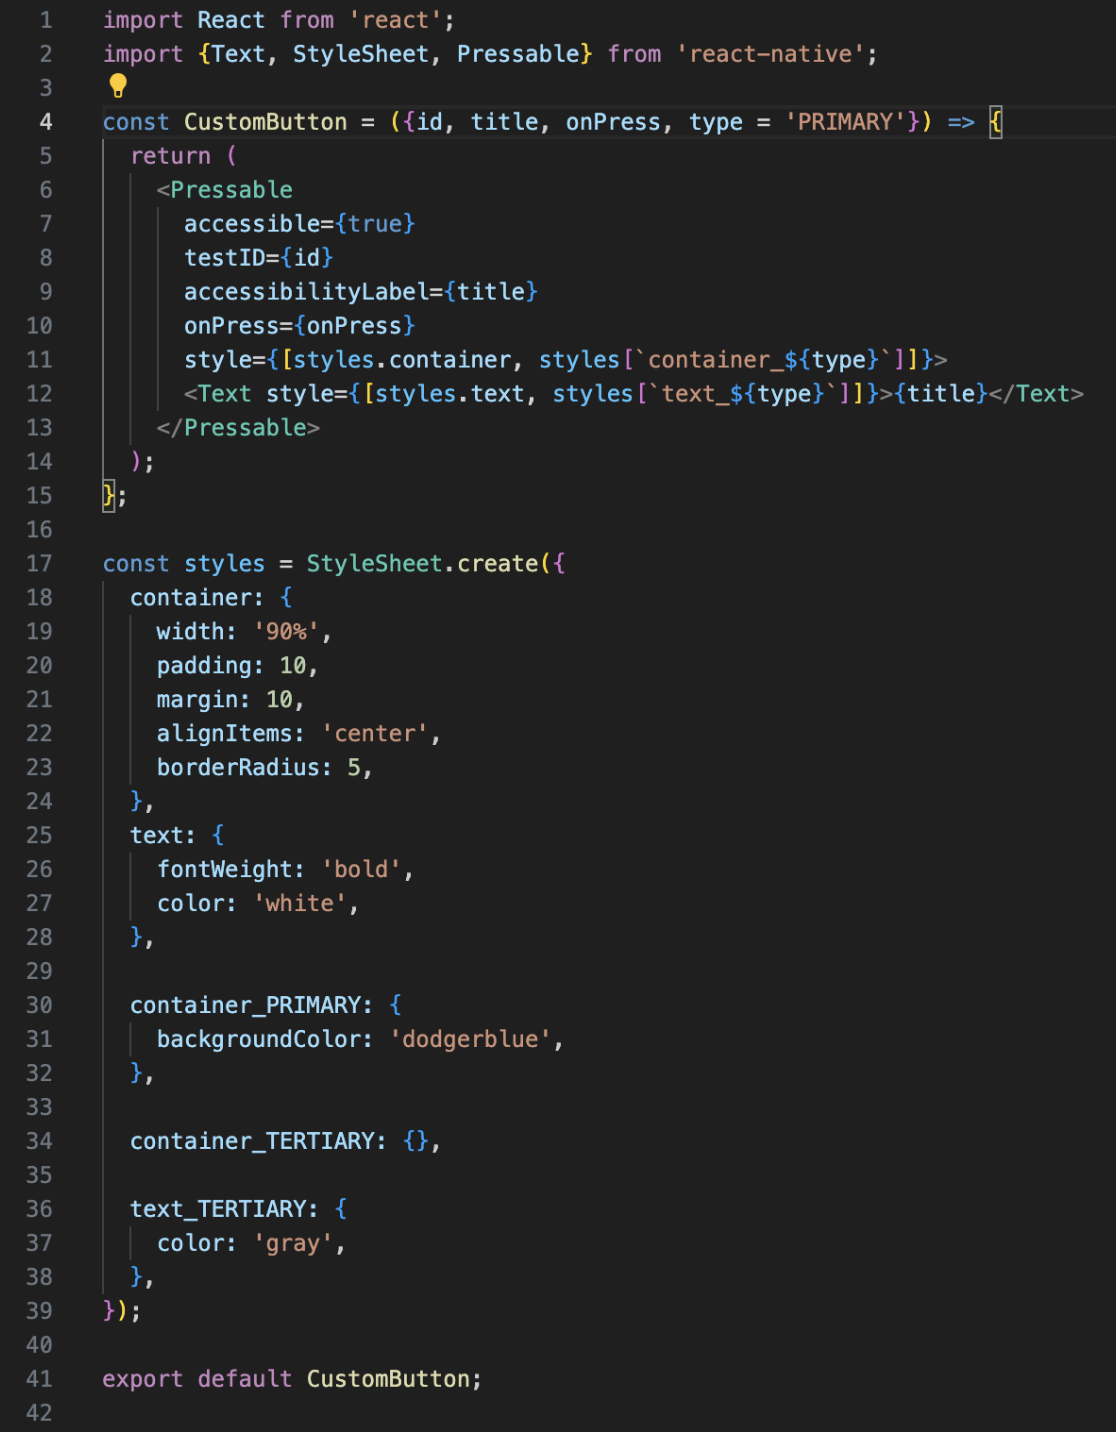
Here is a detailed article about how to perform React Native testing.
Conclusion
While testing with emulators and simulators provides a cost-effective way to cover a wide range of device configurations, it does require significant upfront effort in terms of environment setup and maintenance.
By incorporating real devices and intelligent test automation tools such as testRigor into your test strategy, you can maximize the reliability, performance, and overall quality of your React Native app. This approach helps identify and mitigate issues that may not surface in emulator or simulator testing, ultimately safeguarding the user experience and the app’s reputation in the competitive mobile app landscape.
| Achieve More Than 90% Test Automation | |
| Step by Step Walkthroughs and Help | |
| 14 Day Free Trial, Cancel Anytime |


