React Native Testing

React Native is an open-source JavaScript-based mobile app framework that allows developers to build natively-rendered mobile applications for iOS and Android using JavaScript and React. It was first released in 2015 by Facebook as an open-source project and is an extension of the React library, originally designed to build web user interfaces. React Native extends platform support for Android, Android TV, iOS, macOS, tvOS, web, Windows, and UWP(Universal Windows Platform).
React and React Native may sound similar, but they serve different purposes. React, or ReactJS, is a JavaScript library to create website frontends. On the other hand, React Native, powered by React, is used for building native mobile apps. React Native has features like simple UI design, cost efficiency, code reusability, and fast app development. Market giants like Facebook, Instagram, Airbnb, Walmart, Bloomberg, Tesla, and more, use React Native to build mobile apps.
Possessing these incredible features and being so popular, testing plays a crucial role in ensuring the quality of React Native apps. Let's explore the required testing types and tools available for conducting them:
Unit Testing
In isolation, they test minor code units, such as individual functions or classes. Unit testing ensures that each specific code unit behaves as expected and produces the correct output for a given input. React Native bundles with the Jest testing framework, which supports unit testing.
Jest
Jest is a popular and widely used testing framework for JavaScript applications, including React and React Native. Facebook developed it and is known for its simplicity, ease of use, and other powerful features. Jest support is built-in React Native apps, open package.json and check the dev-dependency section. If it's not present, install it by the command npm install --save-dev jest.
The test files are saved with the extension .test.js or .spec.js, and Jest will automatically pick up all the files with the above extension.
Inside the test files, write test cases using Jest's testing APIs. For React Native components, @testing-library/react-native library renders and interacts with components during testing. Jest provides a helpful describe function that organizes the tests by grouping the tests related to a specific functionality. You can even nest the describe functions if needed. Additionally, use beforeEach or beforeAll functions to set up the objects for testing.
Sometimes, when there are dependencies on external services or APIs, it's better to use mocking. It involves replacing the actual external dependency with its implementation for testing purposes. Mock implementations effectively replace the complex and potentially unreliable external code with a simplified version that behaves predictably during testing. And it helps to isolate the specific functionality that needs to be tested and avoid unnecessary dependencies, making the tests faster, more stable, and more reliable.
ButtonComponent.test.js:// ButtonComponent.test.js
import React from 'react';
import { render, fireEvent } from '@testing-library/react-native';
import ButtonComponent from './ButtonComponent';
describe('ButtonComponent', () => {
test('displays the correct title', () => {
const { getByText } = render(
Here, describe function is used to group the test cases related to the ButtonComponent. The first test checks if the correct title is displayed on the button, while the second test checks if the onPress callback is called when the button is pressed.
Run the test using the npm test command, and see the results in the terminal or on the command prompt. See the tutorials section of React Native's official website for more details.
Integration Testing
In Integration testing, the different units of the application are combined and tested. It aims to identify issues by combining various units of the Native React app into a more extensive system. These units can be components of the application, external APIs, databases, or any external service.
Integration testing requires testing of the below units for Native React:
Component Integration: Tests how application components render, receive, and pass props, handle state changes, and respond to user interactions. React-native-testing-library is the default library for component integration testing in React Native. Read more in detail about this library in the Component Tests section.
API Integration: Tests API endpoints, request, and response handling, error scenarios, and data synchronization.
Database Integration: Tests data is stored and retrieved accurately in the local database, and any interactions with the database work as intended.
Navigation Integration: Tests that React Native app's navigation and routing work correctly, allowing users to move between screens and navigate seamlessly.
External Services Integration: To test that the app's integration with external services such as social media platforms or payment gateways is working as expected.
Component Testing
In React Native, components play a significant role in rendering the app. Even if the business logic is correct, an error in a component can cause failure. Hence, they are tested to verify that each component renders, responds to user interactions, and handles props and states correctly.
Component testing may also involve testing how components interact with each other when integrated into screens or views. Since components are integral to React Native, they are also tested during unit and integration testing. You can perform component testing in two ways:
- Testing User Interactions
- Testing Rendered Output
Testing User Interactions
User interaction testing involves simulating various actions and events that users perform while interacting with the app and verifying that the app responds as expected. Usually, it tests the interactions like tap, scroll, input, swipe, navigation, etc.
While testing the user interactions, the components are tested from a user perspective, meaning the assertions are made based on the UI elements, not the component's properties or state. React Native provides an inbuilt testing library, React Native Testing Library, for testing user interactions.
fireEvent methods changeText and press that simulate a user interacting with the component and a query function getAllByText that finds matching Text nodes in the rendered output.test('given empty GroceryShoppingList, user can add an item to it', () => {
const {getByPlaceholderText, getByText, getAllByText} = render(
<GroceryShoppingList />,
);
fireEvent.changeText(
getByPlaceholderText('Enter grocery item'),
'banana',
);
fireEvent.press(getByText('Add the item to list'));
const bananaElements = getAllByText('banana');
expect(bananaElements).toHaveLength(1); // expect 'banana' to be on the list
});
Testing Rendered Output
For testing the rendered output, usually, snapshot testing is suggested. A snapshot test case renders a UI component, takes a snapshot, then compares it to a reference snapshot file stored alongside the test.
React Native uses Jest for testing rendered output. Instead of rendering the graphical user interface (UI), Jest uses its custom React serializer to generate a JSX-like string representation to compare during the test.
<Text
style={
  Object {
    "fontSize": 20,
    "textAlign": "center",
  }
}>
Welcome to React Native!
</Text>
Create and test the component using Jest to test the rendered output. Jest captures a snapshot of the output and saves it as a reference file in the repository. In the future, if any changes to the component affect its output, the test compares the new output to the stored snapshot. If the output is as expected, the snapshot needs to be updated.
However, Snapshot has got many drawbacks:
- When capturing the reference snapshot, it's essential to ensure no bugs; otherwise, the snapshot will be incorrect and lead to false test results.
- Also, it will be difficult for a developer or reviewer to understand if the change in the snapshot is intended or is a bug.
End-to-end Testing
They test the entire application, including all its components, services, and external dependencies, to verify that it functions correctly and meets its intended requirements. The primary objective of E2E testing is to simulate real user scenarios and interactions with the application to ensure that it works as expected in a production-like environment. It involves testing the entire mobile application, user interface(UI), user interactions, data flow, navigation, and any backend or API interactions.
You can perform E2E testing of React Native applications with various tools:
- Detox
- Appium
- Maestro
- testRigor
Detox
Detox is a robust and widely used end-to-end (E2E) testing framework tailored for React Native applications. It supports both real devices and emulators/simulators, providing flexibility for testing across various platforms. With its intuitive API, Detox allows developers to write test scripts that simulate user actions like tapping, swiping, and entering text, verifying the application's functionality, navigation, and user experience. Detox supports JavaScript programming.
describe('Amazon Shopping Flow', () => {
  beforeAll(async () => {
    await device.launchApp();
  });

  it('should log in to Amazon', async () => {
    await element(by.id('loginEmailInput')).typeText('[email protected]');
    await element(by.id('loginPasswordInput')).typeText('password123');
    await element(by.id('loginButton')).tap();
  });

	it('should search for Men\'s Printed T-Shirt', async () => {
    await element(by.id('searchInput')).typeText('Men\'s Printed T-Shirt');
    await element(by.id('searchButton')).tap();
  });

	it('should select a Men\'s Printed T-Shirt', async () => {
    await element(by.id('productItem_0')).tap();
  });

	it('should add the selected T-Shirt to the cart', async () => {
    await element(by.id('addToCartButton')).tap();
  });

	it('should proceed to checkout', async () => {
    await element(by.id('checkoutButton')).tap();
  });

	it('should complete the checkout process', async () => {
    await element(by.id('shippingAddressInput')).typeText('123 Main Street');
    await element(by.id('paymentInput')).typeText('Credit Card Number');
    await element(by.id('placeOrderButton')).tap();
  });
});
Detox comes with valuable features like cross-platform support, easy debugging, compatibility with real devices, and automatic synchronization of tests.
Appium
Appium is a popular open-source testing framework for mobile applications that supports React Native apps. It supports scripting in different languages and execution in real devices and emulators. Using selectors like IDs or accessibility labels, Appium identifies and simulates user interactions, such as taps and swipes, to validate the app's behavior and responsiveness.
However, it doesn't have inbuilt integrations with other tools like CI/CD tools, test management tools, or any cloud device labs. So mostly, it's preferred to combine with any testing frameworks like Selenium or WebdriverIO. Configuring the device for Appium can be challenging, and running test scripts simultaneously in parallel is not straightforward. This difficulty is because Appium relies on a specific port-hosted server for executing the tests. The code style for Appium is primarily similar to Detox.
Maestro
Maestro is an open-source mobile testing framework compatible with Android and iOS. It's straightforward and intuitive, and you can create test scenarios using YAML. The main advantages of using Maestro are fast test execution, significantly less flaky tests, simple setup, and support for different platforms.
# flow_contacts_android.yaml
appId: com.android.contacts
---
- launchApp
- tapOn: "Create new contact"
- tapOn: "First Name"
- inputText: "John"
- tapOn: "Last Name"
- inputText: "Snow"
- tapOn: "Save"
However, Maestro has got many limitations:
- No support for detailed reports
- Real iOS devices are not supported yet
- Not able to do parameterization
- Won't support parallel execution
- Not possible to write complicated tests
Challenges in Automating React Native Tests
Dynamic UI Elements: React Native applications frequently feature dynamic user interfaces (UI), with components rendered conditionally or based on data. Automated testing of these dynamic elements using traditional test automation tools can present challenges. Identifying and effectively interacting with such dynamic UI elements may require specialized automation approaches and modern testing tools.
Unstable Tests: React Native applications interact with external services, APIs, and device features. Flaky test results may arise from network delays, slow API responses, or timing issues, causing inconsistencies in test outcomes.
Explicit Waits: React Native heavily relies on asynchronous operations. Handling asynchronous actions through legacy automation tests can be complex and may require explicit wait conditions to ensure that tests proceed in sync with the application.
React Native Updates: The frequent updates and changes in React Native can impact the stability and compatibility of automation testing frameworks and tools. As a result, tests may require updates and maintenance to align with the latest versions of React Native for seamless functioning, or the tests will break.
Cross-Platform Tests: React Native enables app development for both Android and iOS platforms. Ensuring cross-platform compatibility in automation tests demands meticulous handling of test cases and configurations tailored to each platform.
Test Dependencies: React Native apps often use third-party libraries and dependencies. Managing and handling these dependencies in automation tests can be complex and require additional configurations such as emulators or simulators. These devices might not fully replicate real-device behavior and can lead to discrepancies between test results and actual device performance.
How testRigor Solves these Challenges?
Testing is critical in ensuring app quality before release, and it should be both speedy and thorough. However, the E2E testing tools we previously discussed have certain drawbacks that hinder these objectives. Many of these tools lack essential features for mobile app testing.
For instance, cross-platform testing or complex test execution is crucial for acceptable test coverage.
The issues mentioned earlier are why organizations are seeking better alternatives to speed up the test automation process and enhance coverage to keep pace with Agile/DevOps methodologies. Organizations cannot afford to spend excessive time on script maintenance due to challenges like dynamic element locators, frequent React Native updates, and asynchronous operations, among others.
To address these concerns, many companies turn to testRigor. TestRigor is an innovative no-code automation tool infused with integrated AI, specifically designed to accelerate test creation and minimize test maintenance.
Below are some advantages that set testRigor apart from other tools:
Versatile test creation: You can create tests through three easy approaches:
- Provide only the test case title and testRigor's generative AI engine automatically creates test steps for you within seconds.
- testRigor helps to write the test scripts in plain English by eliminating the prerequisite to know any programming language. testRigor's AI converts the English test scripts to actual code using advanced Natural Language Processing (NLP).
- Use our test recorder to record your actions and create the test case easily. Tests are generated in plain English, so there is no code to learn. The absence of XPath dependency ensures ultra-stable tests that are easy to maintain.
Self-healing tests: The issue of constant updates and test maintenance is expected in React Native since it is regularly updated with new versions. testRigor incredibly manages these issues with its automatic self-healing features. Any changes in the element attributes or application are incorporated into the test scripts automatically, saving massive maintenance effort hours.
Automatic wait times: testRigor automatically manages wait times. It spares you from manually inputting explicit waits to manage asynchronous operations programmed in React Native. This automatic wait prevents "element not found" errors which are ubiquitous sight while using legacy automation testing tools.
Ultra-stable: As a no-code solution, testRigor eliminates dependencies on specific programming languages. Elements are referenced as they appear on the screen, reducing reliance on implementation details and simplifying test creation, maintenance, and debugging.
Cloud-hosted: Save time, effort, and resources on infrastructure setup. With testRigor, you are ready to start writing test scripts right after signing up, boasting a speed up to 15 times faster compared to other automation tools.
Comprehensive testing coverage: testRigor supports all main types of testing and accommodates cross-browser and cross-platform tests for web, mobile, iOS, Android, Desktop, and almost everything!
Seamless integrations: Built-in integrations with CI/CD, ERP systems such as SalesForce, NetSuite, WorkDay, SAP ERP, ServiceNow, and test management tools ensure a seamless and efficient testing process.
Take a look at the testRigor's documentation to get a better understanding of the supported functionality.
login
enter "Men's Printed Shirt" roughly to the left of  "search"
click "Search"
click on image from stored value "Men's Printed Shirt" with less than "10" % discrepancy
click "Add to Cart"
click "Cart"
click "Checkout"
check that page contains "Enter your zip code"
You can see how straightforward and clean the test script appears. The in-built login command manages the login process seamlessly. Simply write in plain English, using what you see on the screen as element locators. There's no need for CSS and XPath element locators, which often lead to flaky and unstable tests. testRigor meets all your React Native testing requirements with simplicity, allowing anyone on the team to write and execute test cases in plain English.
These features enable you to achieve comprehensive test coverage well before the release deadline and within your budget. You don't need separate testing tools or external integrations for React Native testing. The integrated reporting, logs, error messages, and video recordings of your test runs allow for better and more informed decision-making.
Explore testRigor's remarkable features.
How to do End-to-end Testing with testRigor
Let us take the example of an e-commerce website that sells plants and other gardening needs. We will create end-to-end test cases in testRigor using plain English test steps.
Step 1: Log in to your testRigor app with your credentials.
Step 2: Set up the test suite for the website testing by providing the information below:
- Test Suite Name: Provide a relevant and self-explanatory name.
- Type of testing: Select from the following options: Desktop Web Testing, Mobile Web Testing, Native and Hybrid Mobile, based on your test requirements.
- URL to run test on: Provide the application URL that you want to test.
- Testing credentials for your web/mobile app to test functionality which requires user to login: You can provide the app’s user login credentials here and need not write them separately in the test steps then. The login functionality will be taken care of automatically using the keyword
login. - OS and Browser: Choose the OS Browser combination on which you want to run the test cases.
- Number of test cases to generate using AI: If you wish, you can choose to generate test cases based on the App Description text, which works on generative AI.
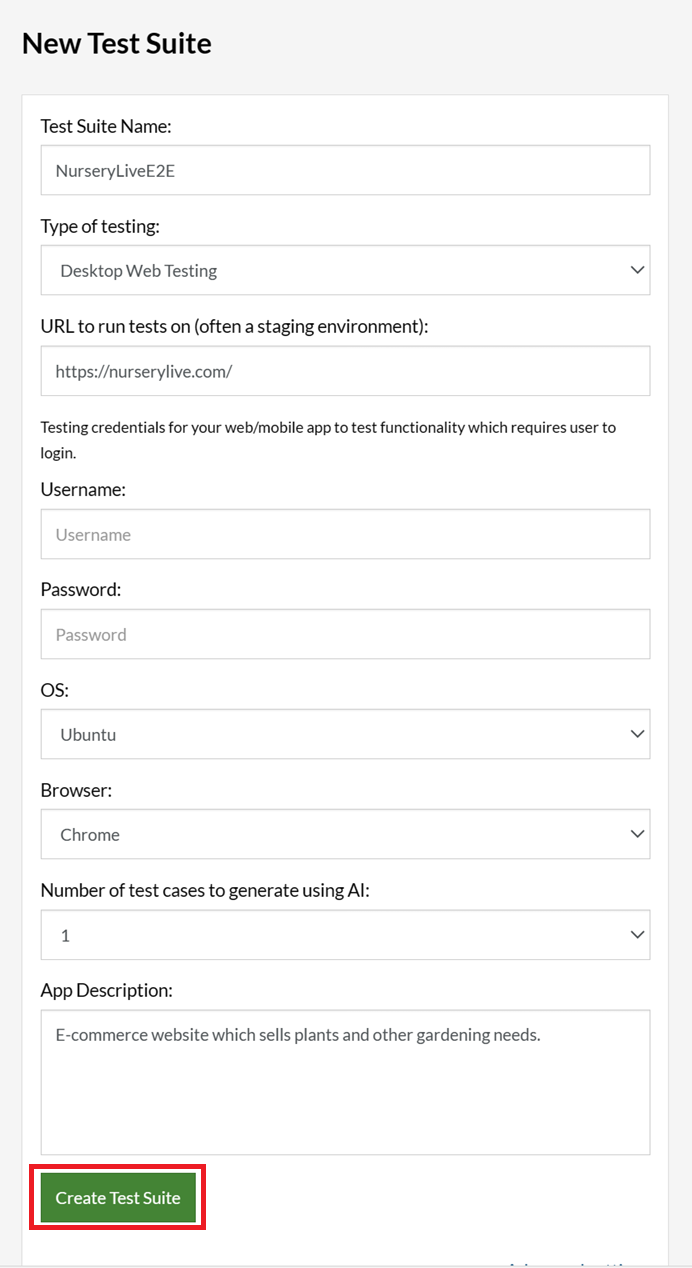
Step 3: Click Create Test Suite.
On the next screen, you can let AI generate the test case based on the App Description you provided during the Test Suite creation. However, for now, select do not generate any test, since we will write the test steps ourselves.
Step 4: To create a new custom test case yourself, click Add Custom Test Case.

Step 5: Provide the test case Description and start adding the test steps.

For the application under test, i.e., e-commerce website, we will perform below test steps:
- Search for a product
- Add it to the cart
- Verify that the product is present in the cart
Test Case: Search and Add to Cart
Step 1: We will add test steps on the test case editor screen one by one.
testRigor automatically navigates to the website URL you provided during the Test Suite creation. There is no need to use any separate function for it. Here is the website homepage, which we intend to test.

First, we want to search for a product in the search box. Unlike traditional testing tools, you can identify the UI element using the text you see on the screen. You need not use any CSS/XPath identifiers.
click "What are you looking for?"
Step 2: Once the cursor is in the search box, we will type the product name (lily), and press enter to start the search.
type "lily"
enter enter
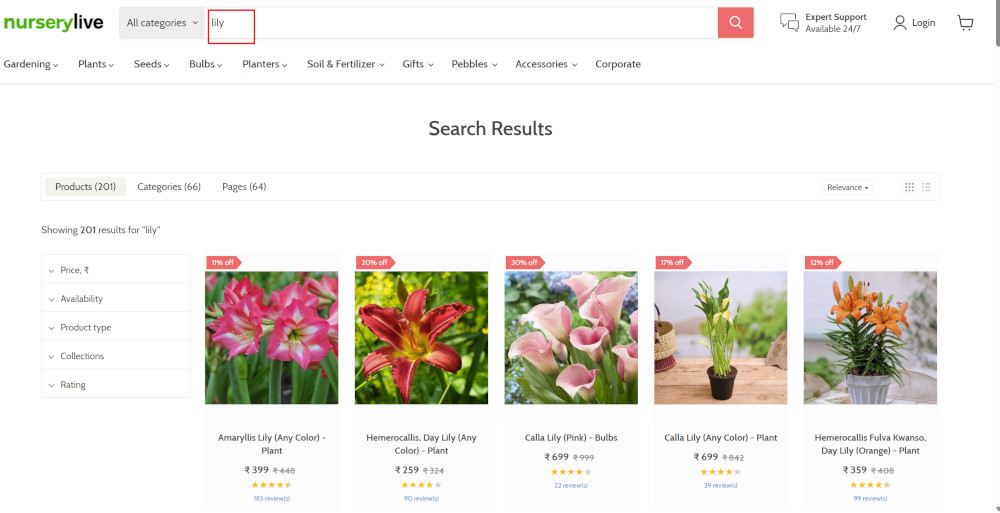
Search lists all products with the “lily” keyword on the webpage.
Step 3: The lily plant we are searching for needs the screen to be scrolled; for that testRigor provides a command. Scroll down until the product is present on the screen:
scroll down until page contains "Zephyranthes Lily, Rain Lily (Red)"

When the product is found on the screen, testRigor stops scrolling.
Step 4: Click on the product name to view the details:
click "Zephyranthes Lily, Rain Lily (Red)"
After the click, the product details are displayed on the screen as below, with the default Quantity as 1.

Step 5: Lets say, we want to change the Quantity to 3, so here we use the testRigor command to select from a list.
select "3" from "Quantity"
click "Add to cart"
The product is successfully added to the cart, and the “Added to your cart:” message is displayed on webpage.
Step 6: To assert that the message is successfully displayed, use a simple assertion command as below:
check that page contains "Added to your cart:"
Step 7: After this check, we will view the contents of the cart by clicking View cart as below:
click "View cart"

Step 8: Now we will again check that the product is present in the cart, under heading “Your cart” using the below assertion. With testRigor, it is really easy to specify the location of an element on the screen.
check that page contains "Zephyranthes Lily, Rain Lily (Red)" under "Your cart"

Complete Test Case
Here is how the complete test case will look in the testRigor app. The test steps are simple in plain English, enabling everyone in your team to write and execute them.
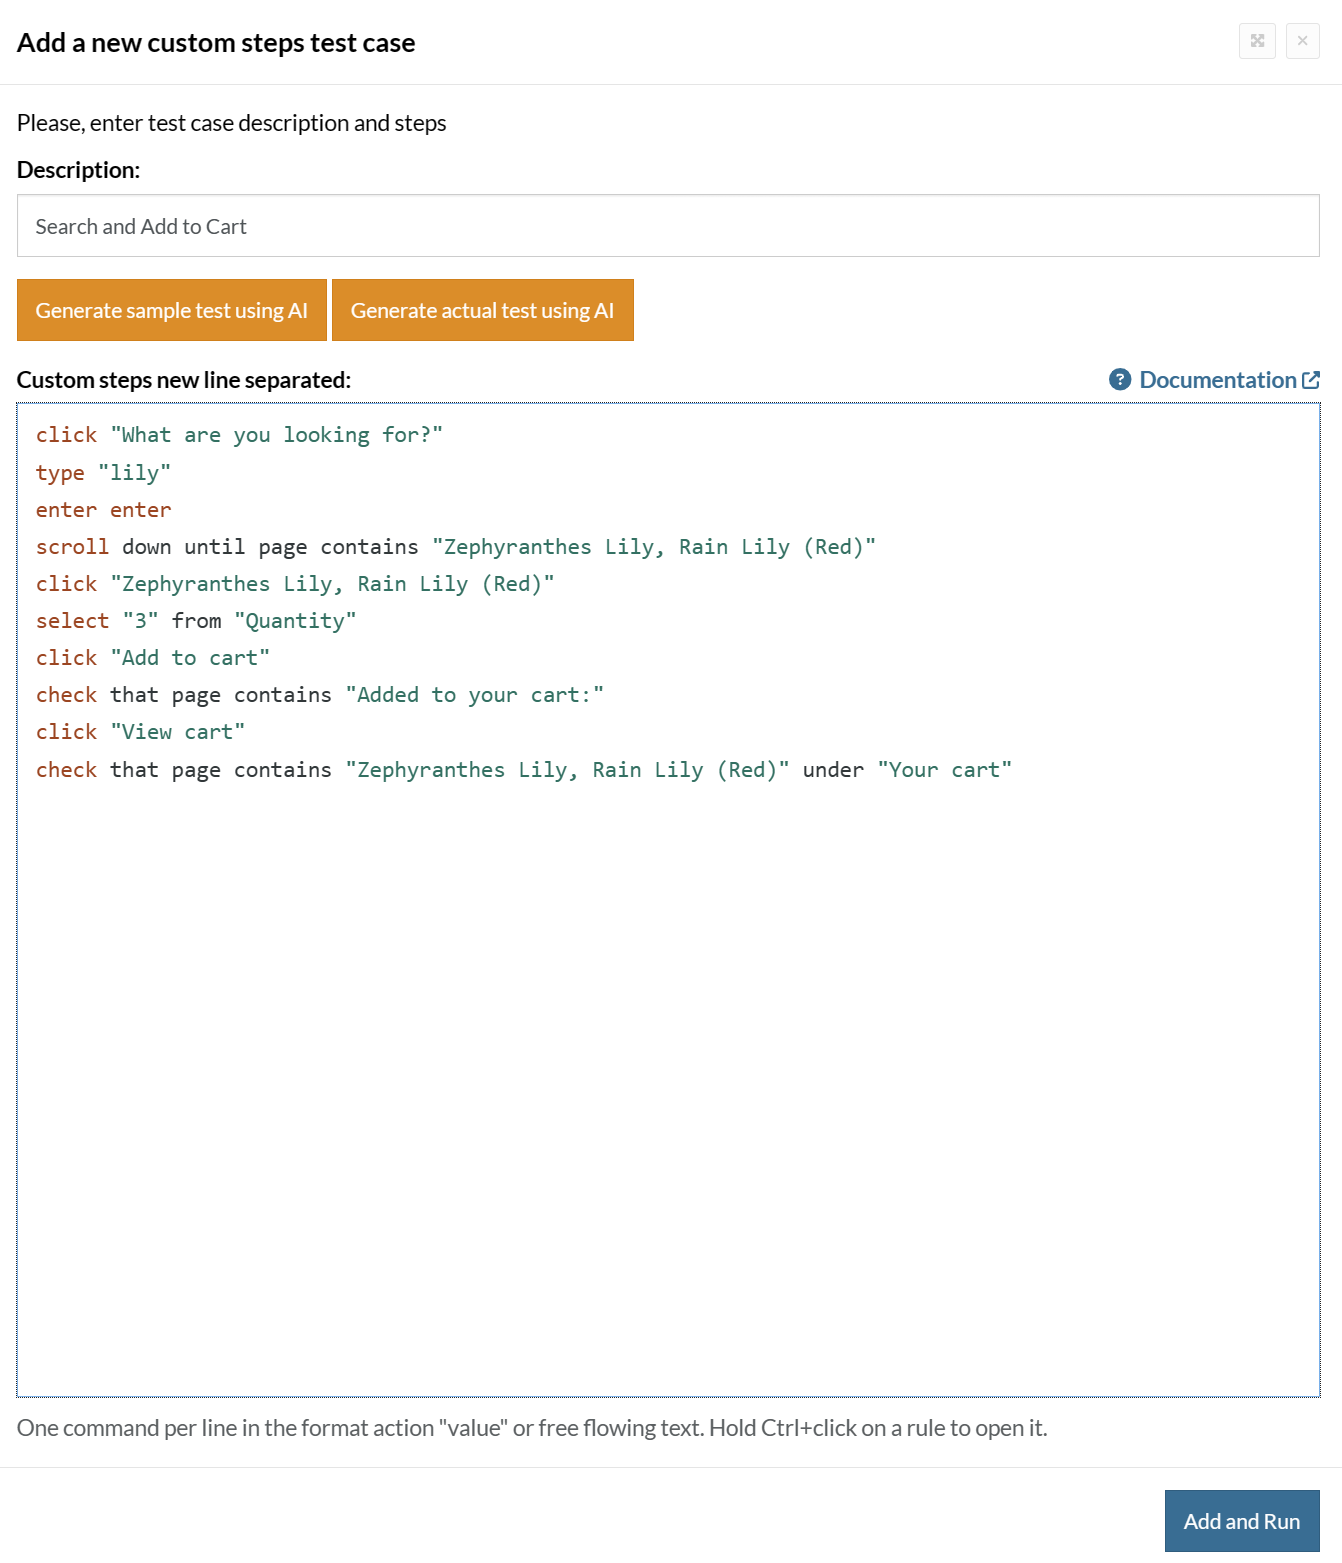
Click Add and Run.
Execution Results
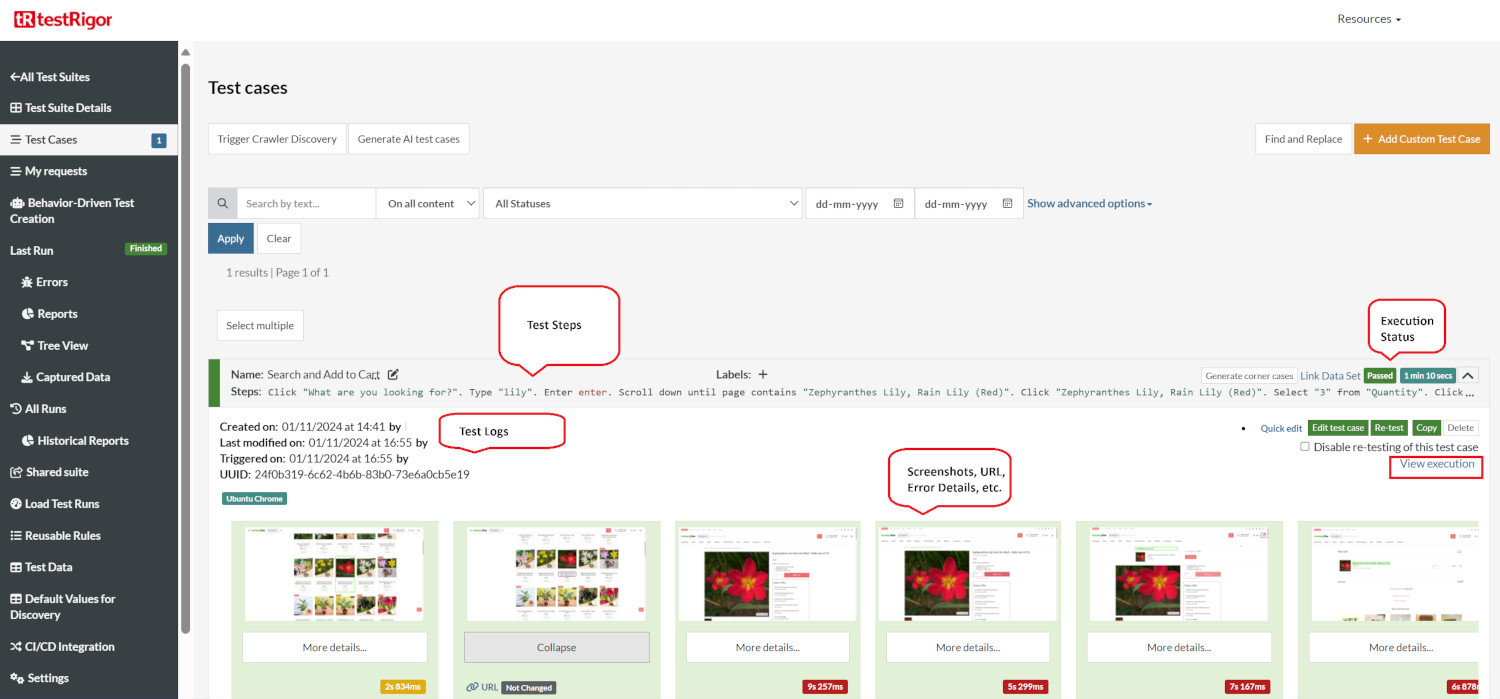
Once the test is executed, you can view the execution details, such as execution status, time spent in execution, screenshots, error messages, logs, video recordings of the test execution, etc. In case of any failure, there are logs and error text that are available easily in a few clicks.
You can also download the complete execution with steps and screenshots in PDF or Word format through the View Execution option.
testRigor’s Capabilities
Apart from the simplistic test case design and execution, there are some advanced features that help you test your application using simple English commands.
- Reusable Rules (Subroutines): You can easily create functions for the test steps that you use repeatedly. You can use the Reusable Rules to create such functions and call them in test cases by simply writing their names. See the example of Reusable Rules.
- Global Variables and Data Sets: You can import data from external files or create your own global variables and data sets in testRigor to use them in data-driven testing.
- 2FA, QR Code, and Captcha Resolution: testRigor easily manages the 2FA, QR Code, and Captcha resolution through its simple English commands.
- Email, Phone Call, and SMS Testing: Use simple English commands to test the email, phone calls, and SMS. These commands are useful for validating 2FA scenarios, with OTPs and authentication codes being sent to email, phone calls, or via phone text.
- File Upload/ Download Testing: Execute the test steps involving file download or file upload without the requirement of any third-party software. You can also validate the contents of the files using testRigor’s simple English commands.
- Database Testing: Execute database queries and validate the results fetched.
testRigor enables you to test web, mobile (hybrid, native), API, and desktop apps with minimum effort and maintenance.
Additional Resources
- Access testRigor documentation to know about more useful capabilities
- Top testRigor’s features
- How to perform end-to-end testing
Conclusion
Testing is crucial to React Native app development to ensure it functions as expected and upholds quality. Any lag in the speed or functionality of the mobile app can prompt users to switch to a competitor's app within seconds. While React Native empowers developers to create efficient cross-platform mobile apps, thorough testing is paramount to identify and address issues before release.
We've observed that many existing testing tools present limitations, hindering the full potential of React Native's robust features. Opting for a comprehensive test automation tool guarantees swift delivery of a top-notch React Native app. These measures ensure the app meets user expectations, delivers consistent performance across various platforms and devices, and retains its user base.
| Achieve More Than 90% Test Automation | |
| Step by Step Walkthroughs and Help | |
| 14 Day Free Trial, Cancel Anytime |


