
OpenCart Testing: How to Test Your Store with testRigor
 |

OpenCart is a free, open-source e-commerce platform for building and managing online stores. It includes product and inventory management, customer accounts, coupons and promotions, multiple currencies and languages, order management, and an administration panel. Store owners can also extend it with themes, payment gateways, shipping methods, and other modules. OpenCart testing helps verify that all of these moving parts continue to work together as the store changes.
That flexibility is one of OpenCart’s biggest strengths, but it also means that every store is slightly different. A theme update can hide or move a checkout button. Shipping extensions may stop returning the expected options, while coupons can apply the wrong discount. Even a payment method that looks correct in the admin panel can fail when a customer tries to place an order.
For a store owner or operator, that is the most important reason to test: the store needs to keep working as a customer actually experiences it.
Each layer protects a different part of the store. For day-to-day store operations, however, end-to-end testing is especially important because it validates complete customer and administrator journeys in the browser.
What Should OpenCart Testing Cover?
- Home page and category navigation
- Product search and product pages
- Required product options
- Adding, updating, and removing cart items
- Guest checkout and registered-customer checkout
- Shipping methods and delivery options
- Payment-method selection
- Coupons and discounts
- Customer registration and login, plus password recovery
- Order history
- Admin-panel access
- Product creation and updates from the admin panel
The highest-priority tests should follow business risk. When search fails, customers may not find a product. A broken cart stops them from moving toward a purchase. Checkout or payment failures can prevent the store from converting visitors into orders.
What OpenCart Already Checks, and What It Does Not
OpenCart itself includes code-level checks in its development workflow. Those checks are useful for identifying syntax and static code problems in the core platform.
They do not, however, validate the exact store your customers use. They cannot tell you whether your theme, installed extensions, shipping configuration, payment provider, products, and business rules still work together in the browser.
- The Add to Cart button still works for a product with required options
- A customer can complete guest checkout
- The expected shipping method appears for a given address
- A coupon applies the correct discount
- A payment method can be selected and the order confirmed
- A product edited in the admin panel appears correctly on the storefront
That is why OpenCart testing still needs to cover the store-specific journeys that customers and administrators actually use.
Unit Testing in OpenCart
Unit tests validate small pieces of logic in isolation. Developers who create custom OpenCart extensions or other bespoke functionality normally write and maintain them.
For a store owner, the main thing to know is what these tests are good at: they can verify calculations and isolated logic, such as pricing, tax rules, or custom extension behavior. They are valuable when your store contains custom code, but they do not open the storefront and complete a purchase like a real customer.
Integration Testing in OpenCart
Integration tests verify that different parts of the application work together. In an OpenCart store, this can include interactions with the database, payment gateways, email delivery, stock updates, or other external services.
Typical examples include checking whether the application saves an order correctly, whether stock changes after a purchase, or whether an integration receives the expected data.
Within an OpenCart testing strategy, these tests are important for custom development and integrations, but they still do not confirm that a shopper can successfully navigate your theme, add a product to the cart, select shipping and payment, and finish checkout.
End-to-End OpenCart Testing
End-to-end testing validates a complete business flow from the user’s perspective. Instead of checking one function or integration at a time, it interacts with the application the way a shopper or store administrator would.
For an online store, this is especially valuable because the business depends on complete journeys:
Find a product → add it to the cart → complete checkout → receive confirmation.
A store can have healthy code and integrations while still losing sales because a visible button disappeared, a field stopped loading, or an extension changed the checkout flow. This is where OpenCart testing becomes directly visible to the store owner: it checks the complete experience, not only the code behind it.
For a broader explanation of this testing layer, see the end-to-end testing guide.
testRigor
One of testRigor’s main advantages is that teams can write test cases using plain-English commands rather than traditional automation code. This makes the scenarios easier to understand for people who know the business flow but may not work with CSS selectors, XPath, or a programming language.
That is useful for e-commerce teams because the people who understand the customer journey are often store owners, e-commerce managers, manual testers, support teams, business analysts, and QA professionals.
For a themeable platform such as OpenCart, there is another practical advantage: testRigor can refer to elements using the text and relative position visible to the user. A step can describe something like the Choose button to the right of “Choose shipping method…” instead of depending on a technical selector that may change after a theme update.
You can read more about testRigor’s approach here.
Selenium
Selenium is a widely used open-source browser automation framework that supports languages such as Java, Python, C#, and Ruby.
It gives development and QA teams a high degree of control, but teams normally write these suites in code and maintain them technically. On stores where themes and page structure change frequently, locator maintenance can become an additional task for the team.
More information about common Selenium maintenance challenges is available here.
Playwright
Playwright is a browser automation framework that Microsoft maintains. It supports Chromium, WebKit, and Firefox and can run across major operating systems.
Like Selenium, Playwright is a strong option for teams that want to maintain coded automation. Store owners who want to create and review tests without programming may prefer a plain-English approach instead. See this comparison for more context.
OpenCart Testing with testRigor: How to Perform End-to-End Tests
Let’s assume you have an OpenCart store that you want to protect with automated tests. In practical OpenCart testing, a guest checkout is one of the best first scenarios because it crosses several revenue-critical parts of the store. The following walkthrough creates a test suite and automates that journey.
Important: Tests that create customers, orders, products, or coupons should run in a staging or test store whenever possible. Do not place real orders, trigger real shipments, or charge real payment methods unless the environment has been intentionally prepared for testing.
Step 1: Log in to your testRigor app with your credentials.
Step 2: Create a test suite and provide the basic configuration:
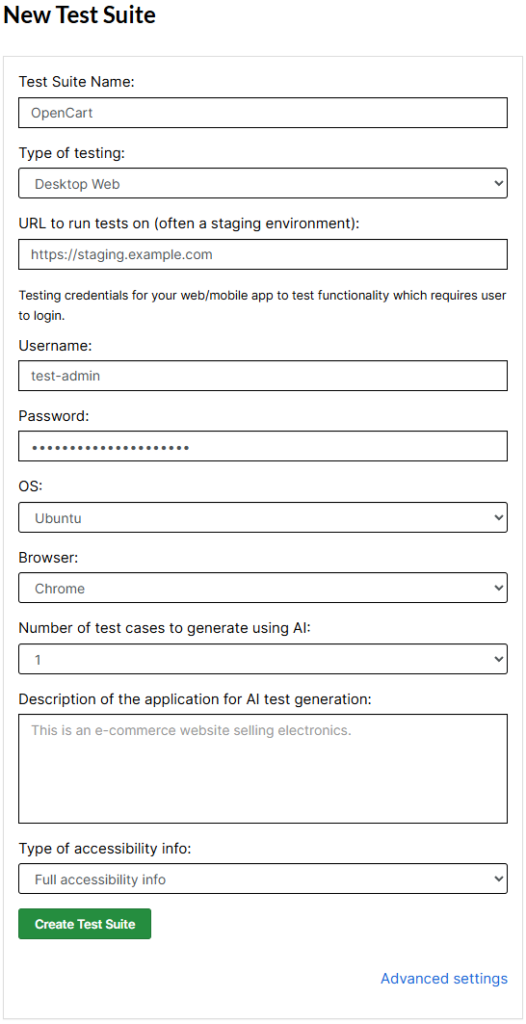
- Test Suite Name: Use a clear name, such as OpenCart Store Regression.
- Type of testing: Select the type that matches the store experience you want to validate.
- URL to run test on: Enter the URL of your staging or test storefront.
- Testing credentials: Add credentials for flows that require authentication.
- OS and Browser: Choose the environment in which the tests should run.
- Number of test cases to generate using AI: Optionally use generative AI to draft cases from the App Description.
Step 3: Click Create Test Suite.
On the next screen, testRigor can generate tests from the App Description. For this walkthrough, select do not generate any test so we can build the scenario manually.
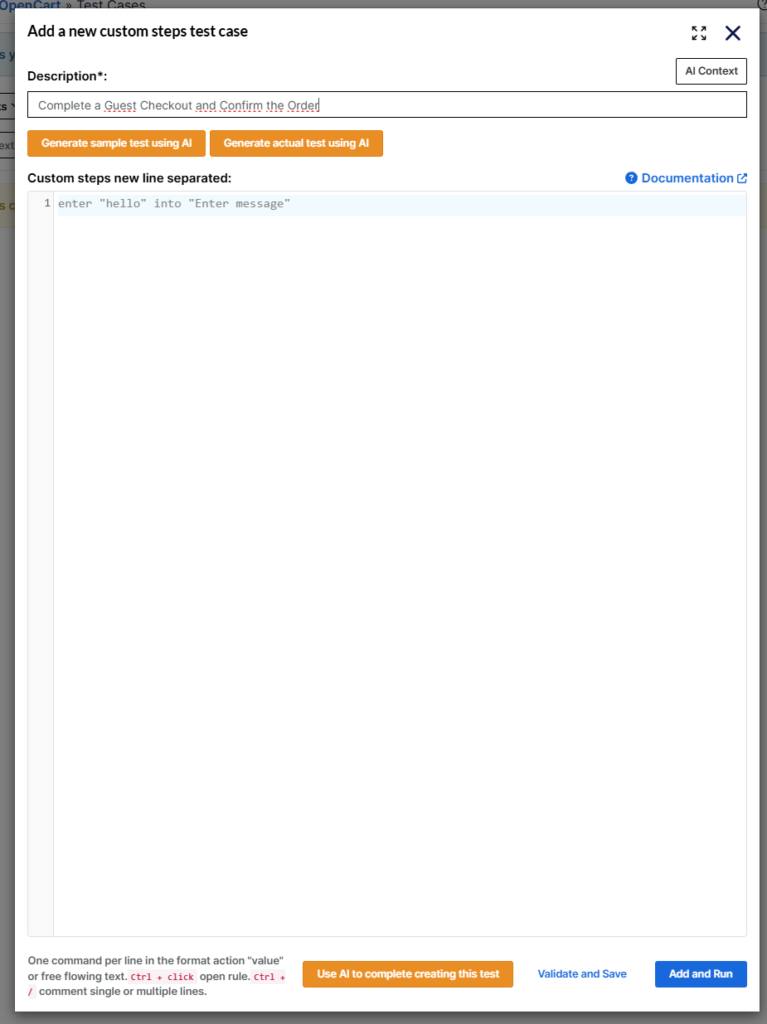
Step 4: Click Add Test Case.

Step 5: Add the test case description and steps, then click Add and Run.
- Storefront: home page, search, product pages, cart, and checkout
- Customer accounts: registration, login, profile updates, password recovery, and order history
- Admin panel: access control and product management
- Marketing: coupon creation and redemption
Setting Up a Safe Environment for OpenCart Testing
For practical OpenCart testing, the safest option for store owners is usually a staging copy of the store that is as close to production as possible.
- The same theme used in production
- The extensions that affect important customer journeys
- Representative products and product options
- Shipping and tax rules similar to production
- A payment method configured in test or sandbox mode
- Test customer and administrator accounts where needed
Avoid integrations that create real charges, shipments, or customer messages unless you intentionally configure them for testing.
A default OpenCart installation can also include demo products such as iPhone, MacBook Air, Apple Cinema 30″, and Canon EOS 5D. These are useful for learning the test flow, but your production-focused suite should eventually use products and rules representative of your real store.
Test Data for OpenCart Testing
Instead of repeating environment details inside every test, you can keep values such as the storefront URL and admin credentials in testRigor Test Data. This makes the same test easier to reuse if you later change the staging URL or credentials.
| Key | Purpose | Example value |
|---|---|---|
storeUrl |
Storefront URL | https://staging.example.com |
adminUrl |
Admin-panel URL | https://staging.example.com/admin |
adminUsername |
Test administrator | test-admin |
adminPassword |
Test administrator password | Stored securely in Test Data |
For customer registration tests, generated data is usually better than fixed data. A unique email address on each run prevents failures caused by reusing an account that already exists.
Test Case: Complete a Guest Checkout and Confirm the Order
Guest checkout is a strong first end-to-end test because it touches the product page, cart, customer details, shipping, payment, and order confirmation in one business-critical flow.
The exact labels in your store may differ depending on your theme, language, OpenCart version, and installed extensions. Use the text that actually appears in your storefront.
Step 1: Find a product.
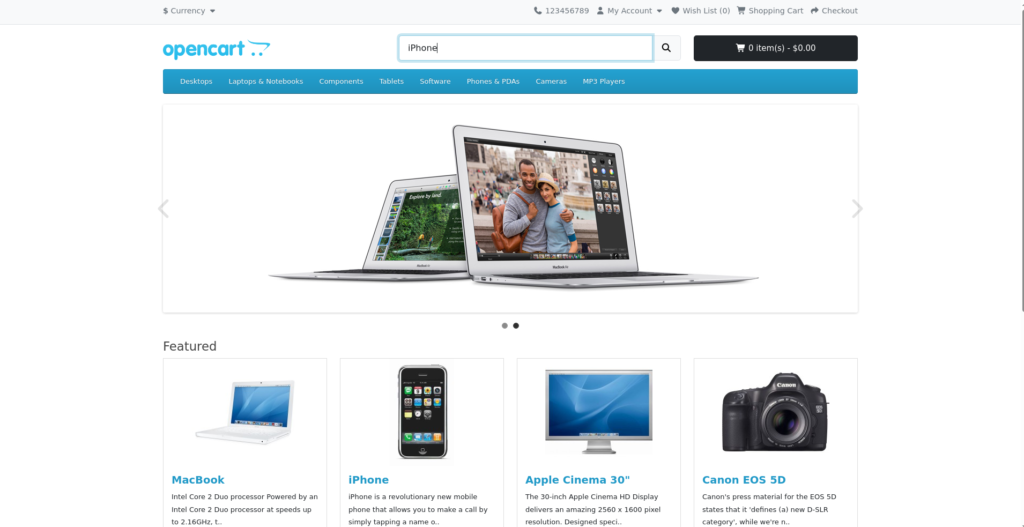
enter "iPhone" into "Search"
press enter
check that page contains "iPhone"
Step 2: Open the product and add it to the cart.
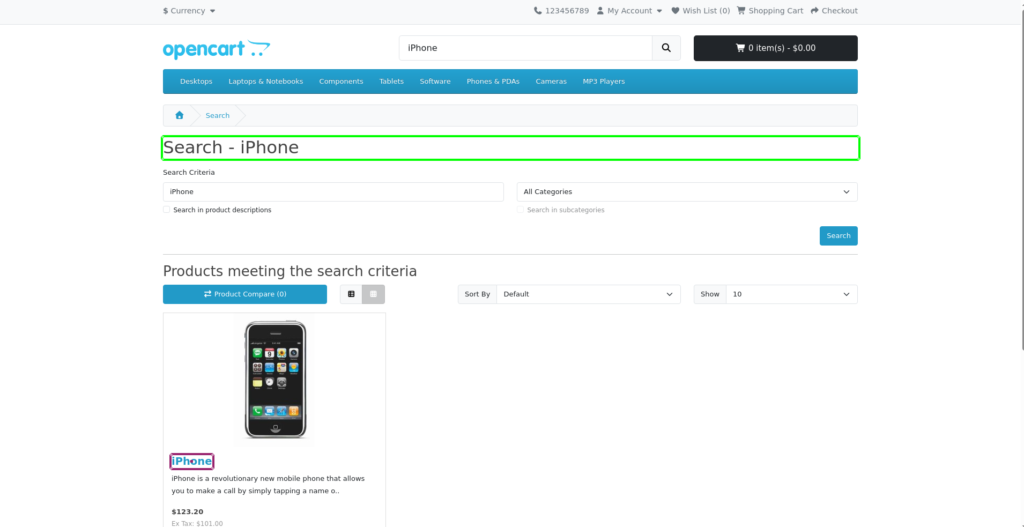
click "iPhone"
check that page contains "Add to Cart"
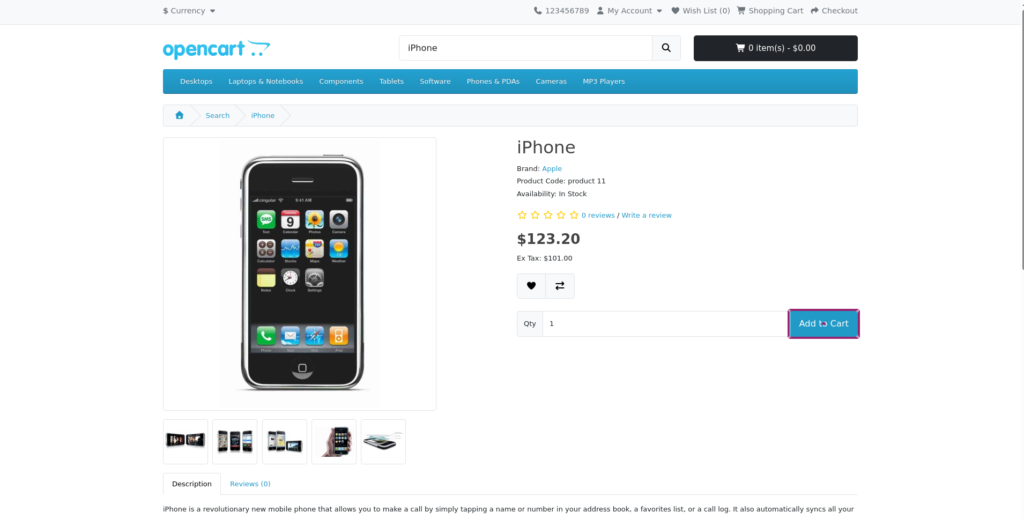
click button "Add to Cart"
check that page contains "Success: You have added"
Step 3: Open the cart and begin checkout.
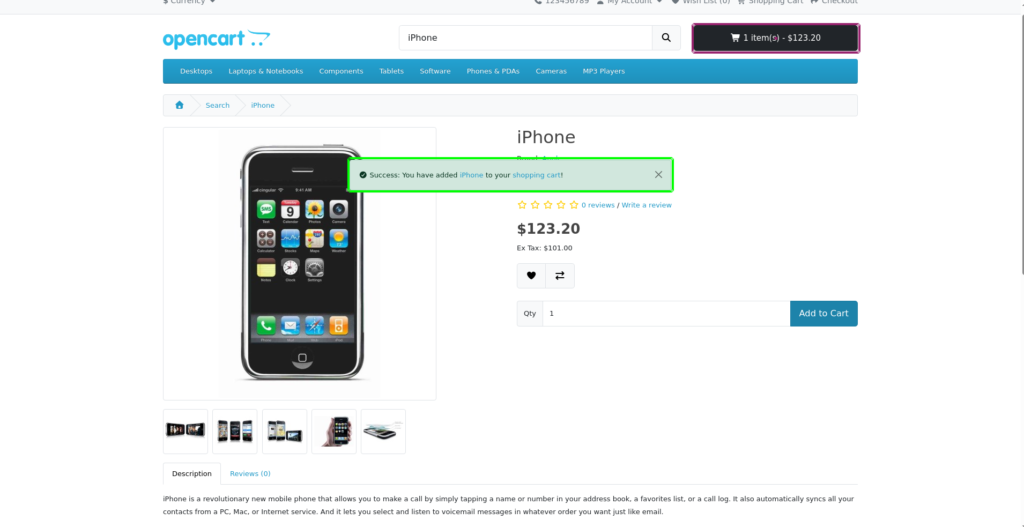
click "item(s)"
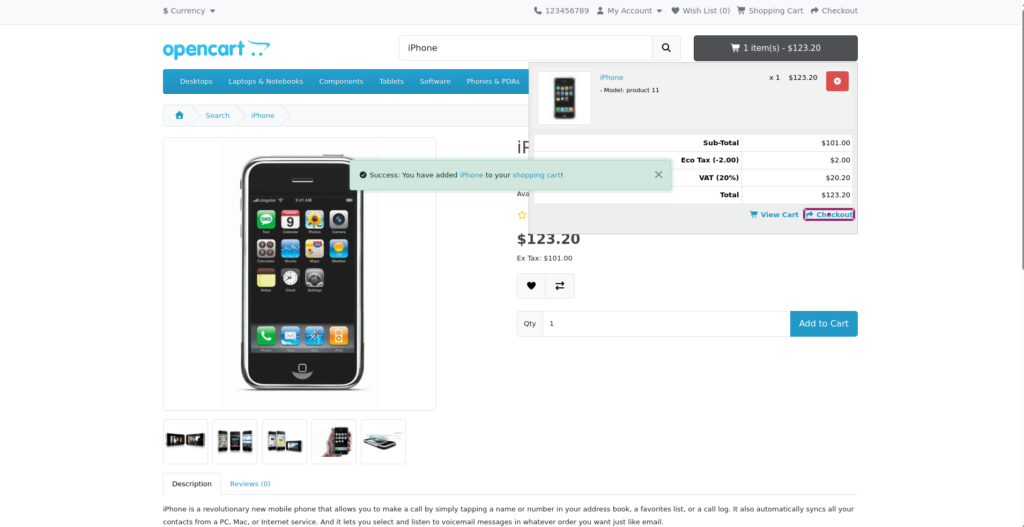
click "Checkout"
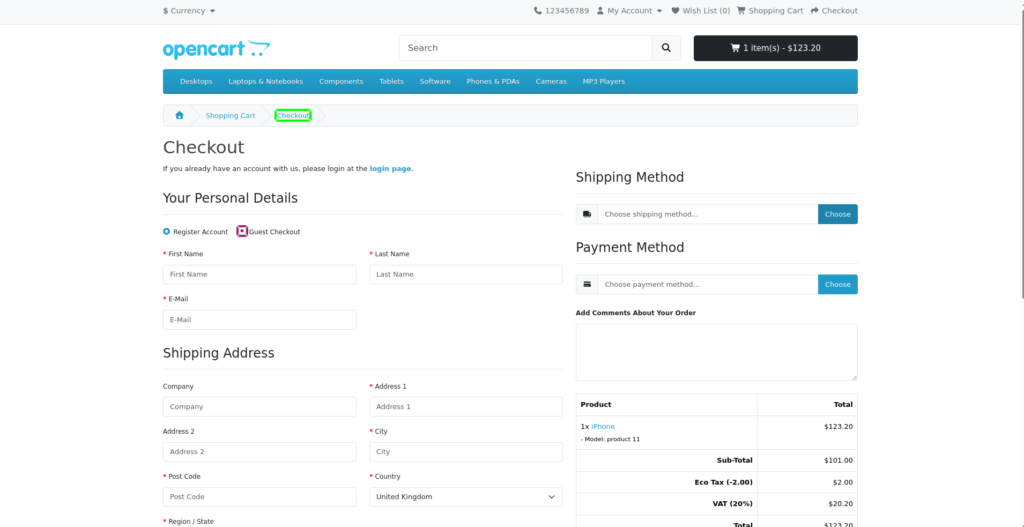
check that page contains "Checkout"
click "Guest Checkout"
Step 4: Enter the guest’s basic information.
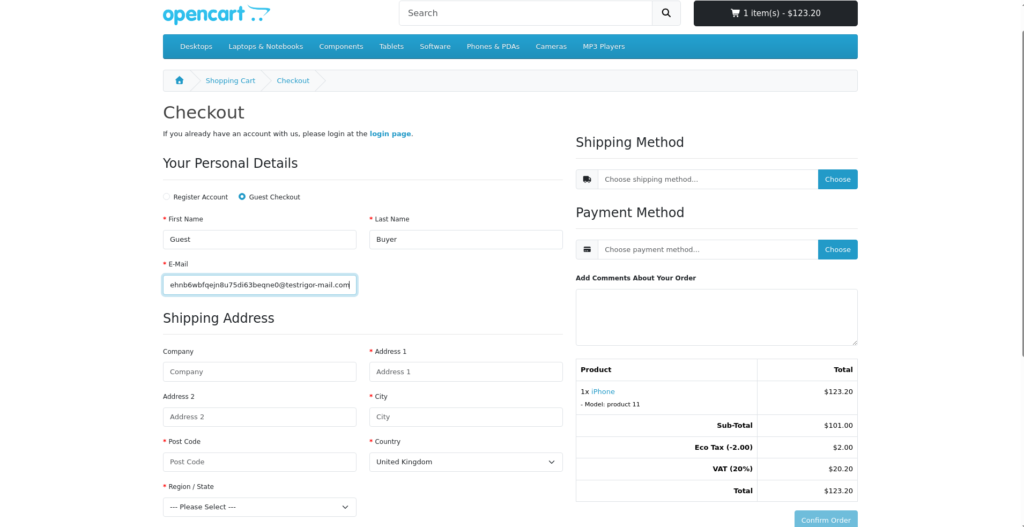
enter "Guest" into "First Name"
enter "Buyer" into "Last Name"
generate unique email, then enter into "E-Mail" and save as "guestEmail"
Step 5: Fill in the address.
The Region / State field may load dynamically after the country changes. Waiting for the expected option is more reliable than using a fixed pause.
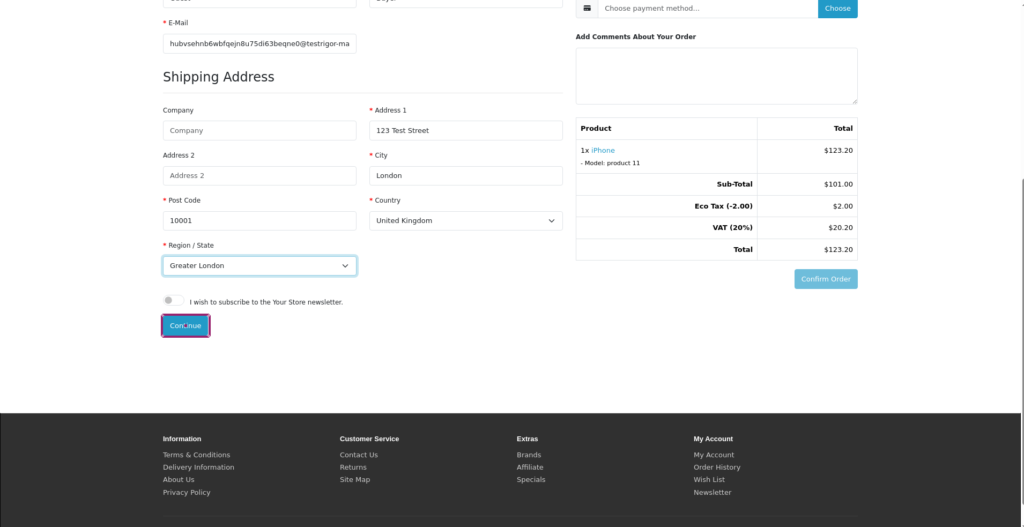
enter "123 Test Street" into "Address 1"
enter "London" into "City"
enter "10001" into "Post Code"
select "United Kingdom" from "Country"
wait up to 60 seconds until page contains "Greater London"
select "Greater London" from "Region / State"
Step 6: Save the guest information and verify that the store accepted it.
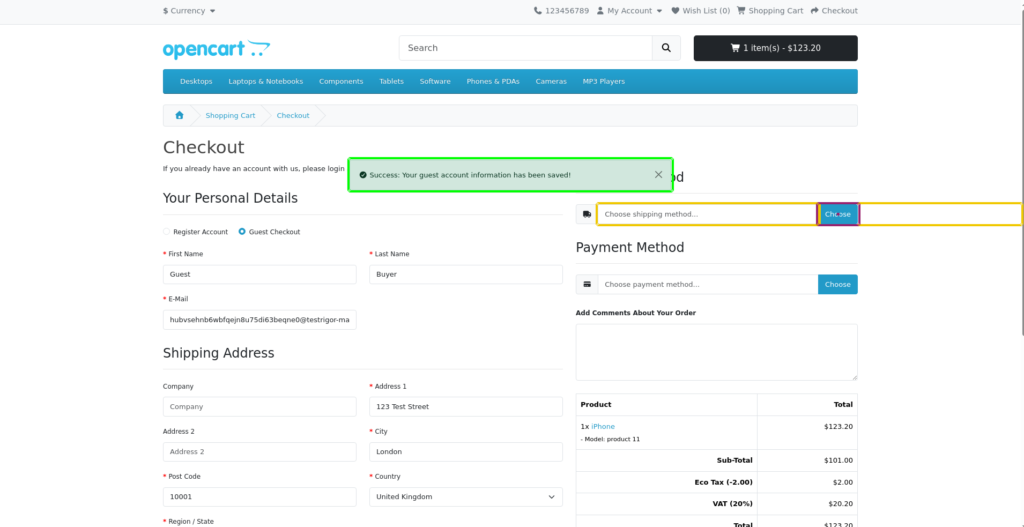
click "Continue"
check that page contains "Success: Your guest account information has been saved!"
Step 7: Confirm shipping and payment.
On a default installation, OpenCart may already select Flat Rate and Cash On Delivery. Your store may use different shipping and payment extensions, so adapt these steps to the options that should appear in your staging environment.
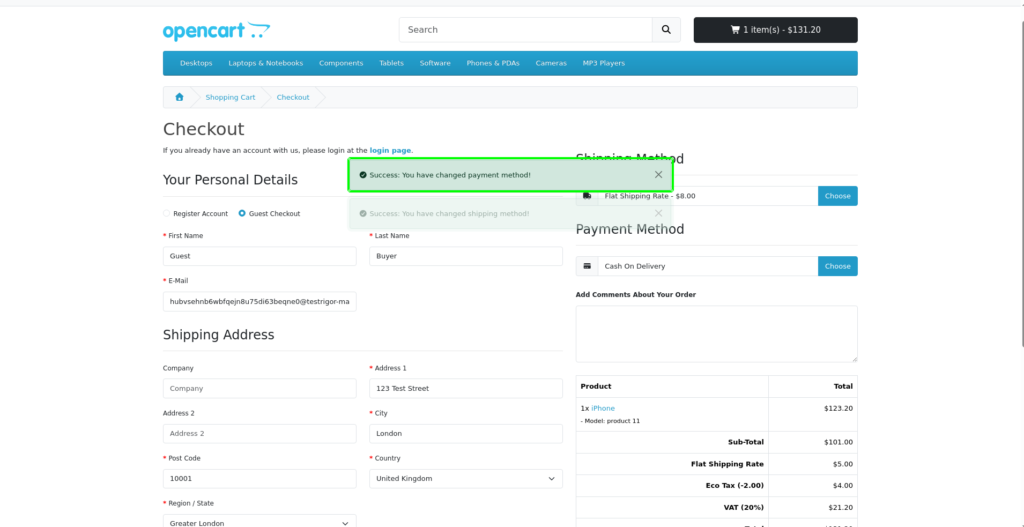
click "Choose" to the right of "Choose shipping method..."
check that page contains "Shipping method options"
click "Continue" below "Please select the preferred shipping method"
check that page contains "Success: You have changed shipping method"
click "Choose" to the right of "Choose payment method..."
check that page contains "Payment method options"
click "Continue" below "Please select the preferred payment method"
check that page contains "Success: You have changed payment method"
Step 8: Place the order and verify the result.
wait up to 60 seconds until page contains "Confirm Order"
click "Confirm Order"
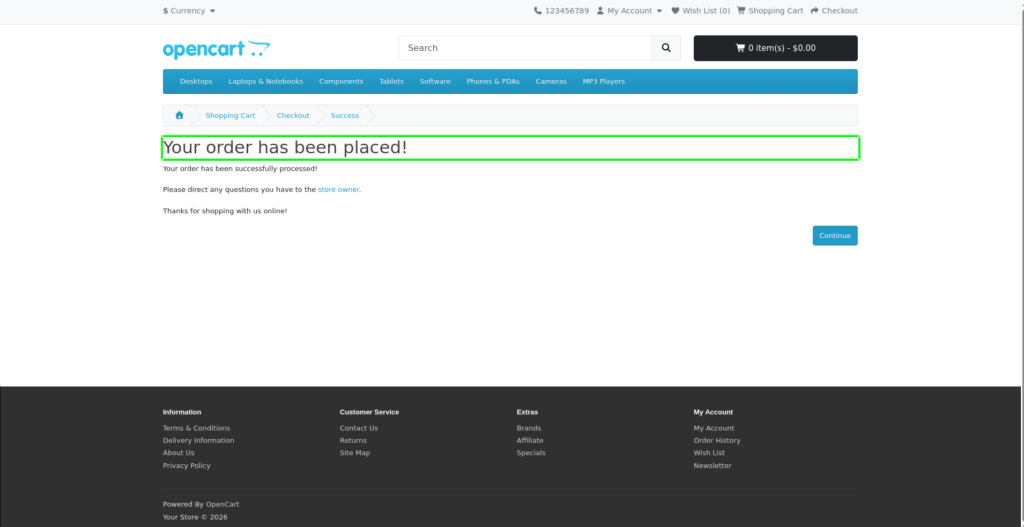
check that page contains "Your order has been placed!"
The final assertion is what proves that the complete purchase journey succeeded.
Complete Test Case
save "iPhone" as "productName"
product-add-to-cart
click "item(s)"
click "Checkout"
check that page contains "Checkout"
click "Guest Checkout"

enter "Guest" into "First Name"
enter "Buyer" into "Last Name"
generate unique email, then enter into "E-Mail" and save as "guestEmail"
address-fill

click "Continue"
check that page contains "Success: Your guest account information has been saved!"

checkout-select-shipping-and-payment

wait up to 60 seconds until page contains "Confirm Order"
click "Confirm Order"
check that page contains "Your order has been placed!"
Execution Results
After a run, testRigor shows the execution status, time spent, screenshots for each step, error messages, and logs. If a test fails, start with the failed step and its screenshot. That usually helps determine whether the problem comes from the store, the test data, an external service, or a changed page flow.
You can also download the complete execution, including steps and screenshots, in PDF or Word format through the View Execution option. You can browse the suite used for the original OpenCart example at app.testrigor.com/public/tERoM8uHao9gHbZMN.
testRigor’s Capabilities
- Reusable Rules (Subroutines): Reuse common flows such as adding a product to the cart, filling an address, or logging in. See the Reusable Rules documentation.
- Global Variables and Data Sets: Keep environment values and reusable test data outside individual test cases.
- 2FA, QR Code, and Captcha Resolution: Handle these flows with plain-English commands. See QR Code and Captcha resolution.
- Email, Phone Call, and SMS Testing: Validate order-confirmation emails, password-reset messages, OTPs, and authentication codes using email, phone, and SMS commands.
- File Upload/Download Testing: Test flows such as invoice downloads or product imports. See files.
- Database Testing: For teams that need deeper validation, database queries can confirm that expected records were created.
Additional Resources
High-Value OpenCart Testing Scenarios
A useful OpenCart testing regression suite should reflect the actions that customers and store staff perform most often. The following examples come from the broader OpenCart test suite. Adapt them to your own theme, catalogue, and extensions.
1. Verify the Storefront Loads Correctly
check that page contains "Your Store"
check that page contains "Search"
check that page contains "featured"
check that page contains "My Account"
scroll down to the bottom of the page
check that page contains "Customer Service"
2. Verify Product Search
enter "MacBook" into "Search"
press enter
check that page contains "MacBook"
click "MacBook Air"
check that page contains "Add to Cart"
enter "zzqqxxnomatch123" into "Search"
press enter
check that page contains "There is no product that matches the search criteria."
3. Verify Required Product Options
enter "Apple Cinema" into "Search"
press enter
click "Apple Cinema 30"
check that page contains "Available Options"
click button "Add to Cart"
check that page contains "required!"
4. Verify Cart Updates and Removal
save "iPhone" as "productName"
product-add-to-cart
click "item(s)"
click "View Cart"
check that page contains "iPhone"
enter "3" into "quantity"
click "Update"
check that page contains "Success: You have modified your shopping cart!"
click "Remove"
check that page contains "Your shopping cart is empty!"
5. Verify Guest Checkout
The guest checkout walkthrough earlier in this article is one of the most important revenue-path tests. Run it against the shipping and payment options that matter to your business.
If your store offers several payment or shipping methods, create separate tests for the combinations that carry the most orders.
6. Verify Customer Registration and Login
click "My Account"
click "Register"
check that page contains "Register Account"
enter "Test" into "First Name"
generate unique name, then enter into "Last Name" and save as "customerLastName"
generate unique email, then enter into "E-Mail" and save as "customerEmail"
generate by regex "[A-Z][a-z]{6}[0-9]{2}[!@#]", then enter into "Password" and save as "currentPassword"
After registration, log out and sign back in with the generated values. That confirms the account can actually be used, rather than only checking a success message.
7. Verify Password Recovery
Password recovery is an important support and customer-retention flow. At minimum, verify that the form accepts a registered email and displays the expected confirmation.
For deeper coverage, testRigor can also validate the email itself and follow the reset link.
8. Verify Admin Access
go to url stored value "adminUrl"
check that page contains "Please enter your login details."
enter "invalid_admin" into "Username"
enter "wrong_password" into "Password"
click button "Login"
check that page contains "No match for Username and/or Password."
Then log in with the test administrator account and confirm that the dashboard opens correctly.
9. Verify Product Changes Reach the Storefront
- Create a temporary product in the admin panel
- Confirm that it appears in storefront search
- Change its price
- Confirm that the new price appears on the storefront
- Delete the temporary product
This verifies that changes made by store staff propagate correctly to the customer-facing catalogue.
10. Verify Coupons and Promotions
click "Use Coupon Code"
enter stored value "couponCode" into "Enter your coupon here"
click "Apply Coupon"
check that page contains "Success: Your coupon discount has been applied!"
For important campaigns, also validate the discount amount and add negative cases such as an expired coupon, minimum order not reached, or an ineligible product.
Reusable Rules for OpenCart Testing
Reusable Rules help keep the suite readable by replacing repeated groups of steps with a meaningful name.
save "iPhone" as "productName"
product-add-to-cart
enter stored value "productName" into "Search"
press enter
check that page contains stored value "productName"
click stored value "productName"
check that page contains "Add to Cart"
click button "Add to Cart"
check that page contains "Success: You have added"
The same idea works well for repeated actions such as filling an address, logging in, selecting shipping and payment, or opening the admin panel.
OpenCart Testing Tips for Reliable Automation
- Use unique customer data. Reusing the same registration email can make later executions fail because the account already exists.
- Wait for dynamic fields. OpenCart can populate fields such as Region / State after another selection changes, so wait for the expected option instead of using a fixed delay.
- Test required product options. A product page can look healthy while a required option prevents customers from adding the item to the cart.
- Use generated products and coupons for tests that create data. This reduces collisions with existing store data and makes cleanup safer.
- Validate the result, not only the success message. For example, after changing a password, log in again. After changing a product price, confirm the new value on the storefront.
- Adapt tests to your theme and extensions. The examples in this article use text from a default OpenCart installation. Your store may use different labels, steps, or checkout components.
When to Run Your OpenCart Testing Suite
- Before and after updating OpenCart
- After installing or updating an extension
- After changing the theme
- After changing shipping, tax, or payment settings
- Before launching an important promotion
- After major catalogue or checkout changes
- On a regular schedule, even when no planned change has been made
Not every test needs to run at the same frequency. A quick storefront and checkout smoke test can run often, while you can reserve longer administration scenarios for maintenance windows or major changes.
OpenCart Testing for Development Teams and Agencies: Git, Docker, and CI/CD
Store owners do not need Git, Docker, or a CI/CD pipeline to benefit from the testing approach in this article. A staging store and a testRigor suite are enough to automate the customer journeys that matter most.
For agencies and development teams, however, the same tests can also run against local or temporary environments and become part of an existing development workflow. The following options are useful for technical teams, but they are not required for everyday OpenCart testing.
Running OpenCart Tests with testRigor
To run the suite from the testRigor application, open Test Suite Details and click Rerun.
--localhost option creates access to an instance that is not publicly reachable:npx -y testrigor-cli test-suite run <SUITE_ID> \ --token <CI_TOKEN> \ --localhost \ --url "http://localhost" \ --variables-path "tests/e2e/variables.docker-compose.json" \ --test-cases-path "tests/e2e/testcases/**/*.txt" \ --rules-path "tests/e2e/reusable-rules/**/*.txt" \ --verbose
The suite ID is available in the suite URL, while CI_TOKEN comes from CI/CD Integration in the testRigor sidebar. Add --async if you want to start the run without waiting for it to finish.
--test-cases-path/--rules-path:
Upload and run the test cases and reusable rules stored locally, so the execution uses the files from the current branch.--variables-path:
Replace the suite’s test data for that execution, making it possible to point the same tests at a local or temporary OpenCart store. Because this option replaces the variable set rather than merging with it, include every value the tests require.--explicit-mutations:
Make the uploaded local files authoritative and replace the stored suite. Because anything missing from the upload can be removed, reserve this option for trusted branches and controlled workflows.
Setting Up GitHub CI/CD Integration
Teams that already use GitHub Actions can also run their OpenCart testing suite automatically as part of the development workflow. Keep testRigor credentials in GitHub secrets and variables instead of placing them directly in the workflow file.
Step 1: Add GitHub Secrets
- Open your GitHub repository.
- Go to Settings → Secrets and variables → Actions.
- Add the following:
- As a secret:
TESTRIGOR_CI_TOKEN: Your testRigor authentication token.
- As a variable:
TESTRIGOR_SUITE_ID: Your testRigor Test Suite ID.
- As a secret:
For more information, see GitHub’s documentation on secrets and variables.
Step 2: Use Them in GitHub Actions
- name: Start services
  run: docker compose up -d --build --remove-orphans opencart mysql

- name: Wait for OpenCart to be reachable
  run: |
    for i in {1..90}; do
      curl -fsS -o /dev/null -L "$LOCAL_BASE_URL" && exit 0
      sleep 3
    done
    exit 1

- name: Run testRigor suite against localhost
  env:
    TESTRIGOR_CI_TOKEN: ${{ secrets.TESTRIGOR_CI_TOKEN }}
    TESTRIGOR_SUITE_ID: ${{ vars.TESTRIGOR_SUITE_ID }}
  run: |
    npx -y testrigor-cli test-suite run "$TESTRIGOR_SUITE_ID" \
      --token "$TESTRIGOR_CI_TOKEN" \
      --localhost \
      --url "$LOCAL_BASE_URL" \
      --variables-path "$RUNNER_TEMP/testrigor-variables.json" \
      --test-cases-path "tests/e2e/testcases/**/*.txt" \
      --rules-path "tests/e2e/reusable-rules/**/*.txt" \
      --verbose
Because this workflow creates the store from scratch, each run can test a clean OpenCart installation instead of depending on a shared staging environment.
- Skip the job when testRigor is not configured.
If the suite ID or token is unavailable, the workflow can report that the integration is not configured and skip the test instead of failing the entire build. This is particularly useful for pull requests from forks, which normally do not receive repository secrets. - Only let trusted branches update the stored suite.
Pull requests can run their local test files without changing the shared suite, while a protected branch can remain responsible for publishing approved changes.
This setup is useful for agencies and development teams that already work with Git, Docker, and automated pipelines. For store owners managing tests directly through testRigor, the staging-based workflow described earlier in this article remains sufficient.
Conclusion
A practical OpenCart testing strategy ultimately protects the journeys that keep the business running.
The page may load even when a checkout step is broken. The admin panel may show a payment extension as enabled while customers still cannot complete an order. Coupons can also display a success message while applying the wrong result. That is why store-level testing should focus on the complete experience: finding products, managing the cart, checking out, using promotions, accessing accounts, and maintaining the catalogue from the admin panel.
Unit and integration testing remain valuable for teams that build custom code and integrations. End-to-end testing adds the layer that store owners can observe directly: can a customer still do what the store expects them to do?
Start OpenCart testing with a small set of business-critical scenarios, especially search, cart, and checkout. Run them in a safe test environment, adapt them to the theme and extensions you actually use, and expand the suite as your store grows.
| Achieve More Than 90% Test Automation | |
| Step by Step Walkthroughs and Help | |
| 14 Day Free Trial, Cancel Anytime |