
Jitsi Meet Testing: How to Test Your Video Meetings with testRigor
 |
Jitsi Meet testing helps verify that a video meeting works consistently for everyone in it. A poll may accept a vote without updating the organizer’s results. A moderator may remove a message, but another participant could still see it. Someone who leaves and rejoins might not return to the same conversation.
Jitsi Meet is an open-source video conferencing application used for meetings, classes, workshops, and embedded conferencing experiences. Alongside audio and video, it supports collaboration features such as group chat, polls, participant controls, and room history. Testing these workflows across separate browser sessions helps teams confirm that participants experience the same meeting state.
This guide explains the main testing layers, shows how to automate a two-participant poll using testRigor, and presents six more scenarios drawn from a real, publicly documented browser-testing contribution. It also explains an important boundary: confirming that a meeting’s interface and messages work is not the same as confirming audio or video quality.
What Should Jitsi Meet Testing Cover?
- Poll creation, voting, and vote changes: participants should see consistent results.
- Participant removal: removing one person should not interrupt the remaining meeting.
- Chat editing and deletion: other participants should see the updated message state.
- Moderator permissions and message removal: only authorized participants should have the relevant controls.
- Participant statistics and search: the participant list should reflect the actual meeting.
- Recent-room rejoining and removal: room history should work as expected in each browser.
- Joining and leaving meetings, including guest access or authentication where applicable.
- Microphone, camera, screen sharing, connection recovery, and actual media quality, which require their own tests.
Prioritize by user impact. A failed poll matters in a class or interactive presentation. Incorrect chat moderation can undermine a meeting’s rules. Participant removal that also interrupts everyone else can end an important conversation. These problems are easier to discover when the test observes more than one browser session.
What Jitsi Meet Already Tests, and Why Add User-Journey Checks?
Jitsi Meet is not an untested application. Its repository includes automated browser specifications under tests/specs, with areas for user interface, moderation, media, and other behaviors. Its test project uses WebdriverIO and supports local browsers or a browser grid. The project also uses code-level checks in development.
Those tests remain valuable. Adding a testRigor suite does not imply that the existing tests are broken or that a new automation service is required. The separate example in this article demonstrates a way to describe participant-visible outcomes and share browser-run evidence. Organizations can also implement these same scenarios in their existing WebdriverIO suite.
One useful distinction is between proving an action was accepted and proving that a second participant received its effect. After an author edits a chat message, checking only the author’s own screen is not enough. A stronger browser test also checks that the other participant sees the replacement, sees the edited indicator, and no longer sees the old text.
Testing Layers in Jitsi Meet
Unit Testing in Jitsi Meet
Unit tests check small pieces of application logic, such as state changes, calculations, and data transformations. They are fast and useful to developers, but they do not show whether two people in a live meeting receive the same poll result or message update.
Integration Testing in Jitsi Meet
Integration checks verify communication between components. In a Jitsi deployment, the web application depends on signaling and conference services; a self-hosted installation may include Prosody, Jicofo, and Jitsi Videobridge. A service responding successfully is useful evidence, but it does not by itself establish what every participant sees in the browser.
End-to-End Jitsi Meet Testing
End-to-end testing follows a complete user journey through the application. In this case, a meaningful sequence is:
Host creates a poll → guest votes → host sees the result → guest changes the vote → both participants see the corrected totals.
Other journeys cross permission boundaries or persist state across visits. For example, a moderator removes a message and all participants see the change, or a person returns to a recent room while a peer remains connected.
These checks are especially useful for collaboration applications because a successful click in one browser does not guarantee the expected result in another.
Tools for Automating Jitsi Meet Tests
testRigor
testRigor lets teams express browser actions in readable English and organize repeated steps into Reusable Rules. For collaborative scenarios, its ability to start and switch between browser sessions is useful: the same test can act as the meeting host, then as another participant, and compare what each person sees.
The example below uses mostly visible UI labels. One advanced participant-statistics scenario in the reference suite also uses browser JavaScript to inspect rows inside a specific dialog. That is a targeted technical assertion, not an example of a fully no-code test.
WebdriverIO
WebdriverIO is particularly relevant because Jitsi Meet already uses it in its own browser tests. It supports coded tests, browser automation, and execution against local browsers or grids. For maintainers and development teams with an established WebdriverIO pipeline, extending the existing suite may be the simplest approach.
Playwright and Selenium
Playwright and Selenium are other established choices for browser automation. Both give developers detailed control through code. The better fit depends on the team’s current tooling, maintenance preferences, and whether non-developers need to read or contribute to the test scenarios.
Jitsi Meet Testing with testRigor: How to Perform End-to-End Tests
We’ll start with a poll that two participants can see. This is a good first scenario because it exercises joining a meeting, interacting with a feature, sending changes between participants, and verifying the outcome on both sides.
Important: Use a controlled Jitsi Meet test or staging deployment. The referenced browser tests use a specially configured local instance with anonymous rooms and initial camera and microphone capture disabled. Do not assume the same access, UI labels, or authentication steps apply to a public meeting service or to your production deployment.
Step 1: Sign in to the testRigor application.
Step 2: Create a test suite for the Jitsi instance you control. Give it a descriptive name, such as Jitsi Meet Collaboration Regression, choose desktop Chrome, and set the suite URL to your staging application.
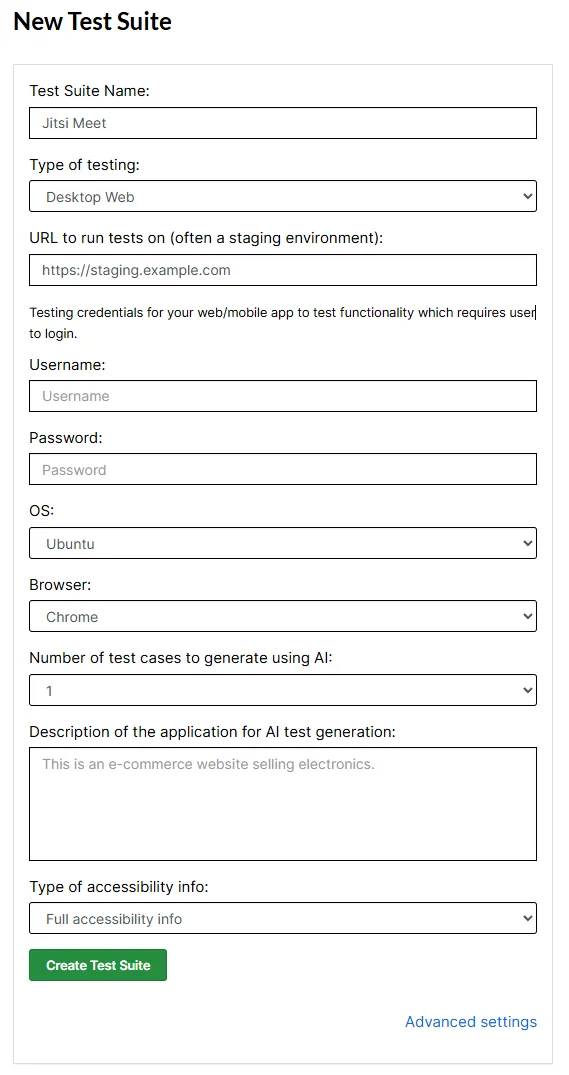
Step 3: Select the browser and operating system that match your intended coverage. The reference contribution ran desktop Chrome in an Ubuntu environment. Keep the environment consistent for the first run before expanding to other browser and device combinations.
Step 4: Create a custom test case and add the steps shown below. If you use the shorter complete example, create its reusable rules first.
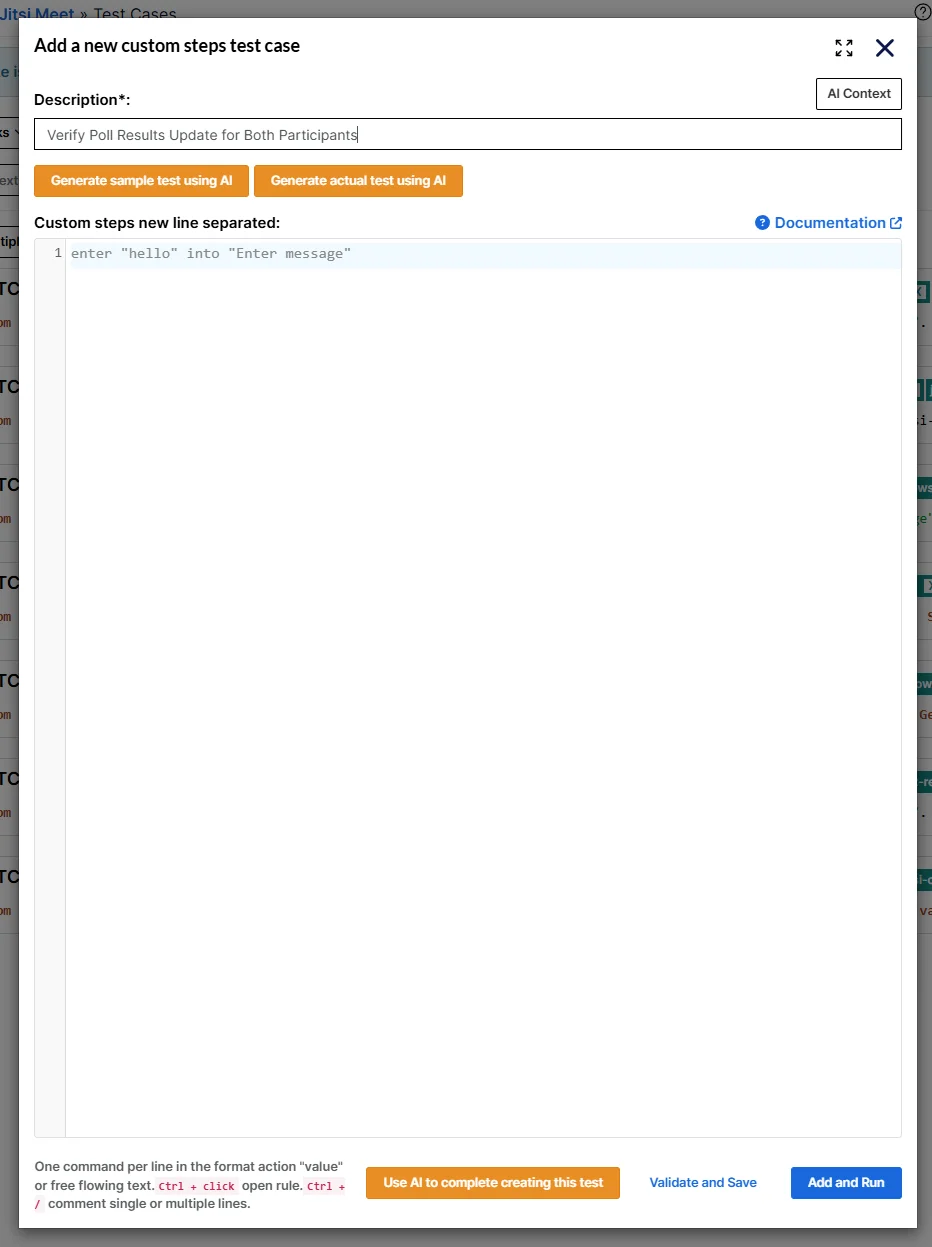
Step 5: Run the case. Review each participant’s screenshots and the step that failed, if any. A host-only success is not sufficient for a scenario whose expected outcome must also appear on the guest’s screen.
Setting Up a Safe Jitsi Meet Test Environment
For a public instance that your team cannot configure, tests may depend on changing authentication and conferencing policies. A self-hosted staging instance gives you more control over room creation, moderator permissions, authentication, and feature settings.
- Meeting access: decide whether tests join anonymously, through a guest flow, or with configured authentication.
- Participant roles: define who becomes moderator and which controls guests should see.
- Feature configuration: enable the relevant polls, chat, room history, and participant-statistics options.
- Microphone and camera permissions: disable initial device capture when you are testing UI and signaling only; use a separate setup for media tests.
- Independent browsers: use separate sessions for host, guests, and witnesses.
- Data isolation: use a different room and uniquely generated content for every run.
The documented contribution built its frontend from a checked-out Jitsi Meet commit and ran it alongside Docker backend release stable-11248-3. Its special browser profile started with audio and video muted, disabled initial device capture, enabled the single-answer poll control, and kept the toolbar visible. These settings make the UI tests more predictable, but they deliberately leave audio/video transmission and toolbar auto-hide behavior untested.
Test Data for Jitsi Meet Testing
Keep environment values separate from test actions. The example creates new room and poll names on each run; it also uses distinct visible participant names so assertions are easy to read.
| Value | Purpose | Example |
|---|---|---|
roomName |
Isolated meeting for the current run | Generated with trpoll[a-z]{20} |
pollQuestion |
Unique question to distinguish the current poll | Generated with Poll[a-z]{20} |
participantName |
Name used by the current browser session | TRPollHost or TRPollGuest |
| Suite URL | Target environment | Your controlled Jitsi Meet staging URL |
Generated names help prevent tests from reusing an old room or confusing a new poll with earlier content. Store credentials securely if your deployment requires authentication. The reference scenario assumes a controlled deployment with its own join flow, not the public service’s access policy.
Test Case: Verify Poll Results Update for Both Participants
This example follows TC-01 in the Jitsi Meet browser-testing pull request. The test does not stop when a guest submits a vote. It checks the host’s view and then verifies that changing the vote moves the count from one answer to the other.
Step 1: Create and Join a Room
generate from regex "trpoll[a-z]{20}" and save as "roomName"
generate from regex "Poll[a-z]{20}" and save as "pollQuestion"
save value "TRPollHost" as "participantName"
jitsi-open-room
jitsi-join-conference
The rules depend on the welcome-screen labels used by this configured environment: Enter room name, Start meeting, Enter your name, and Join meeting.
Step 2: Add an Independent Participant
start browser "Voter" and switch
reset to home
save value "TRPollGuest" as "participantName"
jitsi-open-room
jitsi-join-conference
jitsi-open-polls
switch to browser "default"
Using two browsers is essential here. If the test used only one session, it could confirm that the vote was recorded locally without showing whether another participant received the updated result.
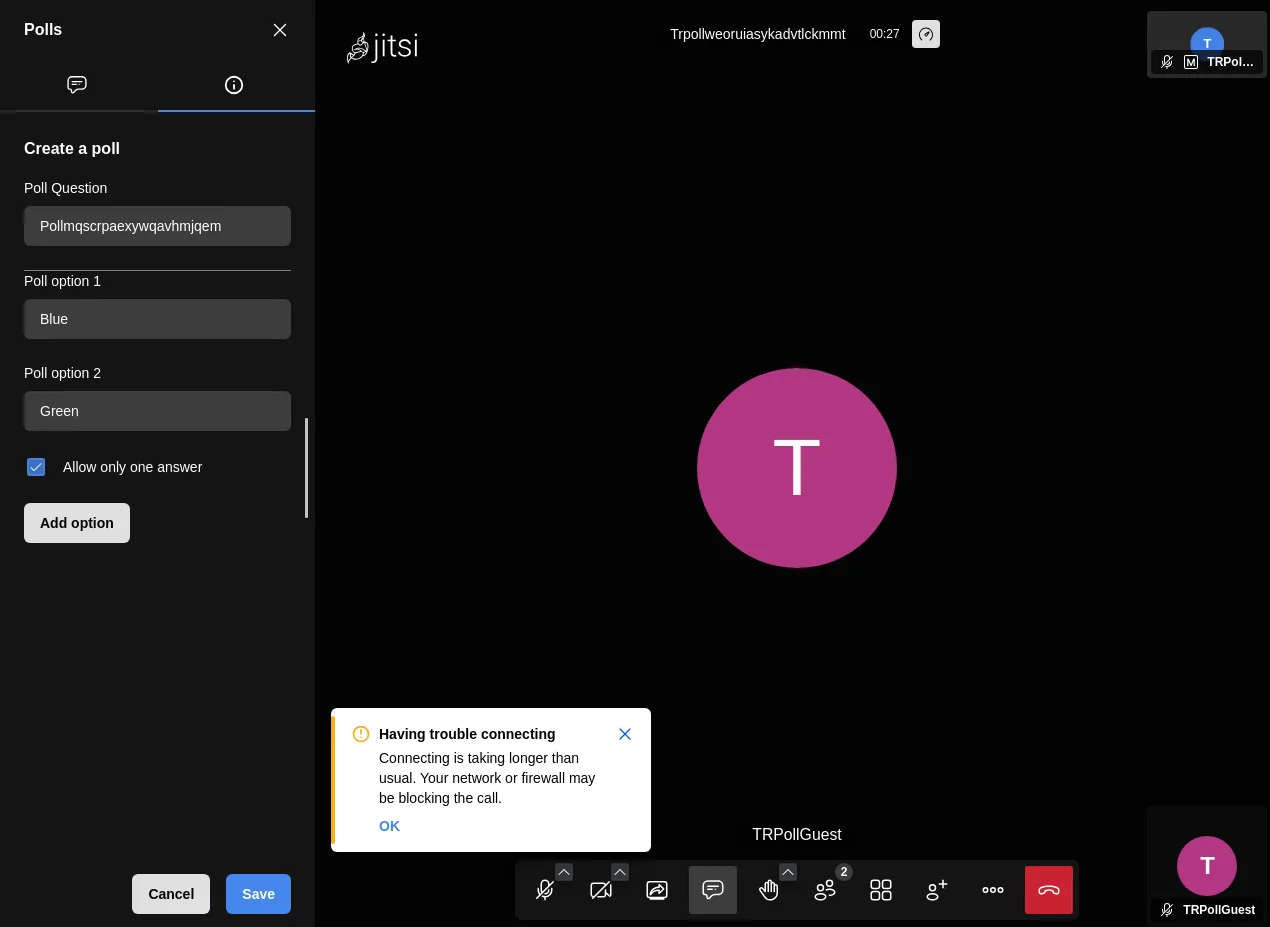
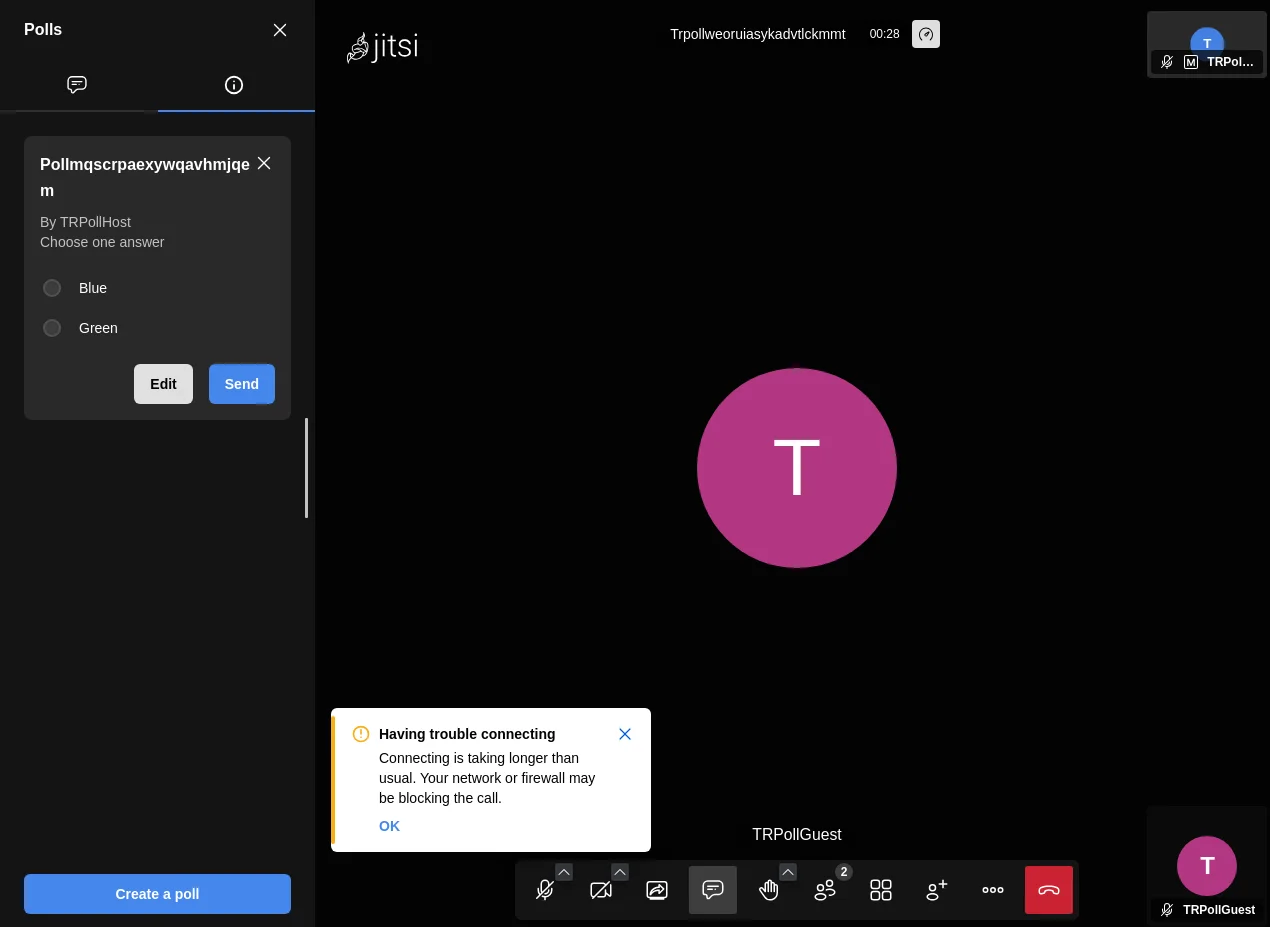
Step 3: Create and Send the Poll
jitsi-open-polls
click button "Create a poll"
enter stored value "pollQuestion" into "Poll Question"
enter "Blue" into "Poll option 1"
enter "Green" into "Poll option 2"
click "Allow only one answer"
click button "Save"
click button "Send poll"
Step 4: Submit and Verify the First Vote
switch to browser "Voter"
wait up to 60 seconds until page contains stored value from "pollQuestion"
click "Blue"
click button "Submit"
check that page contains "1 (100%)" above "Green"
check that page contains "0 (0%)" below "Green"
switch to browser "default"
click button "Skip"
wait up to 60 seconds until page contains "1 (100%)" above "Green"
check that page contains "0 (0%)" below "Green"
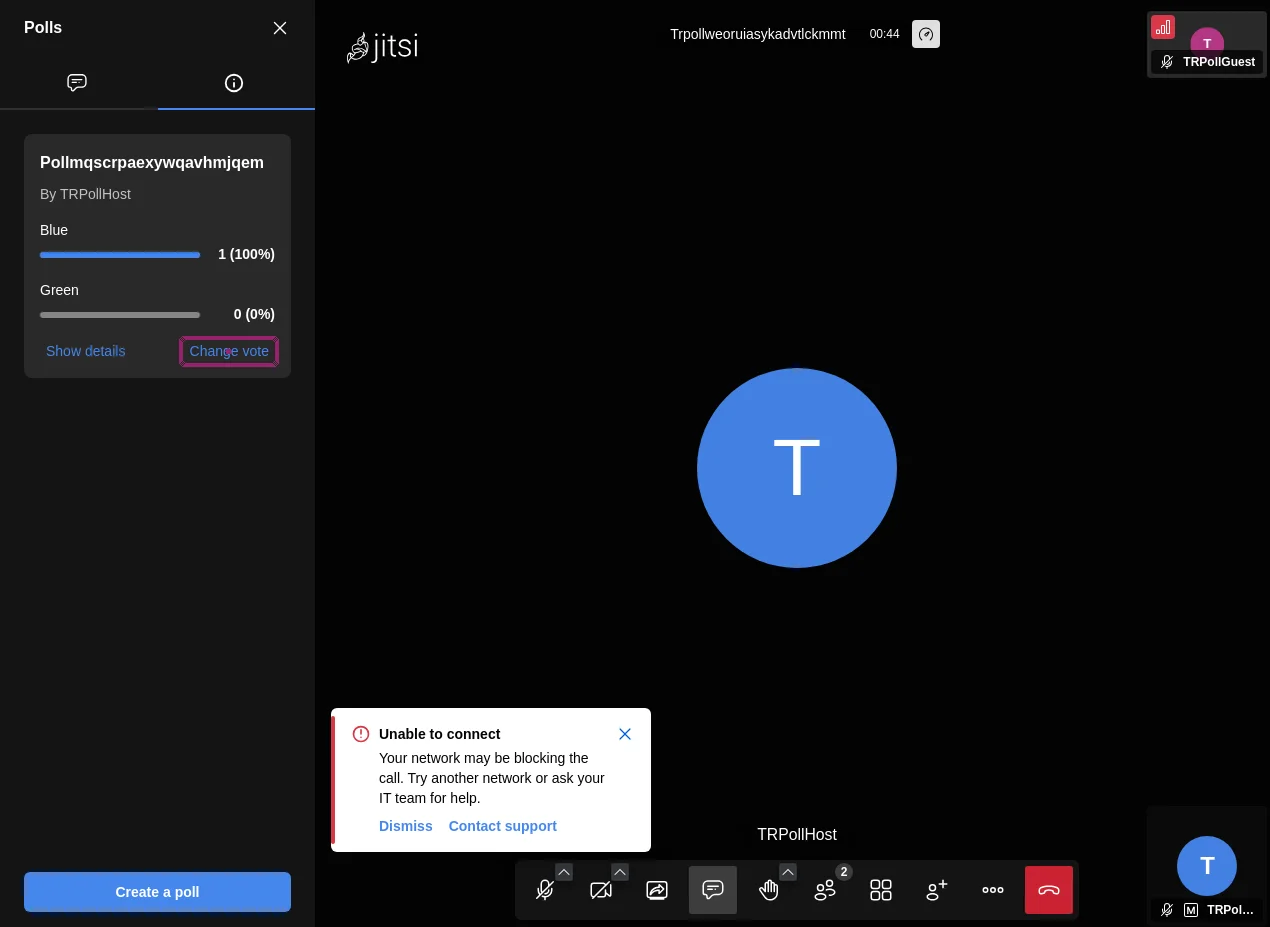
The relative checks associate the visible percentages with the two options rather than merely finding 100% somewhere in the interface.
Step 5: Change the Vote and Verify Both Sides
switch to browser "Voter"
click button "Change vote"
click "Green"
click button "Submit"
check that page contains "0 (0%)" above "Green"
check that page contains "1 (100%)" below "Green"
switch to browser "default"
wait up to 60 seconds until page contains "1 (100%)" below "Green"
check that page contains "0 (0%)" above "Green"
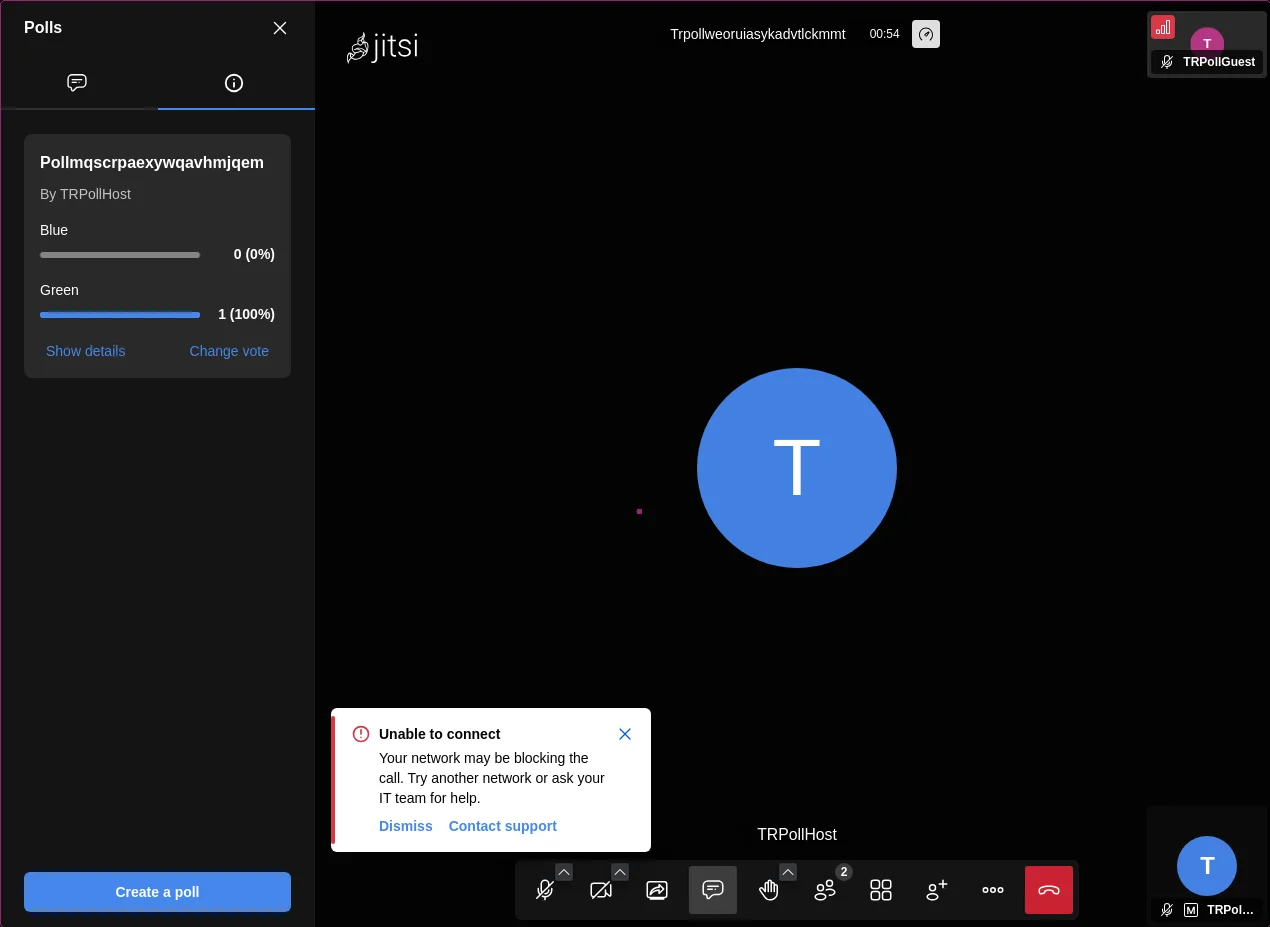
This last cross-browser assertion is the key outcome. The test verifies that both participants see the new count after the vote changes.
Complete Test Case
generate from regex "trpoll[a-z]{20}" and save as "roomName"
generate from regex "Poll[a-z]{20}" and save as "pollQuestion"
save value "TRPollHost" as "participantName"
jitsi-open-room
jitsi-join-conference
start browser "Voter" and switch
reset to home
save value "TRPollGuest" as "participantName"
jitsi-open-room
jitsi-join-conference
jitsi-open-polls
switch to browser "default"
jitsi-open-polls
click button "Create a poll"
enter stored value "pollQuestion" into "Poll Question"
enter "Blue" into "Poll option 1"
enter "Green" into "Poll option 2"
click "Allow only one answer"
click button "Save"
click button "Send poll"
switch to browser "Voter"
wait up to 60 seconds until page contains stored value from "pollQuestion"
click "Blue"
click button "Submit"
check that page contains "1 (100%)" above "Green"
check that page contains "0 (0%)" below "Green"
switch to browser "default"
click button "Skip"
wait up to 60 seconds until page contains "1 (100%)" above "Green"
check that page contains "0 (0%)" below "Green"
switch to browser "Voter"
click button "Change vote"
click "Green"
click button "Submit"
check that page contains "0 (0%)" above "Green"
check that page contains "1 (100%)" below "Green"
switch to browser "default"
wait up to 60 seconds until page contains "1 (100%)" below "Green"
check that page contains "0 (0%)" above "Green"
switch to browser "Voter"
jitsi-leave-conference
switch to browser "default"
jitsi-leave-conference
For reproducibility, the source-controlled version is available in the contribution under tests/E2E/test-cases/, with shared rules under tests/E2E/rules/. Your own installation may have different UI labels or enabled features, so verify those before reusing the script.
Execution Results
The example contribution has a public testRigor suite and a matching GitHub Actions run. On November 18, 2026, the workflow for source commit 90ad5ca867 finished successfully. Its browser-job log states that it verified seven passing browser cases without skips, and the run uploaded a JUnit report and execution manifest.
These results support the tested UI and signaling scenarios under the configured environment. They do not establish that audio/video transmission, call quality, WebRTC recovery, or every production Jitsi deployment works correctly.
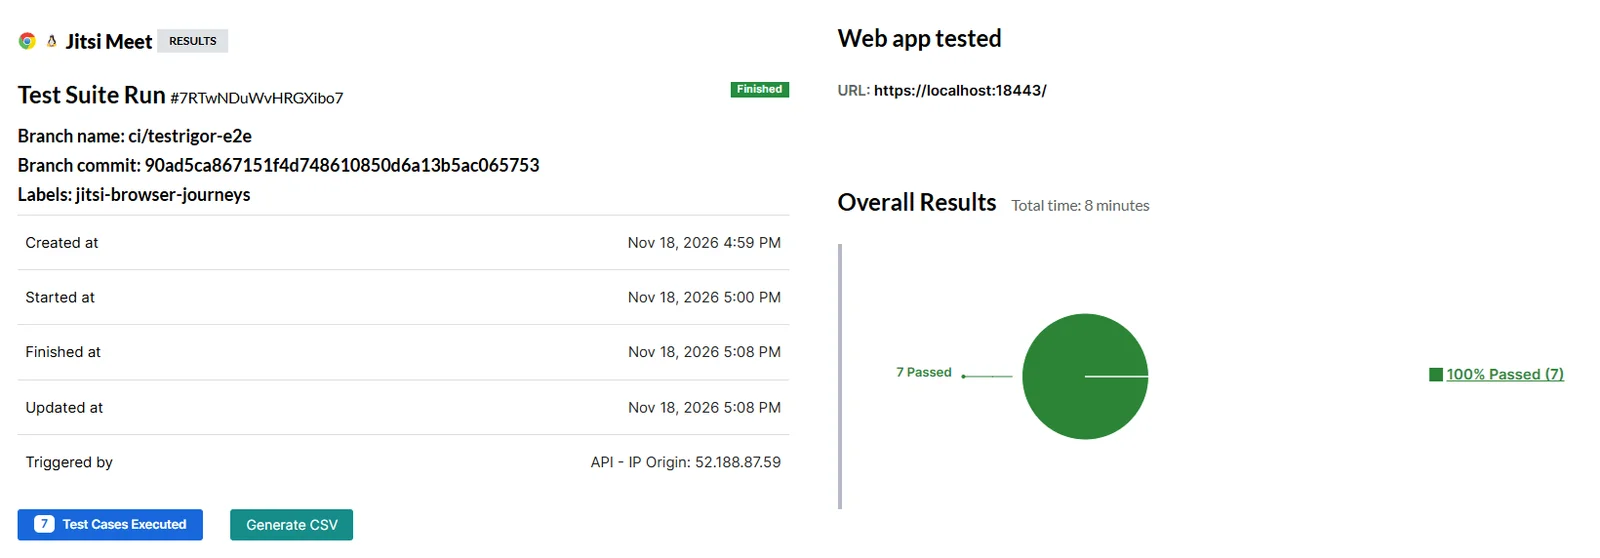
When reviewing your own execution, open the failed step, examine its screenshot and logs, and check which browser was active. In multi-participant tests, the most informative failure is often the first point where the second browser no longer reflects the host’s action.
Six More High-Value Jitsi Meet Testing Scenarios
The same community contribution includes six more workflows. Each targets a result that matters to participants and distinguishes a UI assertion from a stronger observation across browser sessions.
1. Participant Removal Without Ending the Meeting
In TC-02, a host, the participant being removed, and a third-party witness join a room. The host removes one participant from the participant panel. The removed person must see the kick notification, and the witness must stop seeing that person in the meeting.
The scenario goes one step further: the host sends a new chat message, and the witness must receive it. That matters because removing one participant should not make the remaining meeting unusable.
switch to browser "Witness"
wait up to 60 seconds until page contains stored value from "survivalMessage"
2. Chat Editing and Deletion Across Participants
TC-03 first proves that a peer received the original message. The author then edits it. The peer must see the replacement text and the (edited) indicator, while the original message is no longer present.
switch to browser "Peer"
wait up to 60 seconds until page contains stored value from "editedMessage"
check that page contains "(edited)"
check that page does not contain stored value from "targetMessage"
TC-04 covers deletion. Once the author deletes a message, the author sees You deleted this message.; the peer sees This message was deleted.. Both views must stop displaying the deleted text. Checking both the placeholder and absence of the content prevents a stale message from being mistaken for a successful deletion.
3. Moderation Permissions and Message Removal
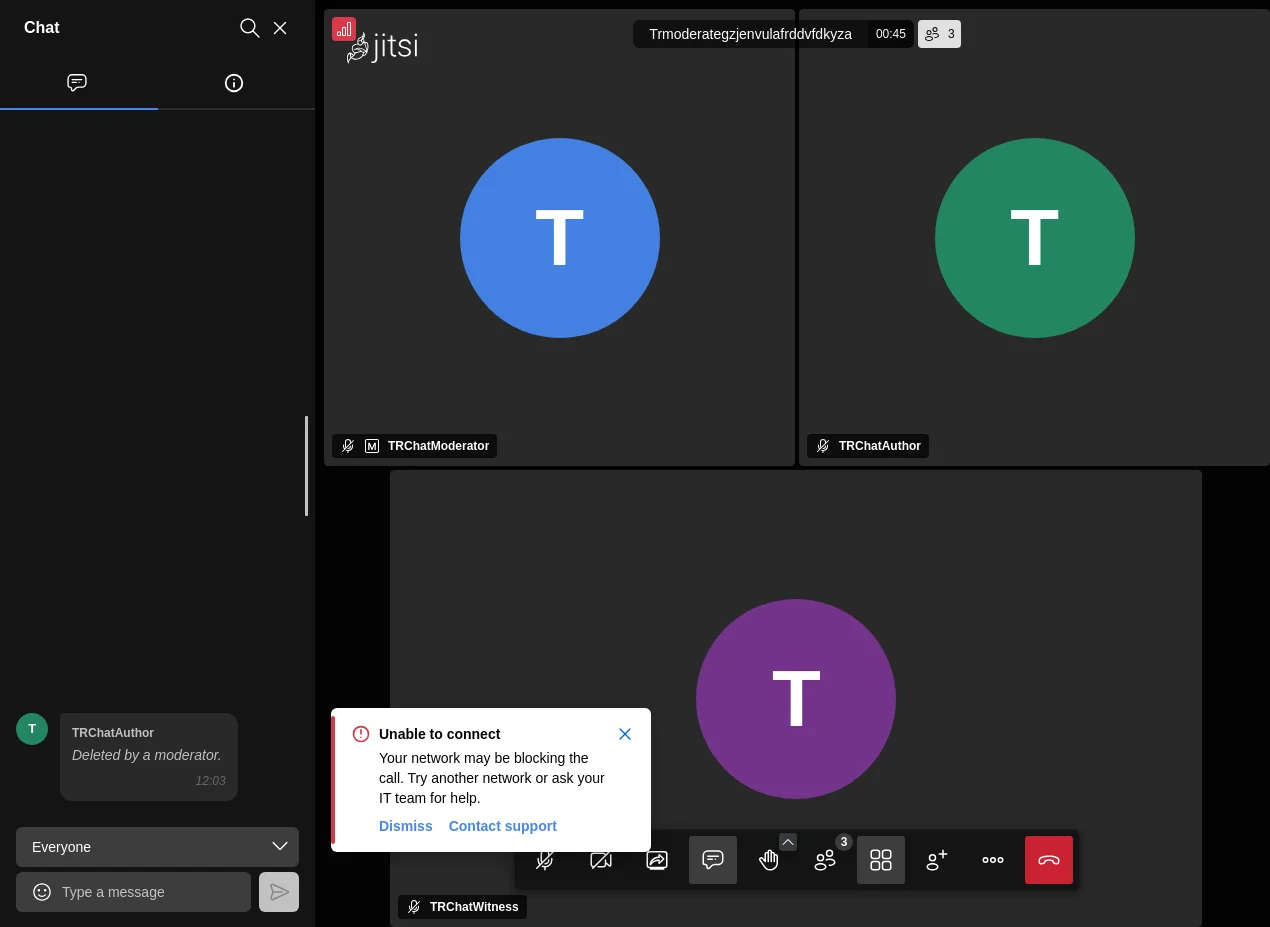
TC-05 uses three browser sessions: a moderator, a message author, and a witness. The witness should not be offered the moderator’s Delete action for another person’s message. The moderator can remove it, after which all three participants should see Deleted by a moderator. instead of the original text.
This tests both authorization in the interface and propagation of the resulting message state. The reference environment assigns moderator privileges to the first participant. Your deployment’s role model may differ, so confirm permissions before applying the same expectations.
4. Participant Statistics and Search
TC-06 opens More actions → Participants Stats with two participants. It checks that the dialog lists both names, then searches for a specific participant and confirms only the matching row remains. Clearing the search must restore the full list.
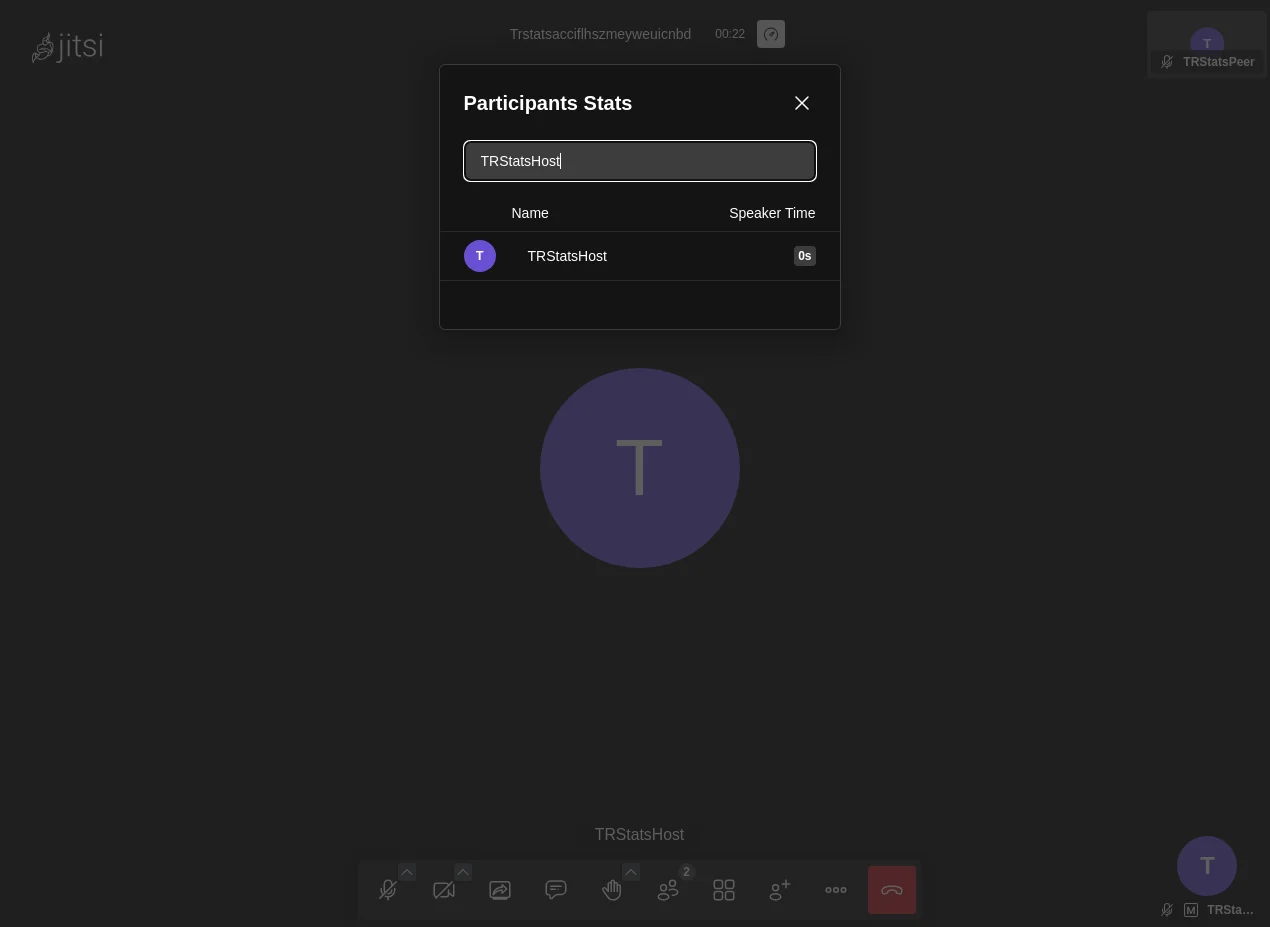
This case includes a deliberate technical exception: it reads visible .display-name rows inside the dialog labeled Participants Stats using browser JavaScript. That avoids accidentally passing an assertion because a name is visible on a video tile behind the dialog. If you adapt the case, keep the assertion scoped to the intended dialog rather than checking the entire page.
5. Recent-Room Rejoining and Removal
TC-07 has two people join a newly generated room. The host leaves, selects that room from their recent history, rejoins the peer, and sends a message. The peer receiving that message confirms that the browser returned to an active conversation rather than merely opening a recent-room entry.
The host then deletes the entry and reloads the welcome page. The room must remain absent from that browser’s history, while the peer’s independent browser still has its own entry. This distinction matters because recent-room history is browser-local state in the tested configuration.
6. Other Meeting Workflows Worth Testing
Depending on your deployment, consider separate coverage for authentication and guest access, room passwords or lobby admission, chat search, private messages, screen sharing, microphone and camera controls, and reconnection after a network interruption.
These are recommendations, not claims about the seven passing cases. In the contributor’s investigation, additional private-message and chat-search scenarios were left outside the submitted suite after failures appeared during a source update. The relationship between those failures and observed bridge disconnects was not established. Treat them as separate investigation and testing work, not confirmed product defects.
Reusable Rules for Jitsi Meet Testing
Multiple scenarios need the same setup: open a room, enter a participant name, join, and later leave. Reusable Rules let you describe these steps once and use consistent behavior across the suite.
jitsi-open-room rule contains:wait up to 60 seconds until page contains "Start meeting" enter stored value "roomName" into "Enter room name" click button "Start meeting" wait up to 60 seconds until page contains "Enter your name"
jitsi-join-conference rule then enters the participant’s name and verifies the new room:enter stored value "participantName" into "Enter your name" click button "Join meeting" wait up to 60 seconds until page does not contain button "Join meeting" check that url contains stored value "roomName" check that page contains stored value from "participantName" hover over the middle of the screen
Other rules open the chat and polls panels, open a message’s options menu, and leave the meeting. These shared steps are easier to maintain when the interface changes. The examples use the precise labels from the reference environment; review them against your deployment.
Jitsi Meet Testing Tips for Reliable Automation
- Assert on the receiving participant’s screen. A successful send or click is weaker evidence than a peer receiving the intended change.
- Create unique rooms and message content. Fresh values reduce conflicts with earlier runs and allow more meaningful negative assertions.
- Keep browser roles clear. Name sessions for their purpose, such as Host, Peer, and Witness; verify who receives moderator privileges.
- Wait for the result, not a fixed duration. A participant list, changed vote total, or deleted-message placeholder is a better condition than sleeping for an arbitrary number of seconds.
- Target the intended UI area. Participant names may appear in tiles, panels, and dialogs. An assertion about a dialog should not accidentally pass because of background content.
- Distinguish meeting behavior from exit behavior. Leaving, being removed, and the page shown after hang-up are related but separate outcomes.
- Do not mistake muted UI testing for media testing. Use real media paths, device permissions, and suitable monitoring when testing audio, video, or connection recovery.
- Reset or isolate test state. Room history, local settings, retained sessions, and reused test accounts can affect later executions.
When to Run Your Jitsi Meet Testing Suite
Run a short smoke suite after deployments and important configuration changes. Use broader collaborative regression tests before releases, after changes to chat, polls, roles, or room history, and when upgrading components that affect signaling.
For a self-hosted service, schedule separate media and network tests when changing bridge configuration, firewall rules, TURN setup, or the infrastructure serving real participants. Browser UI checks and media-path checks answer different questions, so a pass in one should not substitute for the other.
Jitsi Meet Testing for Development Teams: Git, Docker, and CI/CD
You do not need to work on Jitsi Meet’s source code to use a testRigor suite against your own staging deployment. However, development teams may want to keep their test definitions in Git and run them from a controlled environment.
The example community PR #18396 added seven cases under tests/E2E/test-cases/, six reusable rules under tests/E2E/rules/, and an opt-in GitHub Actions workflow. Its installer builds the frontend from the selected commit and pairs it with the pinned Docker backend release. Before running browsers, it checks HTTP availability, the served source revision, and XMPP room/chat signaling.
The contributor’s README and implementation document a local runner using the testRigor CLI. The high-level sequence is to configure a dedicated suite, prepare the local instance, and run the sequential browser cases:
tests/E2E/README.md, the commands are:npm install --global @testrigor/[email protected] bash tests/E2E/scripts/install-jitsi-meet.sh bash tests/E2E/scripts/run-ci.sh
This is not a standalone installation recipe: the scripts belong to the PR’s files and require its documented environment variables, Docker services, and testRigor credentials. The local Jitsi instance is reached by testRigor’s cloud browsers through the CLI localhost tunnel. A working HTTP/XMPP readiness check does not prove a functioning WebRTC media path.
Opt-in GitHub Actions
The contribution also defines a browser workflow that reads TESTRIGOR_SUITE_ID from a repository variable and TESTRIGOR_CI_TOKEN from a secret. It permits configured, same-repository pull requests targeting the default branch and manual dispatches from that branch. Pull requests from forks and repositories without the required settings skip browser execution.
The runner requires seven distinct passing JUnit cases with no failures, errors, or skips. It saves a JUnit report and a manifest of the tested source and definitions, and it can collect sanitized container logs when failures occur. One successful execution is available as evidence.
Conclusion
Reliable video meetings require more than a page that loads and a Join button that works. Participants need to see accurate poll totals, receive chat changes, trust moderation controls, and return to the correct room. Those are real user journeys, and they deserve tests that observe both sides of an interaction.
A practical Jitsi Meet testing strategy combines code and integration checks with browser tests that verify participant-visible outcomes. Begin with one multi-participant workflow, such as changing a poll vote, then add the collaboration features most important to your organization.
Keep the scope explicit. The seven demonstrated cases provide evidence about the configured UI and signaling workflows; real audio and video quality require separate end-to-end media validation. Together, these layers give teams a clearer picture of the meeting experience people actually rely on.
| Achieve More Than 90% Test Automation | |
| Step by Step Walkthroughs and Help | |
| 14 Day Free Trial, Cancel Anytime |