
Laravel Testing
 |
Software testing is the critical aspect of the entire web development process, as web applications are expected to be reliable, secure, and bug-free. As today’s applications are more complex, it becomes challenging to ensure every feature and component works. By testing applications, bugs can be identified early for developers to fix, thus maintaining the code quality and ensuring that new changes in the application do not affect the existing functionality.
Laravel, one of the most popular PHP frameworks, provides a powerful and elegant testing environment out of the box.
| Key Takeaways: |
|---|
|
This article explores Laravel testing in detail, including its importance, testing types, setup process, testing tools, best practices, and practical examples.
Overview of Laravel Testing
- Unit Testing
- Feature Testing
- HTTP Testing
- Database Testing
- API Testing
- Browser Testing with Laravel Dusk
- Mocking and Fakes
tests directory, which is divided into:tests/ ├── Feature/ └── Unit/
The Feature directory has feature tests to verify complete application workflows.
The Unit folder stores unit tests that focus on isolated pieces of code.
Laravel includes PHPUnit by default and provides helper methods that reduce boilerplate code.
Laravel Unit Testing
As you already know, unit testing’s main purpose is to test specific functions of your application to ensure it works correctly across many different scenarios. A good example would be testing a function that formats an email for an email field. The idea of unit tests is that they run quickly, and, therefore, it is faster to write unit tests than to test that the function works manually.
Laravel comes with PHPUnit included out of the box. Moreover, the phpunit.xml file is already included and built correctly for your application. The unit tests are in Tests/Unit/ folder and are designed to test specific isolated functions of an application and execute quickly.
- Service classes
- Helper functions
- Custom libraries
- Business logic methods
A unit test should not depend on databases, APIs, or external services.
<?php declare(strict_types=1);

use PHPUnit\Framework\TestCase;

final class StackTest extends TestCase
{
  public function testPushAndPop(): void
  {
    $stack = [];
    $this->assertSame(0, count($stack));
    array_push($stack, 'foo');
    $this->assertSame('foo', $stack[count($stack)-1]);
    $this->assertSame(1, count($stack));
    $this->assertSame('foo', array_pop($stack));
    $this->assertSame(0, count($stack));
  }
}
Benefits of Unit Testing
- Fast execution
- Easier debugging
- Better code architecture
- Supports refactoring
Unit tests should focus on one behavior at a time.
Laravel Integration Testing
Integration testing in Laravel is also known as Feature testing. It allows you to test larger portions of your code, including how several objects interact, complete HTTP requests, database transactions, and authentication flows. Contrary to unit tests that isolate a single class or method, feature testing simulates actual use behavior or API consumption to ensure that integration of different components is working perfectly.
Integration (Feature) tests are designed to help to test the integration of different components in action, such as a form, an API, or integration with a 3rd party system, like the one to calculate tax.
- HTTP tests to test APIs
- Database test helper functionality to do basic things like resetting the DB or seeding it
- Browser tests
HTTP Testing
GET Request
$response = $this->get('/dashboard');

POST Request
$response = $this->post('/login', [
    'email' => '[email protected]',
    'password' => 'password'
]);

PUT Request
$response = $this->put('/profile', [
    'name' => 'John Doe'
]);

DELETE Request
$response = $this->delete('/posts/1');
- Status codes
- Redirects
- Session data
- Validation errors
- JSON responses
$response->assertRedirect('/dashboard');
<?php
namespace Tests\Feature;
use Illuminate\Foundation\Testing\RefreshDatabase;
use Illuminate\Foundation\Testing\WithoutMiddleware;
use Tests\TestCase;

class ExampleTest extends TestCase
{
  /**
  * A basic test example.
  *
  * @return void
  */
  public function test_a_basic_request()
  {
    $response = $this->get('/');
    $response->assertStatus(200);
  }
}
Database Testing
- RefreshDatabase Trait
This trait resets the database before each test and is used as follows:
class UserTest extends TestCase
{
    use RefreshDatabase;
  //test
}
An example of a database refresh would look like this:<?php namespace Tests\Feature; use Illuminate\Foundation\Testing\RefreshDatabase; use Illuminate\Foundation\Testing\WithoutMiddleware; use Tests\TestCase; class ExampleTest extends TestCase { useRefreshDatabase; /** * A basic functional test example. * * @return void */ public function test_basic_example() { $response = $this->get('/'); // ... } } - Testing Database Records
Here are the assertions used to verify data integrity.
$user = User::factory()->create([
    'name' => 'John Doe'
]);
$this->assertDatabaseHas('users', [
    'name' => 'John Doe'
]);
//Checking record deletion:
$this->assertDatabaseMissing('users', [
    'id' => $user->id
]);
Testing Authentication
Authentication is the starting point of most web applications. You cannot use the application without authenticating yourself. Therefore, testing authentication for any application is critical.
Authentication testing in Laravel is a straightforward process.
- Acting as a User
$user = User::factory()->create();
$this->actingAs($user);
In this code, a user is created using theUser::factory(), and then it is assigned as “acting as a user”. - Testing authenticated access:
public function test_authenticated_user_can_access_dashboard()
{
    $user = User::factory()->create();
    $response = $this->actingAs($user)
                     ->get('/dashboard');
    $response->assertStatus(200);
}
This code uses an assertion to check if the user has access to the dashboard. - Testing guest restrictions:
public function test_guest_cannot_access_dashboard()
{
    $response = $this->get('/dashboard');
    $response->assertRedirect('/login');
}
In this code, the restriction that ‘guest user cannot access the dashboard’ is tested.
These tests ensure authorization rules are working correctly.
API Testing
Many Laravel applications expose REST APIs; therefore, testing these APIs is important. With Laravel, API testing is rather simple.
$response = $this->getJson('/api/users');
$response->assertStatus(200);
The code checks if the response is correct by checking the status code.
$response->assertJsonStructure([
    '*' => [
        'id',
        'name',
        'email'
    ]
]);
$response->assertJson([
    'name' => 'John Doe'
]);
The code above checks the content of the name field. Likewise, you can also check other fields in the JSON structure.
These tests help ensure API consistency.
Laravel End-to-End Testing
End-to-end testing tests your flows on your website, the way end-users would.
- Laravel Dusk
- Any Selenium-based framework out there
- testRigor
We won’t go into Selenium-based stuff since it is nightmarishly complex, and you can learn about Selenium everywhere.
We will get into more details of both in the next section.
Laravel Dusk
Laravel Dusk is an abstraction on top of ChromeDriver to build tests in code. It provides an expressive, easy-to-use browser automation and end-to-end (E2E) testing API for your application. Here you can use a standalone ChromeDriver, which eliminates the need to install complex software such as the JDK or Selenium, enabling you to simulate real user interactions, such as clicking, typing, and navigating.
<?php
namespace Tests\Browser;
use App\Models\User;
use Illuminate\Foundation\Testing\DatabaseMigrations;
use Laravel\Dusk\Chrome;
use Tests\DuskTestCase;

class ExampleTest extends DuskTestCase
{
  use DatabaseMigrations;
  /**
  * A basic browser test example.
  *
  * @return void
  */
  public function test_basic_example()
  {
    $user = User::factory()->create([
        'email' => '[email protected]',
    ]);
    $this->browse(function ($browser) use ($user) {
        $browser->visit('/login')
            ->type('email', $user->email)
            ->type('password', 'password')
            ->press('Login')
            ->assertPathIs('/home');
    });
  }
}
You can refer to buttons by their text, or by Dusk/CSS Selectors described here. Unfortunately, if you change your code from a button to an a-tag, you need to migrate to using click instead of press. Form interaction relies on the same Dusk Selectors or names of the elements.
You can mock things, and it is described here. You can mock functions and programmatic constructs as you’d expect to be able to do for a unit test.
- You’ll need a way to run your tests – probably a more powerful CI server
- Dusk doesn’t cover a lot of important parts of end-to-end tests, like email testing or 2FA logins
- You’ll constantly need to battle with ChromeDriver getting out of date with the Chrome you have installed on your machine, since Chrome auto-updates
- Real browser interaction
- UI verification
- JavaScript testing
- End-to-end workflow validation
testRigor
testRigor is a declarative way to build tests, designed purely for end-to-end testing. It is less applicable for unit/integration testing. However, it is orders of magnitude more powerful for end-to-end tests.
- Run those tests on web and mobile browsers with just a config change
- Support email testing, validation, and manipulation (like clicking a link in the email)
- 2FA-based logins with Gmail, SMS, Email, etc.
You can click on elements with click "Submit", enter data with enter "Peter" into "First Name" and validate with check that page contains "Welcome, Peter!"
login
check that URL ends with "/home"
login is a built-in testRigor function that would log you in regardless of how login is implemented. Or, for the sign-up flow, the test might look like this:click "Sign up"
generate unique email and enter it into "Email", then save it as "generatedEmail"
generate unique name and enter it into "Name", then save it as "generatedName"
enter "PasswordSuperSecure" into "Password"
click "Submit"
check that email to stored value "generatedEmail" was delivered
click "Confirm email"
check that page contains "Email was confirmed"
check that page contains expression "Hello, ${generatedName}"
Finally, testRigor works differently with forms and tables. It simulates how a user would express the steps. Therefore, it would, for instance, associate labels with inputs so that you can always refer to an input by some visible text like a label (or text that looks like a label) or a placeholder. For the tables, it helps even more by enabling things like:
check that table at the row containing stored value "myId" and column "Status" contains "Paid"
This will work regardless of whether the table is rendered as an HTML table or a div-based table.
As you can see, it is very much declarative and completely abstracted from the application’s code. This might be handy if you need to approve how things work with a customer or involve other people in building tests for your app.
How to do End-to-end Testing with testRigor
Let us take the example of an e-commerce website that sells plants and other gardening needs. We will create end-to-end test cases in testRigor using plain English test steps.
Step 1: Log in to your testRigor app with your credentials.
Step 2: Set up the test suite for the website testing by providing the information below:
- Test Suite Name: Provide a relevant and self-explanatory name.
- Type of testing: Select from the following options: Desktop Web Testing, Mobile Web Testing, Native and Hybrid Mobile, based on your test requirements.
- URL to run test on: Provide the application URL that you want to test.
- Testing credentials for your web/mobile app to test functionality which requires user to login: You can provide the app’s user login credentials here and need not write them separately in the test steps then. The login functionality will be taken care of automatically using the keyword
login. - OS and Browser: Choose the OS Browser combination on which you want to run the test cases.
- Number of test cases to generate using AI: If you wish, you can choose to generate test cases based on the App Description text, which works on generative AI.
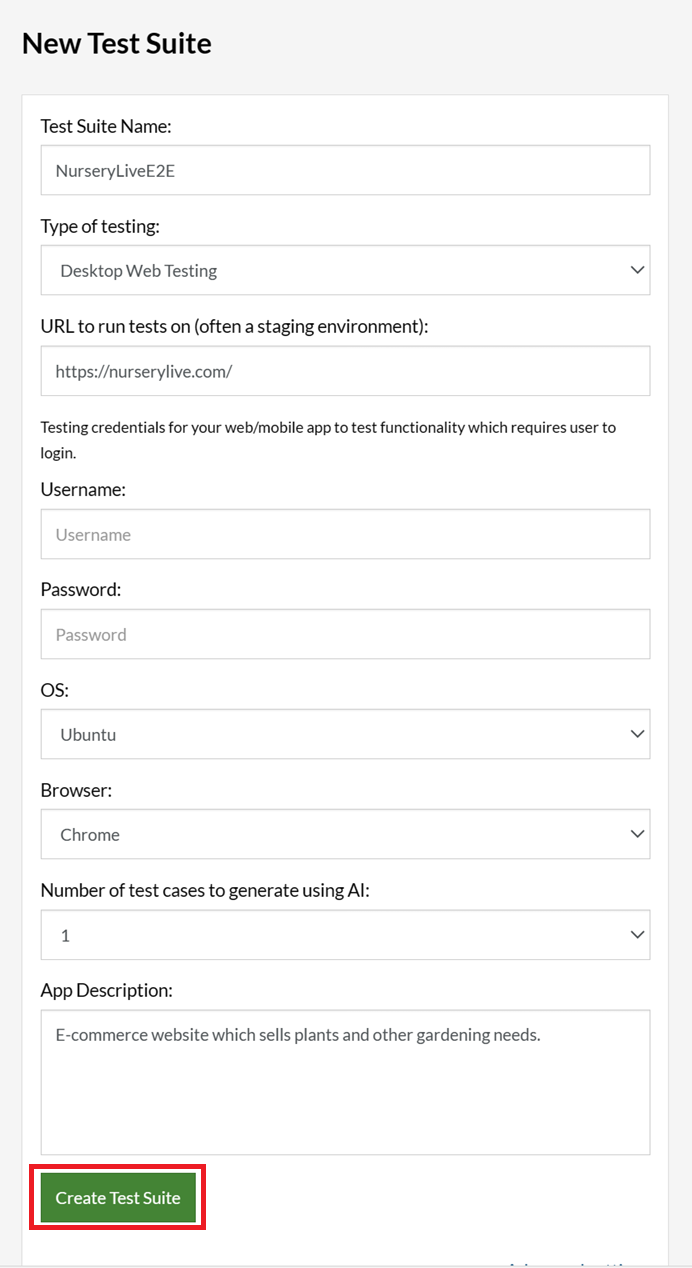
Step 3: Click Create Test Suite.
On the next screen, you can let AI generate the test case based on the App Description you provided during the Test Suite creation. However, for now, select do not generate any test, since we will write the test steps ourselves.
Step 4: To create a new custom test case yourself, click Add Custom Test Case.
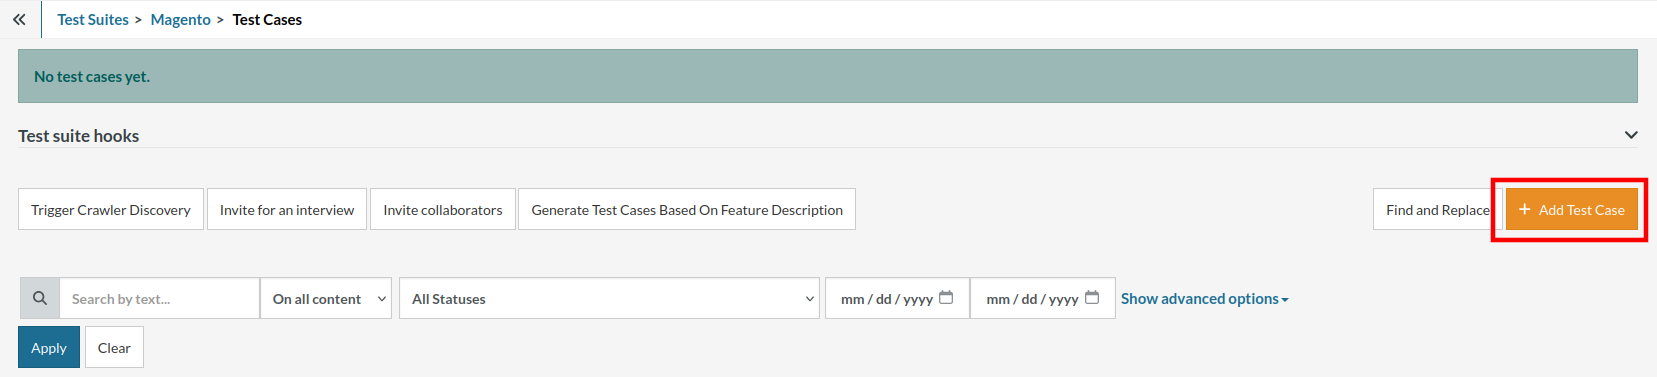
Step 5: Provide the test case Description and start adding the test steps.
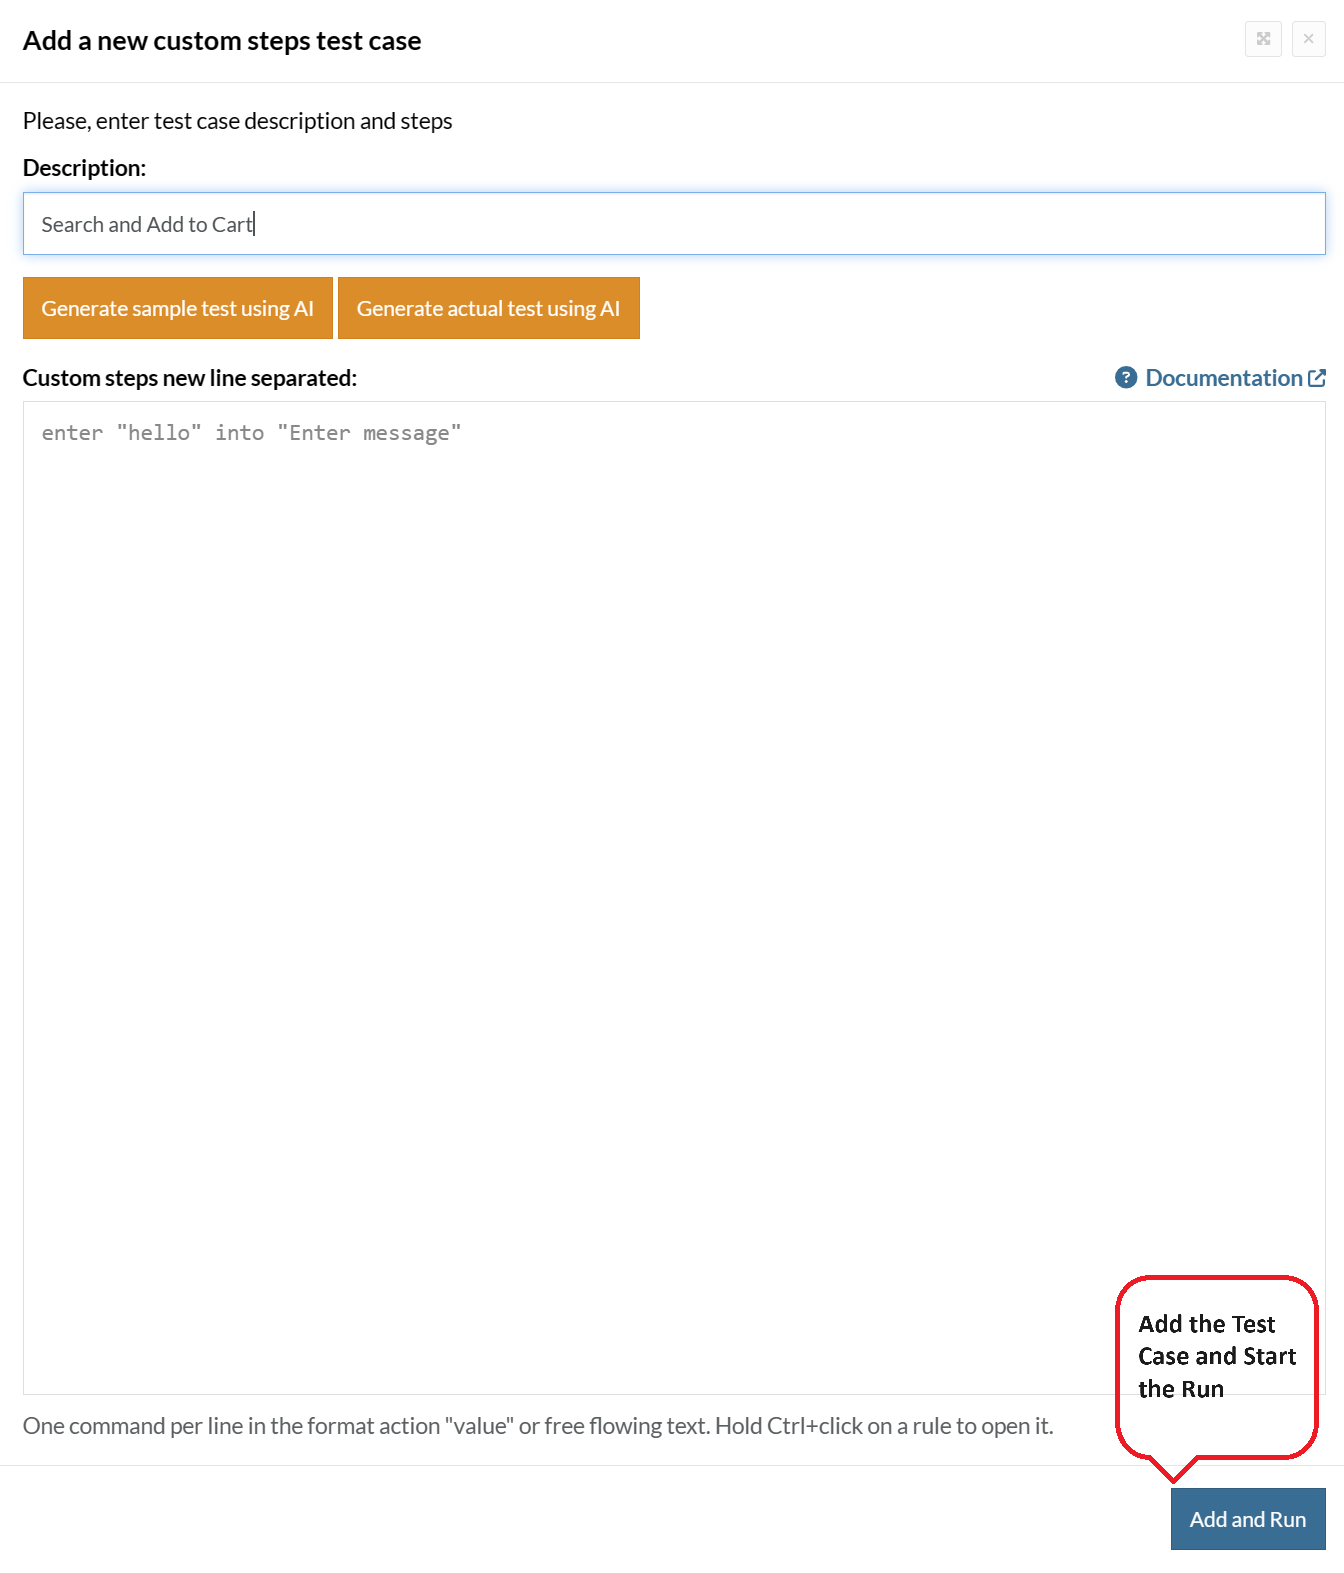
For the application under test, i.e., e-commerce website, we will perform below test steps:
- Search for a product
- Add it to the cart
- Verify that the product is present in the cart
Test Case: Search and Add to Cart
Step 1: We will add test steps on the test case editor screen one by one.
testRigor automatically navigates to the website URL you provided during the Test Suite creation. There is no need to use any separate function for it. Here is the website homepage, which we intend to test.
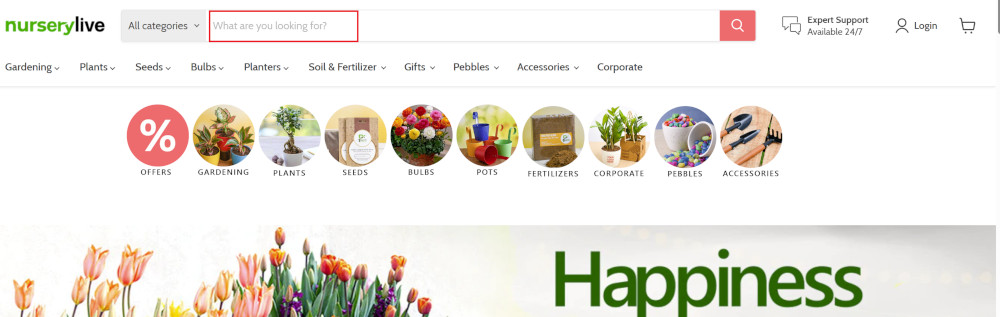
First, we want to search for a product in the search box. Unlike traditional testing tools, you can identify the UI element using the text you see on the screen. You need not use any CSS/XPath identifiers.
click "What are you looking for?"
Step 2: Once the cursor is in the search box, we will type the product name (lily), and press enter to start the search.
type "lily"
enter enter
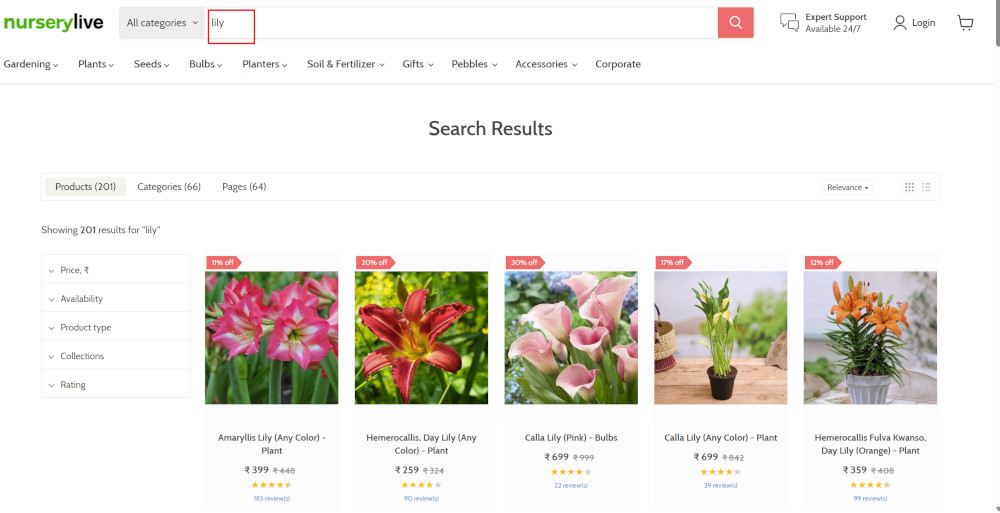
Search lists all products with the “lily” keyword on the webpage.
Step 3: The lily plant we are searching for needs the screen to be scrolled; for that testRigor provides a command. Scroll down until the product is present on the screen:
scroll down until page contains "Zephyranthes Lily, Rain Lily (Red)"
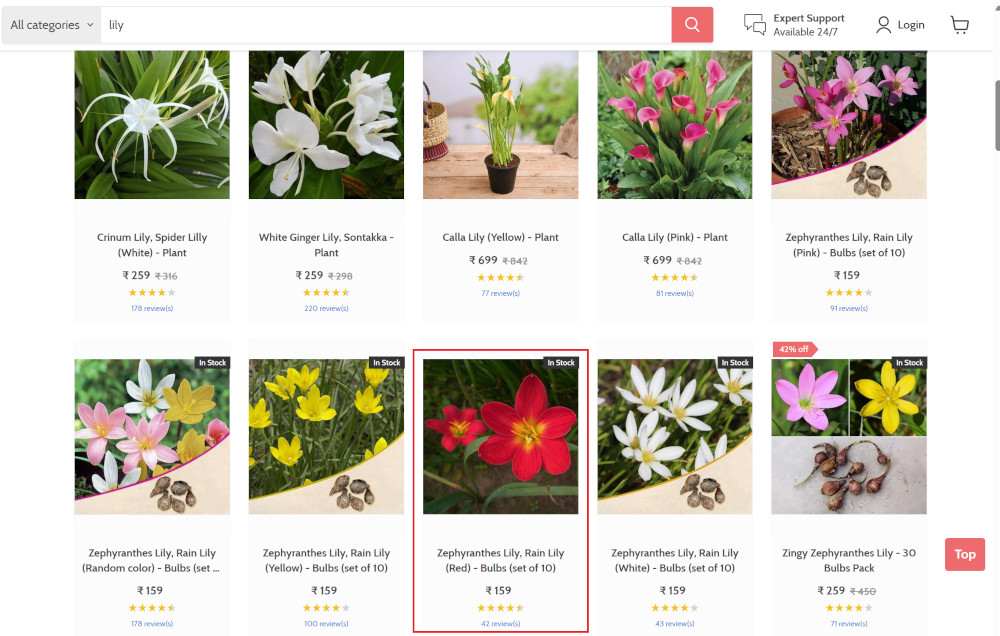
When the product is found on the screen, testRigor stops scrolling.
Step 4: Click on the product name to view the details:
click "Zephyranthes Lily, Rain Lily (Red)"
After the click, the product details are displayed on the screen as below, with the default Quantity as 1.
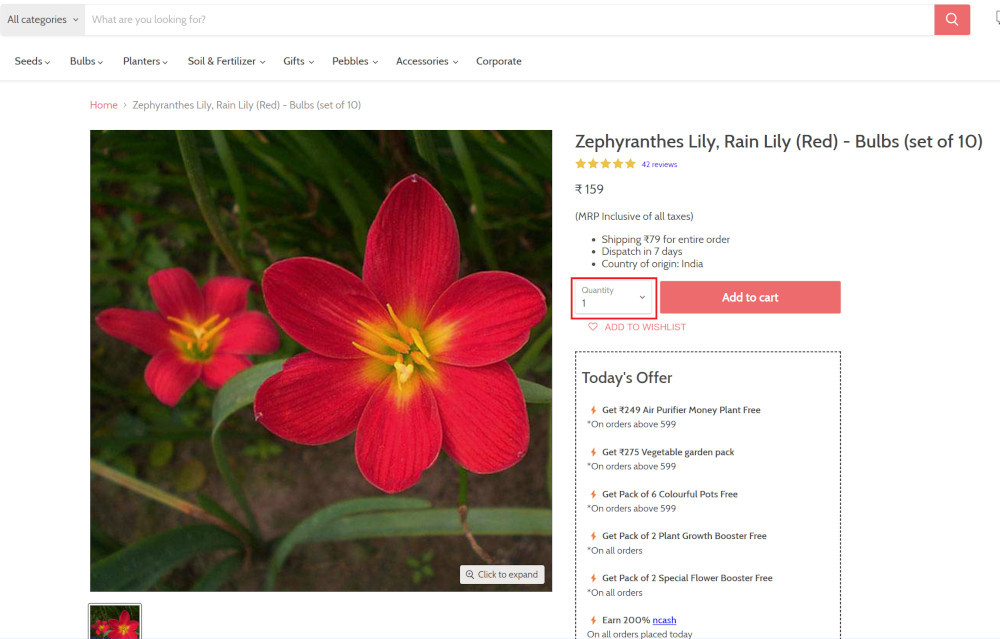
Step 5: Lets say, we want to change the Quantity to 3, so here we use the testRigor command to select from a list.
select "3" from "Quantity"
click "Add to cart"
The product is successfully added to the cart, and the “Added to your cart:” message is displayed on webpage.
Step 6: To assert that the message is successfully displayed, use a simple assertion command as below:
check that page contains "Added to your cart:"
Step 7: After this check, we will view the contents of the cart by clicking View cart as below:
click "View cart"
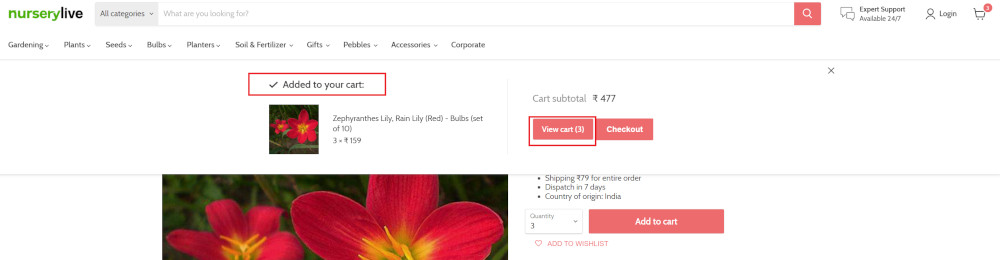
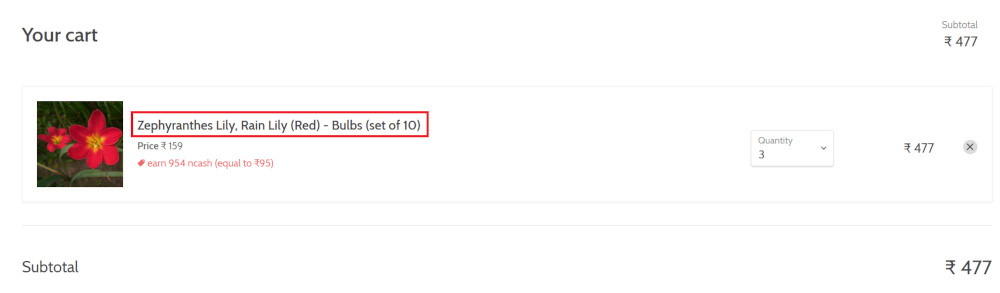
Step 8: Now we will again check that the product is present in the cart, under heading “Your cart” using the below assertion. With testRigor, it is really easy to specify the location of an element on the screen.
check that page contains "Zephyranthes Lily, Rain Lily (Red)" under "Your cart"
Complete Test Case
Here is how the complete test case will look in the testRigor app. The test steps are simple in plain English, enabling everyone in your team to write and execute them.
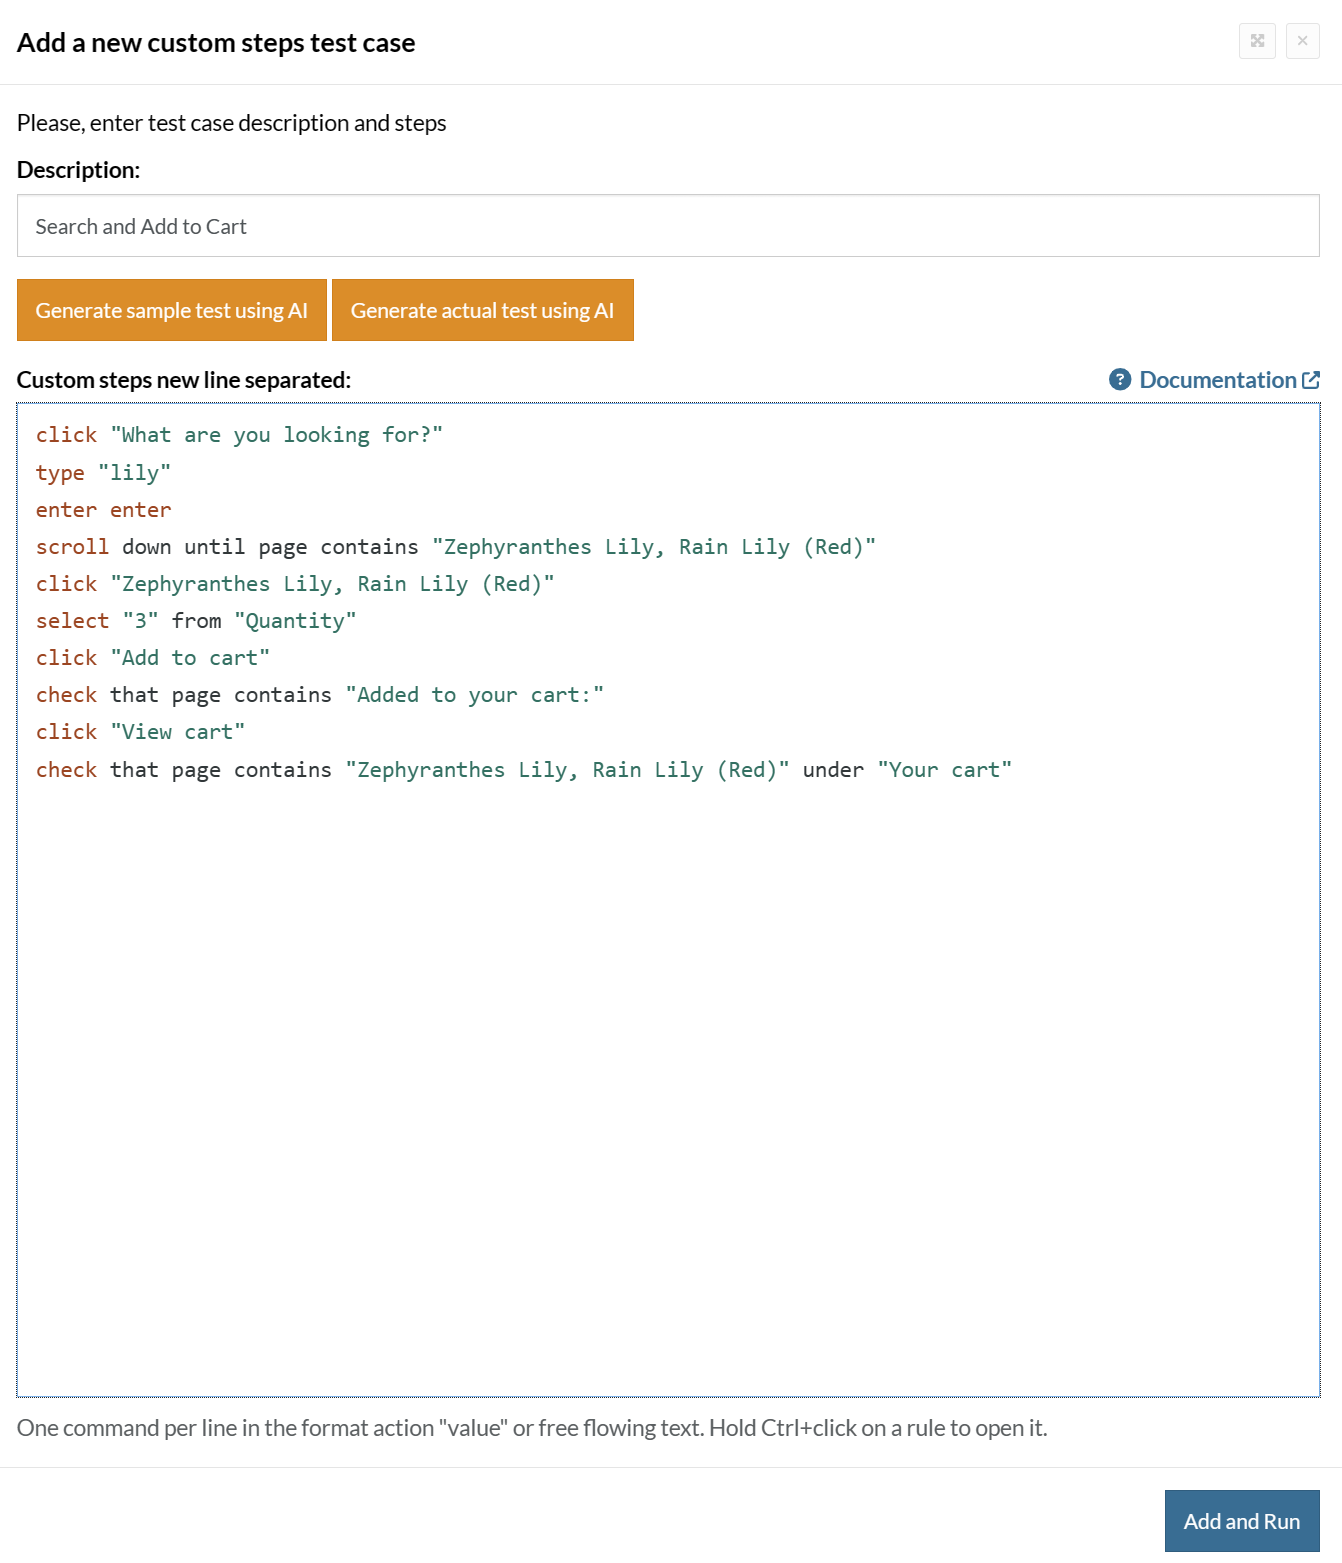
Click Add and Run.
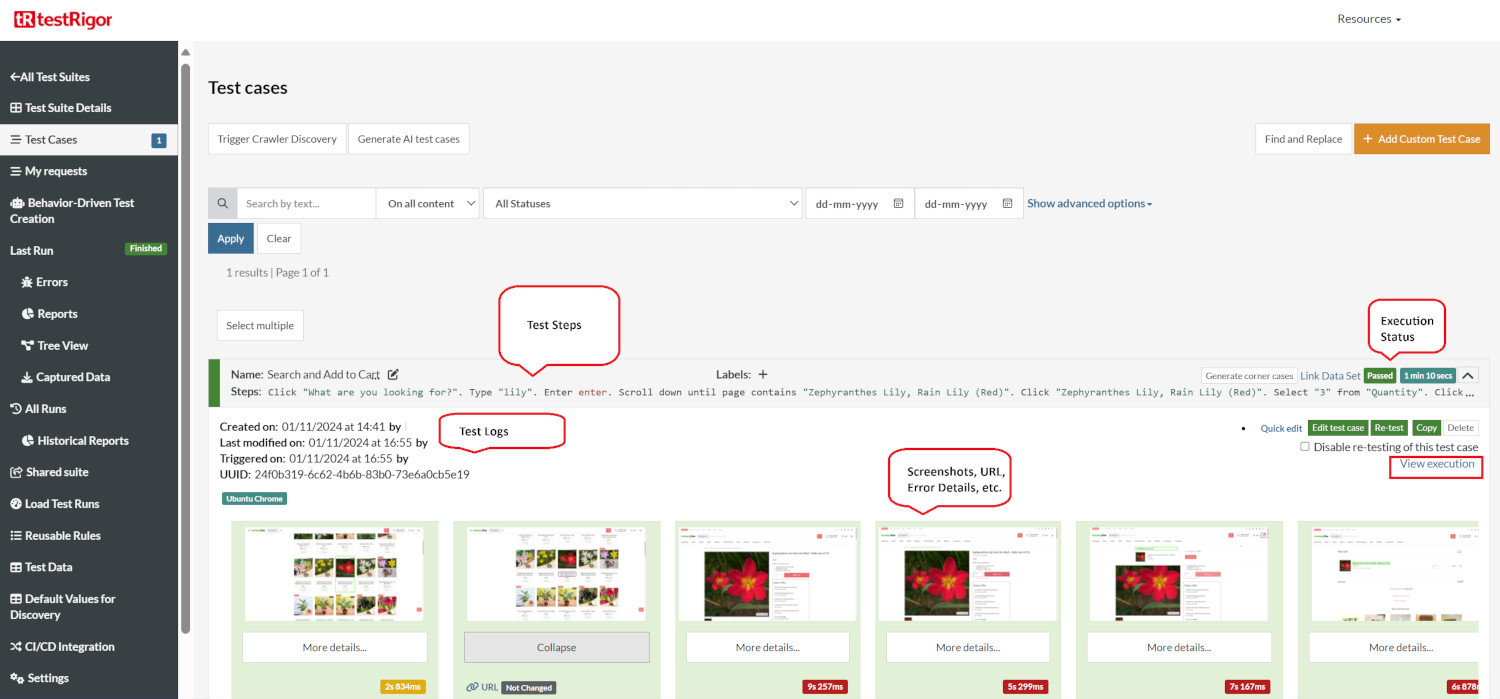
Execution Results
Once the test is executed, you can view the execution details, such as execution status, time spent in execution, screenshots, error messages, logs, video recordings of the test execution, etc. In case of any failure, there are logs and error text that are available easily in a few clicks.
You can also download the complete execution with steps and screenshots in PDF or Word format through the View Execution option.
testRigor’s Capabilities
Apart from the simplistic test case design and execution, there are some advanced features that help you test your application using simple English commands.
- Reusable Rules (Subroutines): You can easily create functions for the test steps that you use repeatedly. You can use the Reusable Rules to create such functions and call them in test cases by simply writing their names. See the example of Reusable Rules.
- Global Variables and Data Sets: You can import data from external files or create your own global variables and data sets in testRigor to use them in data-driven testing.
- 2FA, QR Code, and Captcha Resolution: testRigor easily manages the 2FA, QR Code, and Captcha resolution through its simple English commands.
- Email, Phone Call, and SMS Testing: Use simple English commands to test the email, phone calls, and SMS. These commands are useful for validating 2FA scenarios, with OTPs and authentication codes being sent to email, phone calls, or via phone text.
- File Upload/ Download Testing: Execute the test steps involving file download or file upload without the requirement of any third-party software. You can also validate the contents of the files using testRigor’s simple English commands.
- Database Testing: Execute database queries and validate the results fetched.
testRigor enables you to test web, mobile (hybrid, native), API, and desktop apps with minimum effort and maintenance.
Additional Resources
- Access testRigor documentation to know about more useful capabilities
- Top testRigor’s features
- How to perform end-to-end testing
Best Practices for Laravel Testing
Here are some of the best practices when you use Laravel for testing:
- Write Small Focused Tests: Ensure that each test verifies a single behavior.
For example,
test_login_and_profile_update_and_logout()verifies the entire login/logout and update process, which is not correct. Instead, you can have three different methods as follows:test_user_can_login()test_user_can_update_profile()test_user_can_logout()
- Use Factories: Do not create large datasets manually; instead, use factories.
- Keep Tests Independent: Tests should not rely on each other and should be independent as far as possible.
- Use Meaningful Names: Test names should be such that they describe the behavior of the test clearly and not randomly.
For example, the nametest_guest_cannot_create_post()clearly describes what the test will do. - Test Critical Business Logic: First, focus on important application behavior.
- Run Tests Frequently: Integrate tests into daily development workflows (CI/CD pipelines) so that they run continuously.
Conclusion
Laravel is one of the most developer-friendly testing ecosystems in modern web development. With its built-in support for unit testing, feature testing, database testing, API testing, browser automation, mocking, and fakes, developers can confidently build applications that are reliable, scalable, and maintainable.
Don’t view testing as an optional activity. It is a core part of the development process. By incorporating Laravel testing practices from the beginning of a project, teams can catch bugs early, improve software quality, and accelerate development cycles.
As Laravel continues to evolve, its testing tools remain among the framework’s strongest features, empowering developers to deliver high-quality software efficiently and consistently.
Frequently Asked Questions (FAQs)
- What are model factories in Laravel testing?
Model factories allow developers to generate test data quickly and consistently. They simplify the creation of database records for testing purposes without manually writing repetitive data.
- Can Laravel test REST APIs?
Yes. Laravel offers robust API testing capabilities, allowing developers to send HTTP requests, validate JSON responses, check status codes, and verify API endpoints using built-in testing methods.
- What are mocks and fakes in Laravel testing?
Mocks and fakes simulate external services and dependencies during testing. Laravel provides fakes for mail, notifications, queues, events, and storage, helping developers test functionality without relying on actual third-party services.
- How do I test authentication in Laravel?
Laravel provides methods like actingAs() to simulate authenticated users. This makes it easy to test login functionality, authorization rules, middleware, and protected routes.
| Achieve More Than 90% Test Automation | |
| Step by Step Walkthroughs and Help | |
| 14 Day Free Trial, Cancel Anytime |